6 min read
Overview
In the fast-paced yet often unpredictable world of Web3 engineering, teams consistently face considerable challenges when running hosted subgraphs, such as downtime, data lag, sluggish reindexes, slow queries, and the lack of direct support.
Enter Traceye, an enterprise-grade indexing tool developed by Zeeve for The Graph protocol, allowing for an easy, predictable and smooth experience for indexing and querying subgraphs. In this guide, we'll cover how to add the Traceye add-on to your QuickNode endpoint and then show you how to create and deploy a subgraph using Traceye. Let's get started!
What You Will Do
- Learn about Traceye
- Add the Traceye add-on to your QuickNode endpoint
- Create, deploy, and manage a subgraph using Traceye
What You Will Need
- Basic understanding of The Graph
- Graph-CLI installed
- A subgraph project ready to be indexed and hosted (check out this guide to learn how)
- A QuickNode Account
| Dependency | Version |
|---|---|
| node.js | 18.13.0 |
| graph-cli | 0.49.0 |
What is Traceye?
Zeeve, a provider of blockchain Infrastructure-as-a-Service, has introduced Traceye, a new tool designed for the indexing of blockchain ledger and smart contract data. Traceye is an enterprise-grade ready hosted graph solution that allows developers to deploy, index, and query subgraphs on a hosted service. Currently, if a network is not supported on The Graph's Hosted Service, you'll need to run your own graph node to index it. However, this can take extra engineering effort to set up and can be a mental burden to handle maintenance & issues. Traceye solves this problem by allowing developers to quickly deploy subgraphs in less than 5 minutes.
Key Benefits of Traceye
Features and key benefits of Traceye include:
- Ultrafast Indexing: Experience minimal data lag with our rapid indexing capabilities.
- Zero Maintenance: Say goodbye to the hassle of node maintenance.
- Reliability: 99.9% API SLA uptime.
- Added Value Services: Benefit from additional features like Webhooks, metrics, and more, enhancing your standard subgraph functionalities.
- Flexibility: Easily migrate subgraphs from other platforms.
Additional features include advanced metrics & performance insights, plus direct access to logs emitted from your subgraph.
In the next section, we'll cover how to add the Traceye add-on to your QuickNode account and walkthrough the Traceye dashboard.
Enable Traceye on a QuickNode Endpoint
First, log in to QuickNode (you can create a free account here), and then navigate to your endpoints. For this tutorial, you'll need an endpoint on Ethereum mainnet. Create one now if you don't yet have one.
Once you have your Ethereum mainnet endpoint set up, keep the HTTP Provider URL above handy, as you'll need it later.
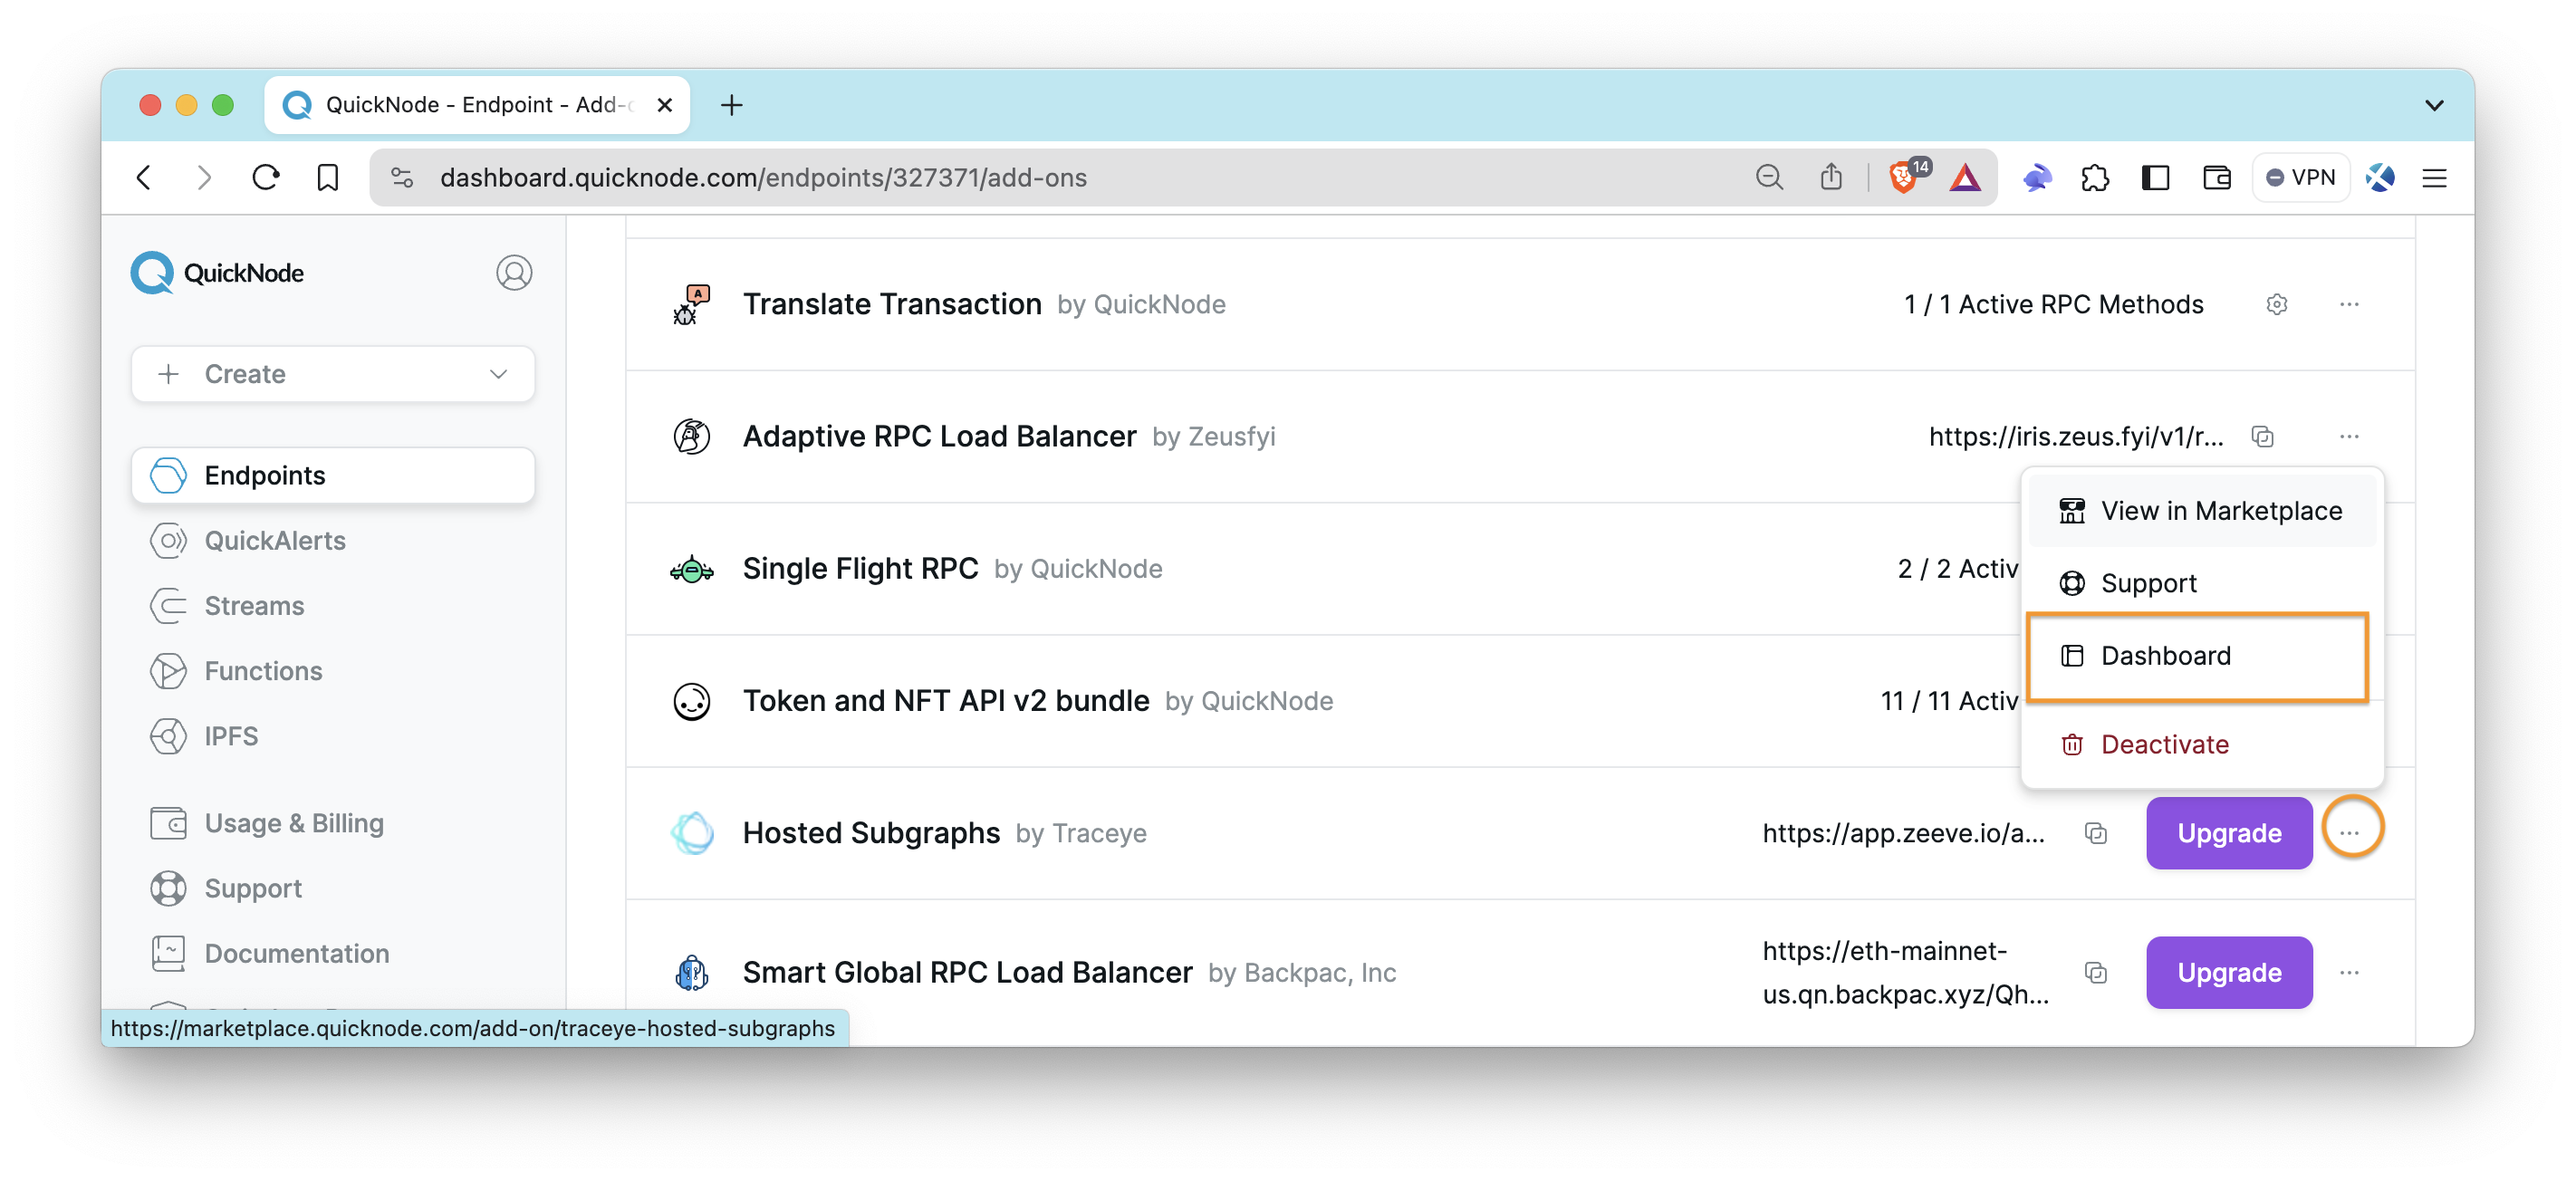
Then, on your endpoint page, click the Add-ons tab and then click the Explore button on the Traceye add-on. You'll see a pop-up box explaining pricing and which endpoints the add-on is compatible with. Once the add-on is enabled, you'll see it in your list of Installed Third-Party Add-Ons.
With the add-on installed, click the Dashboard button to be directed to Zeeve's Traceye dashboard:
Zeeve's Traceye Dashboard:
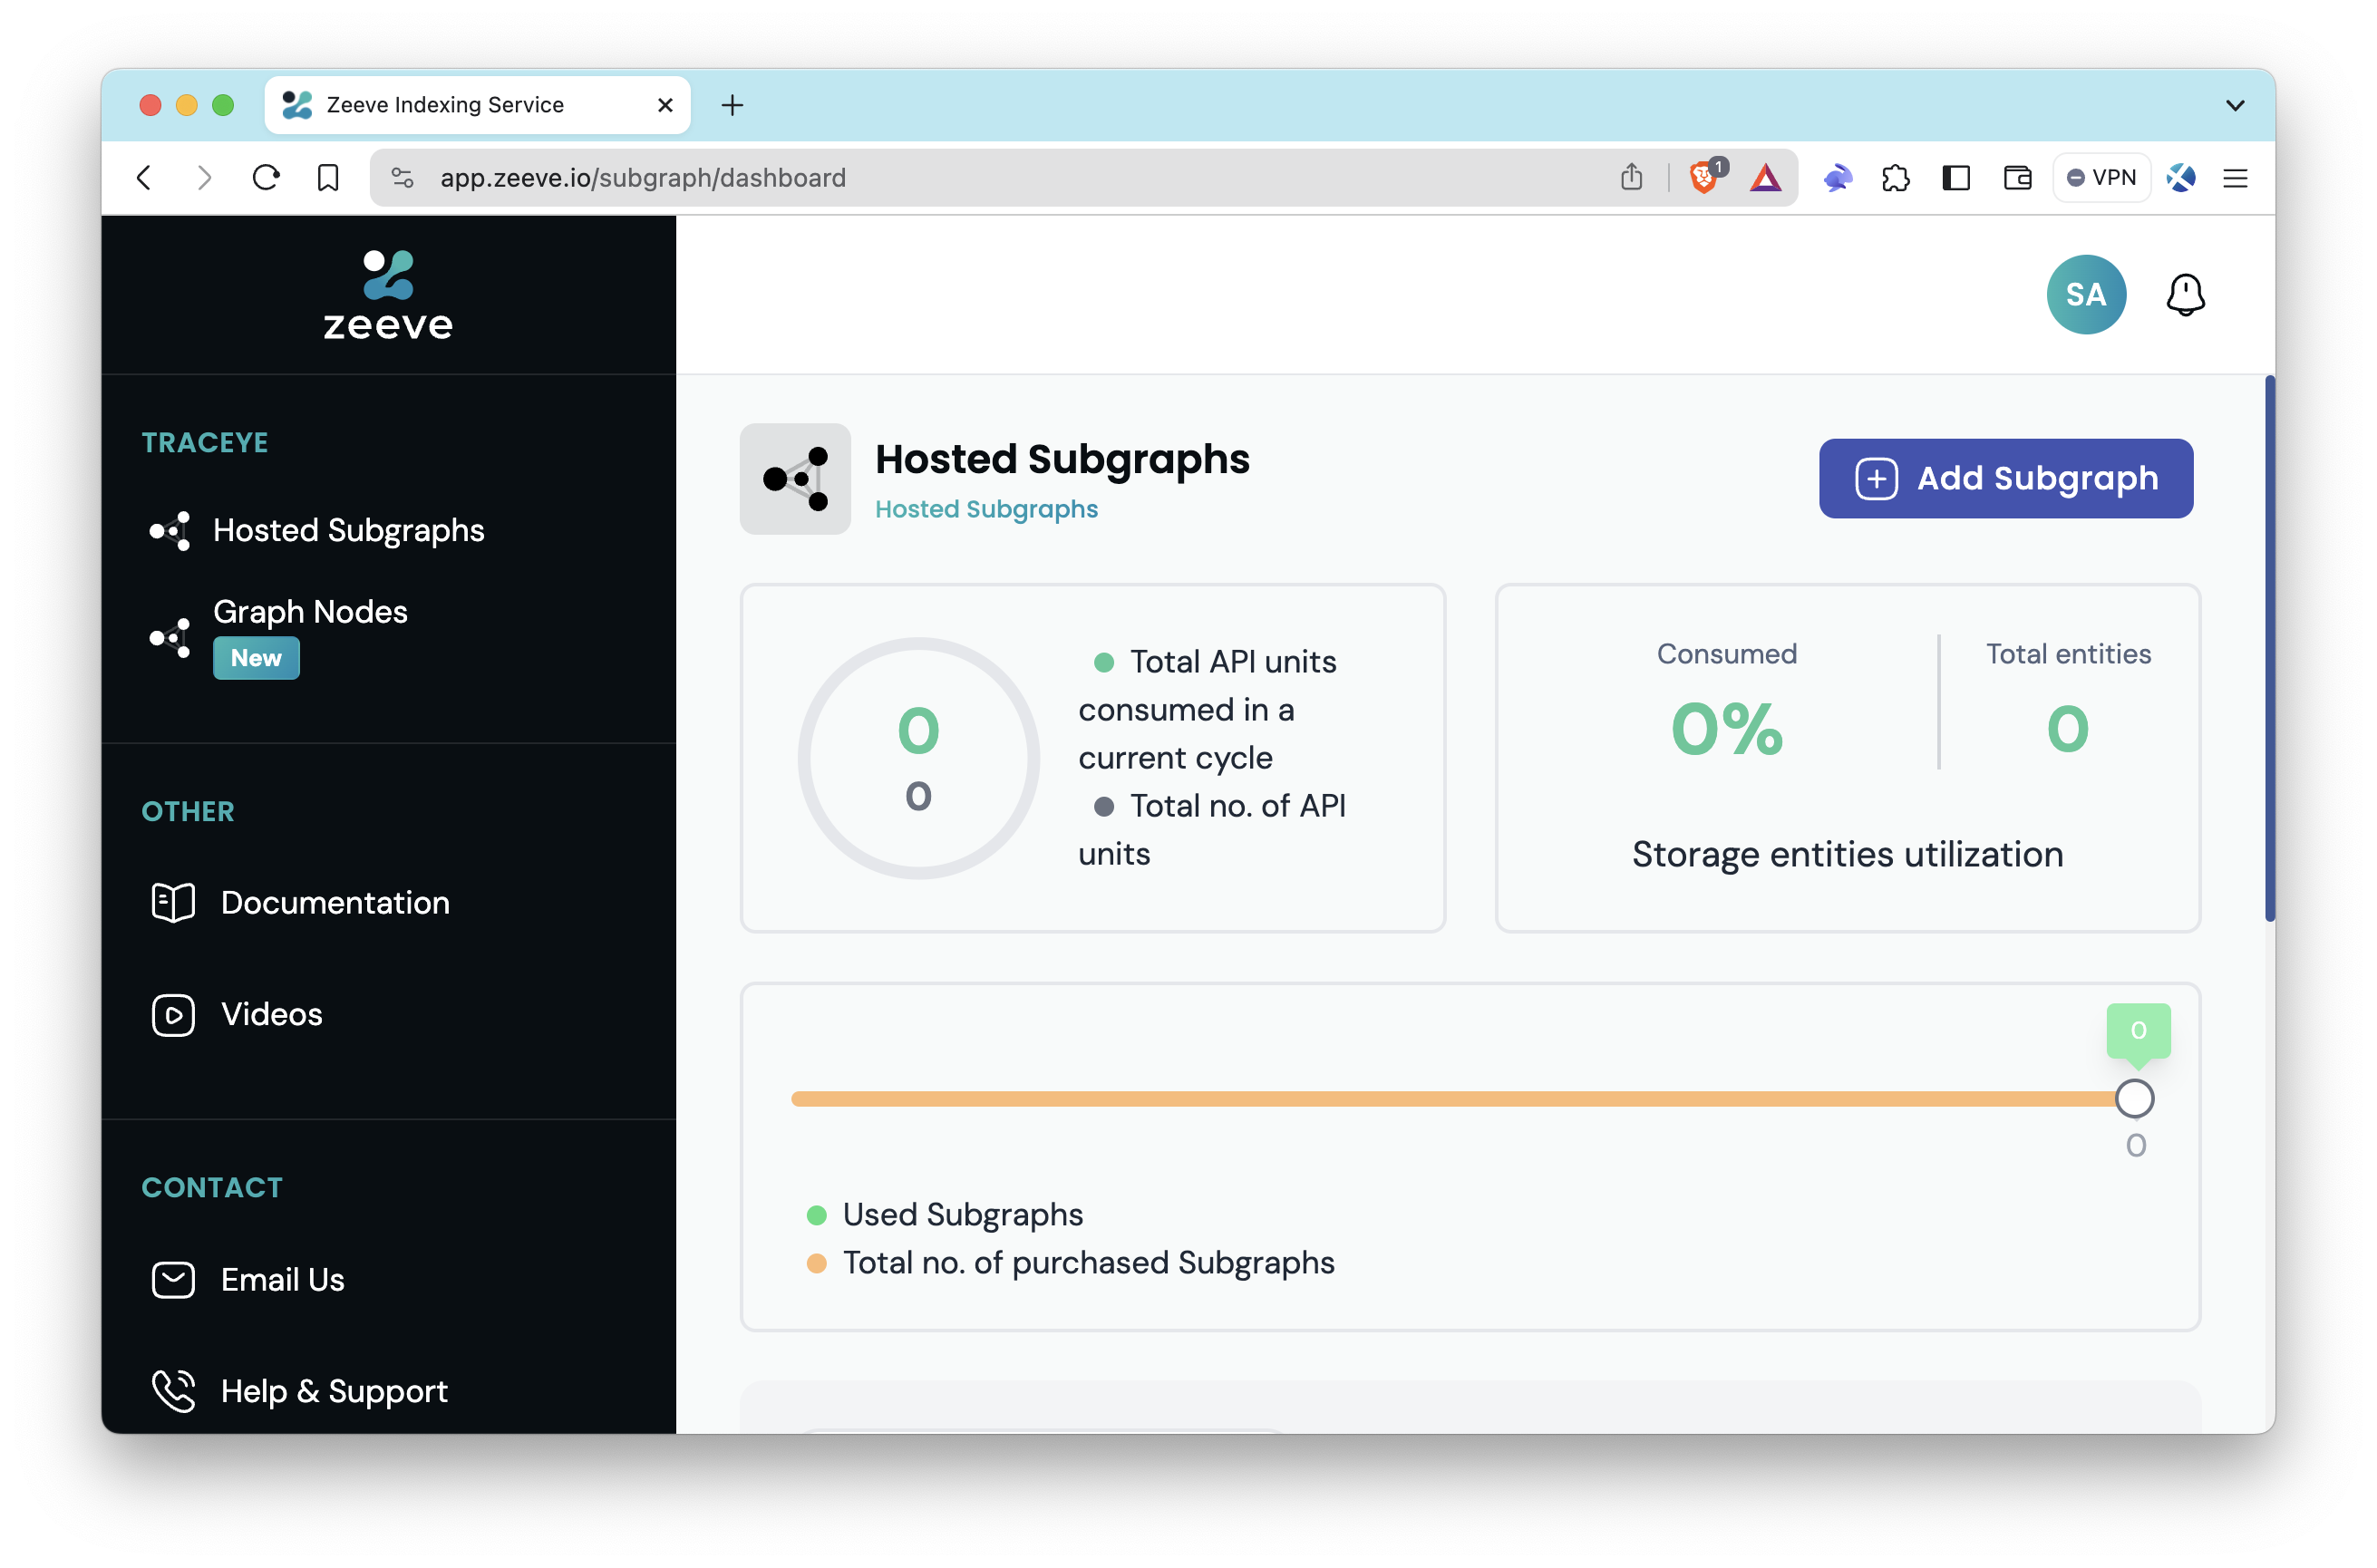
The Traceye dashboard above lets you quickly oversee the activity on your created subgraphs. In the following section, we'll show you how to create and deploy a subgraph on Traceye.
Create a Subgraph with Traceye
Now, within your Traceye dashboard, click the Add Subgraph button, select the Create New option, and you'll be prompted to input details about the subgraph's name, blockchain network, workspace, and which RPC endpoint you want to use with the subgraph.
Select the Custom option under the Blockchain Network and paste your endpoint's HTTP provider URL into the RPC Endpoints.
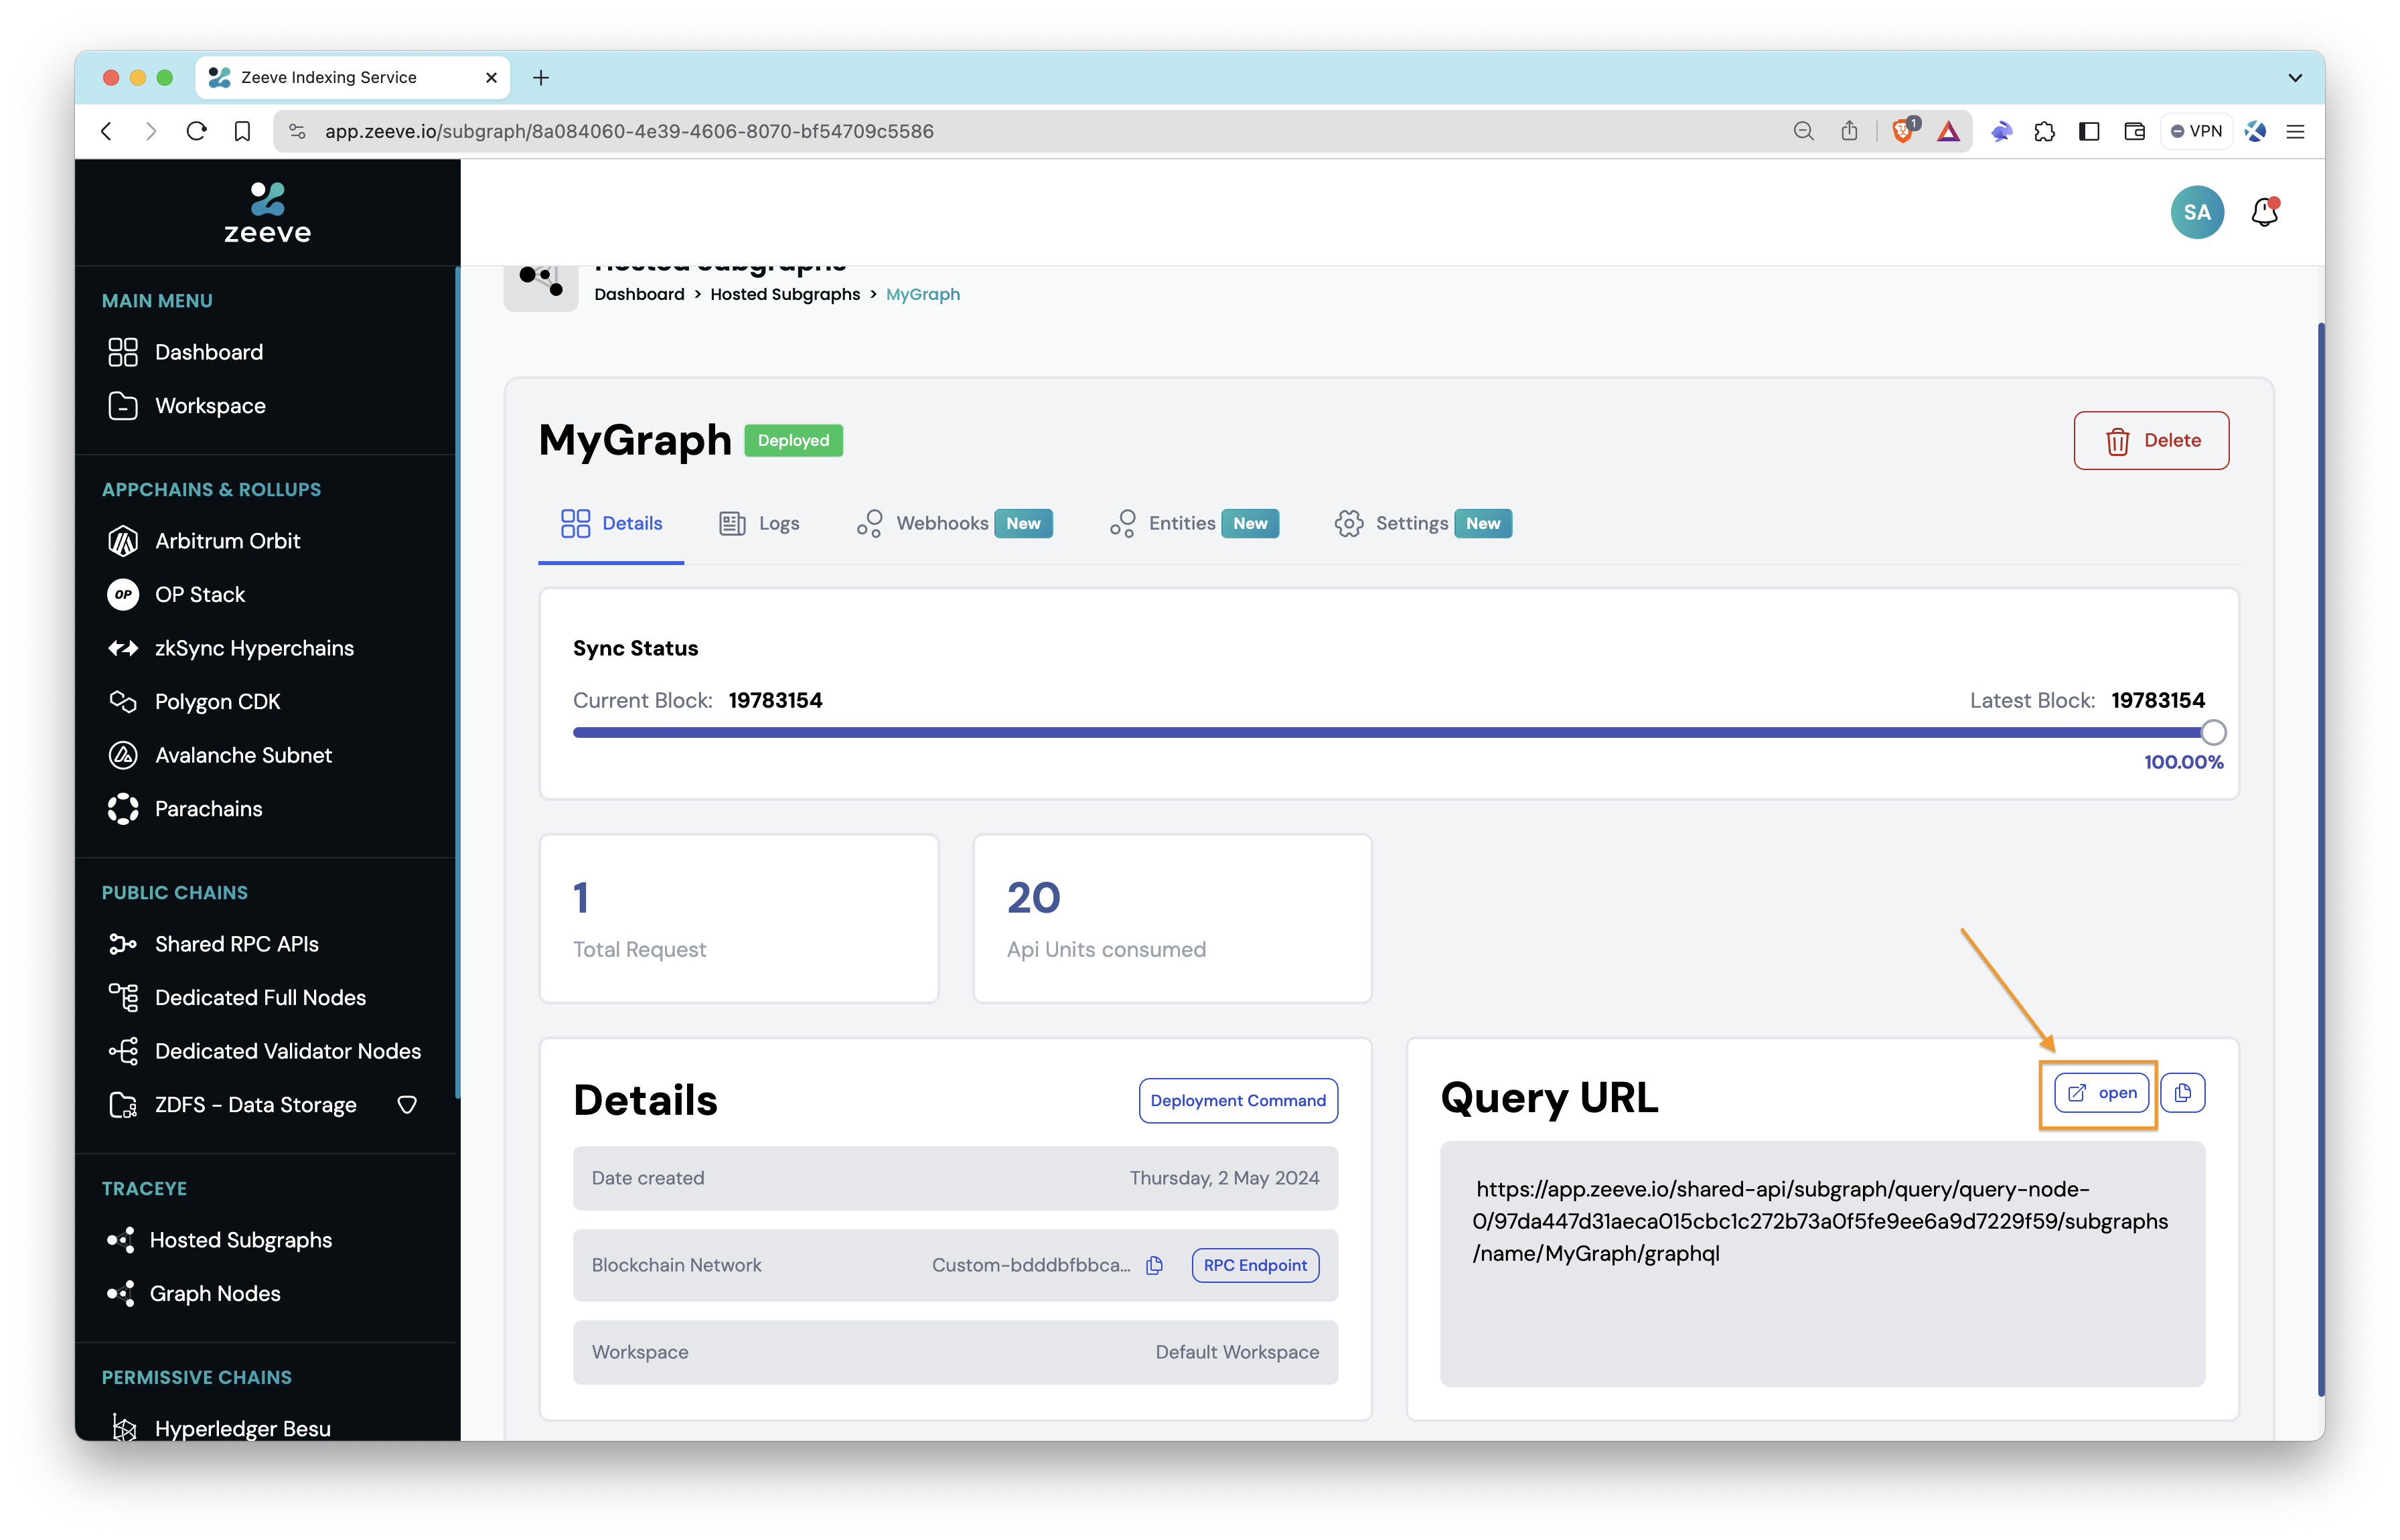
Upon creation of the subgraph, click your newly created subgraph on the dashboard, where you'll see statistics and the configuration of your subgraph:
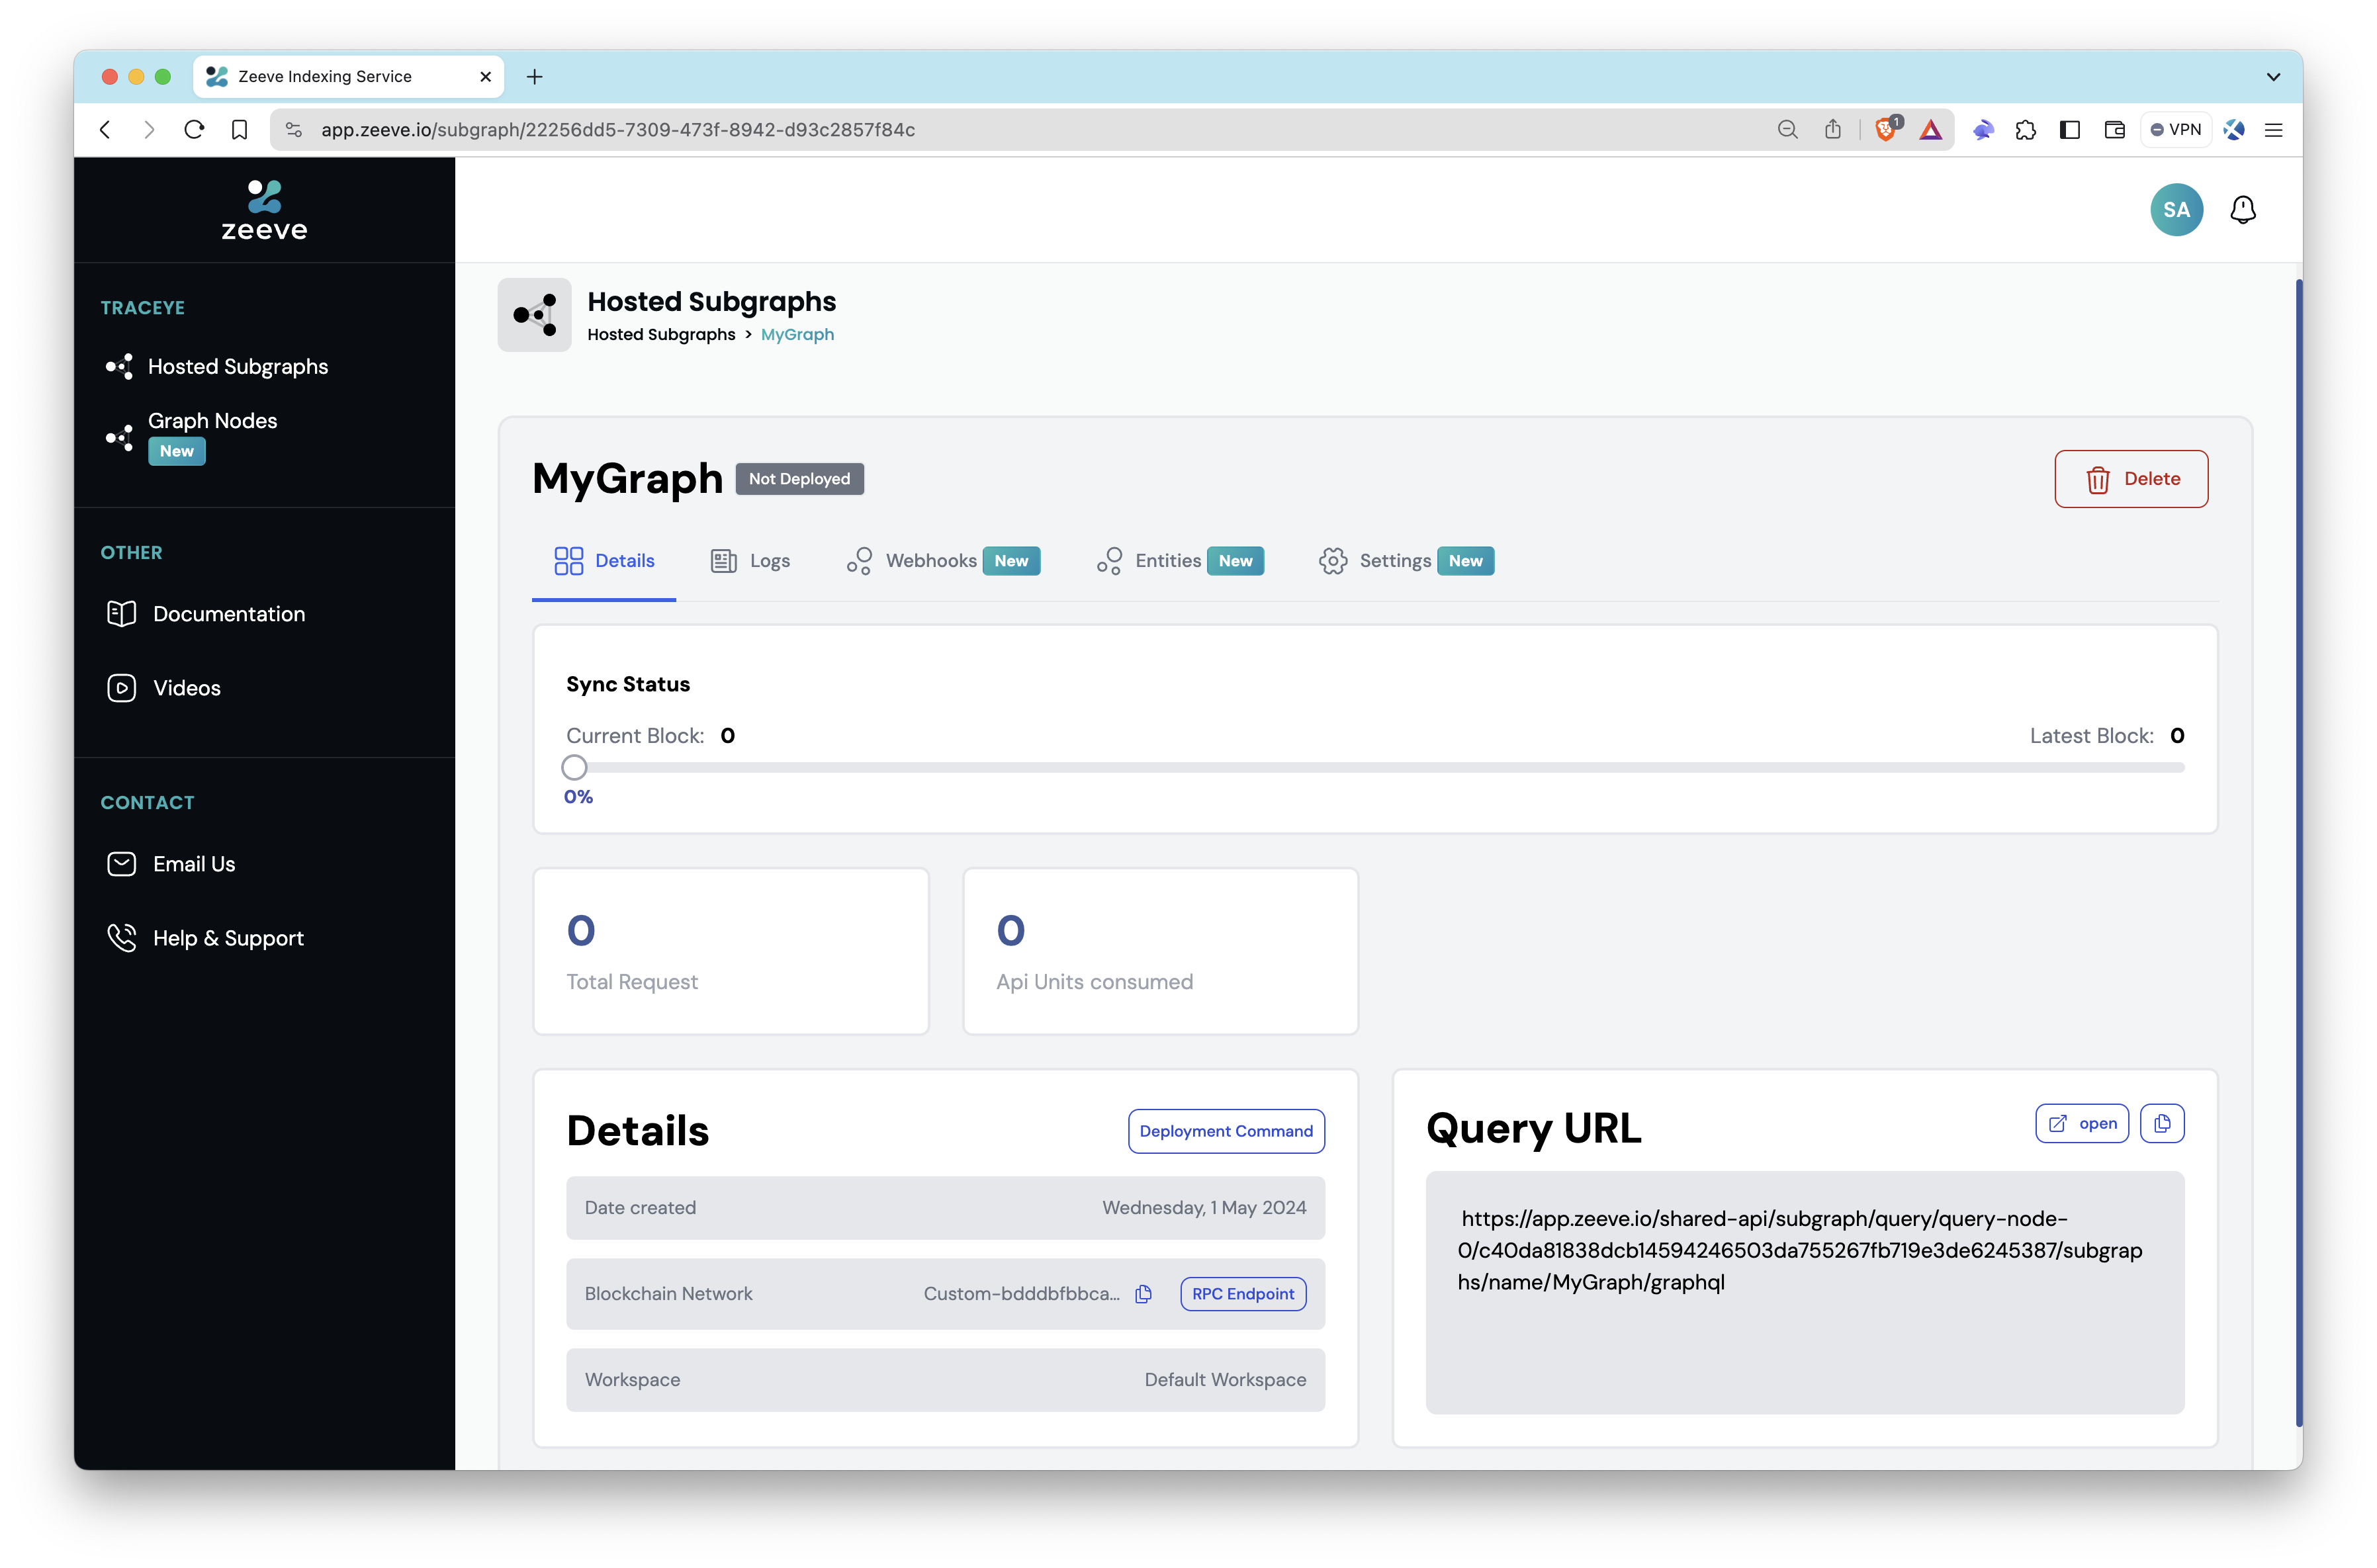
At the top, you'll see a flag noting if your subgraph is deployed or not and a Sync Status bar displaying if the subgraph is synced with the latest tip of the chain.
In the Details section of your subgraph, you'll see information regarding when the subgraph was created, the blockchain network it is referencing, and your workspace (which should be a default workspace). The Deployment Command button explains the steps to host your subgraph (which we'll get into soon).
The Query URL section of your subgraph provides the URL you would use to query your hosted subgraph and also lets you interact with it on an interactive playground (via the Open button).
The interface also provides several tabs to enhance your interaction with the subgraph:
-
Logs Tab: Access detailed logs of your subgraph's operations here. The Logs tab enables you to view, filter, and analyze the events that your subgraph has emitted, which is essential for monitoring its performance and troubleshooting issues.
-
Webhooks Tab: The Subgraph Webhook feature allows you to subscribe to specific entities within your subgraph. This functionality ensures you receive real-time updates directly to your system whenever data related to your subscribed entities is added or modified.
-
Entities Tab: Explore a simplified overview of the entities within your subgraph.
-
Settings Tab: Manage various configurations in this tab according to your operational needs.
Deploy a Subgraph with Traceye
Now, with our subgraph created on Traceye, let's deploy it. Ensure your subgraph is compiled before moving on. If you don't have a subgraph project yet, or don't know what that is, check out this QuickNode Guide: How to Create and Deploy a Custom Subgraph with The Graph to get up and running fast.
In this tutorial, we will be analyzing the Elemental NFT contract deployed on Ethereum mainnet.
After following Steps 1-5 on the How to Create and Deploy a Custom Subgraph with The Graph, follow steps below to deploy your subgraph with Traceye.
Step 1: In the Details section within your subgraph on Traceye's dashboard, click the Deployment Command button and update the network field in your subgraph.yaml (a YAML file containing the subgraph manifest within your subgraph project) with the name provided in Step 1 on Traceye's dashboard.
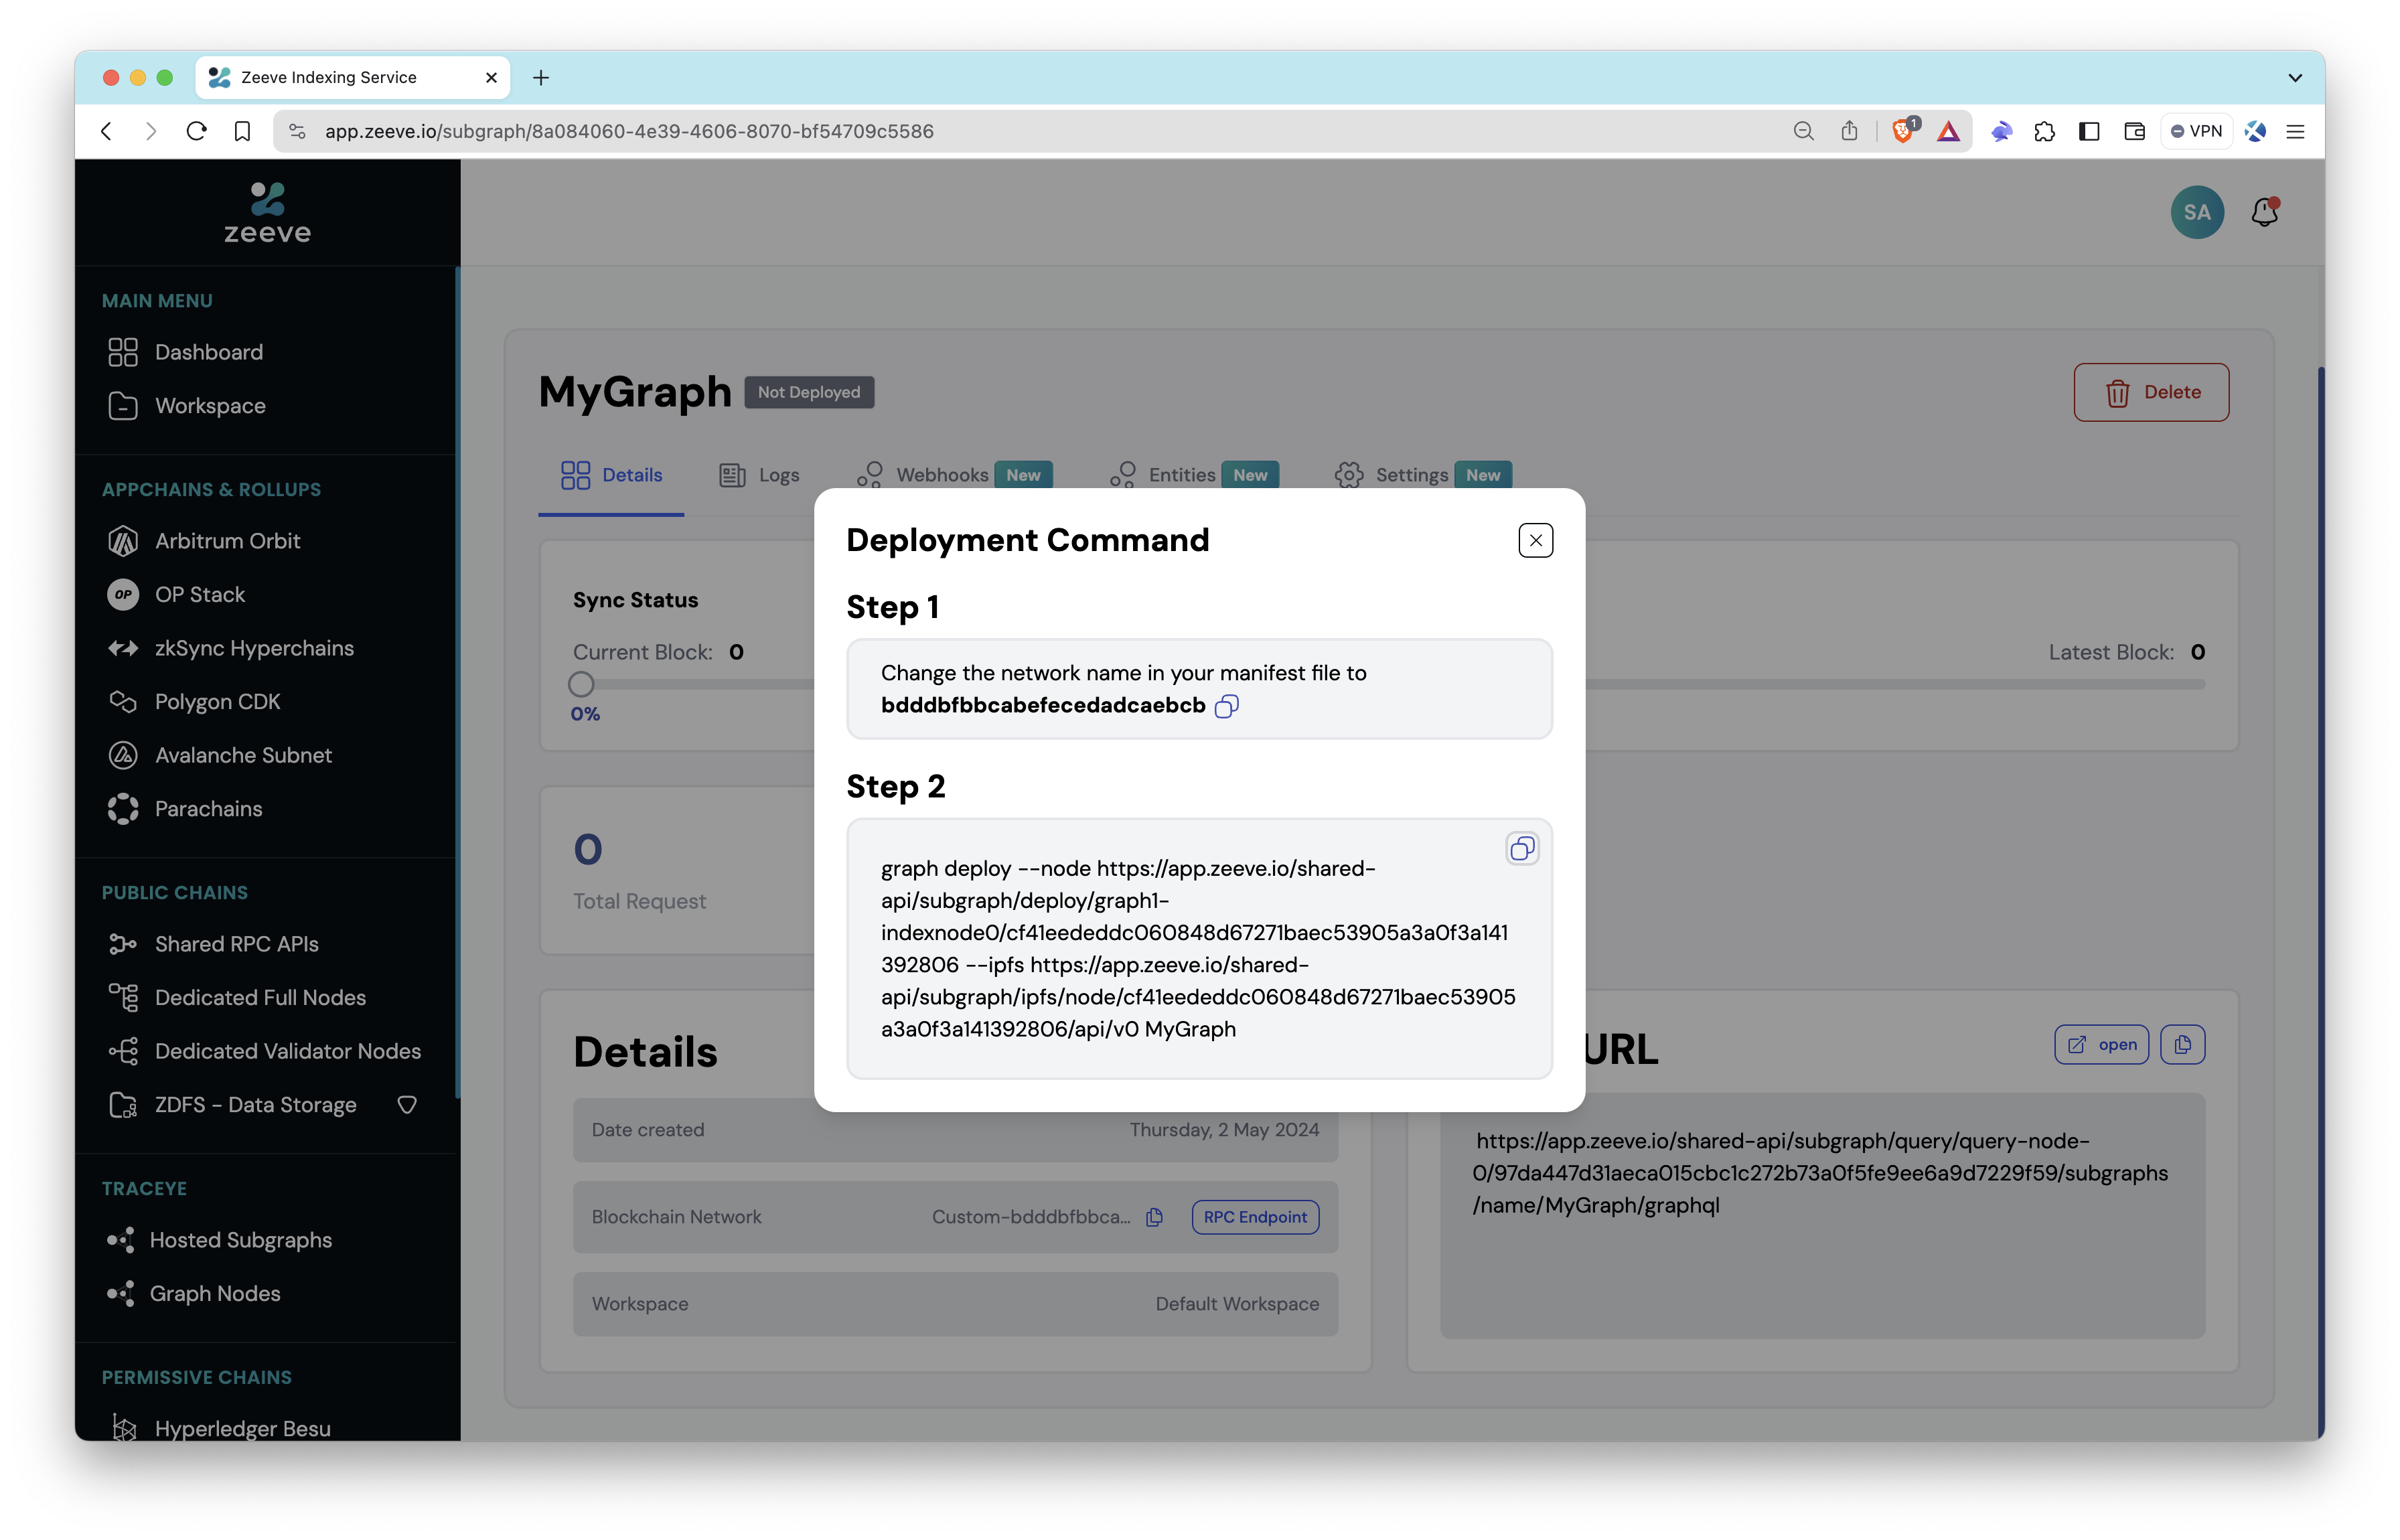
Once your subgraph.yaml is updated to include the network name shown in Step 1, you can move forward.
Step 2: Within your subgraph's root directory, run the command in Step 2 in your terminal, and you'll see an output similar to:
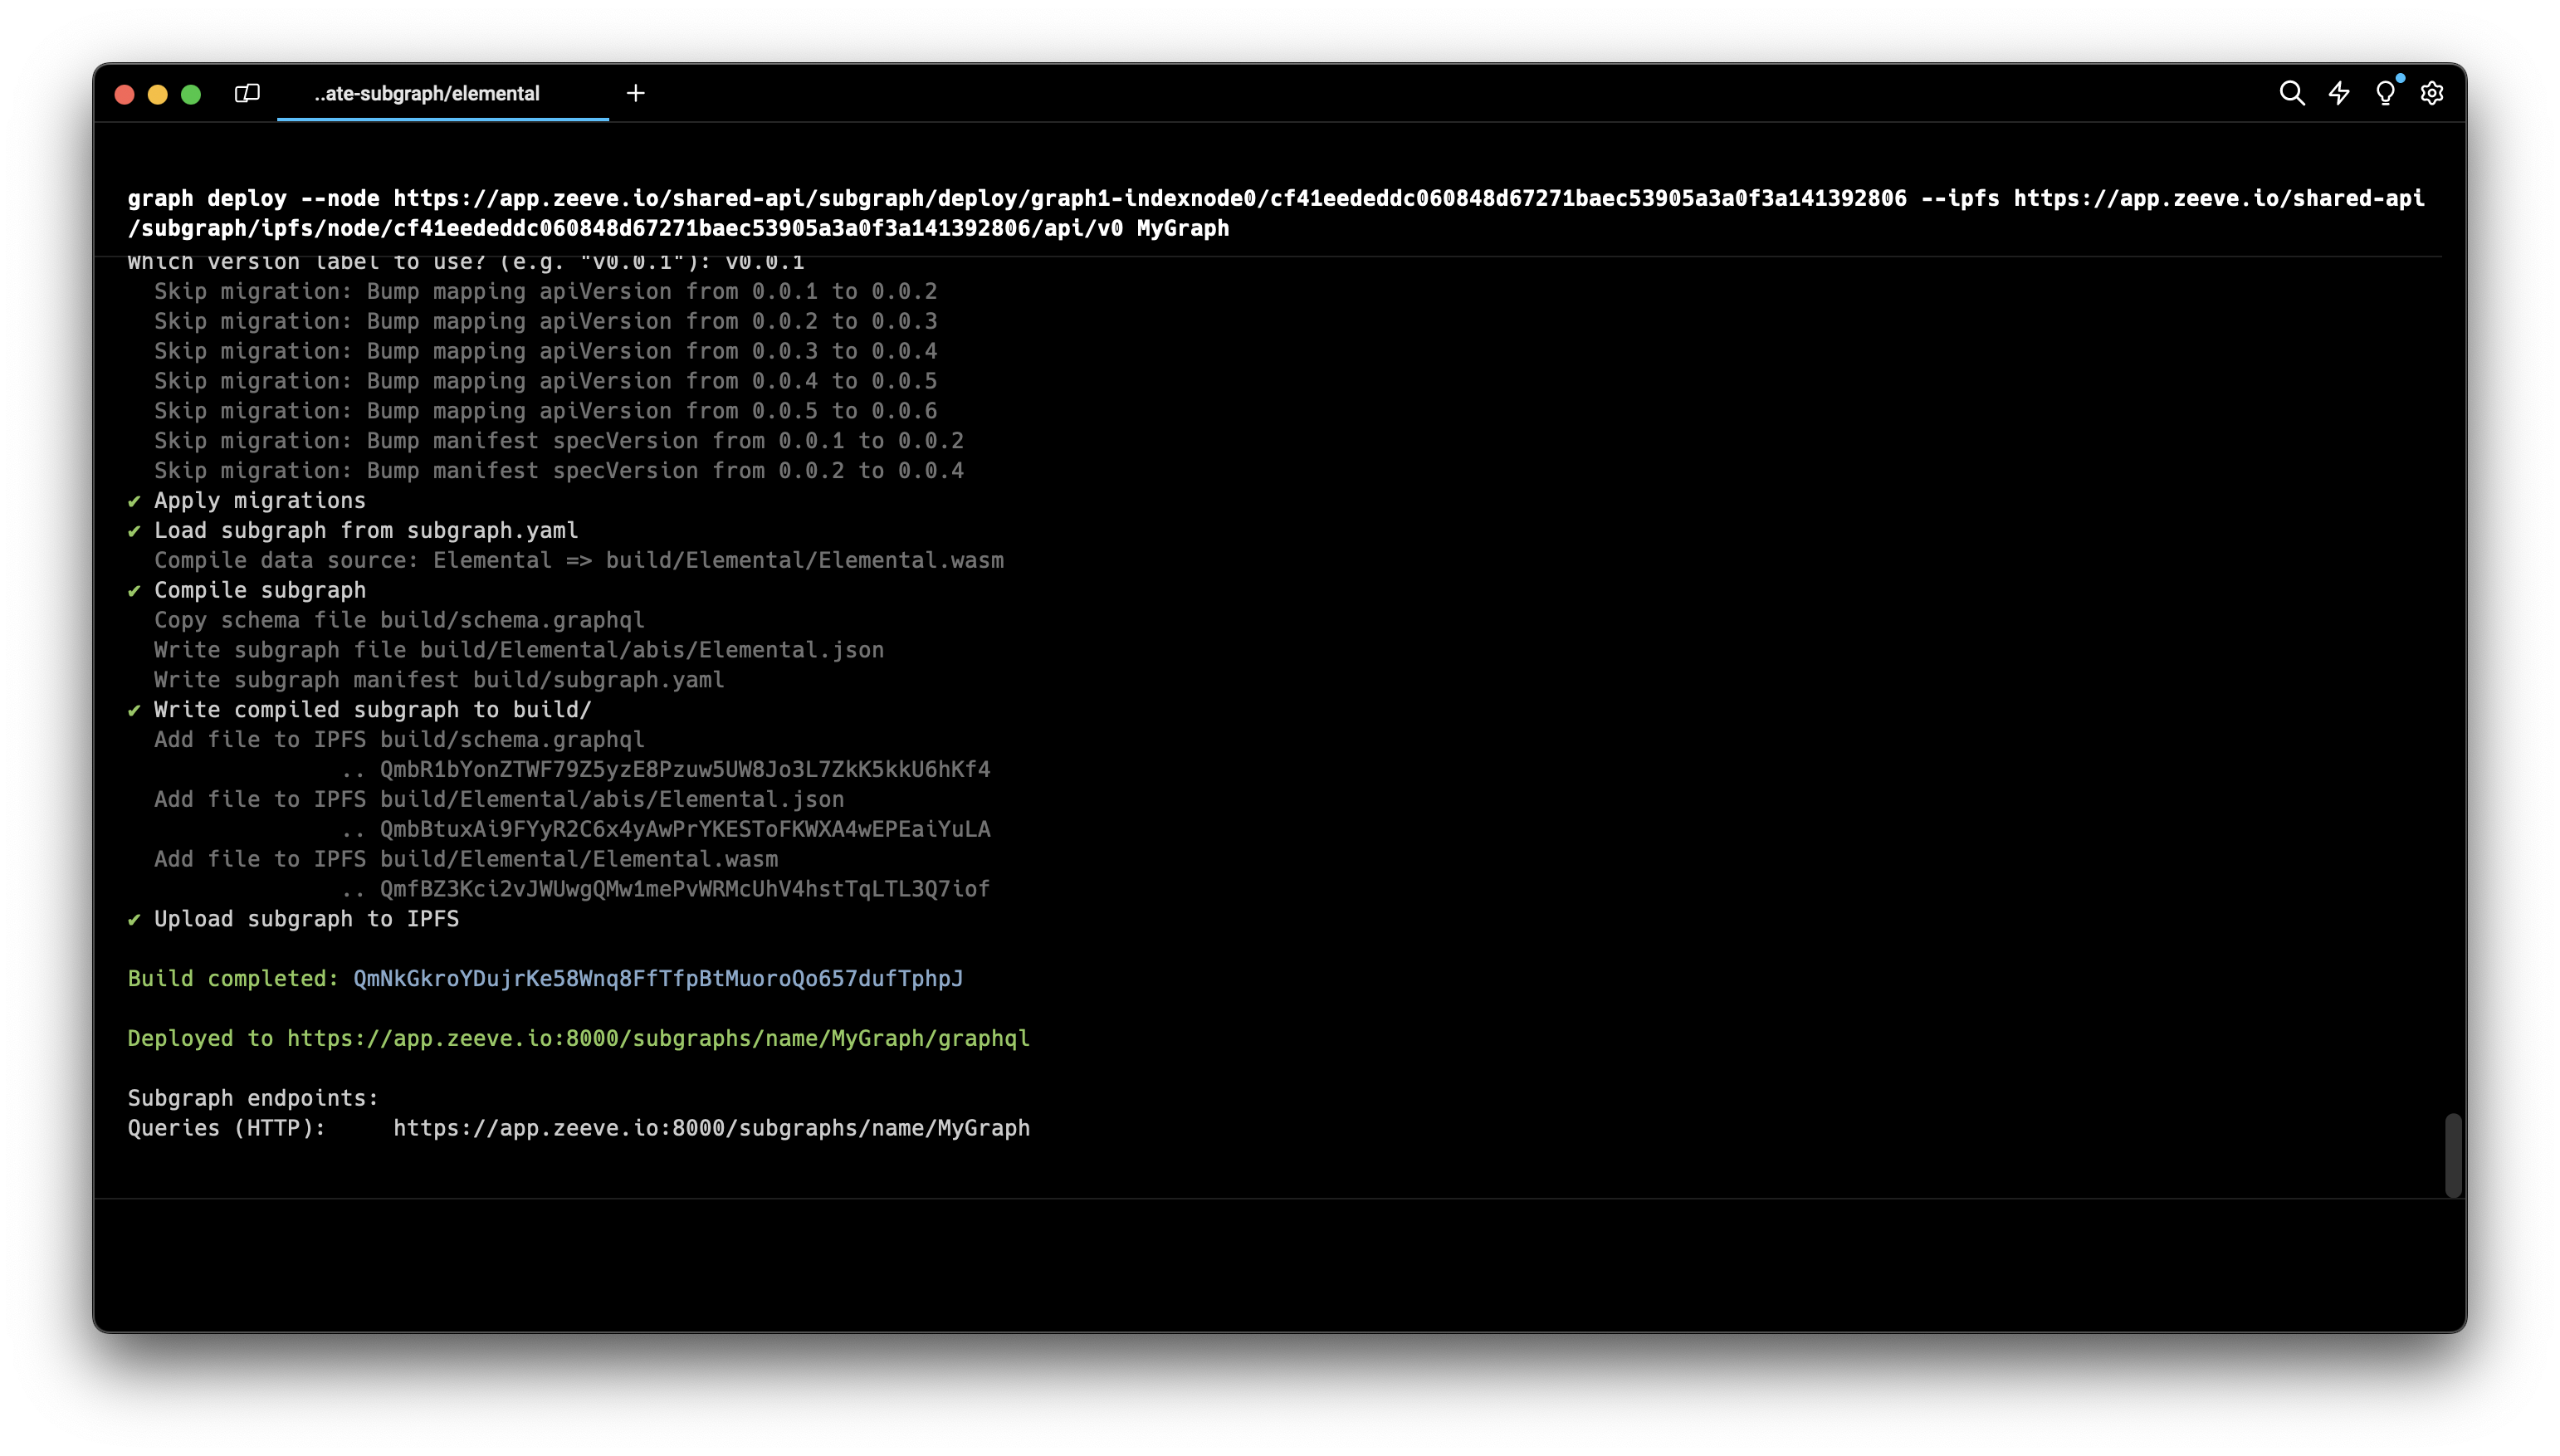
The synchronization process may last longer based on the block number that needs to be synced.
After your subgraph is deployed and you've confirmed its sync status is up to date with the chain, you can interact with it via the Open button in the Query section:
Then query via the GraphQL language to your subgraph's specified schema:
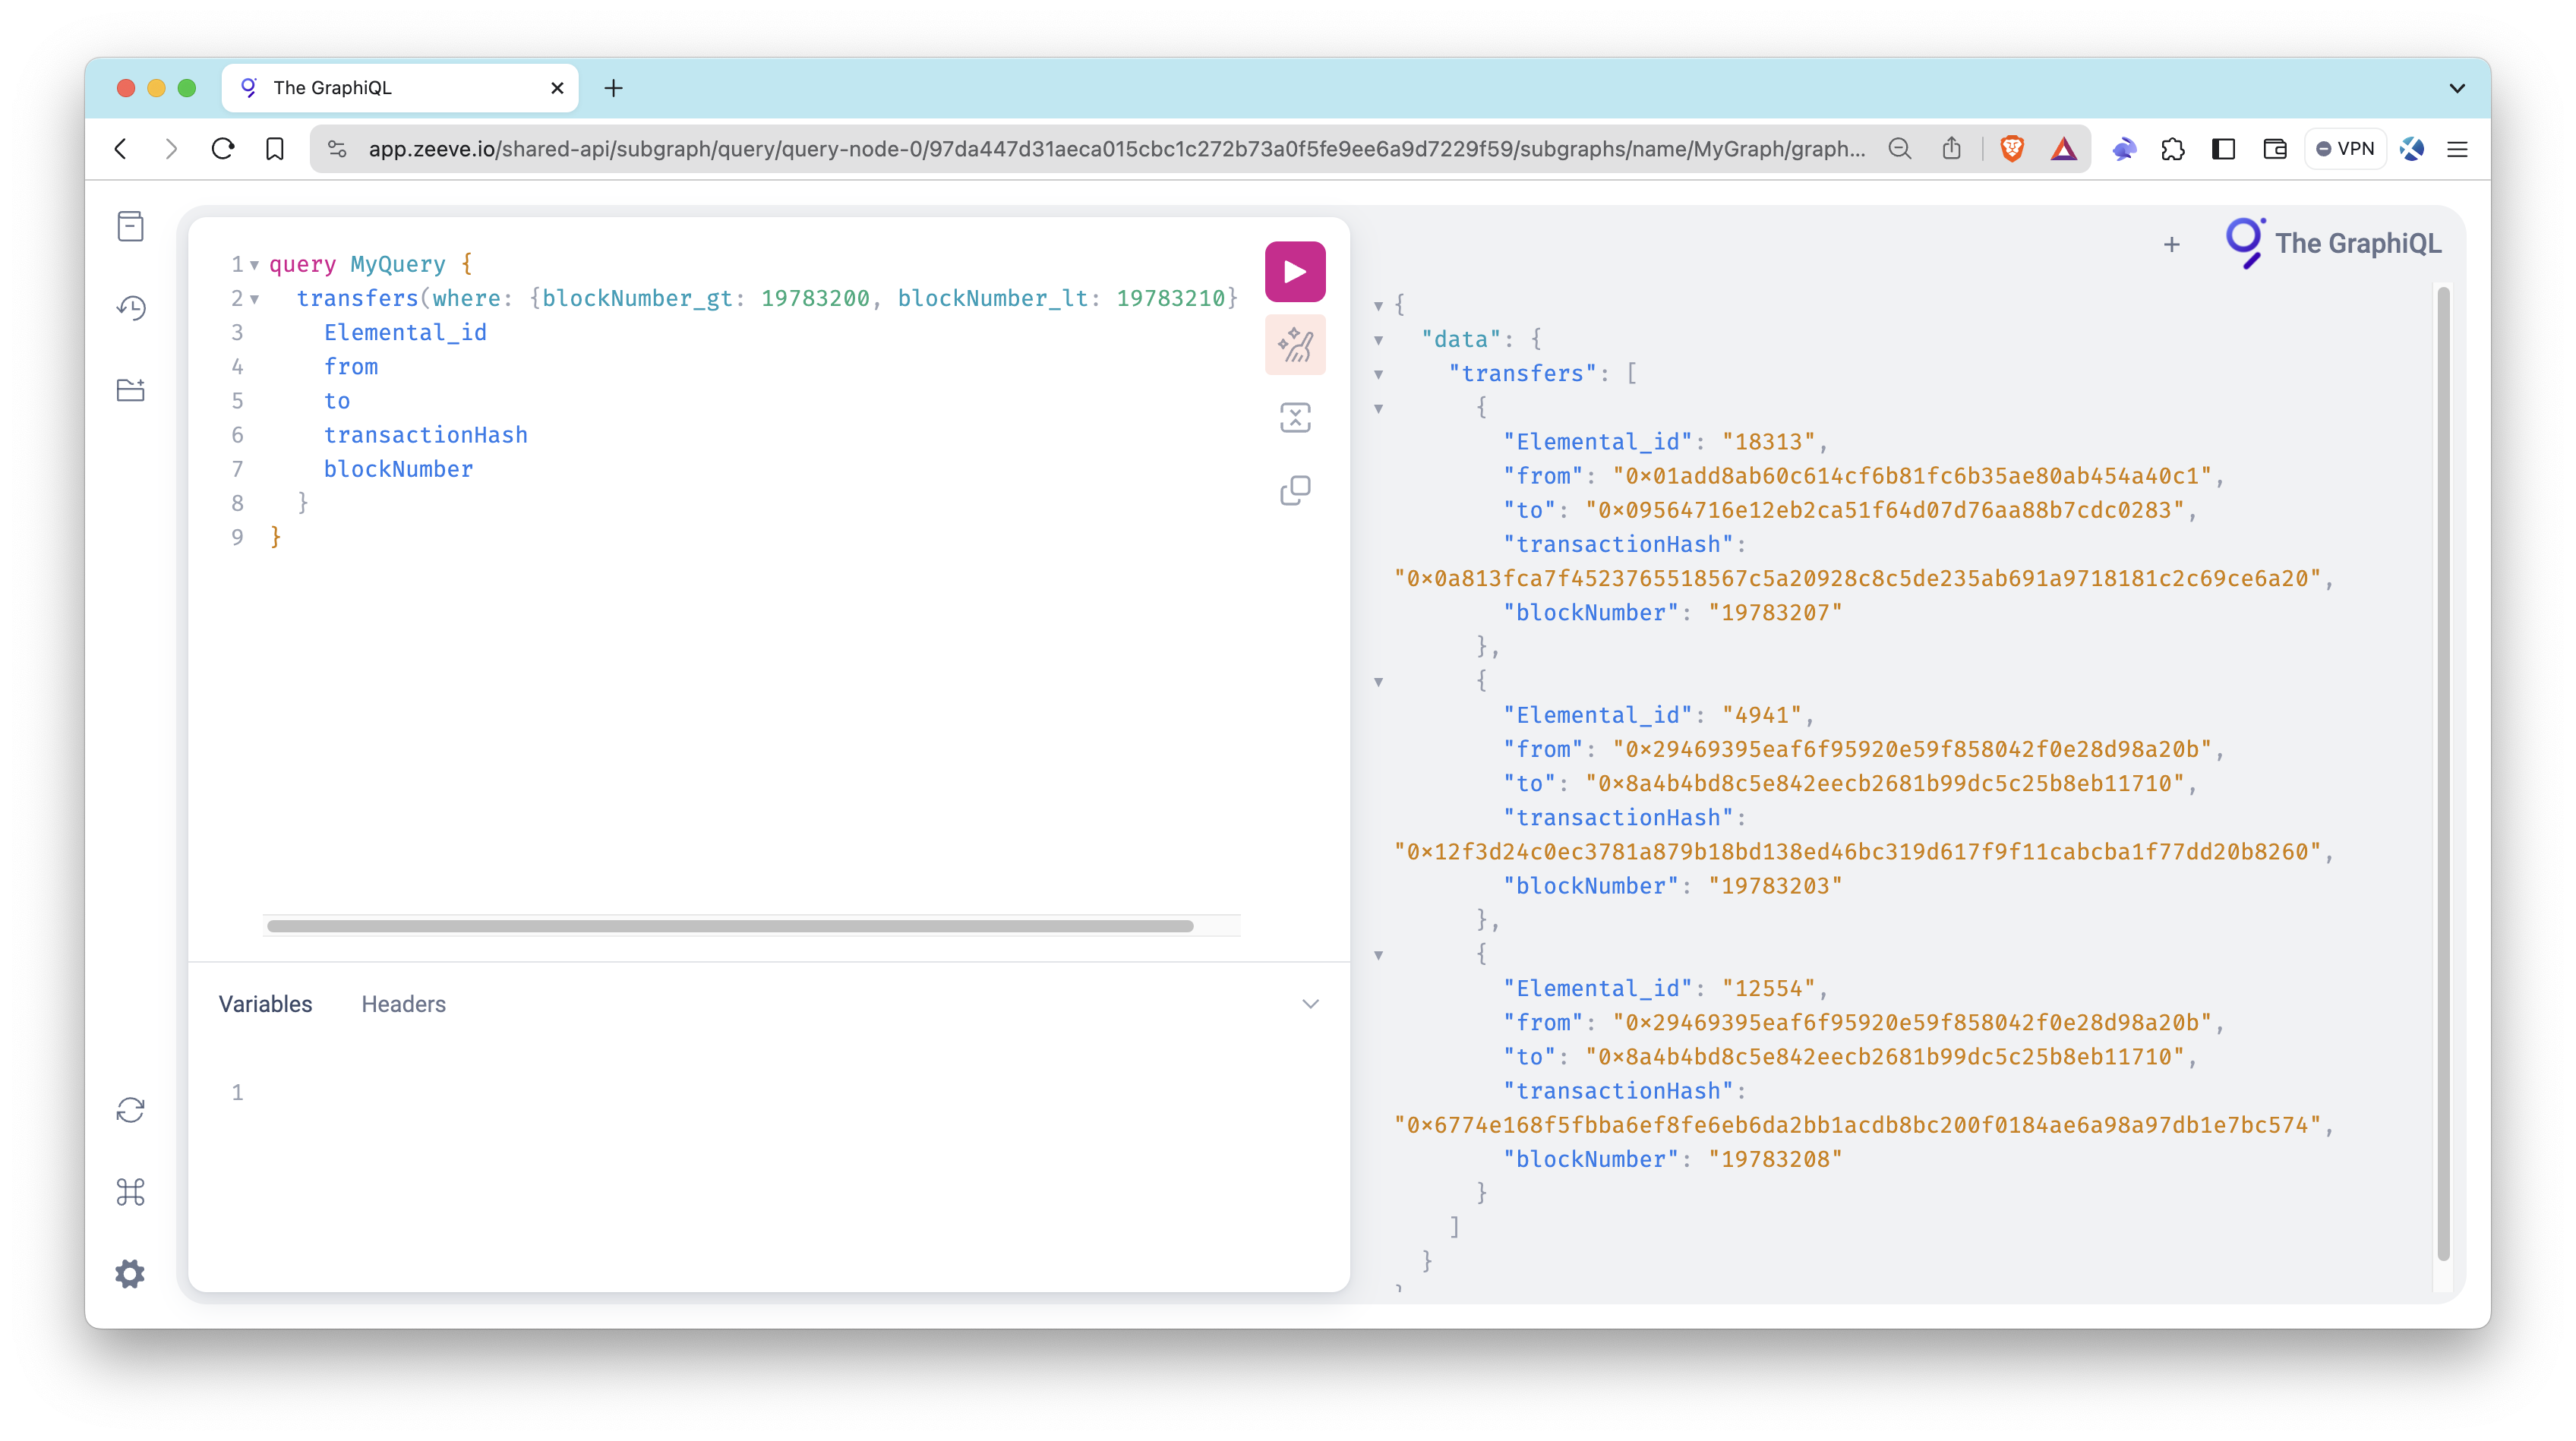
Feel free to use this sample query as a starting point to explore and extract detailed transfer data within a precise block range on the blockchain.
query MyQuery {
  transfers(where: {blockNumber_gt: 19783200, blockNumber_lt: 19783210}) {
    Elemental_id
    from
    to
    transactionHash
    blockNumber
  }
}
You can now access Logs for your RPC endpoints, helping you troubleshoot issues more effectively. If you encounter an issue with your RPC calls, simply check the logs in your QuickNode dashboard to identify and resolve problems quickly. Learn more about log history limits on our pricing page.
Note: You may see empty responses if you are querying a block number greater than the one the subgraph has indexed and synced.
Final Thoughts
That's it! You know now how to create, deploy, and manage your own subgraph using the Hosted Subgraphs add-on on the QuickNode Marketplace created by Traceye. You don't need to maintain the subgraph and can quickly start to query from it with 99.9% uptime!
If you want to learn more, check out the following list of resources:
- Traceye Documentation
- Guide: How to Create and Deploy a Custom Subgraph with The Graph
- QuickNode / Traceye Marketplace Add-on
We would love to hear more about what you are building. Drop us a line in Discord, or give us a follow on Twitter to stay up to date on all the latest information!
We ❤️ Feedback!
Let us know if you have any feedback or requests for new topics. We'd love to hear from you.