13 min read
Overview
Solana Explorer provides access to a wealth of great information on the Solana blockchain: transaction history and details, token balances, NFT metadata, and much more. In our opinion, browsing Solana Explorer is one of the best ways to understand Solana, but building a Solana Explorer takes your knowledge to the next level! In this 3 part series, we'll cover the steps needed to build a simple clone of Solana Explorer!
In our first guide, we're going to cover transactions. If you're building a dApp, chances are you'll want to share transaction history with your users. Some possible use cases can include:
-
an NFT platform may want to show a user a history of an NFT's sales
-
a DAO may want to show a history of voting results
-
an exchange may want to show a user's buy/sell history
-
a non-profit may want to track donation logs
What You Will Do
In this guide, you will use the Solana Scaffold and Wallet Adapter to create a Solana Explorer framework. You'll use that framework to build a simple web app that will fetch transaction history for a wallet and display that history on your site.
What You Will Need
-
Nodejs (version 16.15 or higher) installed
-
Typescript experience and ts-node installed
-
Basic knowledge of HTML/CSS
-
Experience with Solana Transactions (Guide: How to Track Solana Transaction History with Logs)
To follow along with this guide, you will need to have completed our guide on How to Connect Users to Your dApp with the Solana Wallet Adapter and Scaffold. Why? We will be building on top of the code that is there.
Before getting started, make sure that you have followed the instructions in that guide and completed these steps:
-
Installed and launched the Solana Scaffold from your project directory.
-
Updated your RPC endpoint.
-
Created template.tsx in ./src/components/ (we'll be using this as our starting point).
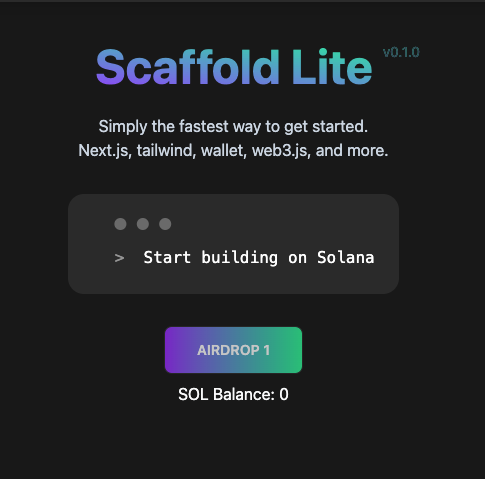
The final code from the How to Connect Users to Your dApp with the Solana Wallet Adapter and Scaffold guide will serve as a starting point to this one. You should have the final code from this Github repo in a local code editor and your localhost:3000 should render the following view:
Set Up Your Environment
Let's start by upgrading our scaffold to the latest version of Solana Web 3. We will be using yarn to initialize our project and install the necessary packages. Feel free to use npm instead if that’s your preferred package manager:
npm update @solana/web3.js@1
## or
yarn upgrade @solana/web3.js@1
Create a Transaction Log Component
From your project directory, duplicate your Component Template and name it TransactionsLog.tsx:
cp ./src/components/template.tsx ./src/components/TransactionsLog.tsx
TransactionsLog.tsx should now exist in your components folder. Open it in a code editor of choice.
Update Dependencies
Start by renaming your Function Component to TransactionLog. Replace:
export const Template: FC = () => {
You can now access Logs for your RPC endpoints, helping you troubleshoot issues more effectively. If you encounter an issue with your RPC calls, simply check the logs in your QuickNode dashboard to identify and resolve problems quickly. Learn more about log history limits on our pricing page.
with
export const TransactionLog: FC = () => {
For this component, we'll need additional imports. Replace the existing imports of your template with these:
import { useConnection, useWallet } from '@solana/wallet-adapter-react';
import { PublicKey, ParsedTransactionWithMeta } from '@solana/web3.js';
import { FC, useEffect, useState } from 'react';
import { notify } from "../utils/notifications";
Create State Variables
Inside of your TransactionLog Function Component, declare two state variables using useState:
-
transactionHistory - this is where we'll store the parsed transaction results of our Solana query
-
transactionTable - this is where we'll store a JSX Element that contains the output table that we'll display in our web app
We'll set both values to null to start:
    const { connection } = useConnection();
    const { publicKey } = useWallet();
    const [transactionHistory, setTransactionHistory] = useState<ParsedTransactionWithMeta[]>(null);
    const [transactionTable, setTransactionTable] = useState<JSX.Element>(null);
Create Solana Query
Next, inside your TransactionLog Function Component create getTransactions, a function that will fetch parsed transactions for a given wallet and set that array of transaction data to the transactionHistory variable:
     async function getTransactions(address, numTx) {
        const pubKey = new PublicKey(address);
        //Find recent transactions
        let transactionList = await connection.getSignaturesForAddress(pubKey, {limit:numTx});
        //Parse transactions to get signature for recent transactions
        let signatureList = transactionList.map(transaction=>transaction.signature);
        //Get parsed details of each transaction
        let transactionDetails = await connection.getParsedTransactions(signatureList, {maxSupportedTransactionVersion:0});
        //Update State
        setTransactionHistory(transactionDetails);
    }
For more information on fetching transactions logs on Solana visit our Guide: How to Track Solana Transaction History with Logs.
Next, create a function that takes our Parsed transaction data and assembles it into a nice table. Here's the function we used which includes some custom styling and formatting, but feel free to modify it to include information that's important to you.
Construct UI
Add the following buildTransactionTable function after getTransactions:
    function buildTransactionTable() {
        if(transactionHistory && transactionHistory.length !== 0) {
            let header = (
                <thead className="text-xs text-gray-700 uppercase bg-zinc-50 dark:bg-gray-700 dark:text-gray-400">
                    <tr>
                        <th className="px-6 py-3">Transaction Signature</th>
                        <th className="px-6 py-3">Slot</th>
                        <th className="px-6 py-3">Date</th>
                        <th className="px-6 py-3">Result</th>
                    </tr>
                </thead>
                )
            let rows = transactionHistory.map((transaction, i)=>{
                let date = new Date(transaction.blockTime*1000).toLocaleDateString();
                return (
                    <tr  key={i+1} className="bg-white border-b bg-zinc-800 dark:border-zinc-700">
                        <td className="px-6 py-3">
                                {/* some transactions return more than 1 signature -- we only want the 1st one */}
                                {transaction.transaction.signatures[0]}
                        </td>
                        <td className="px-6 py-3">{transaction.slot.toLocaleString("en-US")}</td>
                        <td className="px-6 py-3">{date}</td>
                        <td className="px-6 py-3">{transaction.meta.err ? 'Failed' : 'Success'}</td>
                    </tr>)
            })
            setTransactionTable(
                <table className="w-full text-sm text-left text-gray-500 dark:text-gray-400">
                    {header}
                    <tbody>{rows}</tbody>
                </table>)
        }
        else {
            setTransactionTable(null);
        }
    }
A couple notes about this function:
-
We are first checking to make sure a transactionHistory has been found and that we've found at least 1 entry.
-
Header defines the fields that we'll be searching for.
-
Rows will create a table row
<tr>for each transaction in transactionHistory. Inside, we create a<td>element for each piece of data we will display. -
We set our state variable, transactionTable as a
<table>that includes our header and rows.
Trigger Query and Table Rendering
Now we need to create a React hook, useEffect to update call buildTransactionTable when our app has found Transactions. Add it below your state variable declarations and above your getTransactions function:
    useEffect(() => {
        if (publicKey && transactionHistory) {
            buildTransactionTable();
        }
      }, [publicKey, connection, transactionHistory])
Effectively this will look for a change in publicKey, connection, or transactionHistory and refresh our table based on the new parameters.
Let's create an onClick function after the buildTransactionTable function to initiate our search:
    const onClick = async () => {
        if (!publicKey) {
            console.log('error', 'Wallet not connected!');
            notify({ type: 'error', message: 'error', description: 'Wallet not connected!' });
            return;
        }
        try {
            await getTransactions(publicKey.toString(),15);
        } catch (error: any) {
            notify({ type: 'error', message: `Couldn't Find Transactions!`, description: error?.message });
            console.log('error', `Error finding Transactions! ${error?.message}`);
        }
    };
Our function first checks that we have a connected publicKey and performs a simple try/catch to to attempt to search for that public key using our getTransactions function. We're searching for 15 transactions in our example, but you can set the search value to however many transactions you'd like to return.
Finally, update your return statement to include a button that initiates onClick and a <div> that renders our table:
    return(<div>
        <div className="text-center">
        <button
                className="px-8 m-2 btn animate-pulse bg-gradient-to-r from-[#9945FF] to-[#14F195] center hover:from-pink-500 hover:to-yellow-500 ..."
                onClick={onClick}
            >
                <span>Get Transactions</span>
        </button>
        </div>

    {/* Render Results Here */}
        <div>{transactionTable}</div>
    </div>)
If you're following along, your final file should look like this.
Create an Explorer View and Page
Great job! But before we go see our work in action, we need to tell our app where to display it. We'll need to do a couple of things to make our component visible in Next.js:
-
Create an Explorer View
-
Create an Explorer Page
Create an Explorer View for our Solana Explorer Clone
From your project directory, create a new folder, explorer, and in it, create a new file, index.tsx:
mkdir ./src/views/explorer
echo > ./src/views/explorer/index.tsx
Open ./src/views/explorer/index.tsx and paste this code:
import { FC, useEffect } from "react";
import { useWallet, useConnection } from '@solana/wallet-adapter-react';
import useUserSOLBalanceStore from '../../stores/useUserSOLBalanceStore';
import { TransactionLog } from "../../components/TransactionsLog";
{/* import { GetTokens } from "../../components/GetTokens"; */}

export const ExplorerView: FC = ({ }) => {
  const wallet = useWallet();
  const { connection } = useConnection();

  const balance = useUserSOLBalanceStore((s) => s.balance)
  const { getUserSOLBalance } = useUserSOLBalanceStore()

  useEffect(() => {
    if (wallet.publicKey) {
      console.log(wallet.publicKey.toBase58())
      getUserSOLBalance(wallet.publicKey, connection)
    }
  }, [wallet.publicKey, connection, getUserSOLBalance])

  return (
<div className="md:hero mx-auto p-4">
      <div className="md:hero-content flex flex-col">
        <h1 className="text-center text-5xl font-bold text-transparent bg-clip-text bg-gradient-to-tr from-[#9945FF] to-[#14F195]">
          Quick View Explorer
        </h1>
        <div className="text-center">
          {wallet && wallet.publicKey && <p>Connected to: {(wallet.publicKey.toString())}</p>}
          {wallet && <p>SOL Balance: {(balance || 0).toLocaleString()}</p>}
        </div>
        <div className="text-center">
          <TransactionLog/>
          {/* <GetTokens/> */}
        </div>
      </div>
    </div>
  );
};
For this view, we're actually borrowing quite a bit of code from ./src/views/home/index.tsx which fetches a user's wallet balance on Wallet Connect. Below that, we call <TransactionLog/> to handle and display our transaction search.
If you went through our previous guide to Create a Get Token Accounts Component, you could add that here too: just add import { GetTokens } from "components/GetTokens"; to your imports and including <GetTokens/> after <TransactionLog/>.
The Solana Scaffold exports all views from a common file, ./src/views/index.tsx. Open it, and add this line to export ExplorerView:
export { ExplorerView } from "./explorer";
Create an Explorer Page that Publishes our View
From your project directory, create a new page, explorer.tsx:
echo > ./src/pages/explorer.tsx
Paste this code into explorer.tsx:
import type { NextPage } from "next";
import Head from "next/head";
import { ExplorerView } from "../views";

const Explorer: NextPage = (props) => {
  return (
    <div>
      <Head>
        <title>Solana Scaffold</title>
        <meta
          name="description"
          content="Basic Functionality"
        />
      </Head>
      <ExplorerView />
    </div>
  );
};

export default Explorer;
This is the actual page that will render, /explorer/.
Alright! You've made it! Let's recap what we've done just to make sure we're all synced up. Here's a summary of new files you should have created:
-
./src/components/TransactionsLog.tsx - new component that queries solana and renders a table on succesful result
-
./src/views/explorer/index.tsx - new view that will host our transaction log (and other components in the future)
-
./src/pages/explorer.tsx - new page to display our view ./explorer/
Let's see it in action! Enter:
npm run dev
## or
yarn dev
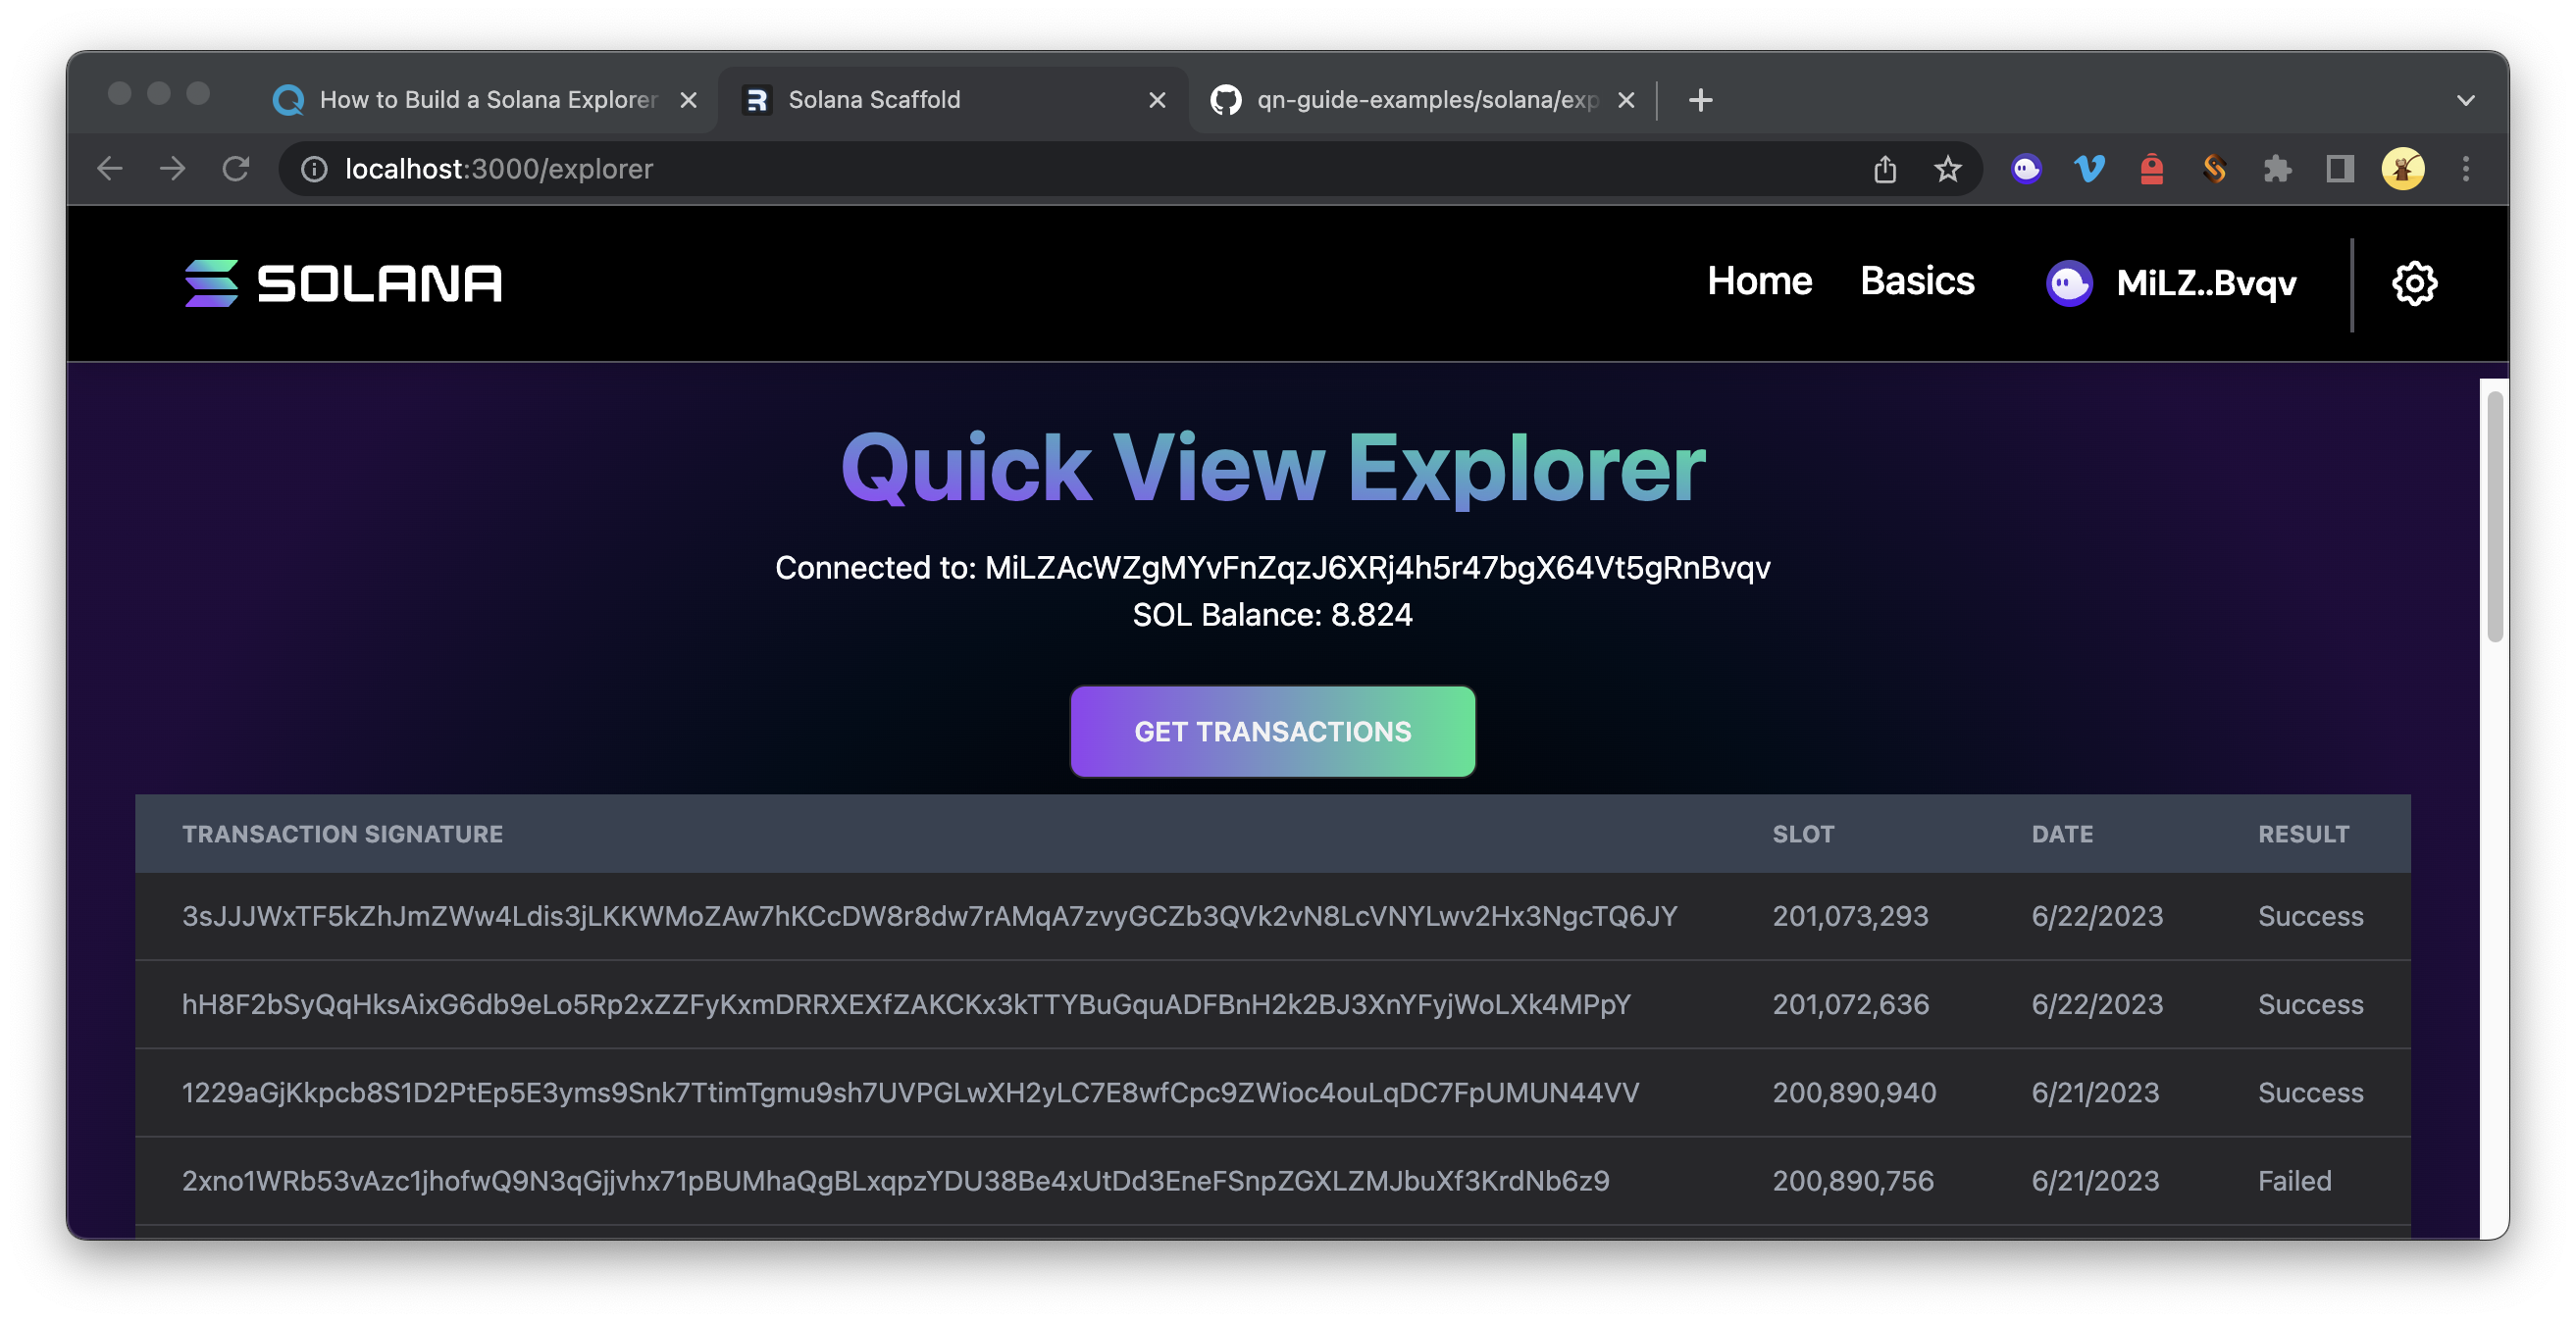
And head over to http://localhost:3000/explorer. Do you see something like this?
Pretty cool, right? Yes, great job!
Conclusion
You just built a dApp that will query a user's wallet, find their transaction history, and renders that history on a dApp. Pretty powerful, huh? But what if we want to know more about a given transaction? We'll be covering that in our next guide in this series.
Ready to take the next step? Check out our Guide: Solana Explorer Clone Part 2 - Transaction Detail.
We ❤️ Feedback!
We're going to be releasing a few follow-up guides to build out this Solana Explorer Clone further. If you want to be the first to know about those or have any feedback or questions on this guide, please let us know. Feel free to reach out to us via Twitter or our Discord community server. We’d love to hear from you!