
19 min read
Overview
Been building on Solana and ready to bring your dApp to the web? You're going to need a way to connect your tools to your users' wallets. Though there are a few ways to connect your dApp to your users' wallets, Solana has created a couple of handy tools that make getting started easy: Solana Wallet Adapter and Solana dApp Scaffold.
What You Will Do
- Learn what Solana Wallet Adapter is
- Deploy the Solana dApp Scaffold
- Customize your environment
- Create a simple dApp to query a Connected Wallet
What You Will Need
- Nodejs (version 16.15 or higher)
- A Solana wallet (e.g. Phantom)
- Experience with [Solana Web3] and Solana SPL Token Library
- Typescript experience and ts-node installed
- Basic knowledge of HTML/CSS
- Experience with front-end web development will be helpful but not required to follow along. We'll be creating a Next.js project using React. The Solana community also supports Vue, Angular, and Svelte. Visit their community page for more information.
What is the Wallet Adapter
Ever notice that many Solana dApps have a similar-looking UI for connecting to Wallets?
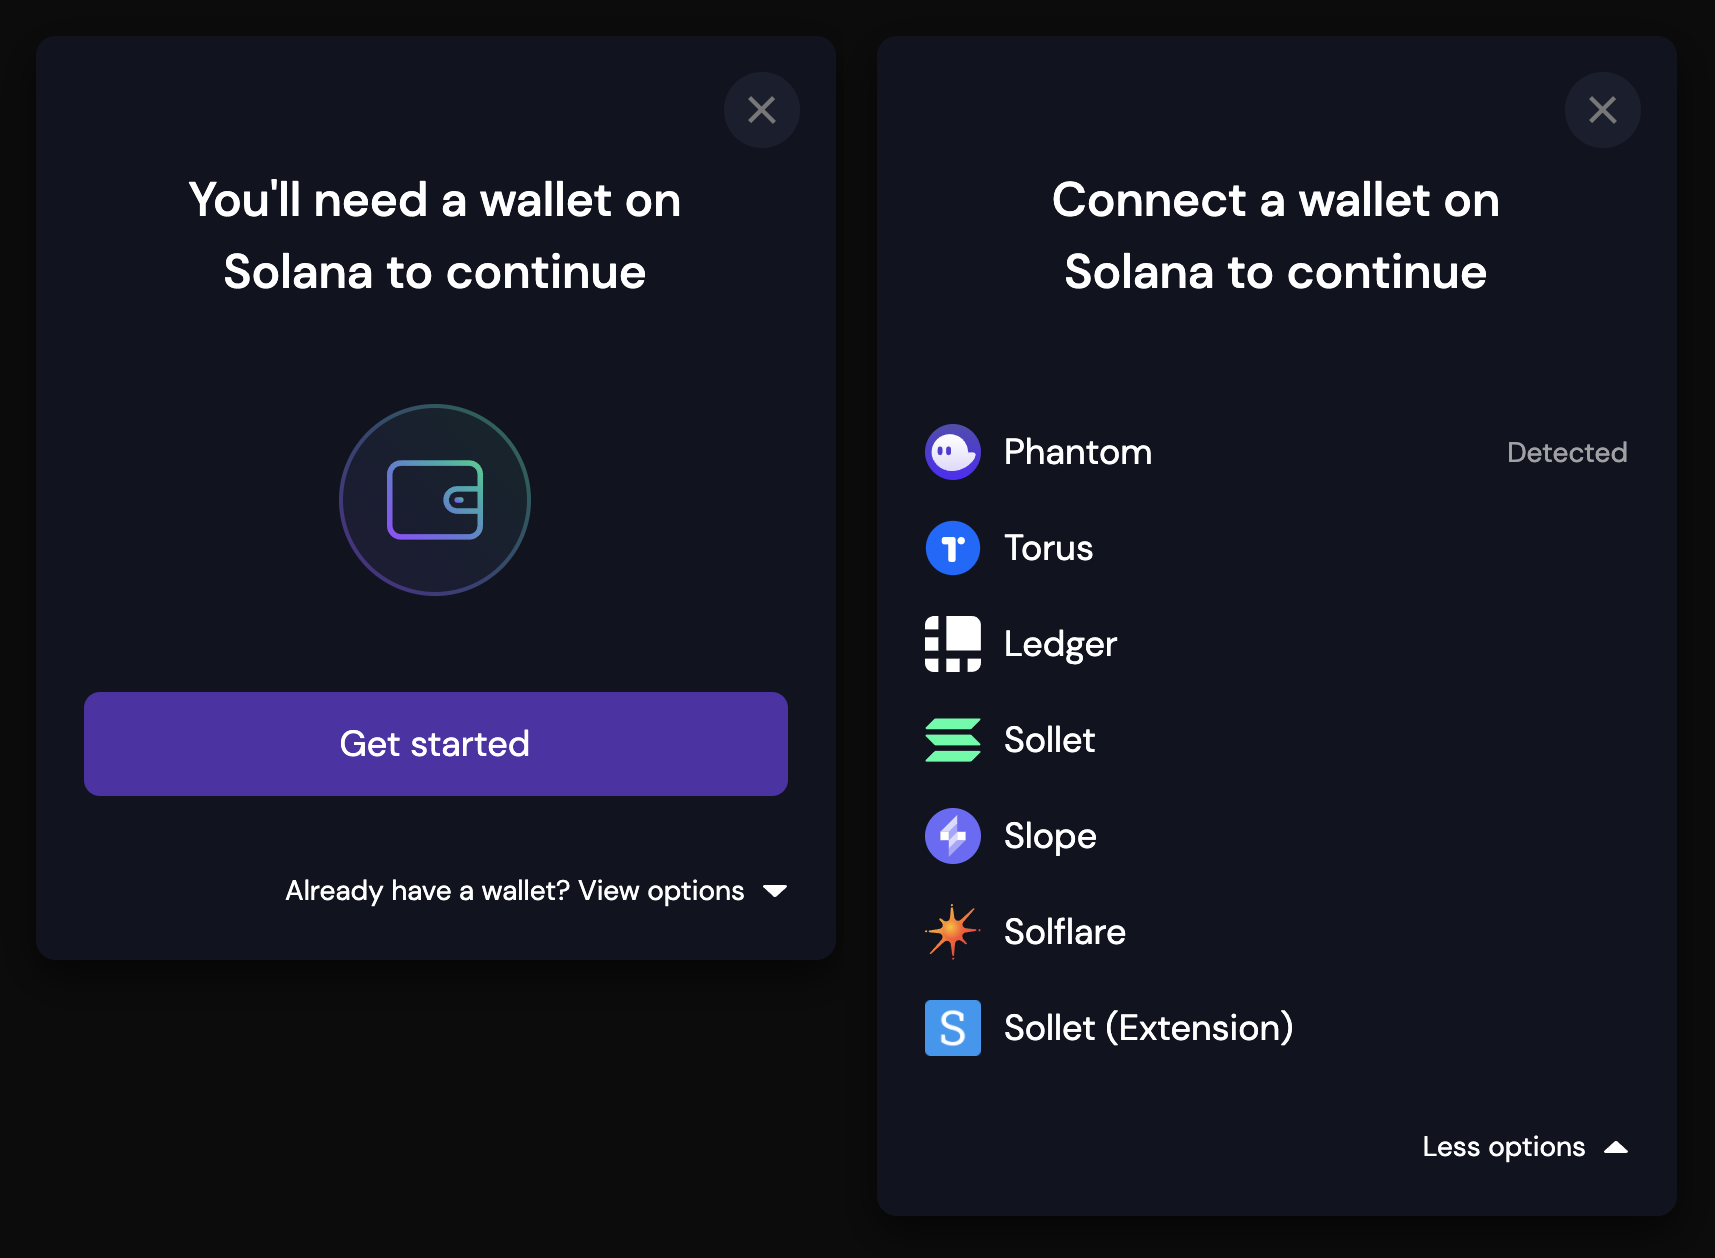
That's the Solana Wallet Adapter ("SWA"), and you see it in lots of places because it is easy to use, inclusive of all of the most common wallets on Solana, and regularly maintained by the Solana Community. So what is it? The SWA is a set of Modular TypeScript wallet adapters and components for Solana applications that allow you to easily connect your dApp to your users' wallet of choice (over a dozen Solana wallets are supported out of the box!).
Here are some reasons to consider using SWA:
- Open source, supported by Solana-labs
- Multi wallet support: let your users use their wallet of choice without a creating a bunch of headaches for you to support new wallets
- Includes an off-the-shelf customizable UI
- Includes Anchor support
- Key Functionality built-in: Connect, Disconnect, Auto-connect
- Supports multiple front-end frameworks
Let's try it out!
Set Up Your Environment
SWA includes support for multiple front-end frameworks:
- React
- Material-UI,
- Ant Design
- Angular Material UI
- Vue (community-supported)
- Angular (community-supported)
- Svelte (community-supported)
You can add these packages to your existing projects using npm instructions here. For this example, however, we will be creating a new project using the Solana dApp Scaffold. The dApp Scaffold includes SWA and a few pre-built components to make it quick for you to get up and running!
Note: if you are adding the adapter to an existing project, the current SWA at the time of this writing does not support React 18. Please use React 17.
Create a new project directory in your terminal with:
mkdir my-solana-dapp
cd my-solana-dapp
Clone the dApp Scaffold:
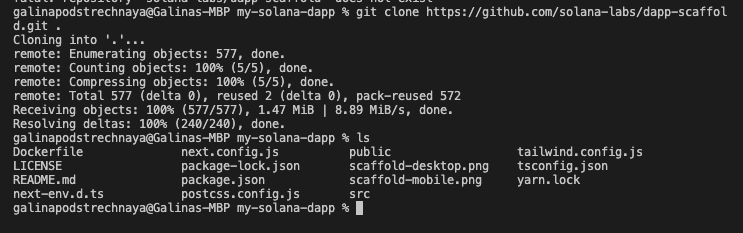
git clone https://github.com/solana-labs/dapp-scaffold.git .
The `.` will clone the scaffold into your project directory without creating a new directory inside of it.
Type ls in your terminal to make sure everything got copied correctly. Your terminal should look something like this:
Install dependencies:
npm install
# or
yarn install
Also go ahead and add the SPL-token Library, which we'll use later in this exercise:
npm i @solana/spl-token
# or
yarn add @solana/spl-token
Adding a Quicknode Custom RPC Endpoint
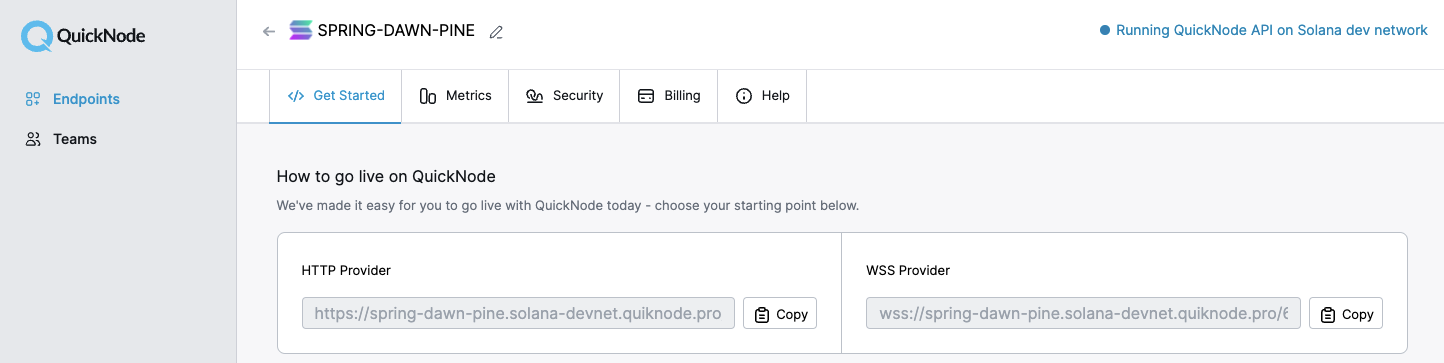
To build on Solana, you'll need an API endpoint to connect with the network. You're welcome to use public nodes (which are already integrated into the Scaffold) or deploy and manage your own infrastructure; however, if you'd like 8x faster response times, you can leave the heavy lifting to us.
See why over 50% of projects on Solana choose Quicknode and sign up for free here.
We're going to launch our node under the Solana Devnet, but you can launch the node that meets your needs. Copy the HTTP Provider link:
Then, navigate back to your terminal, and create an .env file with the following command from your my-solana-dapp directory:
echo > .env
We encourage using an .env to protect your key when creating a production site.
Open your project in a code editor of choice and navigate to your newly created .env file. Declare two variables, REACT_APP_SOLANA_RPC_HOST and REACT_APP_NETWORK. Paste your RPC url in the REACT_APP_SOLANA_RPC_HOST variable and set your REACT_APP_NETWORK to the Solana cluster you'll be using (devnet, mainnet-beta, or testnet). This should be the same network that you selected your RPC endpoint from. Your file should look something like this:
REACT_APP_SOLANA_RPC_HOST=https://example.solana-devnet.quiknode.pro/00000000000/
REACT_APP_NETWORK=devnet
We must also update next.config.js to use these environment variables in our Next.js app. Open the file in your root project directory and replace the contents with this:
/** @type {import('next').NextConfig} */
const nextConfig = {
  reactStrictMode: true,
}

module.exports = {
  nextConfig,
  env: {
    REACT_APP_SOLANA_RPC_HOST: process.env.REACT_APP_SOLANA_RPC_HOST,
    REACT_APP_NETWORK: process.env.REACT_APP_NETWORK
  }
}
Now update the Scaffold's endpoint by opening ./src/contexts/ContextProvider.tsx and replacing lines 20-21:
    const network = WalletAdapterNetwork.Devnet;
    const endpoint = useMemo(() => clusterApiUrl(network), [network]);
with
    const network = process.env.REACT_APP_NETWORK as WalletAdapterNetwork;
    const endpoint = process.env.REACT_APP_SOLANA_RPC_HOST;
We're all set! Let's launch our app!
npm run dev
# or
yarn dev
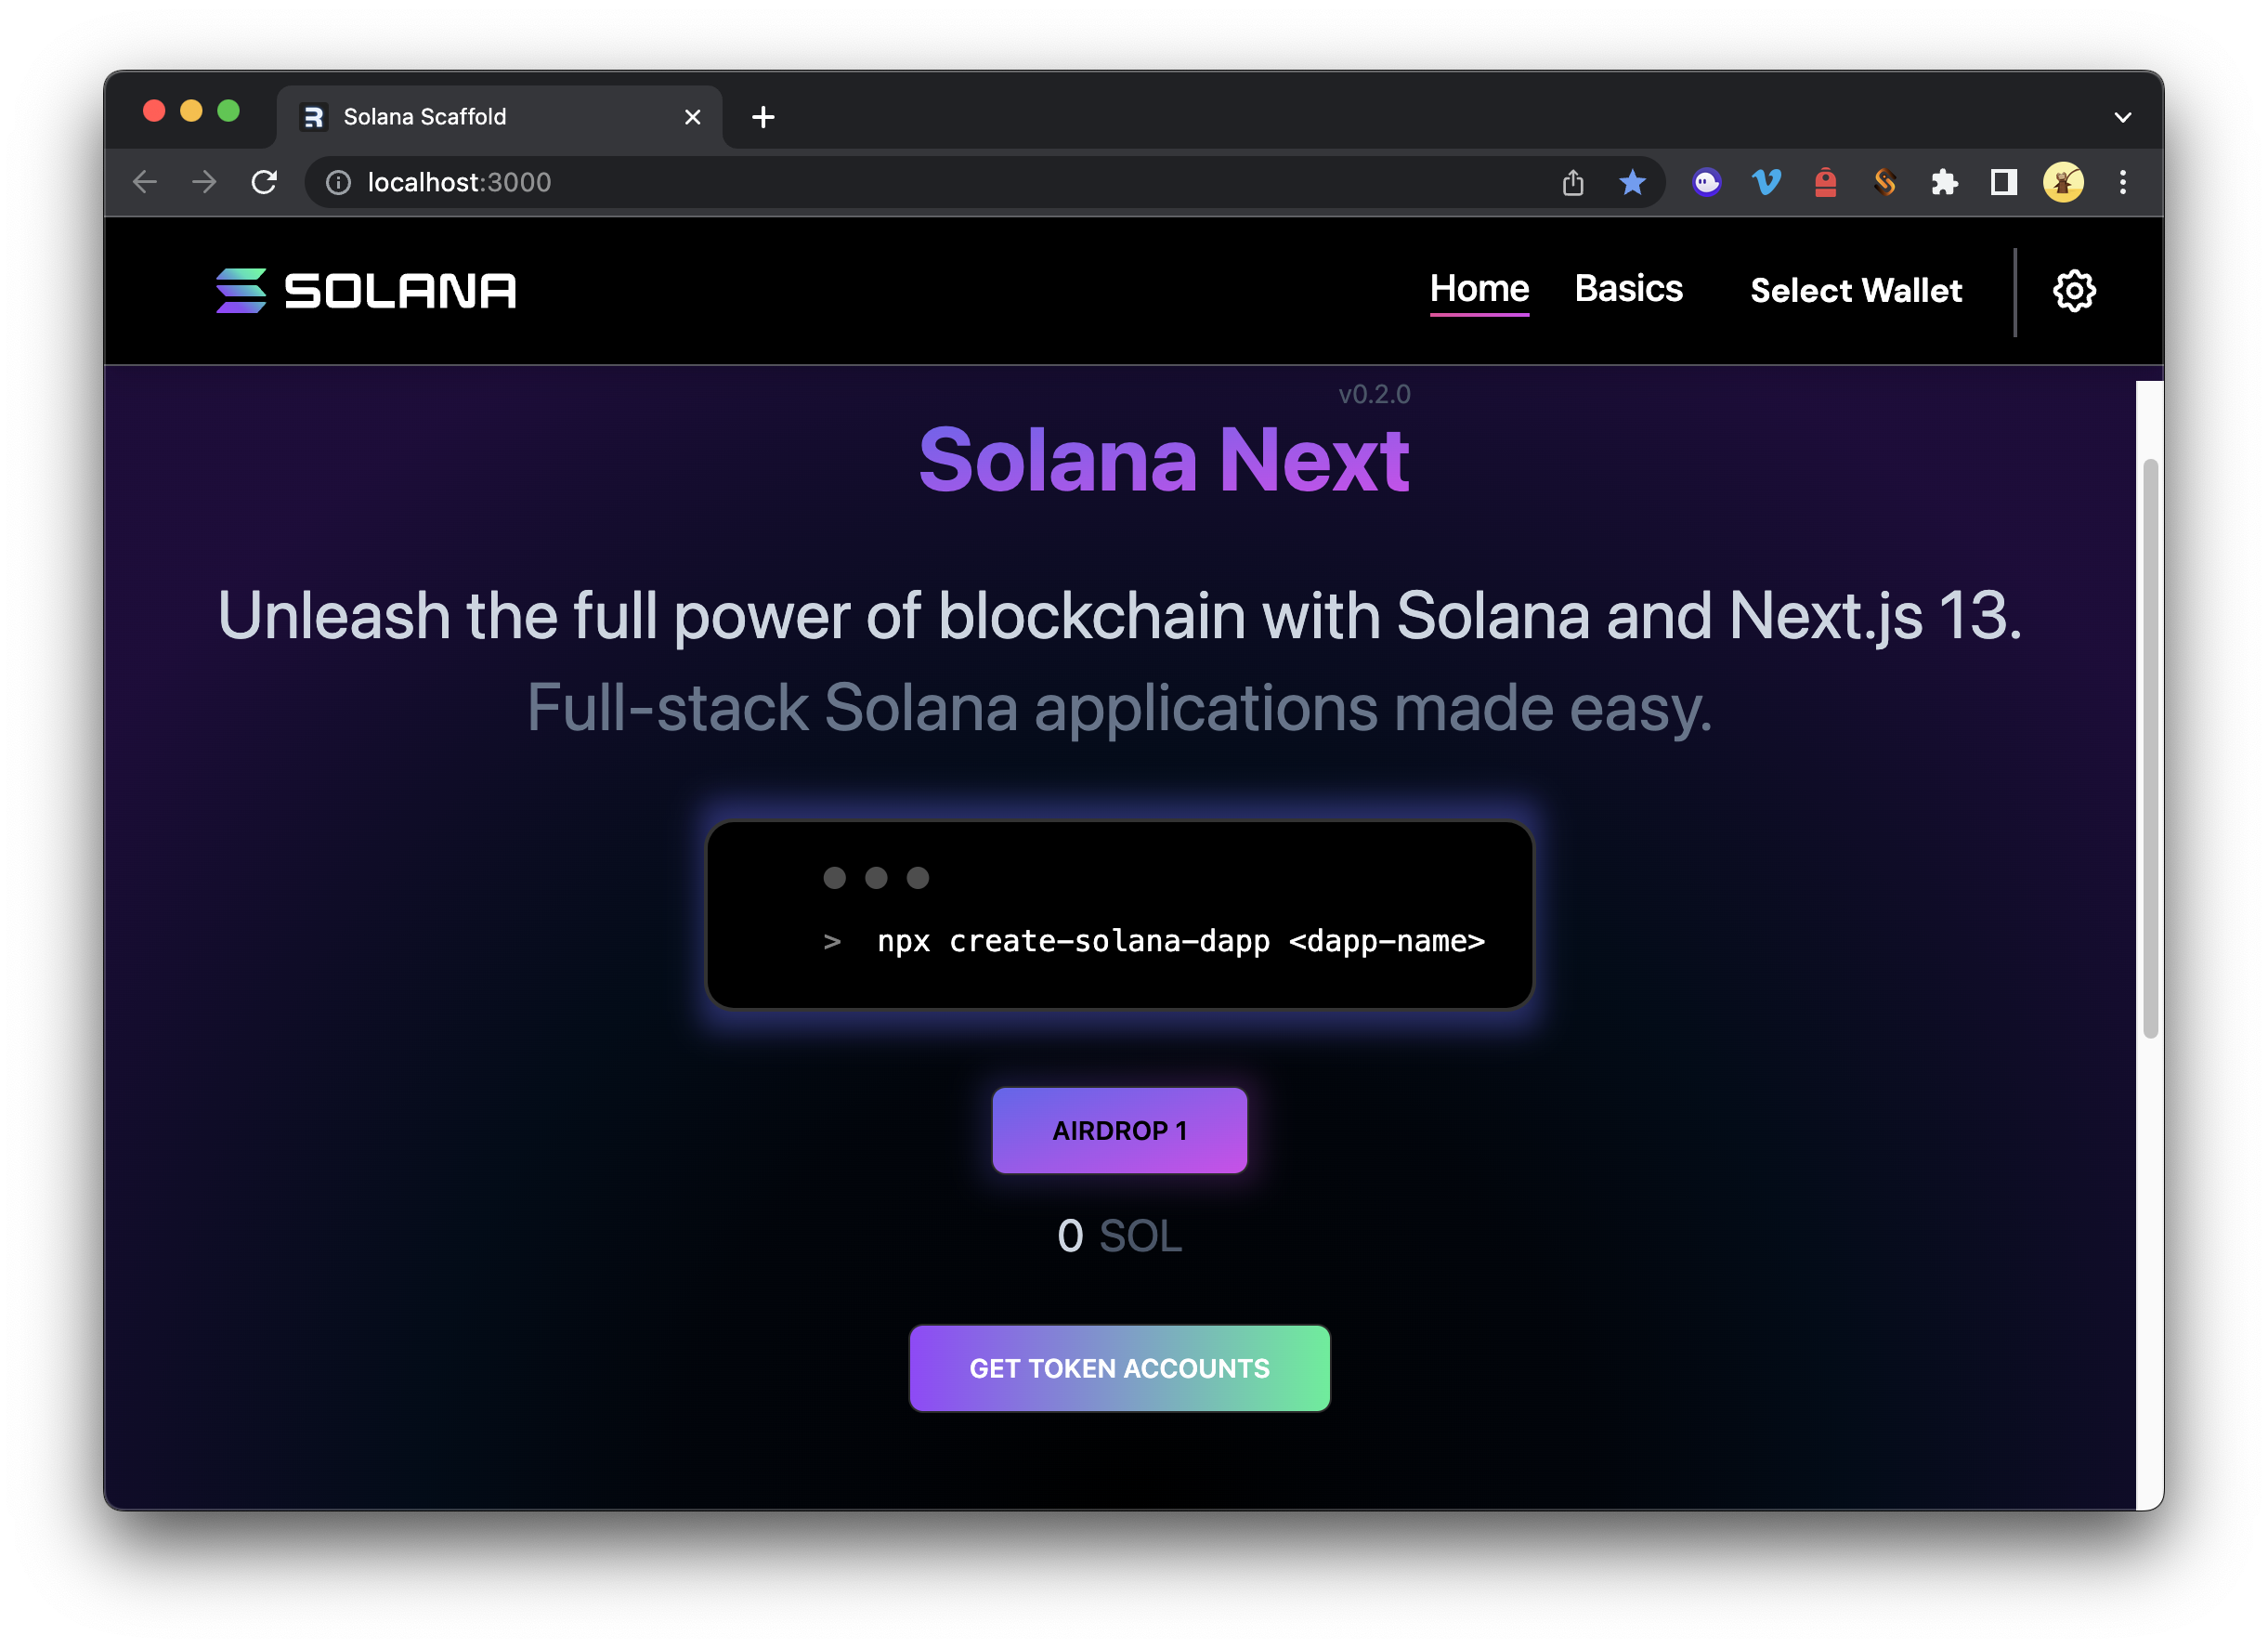
If you have followed all of the steps to this point, you should be able to go to http://localhost:3000/ and see your scaffold. Nice work! You should see something like this:
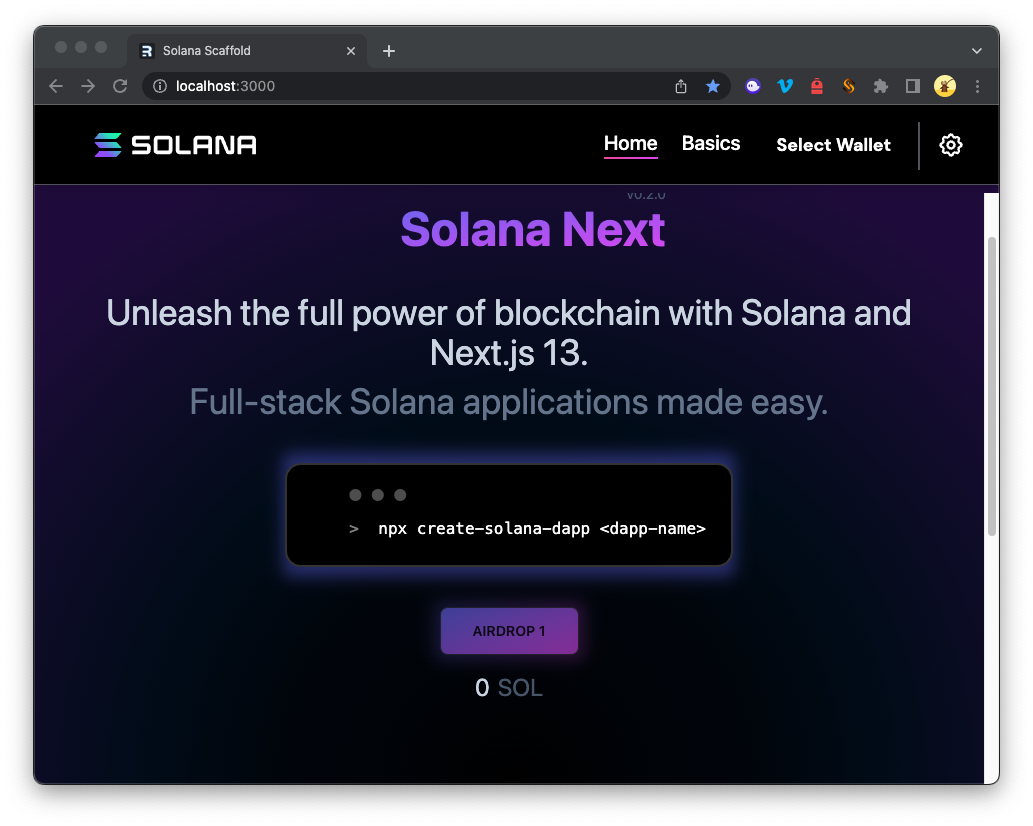
Feel free to click around and explore the scaffold. You can Connect a Wallet and request an airdrop (devnet & testnet), sign a message, or send SOL to a random wallet.
Orienting to Solana Wallet Adapter and Scaffold
Before making our component, let's look around our workspace to better understand how everything is working. Without going too deep into what is going on with the React here, let's cover a few essential pieces relevant to Solana dApps.
Wallet Connect Button
Check out /my-solana-dapp/src/components/AppBar.tsx. You should see that we import WalletMultiButton from solana/wallet-adapter-react-ui. This button, <WalletMultiButton className="btn btn-ghost mr-4" /> is how the user interacts with our wallet adapter. You'll also notice here the use of the setAutoConnect method set the user toggle. We won't change anything here, but if you want to set or disable autoConnect you could use this form.
Connection Context
Next check out /my-solana-dapp/src/contexts/ContextProvider.tsx. This file is where we updated our endpoint and network earlier and is the home of the Wallet Context Provider, where we can configure the Wallet Adapter.
- First, notice our wallets variable. You'll notice a list of common Solana wallets listed. Try commenting one or more out with // or removing the comments on new SlopeWalletAdapter() (in the imports, lines 4-11 AND in the declarations, lines 22-35). Refresh your site and connect your wallet. You should notice that the list of available wallets has changed. Effectively, the wallets variable gets passed into the Wallet Adapter through the Wallet Provider Component to set which wallets will be allowed on our dApp.
- autoconnect determines how the users' wallet interacts with the site on load. As we discussed earlier, our AppBar toggle allows the user to control this on the site UI.
- onError tells our program how to handle errors
- endpoint and network set how your app will connect with the Solana network
- The Scaffold has come configured for us, but if you are setting up your project without the Scaffold, you'll need to make sure this context surrounds your app. You can see where this is done in /my-solana-dapp/src/pages/_app.tsx:
<ContextProvider>is parent to our AppBar and ContentContainer.
Components
Before moving on, check out the Components folder, /my-solana-dapp/src/components. You'll see components associated with each of our app's pre-existing tools/buttons (e.g., Airdrop, Sign Message, Send Transaction). Feel free to explore a couple of these files to see how they work--we will be making our own in just a moment! If you're not familiar with React, that's fine. Just know that each of these files, or components, is basically a building block to our website. We drop those building blocks in the appropriate sites (for example, you can see the RequestAirdrop called in the Home View page: /my-solana-dapp/src/views/home/index.tsx).
Create a Custom Component for your dApp
Now that we have our dApp environment established and know how it works, let's add our component! For this exercise, we're going to use a script we developed in another tutorial to get all of the token accounts associated with an owner's wallet (accessible here).
Create a Reusable Component Template
Let's make a component template that we can use for this exercise and that you can also use to easily create new components in the future.
Create a new file in the components directory called template.tsx. In your terminal, stop the server with a CTRL+C and enter the following command:
echo > ./src/components/template.tsx
Open template.tsx and paste this code, then save.
import { useConnection, useWallet } from '@solana/wallet-adapter-react';
import { FC, useState } from 'react';
import { notify } from "../utils/notifications";
//Add import dependencies here

export const Template: FC = () => {
    const { connection } = useConnection();
    const { publicKey } = useWallet();

    //State Variables here

    //dApp Scripts here

    return(<div>

    {/* Render Results Here */}

    </div>)
}
Set Up Your Component
This creates a shell for a React component that we can use to add our own functionality! Copy the template and save as a new file called GetTokens.tsx.
cp ./src/components/template.tsx ./src/components/GetTokens.tsx
In GetTokens.tsx, rename the component by changing export const Template to:
export const GetTokens
For our tool that looks at a wallet's token accounts, we'll need to add a couple of additional dependencies to help us interact with the SPL Token Library. Add these under Add import dependencies here:
import { GetProgramAccountsFilter } from '@solana/web3.js';
import { TOKEN_PROGRAM_ID } from "@solana/spl-token";
Let's set up a new state variable, tokenTable using setState (if you're not familiar with React, that's fine--this is some of the magic that will help our results render to the page after we've found what we're looking for). Add the following code just after the State Variables here comment in the template:
const [tokenTable, setTokenTable] = useState(null);
Create Your Query
We’ve adapted code from another Quicknode guide on how to get all token accounts held by a Solana wallet, making a few tweaks to make it React-friendly. Specifically instead of using console.log to display our results, we want to write the results to a table (as a JSX Element) that can be rendered on our website.
Go ahead and add this code underneath your state variable //dApp Scripts Here and before return():
    async function getTokenAccounts(wallet: string) {
        const filters:GetProgramAccountsFilter[] = [
            {
              dataSize: 165, // number of bytes
            },
            {
              memcmp: {
                offset: 32, // number of bytes
                bytes: wallet, // base58 encoded string
              },
            }];
        const accounts = await connection.getParsedProgramAccounts(
            TOKEN_PROGRAM_ID, // new PublicKey("TokenkegQfeZyiNwAJbNbGKPFXCWuBvf9Ss623VQ5DA")
            {
              filters: filters,
            }
          );
        console.log(`Found ${accounts.length} token account(s) for wallet ${wallet}: `);
        if(accounts.length === 0) {
            return(<div>No Token Accounts Found</div>)
        }
        else{
            const rows = accounts.map((account,i)=>{
                //Parse the account data
                const parsedAccountInfo:any = account.account.data;
                const mintAddress:string = parsedAccountInfo["parsed"]["info"]["mint"];
                const tokenBalance: number = parsedAccountInfo["parsed"]["info"]["tokenAmount"]["uiAmount"];
                return (
                <tr key={i+1}>
                    <td key={'index'}>{i+1}</td>
                    <td key={'mint address'}>{mintAddress}</td>
                    <td key={'balance'}>{tokenBalance}</td>
                </tr>)
            })
            const header = (<tr>
                <th>Token No.</th>
                <th>Mint Address</th>
                <th>Qty</th>
            </tr>)
            setTokenTable(<table>{header}{rows}</table>)
        }
    }
You'll see that our .map method returns a <tr> row for every account found. When invoked, the getTokenAccounts method should fetch all token accounts from the chain, create a table element with the results, and use react to add the table element to our state. We've also added some logic to let the user know if there were no SPL token accounts found.
Create a Click Handler
In order to invoke getTokenAccounts, create a function called onClick that we can hook to a button on our page. The button will:
- Check if a wallet is connected. We can do this by checking if publicKey is found from our useWallet() method from the Wallet Adapter.
- Try to getTokenAccounts for the connected wallet (note that we need to convert our public key to a string to use it in our filter parameters, using .toString()).
- Handle errors.
    const onClick = async () => {
        if (!publicKey) {
            console.log('error', 'Wallet not connected!');
            notify({ type: 'error', message: 'error', description: 'Wallet not connected!' });
            return;
        }
        try {
            await getTokenAccounts(publicKey.toString());

        } catch (error: any) {
            notify({ type: 'error', message: `Couldn't Find Token Accounts!`, description: error?.message });
            console.log('error', `Error finding Token Accounts! ${error?.message}`);
        }
    };
Create a Button
Inside of your component's return(), you'll see a <div>. Create a button inside of it that calls our onClick function. We're using the same CSS as used elsewhere in the template. Feel free to customize!
        <div className="text-center">
        <button
                className="px-8 m-2 btn animate-pulse bg-gradient-to-r from-[#9945FF] to-[#14F195] hover:from-pink-500 hover:to-yellow-500"
                onClick={onClick}
            >
                <span>Get Token Accounts</span>
        </button>
        </div>
Render Results
Now display your results by calling the tokenTable state variable that we set with getTokenAccounts. Inside your div and after the Render Results Here comment, add:
<div>{tokenTable}</div>
Because we don't define a variable until after our token query, this will just be blank until the program has found anything.
Here's what our Component looks like now that we're done:
import { useConnection, useWallet } from '@solana/wallet-adapter-react';
import { FC, useState } from 'react';
import { notify } from "../utils/notifications";
//Add import dependencies here
import { GetProgramAccountsFilter } from '@solana/web3.js';
import { TOKEN_PROGRAM_ID } from "@solana/spl-token";

export const GetTokens: FC = () => {
    const { connection } = useConnection();
    const { publicKey } = useWallet();

    //State Variables here
    const [tokenTable, setTokenTable] = useState(null);

    //dApp Scripts here
    async function getTokenAccounts(wallet: string) {
        const filters:GetProgramAccountsFilter[] = [
            {
              dataSize: 165, // number of bytes
            },
            {
              memcmp: {
                offset: 32, // number of bytes
                bytes: wallet, // base58 encoded string
              },
            }];
        const accounts = await connection.getParsedProgramAccounts(
            TOKEN_PROGRAM_ID, // new PublicKey("TokenkegQfeZyiNwAJbNbGKPFXCWuBvf9Ss623VQ5DA")
            {
              filters: filters,
            }
          );
        console.log(`Found ${accounts.length} token account(s) for wallet ${wallet}: `);
        if(accounts.length === 0) {
            return(<div>No Token Accounts Found</div>)
        }
        else{
            const rows = accounts.map((account,i)=>{
                //Parse the account data
                const parsedAccountInfo:any = account.account.data;
                const mintAddress:string = parsedAccountInfo["parsed"]["info"]["mint"];
                const tokenBalance: number = parsedAccountInfo["parsed"]["info"]["tokenAmount"]["uiAmount"];
                return (
                <tr key={i+1}>
                    <td key={'index'}>{i+1}</td>
                    <td key={'mint address'}>{mintAddress}</td>
                    <td key={'balance'}>{tokenBalance}</td>
                </tr>)
            })
            const header = (<tr>
                <th>Token No.</th>
                <th>Mint Address</th>
                <th>Qty</th>
            </tr>)
            setTokenTable(<table>{header}{rows}</table>)
        }

    }

    const onClick = async () => {
        if (!publicKey) {
            console.log('error', 'Wallet not connected!');
            notify({ type: 'error', message: 'error', description: 'Wallet not connected!' });
            return;
        }
        try {
            await getTokenAccounts(publicKey.toString());

        } catch (error: any) {
            notify({ type: 'error', message: `Couldn't Find Token Accounts!`, description: error?.message });
            console.log('error', `Error finding Token Accounts! ${error?.message}`);
        }
    };

    return(<div>
        <div className="text-center">
        <button
                className="px-8 m-2 btn animate-pulse bg-gradient-to-r from-[#9945FF] to-[#14F195] hover:from-pink-500 hover:to-yellow-500"
                onClick={onClick}
            >
                <span>Get Token Accounts</span>
        </button>
        </div>
    {/* Render Results Here */}
        <div>{tokenTable}</div>
    </div>)
}
Great job! You've not built your first dApp component using the Solana Scaffold. Time to add it to the site.
Deploy Your Component
Now let's add our component to our homepage. Open up the home view, /my-solana-dapp/src/views/home/index.tsx. Since we created a new component, we must import it before using it. Add this import to line 14:
import { GetTokens } from 'components/GetTokens';
Let's add our component below the existing airdrop button and wallet ballance display:
        <div>
          <RequestAirdrop />
          {/* ... */}
        </div>
        {/* ADD THIS 👇 */}
        <div>
          <GetTokens/>
        </div>
I don't know about you, but I'm ready to see this thing in action. Let's run it!
npm run dev
# or
yarn dev
There's our beautiful button!
If you get trigger happy like me, you will probably get an error message because you have not connected a wallet yet (remember when we set that error?):
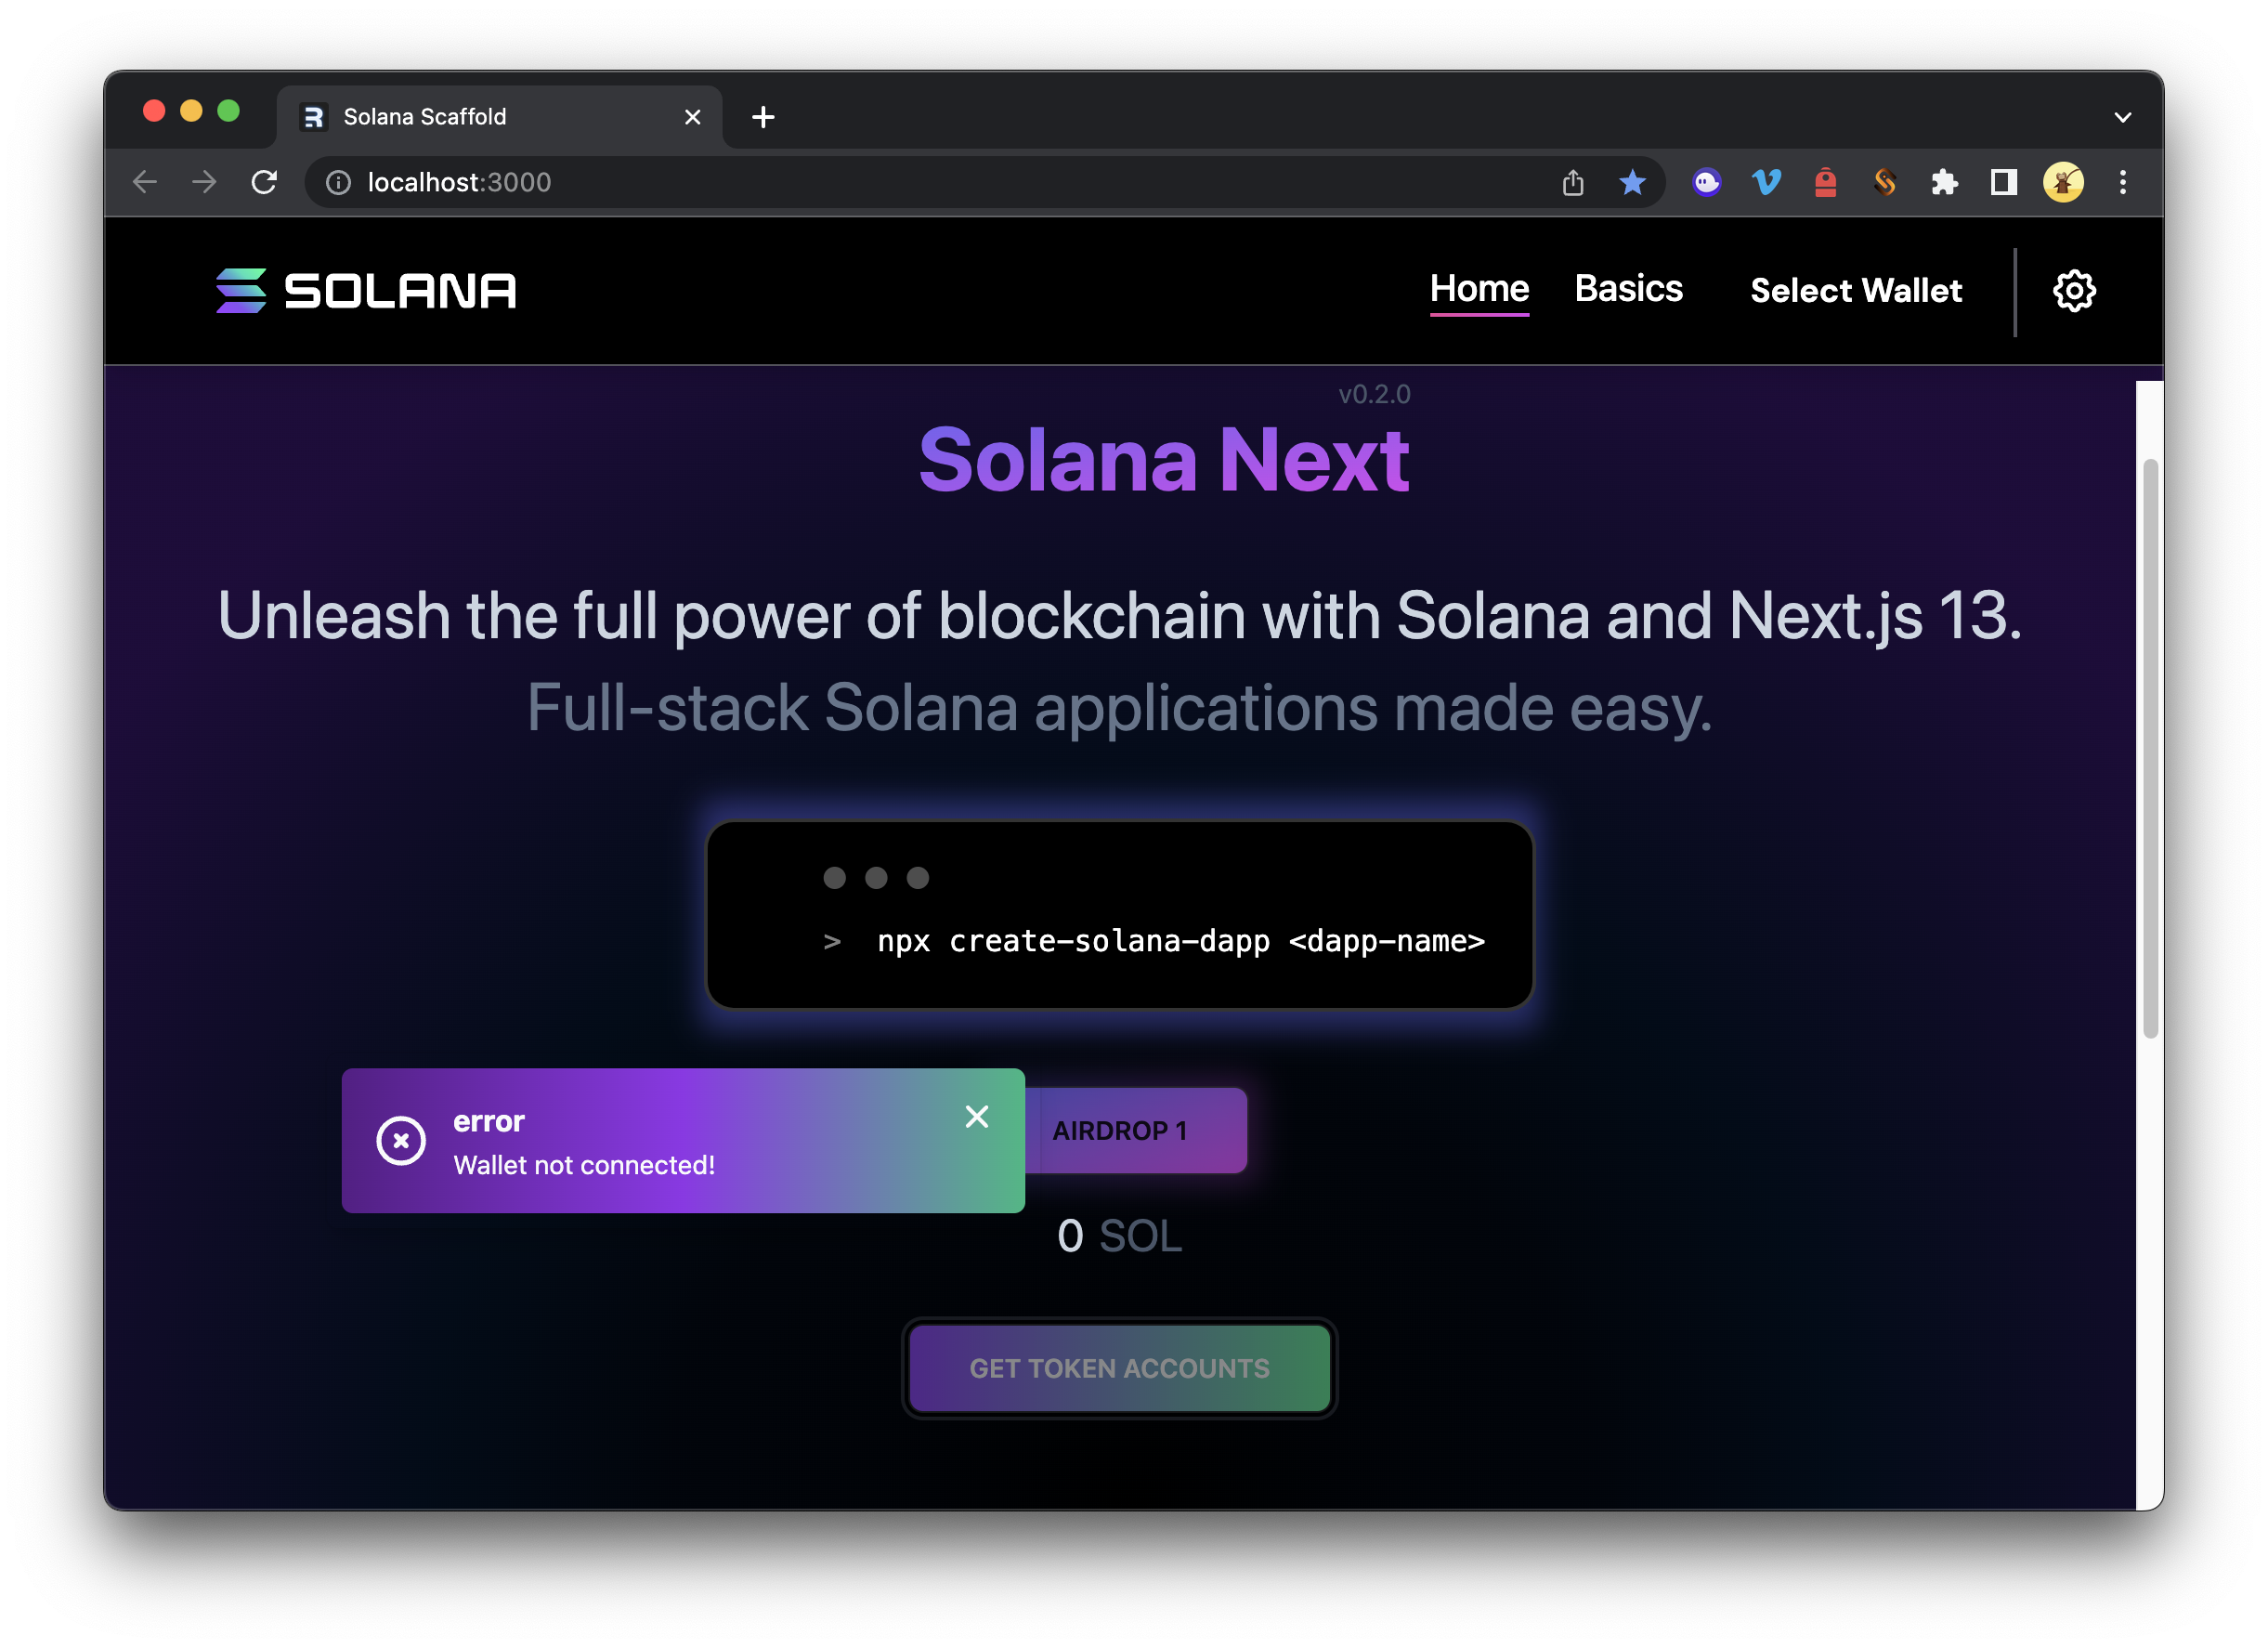
Connect your wallet by clicking Select Wallet in the top right corner. Select your preferred wallet. You should see your Solana balance once your wallet is connected.
Alright, NOW you can click "Get Token Accounts"... BOOM! Do you see something like this?
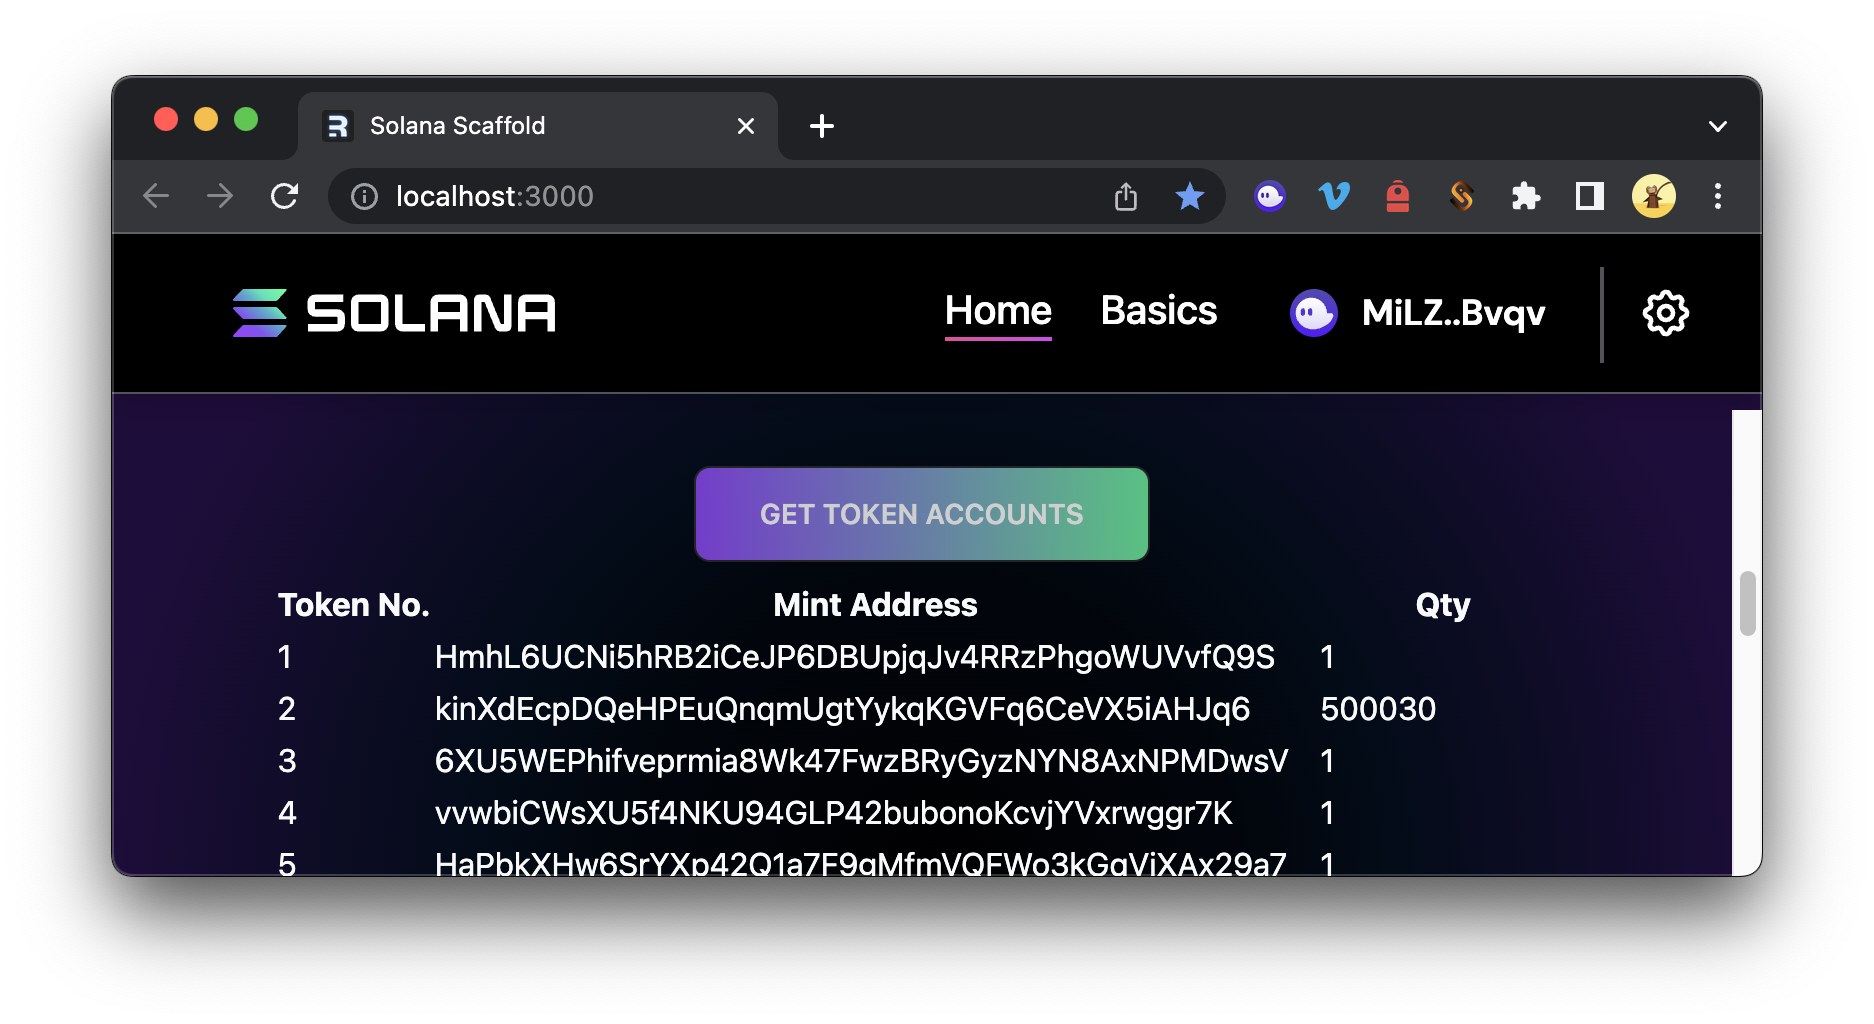
If you don't have any tokens in your wallet yet, you can check out our guide on minting NFTs with Candy Machine to get going.
Having fun? Feel free to continue building on this and even throw in some custom CSS to make that table look however you'd like!
Wrap Up
Congrats! You made it! And we have covered a lot. After completing this exercise, you can now build your own dApps with the Solana dApp Scaffold and Wallet Adapter. This is an excellent foundation for jumping into all sorts of things, so we will be building more components from this foundation in the future!
Find this useful? Check out some of our other Solana tutorials here. Subscribe to our newsletter for more articles and guides on Solana. Feel free to reach out to us via Twitter if you have any feedback. You can always chat with us on our Discord community server, featuring some of the coolest developers you'll ever meet 😎
We ❤️ Feedback!
Wanna share your thoughts on this guide? We'd love to hear it!