8 min read
Metaplex Core Candy Machine has replaced the original Candy Machine as the recommended way to launch NFT collections on Solana. See How to Launch an NFT Collection with Metaplex Core Candy Machine instead. This guide is for historic educational purposes only.
Introduction
Hello readers, in this guide we are going to walk through how to set up an NFT mint on Solana using Candy Machine v2. Candy Machine v2 has some similarities to v1 but quite a lot of differences. The main catalyst that drove v2 was to curb the botting that the NFT community was falling victim to. It was very easy for bots to scoop up all of the NFTs of cheaper projects which led to a less-than-ideal experience for many newcomers to the space.
We will refer to Candy Machine v2 as CMv2 throughout this guide. CMv2 includes a couple of exciting changes:
- Unpredictable mint index — With CMv1 the mint happened in a predetermined order, which opened up opportunities to game the system for the specific NFT you wanted.
- Whitelist — You can now set up white listing with this new version. You can distribute any SPL Token to act as a white list. Knobs to play around with include: early minting, closed minting, or discounted minting for users that have the designated token.
- Captcha Integration — This option prevents bots from interfering with your mint.
- Hidden drops — You can now have all mints sharing a single hash, which means you can then populate all of the NFT's metadata after the drop sells out.
Prerequisites:
To go through the steps in this guide, ensure you have the latest versions of the following technologies and tools set up:
- NodeJS
- TS-Node
- Yarn
- Solana CLI
- A Text Editor
- Phantom Wallet set up
- GitHub CLI
Configuring CMv2
Now, let us begin the configuration. We will need to clone the Metaplex repo, and install all of the dependencies.
NOTE: All commands shown are run on a unix machine.
Let us begin by opening a Terminal window and navigating to the folder in which you’d like to set up your project. Next, create a new directory, solana-nft-project, and cd into it with the following commands:
mkdir solana-nft-project
cd solana-nft-project
Now we are ready to clone the Metaplex repo with the following command:
git clone https://github.com/metaplex-foundation/deprecated-clis
Then to install the dependencies, run this command from the solana-nft-project directory:
yarn install --cwd deprecated-clis
This should have installed everything properly. To test that, we can check the version of Metaplex by running:
ts-node deprecated-clis/src/candy-machine-v2-cli.ts --version
Your output should be:
0.0.2
Setting Up a New Wallet
Now, are ready to start setting up the Solana CLI for devnet testing. We first need to create a new wallet for specifically devnet testing with the following command:
solana-keygen new --outfile ./.config/solana/devnet-wallet.json
We can skip the password (by hitting Enter) as we will only use this wallet on devnet, so the funds are not important. We can confirm that the wallet we just generated is the wallet that the Solana CLI will use by running:
solana config set --keypair ./.config/solana/devnet-wallet.json
Before proceeding, we will need to make sure our Solana CLI is connected to a node. We will do this with Quicknode.
Setting Up a Solana Node with Quicknode
To sign up with a free Quicknode account, navigate to Quicknode.com/signup. We will want to launch our node under the Solana Devnet for this tutorial.
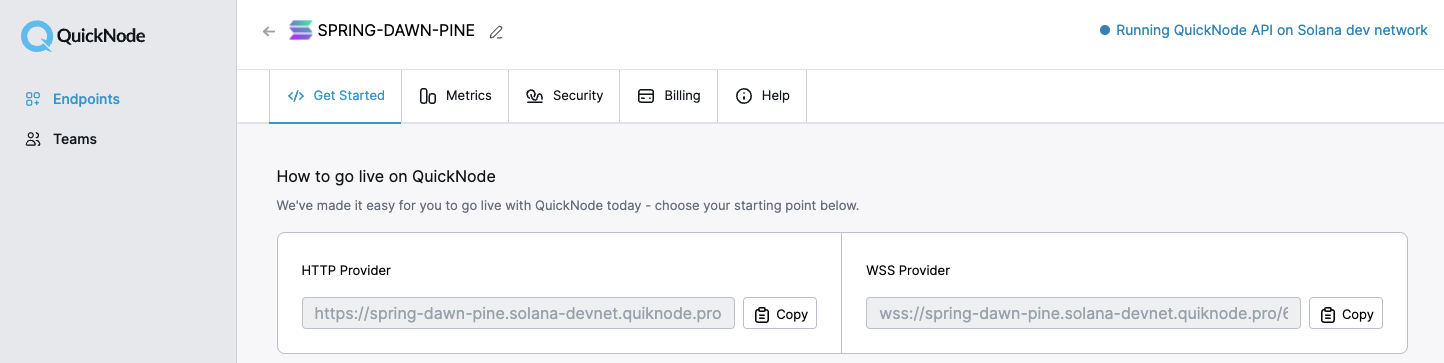
With your endpoint on the Solana Devnet setup, you can now run this command, substituting YOUR_QUICKNODE_URL with the HTTP URL you have copied:
solana config set --url YOUR_QUICKNODE_URL
Now to fund your wallet you can run the command:
solana airdrop 1
If the command is successful you should be able to run solana balance in your terminal and see the 1 SOL is there.
Configuring Candy Machine V2
With our Solana CLI configured, we now need to create the config for our CMv2. One of the changes moving from v1 to v2 is how we configure the candy machine. It reads a JSON file that you can tweak to your liking. There is a full list of all of the options on the Metaplex docs you can find here.
We will be using their recommended minimal setup configuration. To follow along, make sure you are in the solana-nft-project directory and create a config.json file and place it at ./dev/ with the following command:
mkdir dev
touch ./dev/config.json
Next, open up that file with your text editor of choice and paste the following:
{
    "price": 1.0,
    "number": 10,
    "gatekeeper": null,
    "solTreasuryAccount": "<YOUR WALLET ADDRESS>",
    "splTokenAccount": null,
    "splToken": null,
    "goLiveDate": "25 Dec 2021 00:00:00 GMT",
    "endSettings": null,
    "whitelistMintSettings": null,
    "hiddenSettings": null,
    "storage": "arweave-sol",
    "ipfsInfuraProjectId": null,
    "ipfsInfuraSecret": null,
    "awsS3Bucket": null,
    "noRetainAuthority": false,
    "noMutable": false
}
Replace <YOUR WALLET ADDRESS> with the address of the keypair you previously set up.
NOTE: you can run solana address in your terminal to obtain your address.
With all of that done, you should be ready to get going with your mint! But what is an NFT project without some .jpegs? We can get that ready next.
Preparing the Assets
If you have used CMv1 or Metaplex before, this process will be familiar. We need to create a 1-to-1 mapping of the .PNG and .JSON files. The files should be named by number, so 0.png maps to 0.json. The numbers should start at 0 and increase sequentially, never skipping a number.
Metaplex has a sample set of assets that we can download and work with to be consistent. You can edit the json to include whichever values you would like, as long as it is compliant with the URI json schema.
NOTE: CM2 uses an older standard that requires creator shares in each .json file.
Download the sample set and store it somewhere that can be easily referenced from the command line. We will be putting ours at ./dev. This will allow us to reference all the png and json files by using the path ./dev/assets.
The last thing we need to do is update the address value in the json files. This field establishes where royalties are distributed. By default, the address used in the json files is "6j4nNrozTJkk1zatiXHezSLZArnRUq3WkGKHACThXGpZ". We will update all of these to use the address that we’ve set up in the Solana CLI earlier.
To do so, run the following bash script in your terminal:
for json_file in ./dev/assets/*.json;
do
  address=YOUR_SOLANA_ADDRESS
  sed -i '' "s/6j4nNrozTJkk1zatiXHezSLZArnRUq3WkGKHACThXGpZ/$address/g" $json_file
done
This code will loop through all of the files in our assets directory that end in .json. Then, it will store your Solana address in a variable with address=YOUR_SOLANA_ADDRESS. Finally, it uses the sed command line tool to do a “find and replace” action. It searches through each file and replaces the "6j4nNrozTJkk1zatiXHezSLZArnRUq3WkGKHACThXGpZ" with the address that we got from the CLI.
NOTE: The empty pair of quotes at the beginning are necessary if you're on a Mac device. If you are running a linux machine you may omit the initial empty quotes in the sed command.
Creating Your Candy Machine
With all of our assets loaded and programs configured, we can now create a Candy Machine and upload it to the Solana Devnet.
To do so, we will run the following command:
ts-node deprecated-clis/src/candy-machine-v2-cli.ts upload \
   -e devnet \
   -k ./.config/solana/devnet-wallet.json \
   -cp ./dev/config.json \
   -c example \
   --rpc-url <YOUR_QUICKNODE_URL> \
   ./dev/assets
NOTE: You might see a signatureUnsubscribe error: Invalid subscription id error. This will not impact your upload, and you should not stop the process upon seeing these errors. If for some reason your upload stops before it has finished, you can run this command repeatedly until your upload is successful.
Save the CMv2's public key from that output. If you forget this step, you can always find it wherever you ran the command from, at /.cache/devnet-example.json.
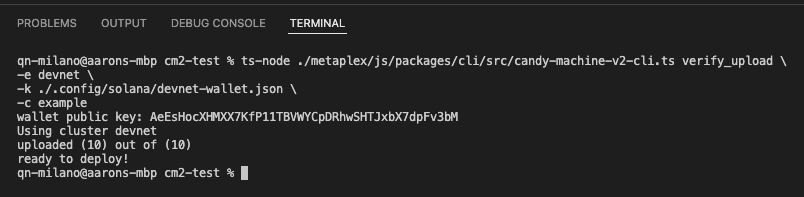
After running that command, you should see the processing of assets. After it has completed, we need to verify that everything uploaded successfully. We can use the verify_upload command to do so:
ts-node deprecated-clis/src/candy-machine-v2-cli.ts verify_upload \
-e devnet \
-k ./.config/solana/devnet-wallet.json \
-c example
Your output should look similar to the picture below, but with your specific address instead of ours:
Once that runs successfully, we can move on to spinning up the front-end so we can deploy our page to the internet and give others the ability mint our NFT.
Setting Up the Website
For the easiest possible set up, we will be using the front end that Metaplex provides us. You will go to where you cloned your Metaplex repository, in our case, it is ./metaplex/js/packages/candy-machine-ui. Open this folder in your code editor of choice.
Rename the file .env.example to .env. After changing the file name, you can change the values in there to the following:
REACT_APP_CANDY_MACHINE_ID=<YOUR_CANDY_MACHINE_PUBKEY>
REACT_APP_SOLANA_NETWORK=devnet
REACT_APP_SOLANA_RPC_HOST=<YOUR_QUICKNODE_DEVNET_ENDPOINT>
With all of that information plugged in, you can now save the file. From that candy-machine-ui folder, run the command:
yarn install
yarn start
This will open up a browser at localhost:3000, where you can connect your wallet and have the ability to mint an NFT. Confirm that your Phantom Wallet is set to devnet and not mainnet before proceeding.
You can use https://solfaucet.com/ to airdrop SOL into the wallet. Make sure to use your Phantom wallet’s address in the field for the “Solana Account Address”.
If done successfully, you should see a website like this:
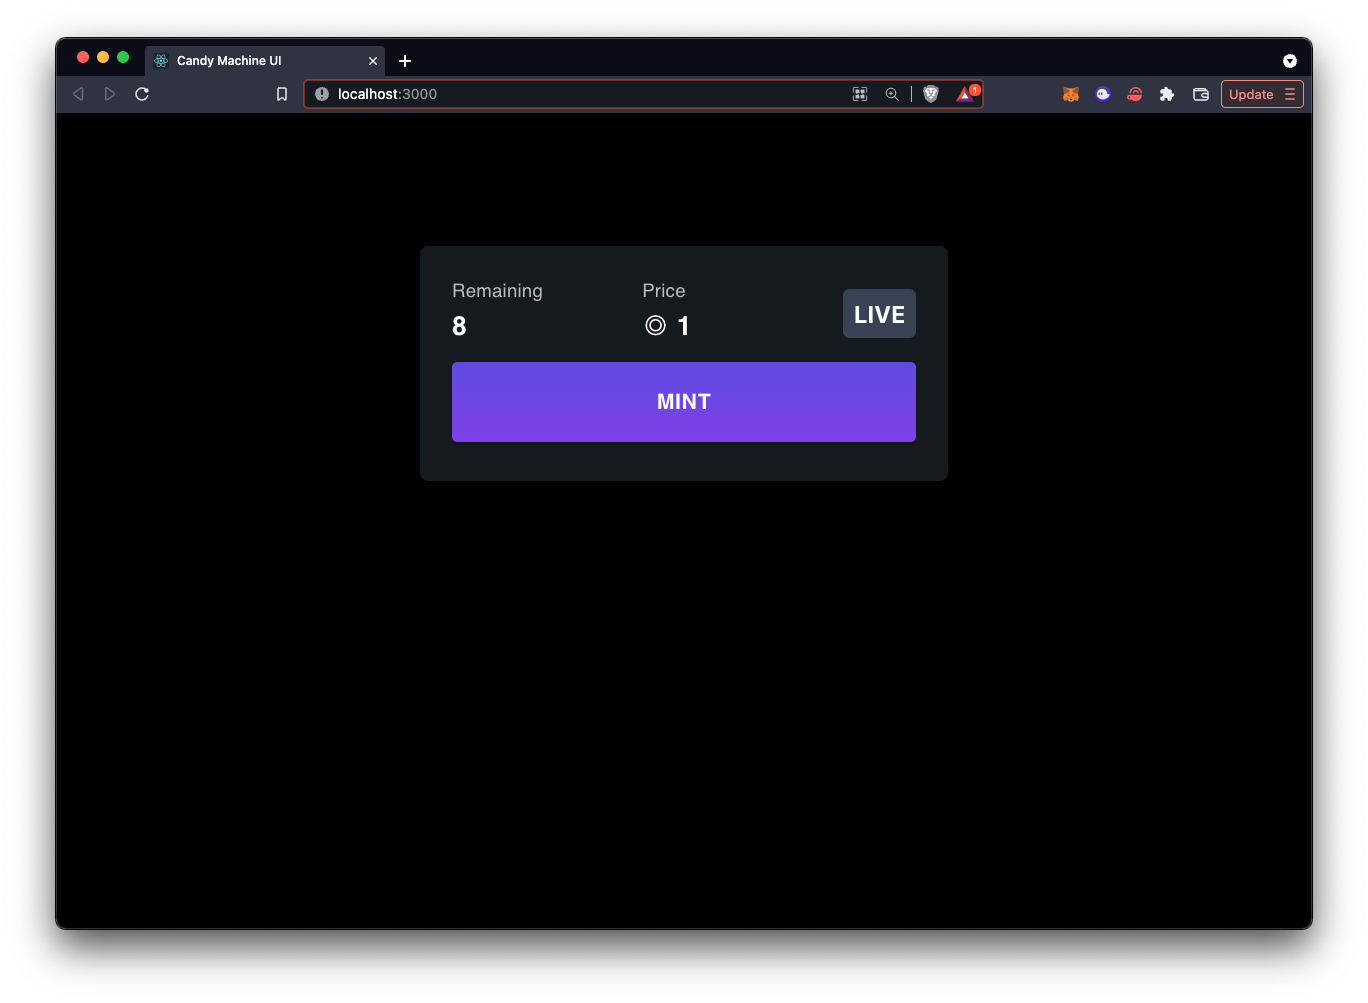
If you see an error that says “Mint Failed”, you might not have enough funds. Try again once you’ve added funds. From the screenshot above, you can see that we’ve already minted 2 out of the original 10. You can view the NFT in your wallet after purchasing. Phantom may take a moment before rendering the NFT in your wallet. Ours looks like this:
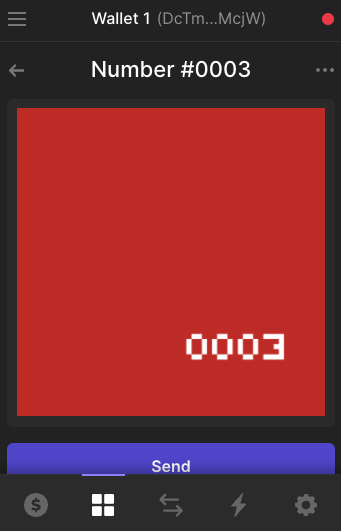
Sample NFT Minted using Candy Machine v2
Conclusion
Congratulations on successfully generating and minting your own CMv2 NFT project! We’ve covered what Candy Machine is and how it’s configured, and deployed our very own NFT project.
Subscribe to our newsletter for more articles and guides. If you have any feedback, feel free to reach out to us via Twitter. You can always chat with us on our Discord community server, featuring some of the coolest developers you’ll ever meet :)