8 min read
Overview
With a growing number of NFT standards on Solana, including the recent launch of compressed NFTs, it can be difficult to keep track of all the different ways to fetch NFT data. "The Metaplex Digital Asset Standard (DAS) API represents a unified interface for interacting with digital assets on Solana, supporting both standard (Token Metadata) and compressed (Bubblegum) assets. The API defines a set of methods that make asset data accessible. In the majority of cases, the data is indexed using Metaplex Digital Asset RPC infrastructure." Source: https://github.com/metaplex-foundation/digital-asset-standard-api
This guide will teach you how to use the DAS Quicknode Marketplace Add-on to fetch NFT data from the Solana blockchain.
What You Will Do
Write a few scripts to fetch NFT data from the Solana blockchain using the DAS API.
What You Will Need
- Experience with Solana NFTs (Guide: Solana NFT Metadata Deep Dive)
- Nodejs (version 16.15 or higher) installed
- Typescript experience and ts-node installed
- Quicknode Endpoint with DAS Add-on Installed:
Get DAS Add-on
If you do not already have one, you will need a Quicknode account with a Solana endpoint. You can sign up for an account here.

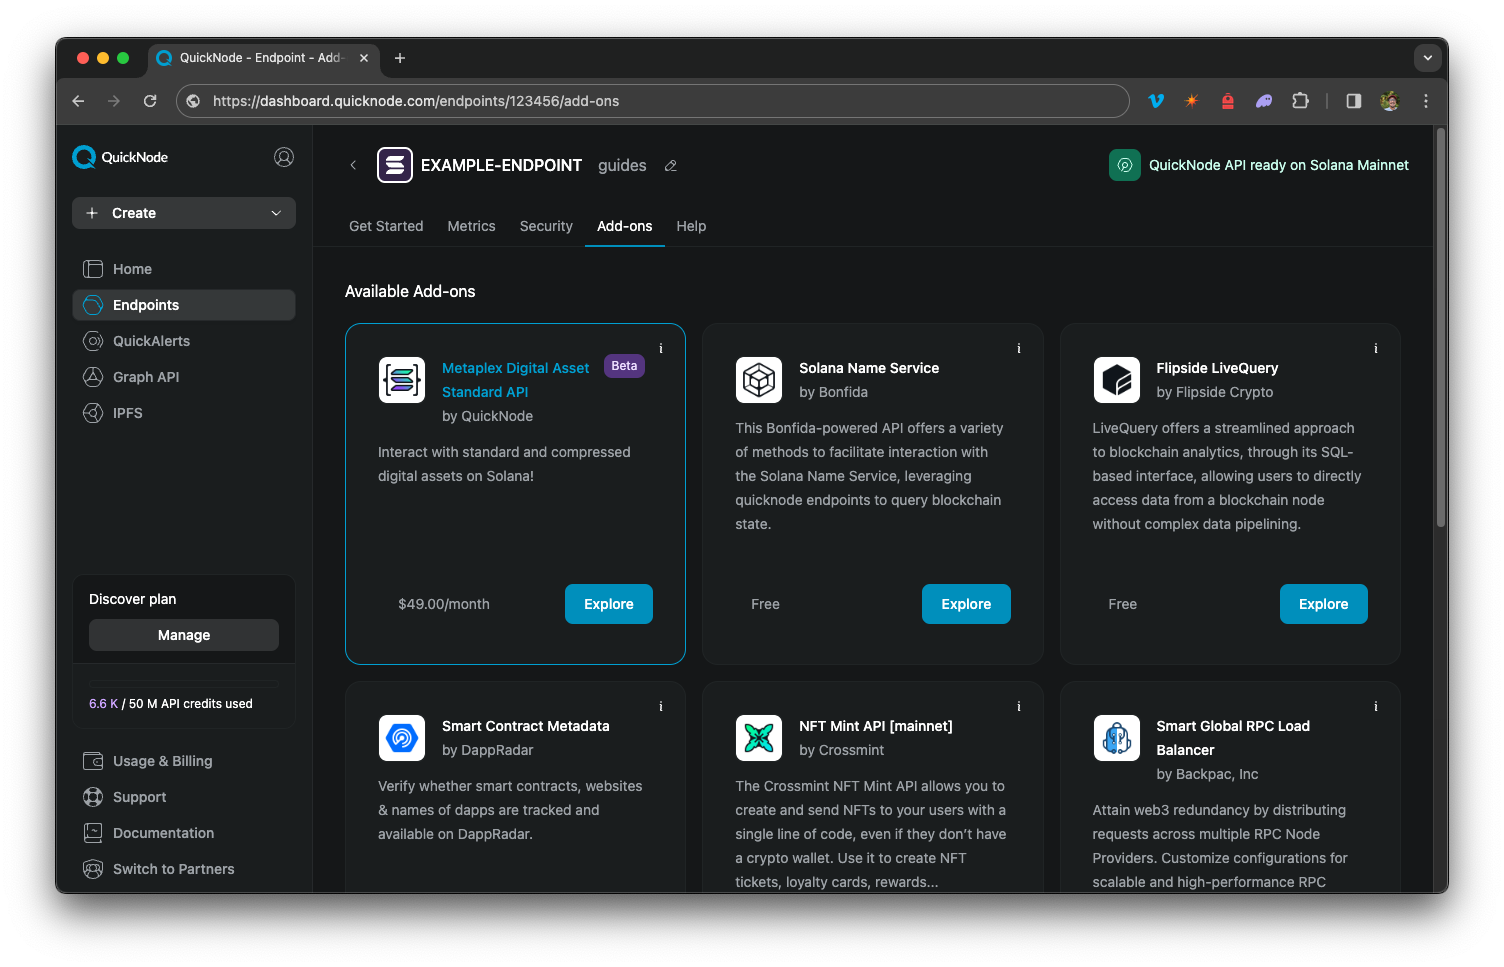
To use the DAS API, you'll need to use a Solana endpoint with the DAS Add-on installed. You can install the DAS Add-on to your endpoint on your endpoint page (https://dashboard.quicknode.com/endpoints/YOUR_ENDPOINT_ID/add-ons).

Make sure to add the Digital Asset Standard Add-on to your endpoint before proceeding.
Dependencies Used in this Guide
| Dependency | Version |
|---|---|
| @metaplex-foundation/digital-asset-standard-api | ^1.0.0 |
| @metaplex-foundation/umi | ^0.8.10 |
| @metaplex-foundation/umi-bundle-defaults | ^0.8.10 |
| @solana/web3.js | ^1.X |
Let's get started!
Create a New Project
mkdir das-demo && cd das-demo && echo > app.ts
Install Solana Web3 dependencies:
yarn init -y
yarn add @metaplex-foundation/umi @metaplex-foundation/umi-bundle-defaults @metaplex-foundation/digital-asset-standard-api @solana/web3.js@1
or
npm init -y
npm install --save @metaplex-foundation/umi @metaplex-foundation/umi-bundle-defaults @metaplex-foundation/digital-asset-standard-api @solana/web3.js@1
Import Dependencies
Open app.ts in a code editor of choice, and on line 1, import the following:
import { PublicKey, Umi, publicKey } from '@metaplex-foundation/umi';
import { createUmi } from '@metaplex-foundation/umi-bundle-defaults';
import { dasApi } from '@metaplex-foundation/digital-asset-standard-api';
These imports will allow us to create an instance of Umi (Metaplex's JS Framework) and use the DAS API to fetch NFT data.
Create an Umi Instance
To query the DAS API using the JS Framework, we must create an instance of Umi with our endpoint. Umi is a JS framework that makes interacting with the Solana blockchain easy. It provides a set of tools to help you build on Solana. On line 5, define your endpoint and establish an instance of Umi:
const ENDPOINT = 'https://example.solana-mainnet.quiknode.pro/123456/'; // <--- replace with your endpoint
const UMI = createUmi(ENDPOINT).use(dasApi());
const COMPRESSED_NFT = publicKey('52sbcUW4mXp8k8rruxgKMD6Kn6FbZoKeemLsyz7xyteW'); // <--- replace with any compressed NFT
const CREATOR = publicKey('7zL7HVn85F5yFT6XM3BsJcQF7PBcNE7R2BT5GyfunpKe'); // <--- replace with any creator
const OWNER = publicKey('E645TckHQnDcavVv92Etc6xSWQaq8zzPtPRGBheviRAk'); // <--- replace with any owner
const COLLECTION = publicKey('J2ZfLdQsaZ3GCmbucJef3cPnPwGcgjDW1SSYtMdq3L9p') // <--- replace with any collection
Our Umi instance will be used to query the DAS API using the dasApi() plug-in.
We have also defined a few public keys that we can use to query for testing:
- a compressed NFT ID
- a creator's public key
- an NFT owner's public key
- a collection's public key
Feel free to replace these with your own public keys. Let's build some queries.
Fetch an Asset
The DAS API includes a DasApiAsset interface, which defines the following properties:
- Type of Asset
- Asset Id
- Metadata
- Authorities
- Compression Details
- Grouping Details
- Royalties
- Creators
- Ownership
- Mutability
- and more
To fetch an asset, we need to provide the asset's ID. In your code editor, add the following fetchAsset() function:
async function fetchAsset(umi: Umi, assetId: PublicKey<string>) {
    try {
        const asset = await umi.rpc.getAsset(assetId);
        console.log(asset);
    } catch (e) {
        console.error(e);
    }
}
This function will fetch an asset from the DAS API and log it to the console. You can test it out by adding:
fetchAsset(UMI, COMPRESSED_NFT);
You should be able to test your code by running ts-node app in your terminal. You should see something like this:
das-demo % ts-node app
{
  interface: 'V1_NFT',
  id: '52sbcUW4mXp8k8rruxgKMD6Kn6FbZoKeemLsyz7xyteW',
  content: {
    '$schema': 'https://schema.metaplex.com/nft1.0.json',
    json_uri: 'https://prod-tensor-creators-s3.s3.us-east-1.amazonaws.com/drop/e6ed698b-ae10-42f9-8d2e-16b8d844439e/5e1bf2ee-5d9e-4496-935a-e222c22de2db',
    files: [ [Object] ],
    metadata: {
      attributes: [Array],
      description: 'A long time ago in a Solaxy far, far away...',
      name: 'Tensorian #9207',
      symbol: 'TNSRNS',
      token_standard: 'NonFungible'
    },
# ...
Great job! You have successfully fetched an asset from the DAS API. Feel free to ctrl/cmd + click the getAsset() function to dig into the function and DasApiAsset interface (or visit their docs here). You can parse the data to get the information you need.
Fetch Asset Proof
To get the Merkle proof of a Compressed NFT (we will dive into the details about Compressed NFTs in another guide), you can use the getAssetProof method (this can be necessary to perform actions with the NFT, e.g., transfers). The proof includes the asset's root, leaf, tree_id, proof, and node_index. To fetch an asset's proof, add the following fetchAssetProof() function:
async function fetchAssetProof(umi: Umi, assetId: PublicKey<string>) {
    try {
        const proof = await umi.rpc.getAssetProof(assetId);
        const { root, leaf, tree_id, node_index } = proof;
        console.table({ root, leaf, tree_id, node_index });
    } catch (e) {
        console.error(e);
    }
}

fetchAssetProof(UMI, COMPRESSED_NFT);
You can test your code by running ts-node app in your terminal. You should see something like this:
das-demo % ts-node app
┌────────────┬────────────────────────────────────────────────┐
│  (index)   │                     Values                     │
├────────────┼────────────────────────────────────────────────┤
│    root    │ 'BgG1eLjuR8SqyihX4oVdhVMxG9S5JYDmH8GaCwGpsgUB' │
│    leaf    │ 'Ckabr29yAYFaivxwPvL6CZtGryx2WS4vzs9QRssp8Ujy' │
│  tree_id   │ '4gcgGDUqyUQZRzA3MDKGAJARq8qzUpeJ4NMsHtPngjxM' │
│ node_index │                     18090                      │
└────────────┴────────────────────────────────────────────────┘
Nice job!
Fetch Groups of Assets
The DAS API Provides a few methods to fetch groups of assets. Let's take a look at a few of them.
By Creator
If you want to query all NFTs created by a specific creator, you can use the getAssetsByCreator method. This method takes in a creator's public key and returns an array of DasApiAsset objects. Because this query can return many results, we can also specify a limit and page number. This can reduce the response time and make parsing the data/paginate results easier. Additionally, we can specify whether we want to return only verified assets (assets that the creator has signed to be authentic).
To fetch assets by creator, add the following fetchAssetsByCreator() function:
async function fetchAssetsByCreator(umi: Umi, creator: PublicKey<string>) {
    try {
        const assets = await umi.rpc.getAssetsByCreator({
            creator,
            onlyVerified: false,
            limit: 10,
            page: 1,
        });
        console.log(assets);

    } catch (e) {
        console.error(e);
    }
}

fetchAssetsByCreator(UMI, CREATOR);
By Owner
Similarly, we can fetch all of a user's owned assets by using the getAssetsByOwner method. This method takes in an owner's public key and returns an array of DasApiAsset objects. We can also specify a limit and page number.
async function fetchAssetsByOwner(umi:Umi, owner: PublicKey<string>) {
    try {
        const assets = await umi.rpc.getAssetsByOwner({
            owner,
            limit: 10,
            page: 1
        });
        console.log(assets);

    } catch (e) {
        console.error(e);
    }
}
fetchAssetsByOwner(UMI, OWNER);
By Collection
Finally, we can use the getAssetsByGroup method to fetch all assets in a collection (this method appears to be named group rather than collection to allow for other types of grouping in the future). This method takes in a collection's public key and returns an array of DasApiAsset objects. We can also specify a limit and page number.
async function fetchAssetsByGroup(umi: Umi, group: string) {
    try {
        const assets = await umi.rpc.getAssetsByGroup({
            groupKey: 'collection',
            groupValue: group
        });
        console.log(assets);

    } catch (e) {
        console.error(e);
    }
}

fetchAssetsByGroup(UMI, COLLECTION);
Test each of these out by running ts-node app in your terminal. Feel free to experiment with different addresses and with parsing the data to get the information you need!
Keep Building
For more information on how to use the DAS API and to explore additional methods (including cURL requests and other programming languages), check out our DAS API Docs.
If you're stuck, have questions, or just want to talk about what you're building, drop us a line on Discord or Twitter!
We ❤️ Feedback!
Let us know if you have any feedback or requests for new topics. We'd love to hear from you.