
8 min read
Overview
Tools like Solana Explorer make it easy to look up a transaction, but a raw transfer of value rarely tells the whole story. Sometimes you need to attach context to a transaction, such as a human-readable note, an invoice ID, or a reference to an order in your own system.
Solana's Memo program solves this by writing arbitrary UTF-8 text onchain as part of a transaction. In this guide, you'll attach a memo to a transaction and read it back, using the new Pinocchio-based Memo program (p-memo) and Solana Kit for the client code.
- The Memo program writes arbitrary UTF-8 text onchain as an instruction in a transaction.
p-memois a Pinocchio-based reimplementation of the Memo program that costs a fraction of the compute units (about 513 CU vs. 13,525 for a single-signer memo).- You'll use Solana Kit and the
@solana-program/memoclient to send a memo withp-memo, then decode it back from the confirmed transaction.
What is p-memo?
p-memo is a rebuild of the SPL Memo program built with Pinocchio, a zero-dependency Rust framework for writing high-performance Solana programs. By using lower-level Pinocchio primitives instead of higher-level abstractions, p-memo dramatically reduces the compute units (CU) a memo costs:
| Signers | p-memo (CU) | SPL Memo (CU) | p-memo cost vs. SPL Memo |
|---|---|---|---|
| 0 | 287 | 2,022 | ~14% |
| 1 | 513 | 13,525 | ~4% |
| 2 | 628 | 25,111 | ~3% |
| 3 | 743 | 36,406 | ~2% |
A typical memo has one signer (the fee payer), so in practice you're spending roughly 513 CU instead of 13,525, about 26x cheaper. When you're packing a memo alongside other instructions in a transaction with a fixed compute budget, that CU optimization matters.
The Memo program version used in this guide is deployed at Memo4c2pN8afCj432Lb7RMVKi9PbQnnW7ewFFaV3oAH. Note that this is a different address from the legacy Memo program (MemoSq4gqABAXKb96qnH8TysNcWxMyWCqXgDLGmfcHr).
What You Will Do
- Set up a TypeScript project with Solana Kit and the Memo program client
- Generate and fund a Devnet keypair with the Solana CLI
- Build and send a transaction that attaches a memo using
p-memo - Read the memo back from the confirmed transaction
What You Will Need
This guide assumes a basic understanding of Solana and TypeScript. If you're new to sending transactions with Solana Kit, the How to Send Transactions with Solana Kit guide is a good primer.
Before you begin, make sure you have the following:
- Node.js (v24+, which can run TypeScript files directly) installed
- The Solana CLI installed, to generate and fund a keypair
- A Quicknode account to access a Solana Devnet endpoint. If you don't have one, you can create one for free here.
| Dependency | Version |
|---|---|
| Node | 24.8.0 |
| solana-cli | 3.0.6 |
| @solana/kit | 6.9.0 |
| @solana/kit-plugin-rpc | 0.11.1 |
| @solana/kit-plugin-signer | 0.10.0 |
| @solana-program/memo | 0.11.1 |
Set Up Project
Create a new project directory and initialize it as a Node.js project:
mkdir solana-memo && cd solana-memo
npm init -y
Install Solana Kit, its RPC and signer plugins, and the Memo program client, plus the Node type definitions:
npm install @solana/kit@6.9.0 @solana/kit-plugin-rpc@0.11.1 @solana/kit-plugin-signer@0.10.0 @solana-program/memo@0.11.1
npm install --save-dev @types/node@25
Set the "type": "module" field in package.json so Node treats your code as an ES module:
npm pkg set type=module
Create an empty app.ts file in your project root. You'll add the transaction code in a later section:
touch app.ts
Next, generate and fund a keypair—the account that will sign and pay for your memo transaction.
Generate and Fund a Keypair
You need a funded account to pay the transaction fee and to sign the memo. Generate a fresh keypair into a project-local file with the Solana CLI:
solana-keygen new --no-bip39-passphrase --outfile ./my-keypair.json
Airdrop 1 Devnet SOL to it so it can cover fees:
solana airdrop 1 --keypair ./my-keypair.json --url devnet
Note: Devnet SOL has no financial value and exists only for testing. The airdrop endpoint is rate-limited, so if the command fails, wait a moment and try again or use the web faucet. Check out A Complete Guide to Airdropping Test SOL on Solana to learn more.
Since this keypair is a secret, keep it out of version control. Create a .gitignore file so you don't accidentally commit your key or environment variables:
node_modules
my-keypair.json
.env
Set Up Quicknode Endpoint
You're welcome to use a public Solana node, but public nodes rate-limit and lag under load. For faster, more reliable responses, create a Quicknode endpoint:
- Sign up for a free account here.
- Create an endpoint, select Solana and the Devnet network, and copy the HTTP Provider URL.
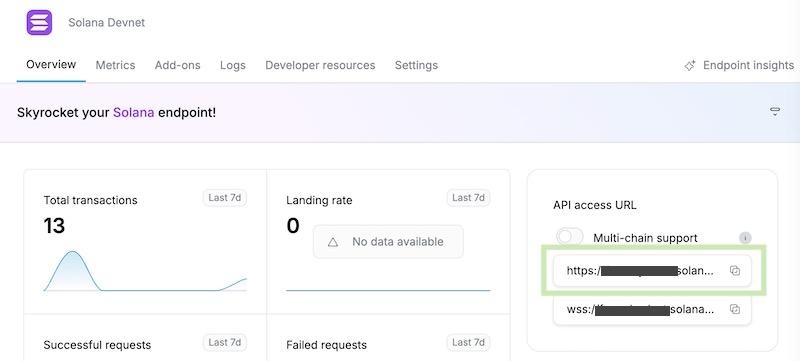
You'll add this URL to your environment variables in the next step. Solana Kit derives the WebSocket endpoint it needs to confirm transactions from the same URL, so you only need the HTTP Provider link.
Configure Environment Variables
Rather than hardcode your endpoint and key path, store them in a .env file in your project root:
KEYPAIR_PATH=./my-keypair.json
SOLANA_RPC_URL=https://example.solana-devnet.quiknode.pro/0123456/
MEMO_PROGRAM_ADDRESS=Memo4c2pN8afCj432Lb7RMVKi9PbQnnW7ewFFaV3oAH
# Cluster used only for the Explorer link (e.g. devnet, mainnet-beta, testnet).
EXPLORER_CLUSTER=devnet
Replace SOLANA_RPC_URL with the HTTP Provider URL you copied above. Node.js can load this file for you at runtime with the --env-file flag, so no extra dependency is required.
Write the App
Open app.ts and build it in pieces: a block of shared setup at the top, then two functions and the code that runs them, added below in order. Follow each step and you'll end up with the complete file.
Start with the imports and setup. This reads your environment variables, then builds a single Kit client that bundles the RPC connection, WebSocket subscriptions, and signer together, and resolves a few constants you'll reuse across the functions:
import {
  address,
  createClient,
  getBase58Encoder,
  type Signature,
} from "@solana/kit";
import {
  getAddMemoInstruction,
  getAddMemoInstructionDataDecoder,
} from "@solana-program/memo";
import { signerFromFile } from "@solana/kit-plugin-signer";
import { solanaRpc } from "@solana/kit-plugin-rpc";

const { KEYPAIR_PATH, SOLANA_RPC_URL, MEMO_PROGRAM_ADDRESS } = process.env;
if (!KEYPAIR_PATH || !SOLANA_RPC_URL || !MEMO_PROGRAM_ADDRESS) {
  throw new Error(
    "Set KEYPAIR_PATH, SOLANA_RPC_URL, and MEMO_PROGRAM_ADDRESS in your environment"
  );
}

// A Kit client bundles the RPC connection, WebSocket subscriptions, and signer.
// signerFromFile loads the keypair JSON as the client's payer/identity, and
// solanaRpc wires up the RPC URL (the subscriptions URL is derived by swapping
// http -> ws). The client also gains a high-level sendTransaction helper.
const client = await createClient()
  .use(signerFromFile(KEYPAIR_PATH))
  .use(solanaRpc({ rpcUrl: SOLANA_RPC_URL }));

// The memo text to attach to the transaction.
const MEMO_TEXT = "Learning about the Memo program with Quicknode";

// Resolve the program address once, here where the env var is known to be set.
const MEMO_PROGRAM = address(MEMO_PROGRAM_ADDRESS);

// Cluster used only for the Explorer link below. Set EXPLORER_CLUSTER in your
// environment if SOLANA_RPC_URL points at a non-devnet network.
const explorerCluster = process.env.EXPLORER_CLUSTER ?? "devnet";
Add sendMemo Function
sendMemo does the work of writing a memo onchain. The client's sendTransaction helper handles the plumbing for you—fetching a recent blockhash, setting the fee payer, signing, sending, and confirming.
Add it below the setup:
// Send a single Memo instruction and confirm it. The client handles fetching a
// blockhash, setting the fee payer, signing, sending, and confirming. Returns
// the confirmed transaction's signature.
async function sendMemo(memo: string): Promise<Signature> {
  const result = await client.sendTransaction(
    getAddMemoInstruction(
      { memo, signers: [client.payer] },
      { programAddress: MEMO_PROGRAM }
    )
  );

  return result.context.signature;
}
A few things worth calling out:
client.sendTransactionwraps the whole build-sign-send-confirm flow that you'd otherwise assemble by hand with Solana Kit's lower-level transaction functions.getAddMemoInstructioncomes from the generated@solana-program/memoclient. Passingsigners: [client.payer]records the fee payer as a signer on the memo instruction (the single-signer case from the table above), andprogramAddress: MEMO_PROGRAMtargetsp-memoinstead of the legacy program.- The confirmed transaction's signature is available on
result.context.signature.
Add fetchMemo Function
fetchMemo proves the round-trip by reading the memo back from onchain. It fetches the confirmed transaction by signature, finds the instruction that belongs to the Memo program, and decodes that instruction's data back into the original text.
Add it below sendMemo:
// Fetch a transaction by signature and decode the plain-text memo it contains.
async function fetchMemo(signature: Signature): Promise<string> {
  const transaction = await client.rpc
    .getTransaction(signature, {
      commitment: "confirmed",
      maxSupportedTransactionVersion: 0,
      encoding: "json",
    })
    .send();
  if (!transaction) {
    throw new Error(`Transaction not found: ${signature}`);
  }

  const { accountKeys, instructions } = transaction.transaction.message;
  const memoInstruction = instructions.find(
    (ix) => accountKeys[ix.programIdIndex] === MEMO_PROGRAM
  );
  if (!memoInstruction) {
    throw new Error("No memo instruction found in transaction");
  }

  // The RPC returns instruction data as a base58 string. A base58 "encoder"
  // turns that string into raw bytes (its .encode() = string -> bytes), and the
  // memo decoder then reads those bytes back into the original memo text.
  const data = getBase58Encoder().encode(memoInstruction.data);
  return getAddMemoInstructionDataDecoder().decode(data).memo;
}
If you've used the original Memo program before, you may have fetched memos from the memo field returned by getSignaturesForAddress. That field is populated by the RPC node only for recognized Memo program IDs, and because p-memo is deployed at a new address, that field won't contain your text. Instead, you fetch the transaction and decode the instruction data yourself, which works for any memo program version.
Send and Read the Memo
Finally, run the two steps in order: send the memo, log the Explorer link, then fetch and log the decoded memo. Because app.ts is an ES module, you can await at the top level—no wrapper function needed.
Add this to the end of app.ts:
// Write a memo onchain, then read it back to prove the round-trip.
const signature = await sendMemo(MEMO_TEXT);
console.log(
  `https://explorer.solana.com/tx/${signature}?cluster=${explorerCluster}`
);

const memo = await fetchMemo(signature);
console.log(`Memo: ${memo}`);
Run Your Code
Run the script, loading your .env file with Node's --env-file flag:
node --env-file=.env app.ts
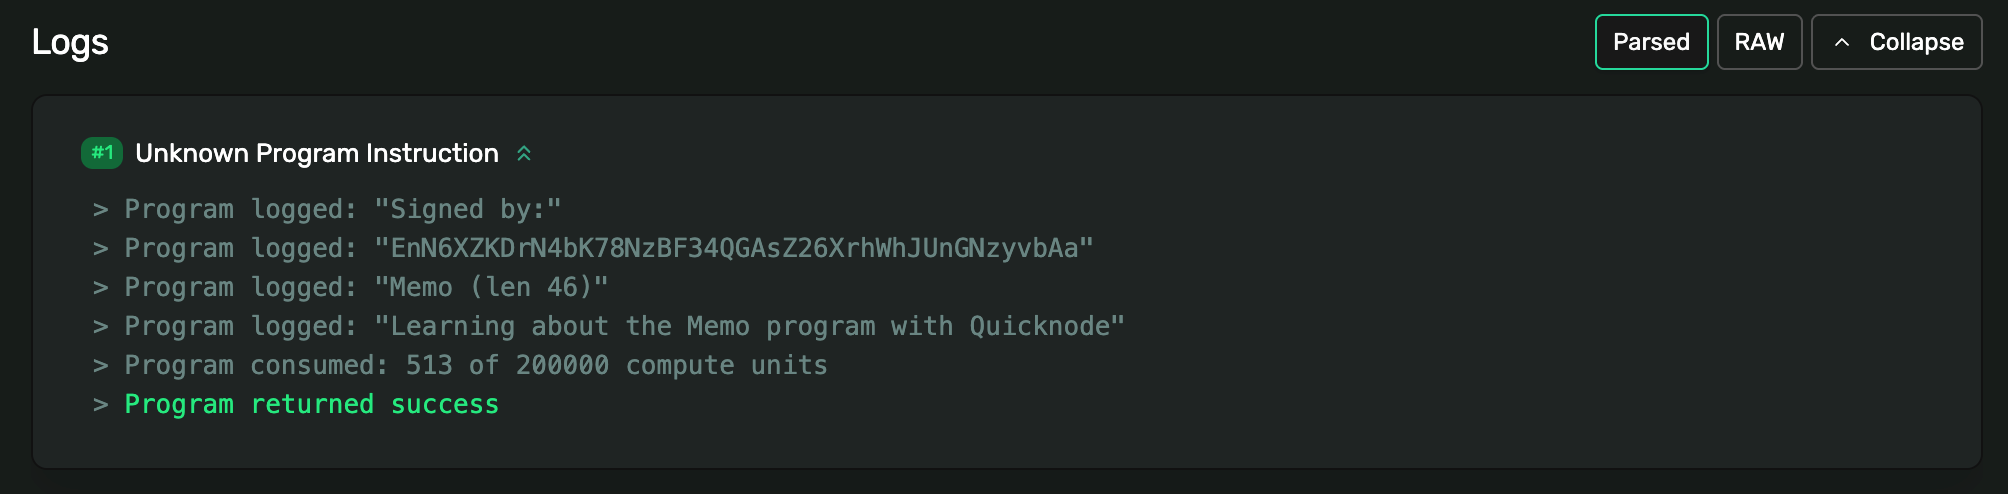
You should see a link to your transaction on Solana Explorer, followed by the decoded memo:
https://explorer.solana.com/tx/5Pp...Xy?cluster=devnet
Memo: Learning about the Memo program with Quicknode
Open the Explorer link, and you'll find your message in the Memo program instruction and in the program logs.
Memo received. Nice job!
Wrapping Up
You've now attached a note to a Solana transaction and read it back, using the Pinocchio-based Memo program and Solana Kit. The memo you wrote was just one instruction in the transaction, which means you can add it alongside any other instructions, such as a SOL transfer or a call to your own program, to log context onto transactions you're already sending. With p-memo costing a fraction of the compute of the original program, you keep more of your transaction's CU budget for other instructions.
Frequently Asked Questions
What is the Solana Memo program?
The Memo program is a native Solana program that records arbitrary UTF-8 text onchain as an instruction within a transaction. It's commonly used to attach human-readable notes, invoice IDs, or external references to a transaction, and it verifies that any account passed to the instruction is a signer.
What is p-memo and how is it different from the original Memo program?
p-memo is a reimplementation of the SPL Memo program built on Pinocchio, a zero-dependency Rust framework. The instruction interface is identical (the instruction data is the memo text), but it uses fewer compute units. A single-signer memo costs roughly 513 CU with p-memo versus about 13,525 CU with the original program. It's deployed at a different address: Memo4c2pN8afCj432Lb7RMVKi9PbQnnW7ewFFaV3oAH.
Why can't I read the memo from getSignaturesForAddress?
The memo field returned by getSignaturesForAddress is populated by the RPC node only for recognized Memo program IDs. Because p-memo is deployed at a new address, that field won't contain your text. Instead, fetch the transaction with getTransaction and decode the memo instruction's data directly, which works for any memo program version.
Can I add a memo to a transaction that already does something else?
Yes. A memo is just one instruction in a transaction, so you can append it alongside other instructions, such as a SOL transfer or a call to your own program, to log context onto transactions you're already sending.
Can I use this on Mainnet?
Yes. The code is identical across clusters; only your endpoint and the keypair you fund change. Point SOLANA_RPC_URL at a Mainnet endpoint and use a funded Mainnet keypair. Note that on Mainnet, SOL has real value and you pay real transaction fees.
Resources
- Solana Memo program (p-memo) repository
- @solana-program/memo client
- SPL Memo program docs
- Solana Kit
- How to Send Transactions with Solana Kit
- How to Build and Deploy a Solana Program Using Pinocchio
We ❤️ Feedback!
Let us know if you have any feedback or requests for new topics. We'd love to hear from you.