12 min read
Overview
Solana Explorer provides access to a wealth of great information on the Solana blockchain: transaction history and details, token balances, NFT metadata, and much more. In our opinion, browsing Solana Explorer is one of the best ways to understand Solana, but building a Solana Explorer takes your knowledge to the next level! In this 3 part series, we are covering the steps needed to create a simple clone of Solana Explorer!
In this guide, we will fetch a wallet's staking accounts to display how much $SOL a user has staked and which validator(s) it's staked with.
What You Will Do
In this guide, you will use the Solana Explorer Example we built in our previous How to Build a Solana Explorer Clone (Part 2: Transaction Detail) guide. You'll use that framework to make a new component that will allow users to see a table of their Staked Solana accounts and delegation.
What You Will Need
- Nodejs (version 16.15 or higher) installed
- Typescript experience and ts-node installed
- Basic knowledge of HTML/CSS
- Experience with Solana Transactions (Guide: How to Track Solana Transaction History with Logs)
- Experience with Solana Scaffold (Guide: How to Connect Users to Your dApp with the Solana Wallet Adapter and Scaffold)
To follow along with this guide, you will need to have completed our guide on How to Build a Solana Explorer Clone (Part 2: Transaction Detail). Why? We will be building on top of the code that is there.
The final code from the How to Build a Solana Explorer Clone (Part 2: Transaction Detail) guide can be found in this Quicknode Github repo. That guide will serve as a starting point for this one. Make sure you have followed the instructions in that guide and completed all the steps.
Quick Start*: If you didn't have a chance to complete the 2nd guide, here's a simple way to jump right in. In your terminal, create a project directory and clone the sample:*
mkdir solana-explorer-demo
cd solana-explorer-demo
git clone https://github.com/quiknode-labs/technical-content.git .
cd solana/explorer-clone-part-3/starter
yarn install
echo > .env
Then update your .env with your Quicknode RPC:
REACT_APP_SOLANA_RPC_HOST=https://example.solana-devnet.quiknode.pro/000000/
REACT_APP_NETWORK=devnet
And enter yarn dev into your terminal.
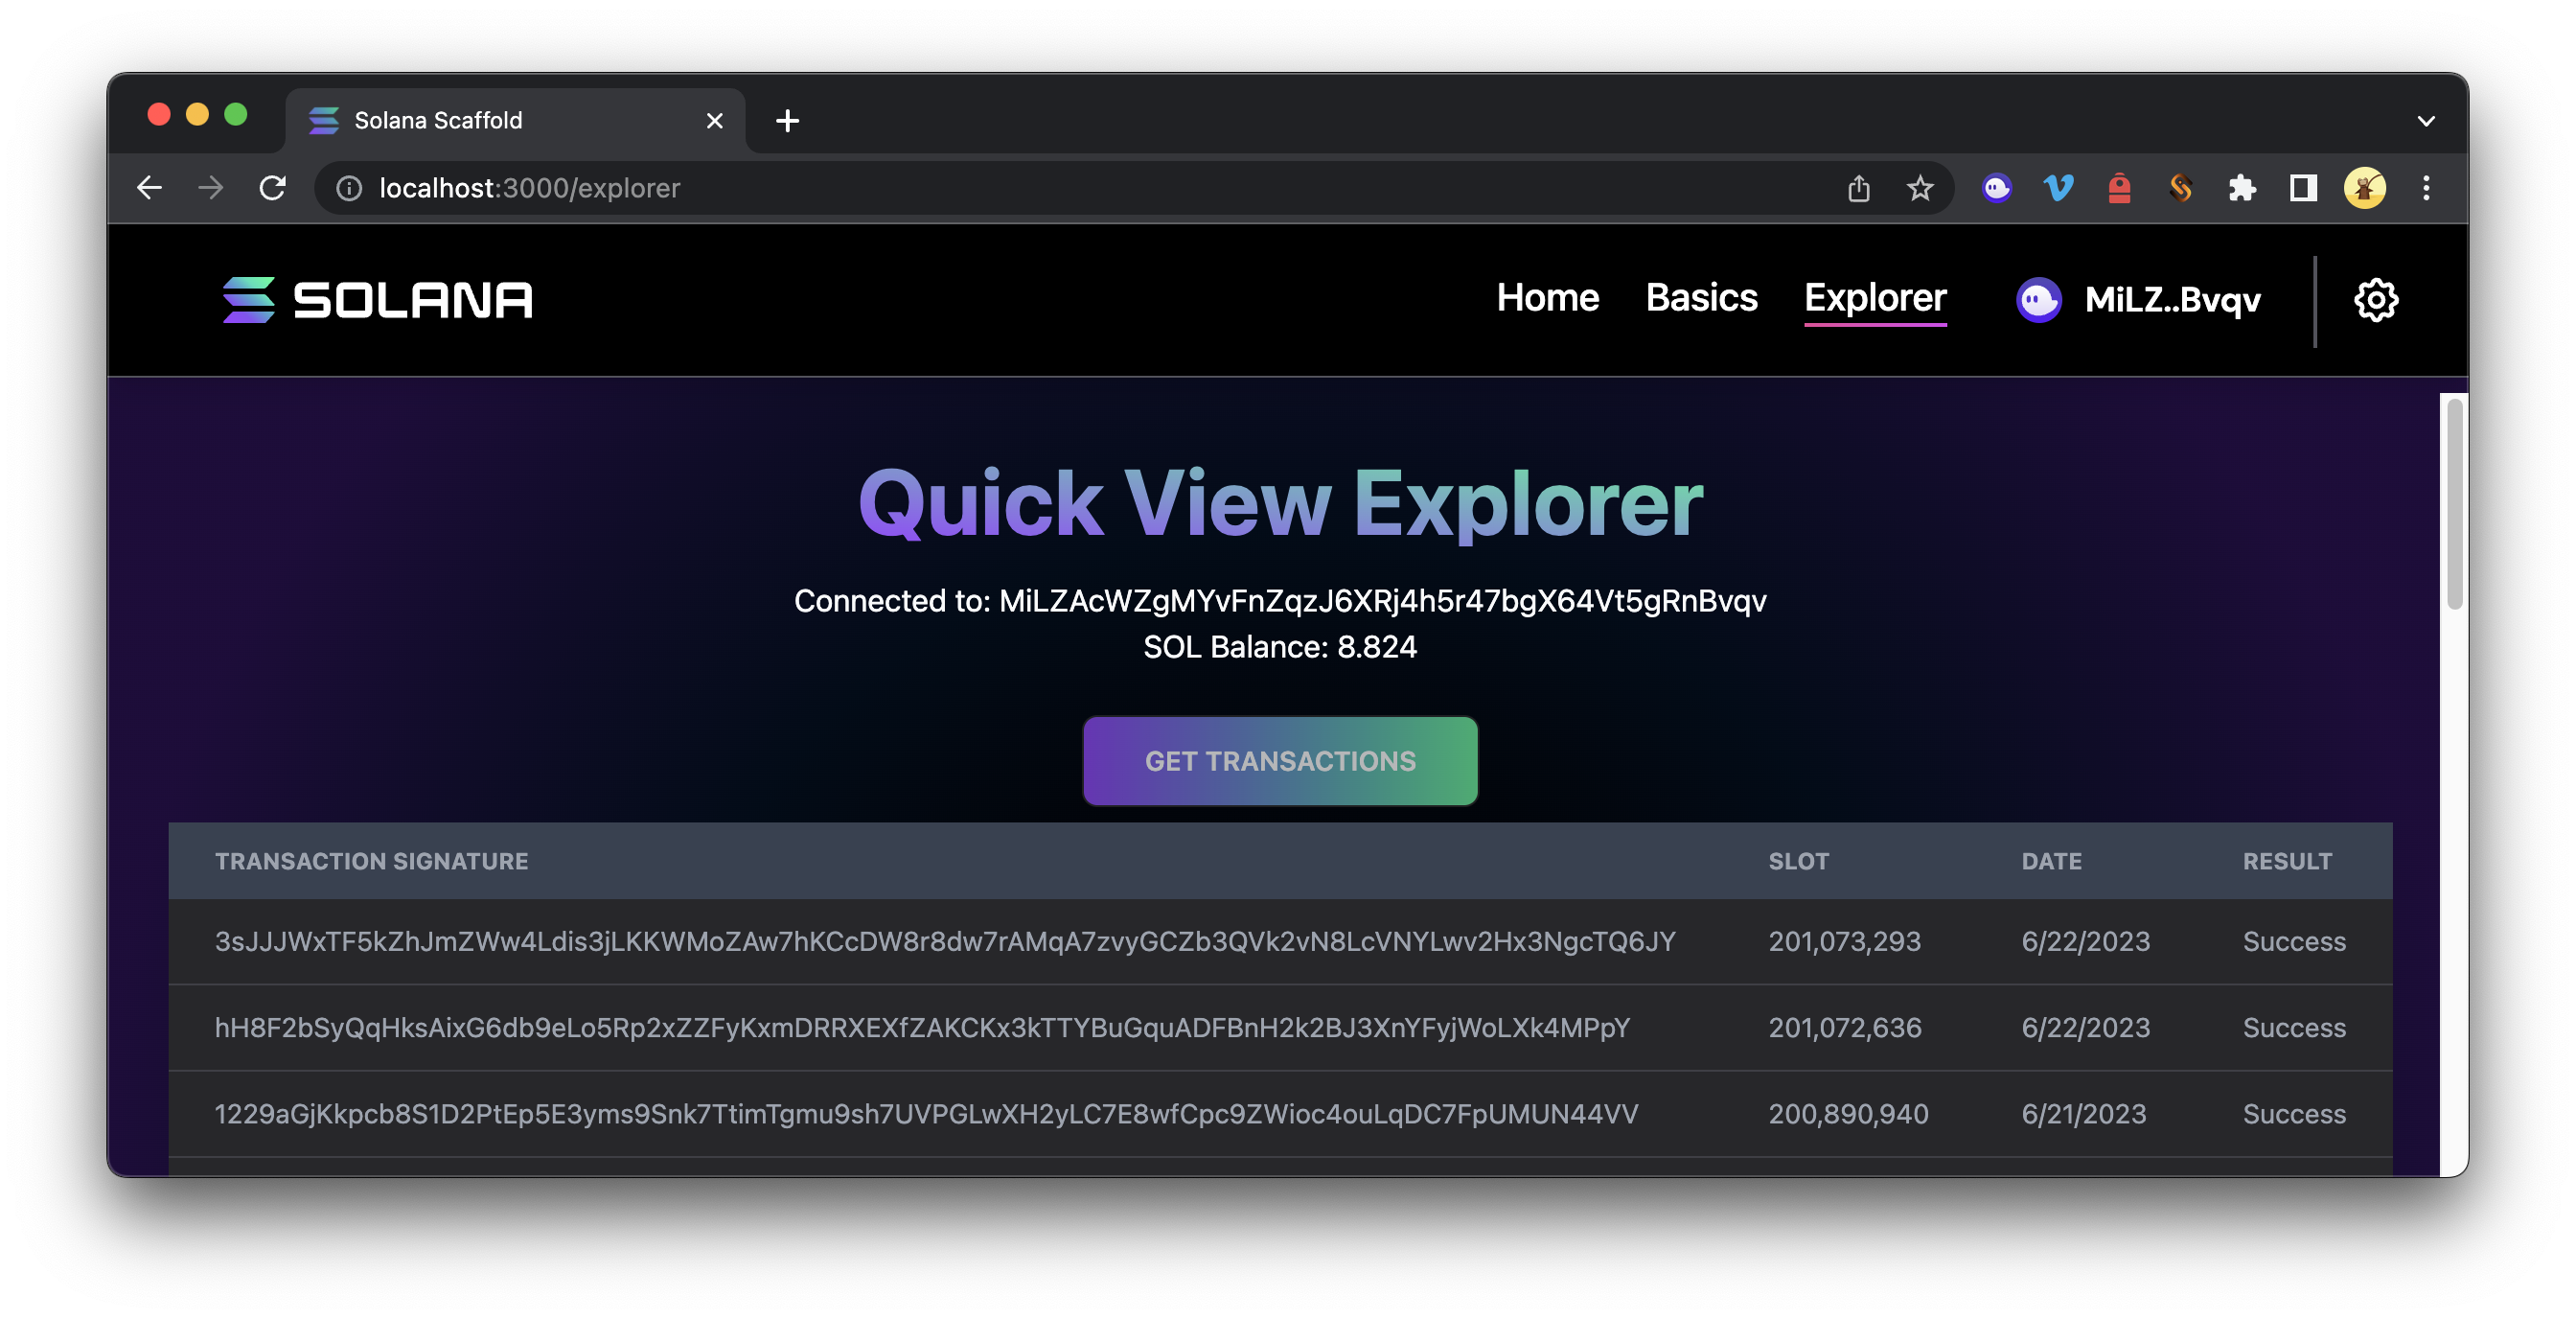
Your https://localhost:3000/explorer should render the following view:
Alright! Let's get started.
Create a Staking Detail Component
Let's build on our transactions tool to allow a user to click on a transaction to get more details about that transaction. The great news is that we already have the tools to do this.
From your project directory, duplicate your Component Template and name it StakingDetail.tsx:
cp ./src/components/template.tsx ./src/components/StakingDetail.tsx
StakingDetail.tsx should now exist in your src/components folder. Open it in a code editor.
Update Dependencies
Start by renaming your Function Component to StakingDetail. Replace
export const Template: FC = () => {
with
export const StakingDetail: FC = () => {
For this component, we need the following imports. Replace the existing imports of your template with these:
import { useConnection, useWallet } from '@solana/wallet-adapter-react';
import { AccountInfo, LAMPORTS_PER_SOL, ParsedAccountData, PublicKey } from '@solana/web3.js';
import { FC, useEffect, useState } from 'react';
import { notify } from "../utils/notifications";
These imports should look familiar as we're using a lot of what we have done in TransactionLog and TransactionDetail. Since the assembly of this component is similar to our previous ones, we're going to share the complete code up front and walk through a few essential pieces:
import { useConnection, useWallet } from '@solana/wallet-adapter-react';
import { AccountInfo, LAMPORTS_PER_SOL, ParsedAccountData, PublicKey } from '@solana/web3.js';
import { FC, useEffect, useState } from 'react';
import { notify } from "../utils/notifications";
const STAKE_PROGRAM_PK = new PublicKey('Stake11111111111111111111111111111111111111');
const WALLET_OFFSET = 44;
const DATA_SIZE = 200;
export const StakeDetail: FC = () => {
const { connection } = useConnection();
const { publicKey } = useWallet();
const [stakeAccounts, setStakeAccounts] = useState<
Array<{
pubkey: PublicKey;
account: AccountInfo<ParsedAccountData|Buffer>;
}>
>();
const [stakeCard, setStakeCard] = useState<JSX.Element>();
useEffect(() => {
if (stakeAccounts) {
buildView();
}
}, [stakeAccounts]);
async function getStakeAccounts(wallet: string) {
const stakeAccounts = await connection.getParsedProgramAccounts(
STAKE_PROGRAM_PK, {
filters: [
{
dataSize: DATA_SIZE, // number of bytes
},
{
memcmp: {
offset: WALLET_OFFSET, // number of bytes
bytes: wallet, // base58 encoded string
},
},
]
}
);
setStakeAccounts(stakeAccounts);
}
function buildView() {
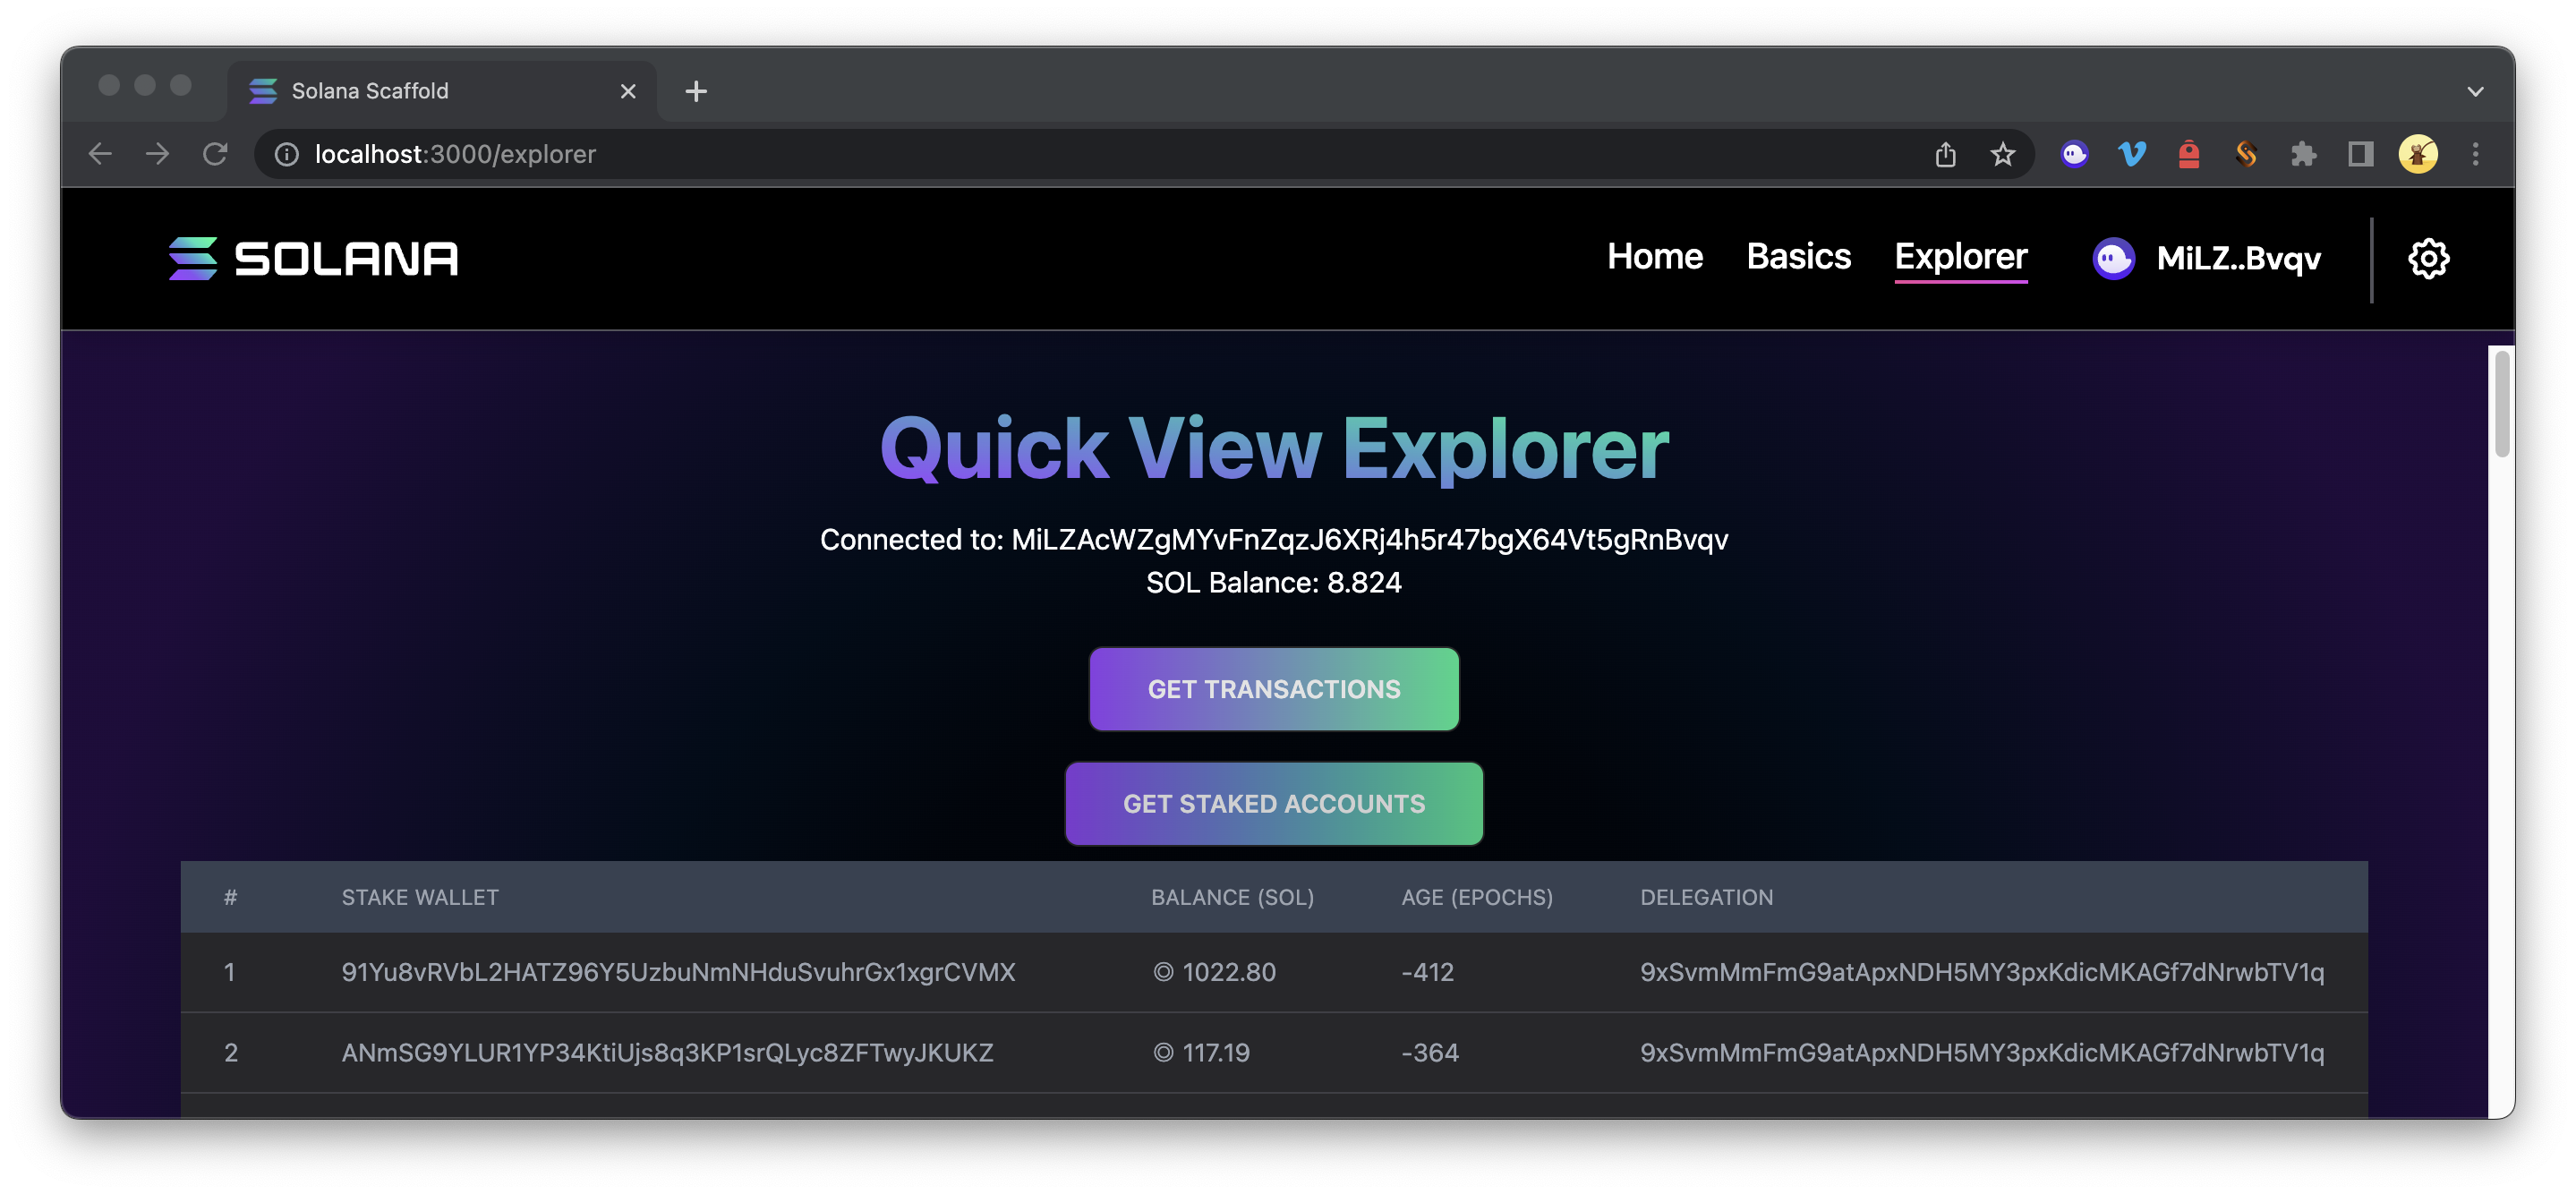
if(stakeAccounts.length > 0) {
let header =
<thead className="text-xs text-gray-700 uppercase bg-zinc-50 dark:bg-gray-700 dark:text-gray-400">
<tr>
<td className="px-6 py-3">#</td>
<td className="px-6 py-3">Stake Wallet</td>
<td className="px-6 py-3">Balance (SOL)</td>
<td className="px-6 py-3">Age (Epochs)</td>
<td className="px-6 py-3">Delegation</td>
</tr>
</thead>;
let rows = (stakeAccounts.map((account,i)=>{
const epcohStart = Number(account.account.data.parsed?.info.stake.delegation.activationEpoch);
const epochCurrent = Number(account.account.rentEpoch);
const epochAge = epochCurrent - epcohStart;
return (
<tr key={i+1} className="bg-white border-b bg-zinc-800 dark:border-zinc-700">
<td className="px-6 py-3">{i+1}</td>
<td className="px-6 py-3">{account.pubkey.toString()}</td>
<td className="px-6 py-3">{'◎ ' + (account.account.lamports/LAMPORTS_PER_SOL).toFixed(2)}</td>
<td className="px-6 py-3">{epochAge}</td>
<td className="px-6 py-3">{account.account.data.parsed?.info.stake.delegation.voter}</td>
</tr>)
}
));
let table = (
<table className="w-full text-sm text-left text-gray-500 dark:text-gray-400">
{header}
<tbody>{rows}</tbody>
</table>);
setStakeCard(table)
}
else {
setStakeCard(<>No Stake Accounts Found</>);
}
}
const onClick = async () => {
if (!publicKey) {
console.log('error', 'Wallet not connected!');
notify({ type: 'error', message: 'error', description: 'Wallet not connected!' });
return;
}
try {
//Example Mainnet Wallet Replace publicKey.toString() with 'AhbkRLfEuL5zV5gbooQzcDP7dZLBWK5En3mPVixs34yb'
//Example Devnet Wallet Replace publicKey.toString() with 'Cxcfw2GC1tfEPEuNABNwTujwr6nEtsV6Enzjxz2pDqoE'
await getStakeAccounts(publicKey.toString());
} catch (error: any) {
notify({ type: 'error', message: `Couldn't Staking Accounts!`, description: error?.message });
console.log('error', `Error finding Staking Accounts! ${error?.message}`);
}
};
return(
<div>
<div className="text-center">
<button
className="px-8 m-2 btn animate-pulse bg-gradient-to-r from-[#9945FF] to-[#14F195] center hover:from-pink-500 hover:to-yellow-500 ..."
onClick={onClick}
>
<span>Get Staked Accounts</span>
</button>
</div>
<div>{stakeCard}</div>
</div>
)
}
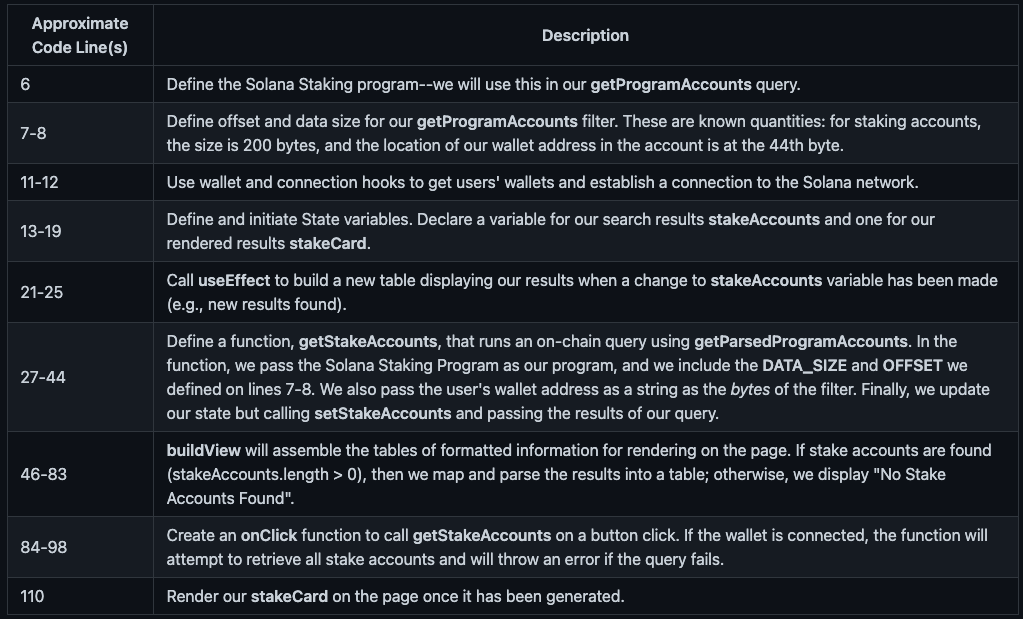
Here's what's happening in this Function Component:
Update Explorer View
Nice work! Now we need to call StakeDetails in our Explorer View. To do that, navigate to src/views/explorer/index.tsx, the view we currently have displayed on our site at /explorer/.
Import StakeDetails into your view. On line 7, add:
import { StakeDetail } from "components/StakingDetail";
Call in your return statement with your TransactionLogs and GetTokens components (ours is on line 35):
        <div className="text-center">
          <TransactionLog/>
          <GetTokens/>
          <StakeDetail/>
        </div>
Since we're adding to our ExplorerView and that view is already called in our Explorer page, we do not need to create any new pages to display these results.
Great job! You should be good to go. Go ahead and run your code. In your terminal type:
yarn dev
NOTE: If you do not have a staking account, you can test your code by making a small change to your StakeDetail component.
Open explorer-clone-part-3/starter/src/components/StakingDetail.tsx and replace line 92:
await getStakeAccounts(publicKey.toString());
with
await getStakeAccounts('AhbkRLfEuL5zV5gbooQzcDP7dZLBWK5En3mPVixs34yb'); // for mainnet-beta
// OR
await getStakeAccounts('Cxcfw2GC1tfEPEuNABNwTujwr6nEtsV6Enzjxz2pDqoE'); // for devnet
These are known staking accounts that will allow you to make sure your query is working correctly if you don't have a staked account in your connected wallet.
Wrap Up
Congrats! If you have followed along throughout this series, you should have a functioning Solana Explorer that returns a user's token accounts, transaction histories, transaction details, and staking accounts.
At this point in the series, you should feel confident in creating new components and views for displaying any kind of information on Solana. Want to keep building on what you have learned? Try adding some of your own custom components to the site. Here are some resources that might get your creative juices flowing:
- Add a user's NFT Gallery (Guide: How to Build an NFT Gallery on Solana Using Quicknode's NFT-API)
- Add a search bar to navigate other wallets
- Use dynamic routes to enable clickable detail for token mints (Guide: How to Build a Solana Explorer Clone (2 of 3): Transaction Detail Using Dynamic Routes)
Got ideas, questions, or want to show off what you've created? Show us on Discord or reach out to us via Twitter to share what you come up with.
We ❤️ Feedback!
If you have any feedback or questions on this guide, let us know. We’d love to hear from you!