Webhooks deliver stream data to your HTTP endpoint in real-time. Your server receives POST requests containing the stream payload and must return a 2xx status code to acknowledge receipt.
Why use Webhooks?
- Real-Time Data Handling: Ideal for scenarios requiring real-time data processing with immediate reaction to incoming data streams
- Direct Integration: Straightforward way to integrate Streams with various third-party services and custom applications
- Flexibility: Create custom workflows and processing logic tailored to your specific needs
- Simplicity: Easy to set up if you already have a system in place to handle HTTP requests
Streams processes blocks sequentially and will not proceed to the next block or batch until receiving confirmation that the current block or batch was successfully delivered to your webhook. Your endpoint must return a 2xx status code to acknowledge receipt, otherwise delivery will be retried.
Configuration
When setting up a webhook destination, you'll configure the following options in the Streams dashboard:
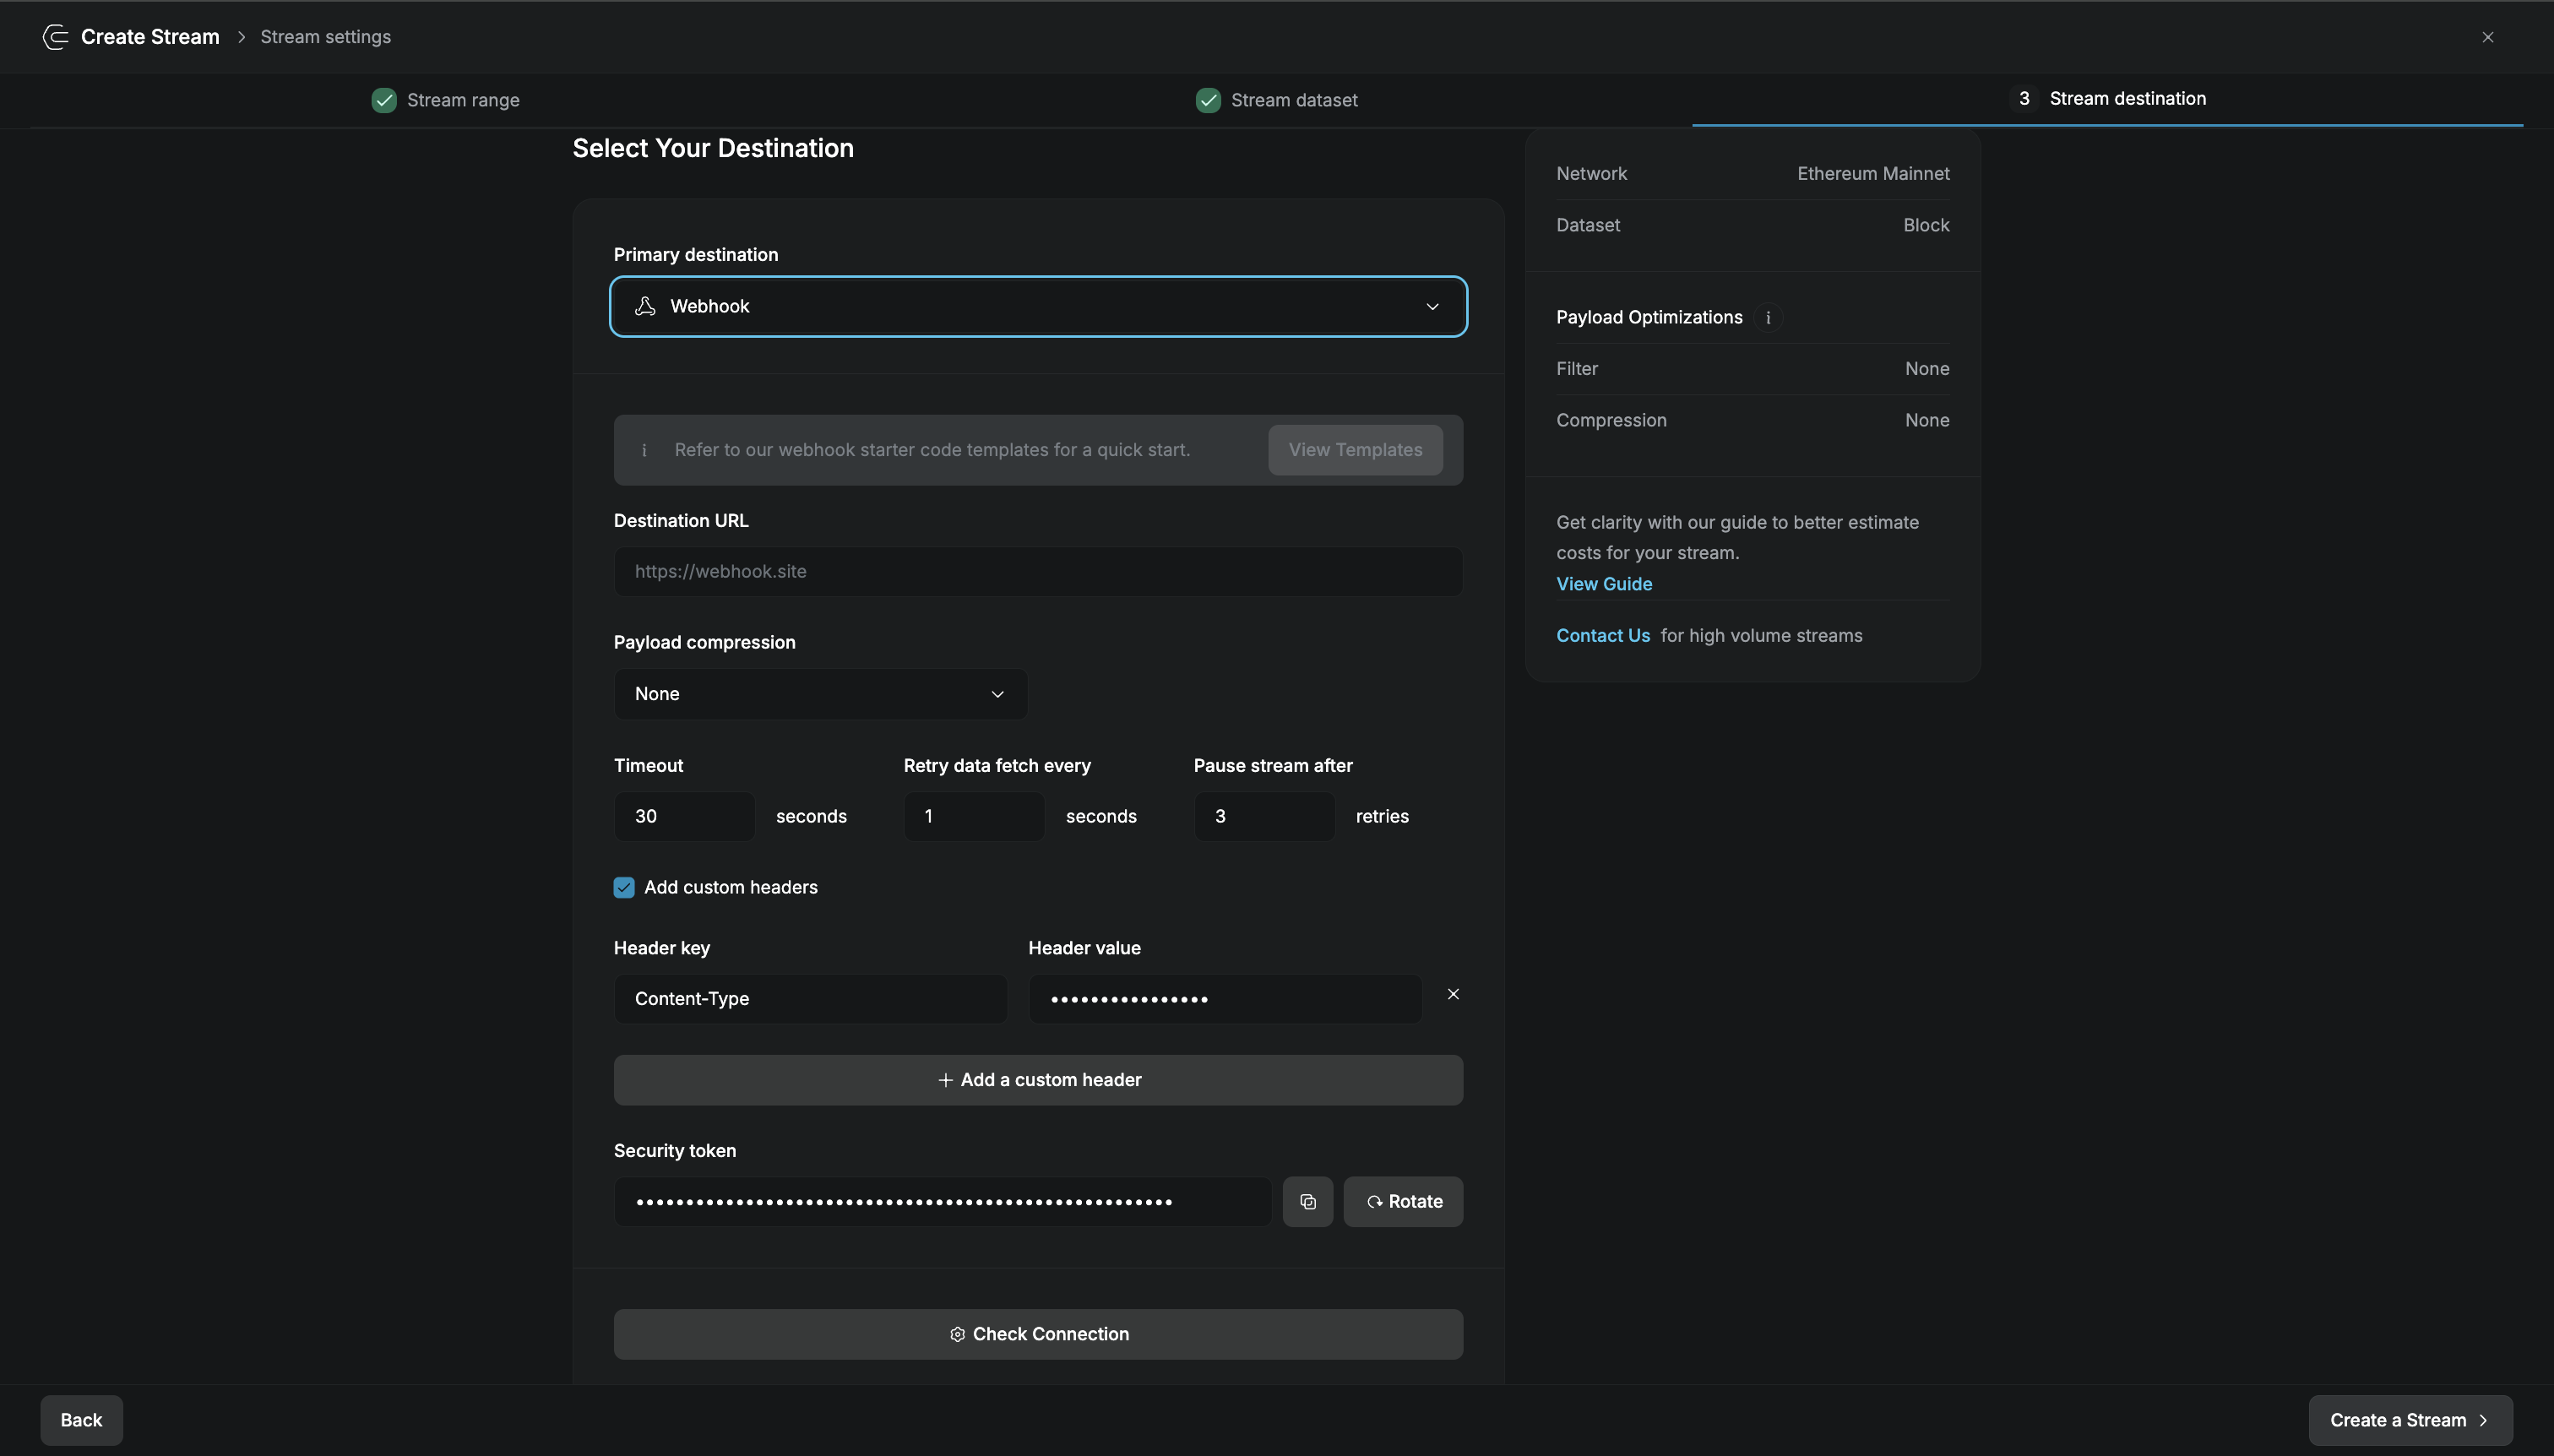
| Field | Description |
|---|---|
| Destination URL | The HTTP(S) endpoint where payloads are delivered |
| Payload compression | None for human-readable payloads, or Gzip for bandwidth optimization |
| Timeout | Maximum seconds to wait for your endpoint to respond (default: 30) |
| Retry data fetch every | Seconds to wait between retry attempts when delivery fails (default: 1) |
| Pause stream after | Number of failed retries before the stream automatically pauses (default: 3) |
| Custom headers | Optional key-value pairs sent with each request for authentication or metadata |
| Security token | Secret token for HMAC signature verification. Use the Rotate button to generate a new token. |
| Enable mTLS | When enabled, Quicknode authenticates to your endpoint with a client certificate on every delivery. See Mutual TLS below. |
| CA Certificate (PEM) | Optional. Only needed if your endpoint's server certificate is signed by a private CA instead of a public one (e.g. Let's Encrypt). Paste your CA's certificate so Streams can verify your server. |
Delivery Requirements
Your endpoint must:
- Accept POST requests with
Content-Type: application/json - Return a 2xx HTTP status code to acknowledge receipt
- Respond within the configured timeout period
If your endpoint doesn't respond or returns a non-2xx status, Streams retries based on your configuration. After the maximum retry attempts, the stream pauses to prevent data loss.
Security
HMAC Verification
Use the Security token to verify that requests originate from Quicknode and haven't been tampered with. Each request includes a signature header that you can validate using this token.
You can rotate the token at any time using the Rotate button. Make sure to update your verification code after rotating.
See Validating Incoming Streams Webhook Messages for implementation details.
Mutual TLS (mTLS)
With mTLS enabled, Quicknode presents a client certificate on every connection to your endpoint, and your server verifies it during the TLS handshake before a single byte of the request body is read. Connections that don't present a valid Quicknode certificate are rejected at the transport layer, so an impostor can't even open a connection to your webhook handler.
Setup is a one-time action:
- Enable mTLS on your webhook destination in the Streams dashboard.
- Click Download Quicknode certificate to get the Quicknode Webhook CA certificate (a public
.pemfile). - Configure your server to require client certificates and trust that CA (examples below).
That's it. There is no ongoing maintenance on your side:
- The CA certificate you download is valid for 10 years. It's the only thing you install.
- The client certificate Quicknode presents is issued from that CA and rotated automatically on our side. Because your server verifies the CA signature rather than the individual certificate, rotations require no action from you and cause no delivery interruption.
- The client certificate identity is stable:
CN=quicknode.com. If your infrastructure supports authorization rules on the client subject, you can additionally pin this value.
mTLS requires an HTTPS destination URL. If your server's own TLS certificate is signed by a private CA rather than a public one, also paste that CA into the CA Certificate (PEM) field so Streams can verify your server. This field is about your certificate and is independent of the mTLS toggle.
Server configuration examples:
- Nginx
- Node.js
- Go
server {
    listen 443 ssl;
    server_name your-webhook.example.com;

    ssl_certificate     /etc/nginx/certs/server.pem;
    ssl_certificate_key /etc/nginx/certs/server.key;

    # Require and verify the Quicknode client certificate
    ssl_client_certificate /etc/nginx/certs/quicknode-webhook-ca.pem;
    ssl_verify_client on;

    location /webhook {
        proxy_pass http://localhost:3000;
    }
}
const https = require('https');
const fs = require('fs');

const server = https.createServer({
  key: fs.readFileSync('server.key'),
  cert: fs.readFileSync('server.pem'),
  // Require and verify the Quicknode client certificate
  ca: fs.readFileSync('quicknode-webhook-ca.pem'),
  requestCert: true,
  rejectUnauthorized: true,
}, (req, res) => {
  const clientCN = req.socket.getPeerCertificate().subject.CN; // "quicknode.com"
  console.log(`Verified client: ${clientCN}`);
  res.writeHead(200, { 'Content-Type': 'application/json' });
  res.end(JSON.stringify({ status: 'received' }));
});

server.listen(443);
package main

import (
    "crypto/tls"
    "crypto/x509"
    "net/http"
    "os"
)

func main() {
    caPEM, _ := os.ReadFile("quicknode-webhook-ca.pem")
    clientCAs := x509.NewCertPool()
    clientCAs.AppendCertsFromPEM(caPEM)

    server := &http.Server{
        Addr: ":443",
        TLSConfig: &tls.Config{
            // Require and verify the Quicknode client certificate
            ClientCAs:  clientCAs,
            ClientAuth: tls.RequireAndVerifyClientCert,
        },
    }
    http.HandleFunc("/webhook", func(w http.ResponseWriter, r *http.Request) {
        w.WriteHeader(http.StatusOK)
    })
    server.ListenAndServeTLS("server.pem", "server.key")
}
Use Check Connection after configuring. It performs a full mTLS handshake against your endpoint, so a trust-store mistake shows up immediately rather than at delivery time. If your server later rejects deliveries (for example, the CA file is removed from its config), the stream retries and then pauses; deliveries resume automatically once the configuration is fixed and the stream reactivates.
Defense in depth: The three security mechanisms answer different questions and are designed to be combined:
| Layer | Question it answers |
|---|---|
| IP allowlisting | Did this connection come from Quicknode's network? |
| mTLS client certificate | Is the connecting party really Quicknode? (verified before any data is accepted) |
| HMAC signature | Is this payload authentic and intended for my stream? (per-payload, per-stream) |
Because every stream presents the same Quicknode client certificate, mTLS proves who is connecting. Keep verifying the HMAC signature to confirm which stream a payload belongs to.
IP Allowlisting
Quicknode Streams delivers webhooks from IP address 141.148.40.227. Restricting your endpoint to this IP provides an additional security layer.
Testing
For development and testing, you can use free webhook testing services:
- webhook.site — Instantly get a unique URL to receive and inspect payloads
- typedwebhook.tools — Similar service with additional features
Click Check Connection to verify your endpoint is reachable before creating the stream.
Example Webhook Server
Here's a simple webhook server that receives stream data and returns a 200 response. All examples listen on port 3000.
- Node.js
 Python
- Go
- Ruby
- PHP
- Java
- Rust
const http = require('http');

const server = http.createServer((req, res) => {
  if (req.method === 'POST' && req.url === '/webhook') {
    let body = '';
    req.on('data', chunk => { body += chunk; });
    req.on('end', () => {
      console.log('Headers:', req.headers);
      console.log('Body:', JSON.parse(body));
      res.writeHead(200, { 'Content-Type': 'application/json' });
      res.end(JSON.stringify({ status: 'received' }));
    });
  } else {
    res.writeHead(404);
    res.end();
  }
});

server.listen(3000, () => console.log('Webhook server running on port 3000'));
from flask import Flask, request, jsonify

app = Flask(__name__)

@app.route('/webhook', methods=['POST'])
def webhook():
    print('Headers:', dict(request.headers))
    print('Body:', request.get_json())
    return jsonify({'status': 'received'}), 200

if __name__ == '__main__':
    app.run(port=3000)
package main

import (
    "encoding/json"
    "fmt"
    "io"
    "net/http"
)

func webhookHandler(w http.ResponseWriter, r *http.Request) {
    if r.Method != http.MethodPost {
        http.Error(w, "Method not allowed", http.StatusMethodNotAllowed)
        return
    }

    body, _ := io.ReadAll(r.Body)
    defer r.Body.Close()

    var data map[string]interface{}
    json.Unmarshal(body, &data)

    fmt.Println("Headers:", r.Header)
    fmt.Println("Body:", data)

    w.Header().Set("Content-Type", "application/json")
    w.WriteHeader(http.StatusOK)
    json.NewEncoder(w).Encode(map[string]string{"status": "received"})
}

func main() {
    http.HandleFunc("/webhook", webhookHandler)
    fmt.Println("Webhook server running on port 3000")
    http.ListenAndServe(":3000", nil)
}
require 'sinatra'
require 'json'

set :port, 3000

post '/webhook' do
  request.body.rewind
  body = JSON.parse(request.body.read)

  puts "Headers: #{request.env.select { |k, _| k.start_with?('HTTP_') }}"
  puts "Body: #{body}"

  content_type :json
  { status: 'received' }.to_json
end
<?php
header('Content-Type: application/json');

if ($_SERVER['REQUEST_METHOD'] === 'POST' && $_SERVER['REQUEST_URI'] === '/webhook') {
    $headers = getallheaders();
    $body = json_decode(file_get_contents('php://input'), true);

    error_log('Headers: ' . print_r($headers, true));
    error_log('Body: ' . print_r($body, true));

    http_response_code(200);
    echo json_encode(['status' => 'received']);
} else {
    http_response_code(404);
}
?>
Run with: php -S localhost:3000
import com.sun.net.httpserver.HttpServer;
import com.sun.net.httpserver.HttpHandler;
import com.sun.net.httpserver.HttpExchange;
import java.io.*;
import java.net.InetSocketAddress;

public class WebhookServer {
    public static void main(String[] args) throws IOException {
        HttpServer server = HttpServer.create(new InetSocketAddress(3000), 0);
        server.createContext("/webhook", new WebhookHandler());
        server.start();
        System.out.println("Webhook server running on port 3000");
    }

    static class WebhookHandler implements HttpHandler {
        @Override
        public void handle(HttpExchange exchange) throws IOException {
            if ("POST".equals(exchange.getRequestMethod())) {
                BufferedReader reader = new BufferedReader(
                    new InputStreamReader(exchange.getRequestBody()));
                StringBuilder body = new StringBuilder();
                String line;
                while ((line = reader.readLine()) != null) {
                    body.append(line);
                }

                System.out.println("Headers: " + exchange.getRequestHeaders());
                System.out.println("Body: " + body);

                String response = "{\"status\": \"received\"}";
                exchange.sendResponseHeaders(200, response.length());
                OutputStream os = exchange.getResponseBody();
                os.write(response.getBytes());
                os.close();
            }
        }
    }
}
use actix_web::{web, App, HttpRequest, HttpServer, HttpResponse};
use serde_json::Value;

async fn webhook(req: HttpRequest, body: web::Json<Value>) -> HttpResponse {
    println!("Headers: {:?}", req.headers());
    println!("Body: {:?}", body);

    HttpResponse::Ok().json(serde_json::json!({"status": "received"}))
}

#[actix_web::main]
async fn main() -> std::io::Result<()> {
    println!("Webhook server running on port 3000");
    HttpServer::new(|| {
        App::new().route("/webhook", web::post().to(webhook))
    })
    .bind("127.0.0.1:3000")?
    .run()
    .await
}
Add to Cargo.toml:
[dependencies]
actix-web = "4"
serde_json = "1"
Exposing Your Local Server
To receive webhooks during development, expose your local server to the internet using ngrok:
ngrok http 3000
This gives you a public URL (e.g., https://abc123.ngrok.io) that you can use as your webhook destination. The /webhook path will be https://abc123.ngrok.io/webhook.
Other Destinations
Archive to Amazon S3, GCS, Backblaze B2, and more.
Microsoft Azure cloud storage with enterprise features.
Store in a relational database for SQL queries and joins.
Stream to Apache Kafka for high-throughput pipelines.