6 min read
Overview
Prefer a video walkthrough? Follow along with Sahil and learn how to build a React frontend with wagmi in under 8 minutes.
wagmi is an open-source collection of React Hooks that provides developers with a simple and efficient way to interact with the Ethereum blockchain. In this guide, we'll teach you all about the wagmi library and show you how to use it to build a fully functional frontend using React, Viem and Bootstrap.
What You Will Do
- Learn about wagmi and its use cases
- Access an Ethereum endpoint using QuickNode
- Build a frontend that can connect to a wallet and display account information
What You Will Need
- A basic understanding of React
- Familiarity with Ethereum and smart contracts
- A code editor (e.g., Visual Studio Code)
- wagmi, Bootstrap and React installed
What is wagmi?
wagmi is a development tool for EVM-based blockchains that provides over 20 React hooks for interacting with wallets, contracts, and transactions. It has built-in wallet connectors for popular wallets like MetaMask, WalletConnect, and Coinbase Wallet. The tool offers various features such as caching, request deduplication, multicall, batching, and persistence. Additionally, wagmi can automatically refresh data on changes in the wallet, block, or network. It is written in TypeScript, and developers can infer types from ABIs and EIP-712 Typed Data. The tool also includes a command-line interface for managing ABIs and code generation. Lastly, wagmi has a test suite running against a forked Ethereum network.
Creating a QuickNode Endpoint
You'll need an API endpoint to communicate with the Ethereum network. You're welcome to use public nodes or deploy and manage your own infrastructure; however, if you'd like 8x faster response times, you can leave the heavy lifting to us. Sign up for a free account here.
Once signed in, click the Create an endpoint button and select the Ethereum mainnet chain. Finally, click Create.
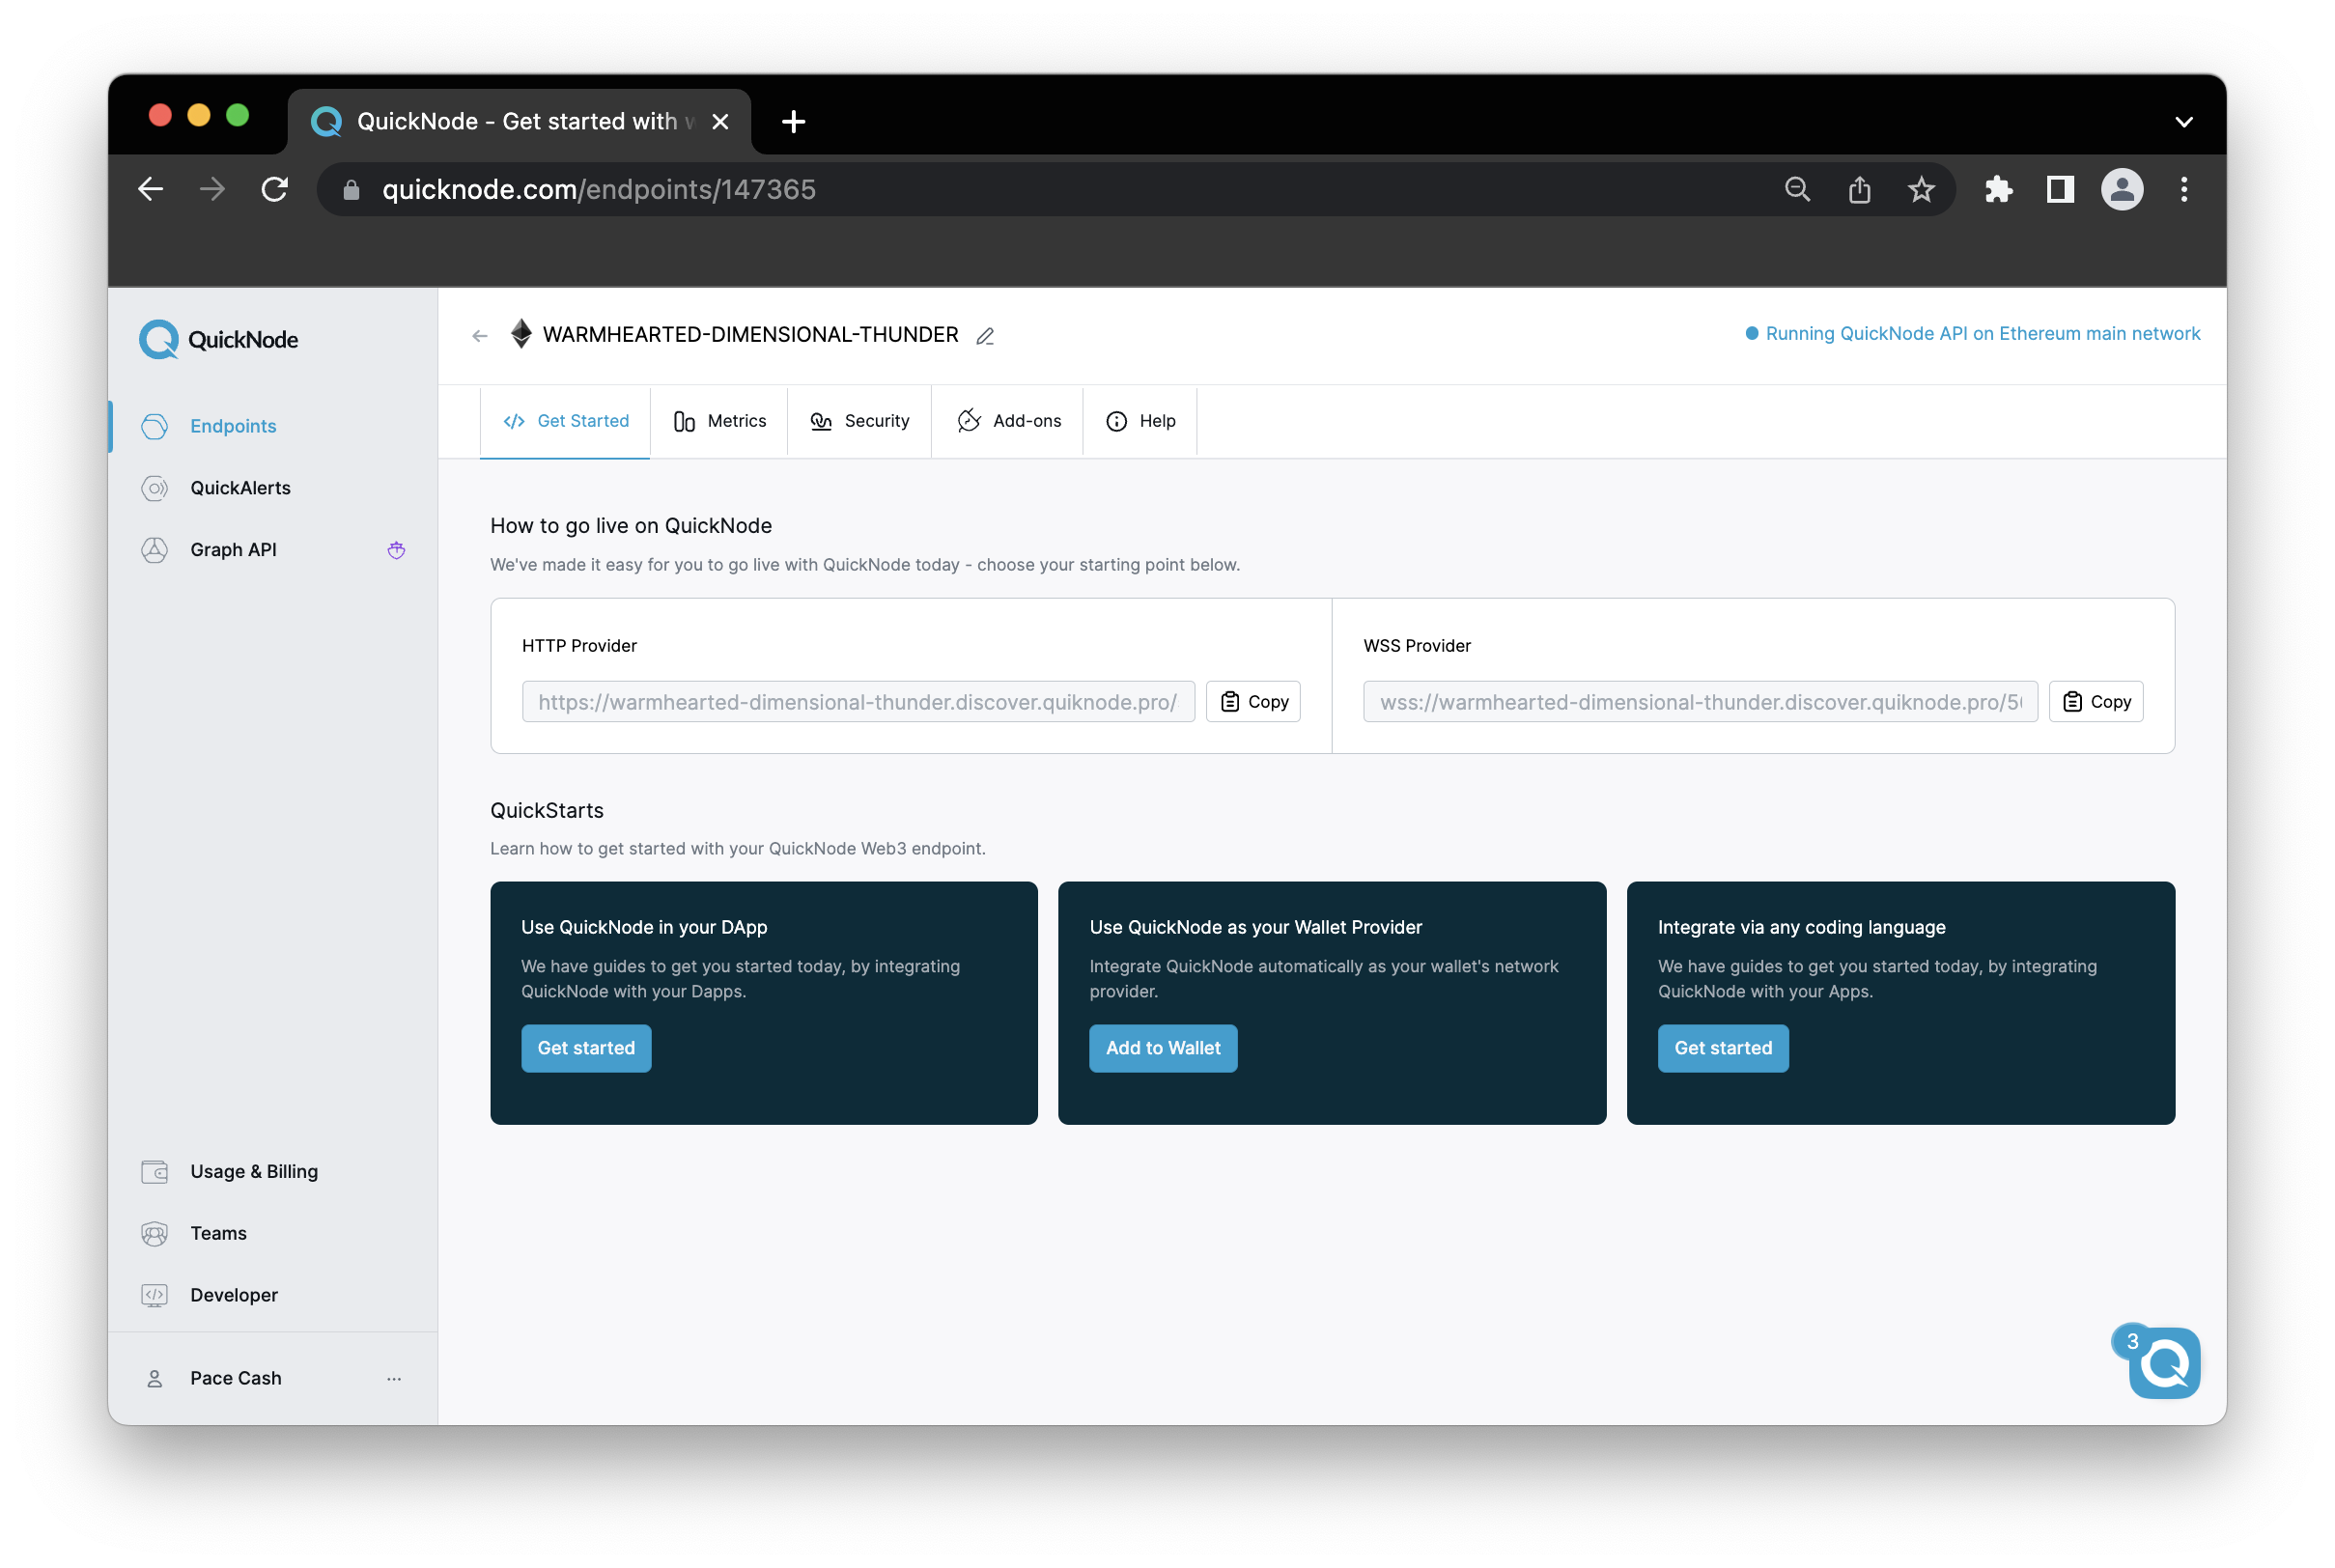
Keep the HTTP Provider URL above handy as you'll need it later. Now, enough chit-chat, time for building! In the next section, we'll use wagmi, React and our QuickNode endpoint to build a fully working frontend that can connect to a wallet, display the address and account balance.
Building a Frontend using React and wagmi
To kick-off development, let's open a terminal window and run the following command to create a react project called wagmi-project and install the required dependencies:
npx create-react-app wagmi-project && cd wagmi-project && npm i wagmi bootstrap
If you run into an installation error with wagmi, use the legacy API flag: npm i wagmi --legacy-peer-deps
Then, open the project in a code editor and navigate to the App.js file. Replace the existing code with the code below:
import { WagmiConfig, createConfig, configureChains, mainnet } from 'wagmi'
import { useAccount, useConnect, useDisconnect, useBalance } from 'wagmi'
import { InjectedConnector } from 'wagmi/connectors/injected'
import { jsonRpcProvider } from 'wagmi/providers/jsonRpc';
import 'bootstrap/dist/css/bootstrap.min.css'; // import Bootstrap CSS
const { chains, publicClient } = configureChains(
[mainnet],
[
jsonRpcProvider({
rpc: () => ({
http: "QUICKNODE_HTTP_PROVIDER_URL" // 👈 Replace this with your HTTP URL from the previous step
}),
})
]
);
const config = createConfig({
autoConnect: true,
publicClient,
connectors: [
new InjectedConnector({
chains,
options: {
name: 'Injected',
shimDisconnect: true,
},
})
]
})
function Profile() {
const { address } = useAccount()
const { connect, isConnecting } = useConnect({
connector: new InjectedConnector(),
})
const { disconnect } = useDisconnect()
const { data, isError, isLoading } = useBalance({
address: address,
})
if (address) {
return (
<div className="d-flex justify-content-center align-items-center vh-100">
<div className="text-center">
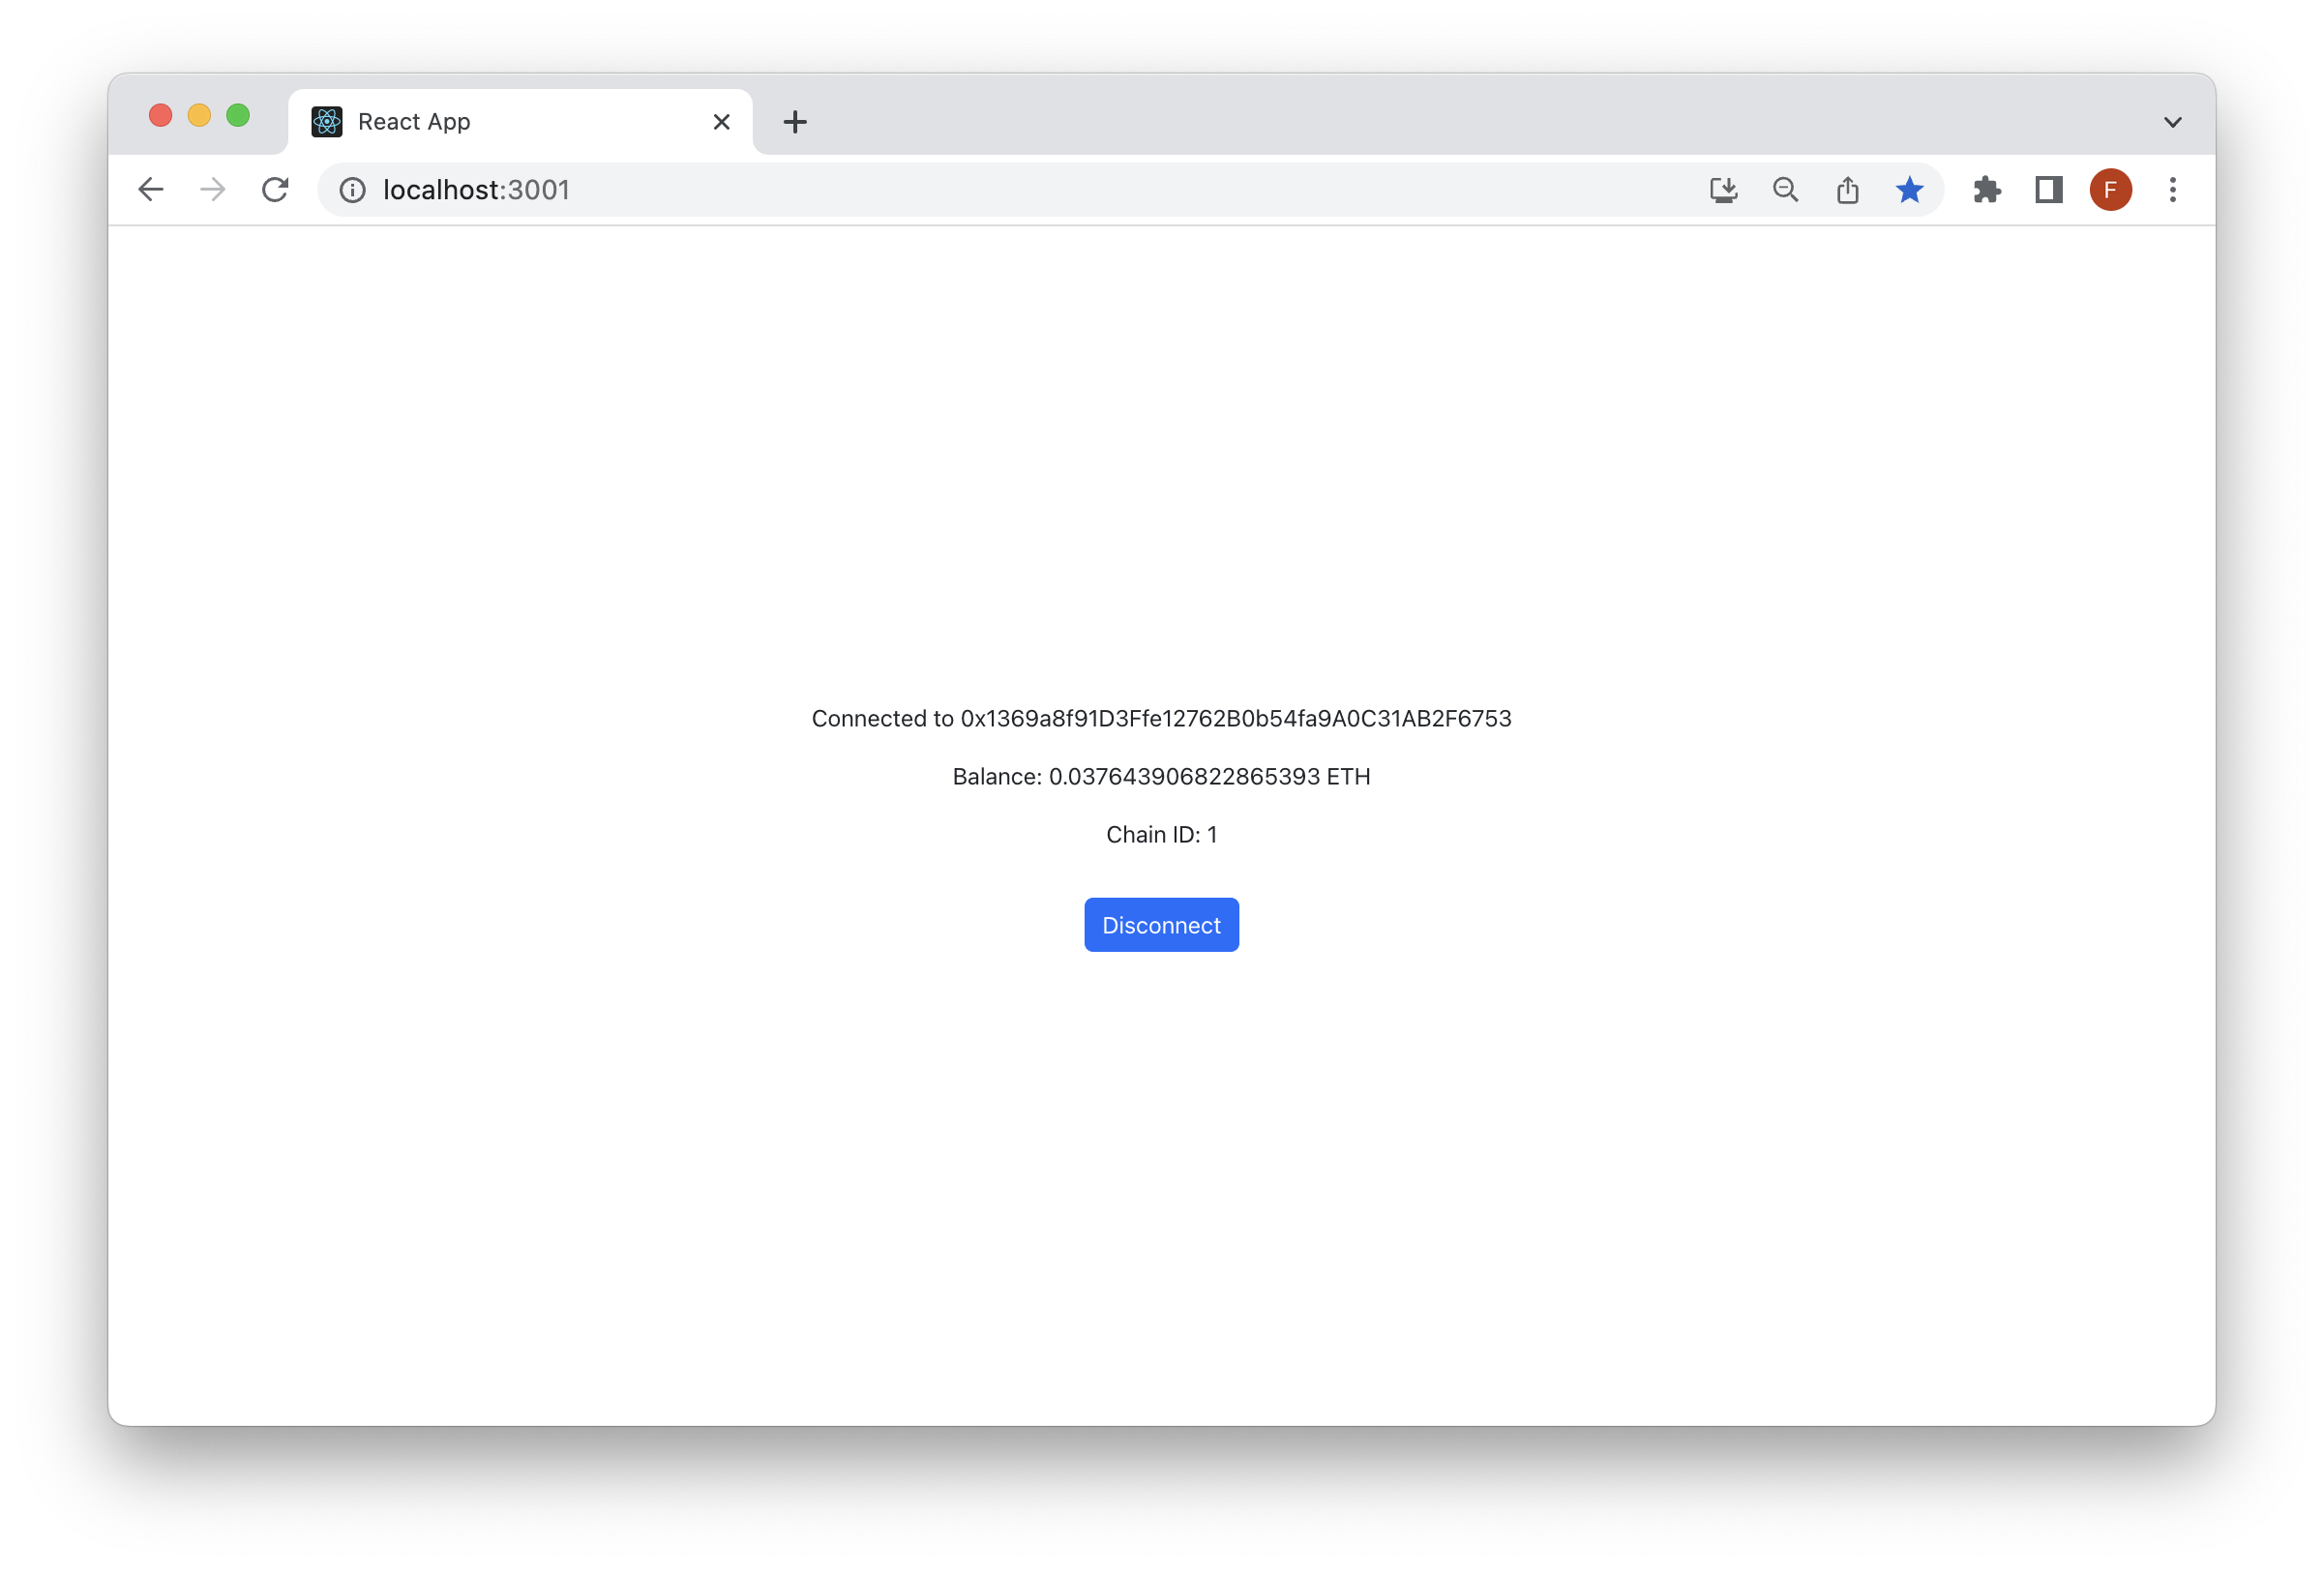
<p>Connected to {address}</p>
<p>Balance: {data ? data.formatted : "Loading..."} ETH</p>
<p>Chain ID: {config ? config.lastUsedChainId : ""}</p>
<button className="btn btn-primary mt-3" onClick={disconnect}>Disconnect</button>
</div>
</div>
)
}
if (isConnecting) {
return (
<div className="d-flex justify-content-center align-items-center vh-100">
<p>Connecting...</p>
</div>
)
}
return (
<div className="d-flex justify-content-center align-items-center vh-100">
<button className="btn btn-primary" onClick={() => connect()}>Connect Wallet</button>
</div>
)
}
function App() {
return (
<WagmiConfig config={config}>
<Profile/>
</WagmiConfig>
)
}
export default App;
You can now access Logs for your RPC endpoints, helping you troubleshoot issues more effectively. If you encounter an issue with your RPC calls, simply check the logs in your QuickNode dashboard to identify and resolve problems quickly. Learn more about log history limits on our pricing page.
NOTE: Remember to replace the QUICKNODE_HTTP_PROVIDER_URL placeholder in the configureChains hook to have your QuickNode HTTP URL.
Let's take a moment to review the code.
The code imports various modules from the 'wagmi' library to create a client, connect to a blockchain network, and retrieve data from the blockchain. Here's a breakdown of the code:
For our imports, we'll include the following:
configureChainsis used to configure the available blockchain networks to connect to. In this code, it configures the mainnet network.createConfigis used to create a configuration object for the Wagmi client (i.e.,publicClient).useAccount,useConnect,useDisconnect, anduseBalanceare hooks provided by Wagmi that allow developers to interact with the user's wallet and retrieve account information and balance.InjectedConnectoris a connector provided by Wagmi that enables connecting to the user's wallet if it supports the Web3 API.jsonRpcProvideris used to configure the JSON-RPC provider for interacting with the blockchain network.bootstrap/dist/css/bootstrap.min.cssimports the CSS styles from Bootstrap for styling the components.
The rest of the code defines the Profile component and the App component. The Profile component handles the rendering of wallet-related information based on the current wallet status. The App component wraps the Profile component with the WagmiConfig component, providing the config object. The WagmiConfig component ensures that the config object is available to the Profile component and other child components within the Wagmi context.
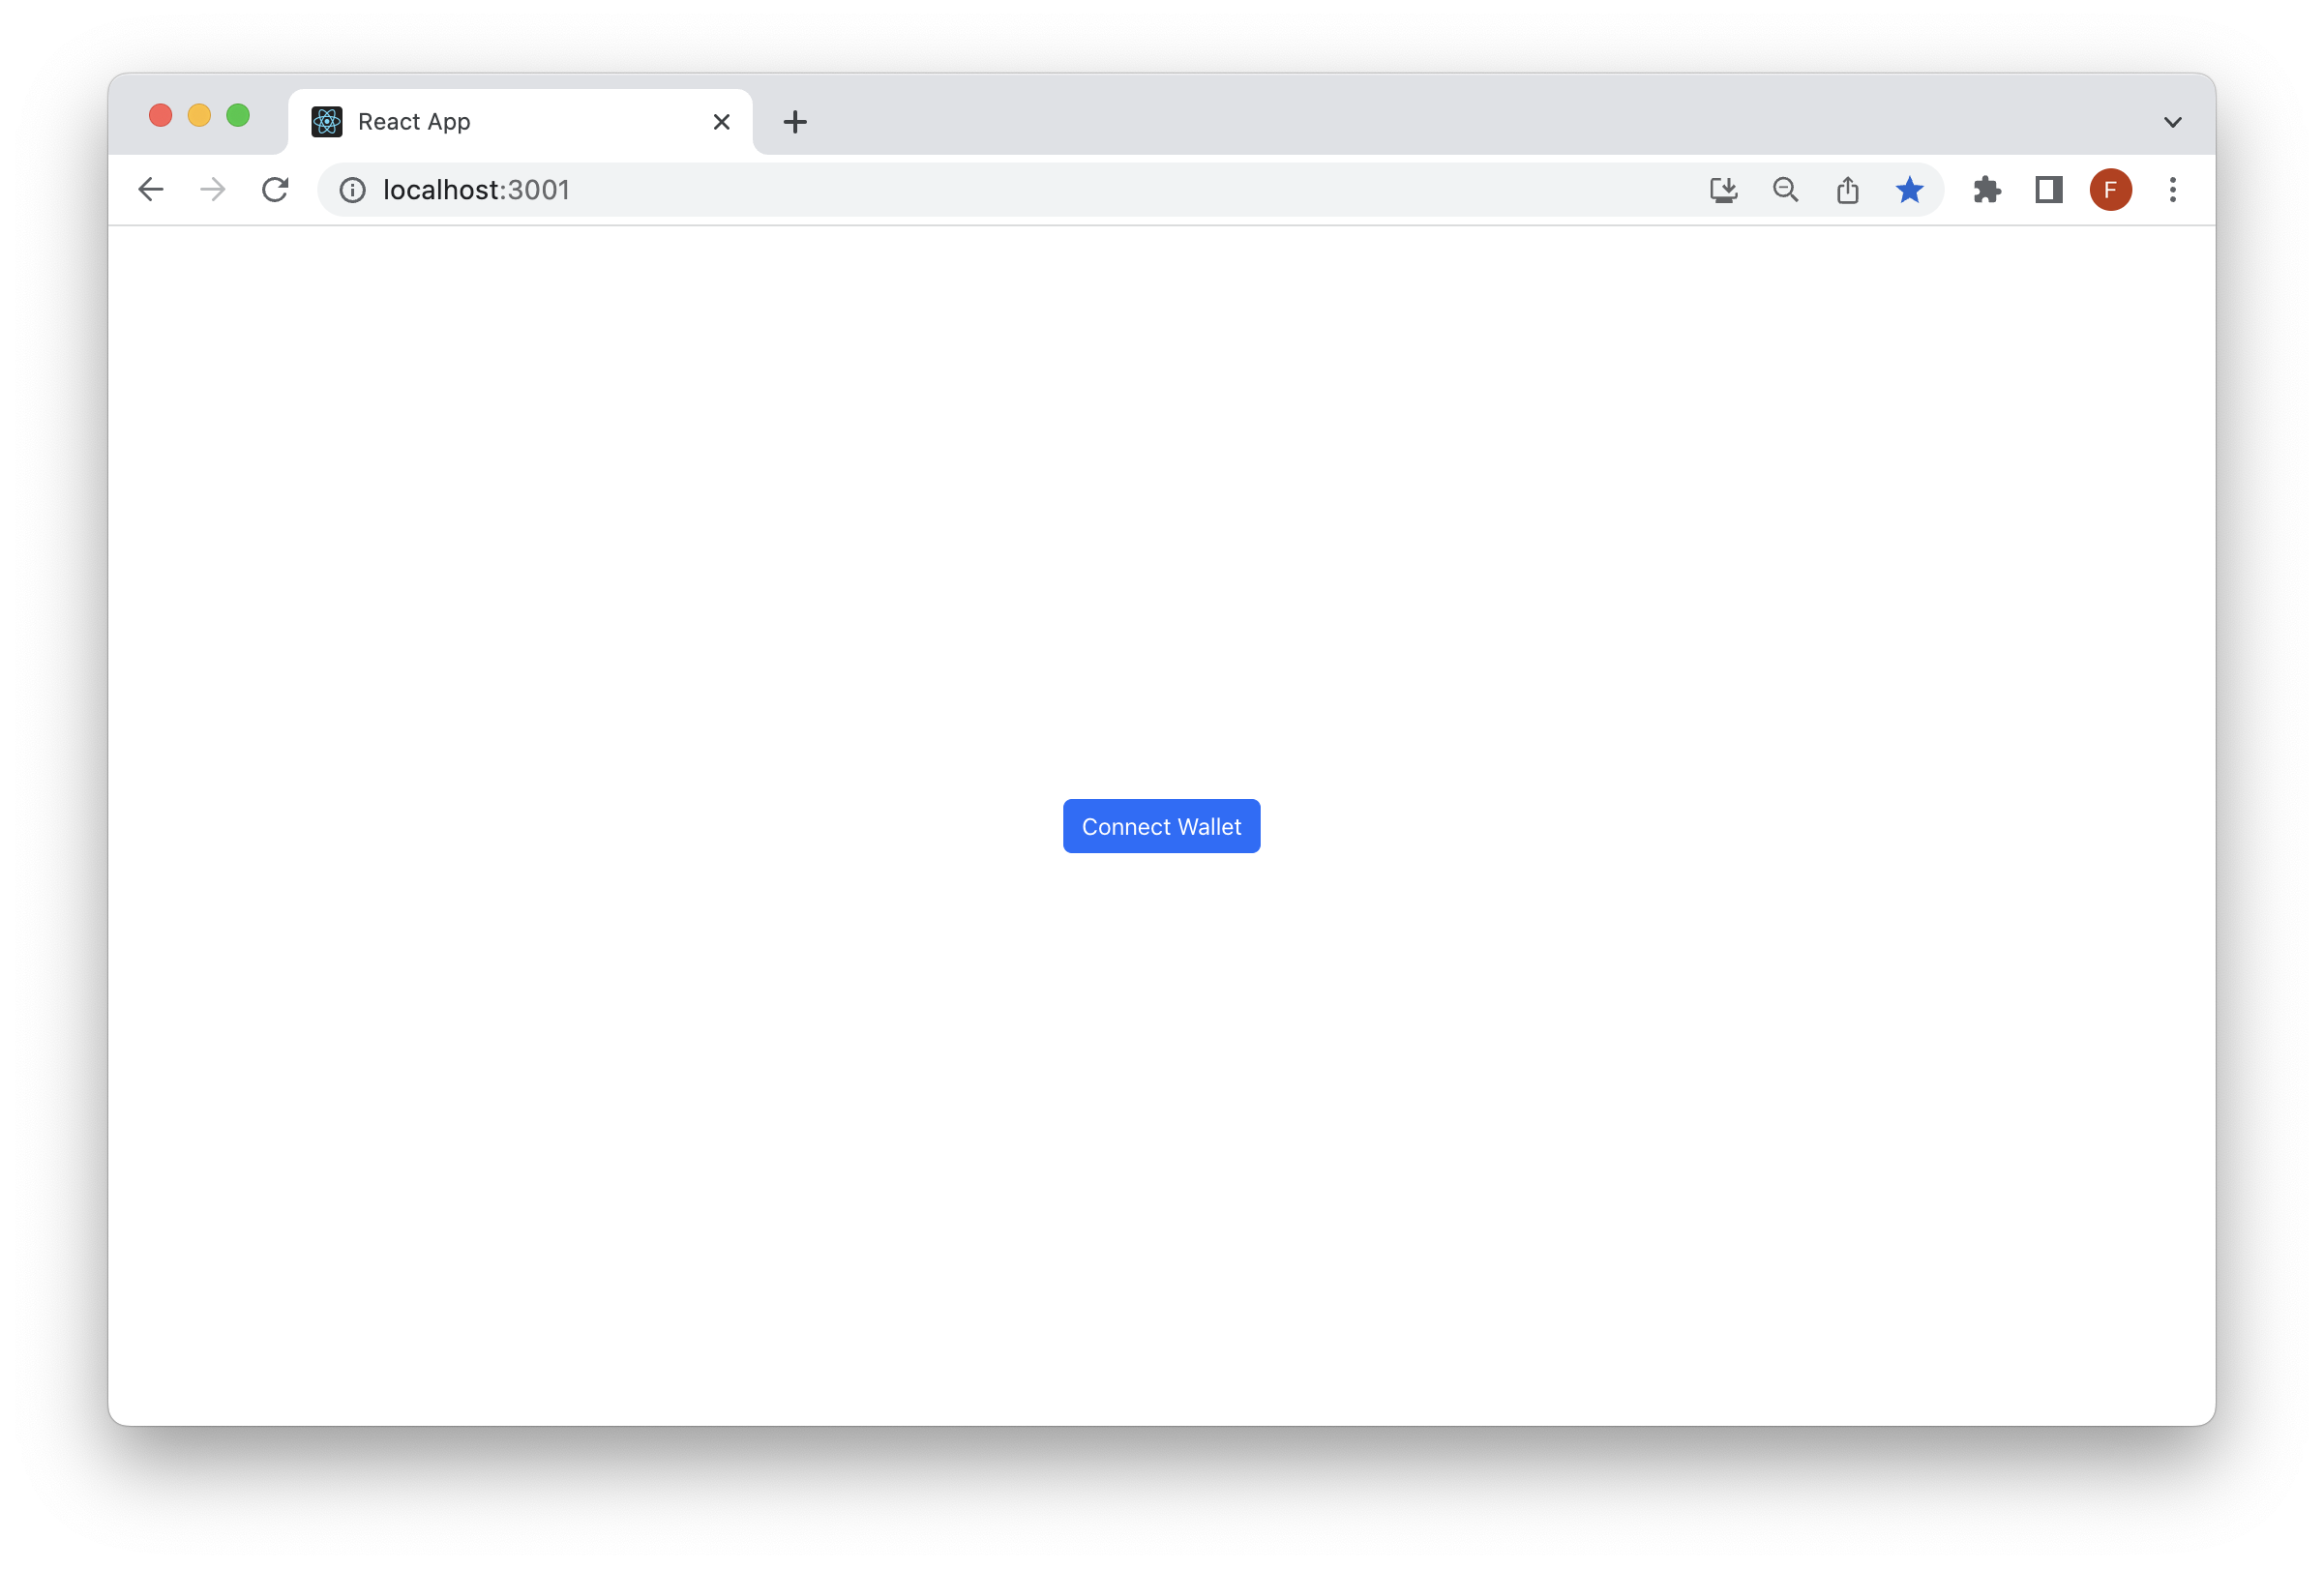
Now, with the code saved, let's spin up the React app. In your terminal window, run the following command to start the server.
npm start
Start interacting with the app.
If you'd like to build on top of this frontend with some other functionality, try some of these suggestions below:
- Add multi-chain support: Currently, the code is only configured for the mainnet. It would be helpful to include support for other chains, such as testnets or sidechains. This would require adding additional configurations to the
configureChainsfunction and modifying theProfilecomponent to display the chain ID. - Add send functionality: Add functionality for users to send transactions directly from the frontend. This would involve adding a new component that allows users to enter transaction details and send them to the network. This component would interact with the
configobject to send the transaction and update the user's balance. To learn how to send Ether in a transaction, check out this QuickNode guide. - Adding support for NFTs: Add functionality to display the user's NFT holdings and allow them to buy, sell, or trade NFTs directly from the frontend. This would require adding a new component to display NFT information and modifying the
configobject to interact with NFT contracts. Check out this QuickNode guide to learn how to retrieve data from the NFT API and create a gallery using React.
If you want to continue building with React, check out our selection of Web3 & React related content here.
Final Thoughts
Congrats! You have successfully built a React frontend with wagmi and Bootstrap. Expand on your new knowledge and build on top of this React app with some of the suggestions above.
We would love to hear more about what you are building. Drop us a line in Discord, or give us a follow on Twitter to stay up to date on all the latest information!
We ❤️ Feedback!
If you have any feedback on this guide, let us know. We'd love to hear from you.