
10 min read
Overview
Web3, often referred to as the decentralized internet, is a set of protocols and technologies that enable applications on the blockchain. This guide aims to walk you through the process of creating a Web3-enabled Chrome extension. By the end, you will be able to create a Chrome extension that can view the balance of an address on the blockchain.
What You Will Need
- Basic understanding of Ethereum
- A Quicknode Endpoint (you can create one for free here)
- A Google Chrome Browser
- A Code Editor (e.g., VSCode)
| Dependency | Version |
|---|---|
| copy-webpack-plugin | ^11.0.0 |
| webpack | ^5.88.2 |
| webpack-cli | ^5.1.4 |
What You Will Do
- Learn about Google Chrome Extensions
- Create a Web3 Chrome Extension
- Test the Web3 Chrome Extension by fetching the Ether balance of an address
Google Chrome Extensions
A Chrome extension is a small software program that customizes and enhances the functionality of the Chrome browser. They are written using standard web technologies like HTML, CSS, and JavaScript.
Popular Web3 Chrome extensions today consist of:
- Wallets: These are non-custodial wallets that allow users to manage their cryptocurrencies directly from their browsers without entrusting their keys to a third party. Prominent examples are MetaMask (widely used for Ethereum and Ethereum-compatible chains), Phantom (popular for the Solana ecosystem), and Solflare (another choice for Solana users).
- Gas Estimators: Given the fluctuating nature of transaction costs on blockchain networks, gas estimator extensions offer users real-time insights into the current gas prices, helping them make informed decisions about when to send transactions. Extensions like 'ETH Gas Price' are invaluable to users who want to optimize their transaction costs on the Ethereum network.
- Trackers: These extensions are dedicated to providing real-time price information about various cryptocurrencies. Price trackers like Crypto Price Tracker or CoinMarketCap's extension give users quick access to current cryptocurrency valuations without having to visit specific websites.
Privacy Requirements
Given the financial nature of many Web3 applications, ensuring user privacy is crucial. Developers should:
- Use encrypted connections (HTTPS) when communicating with external services.
- Store sensitive data, like private keys, securely and never in plain text.
- Only request essential permissions to reduce the potential attack surface.
- Clearly inform users about any data collection and adhere to data protection regulations like GDPR or CCPA.
- Regularly audit and update the extension to address potential vulnerabilities.
Check out the Google Chrome Extension FAQ & Best Practices for more information.
Preview the Chrome Extension You'll Build
The Chrome extension we build will look and function as below:
Note that this guide will only show you local development of the Chrome extension without publishing it to the Chrome store.
Ready? Let's get to building!
Create a Quicknode Endpoint
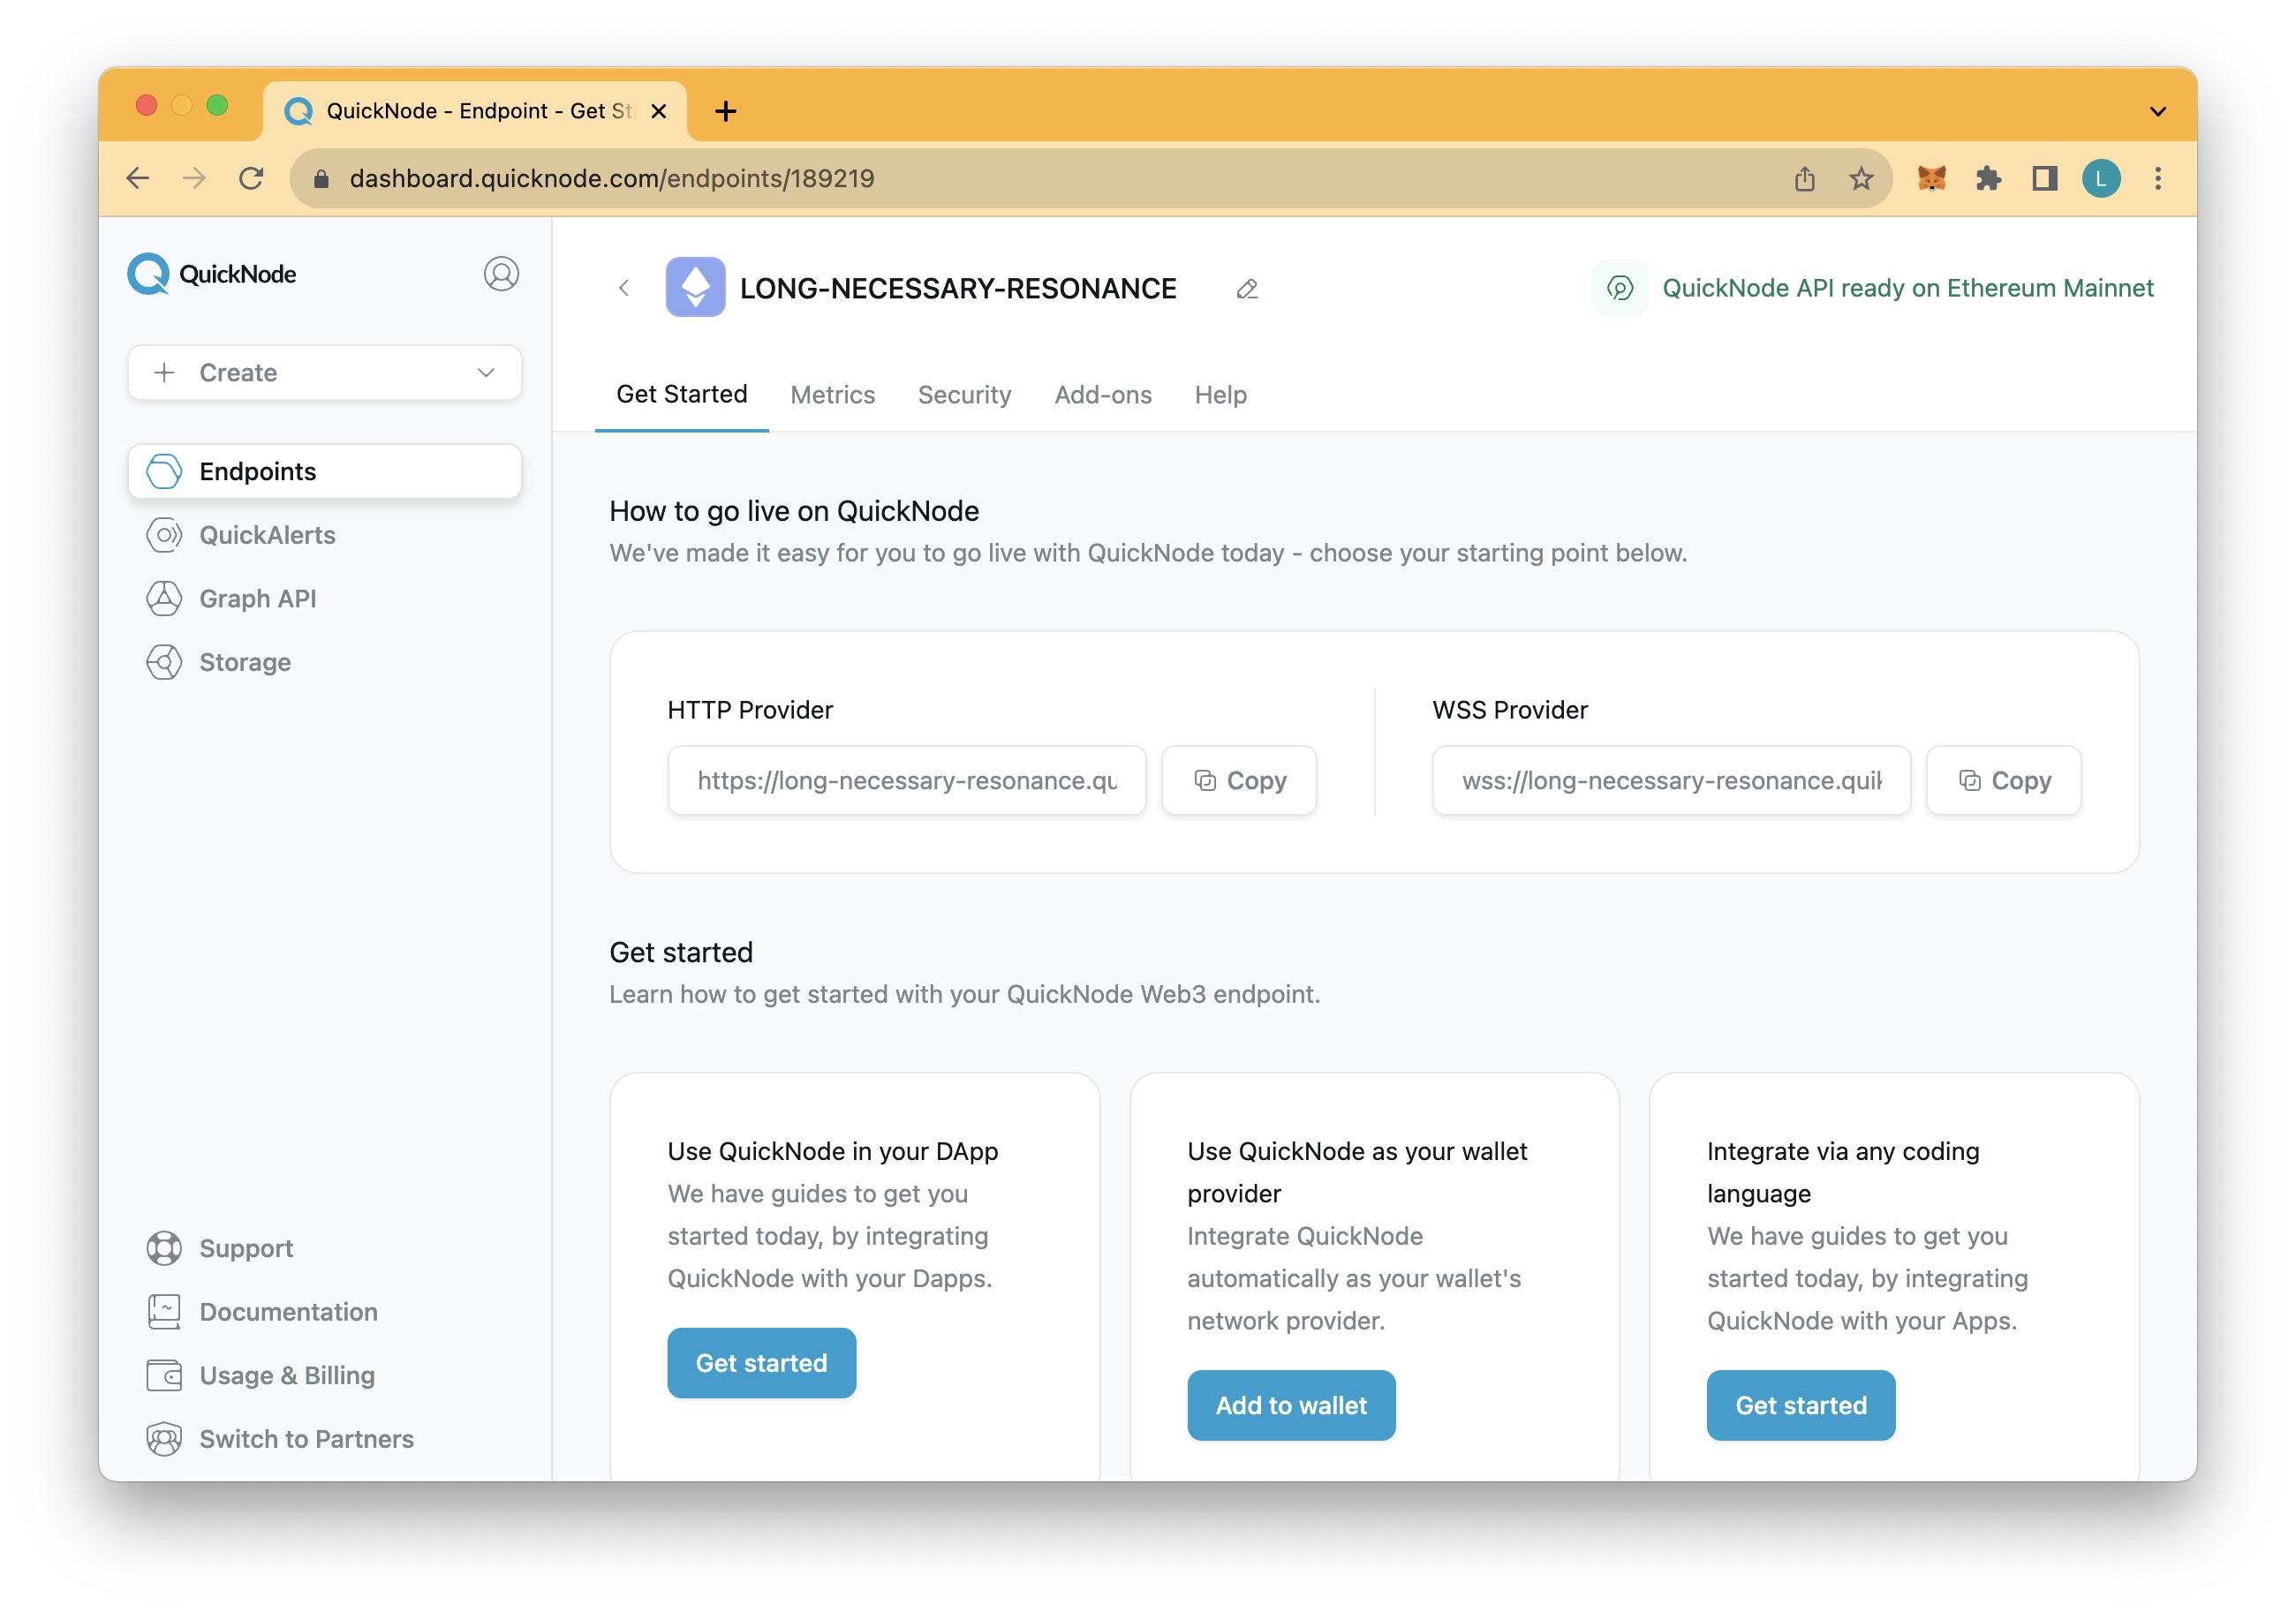
In order to communicate with the Ethereum network, we'll need access to an RPC endpoint. Instead of running our own node and managing its infrastructure, we'll leave the heavy lifting to Quicknode. Quicknode provides up to 8x faster response times. You can create an account here.
Once logged in, select Create an Endpoint and select the Ethereum Mainnet blockchain. Once created, keep the HTTP Provider URL handy, as you'll need it in the following section.
Create the Web3 Chrome Extension
We'll begin by setting up our project folder with all the required files. In your terminal window, run the following commands to create a folder with its necessary files:
mkdir web3-chrome-ext
cd web3-chrome-ext
npm init --y
mkdir src && mkdir static
echo > webpack.config.js
cd src && echo > popup.js && echo > serviceWorker.js
cd ..
cd static && echo > popup.html && echo > manifest.json
cd ..
Let's also install the required dependencies:
npm i webpack webpack-cli copy-webpack-plugin
Then, we'll open up the manifest.json file and input the following configuration:
{
    "manifest_version": 3,
    "name": "Web3 Extension",
    "version": "1",
    "description": "Web3 Extension to view Ether balances on Ethereum",
    "action": {
        "default_popup": "popup.html"
    }
}
Let's recap the file above.
Every chrome extension requires a JSON-formatted file called manifest.json, this file sets important information about our chrome extension, such as the version, description, and action (which defines that we want rendered). Without this file, we won't be able to compile our chrome extension successfully.
Note: We did not include an icon for our chrome extension; however, if you would like to include one, you would add an icons object to the file above. Additionally, you would need to place the image icon into your project folder and reference the path properly. Since we are not including an icon in our project folder, a generic icon would be created.
Now, to configure our frontend UI, open the static/popup.html file and input the following code:
<!DOCTYPE html>
<html lang="en">
<head>
    <meta charset="UTF-8">
    <meta name="viewport" content="width=device-width, initial-scale=1.0">
    <title>Ethereum Balance Viewer</title>
    <style>
        body {
            font-family: Arial, sans-serif;
            background-color: #f4f4f4;
            padding: 20px;
            width: 300px;
        }

        input, button {
            width: 100%;
            padding: 10px;
            margin-top: 10px;
            box-sizing: border-box;
            border: 1px solid #aaa;
            border-radius: 4px;
            font-size: 16px;
        }

        button {
            background-color: #333;
            color: #fff;
            cursor: pointer;
            transition: background 0.3s;
        }

        button:hover {
            background-color: #555;
        }

        #result {
            margin-top: 15px;
            font-weight: bold;
            color: #333;
        }
    </style>
</head>
<body>
    <div>
        <input type="text" id="ethAddress" placeholder="Enter Ethereum Address">
        <button id="fetchBalance">Fetch Balance</button>
    </div>
    <div id="result"></div>
    <script src="popup.bundle.js"></script>
</body>
</html>
To configure the backend logic for the UI, open the src/popup.js file and input the following code:
document.getElementById('fetchBalance').addEventListener('click', function() {
    var address = document.getElementById('ethAddress').value;
    if (address) {
        getBalance(address);
    } else {
        document.getElementById('result').innerText = 'Please enter an Ethereum address';
    }
});

function getBalance(address) {
    var myHeaders = new Headers();
    myHeaders.append("Content-Type", "application/json");

    var raw = JSON.stringify({
        "method": "eth_getBalance",
        "params": [address, "latest"],
        "id": 1,
        "jsonrpc": "2.0"
    });

    var requestOptions = {
        method: 'POST',
        headers: myHeaders,
        body: raw,
        redirect: 'follow'
    };

    fetch("YOUR_QUICKNODE_ENDPOINT", requestOptions)
        .then(response => response.json())
        .then(data => {
            if (data.result) {
                var balanceInEther = parseInt(data.result, 16) / 1e18;
                var balanceFixed = balanceInEther.toFixed(2)
                document.getElementById('result').innerText = `Balance: ${balanceFixed} ETH`;
            } else {
                document.getElementById('result').innerText = 'Error fetching balance';
            }
        })
        .catch(error => {
            document.getElementById('result').innerText = 'Error fetching balance';
            console.log('error', error);
        });
}
** In the file above, replace the YOUR_QUICKNODE_ENDPOINT placeholder with your actual Quicknode Provider HTTP URL you created previously.** If you were to bring this chrome extension to production, you would not want to expose your private endpoint and would instead use a server-side pattern that handles requests to the API. Your chrome extension would send requests to your server (like a proxy), and your server would then add the necessary API credentials and forward that request to the API provider. This way, your API key resides only on your server and is never exposed to the client-side.
Let's recap the code above before moving on.
We first define an event listener for a button (i.e., fetchBalance) which we'll update once an ether balance is retrieved. Then, we define a function getBalance that makes a eth_getBalance RPC POST request via our Quicknode endpoint. eth_getBalance is an RPC method supported by Ethereum nodes. If the RPC request succeeds and returns a valid balance, it converts the balance from Wei to Ether and displays it in an element with ID result. If there's an error during fetch, an error message is shown.
Next, we'll configure the webpack.config.js file. This file will contain the configuration for Webpack in order for it bundle up our JavaScript and HTML code. Open the file and input the following code:
const path = require("path");
const CopyWebpackPLugin = require("copy-webpack-plugin")

module.exports = {
    entry: {
        popup: "./src/popup.js",
        serviceWorker: "./src/serviceWorker.js"
    },
    output: {
        filename: '[name].bundle.js',
        path: path.resolve(__dirname, 'dist')
    },
    devtool: 'source-map',
    mode: 'development',
    watch: true,
    plugins: [
        new CopyWebpackPLugin({
            patterns: [{from: 'static'}]
        })
    ]
}
Remember to save all the files before moving on!
Next, within your project's main directory, open your terminal window and run the following command:
npx webpack build
This will bundle the files in our src & static folder and create a new folder called dist, which we'll upload to the Extensions page.
Given that the command above was successful, now let's test it in Chrome.
- 1. Go to the Extensions page by entering chrome://extensions in a new tab. (By design chrome:// URLs are not linkable.)
- 2. Enable Developer Mode by clicking the toggle switch next to Developer mode.

- 3. Click the Load unpacked button and select the
distdirectory within yourweb3-chrome-extproject folder.
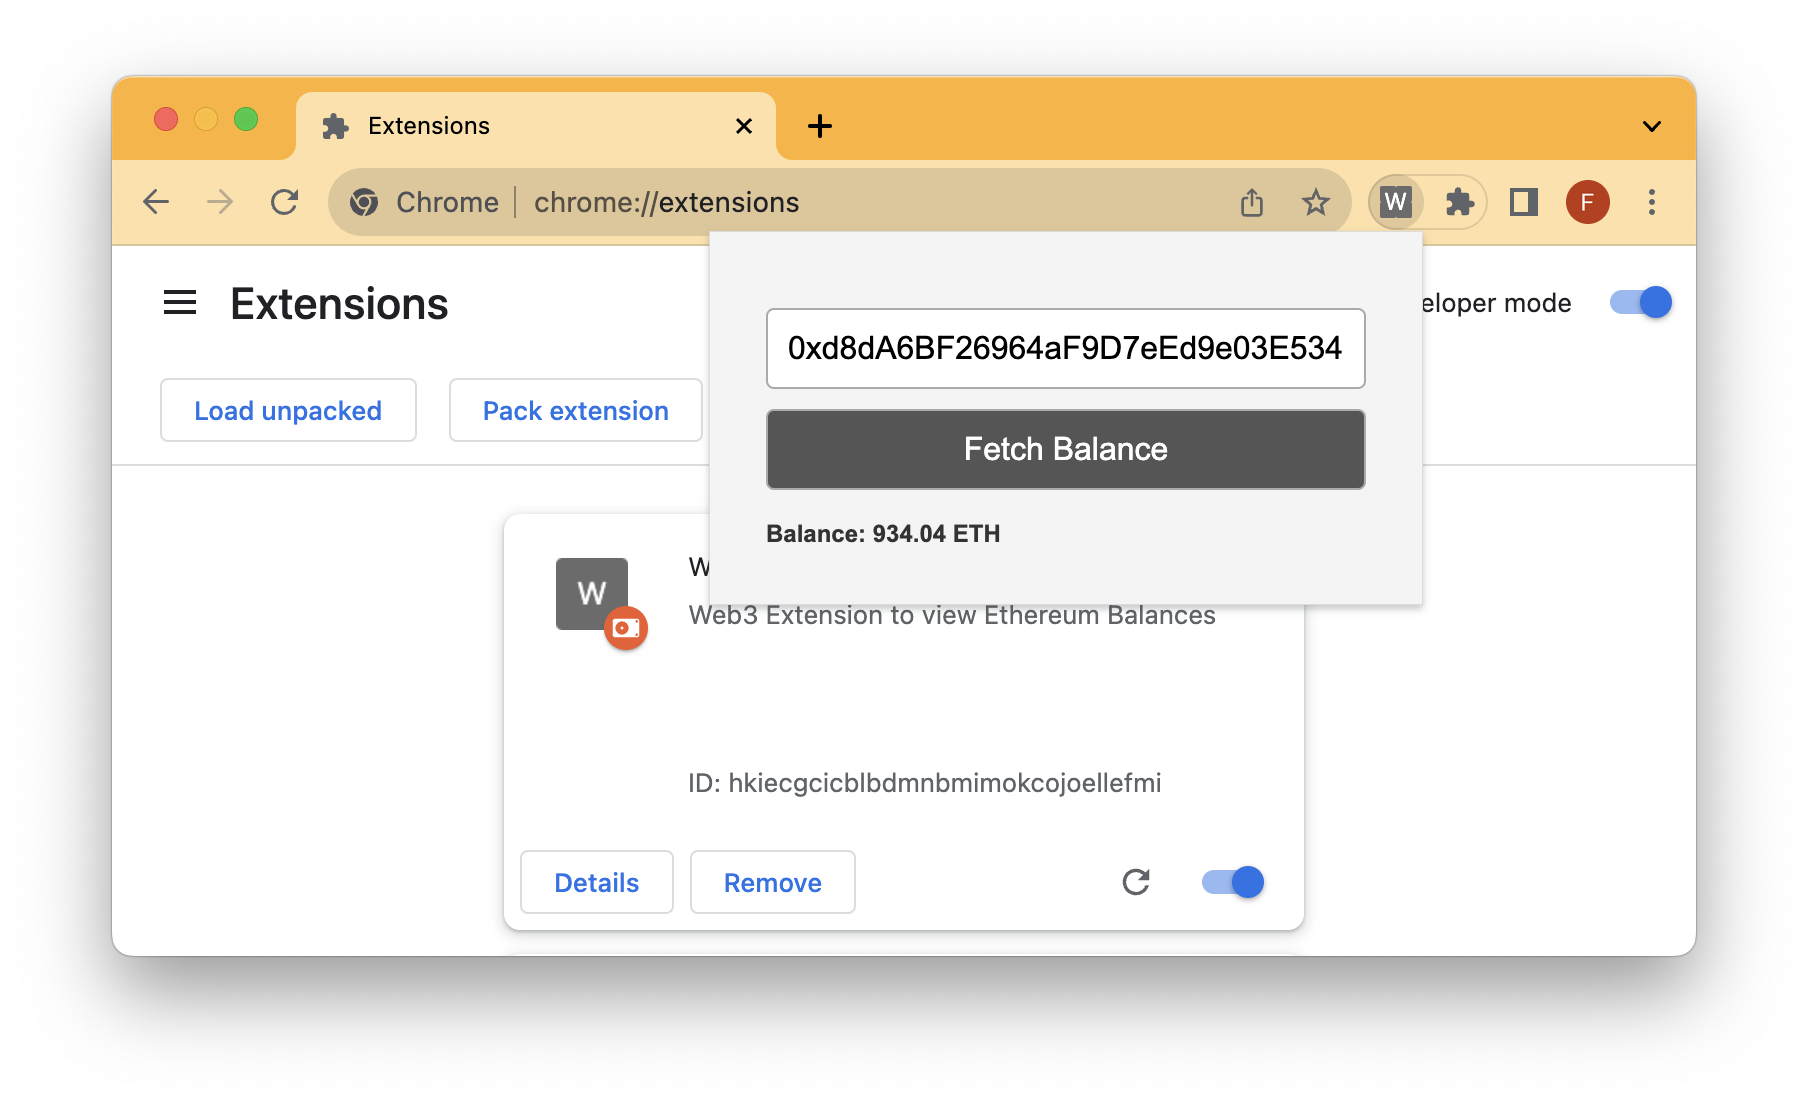
You should see the Extension load up on the screen. You can pin it by clicking the puzzle icon to the right of your Google search bar. Once pinned, click the Extension, and you should see the below:
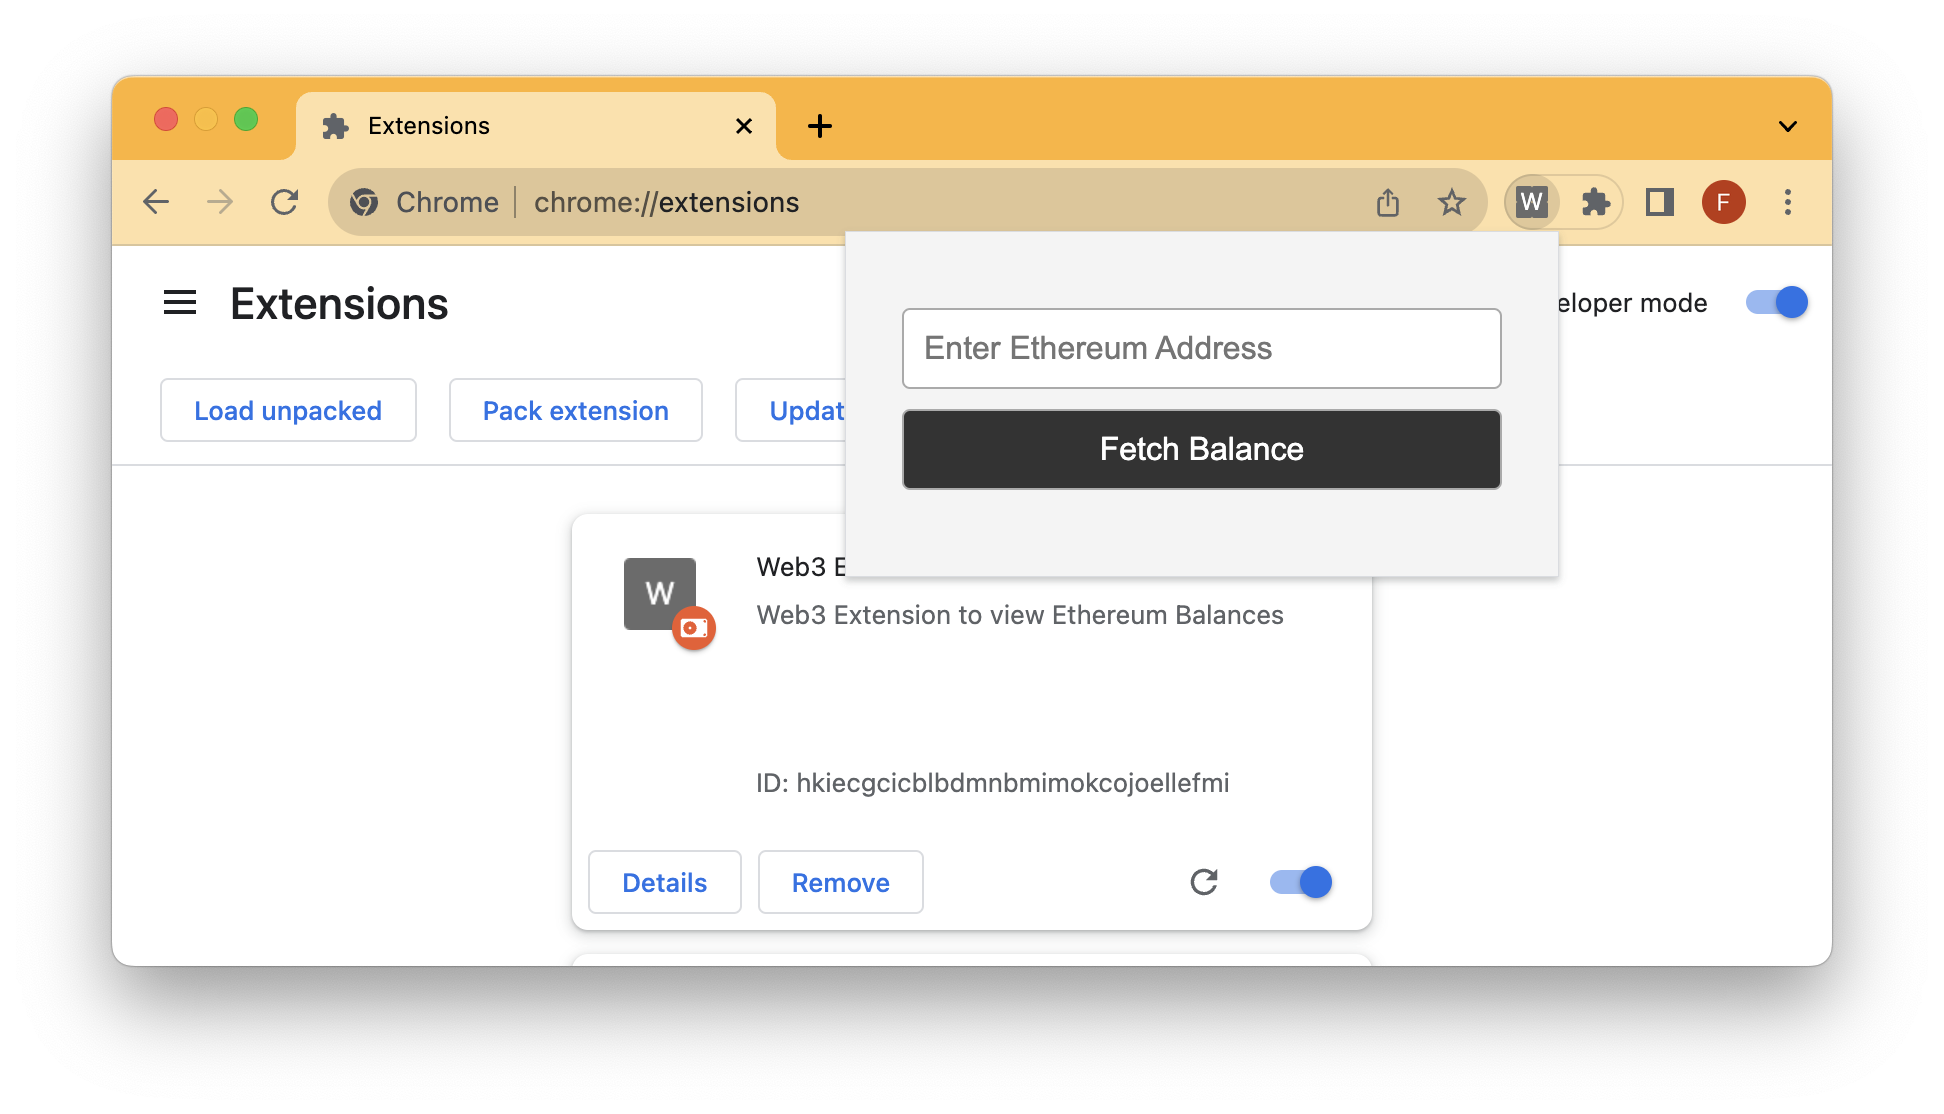
Put in an Ethereum address, and click the button to see its Ether balance. Try this address - 0xd8dA6BF26964aF9D7eEd9e03E53415D37aA96045 (hint it's Vitalik's) as an example. After fetching the balance, you'll see:
Up until this point, we showcased how to build a simple Chrome extension that can fetch Ether balances of an address. I challenge you to take it further and update the script to show balances of not just Ether but other ERC-20 tokens and potentially other NFTs!
Wrap Up
You've successfully built a Web3 Chrome Extension that interacts with the Ethereum blockchain. If you want to open this chrome extension to the public, you'll need to create a Google Developer Account. Also, remember to prioritize user privacy and security in your application by securing your API credentials and not storing sensitive user information.
If you have any questions, feel free to use our dedicated channel on Discord or provide feedback using the form below. Stay up to date with the latest by following us on Twitter and our Telegram announcement channel.
We ❤️ Feedback!
Let us know if you have any feedback or requests for new topics. We'd love to hear from you.