15 min read
Overview
When building a smart contract on the Ethereum blockchain, new developers tend to reach out to tools like truffle and web3.js in building their smart contracts. This tutorial will look at how to use Hardhat and Ether.js, which are now becoming the standard in building smart contracts.
Goals
In this tutorial, we will create, run, compile and deploy the smart contracts made using the Hardhat Ethereum development environment.
Prerequisites:
-
Node.js installed.
-
A little solidity knowledge
-
Working knowledge of React
Tools we will be using:
- Hardhat - Hardhat is the EVM we will run our solidity contracts on locally. It is similar to truffle, so you do not have to worry about coming from a truffle background.
- React - Our smart contract needs a UI, and the React framework will serve as the UI framework when we build the smart contract.
- Ethers.js (version 5.7) - The Ethers.js library allows us to interact with the data we have in the Ethereum blockchain and connect our frontend to the smart contract, which is very important when connecting to dApps.
Getting started with the project
Here we will look at how to set up our project and some essential packages we need to install. To initialize and configure our project, we need to create a directory to house our dApp. Since we will be using React as our UI library, we can use create-react-app to initialize a template project.
npx create-react-app moDappTut
Then we will incrementally add more packages and build up our dApp. Next, we will install Hardhat, Ethers.js (make sure you're on version 5.7), and other important libraries to create our dApp. Below is the list of packages we will install.
npm install ethers@5.7 hardhat @nomiclabs/hardhat-waffle ethereum-waffle @nomiclabs/hardhat-ethers chai
Looking at the section above, we already know what the Ethers and Hardhat package will be used for. We also have supporting packages from @nomiclabs that allow smooth development flow when building our dApp; then, there is the chai library for testing our smart contracts. In the next section, we will be creating our sample Hardhat project.
Set Up Hardhat
To create a basic setup with all the Hardhat configurations we need, we run the npx hardhat command in our terminal.
npx hardhat
Select the following settings when prompted
-
What do you want to do? Select Create a basic sample project
-
Hardhat Project Root Press Enter to set current directory as root
-
Do you want to add a .gitignore? (Y/n) n
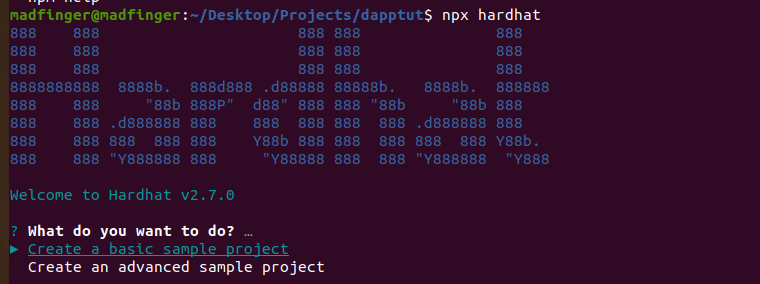
We can now create a basic sample project, setting the default Hardhat config in our current directory moDappTut. In our editor, we see that the Hardhat config, test, script file, and contract folder have been added to our project.
NOTE: You can carry out different configurations in your project through the hardhat config file, like changing the default network to deploy to, or customizing the paths for your tests or artifacts. More about hardhat configurations can be found here. Let us dive into creating our smart contract in the next section.
Building Our Contract
In this section, we will analyze the default contract provided by Hardhat and also create the custom token we will use for transactions later in the tutorial.
We can see an already written contract Hardhat provided to us in the Greeter.sol file in our contracts folder.
In the Greeter contract, we have two functions. One of the functions returns the greeting while the other function sets a new greeting that will change the value of the current greeting. We will be adding a new contract to our contract folder. The contract will be a token contract named MDToken.
//MDToken.sol
//SPDX-License-Identifier: UNLICENSED
pragma solidity ^0.7.0;
contract Token {
    string public name = "Madfinger Token";
    string public symbol = "MHT";
    // The fixed amount of tokens stored in an unsigned integer type variable.
    uint256 public totalSupply = 1000000;
    // An address type variable is used to store ethereum accounts.
    address public owner;
    // A mapping is a key/value map. Here we store each account balance.
    mapping(address => uint256) balances;
    /**
     * Contract initialization.
     *
     * The `constructor` is executed only once when the contract is created.
     * The `public` modifier makes a function callable from outside the contract.
     */
    constructor() {
        // The totalSupply is assigned to transaction sender, which is the account
        // that is deploying the contract.
        balances[msg.sender] = totalSupply;
        owner = msg.sender;
    }
    /**
     * A function to transfer tokens.
     *
     * The `external` modifier makes a function *only* callable from outside
     * the contract.
     */
    function transfer(address to, uint256 amount) external {
        // Check if the transaction sender has enough tokens.
        // If `require`'s first argument evaluates to `false` then the
        // transaction will revert.
        require(balances[msg.sender] >= amount, "Not enough tokens");
        // Transfer the amount.
        balances[msg.sender] -= amount;
        balances[to] += amount;
    }
    /**
     * Read only function to retrieve the token balance of a given account.
     *
     * The `view` modifier indicates that it doesn't modify the contract's
     * state, which allows us to call it without executing a transaction.
     */
    function balanceOf(address account) external view returns (uint256) {
        return balances[account];
    }
}
You can now access Logs for your RPC endpoints, helping you troubleshoot issues more effectively. If you encounter an issue with your RPC calls, simply check the logs in your QuickNode dashboard to identify and resolve problems quickly. Learn more about log history limits on our pricing page.
In our MDToken contract above, we have created a token that we can use for transactions, as well as sending and receiving the token once it is deployed. If you are still new to Solidity, there are comments explaining what each code does in our contract above. The next thing we need to do is deploy our contract.
Deploying Our Contract
In this section, we will deploy our token to a local node provided by Hardhat. To get the local node running, all we have to do is run the command:
npx hardhat node
After running the node, Hardhat provides us with 20 accounts with fake funds that we can use for transactions. Here is how our terminal looks:

From the image above you can see our local test network is running on **http://127.0.0.1:8545/.
**
And each account has a wallet account ID and a private key. We will be using those to connect to MetaMask later on.
In our scripts folder, create a deploy.js file where we write our script for deploying the contract. Hardhat provides us with a sample script sample-script.js for deploying the Greeter contract. We can adapt the contract to our taste and deploy the MDToken contract. Here is what our deploy script looks like:
//deploy.js
const hre = require("hardhat");
async function main() {
    // ethers is avaialble in the global scope
    const [deployer] = await hre.ethers.getSigners();
    console.log(
      "Deploying the contracts with the account:",
      await deployer.getAddress()
    );

    console.log("Account balance:", (await deployer.getBalance()).toString());

    const Token = await hre.ethers.getContractFactory("Token");
    const token = await Token.deploy();
    await token.deployed();

    console.log("Token address:", token.address);

  }

  main()
    .then(() => process.exit(0))
    .catch((error) => {
      console.error(error);
      process.exit(1);
    });
When we deploy our contract, Hardhat automatically creates an artifact folder and stores it in the root folder of our project directory. This artifact folder contains all the info for our smart contract that is needed to connect to our frontend. We want the artifacts folder to be in our src folder so we can configure this from our hardhat config file.
//hardhat.config.js
module.exports = {
  paths: {
    artifacts: './src/artifacts',
  },
  solidity: "0.8.4",
};
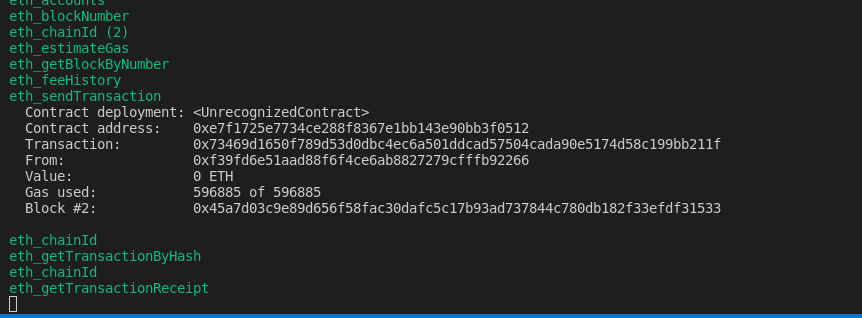
Now to finally deploy our contract we run the command
npx hardhat run --network localhost scripts/deploy.js
Our contract is now deployed on the test network, and we can see from our terminal information about the deployment. The first account provided by Hardhat is the account we have deployed the contract with, and a gas fee is charged for deploying this contract
Now that our contract has been deployed let us connect our MetaMask account to it.
Now that our contract has been deployed, let us connect our MetaMask account to it.
Connecting To MetaMask
This section will go through the steps of setting up a MetaMask account and adding our local Hardhat network.
Install the MetaMask extension and set up your account. To set up our MetaMask account, we have to create a new wallet and backup our phrase. After setting up our MetaMask wallet, if we click on the MetaMask icon, we see we are on the Ethereum Mainnet. What we want to do is connect our local Hardhat network to MetaMask. We can do this by:
-
Make sure you set your test networks to be visible. Navigate to your MetaMask settings, go to advanced settings and set show test network to be on.
-
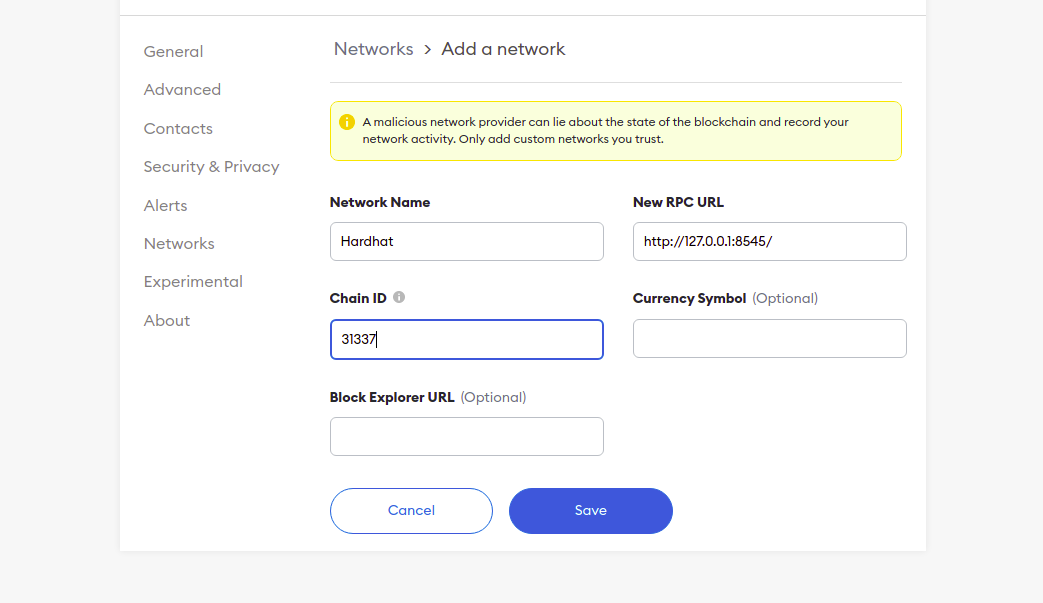
Go to your settings and select network settings, then click on add new network.
-
Fill in the required information and save, and you are now set up with the local Hardhat network.
Below is a screenshot of the information you need to provide to set up your network
Now let us import the account we used to deploy our Token contract. Click on Import Account and paste in your private key from the first account provided by Hardhat used to deploy your contract. You will notice that the 10000 ethers given to us have been reduced a little due to the gas fee we paid to deploy our contract. Now it’s time to finally connect the smart contract we created to our React frontend.
Connecting the Smart Contract to our React frontend
In this section, we will run our React application locally, connect our contract with the ethers library and write code to test everything is working perfectly.
First, start the react application by running:
npm start
To make our dApp complete, we need to connect our smart contract to our React frontend. First, we import the ethers library to communicate with our smart contract data, then useState from React to manage our application state. We need to import the TokenArtifacts ABI, which contains the contract data we will need, then set our token address to the address our contract is deployed to, which is the contract address.
We use react useState to store three variables in the state:
-
tokenData: This is an object that stores information about the token contract, which is the name and symbol
-
amount: we will use amount to store the amount of MDToken we will be sending to another address
-
userAccountId: this stores the user's account address we will be sending our MDToken to. The amount and userAccountId will be set from the form input we provide to the user in the UI.
// src/app.js
import './App.css';
import {ethers} from 'ethers'
import { useState } from 'react';
import TokenArtifact from "./artifacts/contracts/Token.sol/Token.json"
const tokenAddress = "0x5FbDB2315678afecb367f032d93F642f64180aa3"


function App() {
 const [tokenData, setTokenData] = useState({})
 const [amount, setAmount] = useState()
 const [userAccountId, setUserAccountId] = useState()

async function requestAccount() {
  await window.ethereum.request({ method: 'eth_requestAccounts' });
}

 const provider = new ethers.providers.Web3Provider(window.ethereum);
 const signer = provider.getSigner();
 async function _intializeContract(init) {
  // We first initialize ethers by creating a provider using window.ethereum
  // When, we initialize the contract using that provider and the token's
  // artifact. You can do this same thing with your contracts.
  const contract = new ethers.Contract(
    tokenAddress,
    TokenArtifact.abi,
    init
  );

  return contract
}
 async function _getTokenData() {
  const contract = await _intializeContract(signer)
  const name = await contract.name();
  const symbol = await contract.symbol();
  const tokenData = {name, symbol}
  setTokenData(tokenData);
}
async function sendMDToken() {
  if (typeof window.ethereum !== 'undefined') {
    await requestAccount()
    const contract = await _intializeContract(signer)
    const transaction = await contract.transfer(userAccountId, amount);
    await transaction.wait();
    console.log(`${amount} MDToken has been sent to ${userAccountId}`);
  }
}
async function getBalance() {
  if (typeof window.ethereum !== 'undefined') {
    const contract = await _intializeContract(signer)
    const [account] = await window.ethereum.request({ method: 'eth_requestAccounts' })
    const balance = await contract.balanceOf(account);
    console.log("Account Balance: ", balance.toString());
  }
}
  return (
    <div className="App">
      <header className="App-header">
      <button onClick={_getTokenData}>get token data</button>
      <h1>{tokenData.name}</h1>
      <h1>{tokenData.symbol}</h1>
      <button onClick={getBalance}>Get Balance</button>
      <button onClick={sendMDToken}>Send MDToken</button>
      <input onChange={e => setUserAccountId(e.target.value)} placeholder="Account ID" />
        <input onChange={e => setAmount(e.target.value)} placeholder="Amount" />
      </header>
    </div>
  );
}
export default App;
The first two functions we will be writing will be the requestAccount function, which will allow us to connect to the MetaMask wallet of the user, and the _intializeContract function, which will initialize and make available our contact for us to use.
async function requestAccount() {
  await window.ethereum.request({ method: 'eth_requestAccounts' });
}

 const provider = new ethers.providers.Web3Provider(window.ethereum);
 const signer = provider.getSigner();
 async function _intializeContract(init) {
  // We first initialize ethers by creating a provider using window.ethereum
  // When, we initialize the contract using that provider and the token's
  // artifact. You can do this same thing with your contracts.
  const contract = new ethers.Contract(
    tokenAddress,
    TokenArtifact.abi,
    init
  );

  return contract
}
The requestAccount function is an async function that calls the window.ethereum.request method and allows the user to connect to their MetaMask wallet. For us to make use of the _intializeContract function, we need to make use of the provider and the signer. The provider is obtained from our ethers library we imported, and it makes use of the Web3Provider.
In the _intializeContract function, we will create a contract variable that uses the Contract method from Ethers library, which accepts three parameters: the token address, the token ABI, and the signer or provider. Then we return the contract. We will see how the _intializeContract function would be used later.
These two functions are what will allow us to perform the primary task we want in our dApp, which are:
-
Displaying our MDToken information.
-
Get the balance of our MDtoken.
-
Sending MDtoken to the user.
The three functions in our dApp for the above task are _getTokenData, getBalance and sendMDToken.
In our UI, we have three buttons that call the _getTokenData, getBalance, and sendMDToken functions. Then two inputs, where the user can supply the account address to send the tokens and the amount input for the amount to be sent.
return (
    <div className="App">
      <header className="App-header">
      <button onClick={_getTokenData}>get token data</button>
      <h1>{tokenData.name}</h1>
      <h1>{tokenData.symbol}</h1>
      <button onClick={getBalance}>Get Balance</button>
      <button onClick={sendMDToken}>Send MDToken</button>
      <input onChange={e => setUserAccountId(e.target.value)} placeholder="Account ID" />
        <input onChange={e => setAmount(e.target.value)} placeholder="Amount" />
      </header>
    </div>
  );
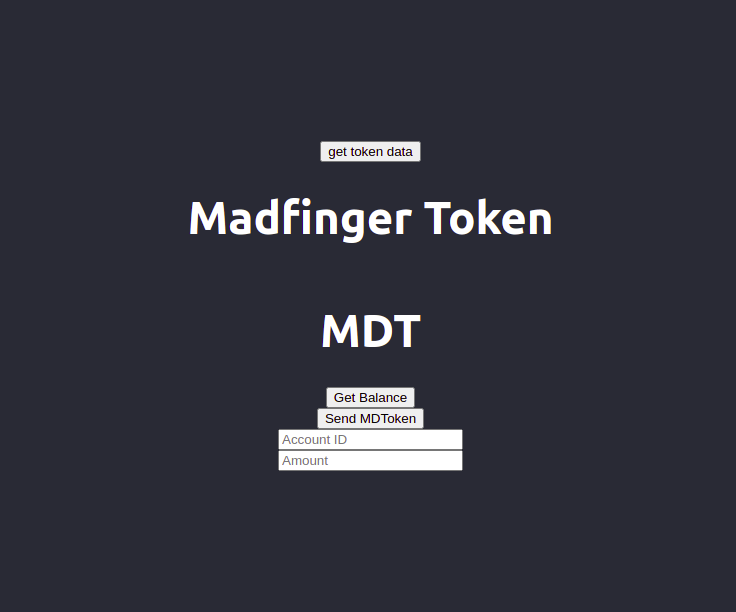
Now that we have an overview of what our dApp will be doing let us go into details on how things are running.
When the user clicks on the get token data button, the _getTokenData function is called.
In our _getTokenData function, we run our _intializeContract function and pass in our signer. The function returns a contract, and we assign our contract to the contract variable we created. Now we can use the contract to get our MDToken name and the symbol which are public in our token contract. Then we call our setTokenData, which accepts the token data object with our name and symbol and updates the tokenData state.
async function _getTokenData() {
  const contract = await _intializeContract(signer)
  const name = await contract.name();
  const symbol = await contract.symbol();
  const tokenData = {name, symbol}
  setTokenData(tokenData);
}
The getBalance function first of all checks if the window.ethereum object is present. If it is present, it means that we have MetaMask installed and we have a wallet. Then we initialize our contract. After initializing the contract we get the account connected to our MetaMask and we use our contract to get the balance of the account using the balanceOf method from our contract then we log the account balance.
async function getBalance() {
  if (typeof window.ethereum !== 'undefined') {
    const contract = await _intializeContract(signer)
    const [account] = await window.ethereum.request({ method: 'eth_requestAccounts' })
    const balance = await contract.balanceOf(account);
    console.log("Account Balance: ", balance.toString());
  }
}
For the last method which is the sendMDToken, we first check if window.ethereum object is present then we run the requestAccount function and initialize our contract. We use the contract transfer method which accepts userAccountId and amount as arguments, then we wait for the transaction to take place and log a success message.
async function sendMDToken() {
  if (typeof window.ethereum !== 'undefined') {
    await requestAccount()
    const contract = await _intializeContract(signer)
    const transaction = await contract.transfer(userAccountId, amount);
    await transaction.wait();
    console.log(`${amount} MDToken has been sent to ${userAccountId}`);
  }
}
Note: For us to send MDTokens, we must first import the token from etamask. To do this, we click on metamask, click import token, select custom token, then paste the token address or contract address and you will see that our custom MDToken has been imported with the available coins.
Now we can get our token information, check our MDToken balance which is logged into the console, and transfer MDToken when we provide the account ID and amount we want to transfer in our input.
You should make sure you are not sending real funds to any of the Hardhat accounts provided. If you transfer any actual funds to any account used in this tutorial, your funds will be lost forever.
Conclusion
We have finally come to the end of this tutorial. In the tutorial, we looked at how to create, run, compile and deploy smart contracts created using the hardhat ethereum development environment. Hope this gets you started on your journey of building amazing stuff!
Source:
Subscribe to our newsletter for more articles and guides on Ethereum. If you have any feedback, feel free to reach out to us via Twitter. You can always chat with us on our Discord community server, featuring some of the coolest developers you’ll ever meet :)