
19 min read
This guide is available in Solana Web3.js (Legacy v 1.x) and Solana Kit (v 2.x) versions. Select the appropriate tab to view the code snippets and instructions for your preferred library:
- Solana Kit
- Solana Web3.js (Legacy)
Overview
Sending Solana Program Library (SPL) Tokens is a critical mechanism for Solana development. Whether you are airdropping whitelist tokens to your community, bulk sending NFTs to another wallet, or managing token flows between escrow accounts, you will inevitably need to be able to transfer SPL tokens. Transferring SPL tokens is slightly different from sending SOL, so it is essential to understand how it works as you progress on your Solana development journey.
What You Will Do
In this guide, you will use TypeScript to write a script that transfers an SPL token from one account to another on Solana's devnet.
If you'd like to learn how to transfer SPL tokens and SOL in a Program using the Anchor Framework, check out our Guide: How to Transfer SOL and SPL Tokens Using Anchor .
Prefer a video walkthrough? Follow along with Sahil and learn how to transfer SPL tokens on Solana Devnet.
What You Will Need
SPL Token Accounts Overview
Before getting started, it is helpful to understand how a couple of components of the Solana Token Program account work: Mint IDs and Associated Token Accounts.
Mint IDs
Every SPL token has a unique Mint ID that can discern it from any other type of token. For example, the $USDC SPL Token Mint ID is EPjFWdd5AufqSSqeM2qN1xzybapC8G4wEGGkZwyTDt1v and the $SAMO mint ID is 7xKXtg2CW87d97TXJSDpbD5jBkheTqA83TZRuJosgAsU.
It is worth noting that every NFT has a unique mint address (which is partly what makes it non-fungible). For example, Famous Fox #4679 has a Mint ID of GS2AtoEoL9DgaYg9xC7cUumftB7vb2CPMrczZCKgJv1Y and Famous Fox #6562 has a Mint ID of 7FTdQdMqkk5Xc2oFsYR88BuJt2yyCPReTpqr3viH6b6C. As you'll see in a second, this is a significant distinction between the two tokens.
If you want to know more about minting SPL tokens, check out our guides on How to Create a Fungible SPL token with the New Metaplex Token Standard and How to Mint an NFT on Solana.
Associated Token Accounts
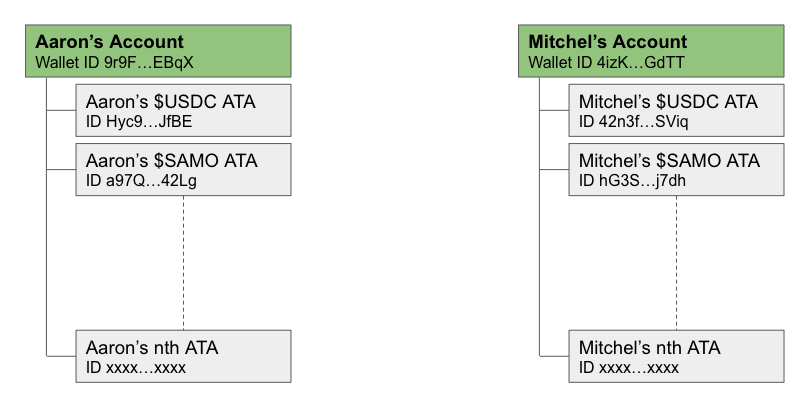
The Solana Token Program derives "a token account key from a user's main System account address and a token mint address, allowing the user to create a main token account for each token they own" (Source: spl.solana.com). That account is referred to as an Associated Token Account or "ATA." Effectively an ATA is a unique account linked to a user and a specific token mint. For example, let's say I am the owner of Account "DEMO...1234". I can have many ATAs--one for each token mint I hold (e.g., a unique ATA for each $USDC, $SAMO, etc., as illustrated below).
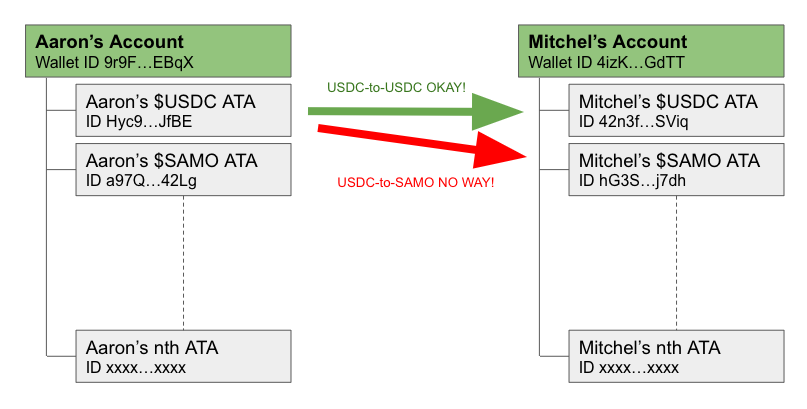
Token Transfers must always occur between two ATAs associated with the same associated mint address. This means we cannot send $USDC from my ATA to your $SAMO ATA (see example below).
As you'll see in our code in a bit, every account does not already have an ATA for every mint. If a user hasn't interacted with a token before, the sender must "create" it and deposit the necessary rent for the account to remain active.
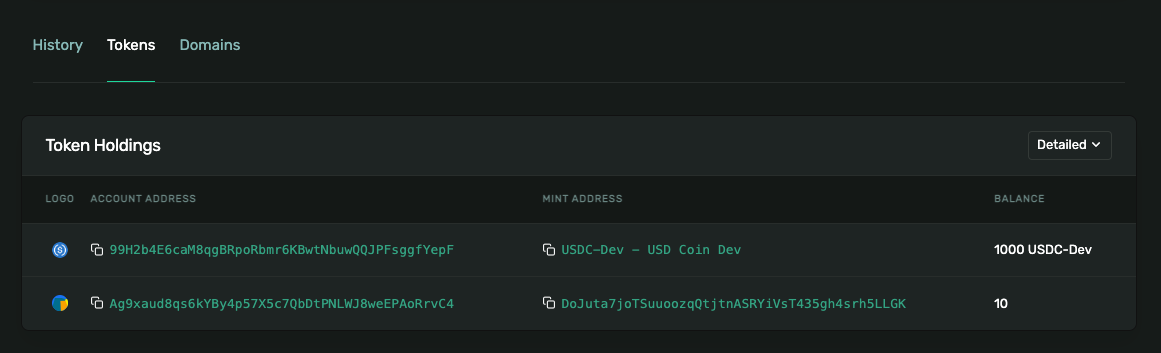
This concept can be tricky at first, but it's important, so take the time to ensure you understand this! I find it helpful to browse my wallet on Solana Explorer on the tokens detail page: https://explorer.solana.com/address/YOUR_WALLET_ADDRESS/tokens?display=detail. You can see each of your ATAs, their Account ID, and the associated Mint ID:
If you want to dig in a little more on the Solana SPL Token Program Library, head over to spl.solana.com.
Ready to start coding? Me too!
Set Up Your Project
- Solana Kit
- Solana Web3.js (Legacy)
Create a new project directory in your terminal with:
mkdir spl-transfer-kit
cd spl-transfer-kit
Create a file for your app, app.ts:
echo > app.ts
Initialize your project with the "yes" flag to use default values for your new package:
yarn init --yes
#or
npm init --yes
Create a tsconfig.json with modern module resolution:
tsc --init
Update your tsconfig.json with the following content:
{
  "compilerOptions": {
    "module": "NodeNext",
    "moduleResolution": "NodeNext",
    "noEmit": true,
    "target": "ESNext"
  }
}
Install Solana Kit Dependencies
We will need to add Solana Kit and the Token program library for this exercise. In your terminal type:
yarn add @solana/kit @solana-program/token
#or
npm install @solana/kit @solana-program/token
Create a new project directory in your terminal with:
mkdir spl-transfer
cd spl-transfer
Create a file for your app, app.ts:
echo > app.ts
Initialize your project with the "yes" flag to use default values for your new package:
yarn init --yes
#or
npm init --yes
Create a tsconfig.json with .json importing enabled:
tsc -init --resolveJsonModule true
Install Solana Web3 Dependency
We will need to add the Solana Web3 and SPL Token libraries for this exercise. In your terminal type:
yarn add @solana/web3.js@1 @solana/spl-token
#or
npm install @solana/web3.js@1 @solana/spl-token
Create a Wallet and Airdrop SOL
- Solana Kit
- Solana Web3.js (Legacy)
The first task we'll need to accomplish is creating an account with a wallet and funding it. We'll be using the handy tool below to automatically generate a new wallet and airdrop 1 SOL to it.
Note: Sending airdrop requests too frequently may trigger a 429 (Too Many Requests) error.
Once you've successfully generated your keypair, you'll notice two new constants: secret and FROM_KEYPAIR, a Keypair. The secret is a 32-byte array that is used to generate the public and private keys. The FROM_KEYPAIR is a Keypair instance that is used to sign transactions (we've airdropped some devnet SOL to cover the gas fees). Make sure to add it to your code below your other constants if you haven't yet.
Below your imports, paste your new secret array:
const secret = [0,...,0]; // 👈 Replace with your secret
The first task we'll need to accomplish is creating an account with a wallet and funding it. We'll be using the handy tool below to automatically generate a new wallet and airdrop 1 SOL to it. (You can also achieve this with the Keypair.generate() and requestAirdrop() functions if you prefer a more manual approach).
Note: Sending airdrop requests too frequently may trigger a 429 (Too Many Requests) error.
Once you've successfully generated your keypair, you'll notice two new constants: secret and FROM_KEYPAIR, a Keypair. The secret is a 32-byte array that is used to generate the public and private keys. The FROM_KEYPAIR is a Keypair instance that is used to sign transactions (we've airdropped some devnet SOL to cover the gas fees). Make sure to add it to your code below your other constants if you haven't yet.
Below your imports, paste your new secret, and add:
import { Keypair } from "@solana/web3.js";

const secret = [0,...,0]; // 👈 Replace with your secret
const FROM_KEYPAIR = Keypair.fromSecretKey(new Uint8Array(secret));
console.log(`My public key is: ${FROM_KEYPAIR.publicKey.toString()}.`);
Mint or Airdrop Some SPL Tokens
To complete this guide, you will need some SPL tokens on Devnet. There are several ways to go about getting Devnet SPL tokens--here are a few.
- Mint your own fungible tokens (Guide: How to Create a Fungible SPL token with the New Metaplex Token Standard).
- Mint one or more NFTs using Candy Machine (Guide: How to Deploy an NFT Collection on Solana Using Sugar (Candy Machine)).
- Request a $DUMMY token airdrop from an SPL Token Faucet.*
- If you already have Devnet SPL tokens in another wallet, you can send them using Phantom or another wallet inteface.*
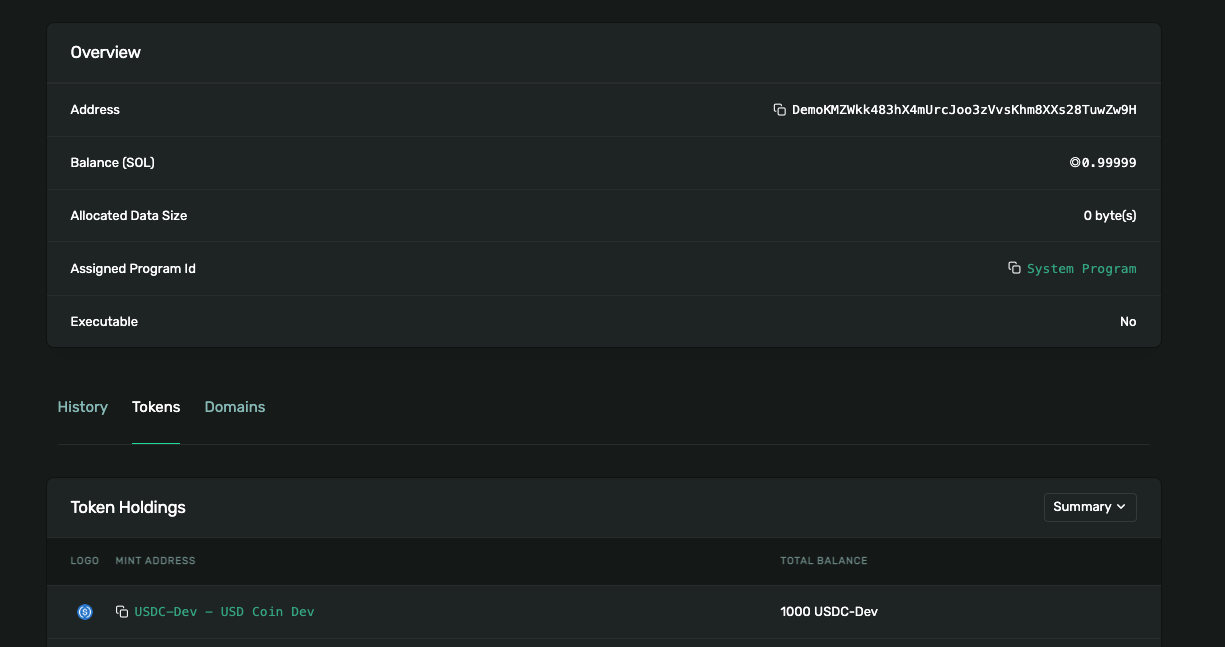
Before proceeding, you should be able to go to Solana Explorer and see that your wallet has a balance of SOL and at least one SPL token on devnet (https://explorer.solana.com/address/YOUR_WALLET_ADDRESS/tokens?cluster=devnet). It should look something like this:
Let's get started.
Set Up Your App
Import Necessary Dependencies
- Solana Kit
- Solana Web3.js (Legacy)
Open app.ts, and paste the following imports on line 1:
import {
  createSolanaRpc,
  createSolanaRpcSubscriptions,
  address,
  pipe,
  createTransactionMessage,
  setTransactionMessageFeePayerSigner,
  setTransactionMessageLifetimeUsingBlockhash,
  appendTransactionMessageInstruction,
  signTransactionMessageWithSigners,
  sendAndConfirmTransactionFactory,
  airdropFactory,
  lamports,
  getSignatureFromTransaction,
  createKeyPairFromBytes,
  createSignerFromKeyPair
} from '@solana/kit';
import {
  TOKEN_PROGRAM_ADDRESS,
  fetchToken,
  getTransferInstruction,
  findAssociatedTokenPda,
  getCreateAssociatedTokenIdempotentInstruction
} from '@solana-program/token';
In addition to the wallet we created in the previous step, we are importing essential methods and classes from Solana Kit and the Token program library.
Open app.ts, and paste the following imports on line 1:
import { getOrCreateAssociatedTokenAccount, createTransferInstruction } from "@solana/spl-token";
import { Connection, Keypair, ParsedAccountData, PublicKey, sendAndConfirmTransaction, Transaction } from "@solana/web3.js";
In addition to the wallet we created in the previous step, we are also importing a few essential methods and classes from the Solana Web3 library.
Set Up Your Quicknode Endpoint
- Solana Kit
- Solana Web3.js (Legacy)
To build on Solana, you'll need an API endpoint to connect with the network. You're welcome to use public nodes or deploy and manage your own infrastructure; however, if you'd like 8x faster response times, you can leave the heavy lifting to us. See why over 50% of projects on Solana choose Quicknode and sign up for an account here. We're going to use a Solana Devnet node.
Copy the HTTP Provider link:
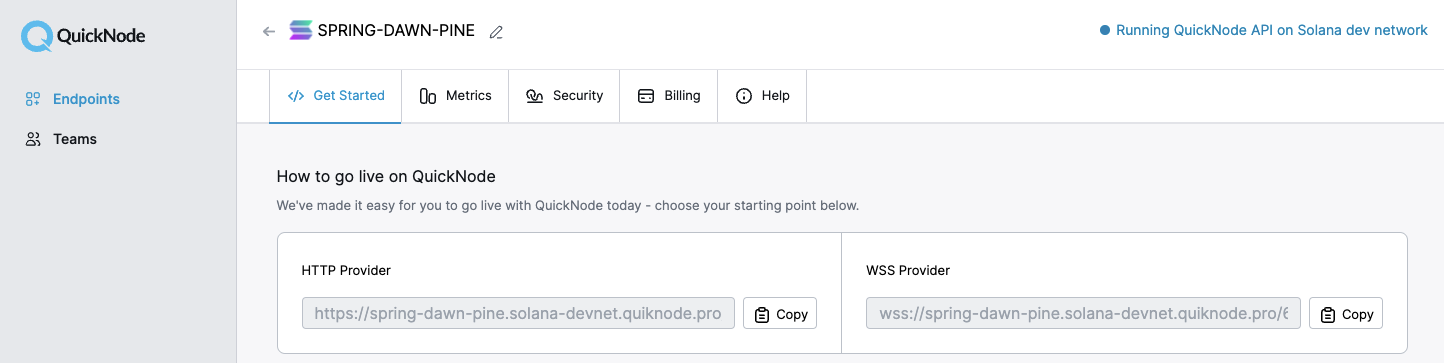
Inside app.ts under your import statements, declare your RPC and establish your connection to Solana:
const QUICKNODE_RPC = 'https://example.solana-devnet.quiknode.pro/0123456/';
const QUICKNODE_RPC_SUBSCRIPTIONS = 'wss://example.solana-devnet.quiknode.pro/0123456/';
const rpc = createSolanaRpc(QUICKNODE_RPC);
const rpcSubscriptions = createSolanaRpcSubscriptions(QUICKNODE_RPC_SUBSCRIPTIONS);
const sendAndConfirmTransaction = sendAndConfirmTransactionFactory({ rpc, rpcSubscriptions });
Make sure to replace the QUICKNODE_RPC and QUICKNODE_RPC_SUBSCRIPTIONS with your actual Quicknode endpoint URLs (https and wss links from the Quicknode dashboard).
To build on Solana, you'll need an API endpoint to connect with the network. You're welcome to use public nodes or deploy and manage your own infrastructure; however, if you'd like 8x faster response times, you can leave the heavy lifting to us. See why over 50% of projects on Solana choose Quicknode and sign up for an account here. We're going to use a Solana Devnet node.
Copy the HTTP Provider link:
Inside app.ts under your import statements, declare your RPC and establish your Connection to Solana:
const QUICKNODE_RPC = 'https://example.solana-devnet.quiknode.pro/0123456/';
const SOLANA_CONNECTION = new Connection(QUICKNODE_RPC);
Declare Variables
- Solana Kit
- Solana Web3.js (Legacy)
You are going to need to declare a few variables to run your script: your destination account (the owner you wish to transfer tokens to), the mint address of the token you are transferring, and the number of tokens to transfer. Add the following declarations below your RPC setup:
const DESTINATION_WALLET = address('DemoKMZWkk483hX4mUrcJoo3zVvsKhm8XXs28TuwZw9H');
const MINT_ADDRESS = address('DoJuta7joTSuuoozqQtjtnASRYiVsT435gh4srh5LLGK'); //You must change this value!
const TRANSFER_AMOUNT = 1n; // Using BigInt for precise token amounts
Replace MINT_ADDRESS with the mint address of the token you plan to send. If you do not know the mint address of your token, you can go to https://explorer.solana.com/address/YOUR_WALLET_ADDRESS/tokens?cluster=devnet and click the Copy icon to capture your mint address. Paste it in the MINT_ADDRESS variable.

Note: You may also update your DESTINATION_WALLET address and TRANSFER_AMOUNT if you like, but both values will work for this example.
You are going to need to declare a few variables to run your script: your destination account (the owner you wish to transfer tokens to), the mint address of the token you are transferring, and the number of tokens to transfer. Add the following declarations below SOLANA_CONNECTION:
const DESTINATION_WALLET = 'DemoKMZWkk483hX4mUrcJoo3zVvsKhm8XXs28TuwZw9H';
const MINT_ADDRESS = 'DoJuta7joTSuuoozqQtjtnASRYiVsT435gh4srh5LLGK'; //You must change this value!
const TRANSFER_AMOUNT = 1;
Replace MINT_ADDRESS with the mint address of the token you plan to send. If you do not know the mint address of your token, you can go to https://explorer.solana.com/address/YOUR_WALLET_ADDRESS/tokens?cluster=devnet and click the Copy icon to capture your mint address. Paste it in the MINT_ADDRESS variable.
Note: You may also update your DESTINATION_WALLET address and TRANSFER_AMOUNT if you like, but both values will work for this example.
Fetch the Number of Decimals
- Solana Kit
- Solana Web3.js (Legacy)
If you have created a fungible SPL token before, you know that decimals matter. Since the chain represents the supply of tokens as an integer value, we must convert the token amount based on the number of decimals allocated in the token's metadata (for example, if a mint has three decimals, we must send 1,000 units in order to effectively transfer one token [1,000 / 10**3]).
To fetch decimals, we will call getAccountInfo on our rpc instance and parse the mint account data. Add this function below your declarations:
async function getNumberDecimals(mintAddress) {

    // getAccountInfo defaults to binary, using `jsonParsed` lets us read parsed.info.decimals without manual byte offsets.
    const accountInfo = await rpc.getAccountInfo(mintAddress, { encoding: 'jsonParsed' }).send();

    const data = accountInfo.value?.data;
    if (!data || !('parsed' in data) || !data.parsed?.info) {
        throw new Error('Failed to find mint account');
    }

    return (data.parsed.info as { decimals: number }).decimals;
}
Technically, you don't need this if you know the number of decimals of your token mint (you can find it on Solana Explorer's token page). Still, we like to include it as it allows you to modify your code with different mints without changing another variable.
Let's get to the fun stuff!
If you have created a fungible SPL token before, you know that decimals matter. Since the chain represents the supply of tokens as an integer value, we must covert the token amount based on the number of decimals allocated in the token's metadata (for example, if a mint has three decimals, we must send 1,000 units in order to effectively transfer one token [1,000 / 10**3]).
To fetch decimals, we will call getParsedAccountInfo on SOLANA_CONNECTION and pass the token MINT_ADDRESS. Because the method can return multiple types, we need to declare our type as ParsedAccountData to parse the data effectively. Add this function below your declarations:
async function getNumberDecimals(mintAddress: string):Promise<number> {
    const info = await SOLANA_CONNECTION.getParsedAccountInfo(new PublicKey(MINT_ADDRESS));
    const result = (info.value?.data as ParsedAccountData).parsed.info.decimals as number;
    return result;
}
Technically, you don't need this if you know the number of decimals of your token mint (you can find it on Solana Explorer's token page). Still, we like to include it as it allows you to modify your code with different mints without changing another variable.
Let's get to the fun stuff!
Create Transfer Function
- Solana Kit
- Solana Web3.js (Legacy)
Create a new async function, sendTokens:
async function sendTokens() {
}
First, we need to create our keypair signer from the secret array and fund it with SOL. Inside of sendTokens, add step 1:
    console.log(`Sending ${TRANSFER_AMOUNT} ${MINT_ADDRESS} to ${DESTINATION_WALLET}.`)

    //Step 1
    console.log(`1 - Creating keypair and funding with SOL`);
    const keyPair = await createKeyPairFromBytes(new Uint8Array(secret));
    const FROM_KEYPAIR = await createSignerFromKeyPair(keyPair);


    // Fund the keypair with SOL for transaction fees
    // (you can skip this step if you already have devnet SOL in your FROM_KEYPAIR)
    await airdropFactory({ rpc, rpcSubscriptions })({
        recipientAddress: FROM_KEYPAIR.address,
        lamports: lamports(1_000_000_000n), // 1 SOL
        commitment: 'confirmed',
    });

    console.log(`    From wallet: ${FROM_KEYPAIR.address}`);
Note: In production, you would use
generateKeyPairFromBytes(new Uint8Array(secret))with your actual secret key instead of generating a new one.
Next, we will derive the Associated Token Accounts ("ATA") for our source and destination accounts. Remember, each account must have an ATA that associates a wallet with a mint; an ATA can only hold tokens for a single mint; and the mint of both sender and receiver associated token accounts must be the same. Add step 2:
    //Step 2
    console.log(`2 - Deriving Associated Token Accounts`);

    const [sourceTokenAccount] = await findAssociatedTokenPda({
        owner: FROM_KEYPAIR.address,
        mint: MINT_ADDRESS,
        tokenProgram: TOKEN_PROGRAM_ADDRESS,
    });

    const [destinationTokenAccount] = await findAssociatedTokenPda({
        owner: DESTINATION_WALLET,
        mint: MINT_ADDRESS,
        tokenProgram: TOKEN_PROGRAM_ADDRESS,
    });

    console.log(`    Source Token Account: ${sourceTokenAccount}`);
    console.log(`    Destination Token Account: ${destinationTokenAccount}`);
Next, we need to check if the destination token account exists and create it if necessary. Add step 3:
    console.log(`3 - Checking Destination Token Account`);
    let needsDestinationAccount = false;
    try {
        await rpc.getAccountInfo(destinationTokenAccount).send();
    } catch (error) {
        needsDestinationAccount = true;
    }

    if (needsDestinationAccount) {
        console.log(`    Destination token account does not exist, will create it`);
    } else {
        console.log(`    Destination token account exists`);
    }
Let's fetch the number of decimals for proper amount calculation. Add step 4:
    //Step 4
    console.log(`4 - Fetching Number of Decimals for Mint: ${MINT_ADDRESS}`);
    const numberDecimals = await getNumberDecimals(MINT_ADDRESS);
    console.log(`    Number of Decimals: ${numberDecimals}`);

    const transferAmountWithDecimals = TRANSFER_AMOUNT * BigInt(Math.pow(10, numberDecimals));
Finally, we need to assemble and send our transaction using Solana Kit's functional approach. Add step 5:
    //Step 5
    console.log(`5 - Creating and Sending Transaction`);

    const { value: latestBlockhash } = await rpc.getLatestBlockhash().send();

    const transactionMessage = pipe(
        createTransactionMessage({ version: 0 }),
        (tx) => setTransactionMessageFeePayerSigner(FROM_KEYPAIR, tx),
        (tx) => setTransactionMessageLifetimeUsingBlockhash(latestBlockhash, tx),
        (tx) => {
            // Add create ATA instruction if needed
            if (needsDestinationAccount) {
                return appendTransactionMessageInstruction(
                    getCreateAssociatedTokenIdempotentInstruction({
                        payer: FROM_KEYPAIR,
                        ata: destinationTokenAccount,
                        owner: DESTINATION_WALLET,
                        mint: MINT_ADDRESS,
                    }),
                    tx
                );
            }
            return tx;
        },
        (tx) => appendTransactionMessageInstruction(
            getTransferInstruction({
                source: sourceTokenAccount,
                destination: destinationTokenAccount,
                authority: FROM_KEYPAIR,
                amount: transferAmountWithDecimals,
            }),
            tx
        )
    );

    const signedTransaction = await signTransactionMessageWithSigners(transactionMessage);
    await sendAndConfirmTransaction(signedTransaction, { commitment: 'confirmed' });
    const signature = await getSignatureFromTransaction(signedTransaction);

    console.log(
        '\x1b[32m', //Green Text
        `   Transaction Success!🎉`,
        `\n    https://explorer.solana.com/tx/${signature}?cluster=devnet`
    );
Create a new async function, sendTokens:
async function sendTokens() {
}
First, we will need to get the Associated Token Accounts ("ATA") for our source and destination accounts. Remember, each account must have an ATA that associates a wallet with a mint; an ATA can only hold tokens for a single mint; and the mint of both sender and receiver associated token accounts must be the same.
We will use getOrCreateAssociatedTokenAccount to fetch the ATA (or create it if it doesn't exist) for each party to this transaction. Because we may need to create an associated account for these transactions, our payer may have to seed the new ATA with a small amount of SOL to cover rent. Inside of sendTokens, add step 1 to your code to fetch our source account (technically, since we know we already have SPL tokens--we already have an ATA, so we could also use getAssociatedTokenAddress):
    console.log(`Sending ${TRANSFER_AMOUNT} ${(MINT_ADDRESS)} from ${(FROM_KEYPAIR.publicKey.toString())} to ${(DESTINATION_WALLET)}.`)
    //Step 1
    console.log(`1 - Getting Source Token Account`);
    let sourceAccount = await getOrCreateAssociatedTokenAccount(
        SOLANA_CONNECTION,
        FROM_KEYPAIR,
        new PublicKey(MINT_ADDRESS),
        FROM_KEYPAIR.publicKey
    );
    console.log(`    Source Account: ${sourceAccount.address.toString()}`);
We will do the same thing for our destinationAccount. Add step 2 below to get or create our destinationAccount (the recipient's ATA to which the tokens will be sent):
    //Step 2
    console.log(`2 - Getting Destination Token Account`);
    let destinationAccount = await getOrCreateAssociatedTokenAccount(
        SOLANA_CONNECTION,
        FROM_KEYPAIR,
        new PublicKey(MINT_ADDRESS),
        new PublicKey(DESTINATION_WALLET)
    );
    console.log(`    Destination Account: ${destinationAccount.address.toString()}`);
Just one more piece of information is required to assemble our transaction. Remember that getNumberDecimals function we created? Let's call that and store the returned value in a constant, numberDecimals:
    //Step 3
    console.log(`3 - Fetching Number of Decimals for Mint: ${MINT_ADDRESS}`);
    const numberDecimals = await getNumberDecimals(MINT_ADDRESS);
    console.log(`    Number of Decimals: ${numberDecimals}`);
Finally, we need to assemble and send our transaction. Add the following instruction assembly below Step 3:
    //Step 4
    console.log(`4 - Creating and Sending Transaction`);
    const tx = new Transaction();
    tx.add(createTransferInstruction(
        sourceAccount.address,
        destinationAccount.address,
        FROM_KEYPAIR.publicKey,
        TRANSFER_AMOUNT * Math.pow(10, numberDecimals)
    ))
- Solana Kit
- Solana Web3.js (Legacy)
What we are doing here is telling our app to transfer TRANSFER_AMOUNT tokens (note that we must multiply by 10 to the power of numberDecimals) from the sourceTokenAccount to the destinationTokenAccount.
The Solana Kit approach uses a functional programming style with the pipe function to compose the transaction step by step. This provides better type safety and makes the transaction building process more explicit. We also handle the creation of the destination ATA if it doesn't exist within the same transaction using the idempotent instruction, which won't fail if the account already exists.
Don't mind that console.log--that's just some trickery to make our success appear in green text.
What we are doing here is telling our app to transfer TRANSFER_AMOUNT tokens (note that we must multiply by 10 to the power of numberDecimals) from the sourceAccount we fetched to the destinationAccount we fetched.
For best practices, we should fetch a recent blockhash before sending our transaction. Add this snippet at the end of Step 4 in your sendTokens function:
    const latestBlockHash = await SOLANA_CONNECTION.getLatestBlockhash('confirmed');
    tx.recentBlockhash = await latestBlockHash.blockhash;
    const signature = await sendAndConfirmTransaction(SOLANA_CONNECTION,tx,[FROM_KEYPAIR]);
    console.log(
        '\x1b[32m', //Green Text
        `   Transaction Success!🎉`,
        `\n    https://explorer.solana.com/tx/${signature}?cluster=devnet`
    );
Don't mind that console.log--that's just some trickery to make our success appear in green text.
🏃♂️ Run Your Code
- Solana Kit
- Solana Web3.js (Legacy)
Finally, at the end of your code, call sendTokens:
sendTokens().catch(console.error);
In your terminal, run your code by typing:
ts-node app.ts
Congrats! If you have followed the steps above, you should see something like this:

Finally, at the end of your code, call sendTokens:
sendTokens();
In your terminal, run your code by typing:
ts-node app.ts
Congrats! If you have followed the steps above, you should see something like this:
Next Steps and Wrap Up
Awesome! You now know how to transfer SPL tokens from one user to another! Want to take it to the next level? Here are a couple of ideas for how you could take this a little further:
-
Can you write a script that will transfer all of your NFTs to another wallet? (Hint: you might want to study up on how to fetch all tokens in a user's wallet first).
-
Can you write a script to airdrop SPL tokens to a bunch of wallets that may or may not have an ATA associated with your mint? (Hint: check out our guide on sending bulk SOL distributions for inspiration).
If you give either a shot or have any questions for us, let us know! Find us on Discord and Twitter!
We ❤️ Feedback!
Let us know if you have any feedback or requests for new topics. We'd love to hear from you.