14 min read
This guide utilizes an older version of the Metaplex JS SDK that is no longer maintained. Though we will keep this guide here for reference, we recommend referencing one of our newer guides for working with Candy Machines:
- How to Deploy an NFT Collection on Solana Using Sugar and Umi (Candy Machine)
- How to Launch an NFT Collection with Metaplex Core Candy Machine
If you have any questions or feedback, please reach out to us on Discord or Twitter.
Overview
Are you ready to launch your NFT collection on Solana? If so, you've come to the right place! We'll explore Metaplex's new JS SDK which brings the power of Candy Machine to your JavaScript and TypeScript applications to allow for quick and easy minting. Metaplex has added several new features, notably Candy Guards (a tool for restricting or limiting access to NFT mints) which we'll implement in this guide.
What You Will Do
In this guide, you will create a new V3 Candy Machine through your own TypeScript application. Specifically, you will:
- Create a Candy Machine
- Add items to the Candy Machine
- Implement a Candy Guard for your Candy Machine
- Mint an NFT!
What You Will Need
- Nodejs (version 16.15 or higher) installed
- Typescript experience and the latest version of ts-node installed (you can update to the latest by entering npm update -g typescript ts-node in terminal)
- Experience with Candy Machine and Solana NFTs is helpful but not required. Review our Guide: How to Deploy an NFT Collection on Solana Using Sugar (Candy Machine) for more information.
Set Up Your Project
Create a new project directory in your terminal with the following:
mkdir cm-v3-demo
cd cm-v3-demo
Create a file for your app, app.ts:
echo > app.ts
Initialize your project with the "yes" flag to use default values for your new package:
yarn init --yes
#or
npm init --yes
Create a tsconfig.json with .json importing enabled:
tsc -init --resolveJsonModule true
Install Solana Web3 Dependency
We will need to add the Solana Web3 and SPL Token libraries for this exercise. Additionally, we will use Metaplex's JS SDK. In your terminal, type:
yarn add @solana/web3.js@1 @metaplex-foundation/js
#or
npm install @solana/web3.js@1 @metaplex-foundation/js
Add Your Wallet and Airdrop SOL
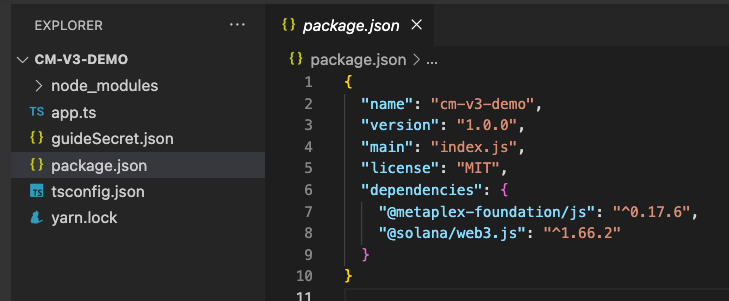
Open the cm-v3-demo directory in your code editor of choice (we're using VSCode). To follow this guide, you will need the same Solana File System Wallet that is the authority of your NFT. You will need to store this wallet in a file, guideSecret.json in your project directory.
If you do not have a paper wallet, you can use this script to create a new one. Make sure you save your wallet to your project directory as guideSecret.json.
For an existing wallet, you can use this Airdrop Widget below to send it some Devnet SOL:
After set up, your environment should look something like this:
Set Up Your App
Import Necessary Dependencies
Open app.ts, and paste the following imports on line 1:
import { Connection, Keypair, PublicKey } from "@solana/web3.js";
import { Metaplex, keypairIdentity, bundlrStorage, toMetaplexFile, toBigNumber, CreateCandyMachineInput, DefaultCandyGuardSettings, CandyMachineItem, toDateTime, sol, TransactionBuilder, CreateCandyMachineBuilderContext } from "@metaplex-foundation/js";
import secret from './guideSecret.json';
You can now access Logs for your RPC endpoints, helping you troubleshoot issues more effectively. If you encounter an issue with your RPC calls, simply check the logs in your QuickNode dashboard to identify and resolve problems quickly. Learn more about log history limits on our pricing page.
In addition to the wallet we created in the previous step, we are also importing a few essential methods and classes from the Solana Web3 and Metaplex JS libraries.
Set Up Your QuickNode Endpoint
To build on Solana, you'll need an API endpoint to connect with the network. You're welcome to use public nodes or deploy and manage your own infrastructure; however, if you'd like 8x faster response times, you can leave the heavy lifting to us.
You can now pay for a QuickNode plan using USDC on Solana. As the first multi-chain provider to accept Solana payments, we're streamlining the process for developers — whether you're creating a new account or managing an existing one. Learn more about paying with Solana here.
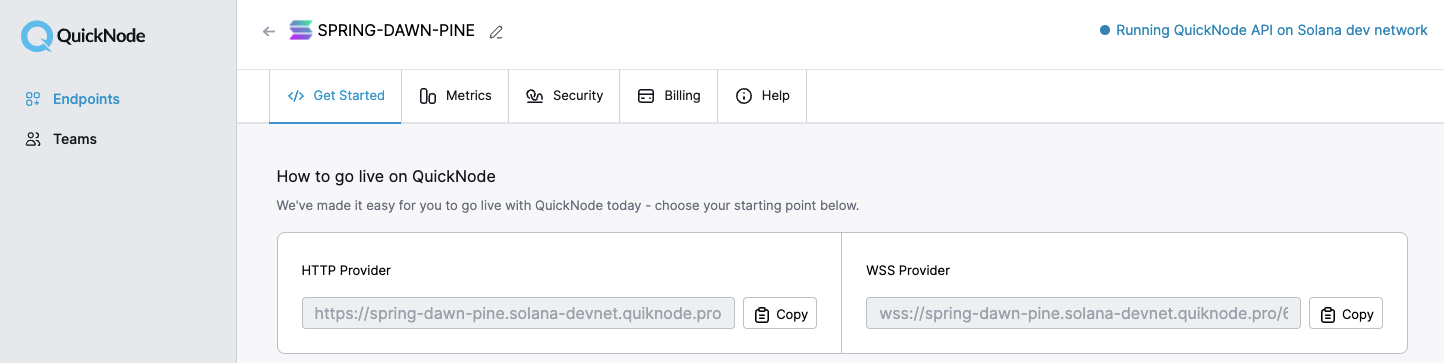
See why over 50% of projects on Solana choose QuickNode and sign up for a free account here. We're going to use a Solana Devnet node.
Copy the HTTP Provider link:
Inside app.ts under your import statements, declare your RPC and establish your Connection to Solana:
const QUICKNODE_RPC = 'https://example.solana-devnet.quiknode.pro/0123456/'; // 👈 Replace with your QuickNode Solana Devnet HTTP Endpoint
const SOLANA_CONNECTION = new Connection(QUICKNODE_RPC, { commitment: 'finalized' });
Declare Variables
You will need to declare a few more variables to run your script:
- Your source wallet (a keypair derived from your secret key).
- A source NFT metadata URL (note: in this guide, we will focus on the mechanics of the Candy Machine, so we will reuse an already uploaded NFT metadata and image. You're welcome to incorporate image and metadata uploading into this exercise--for more information on uploading to Arweave using the Metaplex JS SDK, check out our guide on How to Mint an NFT on Solana using Typescript).
- The mint address for the NFT you would like to use as your Collection NFT (this is the cover image you might see for the collection in a wallet or exchange. More information at Metaplex.com).
- A placeholder for your Candy Machine ID (we will update this later).
- A Metaplex instance.
Add the following declarations below SOLANA_CONNECTION to establish the wallet we will be using and placeholders for the NFT metadata and the Candy Machine ID:
const WALLET = Keypair.fromSecretKey(new Uint8Array(secret));
const NFT_METADATA = 'https://mfp2m2qzszjbowdjl2vofmto5aq6rtlfilkcqdtx2nskls2gnnsa.arweave.net/YV-mahmWUhdYaV6q4rJu6CHozWVC1CgOd9NkpctGa2Q';
const COLLECTION_NFT_MINT = '';
const CANDY_MACHINE_ID = '';
Establish a new Metaplex instance by calling our SOLANA_CONNECTION in Metaplex.make(). Our instance will use the Keypair we just created:
const METAPLEX = Metaplex.make(SOLANA_CONNECTION)
    .use(keypairIdentity(WALLET));
By including our network connection and wallet, the API will make it easy for us to submit transactions to the Solana network.
Note: you will need to include an additional .use() call for a storage route if you intend to upload your own images and metadata (not necessary to follow this demo):
    .use(bundlrStorage({
        address: 'https://devnet.bundlr.network',
        providerUrl: QUICKNODE_RPC,
        timeout: 60000,
    }))
Create Collection NFT
Candy Machine utilizes a feature, Metaplex Certified Collections, in order to verify collections on chain. Verification makes it easy for 3rd parties (e.g., exchanges) to group and track sets of NFTs and prevent fakes. To create our Candy Machine, we must first create a Collection NFT. This will serve as a the "cover image" that you might see on an exchange or wallet (e.g., Magic Eden or Phantom).
All we need to do is create a new NFT using, nfts().create(). Create a new function, createCollectionNft:
async function createCollectionNft() {
    const { nft: collectionNft } = await METAPLEX.nfts().create({
        name: "QuickNode Demo NFT Collection",
        uri: NFT_METADATA,
        sellerFeeBasisPoints: 0,
        isCollection: true,
        updateAuthority: WALLET,
      });

      console.log(`✅ - Minted Collection NFT: ${collectionNft.address.toString()}`);
      console.log(`     https://explorer.solana.com/address/${collectionNft.address.toString()}?cluster=devnet`);
}
Make sure to set isCollection as true, as this will note that this NFT is being used to define a collection.
Mint your NFT. At the end of your app, call createCollectionNft():
createCollectionNft();
And then, in your terminal, run:
ts-node app
Copy the MINT ID and update your COLLECTION_NFT_MINT variable (on line 11 for us):
const COLLECTION_NFT_MINT = 'GWWhaWp7kJ3WKLkQTKyy5DEEGGF4TnCfHXXKxsBSbcwg';
Before moving on, delete or comment out your call to createCollectionNft() as we will no longer need it.
Initiate Candy Machine
The Metaplex SDK allows you to initiate a Candy Machine with a single line of code 🤯:
const { candyMachine } = await METAPLEX.candyMachines().create(candyMachineSettings);
As you can see, however, we must first set some settings for our Candy Machine. Create a new function, generateCandyMachine, where we define our Candy Machine settings and then call candyMachines().create():
async function generateCandyMachine() {
    const candyMachineSettings: CreateCandyMachineInput<DefaultCandyGuardSettings> =
        {
            itemsAvailable: toBigNumber(3), // Collection Size: 3
            sellerFeeBasisPoints: 1000, // 10% Royalties on Collection
            symbol: "DEMO",
            maxEditionSupply: toBigNumber(0), // 0 reproductions of each NFT allowed
            isMutable: true,
            creators: [
                { address: WALLET.publicKey, share: 100 },
            ],
            collection: {
                address: new PublicKey(COLLECTION_NFT_MINT), // Can replace with your own NFT or upload a new one
                updateAuthority: WALLET,
            },
        };
    const { candyMachine } = await METAPLEX.candyMachines().create(candyMachineSettings);
    console.log(`✅ - Created Candy Machine: ${candyMachine.address.toString()}`);
    console.log(`     https://explorer.solana.com/address/${candyMachine.address.toString()}?cluster=devnet`);
}
Candy Machine settings define the size of the collection and key data points that are the same for every NFT (e.g., royalties, creators, symbol, mutability). We have defined some values for this example--feel free to modify them slightly to meet your own needs. A detailed overview of Candy Machine settings is available at Metaplex.com. Note that you can include Candy Guards at this step--we will add them next in a separate step to let you walk through the process of how to update a Candy Machine.
Go ahead and initiate your Candy Machine. At the end of your app, call generateCandyMachine():
generateCandyMachine();
And then, in your terminal, run:
ts-node app
You should see a Candy Machine ID and link to it on Solana Explorer:

Copy the Candy Machine ID and update your CANDY_MACHINE_ID variable (on line 11 for us):
const CANDY_MACHINE_ID = 'D2ARG7rXosZfnZwVBx3v7piG3H2tcYvWyw5YJCPuEpBU';
If you're getting an error or have questions, shoot us a line on Discord, and we will be happy to help.
Before moving on, delete or comment out your call to generateCandyMachine() as we will no longer need it.
Add Candy Guards
Candy Machine V3 includes a nifty new feature called "Candy Guards" (or just Guards for short). Guards are modular pieces of code that can restrict access to the mint of a Candy Machine and even add new features to it! (Source: Metaplex.com). As of November 2022, Metaplex has 16 different Guards available:
- Address Gate: Restricts the mint to a single address.
- Allow List: Uses a wallet address list to determine who is allowed to mint.
- Bot Tax: Configurable tax to charge invalid transactions.
- End Date: Determines a date to end the mint.
- Gatekeeper: Restricts minting via a Gatekeeper Network, e.g., Captcha integration.
- Mint Limit: Specifies a limit on the number of mints per wallet.
- Nft Burn: Restricts the mint to holders of a specified collection, requiring a burn of the NFT.
- Nft Gate: Restricts the mint to holders of a specified collection.
- Nft Payment: Set the price of the mint as an NFT of a specified collection.
- Redeemed Amount: Determines the end of the mint based on the total amount minted.
- Sol Payment: Set the price of the mint in SOL.
- Start Date: Determines the start date of the mint.
- Third-Party Signer: Requires an additional signer on the transaction.
- Token Burn: Restricts the mint to holders of a specified token, requiring a burn of the tokens.
- Token Gate: Restricts the mint to holders of a specified token.
- Token Payment: Set the price of the mint in token amount. (Source: Metaplex.com)
Metaplex allows you to mix, match, and stack multiple Guards to customize your NFT's mint. You can even create various "Guard Groups" to create custom mint experiences for different users.
For our mint, we will set a Start Date, a Sol Payment, and a Limit of 2 mints per user. Create a new function, updateCandyMachine():
async function updateCandyMachine() {
    const candyMachine = await METAPLEX
        .candyMachines()
        .findByAddress({ address: new PublicKey(CANDY_MACHINE_ID) });

    const { response } = await METAPLEX.candyMachines().update({
        candyMachine,
        guards: {
            startDate: { date: toDateTime("2022-10-17T16:00:00Z") },
            mintLimit: {
                id: 1,
                limit: 2,
            },
            solPayment: {
                amount: sol(0.1),
                destination: METAPLEX.identity().publicKey,
            },
        }
    })

    console.log(`✅ - Updated Candy Machine: ${CANDY_MACHINE_ID}`);
    console.log(`     https://explorer.solana.com/tx/${response.signature}?cluster=devnet`);
}
Our function does three things:
- Fetch our Candy Machine: look up our Candy Machine by ID and return a CandyMachine object by calling .candyMachines().findByAddress().
- Update our Candy Machine by calling candyMachines().update(). We first pass our candyMachine from step 1 and then define our guards. Each guard has a specific Object Key with unique GuardSettings. Settings for each Candy Guard can be found at Metaplex.com.
- Start Date: pass a start date using Metaplex's toDateTime method.
- Mint Limit: pass a unique id for this guard (necessary to allow different limits to be tracked using Guard Groups) and a limit amount.
- Sol Payment: pass an amount of SOL to collect using Metaplex's sol method and the destination Public Key (your mint's treasury).
- Log a link to the transaction on Solana Explorer.
Add your Candy Guards by calling updateCandyMachine(). At the end of your app, add the following:
updateCandyMachine();
And then, in your terminal, run:
ts-node app
You should see something like this in your terminal:
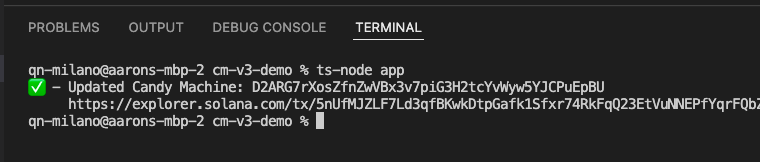
Nice job. Before moving on, delete or comment out your call to updateCandyMachine() as we will no longer need it.
Let's add some items to our Candy Machine!
Add Items to Your Candy Machine
Adding items to your Candy Machine is really similar to updating it. Instead of .update(), however, we need to invoke .insertItems(). Create a new function, addItems() and add the following code:
async function addItems() {
    const candyMachine = await METAPLEX
        .candyMachines()
        .findByAddress({ address: new PublicKey(CANDY_MACHINE_ID) });
    const items = [];
    for (let i = 0; i < 3; i++ ) { // Add 3 NFTs (the size of our collection)
        items.push({
            name: `QuickNode Demo NFT # ${i+1}`,
            uri: NFT_METADATA
        })
    }
    const { response } = await METAPLEX.candyMachines().insertItems({
        candyMachine,
        items: items,
      },{commitment:'finalized'});

    console.log(`✅ - Items added to Candy Machine: ${CANDY_MACHINE_ID}`);
    console.log(`     https://explorer.solana.com/tx/${response.signature}?cluster=devnet`);
}
Our function does three things:
- Fetches our Candy Machine: look up our Candy Machine by ID and return a CandyMachine object by calling .candyMachines().findByAddress().
- Creates an Array of Items to Add: the insertItems() method requires us to pass an items array that includes the name and uri of each item to be added to the Candy Machine. Since we set the size of our Candy Machine as 3 in our "Initiate Candy Machine" step, we will add 3 items using a simple for loop. If you are adding unique NFTs, add your custom logic here. Because Solana transaction sizes are limited, we can only pass a limited number of items per call. "The number of items we can insert per transaction will depend on the Name Length and URI Length attributes defined in the Config Line Settings. The shorter our names and URIs are, the more we can fit into a transaction." (Metaplex.com).
- Inserts Items into Candy Machine by Calling candyMachines().insertItems(): We first pass our candyMachine from step 1, and then pass our items defined in Step 2.
- Logs a link to the transaction on Solana Explorer.
Go ahead and add your items by calling addItems(). At the end of your app, add the following:
addItems();
And then, in your terminal, run:
ts-node app
You should see something like this in your terminal:
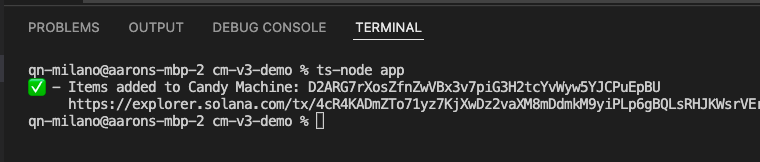
Before moving on, delete or comment out your call to addItems() as we will no longer need it.
You should now have a loaded Candy Machine with guards in place. Let's test it out!
Mint an NFT
Much like our previous steps, we will need to fetch our Candy Machine and call a new method, candyMachines().mint(). Create a new function, mintNft():
async function mintNft() {
    const candyMachine = await METAPLEX
        .candyMachines()
        .findByAddress({ address: new PublicKey(CANDY_MACHINE_ID) });
    let { nft, response } = await METAPLEX.candyMachines().mint({
        candyMachine,
        collectionUpdateAuthority: WALLET.publicKey,
        },{commitment:'finalized'})

    console.log(`✅ - Minted NFT: ${nft.address.toString()}`);
    console.log(`     https://explorer.solana.com/address/${nft.address.toString()}?cluster=devnet`);
    console.log(`     https://explorer.solana.com/tx/${response.signature}?cluster=devnet`);
}
This code should be starting to look pretty familiar--here's what it does:
- Fetches our Candy Machine: look up our Candy Machine by ID and return a CandyMachine object by calling .candyMachines().findByAddress().
- Mints an NFT by calling candyMachines().mint(): We first pass our candyMachine from step 1, and then pass our wallet's public key as the collectionUpdateAuthority (required because "this information does not live in the candyMachine model and it is required by the underlying mint instructions" Source: Metaplex.com).
- Logs a link to the mint and transaction on Solana Explorer.
Finally, mint an NFT by calling mintNft(). At the end of your app, add the following:
mintNft();
And then, in your terminal, run:
ts-node app
You should see something like this in your terminal:

Nice job! Let's test out one of our Candy Guards. Rerun your script. You should see a similar result and mint a 2nd NFT to your wallet. Then try it a third time.
The third try should give you some problems. Why? Well, if you dig into your error code, you should see something like this:
  title: CandyGuardProgram > The maximum number of allowed mints was reached,
  problem: The program [CandyGuardProgram] at address [Guard1JwRhJkVH6XZhzoYxeBVQe872VH6QggF4BWmS9g] raised an error of code [6029] that translates to The maximum number of allowed mints was reached.
If you recall, we created a mintLimit Candy Guard that limits any wallet to only be able to mint 2 NFTs, so the guard is preventing us from minting a third! Pretty cool, huh?
Next Steps and Wrap Up
You now have a couple of useful scripts for interacting with Candy Machine using TypeScript! We are excited to see what you build with this. Hop on Discord or Twitter and share your projects!
Looking for an extra challenge? Try creating a mint site using the scripts we just learned and the Solana dApp Scaffold!
We ❤️ Feedback!
If you have any feedback or questions on this guide, let us know. We'd love to hear from you!