
19 min read
Overview
Token Extensions (formerly known as Token 2022) bring an exciting new suite of functionality and customization to the Solana SPL token program. This program encompasses all features of its predecessor (it maintains compatibility with the original Token instruction and account layouts) while providing new instructions and functionality. In this guide, we will explore two new extensions to create a dynamic NFT using just the SPL Token Program:
- Metadata, and
- Metadata Pointer
What You Will Do
- Mint a Solana token with custom metadata fields, including a "points" field
- Add/remove custom metadata fields
- Remove minting authority
- Increment a token's "points" metadata field
What You Will Need
- Basic knowledge of Solana Fundamentals
- Basic knowledge of Web3 Wallets
- Basic understanding of Token Extensions (What are Solana Token Extensions and How to Get Started?)
| Dependency | Version |
|---|---|
| node.js | 20.9.0 |
| tsc | 5.0.2 |
| ts-node | 10.9.1 |
| @solana/web3.js | ^1.87.6 |
| @solana/spl-token | ^0.3.11 |
| @solana/spl-token-metadata | ^0.1.2 |
Step 1 - Set Up Your Environment
Let's create a new Node.js project and install the Solana-Web3.js library. In your terminal, enter the following commands in order:
mkdir extension-nft && cd extension-nft
npm init -y # or yarn init -y
npm install @solana/web3.js@1 @solana/spl-token @solana/spl-token-metadata # or yarn add @solana/web3.js@1 @solana/spl-token @solana/spl-token-metadata
echo > app.ts
Open the app.ts file in your favorite editor and add the following imports:
// Import necessary functions and constants from the Solana web3.js and SPL Token packages
import {
    Connection,
    Keypair,
    SystemProgram,
    Transaction,
    LAMPORTS_PER_SOL,
    sendAndConfirmTransaction,
    TransactionSignature,
    SignatureStatus,
    TransactionConfirmationStatus
} from '@solana/web3.js';
import {
    TOKEN_2022_PROGRAM_ID,
    createInitializeMintInstruction,
    mintTo,
    createAssociatedTokenAccountIdempotent,
    AuthorityType,
    createInitializeMetadataPointerInstruction,
    TYPE_SIZE,
    LENGTH_SIZE,
    getMintLen,
    ExtensionType,
    getMint,
    getMetadataPointerState,
    getTokenMetadata,
    createSetAuthorityInstruction,
} from '@solana/spl-token';
import {
    createInitializeInstruction,
    createUpdateFieldInstruction,
    createRemoveKeyInstruction,
    pack,
    TokenMetadata,
} from '@solana/spl-token-metadata';
We import necessary dependencies from @solana/web3.js, @solana/spl-token, and @solana/spl-token-metadata libraries. We will use these to create, mint, and fetch data for SPL tokens with extensions. There are several new items here (notably the spl-token-metadata package); we will explore these as we go.
Next, we are going to establish a connection to the local cluster. If you prefer to use devnet or mainnet, you may need to refactor slightly (e.g., the airdrop function below will be unanavailable on mainnet and potentially rate-limited on devnet). You will also need to change the Connection URL to your Quicknode RPC endpoint (sign up for an account here). In addition to creating our necessary authority accounts and defining our token metadata, we have added two helper functions:
- one to generate a URL to the transaction on Solana FM (currently supporting Token Extension Metadata). This will be useful for viewing the transaction details.
- one to airdrop some SOL to our payer account. This is necessary to pay for the transaction fees and new account rent.
const connection = new Connection('http://127.0.0.1:8899', 'confirmed');

const payer = Keypair.generate();
const authority = Keypair.generate();
const owner = Keypair.generate();
const mintKeypair = Keypair.generate();
const mint = mintKeypair.publicKey;

const tokenMetadata: TokenMetadata = {
    updateAuthority: authority.publicKey,
    mint: mint,
    name: 'QN Pixel',
    symbol: 'QNPIX',
    uri: "https://qn-shared.quicknode-ipfs.com/ipfs/QmQFh6WuQaWAMLsw9paLZYvTsdL5xJESzcoSxzb6ZU3Gjx",
    additionalMetadata: [["Background", "Blue"], ["WrongData", "DeleteMe!"], ["Points", "0"]],
};

const decimals = 0;
const mintAmount = 1;

function generateExplorerUrl(identifier: string, isAddress: boolean = false): string {
    if (!identifier) return '';
    const baseUrl = 'https://solana.fm';
    const localSuffix = '?cluster=localnet-solana';
    const slug = isAddress ? 'address' : 'tx';
    return `${baseUrl}/${slug}/${identifier}${localSuffix}`;
}

async function airdropLamports() {
    const airdropSignature = await connection.requestAirdrop(payer.publicKey, 2 * LAMPORTS_PER_SOL);
    async function confirmTransaction(
        connection: Connection,
        signature: TransactionSignature,
        desiredConfirmationStatus: TransactionConfirmationStatus = 'confirmed',
        timeout: number = 30000,
        pollInterval: number = 1000,
        searchTransactionHistory: boolean = false
    ): Promise<SignatureStatus> {
        const start = Date.now();

        while (Date.now() - start < timeout) {
            const { value: statuses } = await connection.getSignatureStatuses([signature], { searchTransactionHistory });

            if (!statuses || statuses.length === 0) {
                throw new Error('Failed to get signature status');
            }

            const status = statuses[0];

            if (status === null) {
                await new Promise(resolve => setTimeout(resolve, pollInterval));
                continue;
            }

            if (status.err) {
                throw new Error(`Transaction failed: ${JSON.stringify(status.err)}`);
            }

            if (status.confirmationStatus && status.confirmationStatus === desiredConfirmationStatus) {
                return status;
            }

            if (status.confirmationStatus === 'finalized') {
                return status;
            }

            await new Promise(resolve => setTimeout(resolve, pollInterval));
        }

        throw new Error(`Transaction confirmation timeout after ${timeout}ms`);
    }

    await confirmTransaction(connection, airdropSignature);
}
Note that we have defined a tokenMetadata object with the following fields specified in the TokenMetadata Interface:
export interface TokenMetadata {
    // The authority that can sign to update the metadata
    updateAuthority?: PublicKey;
    // The associated mint, used to counter spoofing to be sure that metadata belongs to a particular mint
    mint: PublicKey;
    // The longer name of the token
    name: string;
    // The shortened symbol for the token
    symbol: string;
    // The URI pointing to richer metadata
    uri: string;
    // Any additional metadata about the token as key-value pairs
    additionalMetadata: [string, string][];
}
The additionalMetadata field is an array of key-value pairs that can be used to store custom metadata. We have added three fields:
- "Background", a static field
- "WrongData", a field we wish to remove (for demonstration purposes)
- "Points", a field we will modify later
If you would prefer to use your own metadata, you can replace the tokenMetadata object with your own custom metadata. To upload a .json and image file to IPFS, you can use a Quicknode IPFS Gateway.
Finally, create an async function called main and add the following code:
async function main() {
    try {
        await airdropLamports();

        // 1. Create Token and Mint
        const [initSig, mintSig] = await createTokenAndMint();
        console.log(`Token created and minted:`);
        console.log(`   ${generateExplorerUrl(initSig)}`);
        console.log(`   ${generateExplorerUrl(mintSig)}`);

        // 2. Remove Metadata Field
        const cleanMetaTxId = await removeMetadataField();
        console.log(`Metadata field removed:`);
        console.log(`   ${generateExplorerUrl(cleanMetaTxId)}`);

        // 3. Remove Authority
        const removeAuthTxId = await removeTokenAuthority();
        console.log(`Authority removed:`);
        console.log(`   ${generateExplorerUrl(removeAuthTxId)}`);

        // 4. Increment Points
        const incrementPointsTxId = await incrementPoints(10);
        console.log(`Points incremented:`);
        console.log(`   ${generateExplorerUrl(incrementPointsTxId)}`);

        // Log New NFT
        console.log(`New NFT:`);
        console.log(`   ${generateExplorerUrl(mint.toBase58(), true)}`);

    } catch (err) {
        console.error(err);
    }
}
We are outlining the steps we will take to create, mint, and manipulate our NFT. We have already added the first step: airdrop some SOL to our payer account. Let's build out the remaining steps.
Step 1 - Create a New Token
First, we will create our createTokenAndMint function. This function will create a new token with our specified extensions and mint it to a new associated token account owned by the owner wallet we generated previously. Add the following code to your app.ts file:
async function createTokenAndMint(): Promise<[string, string]> {

}
We will return a promise with two strings: the transaction signature for the token initialization and the token minting.
To create our mint account, we will need to determine how much space the mint account will require. We can use the getMintLen function to calculate the minimum balance for the mint account. getMintLen does not yet support extensions with variable sizes (e.g., Metadata, which varies based on the specific metadata), so we must calculate the minimum balance for the mint account manually by adding the size of the mint account and the size of the metadata. We can use the getMinimumBalanceForRentExemption function to calculate the minimum balance for the mint account. Add the following code to your createTokenAndMint function:
async function createTokenAndMint(): Promise<[string, string]> {
    // Calculate the minimum balance for the mint account
    const mintLen = getMintLen([ExtensionType.MetadataPointer]);
    const metadataLen = TYPE_SIZE + LENGTH_SIZE + pack(tokenMetadata).length;
    const mintLamports = await connection.getMinimumBalanceForRentExemption(mintLen + metadataLen);
}
Next, let's create our initialize mint transaction. The transaction will need to do a few things:
- Create the mint account
- Initialize the account as a Metadata Pointer account, which will allow our Mint Account to specify the address of its corresponding Metadata Account (in our case, we will write the metadata to the mint account itself and point to it)
- Initialize the account as a Mint account
- Initialize the account with the token metadata
- Update the token metadata with the custom metadata fields
⛔️ If any of these values are incorrect, the transaction will fail due to incorrect account inputs. Be sure to double-check the parameters you are passing into these functions.
Add the following code to your createTokenAndMint function after the mintLamports declaration:
async function createTokenAndMint(): Promise<[string, string]> {

    // After calculating the minimum balance for the mint account...

    // Prepare transaction
    const transaction = new Transaction().add(
        SystemProgram.createAccount({
            fromPubkey: payer.publicKey,
            newAccountPubkey: mint,
            space: mintLen,
            lamports: mintLamports,
            programId: TOKEN_2022_PROGRAM_ID,
        }),
        createInitializeMetadataPointerInstruction(
            mint,
            authority.publicKey,
            mint,
            TOKEN_2022_PROGRAM_ID,
        ),
        createInitializeMintInstruction(
            mint,
            decimals,
            authority.publicKey,
            null,
            TOKEN_2022_PROGRAM_ID,
        ),
        createInitializeInstruction({
            programId: TOKEN_2022_PROGRAM_ID,
            metadata: mint,
            updateAuthority: authority.publicKey,
            mint: mint,
            mintAuthority: authority.publicKey,
            name: tokenMetadata.name,
            symbol: tokenMetadata.symbol,
            uri: tokenMetadata.uri,
        }),
        createUpdateFieldInstruction({
            programId: TOKEN_2022_PROGRAM_ID,
            metadata: mint,
            updateAuthority: authority.publicKey,
            field: tokenMetadata.additionalMetadata[0][0],
            value: tokenMetadata.additionalMetadata[0][1],
        }),
        createUpdateFieldInstruction({
            programId: TOKEN_2022_PROGRAM_ID,
            metadata: mint,
            updateAuthority: authority.publicKey,
            field: tokenMetadata.additionalMetadata[1][0],
            value: tokenMetadata.additionalMetadata[1][1],
        }),
        createUpdateFieldInstruction({
            programId: TOKEN_2022_PROGRAM_ID,
            metadata: mint,
            updateAuthority: authority.publicKey,
            field: tokenMetadata.additionalMetadata[2][0],
            value: tokenMetadata.additionalMetadata[2][1],
        }),

    );

}
All we are doing here is creating a new transaction and appending a series of instructions to it using .add(). We are using helper from the @solana/spl-token and @solana/spl-token-metadata libraries to create the necessary instructions:
SystemProgram.createAccountto create the new account with the necessary space and lamportscreateInitializeMetadataPointerInstructionfunction to initialize the mint account as a metadata pointercreateInitializeMintInstructionfunction to initialize the mint accountcreateInitializeInstructionfunction to initialize the mint account with the token metadatacreateUpdateFieldInstructionfunction to update the token metadata with the custom metadata fields (not we must add each custom field individually)
Be very careful about the parameters you pass into these functions. You may want to check the TypeScript definitions for these functions to ensure you are passing the correct parameters. You can find the definitions by right-clicking on the function and selecting "Go to Definition" in your editor.
Reminder: When using Token Extensions, you must pass the TOKEN_2022_PROGRAM_ID as the programId into each instruction.
Finally, we will send and confirm the transaction. Add the following code to your createTokenAndMint function after the transaction definition:
async function createTokenAndMint(): Promise<[string, string]> {

    // Calculate the minimum balance for the mint account...
    // Prepare the transaction...

    // Initialize NFT with metadata
    const initSig = await sendAndConfirmTransaction(connection, transaction, [payer, mintKeypair, authority]);
    // Create associated token account
    const sourceAccount = await createAssociatedTokenAccountIdempotent(connection, payer, mint, owner.publicKey, {}, TOKEN_2022_PROGRAM_ID);
    // Mint NFT to associated token account
    const mintSig = await mintTo(connection, payer, mint, sourceAccount, authority, mintAmount, [], undefined, TOKEN_2022_PROGRAM_ID);

    return [initSig, mintSig];
}
We are actually sending three transactions to the network here:
- The first transaction initializes the mint account with the metadata and custom metadata fields (using the
transactionwe created in the previous step) - The second transaction creates an associated token account for the owner of the NFT
- The third transaction mints the NFT to the associated token account
Finally, our function returns the transaction signatures for the mint and initialization transactions.
Step 2 - Remove a Metadata Field
Whoops! We accidentally added a field to our metadata that we don't want. Let's remove it. We will create a new function called removeMetadataField to remove the "WrongData" field from our token metadata. Add the following code to your app.ts file:
async function removeMetadataField() {
    const transaction = new Transaction().add(
        createRemoveKeyInstruction({
            programId: TOKEN_2022_PROGRAM_ID,
            metadata: mint,
            updateAuthority: authority.publicKey,
            key: 'WrongData',
            idempotent: true,
        })
    );
    const signature = await sendAndConfirmTransaction(connection, transaction, [payer, authority]);
    return signature;
}
The @solana/spl-token-metadata library provides a createRemoveKeyInstruction function to create an instruction that will remove a key from the token metadata. We simply create a new transaction and add the instruction to remove the "WrongData" field from the token metadata. We then send and confirm the transaction and return the transaction signature.
Step 3 - Remove Authority
Since we are creating an NFT, we want to limit supply to 1 and prevent any further minting. We can do this by removing the mint authority. We will create a new function called removeTokenAuthority to remove the mint authority from the mint account. Add the following code to your app.ts file:
async function removeTokenAuthority(): Promise<string> {
    const transaction = new Transaction().add(
        createSetAuthorityInstruction(
            mint,
            authority.publicKey,
            AuthorityType.MintTokens,
            null,
            [],
            TOKEN_2022_PROGRAM_ID
        )
    );
    return await sendAndConfirmTransaction(connection, transaction, [payer, authority]);
}
We are using the createSetAuthorityInstruction function from the @solana/spl-token library to create an instruction that will set the mint authority from the mint account to a new authority (in this case, we pass null to remove the authority). We then send and confirm the transaction and return the transaction signature.
Step 4 - Increment Points
Finally, let's increment the "Points" field in our token metadata. We will create a new function called incrementPoints to increment the "Points" field by a specified amount. Add the following code to your app.ts file:
async function incrementPoints(pointsToAdd: number = 1) {
    // Retrieve mint information
    const mintInfo = await getMint(
        connection,
        mint,
        "confirmed",
        TOKEN_2022_PROGRAM_ID,
    );

    const metadataPointer = getMetadataPointerState(mintInfo);

    if (!metadataPointer || !metadataPointer.metadataAddress) {
        throw new Error('No metadata pointer found');
    }

    const metadata = await getTokenMetadata(
        connection,
        metadataPointer?.metadataAddress,
    );

    if (!metadata) {
        throw new Error('No metadata found');
    }
    if (metadata.mint.toBase58() !== mint.toBase58()) {
        throw new Error('Metadata does not match mint');
    }
    const [key, currentPoints] = metadata.additionalMetadata.find(([key, _]) => key === 'Points') ?? [];
    let pointsAsNumber = parseInt(currentPoints ?? '0');
    pointsAsNumber += pointsToAdd;
    const transaction = new Transaction().add(
        createUpdateFieldInstruction({
            programId: TOKEN_2022_PROGRAM_ID,
            metadata: mint,
            updateAuthority: authority.publicKey,
            field: 'Points',
            value: pointsAsNumber.toString(),
        })
    );
    return await sendAndConfirmTransaction(connection, transaction, [payer, authority]);
}
Rather than just using the createUpdateFieldInstruction function to update the "Points" field, we are also adding a few checks here to familiarize you with some of the account fetching functions for SPL tokens with Metadata.
- First, we use
getMintto fetch the mint account information - Then we use
getMetadataPointerStateto fetch the metadata pointer state (this includes our metadata address) - We use
getTokenMetadatato fetch the metadata for our mint account - We then check that the metadata matches the mint account
- Since this function is a points incrementer, we also ensure that the "Points" field exists
- Finally, we increment the points and send and confirm the transaction
As you see in our handling of points, custom metadata fields are all stored as strings. This means that if you want to store a number, you must convert between string and number types as necessary.
Run the Code
Call your main function at the end of your app.ts file:
main();
Finally, in a separate terminal, run the following command to start a local Solana cluster (skip this step if you are using a different cluster):
solana-test-validator
And in your main terminal, run your script:
ts-node app.ts
You should see output similar to the following:
Token created and minted:
   https://solana.fm/tx/2HRXAjCt2zuyH3XPD4kKcKvyyqDZ6B98vk6CB8UFNSWhgydR8CNRNqAjNQLnorPhmabszLUgY6Uh5crhSUFYGvB9?cluster=localnet-solana
   https://solana.fm/tx/37ngRFFSunK88gZKgTfsc866hqb5e3zXj4z3oeWxAdtsokPpcrwXb56sZwnJ7pS3X7HNbcBCtaaEgWKmDMmGgCks?cluster=localnet-solana
Metadata field removed:
   https://solana.fm/tx/4TWGd9fDCCTyv39o35BtZyP9kyoYruFCe3XASvmXUpSZpgFGM3So238oQiQAMS14uhxKTDe48V5wujBtzDQFxEuE?cluster=localnet-solana
Authority removed:
   https://solana.fm/tx/Atbt1zwyRmBPijtC423yHTdWaM7ZZqiUoDuMpV5HHT9uHMDqyF4b4Mi4mQP6h9eEie75mew6RfmtbynGMWxyuXb?cluster=localnet-solana
Points incremented:
   https://solana.fm/tx/4CbUcLk7TPvydRghXgNTR8WpGJU82zeMpJh4ughdYWhbj7BE2krXhhStEu7FzjJzW3GDRfigAWnuEBUjS5XESqBC?cluster=localnet-solana
New NFT:
   https://solana.fm/address/FPyoBNZ24Xv3yu9p5uqsgHXxMXkPMPHGF9pLAWRLFmWF?cluster=localnet-solana
You should be able to follow the final link to your NFT's page on Solana FM. You should see the NFT's image, metadata (a lack of the "WrongData" field), no mint authority, and a points value of "10":
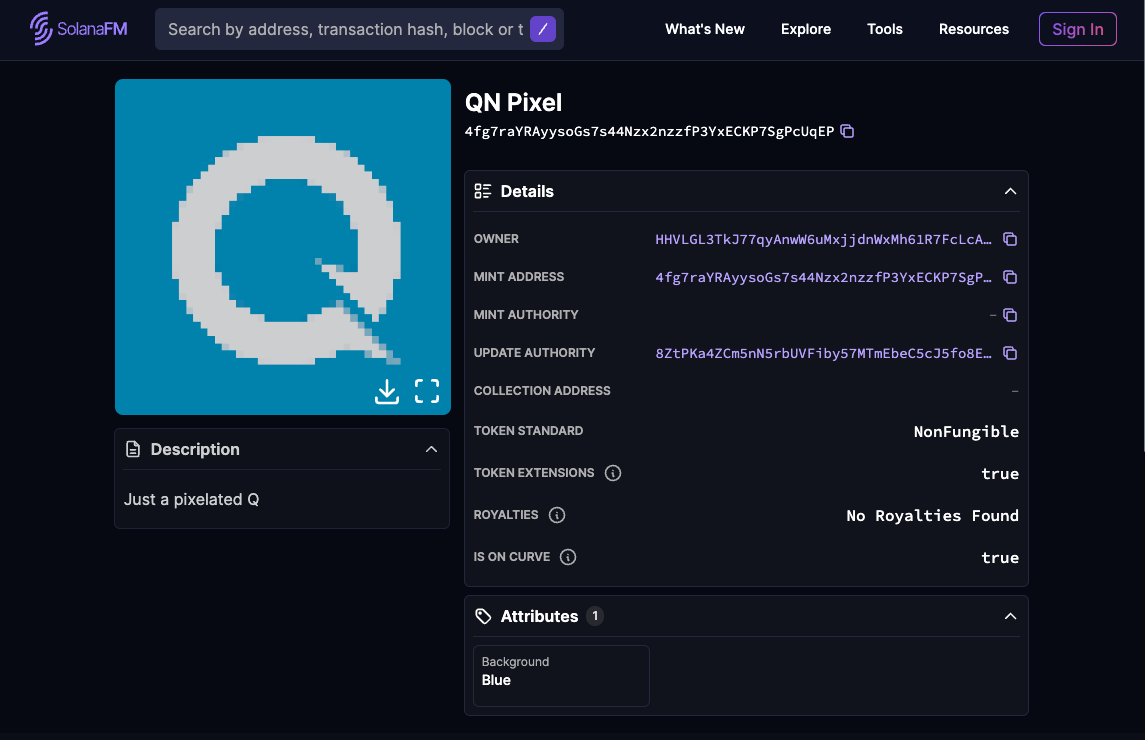
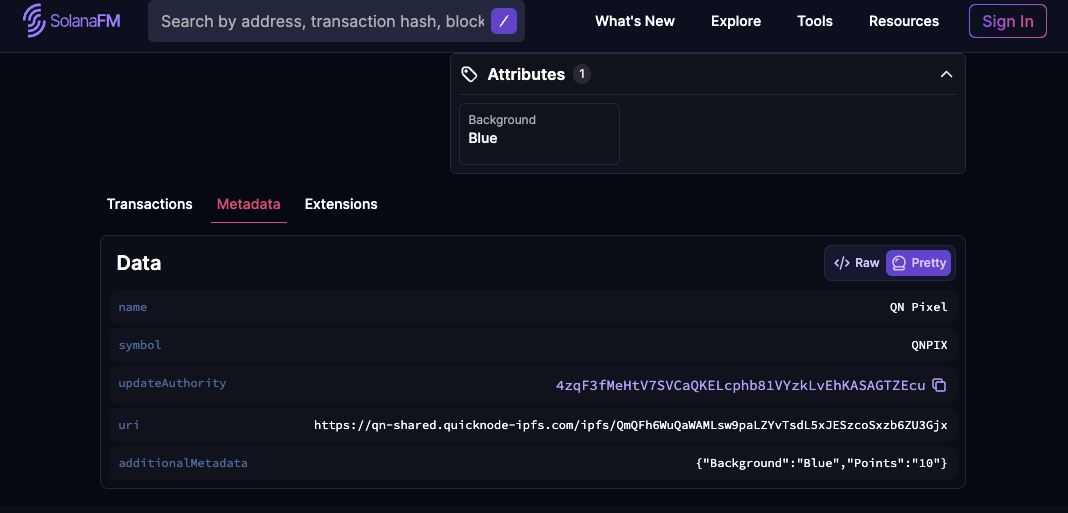
Note: Sometimes the NFT data does not render immediately. If this is the case, wait a few moments and try refreshing the page.
Nice job!
Wrap Up
If you would like, you can find our completed code in the Quicknode Examples GitHub Repository.
You now have another tool in your tool belt for creating and managing NFTs on Solana. For continued practice, challenge yourself to add more functionality to your NFT. You could try:
- Making the NFT Soulbound using the
NonTransferableExtension - Enforce royalties using the
TransferHookExtension
We would love to hear more about what you are building and how you plan to use Token Extensions for your projects. Drop us a line in Discord, or give us a follow on Twitter to stay up to date on all the latest information!
We ❤️ Feedback!
Let us know if you have any feedback or requests for new topics. We'd love to hear from you.