11 min read
Overview
Are you looking to get your transactions confirmed as quickly as possible on Solana? This guide will show you how to use priority fees to bid for priority in the leader's queue and confirm your transactions faster.
Solana's fee priority system allows you to set an additional fee on top of the base fee for a transaction, which gives your transaction a higher priority in the leader's queue. By bidding more for priority status, your transaction will be more likely to be confirmed quickly by the network.
Prefer a video walkthrough? Follow along with Sahil and learn about priority fees on Solana.
What You Will Do
In this guide, we will walk you through the process of using priority fees in your Solana transactions using the Solana Web3.js library. We will show you how to create a base transaction, create a priority transaction with a higher fee, and send them to the network.
By the end of this guide, you will have a good understanding of how to use priority fees to prioritize your Solana transactions and get them confirmed faster on the network.
What You Will Need
To follow along with this guide, you will need the following:
- Basic experience with Solana transactions using solanaWeb3.js
- Basic knowledge of the JavaScript/TypeScript programming languages
- Nodejs installed (version 16.15 or higher)
- npm or yarn installed (We will be using yarn to initialize our project and install the necessary packages. Feel free to use npm instead if that is your preferred package manager)
- TypeScript experience and ts-node installed
- A Solana Paper wallet (.json) with Devnet SOL (Example script).
Priority Fees
Before we jump into how priority fees can be leveraged, let's understand what priority fees are on Solana. Priority fees have recently been introduced by Solana to allow users to have more control over the order of their transactions in a queue. A user can set an additional fee on their transaction to to bid for higher priority in the leader's queue on Solana. Transactions with higher priority fees are more likely to be confirmed quickly by the network, as they are given priority over transactions with lower priority fees. This is particularly useful for dApps sending high-value or time-sensitive transactions.
How else might priority fees be used in a real-world application? Imagine a very hyped NFT mint. Users who are willing to pay a premium to ensure their transactions are processed might voluntarily pay a priority fee in order to increase their chances of their transaction succeeding and getting an NFT.
Set Up Your Project
Create a new project directory in your terminal with the following:
mkdir solana-priority-fees
cd solana-priority-fees
Create a file for your app, app.ts:
echo > app.ts
Initialize your project with the "yes" flag to use default values for your new package:
yarn init --yes
#or
npm init --yes
Create a tsconfig.json with .json importing enabled:
tsc -init --resolveJsonModule true --target es2020
Save your paper wallet with devnet SOL as guideSecret.json to your project directory. If you need some devnet SOL, you can request some here:
Install Solana Web3 Dependency
We will need to add the Solana Web3 library for this exercise. In your terminal, enter:
yarn add @solana/web3.js@1
#or
npm install @solana/web3.js@1
We will need a few components from these libraries and our secret key. Import them in app.ts at line 1 by adding:
import { ComputeBudgetProgram, Connection, Keypair, LAMPORTS_PER_SOL, sendAndConfirmTransaction, SystemProgram, Transaction } from "@solana/web3.js";
import secret from './guideSecret.json';
You can now access Logs for your RPC endpoints, helping you troubleshoot issues more effectively. If you encounter an issue with your RPC calls, simply check the logs in your QuickNode dashboard to identify and resolve problems quickly. Learn more about log history limits on our pricing page.
Connect to a Solana Cluster with Your QuickNode Endpoint
To build on Solana, you'll need an API endpoint to connect with the network. You're welcome to use public nodes or deploy and manage your own infrastructure; however, if you'd like 8x faster response times, you can leave the heavy lifting to us.
You can now pay for a QuickNode plan using USDC on Solana. As the first multi-chain provider to accept Solana payments, we're streamlining the process for developers — whether you're creating a new account or managing an existing one. Learn more about paying with Solana here.
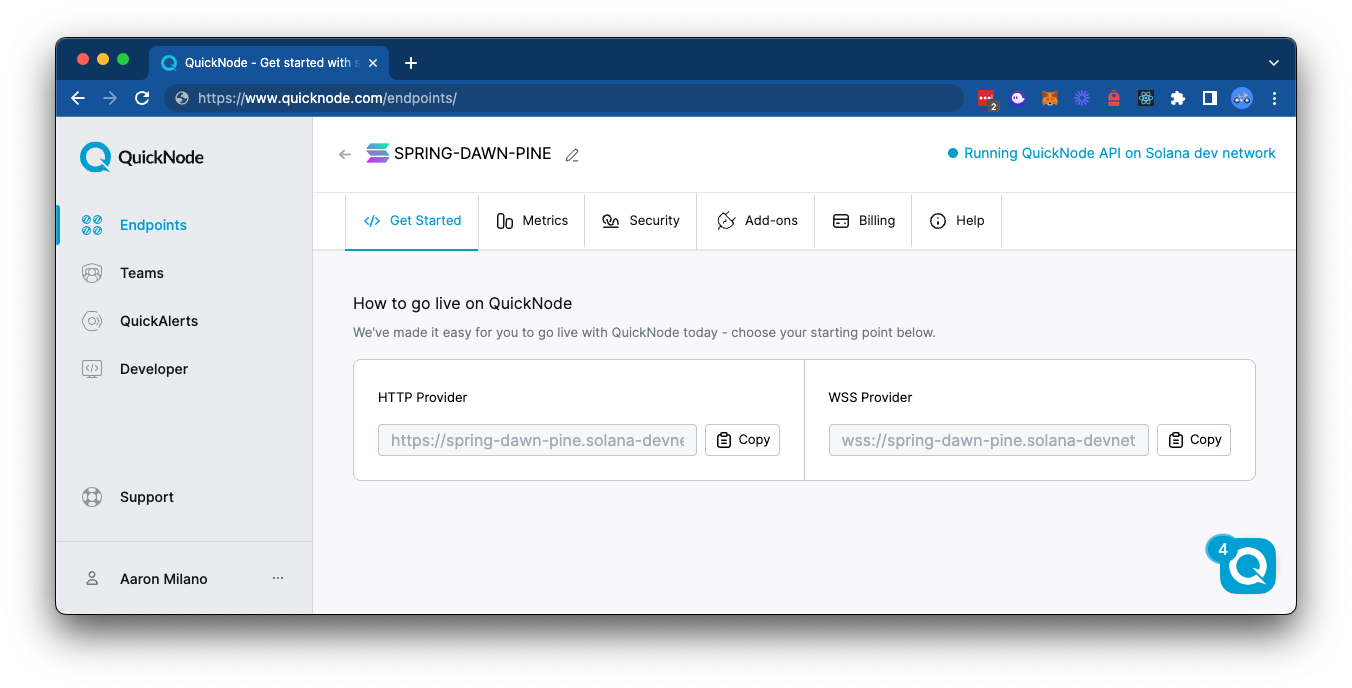
See why over 50% of projects on Solana choose QuickNode and sign up for a free account here. We're going to use a Solana Devnet node.
Copy the HTTP Provider link:

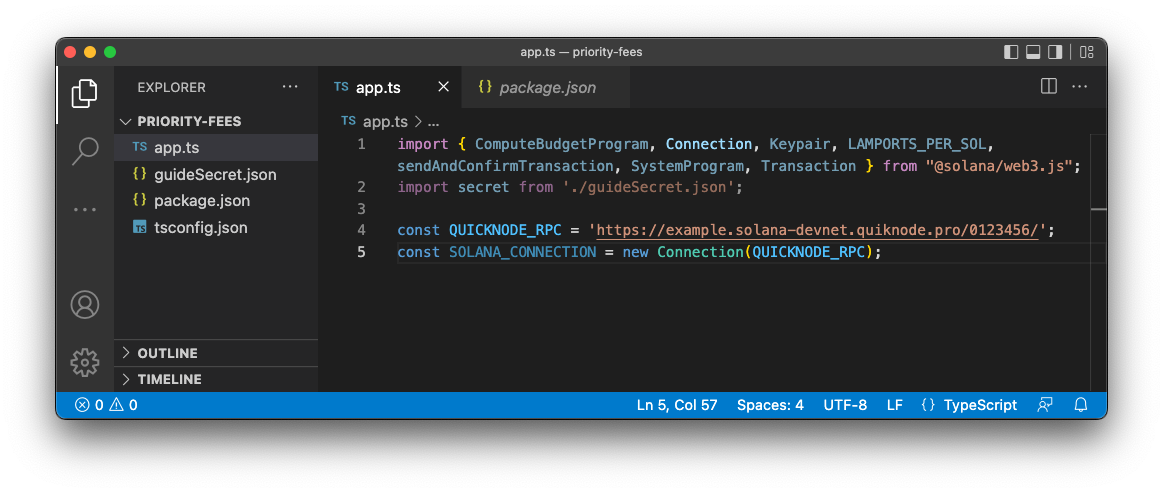
Inside app.ts under your import statements, declare your RPC and establish your Connection to Solana:
const QUICKNODE_RPC = 'https://example.solana-devnet.quiknode.pro/0123456/';
const SOLANA_CONNECTION = new Connection(QUICKNODE_RPC);
Your environment should look like this.

Ready? Let's build!
Create a Base Transaction
Set up Keypairs
To create a base transaction, we first need to set up a "to" and "from" keypair.
Add the following code snippet to app.ts:
const fromKeypair = Keypair.fromSecretKey(new Uint8Array(secret));
const toKeypair = Keypair.generate();
This code creates a keypair for the transaction's sender using the secret from the guideSecret.json file and generates a new random keypair for the transaction's recipient.
Add Key Constants
Let's define some important constants that will be used throughout the code. Add the following code snippet to your app.ts file:
const PRIORITY_RATE = 100; // MICRO_LAMPORTS
const SEND_AMT = 0.01 * LAMPORTS_PER_SOL;
const PRIORITY_FEE_IX = ComputeBudgetProgram.setComputeUnitPrice({microLamports: PRIORITY_RATE});
- The
PRIORITY_RATEconstant is used to set the rate of the priority fee in microLamports; in this example, it's 100 microLamports (1 microLamport = 0.000001 lamports). SEND_AMTis used to set the number of lamports to be sent in the transaction. In this example, it is 0.01 SOL, which is equivalent to 10 million lamports (1 SOL = 1,000,000,000 lamports)PRIORITY_FEE_IXis used to set the priority fee instruction, which will be added to the transaction later.ComputeBudgetProgram.setComputeUnitPriceis a method provided by the@solana/web3.jslibrary, which allows you to set the compute unit price for the transaction. This means you can set how many microLamports you're willing to pay per compute unit. In this case, we use thePRIORITY_RATEconstant to set the compute unit price to 100 microLamports.
Calculating Priority Fee Rates (for production applications)
For production applications, you may want to calculate the priority fee rates dynamically based on the current fee market. Tracking local fee markets and understanding the right priority fee to use in your app can be tricky. Though SolanaWeb3.js has the getRecentPrioritizationFees() method to help you understand the current fee market, it only returns a single value for the entire network.
Fees are localized by program and transaction success rates can vary substantially based on current market conditions. Monitoring the fee market and adjusting your priority fees is important to ensure transaction success. QuickNode makes tracking the fee market easy with our Solana Priority Fees Add-on. The custom method accepts a program account ID and a number of recent blocks and returns a fee distribution in 5% percentiles.
To use the qn_estimatePriorityFees method, you will need to add the add-on to your QuickNode endpoint through the marketplace page or on your endpoint page (e.g., https://dashboard.quicknode.com/endpoints/219123/add-ons).
During periods of high network congestion, to increase the likelihood of successful transaction processing, we recommend using the recommended property of the response. We monitor the network conditions and adjust the fee level accordingly to maximize the likelihood of successful transaction processing.
Any user sending non-duplicate transactions with recommended priority fees or higher will now be routed through our staked connections. Learn more about Stake-Weighted Quality of Service (SWQoS) here.
Here's an example of how you might add the qn_estimatePriorityFees method to your apps. First, define key interfaces for the request and response payloads:
interface RequestPayload {
    method: string;
    params: {
        last_n_blocks: number;
        account: string;
        api_version: number;
    };
    id: number;
    jsonrpc: string;
}

interface FeeEstimates {
    extreme: number;
    high: number;
    low: number;
    medium: number;
    percentiles: {
        [key: string]: number;
    };
}

interface ResponseData {
    jsonrpc: string;
    result: {
        context: {
            slot: number;
        };
        per_compute_unit: FeeEstimates;
        per_transaction: FeeEstimates;
    };
    id: number;
}

interface EstimatePriorityFeesParams {
    // The number of blocks to consider for the fee estimate
    last_n_blocks?: number;
    // The program account to use for fetching the local estimate (e.g., Jupiter: JUP6LkbZbjS1jKKwapdHNy74zcZ3tLUZoi5QNyVTaV4)
    account?: string;
    // The API version to use for fetching the local estimate
    api_version?: number;
    // Your Add-on Endpoint (found in your QuickNode Dashboard - https://dashboard.quicknode.com/endpoints)
    endpoint: string;
}
Next, create a function for fetching the priority fees:
async function fetchEstimatePriorityFees({
    last_n_blocks,
    account,
    api_version,
    endpoint
}: EstimatePriorityFeesParams): Promise<ResponseData> {
    // Only include params that are defined
    const params: any = {};
    if (last_n_blocks !== undefined) {
        params.last_n_blocks = last_n_blocks;
    }
    if (account !== undefined) {
        params.account = account;
    }
    if (api_version !== undefined) {
        params.api_version = api_version;
    }

    const payload: RequestPayload = {
        method: 'qn_estimatePriorityFees',
        params,
        id: 1,
        jsonrpc: '2.0',
    };

    const response = await fetch(endpoint, {
        method: 'POST',
        headers: {
            'Content-Type': 'application/json',
        },
        body: JSON.stringify(payload),
    });

    if (!response.ok) {
        throw new Error(`HTTP error! status: ${response.status}`);
    }

    const data: ResponseData = await response.json();
    return data;
}
Finally, you can use the fetchEstimatePriorityFees function to fetch the priority fees for a specific program (to use in your priority fee instruction):
const params: EstimatePriorityFeesParams = {
    last_n_blocks: 100,
    account: 'JUP6LkbZbjS1jKKwapdHNy74zcZ3tLUZoi5QNyVTaV4',
    endpoint: 'https://YOUR_PRIORITY_FEE_ENDPOINT/'
};

async function createDynamicPriorityFeeInstruction() {
    const { result } = await fetchEstimatePriorityFees(params);
    const priorityFee = result.per_compute_unit.high; // 👈 Insert business logic to calculate fees depending on your transaction requirements (e.g., low, medium, high, or specific percentile)
    const priorityFeeInstruction = ComputeBudgetProgram.setComputeUnitPrice( { microLamports: priorityFee } );
    return priorityFeeInstruction;
}
Let's get back to our example.
Create a Base Transaction Example
Now that we have our keypairs, we can create our base transaction.
Add the following code snippet to your app.ts file:
function generateTxExample() {
    return new Transaction().add(SystemProgram.transfer({
        fromPubkey: fromKeypair.publicKey,
        toPubkey: toKeypair.publicKey,
        lamports: SEND_AMT
    }));
}
This function creates a new transaction and adds a SystemProgram.transfer instruction. The instruction transfers SEND_AMT lamports from the fromKeypair to the toKeypair.
Perfect. We have got the tools we need to build our script.
Create and Send Transactions
Let's create a function, createAndSendTransactions(), that demonstrates how to use priority fees on the Solana network. In app.ts, add:
async function createAndSendTransactions() {
    // Step 1 - Generate base and priority transactions
    const txBase = generateTxExample();
    const txPriority = generateTxExample().add(PRIORITY_FEE_IX);
    const { blockhash, lastValidBlockHeight } = await SOLANA_CONNECTION.getLatestBlockhash();
    txBase.recentBlockhash = blockhash;
    txPriority.recentBlockhash = blockhash;
    txBase.lastValidBlockHeight = lastValidBlockHeight;
    txPriority.lastValidBlockHeight = lastValidBlockHeight;

    // Step 2 - Generate promises for each transaction
    const [txBaseRequest, txPriorityRequest] = [txBase, txPriority].map(tx => sendAndConfirmTransaction(SOLANA_CONNECTION, tx, [fromKeypair]));

    try {
        // Step 3 - Send transactions to the cluster
        const [txBaseId, txPriorityId] = await Promise.all([txBaseRequest, txPriorityRequest]);

        // Step 4 - Fetch tx results, and log fees
        const [txBaseResult, txPriorityResult] = await Promise.all([SOLANA_CONNECTION.getTransaction(txBaseId), SOLANA_CONNECTION.getTransaction(txPriorityId)]);
        console.log(`txBase URL: https://explorer.solana.com/tx/${txBaseId}?cluster=devnet`);
        console.log(`txBase Fee: ${txBaseResult?.meta?.fee} Lamports`);
        console.log(`txPriority URL: https://explorer.solana.com/tx/${txPriorityId}?cluster=devnet`);
        console.log(`txPriority Fee: ${txPriorityResult?.meta?.fee} Lamports`);
    } catch (error) {
        console.log(error);
    }
}
Let's break that down:
- Generate a base and priority transaction. The base transaction is generated using the
generateTxExample()function, while the priority transaction is generated by adding thePRIORITY_FEE_IXinstruction, which was previously defined, by calling.add(). Then it will fetch the recent blockhash and the last valid block height from the Solana node using thegetLatestBlockhash()method. Then we set the blockhash and last valid block height on the base and priority transactions. The purpose of the recent blockhash and last valid block height is to include the information of the most recent transaction in the node; it ensures that the transaction being sent has the most current state of the node. - Generate promises for each transaction. The
sendAndConfirmTransaction()function, provided by the @solana/web3.js library, generates promises for the base and priority transactions. This function sends the transactions to the Solana cluster and waits for their confirmation. We use JavaScript destructuring to return a promise for each of our transactions. - Send the transactions to the Solana cluster. The
Promise.all()function is used to simultaneously send the base and priority transactions to the Solana cluster. This function returns the transaction IDs for each transaction, which are stored in thetxBaseIdandtxPriorityIdvariables. - Fetch the transaction results and log the fees. The
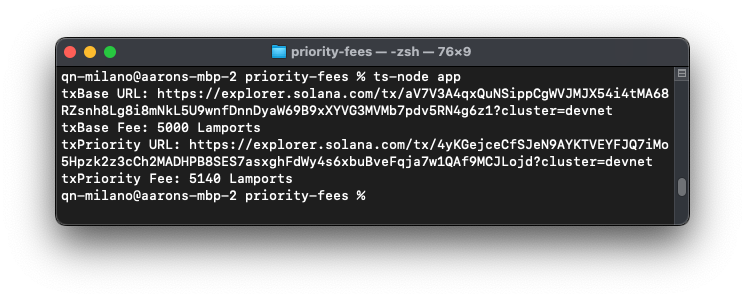
getTransaction()function is used to fetch the results of the base and priority transactions. We then log the URLs of each transaction on the Solana Explorer and the posted fees associated with each transaction. We expect our priority transaction fee to be higher than that of our base transaction.
Finally, you will just need to call your function. At the bottom of app.ts, call your function:
createAndSendTransactions();
And then run your code. In your terminal, run the following:
ts-node app
You should see a log in your terminal that links to both transactions on Solana Explorer and the total fees associated with each transaction:

Great job!
Wrap Up
You now know about priority fees and how to add them to your transactions. Priority fees are still new, so keep an eye out for changes as the ecosystem evolves and gets used to them. We are curious to know how you are using priority fees--drop us a line on Discord or Twitter and let us know what you are up to!
We ❤️ Feedback!
If you have any feedback on this guide, let us know. We’d love to hear from you.