
12 min read
Jito Bundles Project Overview
As Solana continues to grow in popularity, developers need effective tools to ensure their transactions are processed reliably. Jito Bundles address this need by allowing multiple transactions to be bundled together and executed atomically in the same block. In this guide, I'll walk you through creating a Rust application that sends Jito Bundles using the Jito Rust SDK.
By the end of this guide, you'll have built a working Rust application that can:
- Create a series of transactions with memo instructions
- Bundle them together with a tip to incentivize validators
- Send the bundle to Jito's Block Engine
- Verify the bundle was successfully processed
Let's dive in!
Prerequisites
Before we begin, you'll need:
- Rust installed on your system
- A Quicknode account with Solana Mainnet endpoint and the Lil' JIT add-on enabled
- Basic familiarity with Solana development concepts
- A Solana keypair with a small amount of SOL (~0.01 SOL) for transaction fees and tips
Understanding Jito Bundles
Jito Bundles are a powerful feature that enables sequential and atomic execution of multiple transactions on Solana. Here's what makes them special:
| Feature | Description |
|---|---|
| Sequential Execution | Transactions execute in the exact order specified |
| Atomic Execution | All transactions in a bundle execute within the same slot |
| All-or-Nothing | If any transaction fails, none are committed to the chain |
| Bundle Size | Maximum of 5 transactions per bundle |
| MEV Protection | Helps protect users from front-running and other MEV activities |
Bundles are particularly useful for complex operations that require multiple transactions to be executed in a specific order, such as arbitrage, liquidations, or any multi-step process that exceeds Solana's per-transaction compute budget.
Quicknode's Lil' JIT - JITO Bundles & Transactions Add-on allows you to make full use of the power of Jito and Jito Bundles. Let's check out how to use it in Rust!
Project Setup
Let's start by creating a new Rust project:
cargo new jito-bundle-example
Open the project directory:
cd jito-bundle-example
Replace the contents of your Cargo.toml file with:
[package]
name = "jito-bundle-example"
version = "0.1.0"
edition = "2021"

[dependencies]
tokio            = { version = "1.37", features = ["full"] }
anyhow           = "1"
serde_json       = "1"
base64           = "0.22.1"
jito-sdk-rust    = "0.2.0"
solana-client    = "2.2.7"
solana-sdk       = "2.2.2"
bincode          = "1.3.3"
dotenv           = "0.15.0"
This sets up our project with all the necessary dependencies:
tokio- For async runtimeanyhow- For error handlingbase64- For encoding/decoding transaction datajito-sdk-rust- For interacting with Jito's Block Enginesolana-clientandsolana-sdk- For Solana blockchain interactionsbincode- For serializing transactionsdotenv- For loading environment variables
Environment Variables
Now, create a file named .env in your project root to store your endpoints:
SOLANA_RPC=https://your-quicknode-endpoint.quiknode.pro/your-api-key
JITO_ENDPOINT=https://your-quicknode-endpoint.quiknode.pro/your-api-key
Your Jito Endpoint will be the same as your Solana RPC endpoint that you enabled the Lil' JIT add-on on. The SOLANA_RPC endpoint and JITO_ENDPOINT are often the same, but you can use different endpoints if you want to separate your RPC and Jito requests.
Make sure your Jito endpoint doesn't have trailing slashes.
Keypair Setup
You will need a paper wallet with ~0.01 SOL to test out this demo (and cover the cost of a bundle tip). If you don't have one, you can create one using the following command:
solana-keygen new -o secret.json -s --no-bip39-passphrase
You can get the new wallet's address by running the following command:
solana address -k secret.json
Make sure to send that wallet ~0.01 SOL before proceeding. You can verify your mainnet balance by running the following command:
solana balance -um -k secret.json
Great. Let's write our script!
Code Implementation
Next, let's implement our main application.
Define Import Statements
Open src/main.rs and add the following:
use anyhow::{anyhow, Result};
use base64::{engine::general_purpose, Engine as _};
use jito_sdk_rust::JitoJsonRpcSDK;
use serde_json::json;
use solana_client::rpc_client::RpcClient;
use solana_sdk::{
    instruction::{AccountMeta, Instruction},
    pubkey::Pubkey,
    signature::{Keypair, Signer},
    system_instruction,
    transaction::Transaction,
};
use std::{fs::File, io::BufReader, str::FromStr, env};
use tokio::time::{sleep, Duration};
These imports bring in the necessary libraries that we will use throughout our application.
Define Constants
Next, let's define some constants that will be used throughout the code. Add the following lines to your src/main.rs file:
/// ---------- constants ----------------------------------------------------
const NUMBER_TRANSACTIONS: usize = 5;
const MIN_JITO_TIP_LAMPORTS: u64 = 1_000;  // 1_000 lamports ≈ 0.000001 SOL
const POLL_INTERVAL_SECS: u64 = 5;
const POLL_TIMEOUT_SECS: u64 = 60;
These will help manage the size of our bundle, our tip amount, and how often we poll for bundle status. Since we are just testing here and do not want to overspend on tips, we are using a static tip amount of 1,000 lamports (0.000001 SOL). In a production environment, you will likely want to use the getTipFloor endpoint to get the current tip floor and set your tip accordingly.
Define Helper Functions
Next, let's create a couple of helper functions to load our keypair and poll for bundle status. Add the following lines to your src/main.rs file:
/// ---------- helper utilities --------------------------------------------
fn load_keypair(path: &str) -> Result<Keypair> {
    let reader = BufReader::new(File::open(path)?);
    let bytes: Vec<u8> = serde_json::from_reader(reader)?;
    Ok(Keypair::from_bytes(&bytes)?)
}


async fn poll_bundle_status(
    sdk: &JitoJsonRpcSDK,
    bundle_id: &str,
) -> Result<()> {
    let start = tokio::time::Instant::now();
    loop {
        let resp = sdk
            .get_in_flight_bundle_statuses(vec![bundle_id.to_string()])
            .await?;

        let status = resp["result"]["value"][0]["status"]
            .as_str()
            .unwrap_or("Unknown");
        match status {
            "Landed" => return Ok(()),
            "Failed" => return Err(anyhow!("bundle failed on‑chain")),
            _ => {
                if start.elapsed() > Duration::from_secs(POLL_TIMEOUT_SECS) {
                    return Err(anyhow!("bundle not confirmed in time"));
                }
                sleep(Duration::from_secs(POLL_INTERVAL_SECS)).await;
            }
        }
    }
}
- The
load_keypairfunction loads a keypair from a JSON file (we will use this to load oursecret.jsonfile). - The
poll_bundle_statusfunction checks the status of our bundle until it either lands or fails.
Main Function
Finally, let's create our entrypoint, the main function. Add the following lines to your src/main.rs file:
/// ---------- main logic ---------------------------------------------------
#[tokio::main]
async fn main() -> Result<()> {
    // STEP 1 — local key & RPC handles

    // STEP 2 — choose a Jito tip account

    // STEP 3 — recent block‑hash

    // STEP 4 — build & sign five transactions

    // STEP 5 — send the bundle

    // STEP 6 — confirm inclusion

    Ok(())
}
This is the main function where we will implement the logic to create and send our Jito Bundle. We are using the tokio runtime to handle asynchronous operations. Let's fill in the steps.
Step 1: Load Keypair and RPC Client
Replace the // STEP 1 comment with the following code:
    // STEP 1 — local key & RPC handles
    let payer = load_keypair("secret.json")?;
    println!("Using wallet: {}", payer.pubkey());

    dotenv::dotenv().ok();
    let jito_endpoint = env::var("JITO_ENDPOINT").expect("JITO_ENDPOINT must be set in .env file");
    let solana_rpc = env::var("SOLANA_RPC").expect("SOLANA_RPC must be set in .env file");

    let solana_rpc = RpcClient::new(solana_rpc.as_str());
    let jito_sdk = JitoJsonRpcSDK::new(jito_endpoint.as_str(), None);
This code:
- loads our local keypair from the
secret.jsonfile - initializes the Solana RPC client and Jito SDK client using the endpoints we set in our
.envfile
Step 2: Get a Jito Tip Account
Replace the // STEP 2 comment with the following code:
    // STEP 2 — choose a Jito tip account
    let random_tip_account = jito_sdk.get_random_tip_account().await?;
    let jito_tip_account = Pubkey::from_str(&random_tip_account)?;
    println!("Selected tip account: {random_tip_account}");
We randomly select one of Jito's tip accounts to send our tip to. This incentivizes validators to include our bundle in their blocks. This allows parallel bundle execution and payment across multiple processing pipelines.
Step 3: Get Recent Blockhash
Replace the // STEP 3 comment with the following code:
    // STEP 3 — recent block‑hash
    let blockhash = solana_rpc.get_latest_blockhash()?;
    println!("Latest blockhash: {blockhash}");
We get the latest blockhash to ensure our transactions are valid/fresh and can be processed by the Solana network.
Step 4: Build and Sign Transactions
Replace the // STEP 4 comment with the following code:
    // STEP 4 — build & sign five transactions
    let memo_program = Pubkey::from_str("MemoSq4gqABAXKb96qnH8TysNcWxMyWCqXgDLGmfcHr")?;
    let mut encoded: Vec<String> = Vec::with_capacity(NUMBER_TRANSACTIONS);

    for i in 0..NUMBER_TRANSACTIONS {
        let memo_ix = Instruction::new_with_bytes(
            memo_program,
            format!("lil jit demo transaction # {}", i + 1).as_bytes(),
            vec![AccountMeta::new(payer.pubkey(), true)],
        );

        let mut ixs = vec![memo_ix];

        // For the last transaction, add a tip instruction
        if i == NUMBER_TRANSACTIONS - 1 {
            ixs.push(system_instruction::transfer(
                &payer.pubkey(),
                &jito_tip_account,
                MIN_JITO_TIP_LAMPORTS,
            ));
        }

        let mut tx = Transaction::new_with_payer(&ixs, Some(&payer.pubkey()));
        tx.sign(&[&payer], blockhash);
        let bytes = bincode::serialize(&tx)?;
        encoded.push(general_purpose::STANDARD.encode(bytes));
    }

    println!("Signed and encoded all {NUMBER_TRANSACTIONS} transactions…");
In this step:
- We create five transactions (depending on the number defined in our constants), each with a unique memo instruction
- For the last transaction, we add a tip instruction to incentivize validators
- We sign each transaction with our payer keypair
- We serialize and base64 encode each transaction and push each encoded transaction into a vector
Step 5: Send the Bundle
Now that we have a vector of encoded signed transactions, we can send our bundle to Jito's Block Engine.
Replace the // STEP 5 comment with the following code:
    // STEP 5 — send the bundle
    let params = json!([
        encoded.clone(),
        { "encoding": "base64" }
    ]);
    let resp = jito_sdk.send_bundle(Some(params), None).await?;
    let bundle_id = resp["result"]
        .as_str()
        .ok_or_else(|| anyhow!("no bundle id in response"))?;

    println!("Bundle submitted: {bundle_id}");
We send our bundle of transactions to Jito's Block Engine using send_bundle and extract the bundle ID from the response.
Step 6: Confirm Inclusion
Finally, we need to confirm that our bundle was included in a block. Replace the // STEP 6 comment with the following code:
    // STEP 6 — confirm inclusion
    poll_bundle_status(&jito_sdk, bundle_id).await?;
    println!("Bundle landed! View it at https://explorer.jito.wtf/bundle/{bundle_id}");

    Ok(())
Since we already created our polling function, all we have to do is call it with our Jito SDK and bundle ID. If the bundle is confirmed, we print a link to view the bundle in Jito's explorer.
Running the Application
Building the Application
To build the application, run the following command in your terminal:
cargo build
This will compile your Rust code and create an executable in the target directory. If you followed our steps correctly, you should see no errors. If you do, double-check your code against the snippets provided in this guide and follow the terminal output for any errors.
Running the Application
Before running the application, double check that you have:
- Created or copied a Solana keypair to
secret.jsonin your project directory - Set
SOLANA_RPCandJITO_ENDPOINTin your.envfile with your Quicknode endpoints - Funded your keypair with a small amount of SOL (~0.01 SOL)
To run the application:
cargo run
If successful, you should see output similar to:
Using wallet: RUA7zS3PXVtW2VCmFGtfv5q6AdusbpVGy8HTjVjBAAxR
Selected tip account: HFqU5x63VTqvQss8hp11i4wVV8bD44PvwucfZ2bU7gRe
Latest blockhash: CghMwVqLLdKrdgdCKDbTtRgdRhj9BfCBZxL8n87QNB9C
Signed and encoded all 5 transactions…
Bundle submitted: c4fb0940406d3fead71e29b9f87d2273ab6a743f3da1bf4aeeb73db3521685b0
Bundle landed! View it at https://explorer.jito.wtf/bundle/c4fb0940406d3fead71e29b9f87d2273ab6a743f3da1bf4aeeb73db3521685b0
The SDK includes verbose logging, so you can see the status of each step. If you encounter any errors, check the error messages for hints on what went wrong.
Verifying Your Bundle
Note: The Jito bundle explorer might take a minute to update with your Bundle, so wait a minute or so and then click your link.
You should see something like this:
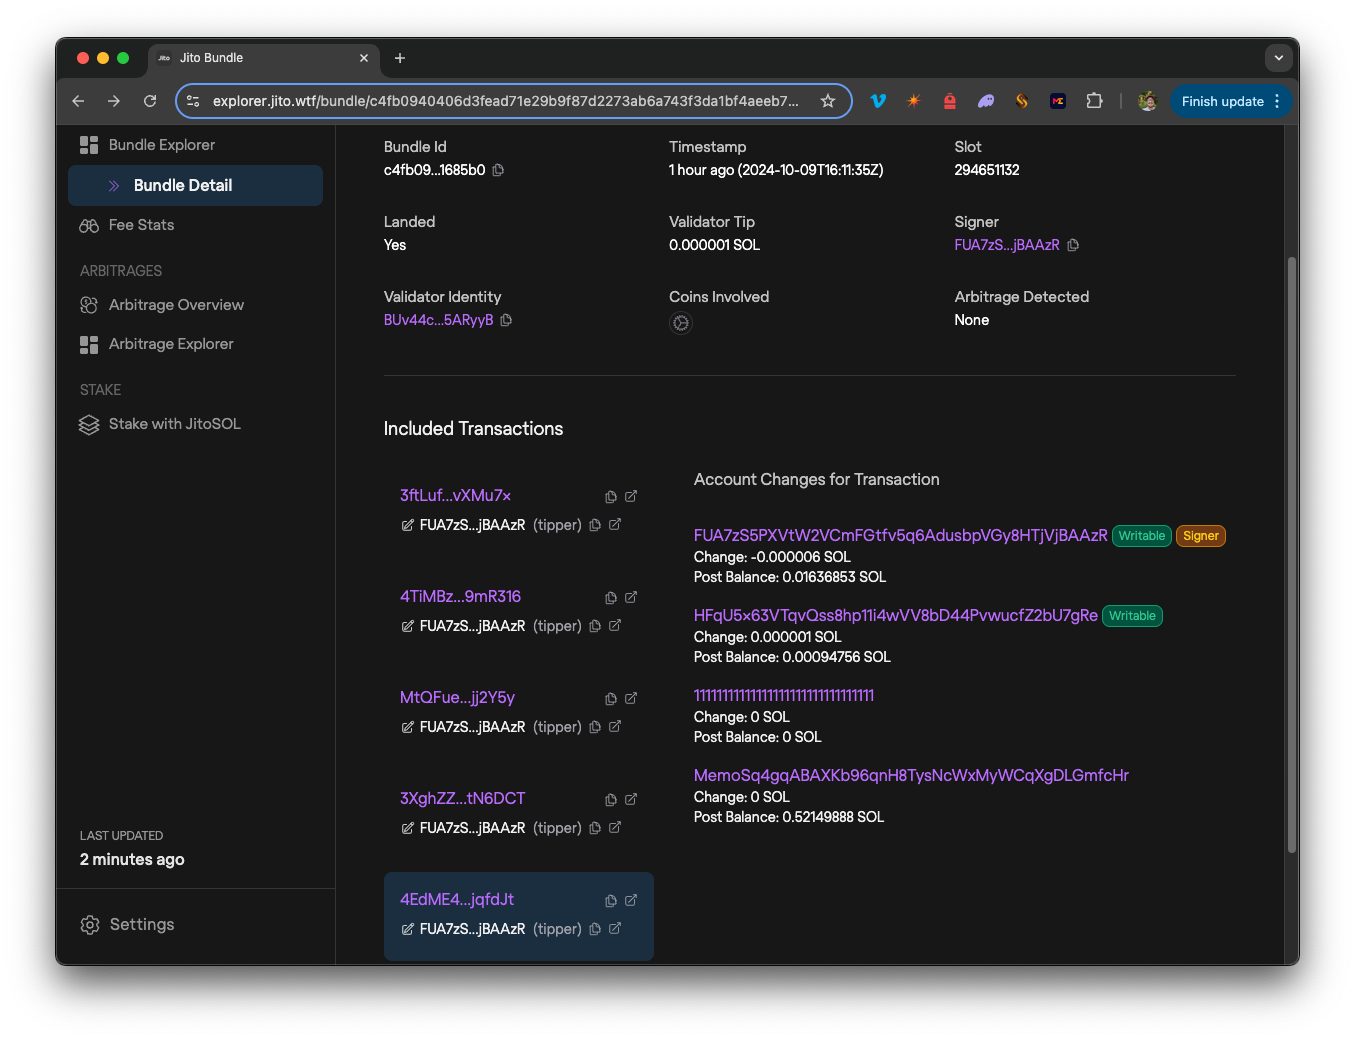
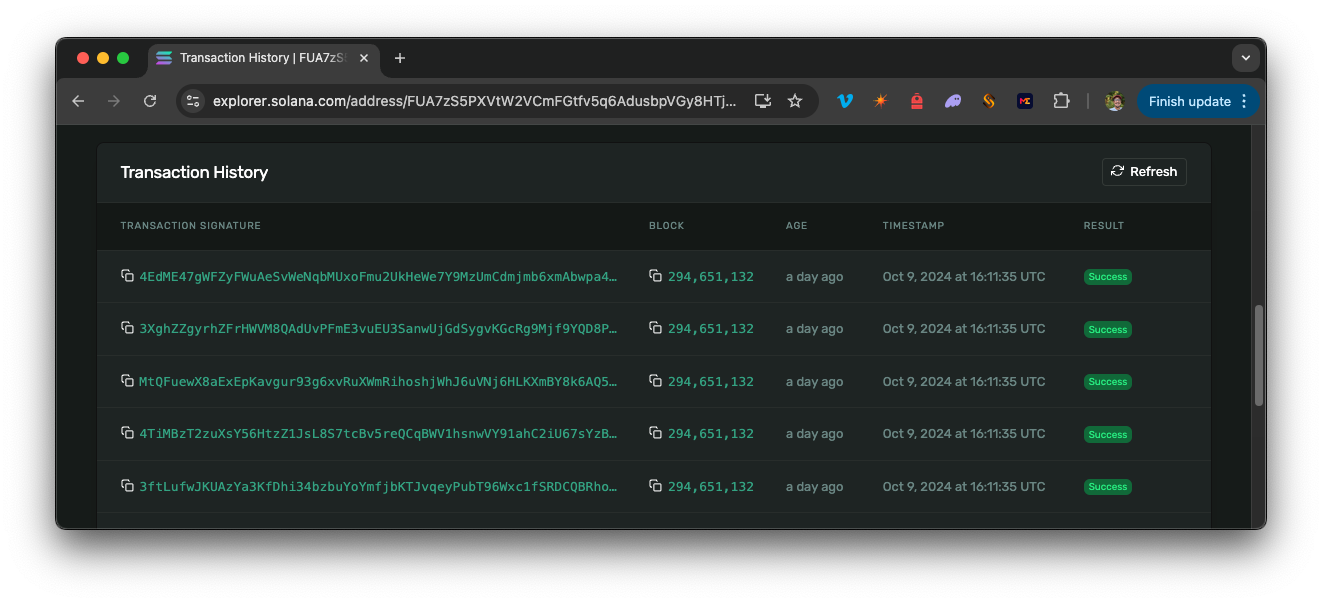
The Bundle should show all five transactions in order. The fifth transaction should include the tip instruction with a SOL balance transfer. You can see this in the example above. You can also open each transaction individually by clicking the ⎘ icon in the top right of a transaction (or browse your wallet address in the Solana Explorer). You should see all five transactions with the same timestamp and block:
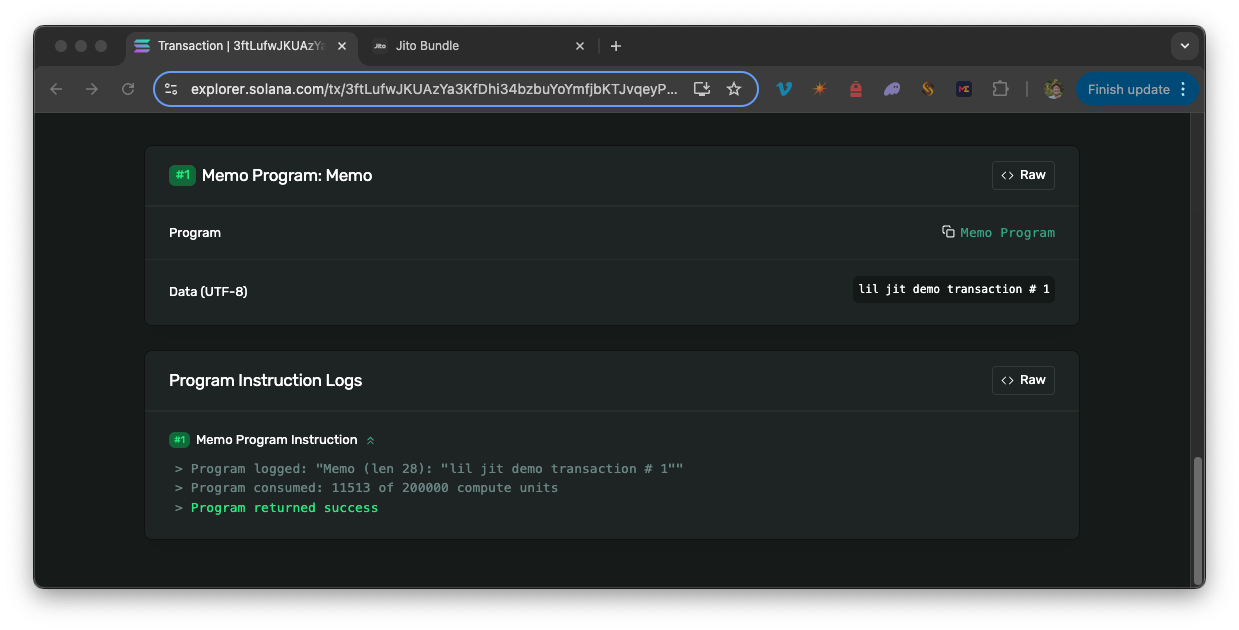
You should be able to navigate to the 1st of the five transactions and see "lil jit demo transaction # 1" in the transaction details:
And you should be able to navigate to the 5th transaction and see "lil jit demo transaction # 5" in the transaction details with our tip transfer as well:
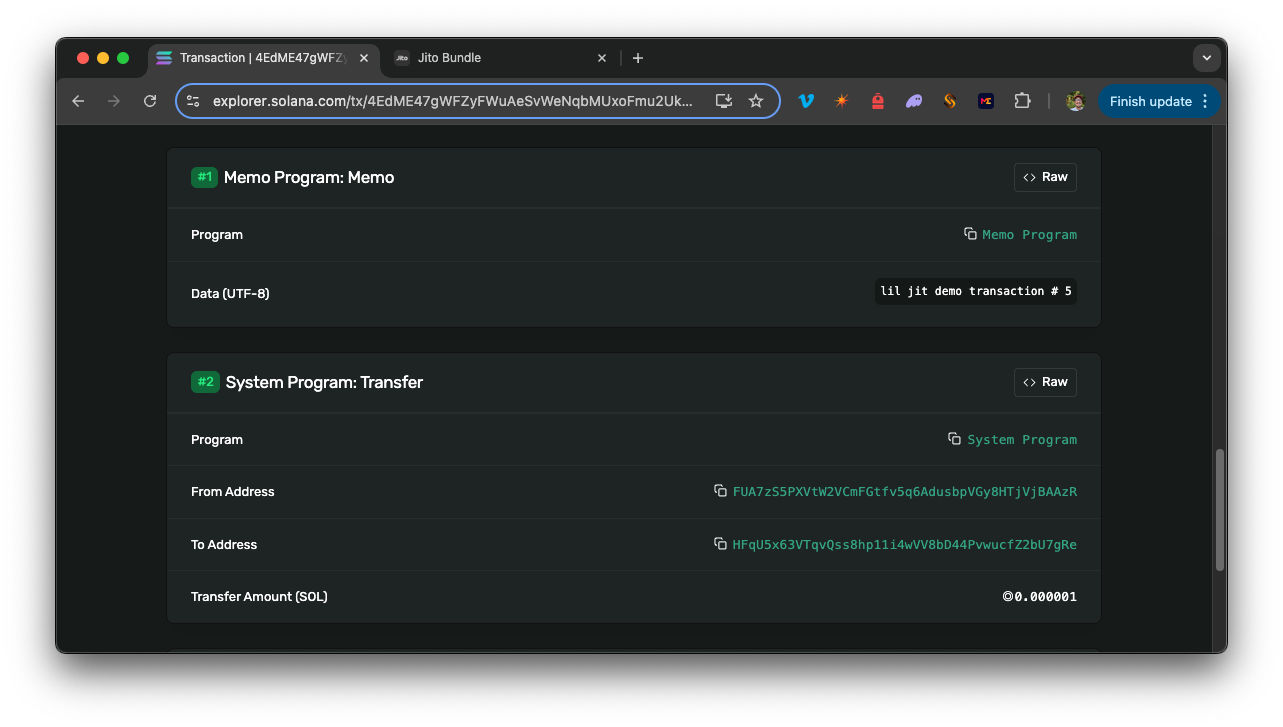
This shows:
- All transactions are included in the same block
- All transactions are executed in the same order that they were sent
- All transactions are successful
- The final transaction includes a tip transfer to the tip account
Pretty cool, right? Nice job! 🎉
Recap
Jito Bundles are a powerful tool for Solana developers who need guaranteed transaction ordering and atomic execution. Jito Bundles are particularly valuable when:
- Sequential Execution is Required: When the order of transaction execution is critical
- Atomic Execution is Needed: When multiple transactions must either all succeed or all fail
- MEV Protection is Desired: To protect against front-running and other forms of MEV
- Complex Operations: For operations that require multiple transactions exceeding compute limits
When working with Jito Bundles, keep these points in mind the minimum tip is 1,000 lamports, but in high-demand periods, you may need higher tips for your bundle to be prioritized -- you can use our getTipFloor endpoint to get the current tip floor.
Whether you're building DeFi protocols, trading bots, or complex dApps, the ability to bundle transactions can significantly enhance your application's reliability and user experience.
Keep Building
This example uses simple memo transactions, but you can extend it to build more complex applications:
- DeFi arbitrage: Bundle transactions to execute arbitrage across multiple DEXs
- NFT marketplace operations: Bundle swap from USDC to SOL with a buy now transaction to effectively buy an NFT with USDC
- Complex governance actions: Bundle multiple governance proposal transactions
Troubleshooting Common Issues
| Issue | Possible Solution |
|---|---|
| Bundle not confirmed in time | Increase the POLL_TIMEOUT_SECS constant |
| Bundle failed on-chain | Check transaction validity, increase tip amount, or verify account balances |
| Bundle not on explorer | Wait a few minutes for the Jito Explorer to update |
Additional Resources
- Lil' JIT Docs
- Lil' JIT Marketplace Add-on
- Jito SDK Rust GitHub
- Guide: Jito Bundles: What They Are and How to Use Them (TypeScript)
- Solana Optimization Strategies
- Jito Explorer
- Sample Code Repository
We ❤️ Feedback!
Let us know if you have any feedback or requests for new topics. We'd love to hear from you.