8 min read
Overview
Ever need to pull all the transactions associated with a Wallet? Want to see all of the mint transactions associated with a Candy Machine? Or maybe see transaction history of an NFT? Solana's getSignaturesForAddress method is a versatile tool that makes getting transaction history a breeze.
Prefer a video walkthrough? Follow along with Noah and learn how to get Solana transaction logs using Solana web3.js in 15 minutes.
What You'll Do
In this guide, you'll dive into the exciting world of Solana transactions! You will build a simple script that can query an address (wallet, programid, token mint, etc.) and find all of the transaction history associated with it.
What You'll Need
-
Nodejs (version 16.15 or higher)
-
Yarn installed
-
Experience with basic transactions on Solana. To brush up on your knowledge, read our beginner guide on How to Send a Transaction on Solana
-
Knowledge of Javascript
Let's get started!
Set Up Your Environment
Create a new project directory and file, log.js, in your terminal with:
mkdir get_sol_tx
cd get_sol_tx
echo > log.js
Install Solana web3 dependencies:
yarn init -y
yarn add @solana/web3.js@1
or
npm init -y
npm install --save @solana/web3.js@1
Open log.js in a code editor of choice and on line 1, require @solana/web3.js and store it in a constant, **solanaWeb3:
**
const solanaWeb3 = require('@solana/web3.js');
Declare an address that you'd like to search:
const searchAddress = 'YOUR_ADDRESS_HERE'; //example 'vines1vzrYbzLMRdu58ou5XTby4qAqVRLmqo36NKPTg'
Note: this can be any valid address on Solana (e.g., Wallet Address, Mint Address, Program Address). You can use 'vines1vzrYbzLMRdu58ou5XTby4qAqVRLmqo36NKPTg' as an example if you don't already have one.
Alright, we're ready to get cookin'!
Establish a Connection to Your Quicknode RPC
To build on Solana, you'll need an API endpoint to connect with the network. You're welcome to use public nodes or deploy and manage your own infrastructure; however, if you'd like 8x faster response times, you can leave the heavy lifting to us.
See why over 50% of projects on Solana choose Quicknode and sign up for free here.
We're going to launch our node under the Solana Devnet, but you can launch the node that meets your needs. Copy the HTTP Provider link:

Navigate back to log.js and create a constant, endpoint and assign it your Quicknode url. On the following line, pass in this constant as a parameter for the Connection function and store that in another constant called solanaConnection:
const endpoint = 'https://example.solana-devnet.quiknode.pro/000000/';
const solanaConnection = new solanaWeb3.Connection(endpoint);
Great! You're ready to build your search function.
Create a Transaction Query
The getSignaturesForAddress method will do a lot of the heavy lifting here. Here's how it will work:
It will accept two parameters:
- Address to search (required): the public key you would like to query
- Options (optional): an object that includes 3 optional entries:
-
before: start searching backwards in time before a specific transaction signature
-
after: start searching forward in time after a specific transaction signature
-
limit: max number of transactions to return (Note that the max and default value is 1,000)
-
It will return a Promise for an Array of ConfirmedSignatureInfo, a type object that includes key transaction information:
-
signature (transaction ID),
-
slot and blockTime (to see when the transaction was processed),
-
err (if any errors), and
-
memo (if any memos associated with the transaction)
Define a new async function, getTransactions that takes two parameters: address and numTx.
Inside of our function call the getSignaturesForAddress method on a new instance of solanaConnection and save the output to a variable, transactionList:
const getTransactions = async(address, numTx) => {
    const pubKey = new solanaWeb3.PublicKey(address);
    let transactionList = await solanaConnection.getSignaturesForAddress(pubKey, {limit:numTx});
}
This should give us an array of all of the transaction history that meets our search criteria. Let's log the results in a way that's easy to read.
Inside getTransactions, create a forEach loop to log information about each transaction:
const getTransactions = async(address, numTx) => {
    const pubKey = new solanaWeb3.PublicKey(address);
    let transactionList = await solanaConnection.getSignaturesForAddress(pubKey, {limit:numTx});
    transactionList.forEach((transaction, i) => {
        const date = new Date(transaction.blockTime*1000);
        console.log(`Transaction No: ${i+1}`);
        console.log(`Signature: ${transaction.signature}`);
        console.log(`Time: ${date}`);
        console.log(`Status: ${transaction.confirmationStatus}`);
        console.log(("-").repeat(20));
    })
}
Run Your Code!
If everything is set up correctly, you should be able to call your function and see some results! Add this to the bottom of log.js:
getTransactions(searchAddress,3);
And now in your terminal type:
node log.js
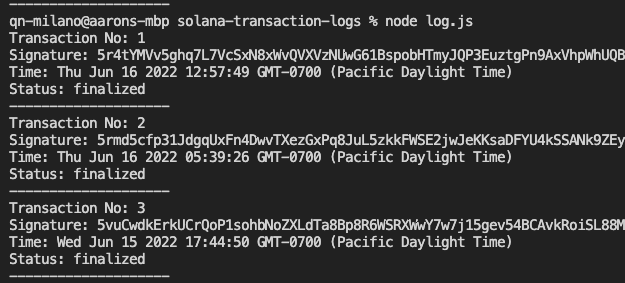
You should see something like this:

Woo! Pretty easy, right? Feel free test try a few different wallets, an NFT mint address, and a Candy Machine ID. You can see that the method should produce similar results, which makes it really handy for lots of different applications.
Congrats! You've successfully achieved getting transactions....You can stop here, but if you want to see what else we can do with that Transaction Signature, keep reading! 👇
Parsing the Transaction
So we've got some useful basic information about our transaction history, but what did each transaction do? We can use Solana's getParsedTransaction method to give us loads of additional detail.
The getParsedTransaction method will take a confirmed or finalized transaction signature and will return a ParsedTransactionWithMeta object:
export type ParsedTransactionWithMeta = {
    /** The slot during which the transaction was processed */
    slot: number;
    /** The details of the transaction */
    transaction: ParsedTransaction;
    /** Metadata produced from the transaction */
    meta: ParsedTransactionMeta | null;
    /** The unix timestamp of when the transaction was processed */
    blockTime?: number | null;
    /** The version of the transaction message */
    version?: TransactionVersion;
  };
There's a lot of information hiding in here, which we won't cover in this introductory guide, but we do want to give an example on how you can interact with these objects.
Within your getTransactions function, let's declare two new variables: signatureList and transactionDetails. We'll generate a list of signatures by mapping our transactionList, and we'll generate details on each transaction calling those signatures into getParsedTransactions:
const getTransactions = async(address, numTx) => {
    const pubKey = new solanaWeb3.PublicKey(address);
    let transactionList = await solanaConnection.getSignaturesForAddress(pubKey, {limit:numTx});

    //Add this code
    let signatureList = transactionList.map(transaction=>transaction.signature);
    let transactionDetails = await solanaConnection.getParsedTransactions(signatureList, {maxSupportedTransactionVersion:0});
    //--END of new code

    transactionList.forEach((transaction, i) => {
        const date = new Date(transaction.blockTime*1000);
        console.log(`Transaction No: ${i+1}`);
        console.log(`Signature: ${transaction.signature}`);
        console.log(`Time: ${date}`);
        console.log(`Status: ${transaction.confirmationStatus}`);
        console.log(("-").repeat(20));
    })
}
When our promises return, transactionDetails will yield an array of ParsedTransactionWithMeta objects. Let's try and find some useful information in there.
Let's say we're interested in finding all of the programs or smart contracts that we interacted with for a given transaction. Inside of our original forEach loop, after our date declaration, let's create a new variable, transactionInstructions:
const transactionInstructions = transactionDetails[i].transaction.message.instructions;
This will use our index, i, to find the detailed transaction information for the same transaction that is being queried in the loop. Since each transaction can have multiple instructions or program iterations, we'll need another loop to get each Program interaction in our transaction. Inside of our loop, after our confirmationStatus log, add this:
        transactionInstructions.forEach((instruction, n)=>{
            console.log(`---Instructions ${n+1}: ${instruction.programId.toString()}`);
        })
What we're doing here is, for each transaction, looking at each transaction instruction and logging the program name (if one exists) and program id.
The final function should look like this:
const getTransactions = async(address, numTx) => {
    const pubKey = new solanaWeb3.PublicKey(address);
    let transactionList = await solanaConnection.getSignaturesForAddress(pubKey, {limit:numTx});

    let signatureList = transactionList.map(transaction=>transaction.signature);
    let transactionDetails = await solanaConnection.getParsedTransactions(signatureList, {maxSupportedTransactionVersion:0});

    transactionList.forEach((transaction, i) => {
        const date = new Date(transaction.blockTime*1000);
        const transactionInstructions = transactionDetails[i].transaction.message.instructions;
        console.log(`Transaction No: ${i+1}`);
        console.log(`Signature: ${transaction.signature}`);
        console.log(`Time: ${date}`);
        console.log(`Status: ${transaction.confirmationStatus}`);
        transactionInstructions.forEach((instruction, n)=>{
            console.log(`---Instructions ${n+1}: ${instruction.programId.toString()}`);
        })
        console.log(("-").repeat(20));
    })
}
Now, run your script again. In your terminal type:
node log.js
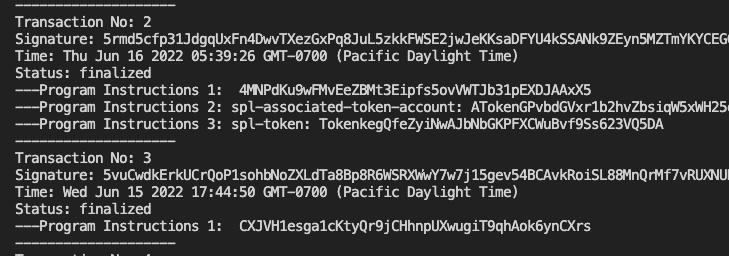
You should see something like this:

Great job! Our transaction results now include details about the different programs we interacted with!
If you'd like, you can compare your results to the Solana explorer by searching your address here (make sure you're searching the same network by changing in the top right corner of the page).
Wrap Up
Kudos! You've now got an inside look into the exciting world of Solana transactions!
We'll cover more on these in a future guide; but if you're eager to keep exploring, try experimenting with your transactionDetails array by running some similar queries that instead look at:
-
transactionDetails[i].meta
-
transactionDetails[i].transaction.message.accountKeys
To put these concepts into practice, check out some of our other Solana tutorials here.
Subscribe to our newsletter for more articles and guides on Solana. Feel free to reach out to us via Twitter if you have any feedback. You can always chat with us on our Discord community server, featuring some of the coolest developers you'll ever meet :)
We ❤️ Feedback!
Let us know if you have any feedback or requests for new topics. We'd love to hear from you.