
10 min read
Overview
Imagine losing millions of dollars worth of crypto assets because of a single leaked private key. This nightmare became reality for several DeFi projects — most notably the $625M Ronin Bridge hack, where attackers exploited leaked validator keys to drain funds — highlighting developers' most dangerous blind spot: credential management.
While .env files are a common solution for managing local secrets, they still present inherent risks since they store credentials in plaintext that could be accidentally committed to version control or exposed through misconfiguration. For stronger security, encrypted secret storage is the preferred alternative, with major frameworks like Hardhat and Foundry now offering built-in support.
This guide walks you through implementing encrypted secrets in your development workflow. You'll learn how these encryption systems work, and how to integrate them with both Hardhat and Foundry frameworks. Whether you're deploying to testnet or mainnet, you'll discover best practices to safeguard your private keys throughout the entire development lifecycle.
What You Will Do
- Understand the risks of handling secrets in plaintext
- Learn how encryption works behind the scenes
- Set up encrypted secrets in both Hardhat and Foundry
- Use encrypted secrets in your deployments
What You Will Need
- Node.js (v22 or higher)
- A Web3 wallet (e.g., MetaMask, Rabby) with some testnet ETH (Use Quicknode Multi-Chain Faucet if needed)
- A free Quicknode account — recommended for obtaining a reliable Sepolia RPC endpoint used throughout this guide
Why Encrypted Secrets Matter
Sensitive credentials like private keys and RPC URLs are often required during smart contract development and deployment. These are effectively the keys to your entire application — if exposed, attackers can drain your wallet, take over infrastructure, or impersonate your dApp.
While it's easy to underestimate the risk during early development or hackathons, real-world incidents show that one small mistake — like leaving a secret in a public GitHub repo — can be devastating.
Common Risks
.envfiles committed by mistake- Shell command history leaks
- Malware scanning local files for key patterns
- Secrets exposed via screenshots or livestreams
Real-World Stories
According to Chainalysis's 2024 report, private key compromises accounted for 43.8% of all stolen crypto last year. One of the largest was the $305M DMM Bitcoin hack, likely caused by improper key storage or operational security.
-
Ronin Bridge Hack ($625M): Attackers used leaked validator keys to drain one of the largest DeFi bridges to date. (Source)
-
$40K GitHub Leak (2024): A developer accidentally left their private key in a private GitHub repo, which they briefly made public to submit a grant application. Within moments, their wallet was drained of $40,000. (Source)
-
Solana
solana-web3.jsBackdoor (2024): A malicious update to a widely-used JavaScript library introduced a backdoor that stole private keys directly from disk. Thousands of projects were affected before the vulnerability was discovered. (Source)
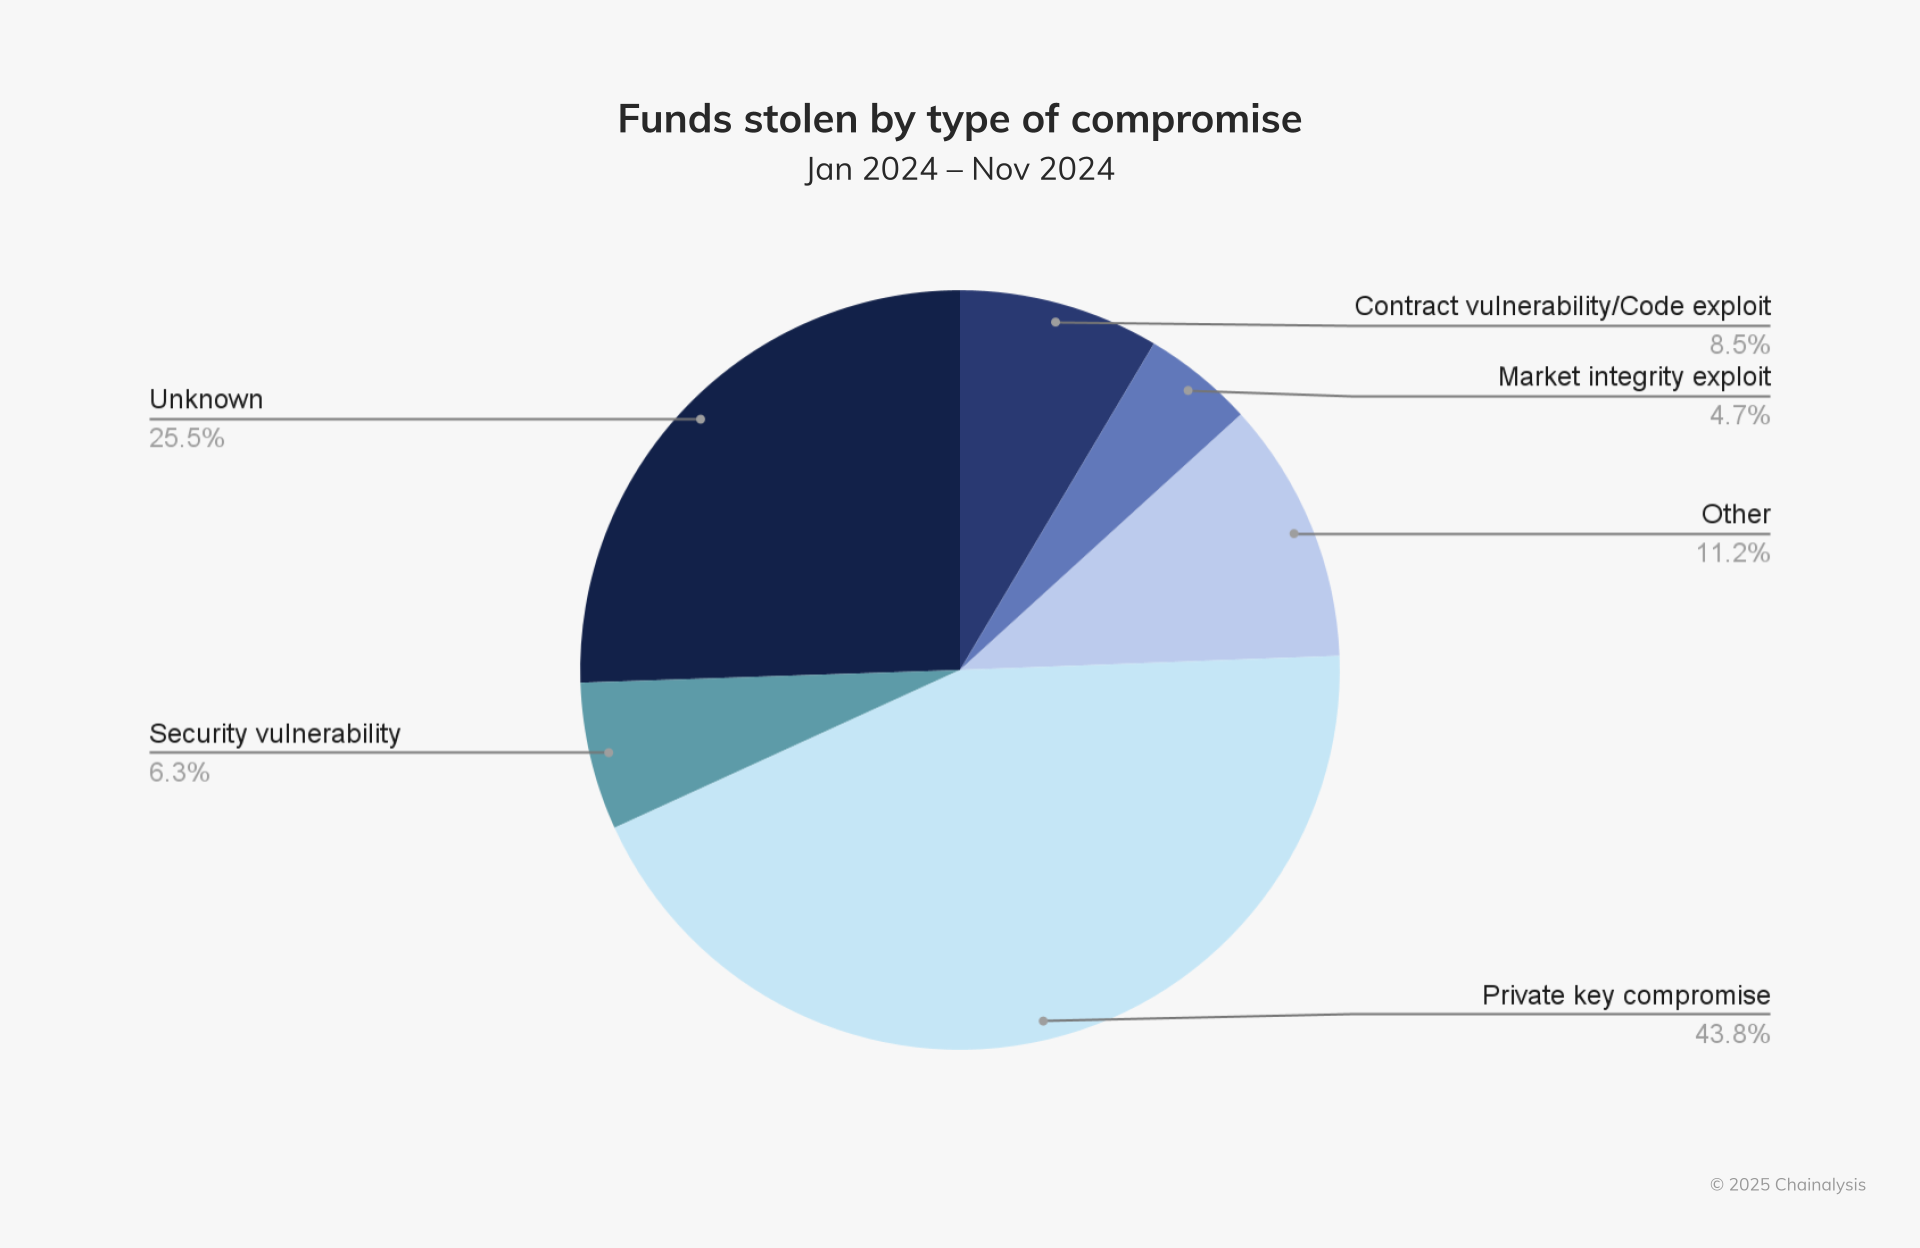 Source: Chainalysis's 2024 report
These are not edge cases — they represent a trend. Key management is still one of the biggest attack vectors in Web3.
How Encryption Works
When you encrypt a secret, you're converting it into ciphertext using a key or passphrase. Only users or systems with the correct decryption key can retrieve the original value.
In frameworks like Hardhat and Foundry:
- Secrets are encrypted using AES (Advanced Encryption Standard) or a similar symmetric encryption scheme
- A password (or master key) is used to encrypt and decrypt values locally
- Encrypted secrets are stored in special files (
secrets.json, wallet keystore, etc.) - Decryption only occurs at runtime, preventing long-lived exposure in memory or CLI history
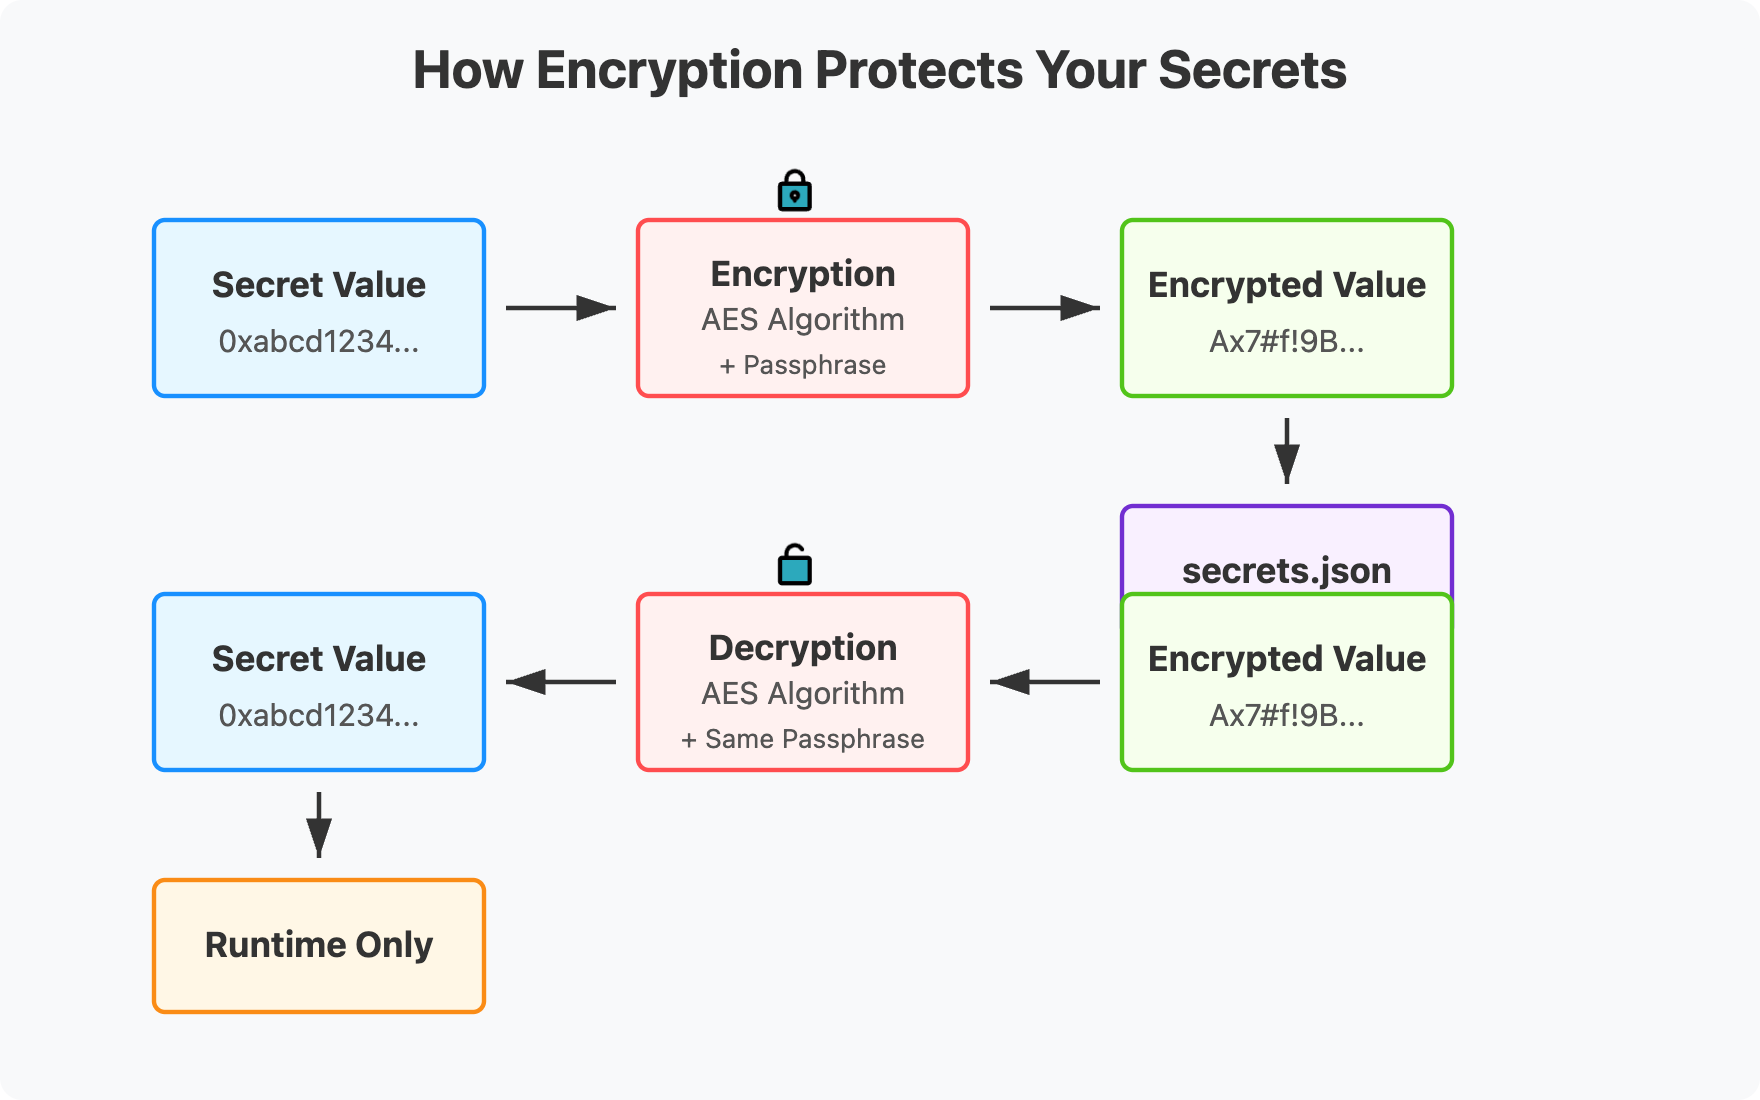
Even if your machine is compromised or a repo goes public by mistake, encrypted secrets add a critical barrier. Without the decryption password, an attacker can’t simply read the raw key. This alone can prevent drains, especially from automated bots.
Project Setup
Before diving into framework-specific instructions for encrypted secrets, let’s get your environment ready. This setup will allow you to follow the guide smoothly using either Hardhat or Foundry.
1. Get a Quicknode Endpoint
To interact with any blockchain, you’ll need an RPC endpoint. You can create one instantly with Quicknode. In this guide, we will use Etherem Sepolia as testnet. If you’re willing to use a different network, feel free to do so.
- Go to Quicknode and sign up for an account
- Choose Ethereum Sepolia as your network
- Copy your endpoint URL — we’ll use it later to connect your scripts
2. Fund Your Wallet with Test ETH
You’ll also need Sepolia test ETH to deploy contracts and pay for transactions. You can request test ETH from the Quicknode Sepolia Faucet (Note: You must have at least 0.001 ETH on Ethereum Mainnet to use the faucet in order to avoid spam and abuse)
Once you’ve got a funded testnet wallet and a working endpoint, you’re ready to test encrypted secrets.
If you’re using Foundry, you can skip ahead to the How to Use Encrypted Wallets in Foundry section.
How to Use Encrypted Secrets in Hardhat
Hardhat 3 (currently in alpha) introduces encrypted secrets via a built-in secrets manager. This feature supports securely storing any string-based secret — including private keys, RPC URLs, and any other secrets you might need.
Hardhat 3 is currently in alpha. Please use it with caution before it is officially released as a stable version.
Step 1: Set Up a New Hardhat Project
Run the following commands to create a new Hardhat project.
Note that @next is added to the npx command to ensure you’re using the next tagged version of Hardhat, which is Hardhat 3.0.0-next.4 as of this writing.
mkdir secure-hardhat && cd secure-hardhat
npm init -y
npx hardhat@next --init
Accept default answers to the prompts. Then, verify that Hardhat 3 is installed:
npx hardhat --version
Step 2: Set Encrypted Secrets
To store your RPC URL, run the following command:
npx hardhat keystore set SEPOLIA_RPC_URL
If this is your first time using the keystore, you’ll be prompted to enter a password. This password will be used as a master key to encrypt your secrets. This means that if you lose your password, you won’t be able to access your secrets.
Then, you’ll be prompted to enter a value that will be encrypted with the master key you provide.
Repeat this process for your private key by running the following command:
npx hardhat keystore set SEPOLIA_PRIVATE_KEY
Step 3: Verify Encrypted Secrets
To verify that your secrets are encrypted, run the following command:
npx hardhat keystore list
You should see your RPC URL and private key in the list of encrypted secrets.
If you need to get the secret value again, you can run the following command. This will prompt you to enter the master key and decrypt the value:
npx hardhat keystore get SEPOLIA_RPC_URL
Once you've set up your secrets, you can reference them in your config file to use them safely in your project.
Step 4: Reference Secrets in Config
When you initialize a new Hardhat project, it comes with a pre-configured hardhat.config.js file along with a sample contract, deployment script, and a Hardhat Ignition deployment file - the recommended way of deploying smart contracts.
For this guide, we’ll stick with the basic script deployment, but it's helpful to understand how to use the config file to reference your secrets.
Open hardhat.config.js and check the networks object to reference your encrypted secrets. If you're using different secret names, update the networks object accordingly.
import { configVariable } from "hardhat/config";

module.exports = {
  networks: {
    sepolia: {
      url: configVariable("SEPOLIA_RPC_URL"),
      accounts: [configVariable("SEPOLIA_PRIVATE_KEY")],
    },
  },
};
That's it! Now you can use your encrypted secrets in your deployment scripts, without ever exposing them as plaintext.
Step 5: Use Encrypted Secrets in Deployment Scripts
Run the following command to deploy your contract using the Counter.ts module under ignition/modules, which basically deploys the Counter.sol contract and then calls the incBy function with a value of 5.
npx hardhat ignition deploy --network sepolia ignition/modules/Counter.ts
When you run the command, Hardhat will prompt you to enter the password you set up earlier because the sepolia network is configured to use the keystore. This password is needed only if the current script or task is using encrypted secrets. Otherwise, you won't be prompted to enter a password.
Once you've entered the password, Hardhat will deploy your contract and call the incBy function with a value of 5.
Congratulations! You've successfully set up encrypted secrets in Hardhat and used them in your deployment scripts.
How to Use Encrypted Secrets in Foundry
Foundry supports encrypted wallet imports via the cast wallet CLI. While it does not support encrypting other variables like RPC URLs yet, you can still secure your workflow using a combination of encrypted keys and environment variables.
If you're new to Foundry, we recommend starting with the Intro to Foundry guide to get familiar with the basics.
Step 1: Install and Initialize Foundry
Install Foundry if you haven't yet by running the following command:
curl -L https://foundry.paradigm.xyz | bash
Then, initialize Foundry by running the following command:
foundryup
forge init secure-foundry
cd secure-foundry
This command will create a new directory called secure-foundry and initialize a new Foundry project inside it from the default template.
├── README.md
├── foundry.toml
├── lib
│   └── forge-std
├── script
│   └── Counter.s.sol
├── src
│   └── Counter.sol
└── test
    └── Counter.t.sol
Now, we will import a wallet to use in our Foundry project.
Step 2: Import Your Wallet
To import a wallet, we will use the cast wallet CLI. Replace your-wallet-name with the name of your wallet and run the following command:
cast wallet import your-wallet-name --interactive
You’ll be prompted to enter your private key and encrypt it with a password. The key is stored securely in your local keystore, whose default path is ~/.foundry/keystore.
The reason of using
--interactiveflag is to avoid storing the private key in the terminal history.
As your wallet is imported, it's ready to be used.
Step 3: Create and Source an Environment File
Now that your wallet is encrypted, you'll need to securely reference your RPC endpoint. Since Foundry doesn’t currently support encrypting arbitrary values like RPC URLs, the most practical approach is to use a .env file to manage these secrets. While not encrypted, .env files are still widely used and safer than storing secrets directly in source code.
If you’re looking for additional protection in larger applications or teams, you can also explore tools like Dotenv Vault for encrypted .env file sharing, or cloud-managed solutions like AWS Secrets Manager for production deployments.
Create a .env file in the root directory of your project and add your Quicknode endpoint:
SEPOLIA_RPC_URL=https://your-quicknode-endpoint
And load it before running your script:
source .env
Step 4: Run Your Script
We imported the wallet safely in the previous step, and we added the RPC endpoint to our config. Now, we can run our script and deploy our contract.
Foundry's template project comes with a sample script that deploys a Counter contract. Update the script to use your wallet and RPC endpoint:
forge script script/Counter.s.sol:CounterScript --rpc-url $SEPOLIA_RPC_URL --account your-wallet-name --broadcast
The terminal will prompt you to enter your password that was used to encrypt your private key.
Once you've entered the password, Foundry will run your script and deploy your contract.
[⠊] Compiling...
No files changed, compilation skipped
Enter keystore password:
Script ran successfully.

## Setting up 1 EVM.

==========================
...
Congratulations! You've successfully set up encrypted secrets in Foundry and used them in your deployment scripts.
Best Practices for Managing Secrets
Encrypting secrets is a foundational step, but maintaining a secure development workflow requires additional care. Below are key practices to help protect credentials and minimize exposure risks:
Step 1: Use .gitignore to Prevent Accidental Commits
If you use .env files, make sure they are excluded from version control and kept local to your environment. Secrets in these files are not encrypted and should be treated carefully.
# Common entries
.env
secrets.json
foundry.keystore
Step 2: Avoid Typing Secrets Directly into the Terminal
Input secrets using interactive CLI prompts or environment variables. Avoid passing secrets as inline arguments to prevent them from being stored in shell history.
Step 3: Clear Shell History After Mistakes If a secret is accidentally entered or pasted into the terminal, clear your history immediately:
history -c && history -w # For Bash and Zsh
Step 4: Use Dedicated Keys Per Project
Generate separate private keys and RPC endpoint URLs for different projects or environments. This limits the effectiveness of any compromise.
For more detailed information on RPC endpoint security, check out this guide.
Step 5: Test Secret Workflows Before Deployment
Always validate that your project decrypts secrets correctly in a local or staging environment.
Step 6: Secure Your Local Machine
Keep your operating system and tooling updated. Avoid installing unverified software, and regularly scan for malware that might target wallet or key files.
Step 7: Explore Encrypted Secret Management Tools
Step 8: Use Cloud Secret Managers in Production
For production infrastructure, consider using cloud-based secret management tools such as:
Conclusion
Private key management remains one of the most critical aspects of building secure dApps and smart contracts. With encrypted secret support now available in both Hardhat and Foundry, developers have the tools to protect sensitive data without compromising speed or convenience.
Whether you're using Hardhat’s built-in secrets manager or Foundry’s encrypted wallet keystore, adopting these practices early helps prevent common mistakes and safeguards your deployments.
If you are stuck or have questions, drop them in our Discord. Stay up to date with the latest by following us on Twitter (@Quicknode) or our Telegram announcement channel.
We ❤️ Feedback!
Let us know if you have any feedback or requests for new topics. We'd love to hear from you.