
6 min read
Overview
Celestia is the modular blockchain powering unstoppable apps with full-stack control. Light nodes in Celestia perform data availability sampling, allowing them to verify that block data is available without downloading entire blocks. In this guide, we'll show you how to set up and run a Celestia light node using Quicknode as your consensus RPC endpoint.
What You Will Do
- Learn about Celestia blockchain
- Set up a Quicknode Celestia endpoint with Quicknode authentication
- Submit and retrieve blob data to/from Celestia
What You Will Need
- Intermediate understanding of blockchain concepts and command line tools
- A Quicknode account (create one here)
- Celestia testnet tokens (TIA) for blob submissions
What is Celestia?
Celestia is a modular consensus and data availability network, built to enable anyone to easily deploy their own blockchain with minimal overhead. Unlike traditional blockchains that handle consensus, execution, and data availability in a single layer, Celestia focuses specifically on consensus and data availability, allowing other chains to use it as their data availability layer.
Understanding Light Nodes
Light nodes in Celestia are special because they participate in data availability sampling (DAS). They:
- Download block headers and randomly sample small portions of block data
- Verify data availability without downloading full blocks
- Can submit and retrieve blob data to/from the network
- Require significantly less storage and bandwidth than full nodes
This makes them perfect for applications that need to interact with Celestia without the overhead of running a full node.
Project Prerequisite: Create a Quicknode Celestia Endpoint
To connect your light node to Celestia, you'll need access to a consensus node. Quicknode provides reliable, high-performance Celestia RPC endpoints that your light node can use for state access. Create an account and register for a Quicknode account if you haven't already. Navigate to your dashboard and click "Create Endpoint", then select "Celestia" from the blockchain options. Choose "Mocha Testnet" for this guide.
Once created, you'll see your endpoint details that look like this:
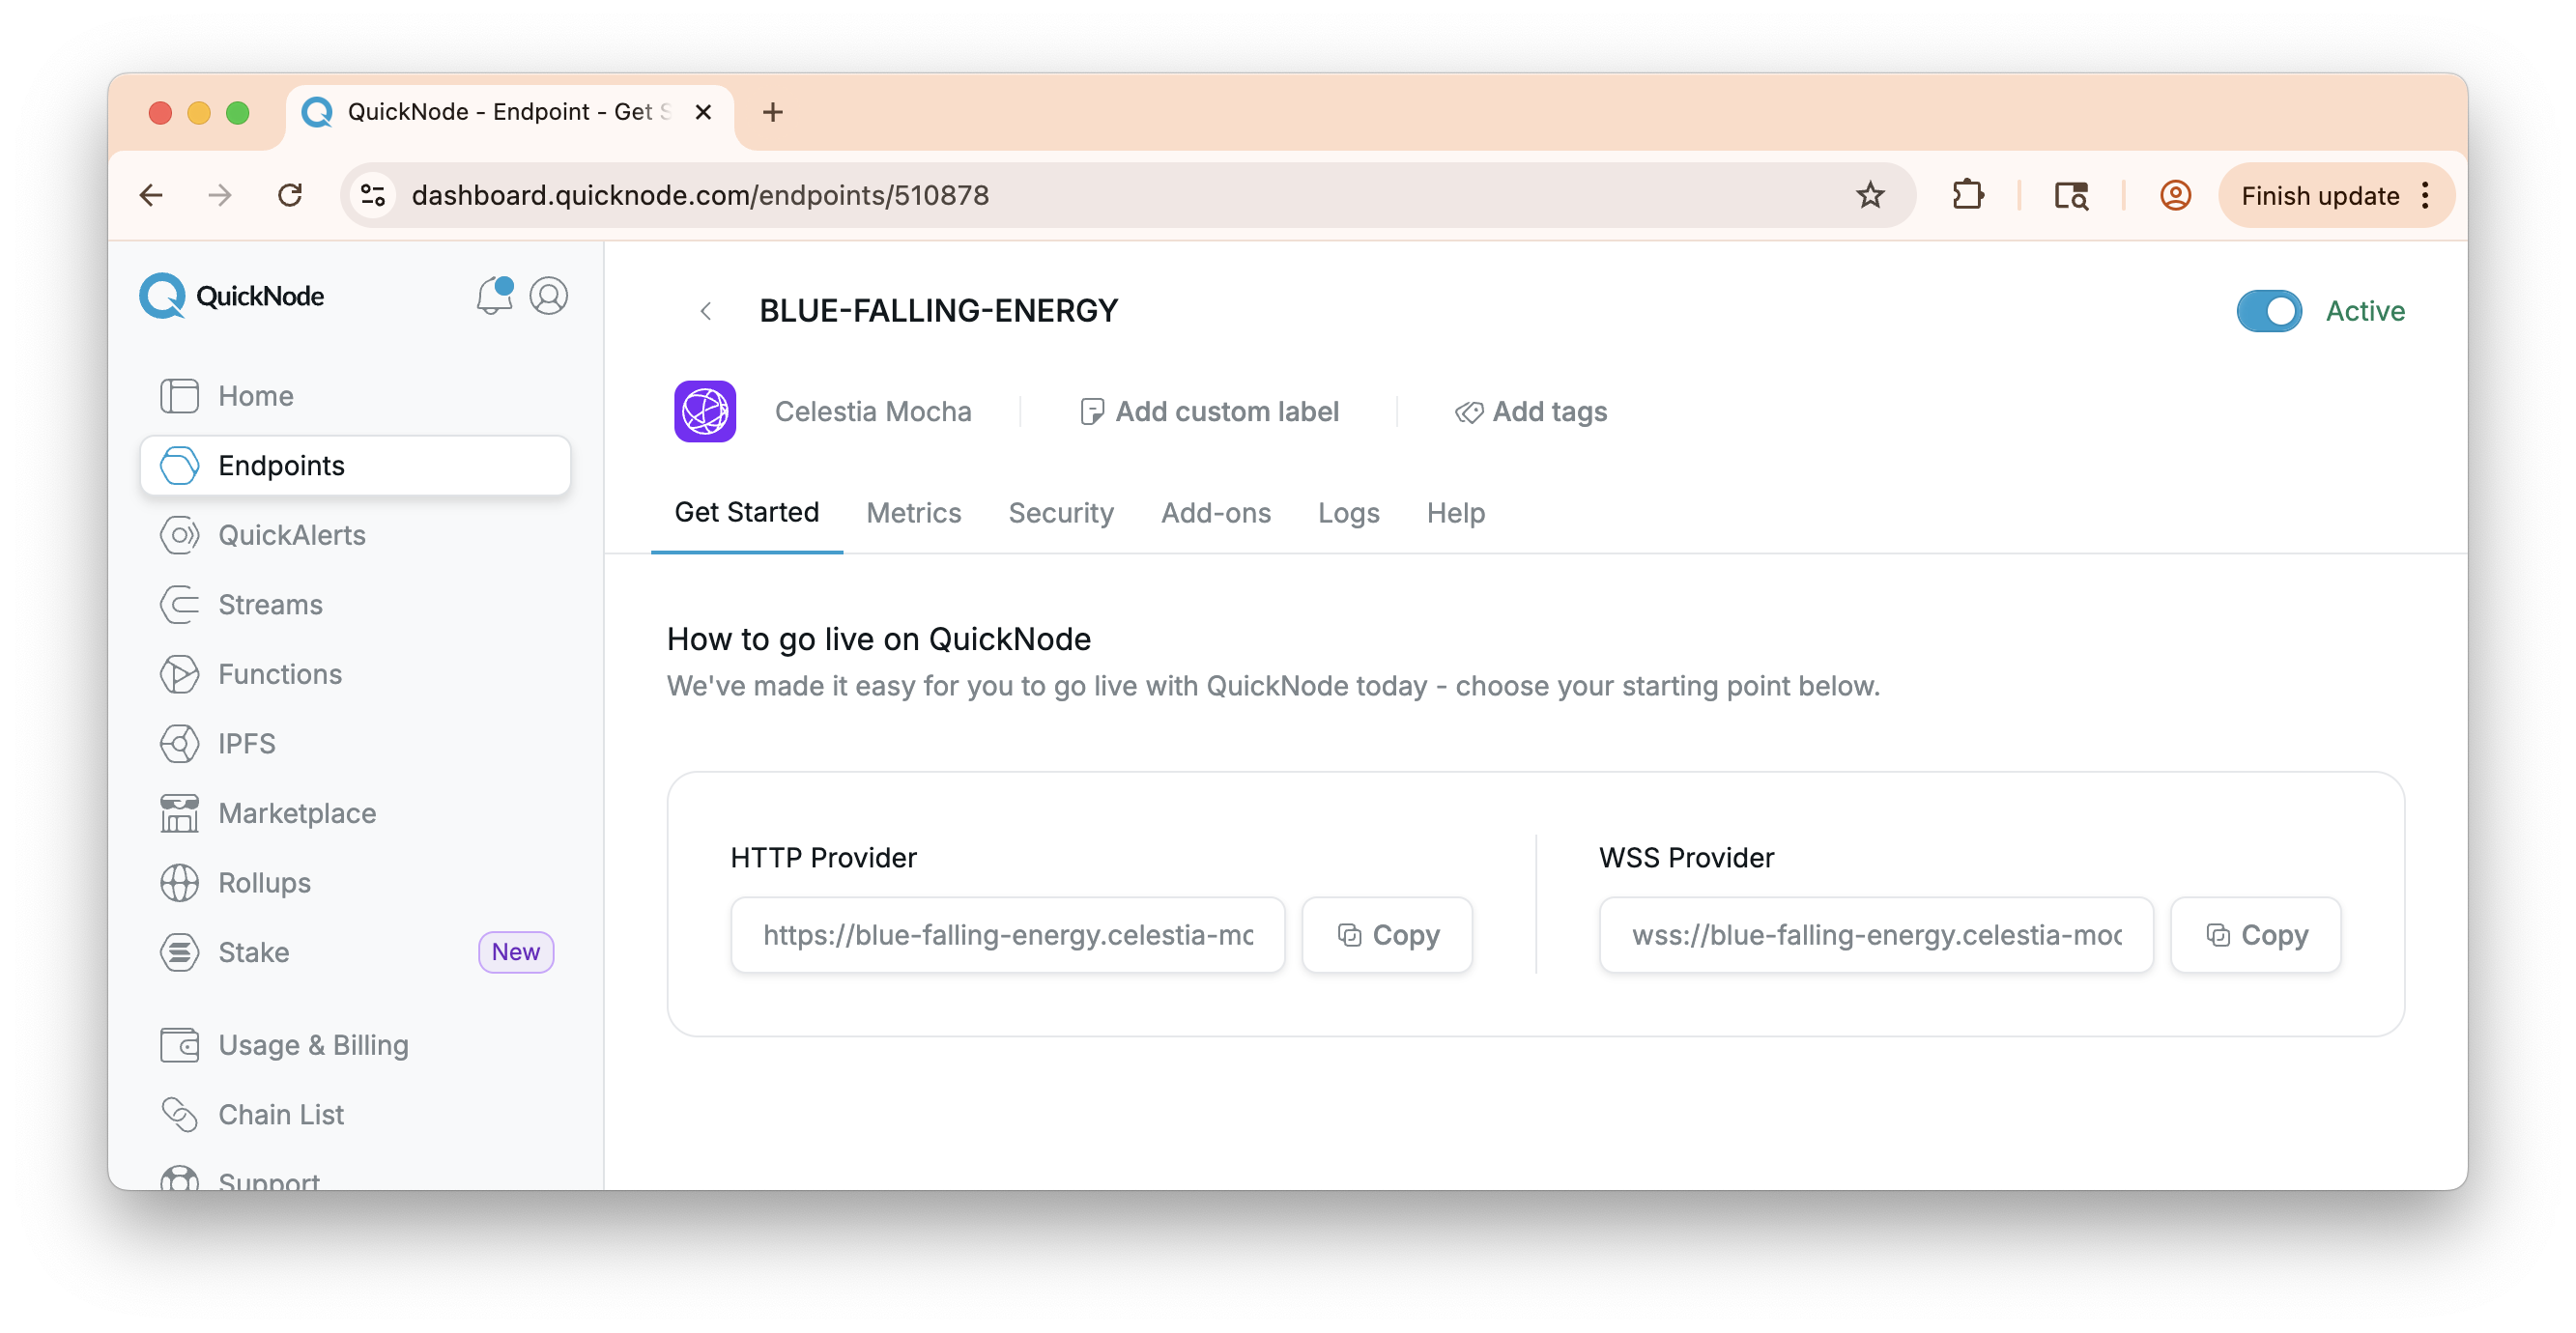
In your endpoint dashboard, find the authentication section in the Security tab and copy your auth token. You'll need this later.
Project Prerequisite: Get Celestia Testnet Tokens
To submit blob data to Celestia, you'll need testnet TIA tokens to pay for gas fees. You can get these from the Celestia Discord faucet or the web faucet from Celenium. Reference this document for the latest faucet instructions: https://docs.celestia.org/how-to-guides/mocha-testnet
We won't need to retrieve testnet tokens at this time but later when we initialize our light node where it will generate a wallet for us. You can however, use your own wallet but it will need to be configured using the cel-key utility tool which lives in a binary from the celestia-node repository. For the purpose of this guide, we will not demonstrate this but more information can be found here.
Installing the Celestia Node
Celestia provides an installation script that automatically downloads and installs the correct version for your system. Check out the docs here: https://docs.celestia.org/how-to-guides/light-node
Download and Install
First, run the installation script with the specific version for Mocha or Mainnet Beta:
bash -c "$(curl -sL https://docs.celestia.org/celestia-node.sh)" -- -v v0.23.1-mocha
You can find the latest versions in Celestia docs.
Then, check that the installation was successful:
celestia version
You should see output similar to:
Semantic version: v0.23.1-mocha
Commit: a4f8e60c4865b89b0e3b0b31b7f7c7a8f4e8e60c
Build Date: Mon Oct 14 2024
System version: amd64/darwin
Golang version: go1.21.12
Configuring Authentication
Before running our light node, we'll need to set up authentication credentials that your light node will use to connect to the consensus RPC (aka Quicknode).
Create the Authentication File
Create the authentication directory and file:
mkdir -p ~/.celestia-auth
Create the xtoken.json file with x-token as the key and your YOUR_QUICKNODE_AUTH_TOKEN_HERE as the value.
cat > ~/.celestia-auth/xtoken.json << 'EOF'
{
 "x-token": "YOUR_QUICKNODE_AUTH_TOKEN_HERE"
}
EOF
Replace YOUR_QUICKNODE_AUTH_TOKEN_HERE with the actual authentication token from your Quicknode endpoint dashboard.
Set Proper Permissions
Ensure the xtoken.json file has appropriate permissions:
chmod 600 ~/.celestia-auth/xtoken.json
Initializing Your Light Node
Before starting your light node, you need to initialize it for the target network.
Initialize for Mocha Testnet
celestia light init --p2p.network mocha
This will also generate a wallet tied to our node. Later, we can use the commands in the Check Your Account section to reference your public key for usage in the faucet.
The
mochacommand let's the config know we want to run a mocha testnet.
You'll see output indicating successful initialization:
2024-01-15T10:30:45.123Z    INFO    node    Successfully initialized light node
2024-01-15T10:30:45.124Z    INFO    node    Node ID: 12D3KooWXXXXXXXXXXXXXXXXXXXXXXXXXXXXXXXXXXXXX
...
Note that if no key exists, this is where you will see the mnemonic and your public address.
Get Trusted Hash and Height
Before starting your light node, we'll need to get a trusted hash and height from the network. This will help speed up our sync time to get up to the latest block.
read -r TRUSTED_HEIGHT TRUSTED_HASH <<<"$(curl -s YOUR_QUICKNODE_ENDPOINT | jq -r '.result.header | "\(.height) \(.last_block_id.hash)"')" && export TRUSTED_HEIGHT TRUSTED_HASH && echo "Height: $TRUSTED_HEIGHT" && echo "Hash: $TRUSTED_HASH"
Replace
YOUR_QUICKNODE_ENDPOINTwith your actual Quicknode endpoint you created earlier.
This command will output something like:
Height: 2847392
Hash:   7B3B0F4A8C9D2E1F6A5B8C7D4E3F2A1B9C8D7E6F5A4B3C2D1E0F9A8B7C6D5E4F3
We'll need to use this info and update the config.toml file with the appropriate values returned from above (i.e., TrustedHash and SampleFrom). The file will be located in .celestia-light-mocha-4/config.toml if you're using Mocha testnet.
Starting Your Light Node
Now you can run the following commands to start a light node + commands to connect to a Quicknode RPC:
celestia light start \
  --p2p.network mocha \
  --core.ip your-quicknode-endpoint.celestia-mocha.quiknode.pro \
  --core.port 9090 \
  --core.tls \
  --core.xtoken.path ~/.celestia-auth
Important Parameters:
--p2p.network mocha: Connects to the Mocha Testnet--core.ip: Your Quicknode endpoint hostname (without https://)--core.port 9090: The gRPC port for consensus communication--core.tls: Enables TLS encryption for the connection--core.xtoken.path: Path to your authentication file
If everything is configured correctly, you'll see logs indicating successful connection:
2024-01-15T10:35:12.456Z    INFO    light   Started light node
2024-01-15T10:35:12.457Z    INFO    core    Connected to core node
2024-01-15T10:35:12.458Z    INFO    p2p     Connected to 8 peers
2024-01-15T10:35:12.459Z    INFO    das     Started data availability sampling
...
For mainnet, remove --p2p.network mocha and it will default to mainnet.
Interacting with Your Light Node
Once your light node is running, you can interact with it using the Celestia CLI. Open a new terminal window for the commands below.
Check Your Account
Get your light node's account address:
celestia state account-address
Output:
celestia1abc123def456ghi789jkl012mno345pqr678stu
Check Your Balance
Check your account balance (you'll need testnet TIA for blob submissions):
celestia state balance
Output:
{
 "denom": "utia",
 "amount": "1000000"
}
The balance is shown in micro-TIA (utia). 1 TIA = 1,000,000 utia.
Working with Blob Data
One of the primary use cases for Celestia light nodes is submitting and retrieving blob data. Let's explore how to work with blobs.
Understanding Namespaces
Namespaces in Celestia are 29-byte identifiers that organize blob data. They must be exactly 29 bytes long, hex-encoded when used in commands, and properly formatted to avoid reserved ranges.
Creating a Namespace
Let's create a simple namespace for our examples:
Create a 29-byte namespace (58 hex characters)
NAMESPACE=$(openssl rand -hex 10)
echo "Using namespace: $NAMESPACE"
Submitting Blob Data
Now we'll demonstrate how to submit blob data to your namespace. Before running the command below, ensure your account is funded with testnet TIA tokens.
celestia blob submit $NAMESPACE 'Hello, Celestia! This is my first blob submission. gm!'
Successful submission returns:
{
  "result": {
    "height": 6837048,
    "commitments": [
      "0x039d15a1dff9fef62fcce0e16822cdeeb0d70c732c9292e53ec55375671df58a"
    ]
  }
}
Retrieving Blob Data
Now, retrieve blob data using the height, namespace, and commitment with the following command:
celestia blob get HEIGHT $NAMESPACE COMMITMENT_HASH
Remember to replace the HEIGHT and COMMITMENT_HASH variables with the details from your blob submission.
Where:
$NAMESPACEis the namespace you used for submission$HEIGHTis the block height where the blob was included
This returns the original blob data:
{
  "result": {
    "namespace": "0xa739ff2648ab440ac768",
    "data": "0xHello, Celestia! This is my first blob submission. gm!",
    "share_version": 0,
    "commitment": "0x039d15a1dff9fef62fcce0e16822cdeeb0d70c732c9292e53ec55375671df58a",
    "index": 514
  }
}
Wrap Up
That's it! You now know how to run a light node on Celestia as well as use Quicknode for your consensus RPC endpoint. Keep building on top of your newly gained knowledge by continuing to explore the Celestia ecosystem and applications.
If you have questions or need help, reach out to us on Discord or Twitter.
We ❤️ Feedback!
Let us know if you have any feedback or requests for new topics. We'd love to hear from you.