
13 min read
Overview
Making a dApp that requires ERC20 token data can be tedious since there are numerous tokens, and one needs to query each token contract to get the data. This guide will show how we can build a ERC20 token balance app with Quicknode Token API.
Prefer a video walkthrough? Follow along with Radek and learn how to Build an ERC20 Token Balance App with the Quicknode Token API.
What You Will Need
- Node v14 or later.
- Knowledge of HTML, CSS, JavaScript & React.
- Ethers.js (version 5.7) & TailwindCSS libraries.
- A Quicknode Ethereum node with Token API.
- A code editor (i.e., VScode).
What You Will Do
- Learn about the traditional method of fetching ERC20 token data.
- Learn about Quicknode Token API and its different methods.
- Boot a Quicknode Ethereum node with Token API.
- Create a React app to display ERC20 token balances of a particular wallet using Quicknode Token API and Ethers.js library along with Tailwind CSS for styling.
The Traditional way
To get token data like the balance for a specific ERC20 token, one needs to query the smart contract of that particular token. Multiple smart contracts need to be queried when you want to obtain data for multiple tokens. In this process, one needs to query the contract with the help of contract ABI; this creates a lot of redundant code, which also needs to be maintained. Learn how to get token balances using this method in this guide.
Quicknode Token API makes this process very easy and short. In the next section, we will learn more about the Token API and its methods.
What is Quicknode's Token API?
Quicknode Token API is an API using which a user can get token metadata, balances, and transfer histories of ERC20 tokens for a wallet on the Ethereum mainnet. While using the Token API, the user must make a method call to the Quicknode RPC without the need to query smart contracts. The following are the methods of Quicknode Token API:
- qn_getTokenMetadataByContractAddress: A user can get metadata of a specific ERC20 by using that token's contract address.
- qn_getTokenMetadataBySymbol: Using this method, a user can get metadata of a specific ERC20 by using that token's symbol (WETH, USDT, MATIC, etc).
- qn_getWalletTokenBalance: A user can get all the ERC20 tokens of a wallet address along with their balances.
- qn_getWalletTokenTransactions: The transfer history of a particular ERC20 token for a wallet address can be retrieved; the wallet address and the token's contract address need to be used as parameters.
Now that we have learned about Quicknode Token API, let us boot a Quicknode Ethereum mainnet endpoint and create a small Token app in the upcoming sections.
Booting Quicknode endpoint with Token API
Token API is an adjacent product to the Quicknode RPC, so it only works with the Quicknode RPC endpoints. Let us quickly get a free Quicknode Ethereum mainnet node, as the Token API is also included with the Free Trial plan.
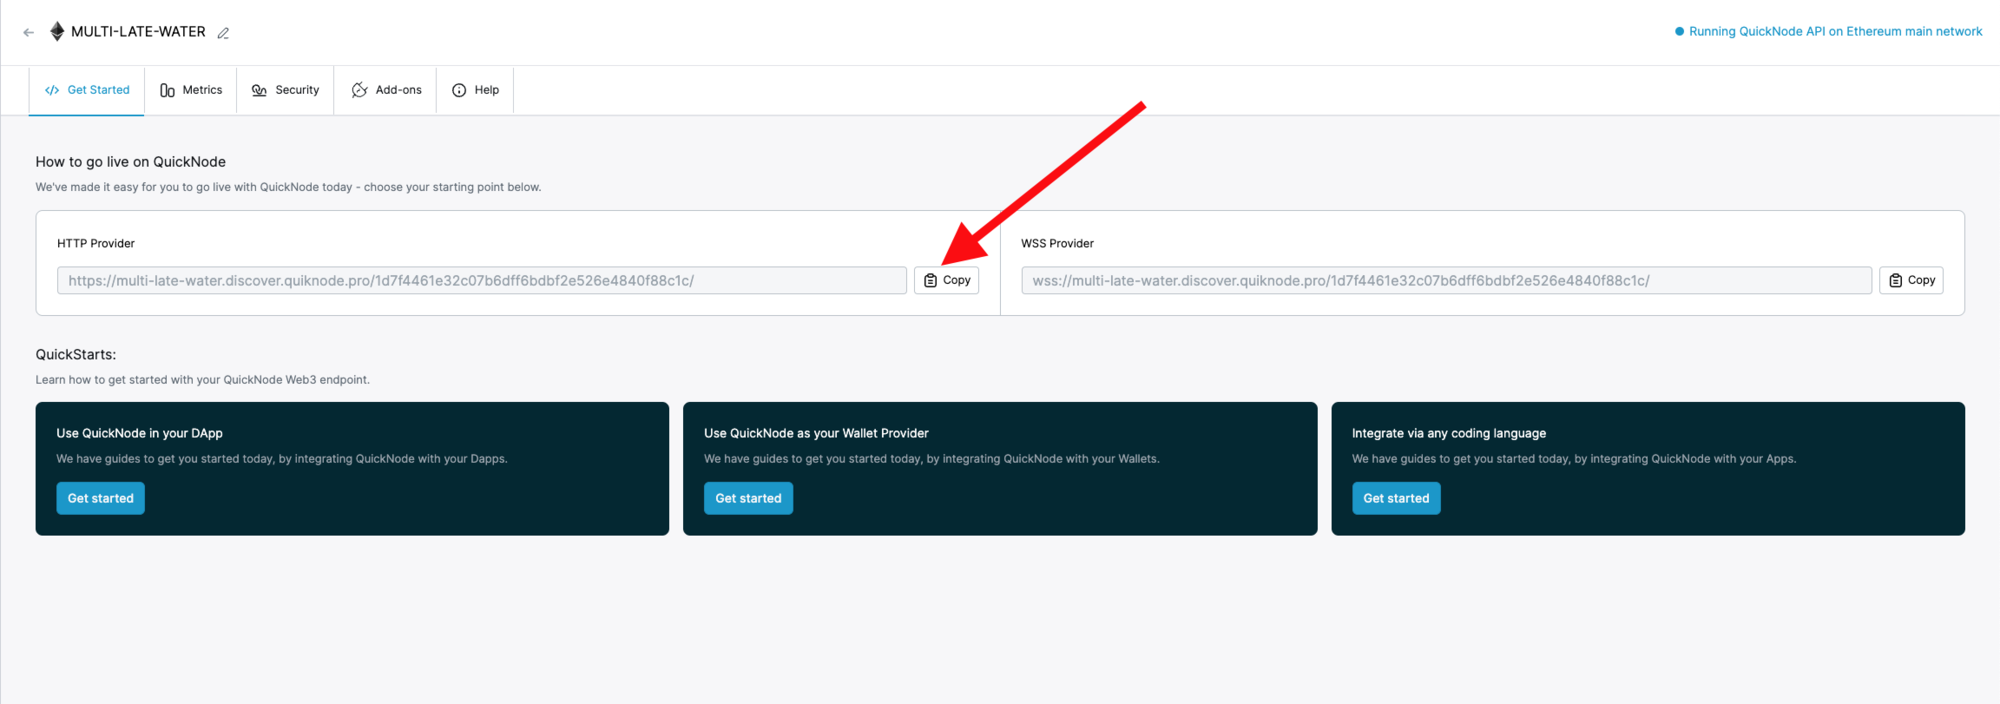
Copy and keep the HTTP Provider link, as we will need it in the next section.
How to create an ERC20 Token Balance App with Quicknode Token API
Now that we know about the Token API and have a Quicknode RPC with Token API let us create a small React app to show balances of ERC20 tokens for a given address. To do so, let us install some libraries/dependencies we will use.
Copy-paste the following into your terminal/command prompt
npx create-react-app token_wallet
This will create a new directory, token_wallet, with the required React components.
We will need Ethers.js (version 5.7) to connect our Quicknode node to the React app and Tailwind CSS for styling our React app. Go to the recently created directly and copy-paste the following in your terminal/command prompt to install ethers and Tailwind CSS:
cd token_wallet
npm install ethers@5.7
npx tailwindcss init -p
We need to let Tailwind know about the file's path, which needs styling, so open your project directory in a code editor, open the tailwind.config.js file, and modify the config to look like this:
/** @type {import('tailwindcss').Config} */
module.exports = {
  content: ["./src/**/*.{html,js,jsx}"],
  theme: {
    extend: {},
  },
  plugins: [],
}
After saving the above file, navigate to src/index.js in your code editor and add the following line between lines 9 and 10:
<link href="https://cdn.jsdelivr.net/npm/tailwindcss/dist/tailwind.min.css" rel="stylesheet" />
This will import Tailwind's utility classes.
The app we are creating will have a form input field and a submit button. Once an address is input and the button is clicked, using the Token API, ERC20 token data will be retrieved for the imputed address and displayed
Start building by going to src/app.js in your code editor and pasting the following code:
import { useState } from 'react';
import { ethers, utils } from "ethers";

function App() {
  //State variables
  const [tokens, setTokens] = useState([])
  const [address, setAddress] = useState('')
}
export default App;
In the above code, on
Line 1-2: we're importing the React useState hook to track our input wallet address and ethers library to connect our app with the Ethereum blockchain using Quicknode.
Line 4-7: Starting our React app named App and declaring two state variables to store token data and another to store input address, respectively.
Now add the following on line 9:
  //Function to handle form submission
  const handleSubmit = (e) => {
    e.preventDefault();
    setAddress(address);
    fetchTokens()
    .then(data => {
      setTokens(data.assets)
    })
    .catch(err => setTokens([]))
  }

  //Function to fetch tokens
  const fetchTokens = async () => {
    if (!utils.isAddress(address)){
      alert('Please enter a valid Ethereum wallet address')
      return;
    }
    const provider = new ethers.providers.JsonRpcProvider("YOUR-QUICKNODE-HTTP-URL-HERE");
    const tokens = await provider.send("qn_getWalletTokenBalance", {
      wallet: address,
      contracts: [
        '0xC02aaA39b223FE8D0A0e5C4F27eAD9083C756Cc2', //WETH
        '0xdAC17F958D2ee523a2206206994597C13D831ec7', //USDT
        '0x7D1AfA7B718fb893dB30A3aBc0Cfc608AaCfeBB0', //MATIC
        '0xC18360217D8F7Ab5e7c516566761Ea12Ce7F9D72', //ENS
      ]
    });
    return tokens
  }
Replace YOUR-QUICKNODE-HTTP-URL-HERE with Quicknode's HTTP Provider link we got in the last step.
In the above code, on
Line 10-18: We're writing a function handleSubmit to handle the form submission event; basically, it is changing the state of the address variable to store the imputed address's value, then calling the function fetchTokens, then changing the state of the tokens variable to store token data.
Line 20-37: A function fetchTokens to fetch tokens. First, an if statement to check if the input address is a valid Ethereum address or not using the ethers isAddress function. Then connecting to Quicknode Ethereum node. Making a Token API call to get wallet tokens by passing the address as a parameter along contract addresses of WETH, USDT, MATIC, and ENS to get these specific token's data. Then Returning tokens
On line 38, paste the following code:
//JSX code
  return(
    <div className="h-screen w-screen justify-center space-x-3">
      <div className="flex justify-center space-x-3 w-screen h-14 mt-10">
        <form
            onSubmit={handleSubmit}
            className="w-4/12 h-15 relative block overflow-hidden rounded-md border border-gray-200 px-3 pt-3 shadow-sm focus-within:border-blue-600 focus-within:ring-1 focus-within:ring-blue-600 dark:border-gray-700 dark:bg-gray-800">
            <input
                onChange={e => setAddress(e.target.value)}
                type="text"
                placeholder="Enter your Address here 🎯"
                className="mt-1 w-full border-none p-0 focus:border-transparent focus:outline-none focus:ring-0 sm:text-sm"
            />
            <button
            type='submit'
            className="rounded-lg top-1 right-1 bottom-1 border absolute w-12 justify-center bg-blue-400 text-white p-3 font-bold uppercase"
            >
            GO
            </button>
        </form>
      </div>
      <div className="relative top-4/12 left-1/4 overflow-x-auto justify-center space-x-3 w-6/12 h-140 m-10">
        <table className="min-w-full divide-y-2 divide-gray-200 text-sm">
          <thead>
            <tr>
              <th
                className="whitespace-nowrap px-4 py-2 text-left font-medium text-gray-1000">
                Name
              </th>
              <th
                className="whitespace-nowrap px-4 py-2 text-left font-medium text-gray-900">
                Symbol
              </th>
              <th
                className="whitespace-nowrap px-4 py-2 text-left font-medium text-gray-900">
                Balance
              </th>
            </tr>
          </thead>
          <tbody className="divide-y divide-gray-200">
            {tokens.map((token, index) => (
              <tr key={index}>
                <td className="whitespace-nowrap px-4 py-2 text-gray-900">{token.name}</td>
                <td className="whitespace-nowrap px-4 py-2 text-gray-900">{token.symbol}</td>
                <td className="whitespace-nowrap px-4 py-2 text-gray-900">{utils.formatUnits(token.amount, token.decimals)}</td>
              </tr>
            ))}
          </tbody>
        </table>
      </div>
    </div>
  );
The above code is basic HTML in JS (JSX) and Tailwind styling. The few worth noting lines are:
Line 44: Calling the handleSubmit function on form submission.
Line 47: Getting the current value of the input field and setting it to setAddress.
Line 79: Mapping the token data in the tokens array.
Line 81: Printing the token's name, symbol, and balance (formatting the units based on that token's decimal values).
Note: The app will only display balances of tokens which me added in the contracts section of the RPC.
Save the file, and the final file should look like this:
import { useState } from 'react';
import { ethers, utils } from "ethers";

function App() {
  //State variables
  const [tokens, setTokens] = useState([])
  const [address, setAddress] = useState('')

  //Function to handle form submission
  const handleSubmit = (e) => {
    e.preventDefault();
    setAddress(address);
    fetchTokens()
    .then(data => {
      setTokens(data.assets)
    })
    .catch(err => setTokens([]))
  }

  //Function to fetch tokens
  const fetchTokens = async () => {
    if (!utils.isAddress(address)){
      alert('Please enter a valid Ethereum wallet address')
      return;
    }
    const provider = new ethers.providers.JsonRpcProvider("YOUR-QUICKNODE-HTTP-URL-HERE");
    const tokens = await provider.send("qn_getWalletTokenBalance", {
      wallet: address,
      contracts: [
        '0xC02aaA39b223FE8D0A0e5C4F27eAD9083C756Cc2', //WETH
        '0xdAC17F958D2ee523a2206206994597C13D831ec7', //USDT
        '0x7D1AfA7B718fb893dB30A3aBc0Cfc608AaCfeBB0', //MATIC
        '0xC18360217D8F7Ab5e7c516566761Ea12Ce7F9D72', //ENS
      ]
    });
    return tokens
  }

  //JSX code
  return(
    <div className="h-screen w-screen justify-center space-x-3">
      <div className="flex justify-center space-x-3 w-screen h-14 mt-10">
        <form
            onSubmit={handleSubmit}
            className="w-4/12 h-15 relative block overflow-hidden rounded-md border border-gray-200 px-3 pt-3 shadow-sm focus-within:border-blue-600 focus-within:ring-1 focus-within:ring-blue-600 dark:border-gray-700 dark:bg-gray-800">
            <input
                onChange={e => setAddress(e.target.value)}
                type="text"
                placeholder="Enter your Address here 🎯"
                className="mt-1 w-full border-none p-0 focus:border-transparent focus:outline-none focus:ring-0 sm:text-sm"
            />
            <button
            type='submit'
            className="rounded-lg top-1 right-1 bottom-1 border absolute w-12 justify-center bg-blue-400 text-white p-3 font-bold uppercase"
            >
            GO
            </button>
        </form>
      </div>
      <div className="relative top-4/12 left-1/4 overflow-x-auto justify-center space-x-3 w-6/12 h-140 m-10">
        <table className="min-w-full divide-y-2 divide-gray-200 text-sm">
          <thead>
            <tr>
              <th
                className="whitespace-nowrap px-4 py-2 text-left font-medium text-gray-1000">
                Name
              </th>
              <th
                className="whitespace-nowrap px-4 py-2 text-left font-medium text-gray-900">
                Symbol
              </th>
              <th
                className="whitespace-nowrap px-4 py-2 text-left font-medium text-gray-900">
                Balance
              </th>
            </tr>
          </thead>
          <tbody className="divide-y divide-gray-200">
            {tokens.map((token, index) => (
              <tr key={index}>
                <td className="whitespace-nowrap px-4 py-2 text-gray-900">{token.name}</td>
                <td className="whitespace-nowrap px-4 py-2 text-gray-900">{token.symbol}</td>
                <td className="whitespace-nowrap px-4 py-2 text-gray-900">{utils.formatUnits(token.amount, token.decimals)}</td>
              </tr>
            ))}
          </tbody>
        </table>
      </div>
    </div>
  );
}

export default App;
Start the application by running the following:
npm start
It should look something like this.
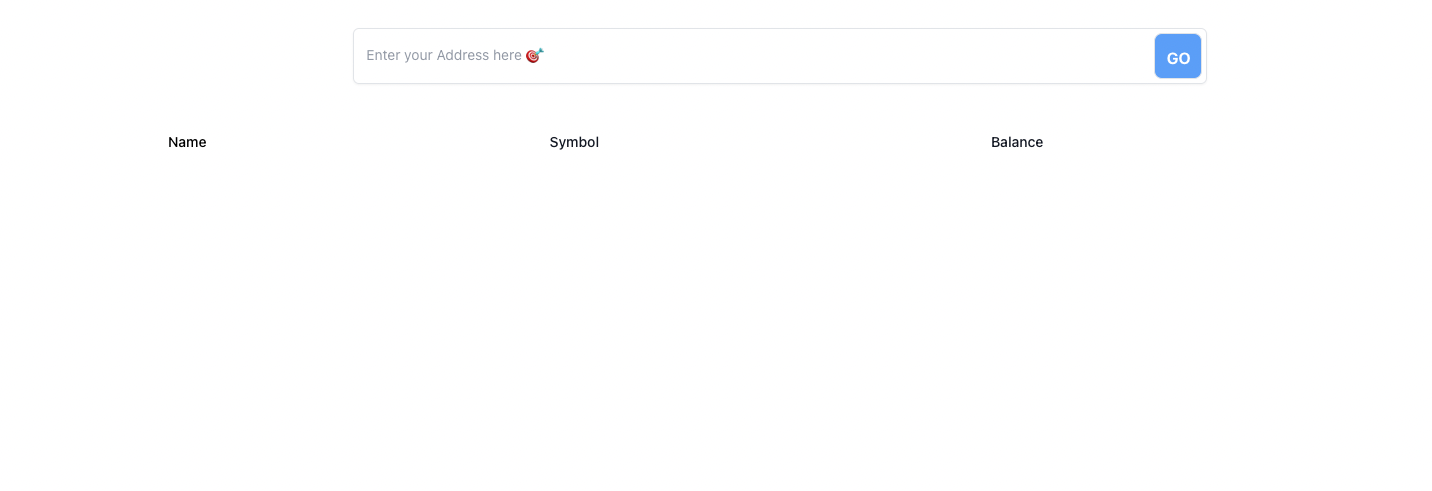
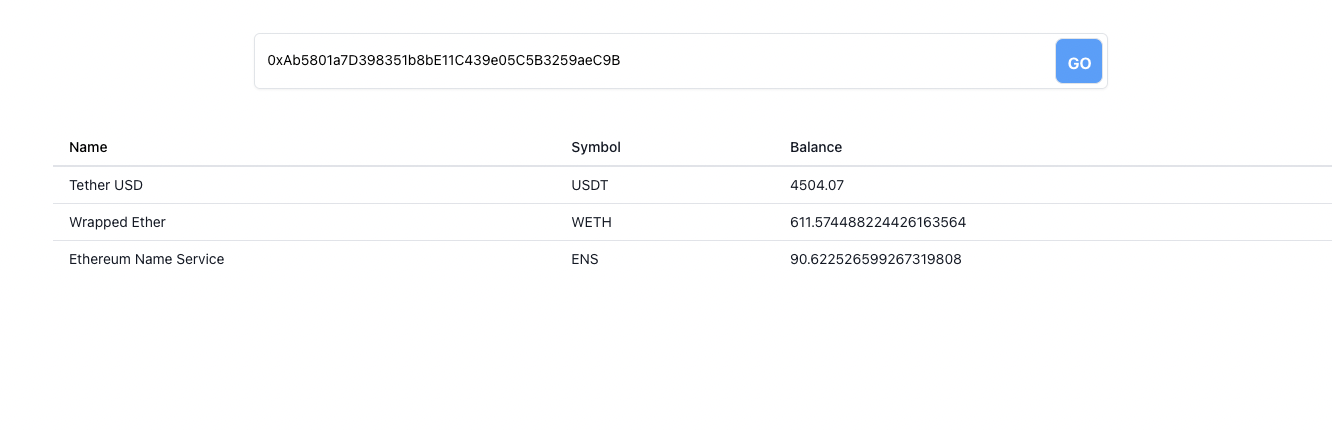
Paste an address in the input field and click on GO; you should see the balances of tokens.
Get the entire code from this GitHub repo.
Conclusion
You are fantastic if you made it till here. In this tutorial, we learned about Quicknode Token API and created a ERC20 token balance app using the Token API.
Make more out of the Token API with its various methods. Join our Discord if you have any questions, or reach out to us via Twitter.
We ❤️ Feedback!
Let us know if you have any feedback or requests for new topics. We'd love to hear from you.