22 min read
Overview
A non-fungible token (NFT) marketplace is a platform where users buy and sell unique digital assets called NFTs. These digital assets can represent various things, such as collectible items, digital art, in-game items, and much more. This guide will teach you how to create and deploy an NFT marketplace smart contract on the Polygon Mumbai test network using Hardhat. You will also learn how to test and interact with your deployed marketplace contract using Ethers.js. Let's get started!
What We Will Do
- Create and deploy an NFT Marketplace to the Polygon Mumbai testnet using Hardhat.
- Create an NFT (using the ERC-721 standard) that we'll use on the NFT Marketplace.
- Interact with the NFT marketplace smart contract with Ethers.js.
What You Will Need
- Node.js installed
- NPM installed
- A text editor or IDE (e.g., VSCode)
- A web3 wallet (e.g., MetaMask) with access to private keys on two accounts
- MATIC tokens on Mumbai testnet (you can get some at the Quicknode Faucet)
- Hardhat installed
- Ethers.js installed
Setting up the Project
To set up the Hardhat environment for our smart contracts, run the following set of terminal commands:
mkdir marketplace-hardhat
cd marketplace-hardhat
npm install --save-dev hardhat
npx hardhat
You will be prompted to choose the type of project in the terminal. Choose the following default configurations:
What do you want to do? · Create a JavaScript project
Hardhat project root: · /Users/User/*/marketplace-hardhat
Do you want to add a .gitignore? (Y/n) · y
Do you want to install this sample project's dependencies with npm (@nomicfoundation/hardhat-toolbox)? (Y/n) · y
Then, run the following command to install dependencies such as the OpenZeppelin library, a plug-in to verify smart contracts on Hardhat and the dotenv library to secure our private data:
npm install @openzeppelin/contracts dotenv ethers@5.7
npm install --save-dev @nomiclabs/hardhat-etherscan
For more context on Hardhat, check out this Quicknode guide.
Set Up a Quicknode Polygon Endpoint
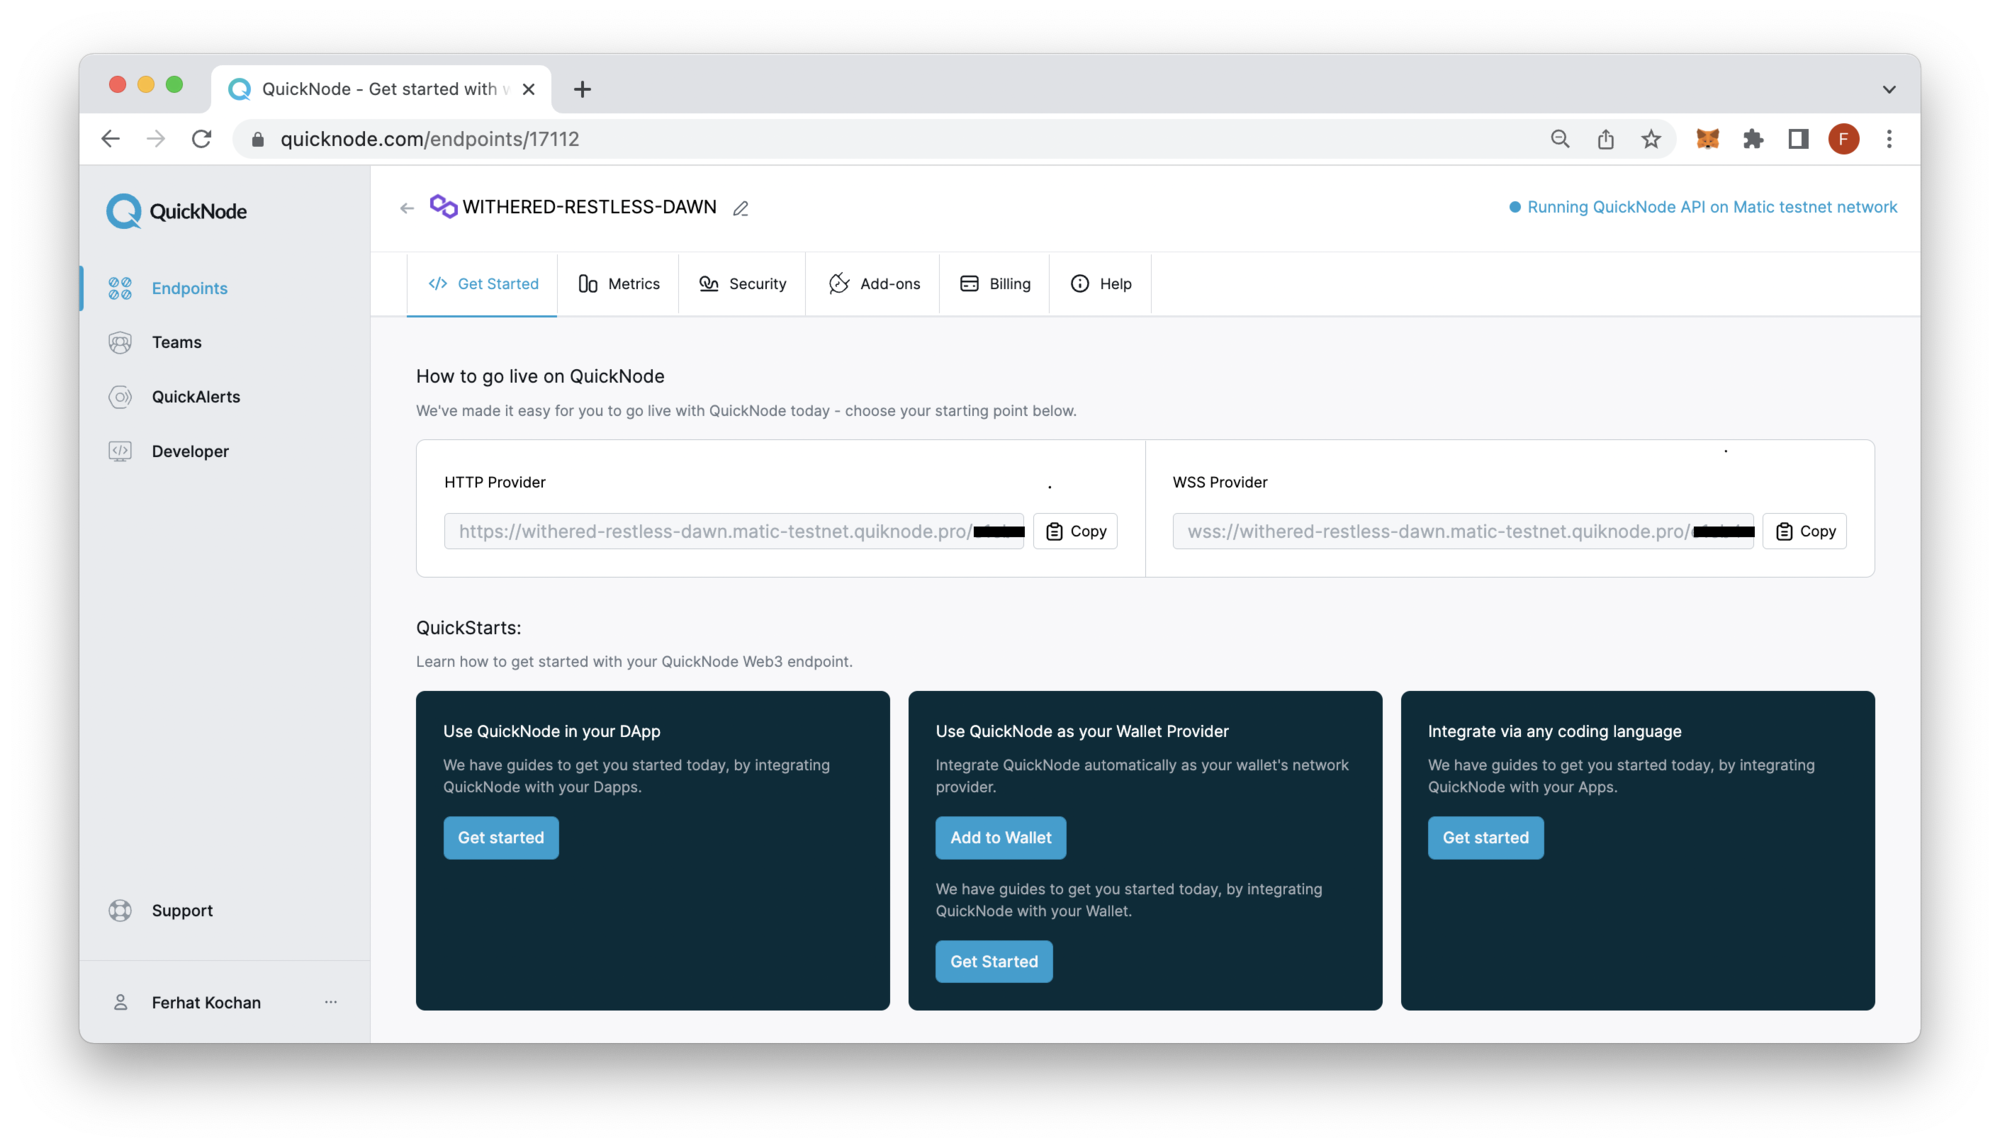
To deploy and interact with our NFT marketplace contract, we will need a full node connected to Polygon Mumbai testnet. You can run your own node by looking at the Nodes tab on Polygon's documentation. However, this can be hard to manage at times and may not be optimized as well as we'd like. Instead, you can easily set up a free Quicknode account here and have access to 20+ blockchains. Quicknode's infrastructure is optimized for latency and redundancy, making it up to 8x faster than competitors.
Click the Create an Endpoint button and select the Polygon chain, Mumbai testnet network. Then once your endpoint is ready, keep the HTTP Provider URL handy, as you'll need it when setting up your environment variables.
Fetching MATIC tokens from the Quicknode Faucet
You will also need some MATIC tokens on the Mumbai testnet to pay for transactions. You can get some at the Quicknode Faucet or the Polygon Mumbai Faucet.
Creating the NFT Marketplace Smart Contract
Before getting into the actual code, let us first understand what functionality our NFT marketplace contract should contain. It should be able to do the following:
- Store details of a listed NFT, such as the token ID, token address, type of NFT (ERC-721 or ERC-1155), price, and the seller’s address.
- Allow users to list NFTs for sale on the marketplace (via the createListing function)
- Allow users to buy NFTs that are listed for sale (via the buyNFT function)
- Facilitate the transfer of NFTs between buyers and sellers (via the marketplace contract as an intermediary)
- Allows users to view their listed and purchased NFTs (via the public getMyListedNFTs and getMarketItem functions)
Now that we know how our NFT marketplace contract will work, let us start creating the marketplace contract.
Importing Dependencies and Declaring the Contract
Go to your contracts folder within your marketplace-hardhat folder and run the following command to create the required solidity files:
echo > marketplace.sol
echo > NFT.sol
Then, open the marketplace.sol file and input the following code:
// SPDX-License-Identifier: MIT
pragma solidity ^0.8.9;

import "@openzeppelin/contracts/token/ERC721/ERC721.sol";
import "@openzeppelin/contracts/utils/Counters.sol";
import "@openzeppelin/contracts/access/Ownable.sol";
import "@openzeppelin/contracts/security/ReentrancyGuard.sol";

contract Marketplace is ReentrancyGuard, Ownable {
We will review the code in sections to understand each part fully. If you don't want to follow along, feel free to skip to the end of this section to see the complete code.
The first line of our solidity file is the license identifier. Then, in the second line, we define the version pragma we want to compile with. ^0.8.9 means we can compile the code on solidity version 0.8.9 and greater.
Next, we import all the contracts we will inherit and use. Our contract's name will be Marketplace, and it'll inherit other contracts such as ReentrancyGuard and Ownable.
Creating the State for the NFT Marketplace
Now, paste the following code under the code you previously copied into marketplace.sol:
    using Counters for Counters.Counter;
    Counters.Counter private marketplaceIds;
    Counters.Counter private totalMarketplaceItemsSold;

    mapping(uint => Listing) private marketplaceIdToListingItem;

    struct Listing {
        uint marketplaceId;
        address nftAddress;
        uint tokenId;
        address payable seller;
        address payable owner;
        uint listPrice;
    }

    event ListingCreated(
        uint indexed marketplaceId,
        address indexed nftAddress,
        uint indexed tokenId,
        address seller,
        address owner,
        uint listPrice
    );
In the code above, we call the using keyword on Counters.Counter to assign the Counters library to that variable. We also created two private functions, marketplaceIds and totalMarketplaceItemsSold, which will track the IDs and total NFTs sold on the marketplace.
The contract also declares a mapping, marketplaceIdToListingItem, which will map a uint to a struct called Listing. This struct will hold data such as the marketplaceId, nftAddress, tokenId, seller, owner, and listPrice.
The event ListingCreated is emitted whenever a user lists an NFT on the marketplace. This event can be useful for real-time and historical listings.
Listing NFTs to the Marketplace
Our marketplace will also need logic to list an NFT. Paste the following code to the end of your marketplace.sol file:
    function createListing(
        uint tokenId,
        address nftAddress,
        uint price
    ) public nonReentrant {
        require(price > 0, "List price must be 1 wei >=");
        marketplaceIds.increment();
        uint marketplaceItemId = marketplaceIds.current();
        marketplaceIdToListingItem[marketplaceItemId] = Listing(
            marketplaceItemId,
            nftAddress,
            tokenId,
            payable(msg.sender),
            payable(address(0)),
            price
        );
        IERC721(nftAddress).transferFrom(msg.sender, address(this), tokenId);
        emit ListingCreated(
            marketplaceItemId,
            nftAddress,
            tokenId,
            msg.sender,
            address(0),
            price
        );
    }
Let's recap the code.
The createListing public function takes three arguments; tokenId, nftAddress and price. We use a nonReentrant modifier to prevent reentrancy, and a require statement to ensure the list price is greater than one wei (i.e., the smallest denomination of ETH). The rest of the function's logic includes incrementing the marketplaceId, adding the listing details to the Listing struct, transferring the token to the marketplace via transferFrom, and then emitting an event ListingCreated. The marketplace contract secures the NFT in the marketplace contract itself. This is different than holding the listed NFT in your wallet in that the marketplace contract doesn't have the authority to take NFTs from your wallet (i.e., the account tied to your private key) at a moment's notice.
Creating the Buy Listing Functionality
    function buyListing(uint marketplaceItemId, address nftAddress)
        public
        payable
        nonReentrant
    {
        uint price = marketplaceIdToListingItem[marketplaceItemId].listPrice;
        require(
            msg.value == price,
            "Value sent does not meet list price for NFT"
        );
        uint tokenId = marketplaceIdToListingItem[marketplaceItemId].tokenId;
        marketplaceIdToListingItem[marketplaceItemId].seller.transfer(msg.value);
        IERC721(nftAddress).transferFrom(address(this), msg.sender, tokenId);
        marketplaceIdToListingItem[marketplaceItemId].owner = payable(msg.sender);
        totalMarketplaceItemsSold.increment();
    }
Let's recap the code.
The buyListing function is a public payable function that takes in a marketplaceItemId, and nftAddress. It also utilizes the nonReentrant modifier to prevent reentrancy. The function's logic includes retrieving the list price and ensuring the value sent along with the function call meets the list price. The remainder of the logic consists of transferring the NFT to the buyer, changing the owner value in the marketplaceIdToListingItem mapping, and incrementing the totalMarketplaceItemsSold variable.
Creating Helper Functions for the NFT Marketplace
    function getMarketItem(uint marketplaceItemId)
        public
        view
        returns (Listing memory)
    {
        return marketplaceIdToListingItem[marketplaceItemId];
    }

    function getMyListedNFTs() public view returns (Listing[] memory) {

        uint totalListingCount = marketplaceIds.current();
        uint listingCount = 0;
        uint index = 0;

        for (uint i = 0; i < totalListingCount; i++) {
            if (marketplaceIdToListingItem[i + 1].owner == msg.sender) {
                listingCount += 1;
            }
        }
        Listing[] memory items = new Listing[](listingCount);
        for (uint i = 0; i < totalListingCount; i++) {
            if (marketplaceIdToListingItem[i + 1].owner == msg.sender) {
                uint currentId = marketplaceIdToListingItem[i + 1].marketplaceId;
                Listing memory currentItem = marketplaceIdToListingItem[currentId];
                items[index] = currentItem;
                index += 1;
            }
        }
        return items;
    }
}
Let's recap the code.
These two functions are helper functions that will return a marketplace item and retrieve a seller's listed NFTs. The getMyListedNFTs uses a for loop to iterate and return the marketplace items.
Your complete marketplace code should look like this:
// SPDX-License-Identifier: MIT
pragma solidity ^0.8.9;

import "@openzeppelin/contracts/token/ERC721/ERC721.sol";
import "@openzeppelin/contracts/utils/Counters.sol";
import "@openzeppelin/contracts/access/Ownable.sol";
import "@openzeppelin/contracts/security/ReentrancyGuard.sol";

contract Marketplace is ReentrancyGuard, Ownable {

    using Counters for Counters.Counter;
    Counters.Counter private marketplaceIds;
    Counters.Counter private totalMarketplaceItemsSold;

    mapping(uint => Listing) private marketplaceIdToListingItem;

    struct Listing {
        uint marketplaceId;
        address nftAddress;
        uint tokenId;
        address payable seller;
        address payable owner;
        uint listPrice;
    }

    event ListingCreated(
        uint indexed marketplaceId,
        address indexed nftAddress,
        uint indexed tokenId,
        address seller,
        address owner,
        uint listPrice
    );

    function createListing(
        uint tokenId,
        address nftAddress,
        uint price
    ) public nonReentrant {
        require(price > 0, "List price must be 1 wei >=");
        marketplaceIds.increment();
        uint marketplaceItemId = marketplaceIds.current();
        marketplaceIdToListingItem[marketplaceItemId] = Listing(
            marketplaceItemId,
            nftAddress,
            tokenId,
            payable(msg.sender),
            payable(address(0)),
            price
        );
        IERC721(nftAddress).transferFrom(msg.sender, address(this), tokenId);
        emit ListingCreated(
            marketplaceItemId,
            nftAddress,
            tokenId,
            msg.sender,
            address(0),
            price
        );
    }

    function buyListing(uint marketplaceItemId, address nftAddress)
        public
        payable
        nonReentrant
    {
        uint price = marketplaceIdToListingItem[marketplaceItemId].listPrice;
        require(
            msg.value == price,
            "Value sent does not meet list price for NFT"
        );
        uint tokenId = marketplaceIdToListingItem[marketplaceItemId].tokenId;
        marketplaceIdToListingItem[marketplaceItemId].seller.transfer(msg.value);
        IERC721(nftAddress).transferFrom(address(this), msg.sender, tokenId);
        marketplaceIdToListingItem[marketplaceItemId].owner = payable(msg.sender);
        totalMarketplaceItemsSold.increment();
    }

    function getMarketItem(uint marketplaceItemId)
        public
        view
        returns (Listing memory)
    {
        return marketplaceIdToListingItem[marketplaceItemId];
    }

    function getMyListedNFTs() public view returns (Listing[] memory) {

        uint totalListingCount = marketplaceIds.current();
        uint listingCount = 0;
        uint index = 0;

        for (uint i = 0; i < totalListingCount; i++) {
            if (marketplaceIdToListingItem[i + 1].owner == msg.sender) {
                listingCount += 1;
            }
        }
        Listing[] memory items = new Listing[](listingCount);
        for (uint i = 0; i < totalListingCount; i++) {
            if (marketplaceIdToListingItem[i + 1].owner == msg.sender) {
                uint currentId = marketplaceIdToListingItem[i + 1].marketplaceId;
                Listing memory currentItem = marketplaceIdToListingItem[currentId];
                items[index] = currentItem;
                index += 1;
            }
        }
        return items;
    }
}
Creating NFTs to Use On the NFT Marketplace
Next, we need to create test NFTs that we can use with our marketplace contract. For our example, we will be creating an ERC-721 to test with.
Open up the NFT.sol file and input the following code:
// SPDX-License-Identifier: MIT
pragma solidity ^0.8.9;

import "@openzeppelin/contracts/token/ERC721/ERC721.sol";
import "@openzeppelin/contracts/token/ERC721/extensions/ERC721URIStorage.sol";
import "@openzeppelin/contracts/utils/Counters.sol";
import "@openzeppelin/contracts/access/Ownable.sol";

contract NFT is ERC721, ERC721URIStorage, Ownable {
    using Counters for Counters.Counter;

    Counters.Counter private _tokenIdCounter;

    constructor() ERC721("YOUR_NFTS_NAME", "YOUR_NFTS_SYMBOL") {}

    function safeMint(address to, string memory uri) public onlyOwner {
        uint256 tokenId = _tokenIdCounter.current();
        _tokenIdCounter.increment();
        _safeMint(to, tokenId);
        _setTokenURI(tokenId, uri);
    }

    function _burn(uint256 tokenId) internal override(ERC721, ERC721URIStorage) {
        super._burn(tokenId);
    }

    function tokenURI(uint256 tokenId)
        public
        view
        override(ERC721, ERC721URIStorage)
        returns (string memory)
    {
        return super.tokenURI(tokenId);
    }
}
Let's recap the code.
The code above is boilerplate code taken from OpenZeppelin. For this NFT, we inherit ERC721URIStorage and Ownable for metadata and access control. Additionally, we have a safeMint function, burn function, and tokenURI function for returning token metadata.
Before moving on to the next section, take a moment to rename your NFT by replacing the YOUR_NFTS_NAME & YOUR_NFTS_SYMBOL placeholders with your actual NFT name and symbol. Remember to save the file!
Compiling the Marketplace and NFT contract
Now that we have finished creating our test NFT, it is time to compile everything and ensure it is working as expected.
To compile the contracts, run the command: **npx hardhat compile
**
After compiling, you will notice two new folders - artifacts and cache. Artifacts are where you will find the ABI and bytecode of your smart contract. You will need the ABI later when deploying the smart contract.
Note: If you want to clear the cache and delete the compiled artifacts, you can run the npx hardhat clean command.
Now, for testing all of our contract’s functions, we will use Hardhat's test functionality in the next section.
Testing The Marketplace Contract
Before we deploy our contracts to a test blockchain such as Mumbai, we should test our contracts in a local environment to ensure everything behaves as expected.
Go to your test folder within the marketplace-hardhat directory and create a new file called **marketplace-test.js
**
This test file will allow us to execute different functions and see if the marketplace contract behaves as expected. For example, when a person lists NFT, we will check whether the NFT has moved from the seller to the marketplace, etc.
Copy and paste the following code into the marketplace-test.js file:
const { expect } = require("chai");
const { ethers } = require("hardhat");

describe("Marketplace", function () {

  let acc1, acc2;
  let marketplaceAddress;
  let nftAddress;
  let nft;
  let marketplace;
  let listPrice = ethers.utils.parseEther("0.01", "ether");

  beforeEach(async function () {

    [acc1, acc2] = await ethers.getSigners();

    const Marketplace = await ethers.getContractFactory("Marketplace");
    nftMarketplace = await Marketplace.deploy();
    await nftMarketplace.deployed();
    marketplaceAddress = nftMarketplace.address;

    const NFT = await ethers.getContractFactory("NFT");
    nft = await NFT.deploy();
    await nft.deployed();
    nftAddress = nft.address.toString();

  });

  it("Should list an NFT onto the marketplace", async function () {

    await nft.safeMint(acc1.address, "META_DATA_URI");
    await nft.approve(marketplaceAddress, 0);
    await nftMarketplace.createListing(0, nftAddress, listPrice); //0.01 MATIC

  });

  it("Should sell an active NFT listed on the marketplace ", async function () {


    await nft.safeMint(acc1.address, "META_DATA_URI");
    await nft.approve(marketplaceAddress, 0);
    await nftMarketplace.createListing(0, nftAddress, listPrice); //0.01 MATIC

    await expect(
      await nftMarketplace
        .connect(acc2)
        .buyListing(1, nftAddress, { value: listPrice })
    )

    item = await nftMarketplace.getMarketItem(1);

    expect(item.owner).to.equal(acc2.address);
  });

  it("Test a market sale that does not send sufficient funds", async function () {

    await nft.safeMint(acc1.address, "META_DATA_URI");
    await nft.approve(marketplaceAddress, 0);
    await nftMarketplace.createListing(0, nftAddress, listPrice);

    await expect(
        nftMarketplace.connect(acc2).buyListing(1, nftAddress, { value:  ethers.utils.parseEther("0.02", "ether")})
    ).to.be.revertedWith(
      "Value sent does not meet list price for NFT"
    );

    item = await nftMarketplace.getMarketItem(1);

    expect(item.owner).to.equal("0x0000000000000000000000000000000000000000");
  });
});
The above script shows a rough outline of how a test will look. However, note that this test only covers some functions in the marketplace.
To run the above test script, run this terminal command: npx hardhat test test/marketplace-test.js.
Once the test passed successfully, you should see the following:
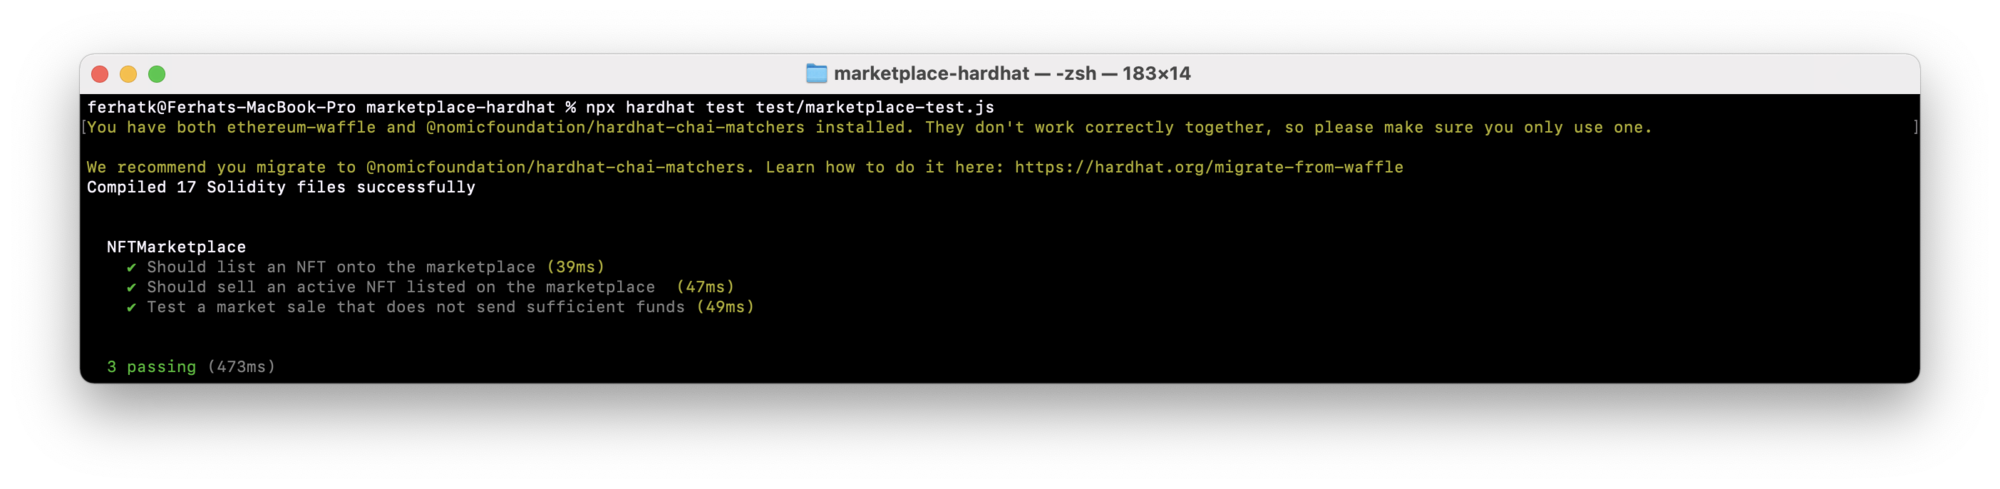
This means all your expect assertions are true and, therefore, the test is successful.
In the next section, we will deploy the contracts onto the Polygon Mumbai testnet blockchain.
Deploying To Polygon Mumbai Testnet
Until this point, you have successfully created and tested your NFT marketplace. Now it is time to deploy your contract to Polygon’s Mumbai testnet. Before we do this, we need to set up some dependencies and configure our environment variables.
First, create a .env file by running the following terminal command within your marketplace-hardhat directory:
echo > .env
Then, open the .env file and add the following variables:
PRIVATE_KEY_ACCOUNT_1=
PRIVATE_KEY_ACCOUNT_2=
POLYGONSCAN_API_KEY=
RPC_URL=
Take a moment to fill in your private keys and Quicknode HTTP provider URL from Quicknode. The purpose of having two accounts is to test the listing and buying functionality on the marketplace. Additionally, create an account on Polygonscan and retrieve an API key. You can do this by clicking "My Profile" on Polygonscan, then clicking the "API KEYS" tab, and then clicking "Add" to generate an API key.
After populating all the values in the .env file, save the file.
We will also need to configure the hardhat.config.js file. Open the file and input the following code:
require("dotenv").config();
require("@nomicfoundation/hardhat-toolbox");
require("@nomiclabs/hardhat-etherscan");

module.exports = {
 solidity: "0.8.9",
 networks: {
  mumbai: {
     url: process.env.RPC_URL,
     accounts: [process.env.PRIVATE_KEY_ACCOUNT_1],
     gas: 2100000,
     gasPrice: 8000000000,
  },
 },
 etherscan: {
  apiKey: {
    polygonMumbai: process.env.POLYGONSCAN_API_KEY
  }
},
};
Note: gas and gasPrice are hardcoded to prevent unpredictable wait times during high network activity.
Now it's time to deploy the smart contracts. We will do this via a script that's located in the scripts folder. Replace the content within the scripts/deploy.js file with the following code:
const hre = require("hardhat");

async function main() {

  const Marketplace = await hre.ethers.getContractFactory("Marketplace");
  const marketplace = await Marketplace.deploy()
  await marketplace.deployed();

  const NFT = await hre.ethers.getContractFactory("NFT");
  const nft = await NFT.deploy()
  await nft.deployed();

  console.log(
    `NFT Marketplace deployed to ${marketplace.address} - Block explorer URL: https://mumbai.polygonscan.com/address/${marketplace.address}`);
  console.log(
    `NFT deployed to ${nft.address} - Block explorer URL: https://mumbai.polygonscan.com/address/${nft.address}`);
}

main().catch((error) => {
  console.error(error);
  process.exitCode = 1;
});
Then, to deploy the contracts, run the following terminal command:
npx hardhat run --network mumbai scripts/deploy.js
You should see something similar to the following output:
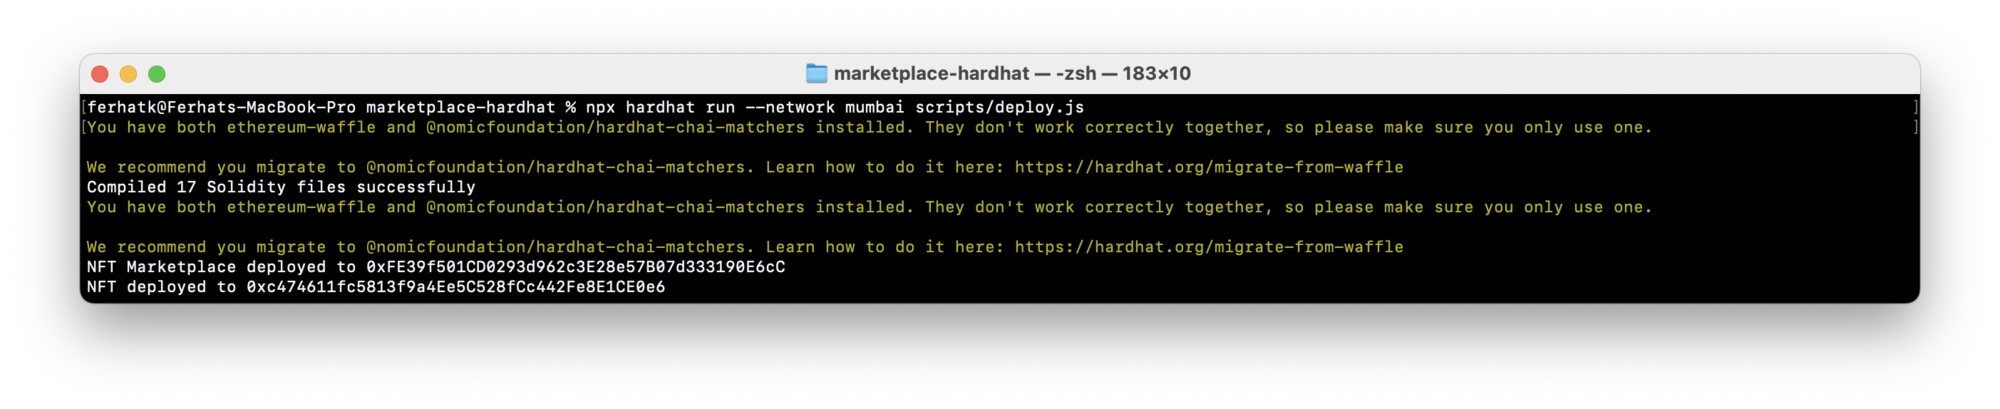
You just deployed your marketplace contract and NFT tokens to the Mumbai testnet! Take a moment to verify the transactions on Polygonscan by going to the URL provided in your terminal. In the next section, we will interact with our marketplace smart contract with Javascript and Ethers.js.
Interacting with the NFT Marketplace via a Hardhat Script
With our NFT Marketplace contract deployed, we will now interact with it using Ethers.js. In your scripts folder, create a file named interact.js, then input the following code:
const { ethers } = require("hardhat");
const hre = require("hardhat");
require("dotenv").config();

async function main() {

  [acc1] = await ethers.getSigners(); //
  const acc2 = await new ethers.Wallet(process.env.PRIVATE_KEY_ACCOUNT_2, acc1.provider)
  const nConfirm = 10;
  const marketplaceId = 1; //this value will need to be modified according to the NFT being listed/sold

  //Create instances of the marketplace contract
  const Marketplace = await hre.ethers.getContractFactory("Marketplace");
  const marketplace = await Marketplace.attach(
    "YOUR_MARKETPLACE_CONTRACT_ADDRESS" // The marketplace contract address
  );

  //Create instances of the NFT contract
  const NFT = await hre.ethers.getContractFactory("NFT");
  const nft = await NFT.attach(
    "YOUR_NFT_CONTRACT_ADDRESS" // The nft contract address
  );

  //Mint an NFT to list on the marketplace
  const mintTxn = await nft.safeMint(acc1.address, "YOUR_META_DATA_URI");
  console.log("safeMint function call Tx Hash:", mintTxn.hash);
  const receipt = await mintTxn.wait([confirms = nConfirm])
  let tokenId = parseInt(receipt["logs"][0].topics[3].toString())

  //Approve the marketplace address as a spender
  const approval = await nft.approve(marketplace.address, tokenId);
  console.log("Approval function call Tx Hash:", approval.hash);
  approval.wait([confirms = nConfirm]); //wait till the transaction mines

  //List the NFT onto the marketplace
  const createListing = await marketplace.createListing(tokenId, nft.address, ethers.utils.parseEther("0.01", "ether"));
  console.log("createListing function call Tx Hash:", createListing.hash);
  createListing.wait([confirms = nConfirm]); //wait till the transaction mines

  //Buy the NFT from acc2
  const buyNFT = await marketplace.connect(acc2).buyListing(marketplaceId, nft.address, { value: ethers.utils.parseEther("0.01", "ether")});
  console.log("Buy NFT Tx Hash:", buyNFT.hash)
  buyNFT.wait([confirms = nConfirm]); //wait till the transaction mines
}

main().catch((error) => {
  console.error(error);
  process.exitCode = 1;
});
IMPORTANT NOTE: Remember to replace YOUR_MARKETPLACE_CONTRACT_ADDRESS & YOUR_NFT_CONTRACT_ADDRESS placeholders in the code above with your own deployed smart contract addresses.
Additionally, if you want to set your metadata URL, replace the YOUR_META_DATA_URI placeholder with your actual metadata URL. To learn how to set NFT metadata, check out the "Adding Files to IPFS" section in this Quicknode guide.
Take a few minutes to review the code comments in the interact.js code above. Then, run the following terminal command to execute the interact.js script:
npx hardhat run scripts/interact.js --network mumbai
You should see something similar to the following output:

**Verifying Contract Source Code on Polygonscan
**
Let us take a moment to verify the source of our contracts on a public block explorer. Once verified, we will analyze the marketplace and NFT contract activity to view the NFT sale.
Within your marketplace-hardhat folder, run the following hardhat command for each of the contracts you deployed to verify the contracts. Remember to replace the placeholder value with your actual deployed contract addresses.
npx hardhat verify --network mumbai <contract_address>
After the command is successfully executed, you'll see a link to the publicly verified code of your contract. Navigate to the URL of your NFT contract on Polygonscan and click on the Contract tab and then the Read Contract tab.
If you input the address of your second account (the one buying the NFT), you'll see a balance of one. Also, confirm the balance of NFTs in the first account should be zero.
Conclusion
Great Job! You have learned how to deploy an NFT marketplace to Polygon's Mumbai testnet. Try adding your own logic to the marketplace contract (e.g., rewards, commissions) to expand its functionality. You can also write your own tests to see how the contract reacts in different situations.
Show us your skills on Twitter or Discord. We'd love to know what you're building!
We ❤️ Feedback
If you have any feedback on this guide, let us know!