16 min read
This guide includes references to either Truffle or Ganache, which are no longer actively maintained. We recommend exploring the Hardhat framework as an alternative, as Consensys has established a new partnership with Hardhat after sunsetting Truffle and Ganache. You can find our Hardhat-related guides here. If you’d like to see an updated version of this guide, please let us know!
Overview
With the increasing popularity of NFTs, Polygon, a fast-growing blockchain, has become the go-to choice for many users and developers. Compared to Ethereum, Polygon allows users and developers to interact with blockchains at a more affordable level. For these reasons, this guide will cover how to create and deploy a Factory ERC-1155 smart contract on Polygon using Truffle. To make things fun, the ERC-1155 tokens we mint will represent a Solar System NFT collection (containing eight different planets). To create this collection, we gathered eight images (our planets) and eight metadata files (which includes a name, description, and link fields) which we uploaded to NFT.Storage. At the end of this guide, we will be able to view our minted NFT on OpenSea:
Plus, we will also add some additional knowledge bombs at the end if you stick around!
What We Will Do
- Define the ERC-1155 Standard
- Set up a Polygon endpoint using Quicknode (sign up for free here)
- Set up Truffle Project
- Deploy an ERC-1155 factory smart contract
- Mint a collection of ERC-1155 tokens from the factory smart contract
What You Will Need
- Basic understanding of smart contract
- Your own image assets and metadata
- Node.js installed
- A code editor (e.g., VSCode)
- A Web3 wallet (e.g., MetaMask, Coinbase Wallet) and some MATIC on Polygon mainnet
- Polygonscan API Key
| Dependency | Version |
|---|---|
| node.js | 18.13.0 |
| @openzeppelin/contracts | ^5.0.0 |
| @truffle/hdwallet-provider | ^2.1.15 |
| truffle-plugin-verify | ^0.6.7 |
We will now give an overview of the ERC-1155 Standard, Factory Patterns, Polygon and Truffle. If you're familiar with these, feel free to skip to the "Set up a Quicknode Endpoint" section.
ERC-1155 Standard
The ERC-1155 standard was proposed back in 2018 and continues to be used by many NFT projects. Why? It solved some of the problems the ERC-721 standard was running into. Let us dive a bit more into what it can do:
Use Cases
- Represent fungible, non-fungible, and partially fungible tokens
- Send multiple tokens in a single transaction
- Allows for atomic swaps (enabling swaps across two different chains)
What is the Factory Pattern?
A factory contract refers to a smart contract that can create, track, and modify the state of its created contracts. There are several use cases of why you may want to implement a factory contract. For example, if your deployment pipeline involves re-deploying the same contract, you can utilize the factory pattern to keep track of these contracts and save on gas fees.
The factory contract we are deploying in this guide allows us to create and track multiple ERC-1155 tokens in one contract. This gives us the ability to make different NFT collections and manage them from one place.
What is Polygon?
Polygon is a scaling solution for public blockchains. Based on an adapted implementation of the Plasma framework (PoS) - with an account-based performance, Polygon supports all the existing Ethereum tooling and faster and cheaper transactions.
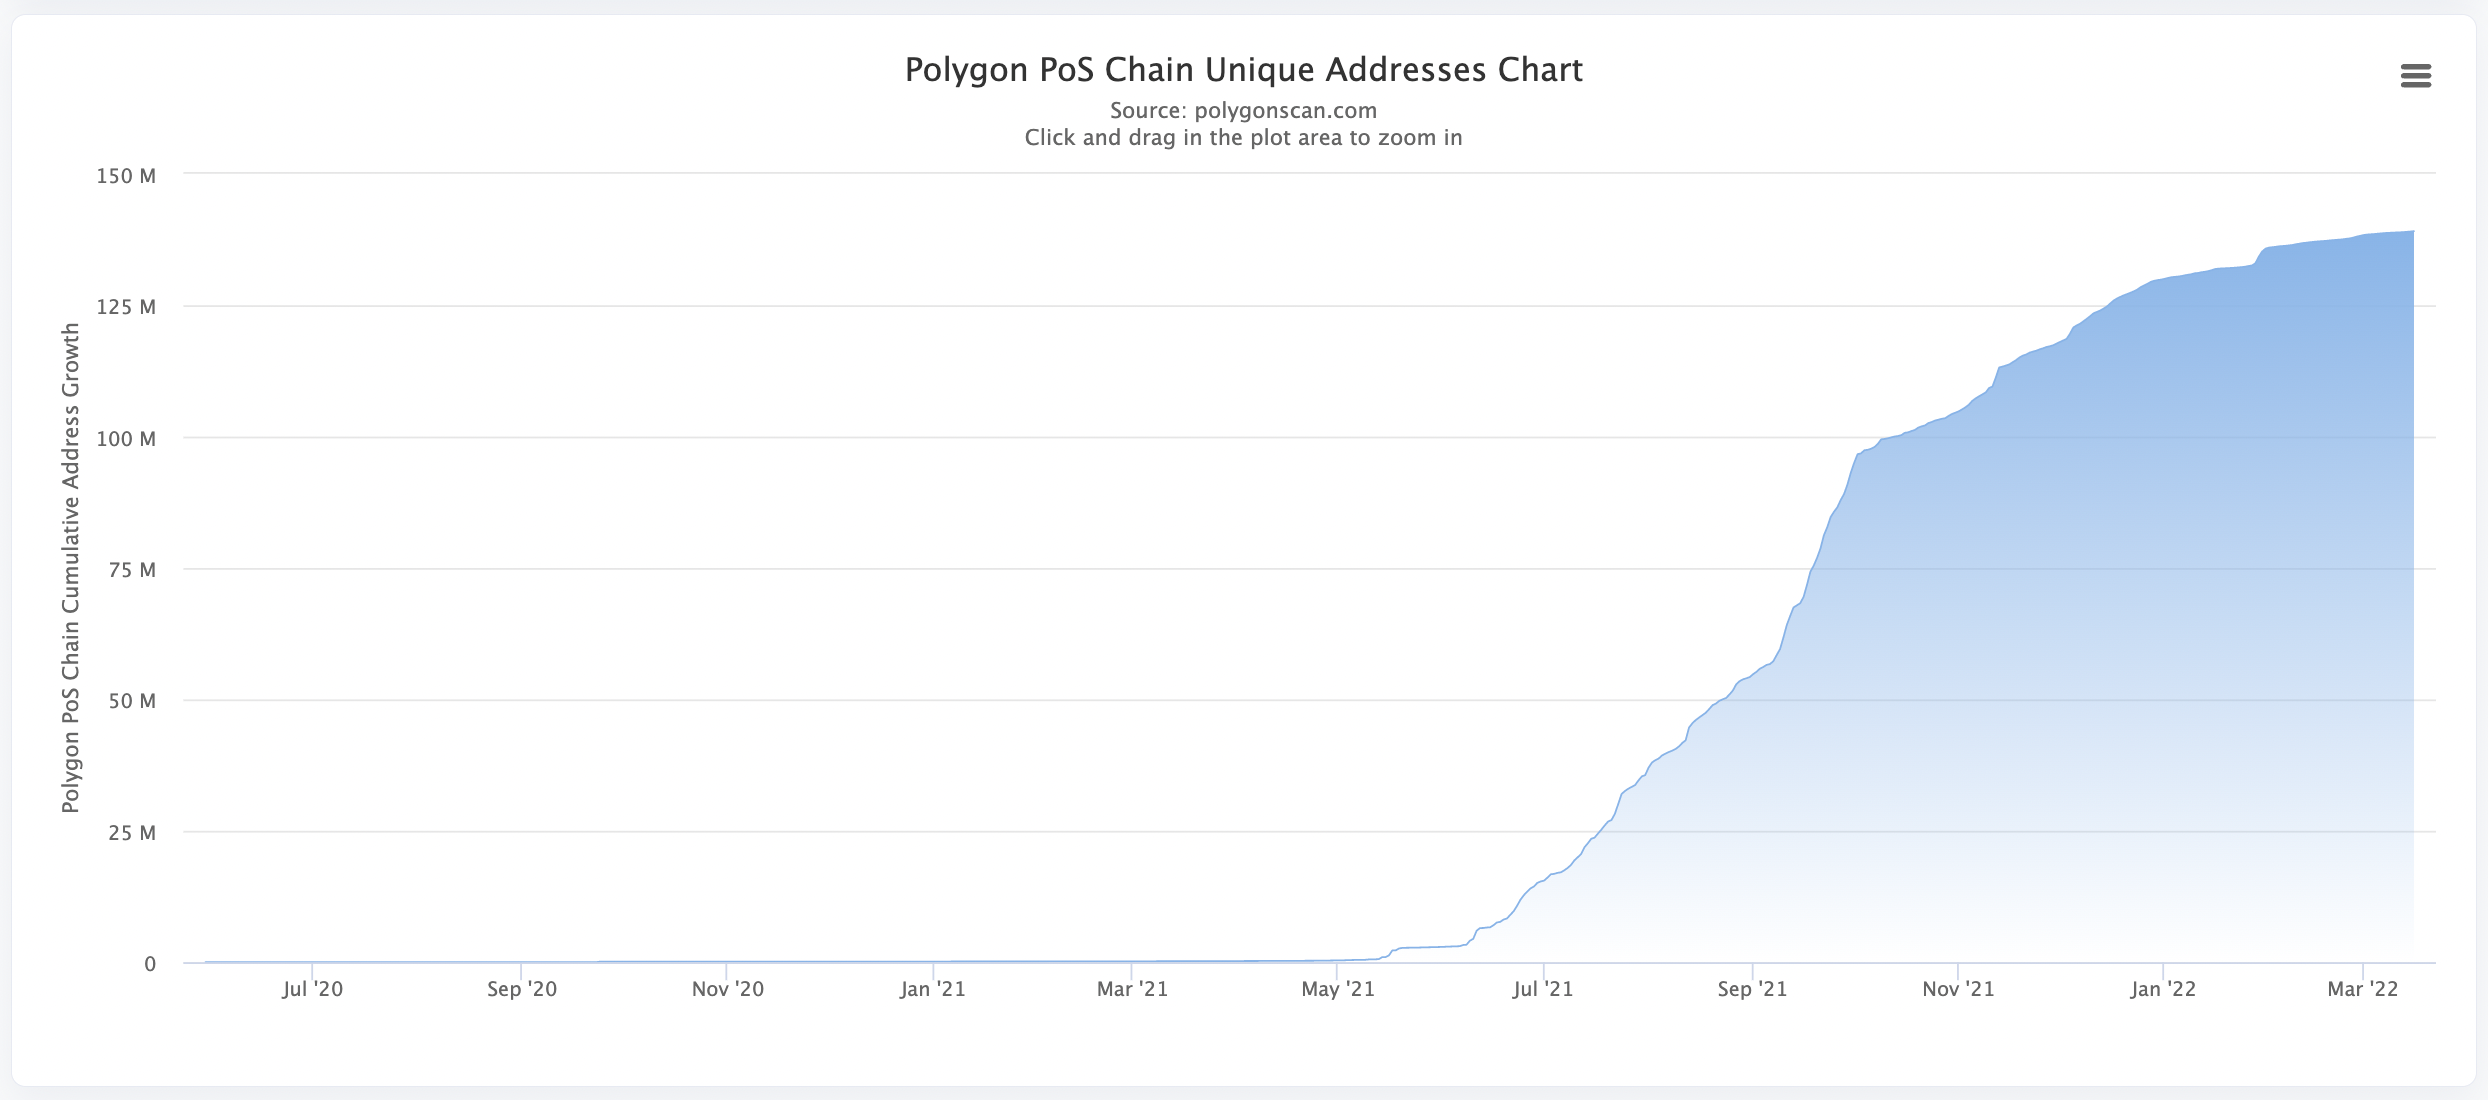
To put its growth into context, Polygon's total value locked (TVL) increased from 100 million to over 3 billion in under a year (source). We can also see growth when looking at the number of unique addresses on Polygon:
What is Truffle?
Truffle is a development environment, testing framework, and asset pipeline for blockchains using the Ethereum Virtual Machine (EVM). It is a suite of products that will help developers quickly build and ship more awesome products in web3. Check out the Truffle homepage to learn more.
Set up a Quicknode Polygon Endpoint
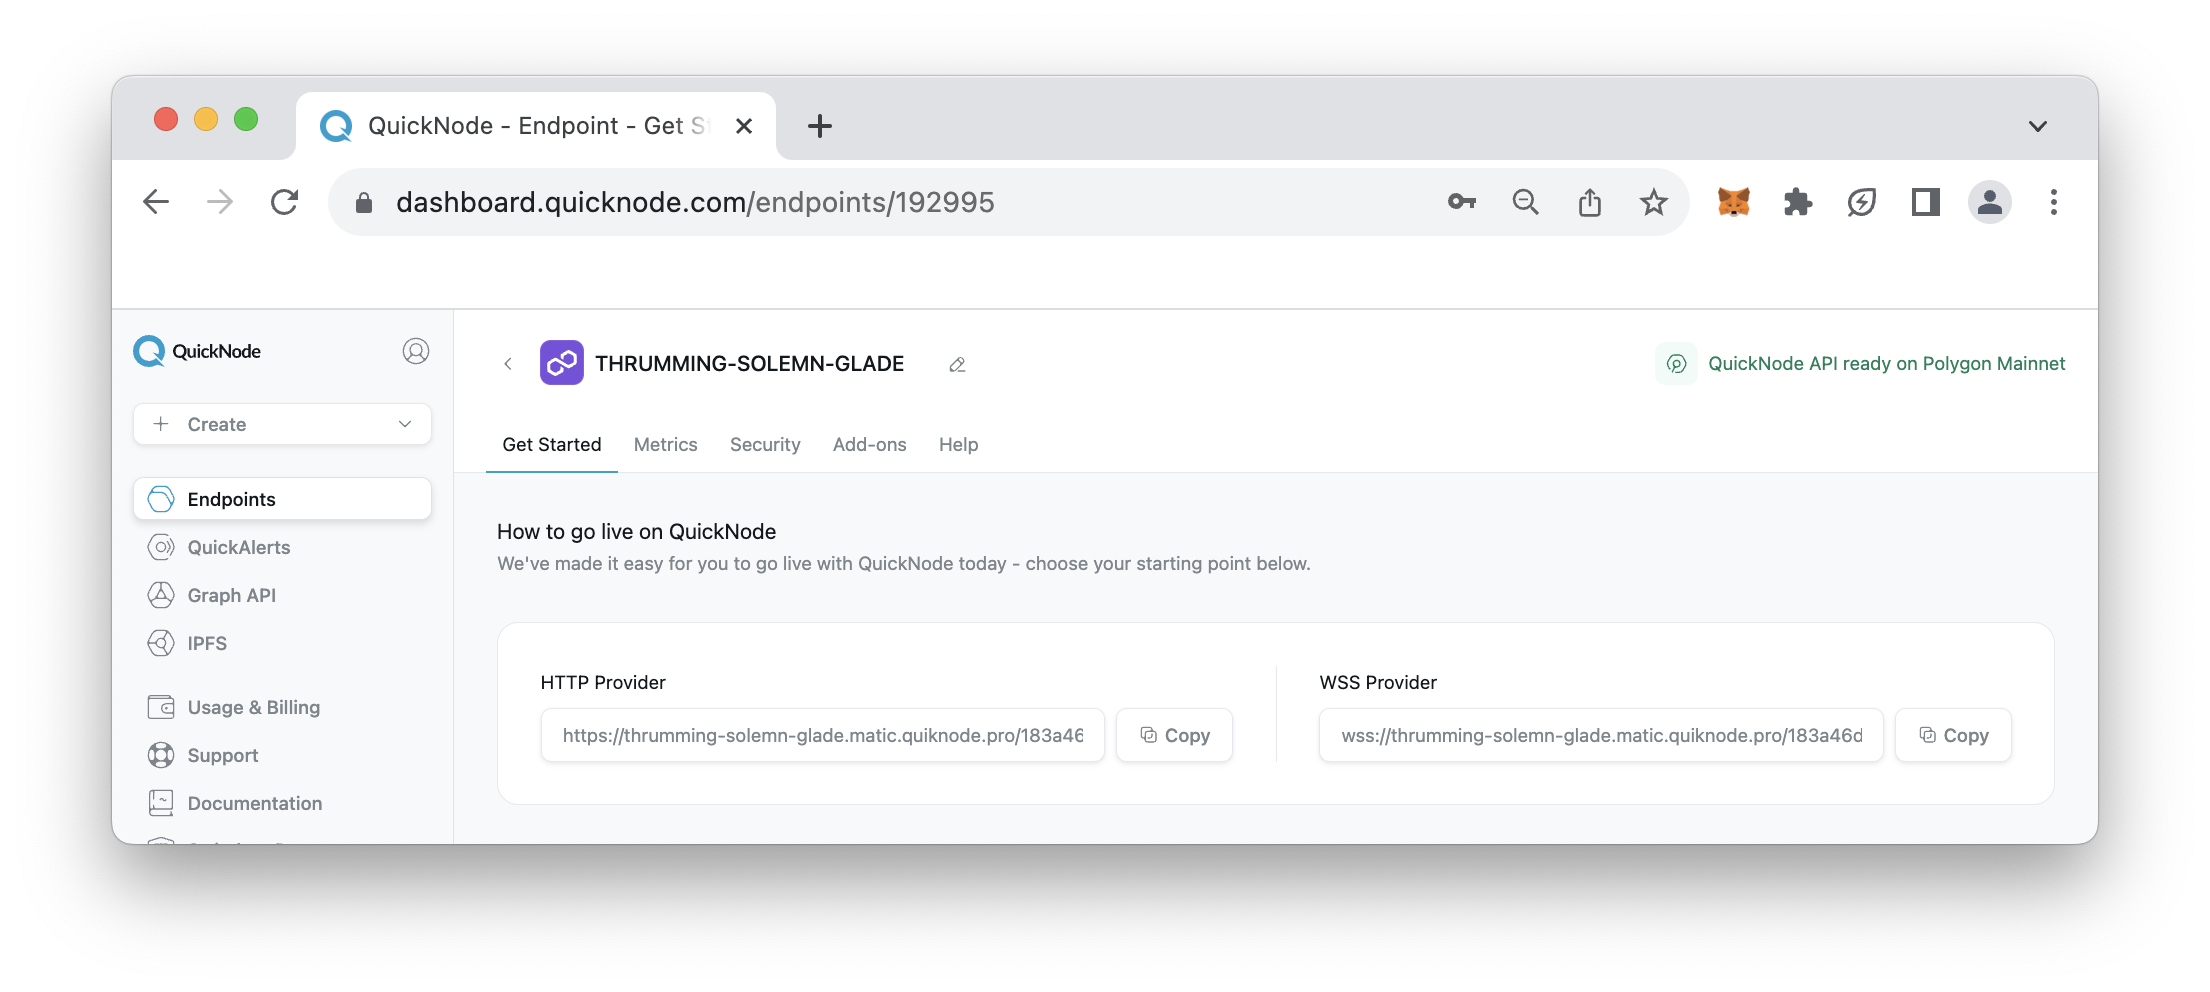
To deploy our contract to Polygon main-net, we will need to run a Polygon node. We could run our own Polygon node, but since that can be too involved for just deploying a contract, we will use a free endpoint from Quicknode to make this easy. To access to a Polygon node, navigate to Quicknode and set up an account here! After you have created your free Polygon endpoint, copy your HTTP Provider endpoint:
Set up Project Directory
Navigate to a directory in your terminal where you'd like to set up this project and run the following commands:
mkdir nft_project && cd nft_project
Then, install the required dependencies (i.e., Truffle & OpenZeppelin, plugins) and run:
npm install -g truffle
To initialize an npm & truffle project, run:
npm init --y && truffle init
Installing necessary dependencies:
npm install @openzeppelin/contracts @truffle/hdwallet-provider truffle-plugin-verify
After installation, you can also run the commands `node --version` or `truffle version` to see the installed version. If you see an error, ensure that your npm modules are added to your path.
The Truffle boilerplate template is as follows:
- contracts/: Directory for Solidity contracts
- migrations/: Directory for scriptable deployment files
- test/: Directory for test files for testing your application and contracts
- truffle-config.js: Truffle configuration file
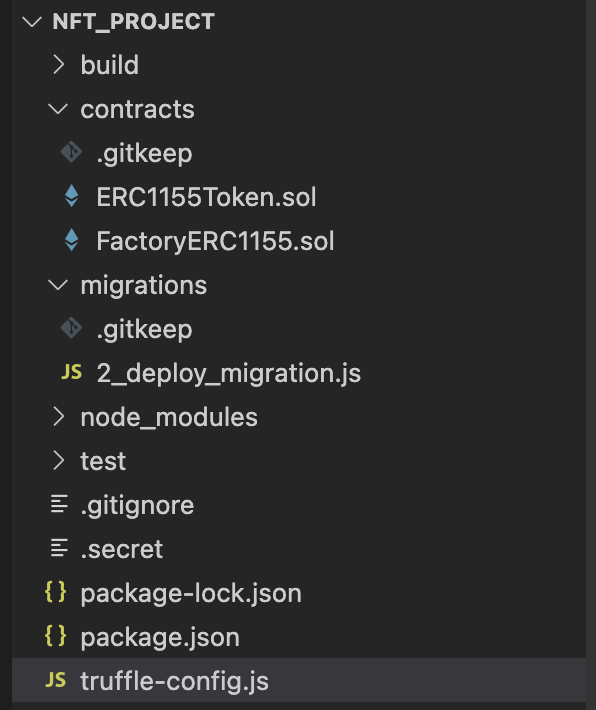
To double-check, the project is initialized, run the ls command in your terminal. You should see the following files and folders:

Once you confirm that it's created, you are one step closer to deploying and minting an NFT on Polygon!
Create the Core Contracts
Now that we have verified our truffle project is created, we can start making the necessary files to deploy our NFT smart contract.
Create a file called `ERC1155Token.sol` in the contracts directory.
echo > contracts/ERC1155Token.sol
Then open up the file in your text editor and input the following code:
// contracts/ERC1155Token.sol

// SPDX-License-Identifier: MIT
pragma solidity ^0.8.4;

import "@openzeppelin/contracts/token/ERC1155/ERC1155.sol";
import "@openzeppelin/contracts/access/Ownable.sol";
import "@openzeppelin/contracts/utils/Strings.sol";

contract ERC1155Token is ERC1155, Ownable {

    string[] public names; //string array of names
    uint[] public ids; //uint array of ids
    string public baseMetadataURI; //the token metadata URI
    string public name; //the token mame
    uint public mintFee = 0 wei; //mintfee, 0 by default. only used in mint function, not batch.

    mapping(string => uint) public nameToId; //name to id mapping
    mapping(uint => string) public idToName; //id to name mapping

    /*
    constructor is executed when the factory contract calls its own deployERC1155 method. Note the Ownable(msg.sender) setting the deployer of the ERC-1155 as the owner
    */
    constructor(string memory _contractName, string memory _uri, string[] memory _names, uint[] memory _ids) Ownable(msg.sender) ERC1155(_uri) {
        names = _names;
        ids = _ids;
        createMapping();
        setURI(_uri);
        baseMetadataURI = _uri;
        name = _contractName;
    }

    /*
    creates a mapping of strings to ids (i.e ["one","two"], [1,2] - "one" maps to 1, vice versa.)
    */
    function createMapping() private {
        for (uint id = 0; id < ids.length; id++) {
            nameToId[names[id]] = ids[id];
            idToName[ids[id]] = names[id];
        }
    }
    /*
    sets our URI and makes the ERC1155 OpenSea compatible
    */
    function uri(uint256 _tokenid) override public view returns (string memory) {
        return string(
            abi.encodePacked(
                baseMetadataURI,
                Strings.toString(_tokenid),".json"
            )
        );
    }

    function getNames() public view returns(string[] memory) {
        return names;
    }

    /*
    used to change metadata, only owner access
    */
    function setURI(string memory newuri) public onlyOwner {
        _setURI(newuri);
    }

    /*
    set a mint fee. only used for mint, not batch.
    */
    function setFee(uint _fee) public onlyOwner {
        mintFee = _fee;
    }

    /*
    mint(address account, uint _id, uint256 amount)

    account - address to mint the token to
    _id - the ID being minted
    amount - amount of tokens to mint
    */
    function mint(address account, uint _id, uint256 amount)
        public payable returns (uint)
    {
        require(msg.value == mintFee);
        _mint(account, _id, amount, "");
        return _id;
    }

    /*
    mintBatch(address to, uint256[] memory _ids, uint256[] memory amounts, bytes memory data)

    to - address to mint the token to
    _ids - the IDs being minted
    amounts - amount of tokens to mint given ID
    bytes - additional field to pass data to function
    */
    function mintBatch(address to, uint256[] memory _ids, uint256[] memory amounts, bytes memory data)
        public
    {
        _mintBatch(to, _ids, amounts, data);
    }
}
We will also need to create a file that contains the Factory code. Create a file called `FactoryERC1155.sol` in the contracts directory.
echo > contracts/FactoryERC1155.sol
Then open the file and input the following code:
// contracts/FactoryERC1155.sol

// SPDX-License-Identifier: MIT
pragma solidity ^0.8.4;

import "./ERC1155Token.sol";

contract FactoryERC1155 {

    ERC1155Token[] public tokens; //an array that contains different ERC1155 tokens deployed
    mapping(uint256 => address) public indexToContract; //index to contract address mapping
    mapping(uint256 => address) public indexToOwner; //index to ERC1155 owner address

    event ERC1155Created(address owner, address tokenContract); //emitted when ERC1155 token is deployed
    event ERC1155Minted(address owner, address tokenContract, uint amount); //emmited when ERC1155 token is minted

    /*
    deployERC1155 - deploys a ERC1155 token with given parameters - returns deployed address

    _contractName - name of our ERC1155 token
    _uri - URI resolving to our hosted metadata
    _ids - IDs the ERC1155 token should contain
    _name - Names each ID should map to. Case-sensitive.
    */
    function deployERC1155(string memory _contractName, string memory _uri, uint[] memory _ids, string[] memory _names) public returns (address) {
        ERC1155Token t = new ERC1155Token(_contractName, _uri, _names, _ids);
        tokens.push(t);
        indexToContract[tokens.length - 1] = address(t);
        indexToOwner[tokens.length - 1] = tx.origin;
        emit ERC1155Created(msg.sender,address(t));
        return address(t);
    }

    /*
    mintERC1155 - mints a ERC1155 token with given parameters

    _index - index position in our tokens array - represents which ERC1155 you want to interact with
    _name - Case-sensitive. Name of the token (this maps to the ID you created when deploying the token)
    _amount - amount of tokens you wish to mint
    */
    function mintERC1155(uint _index, string memory _name, uint256 amount) public {

        uint id = getIdByName(_index, _name);
        tokens[_index].mint(indexToOwner[_index], id, amount);
        emit ERC1155Minted(tokens[_index].owner(), address(tokens[_index]), amount);
    }

    /*
    Helper functions below retrieve contract data given an ID or name and index in the tokens array.
    */
    function getCountERC1155byIndex(uint256 _index, uint256 _id) public view returns (uint amount) {
        return tokens[_index].balanceOf(indexToOwner[_index], _id);
    }

    function getCountERC1155byName(uint256 _index, string calldata _name) public view returns (uint amount) {
        uint id = getIdByName(_index, _name);
        return tokens[_index].balanceOf(indexToOwner[_index], id);
    }

    function getIdByName(uint _index, string memory _name) public view returns (uint) {
        return tokens[_index].nameToId(_name);
    }

    function getNameById(uint _index, uint _id) public view returns (string memory) {
        return tokens[_index].idToName(_id);
    }

    function getERC1155byIndexAndId(uint _index, uint _id)
        public
        view
        returns (
            address _contract,
            address _owner,
            string memory _uri,
            uint supply
        )
    {
        ERC1155Token token = tokens[_index];
        return (address(token), token.owner(), token.uri(_id), token.balanceOf(indexToOwner[_index], _id));
    }
}
Now, let's move onto configuring the compilation and deployment of our smart contracts.
Configure and Compile the Smart Contracts
Truffle requires you to have a migration contract in order to use there migrations feature. This migration contract (Migration.sol) can be found in the contracts folder. Our Truffle project also contains a migrations folder which helps us deploy our smart contracts onto the blockchain. We will create a file called `2_deploy_migration.js` in the migrations folder.
echo > migrations/2_deploy_migration.js
Then, input the following code:
var factoryContract = artifacts.require("FactoryERC1155");

module.exports = function(deployer){
  deployer.deploy(factoryContract);
}
Let's recap the code.
- Line 1: We tell Truffle which contract we want to interact with via an artifact.require() method
- Line 3-5: We export a function via module exports that accepts a deployer object as its first parameter and use that parameter to call a deploy method on our contract.
*Now we will run the command `echo > .secret` to create a secret file that will contain our account's private key.
echo > .secret
Create a `.gitignore` file so you don't commit your private key.
echo '.secret' >> .gitignore
To find your private key on MetaMask, look at the following article: How to Export a Private Key. Once you retrieve your private key, paste the contents into the `.secret` file and save.
It's time to set up our configuration file. Luckily, the truffle init command we ran earlier gave us a boilerplate we can edit and configure. Replace the contents of your `truffle-config.js` file with the code below. This file contains the code necessary to create our configuration.
// truffle-config.js

const HDWalletProvider = require('@truffle/hdwallet-provider');
const fs = require('fs');
const privateKey = fs.readFileSync(".secret").toString().trim();
const QUICKNODE_PROVIDER = "YOUR_POLYGON_HTTP_ENDPOINT"

module.exports = {
  networks: {
    polygon: {
      provider: () => new HDWalletProvider(privateKey, QUICKNODE_PROVIDER),
      network_id: 137, // change if using a different network other than polygon mainnet
      gasPrice: 40000000000,
      confirmations: 2,    // # of confs to wait between deployments. (default: 0)
      timeoutBlocks: 200,  // # of blocks before a deployment times out  (minimum/default: 50)
      skipDryRun: true     // Skip dry run before migrations? (default: false for public nets )
    },
  },
  compilers: {             // Configure your compilers
    solc: {
      version: "0.8.20",    // Fetch exact version from solc-bin (default: truffle's version)
      settings: {          // See the solidity docs for advice about optimization and evmVersion
        optimizer: {
          enabled: true,
          runs: 200
        },
      }
    }
  },
  plugins: [
    'truffle-plugin-verify'
  ],
  api_keys: {
    polygonscan: 'YOUR_POLYGONSCAN_APY_KEY'
  }
};
Before moving on to the next step, make sure the following information is filled in:
1. Remember to assign the Quicknode HTTP Endpoint you retrieved in the previous step to the variable `YOUR_POLYGON_MAINNET_HTTP_ENDPOINT`.
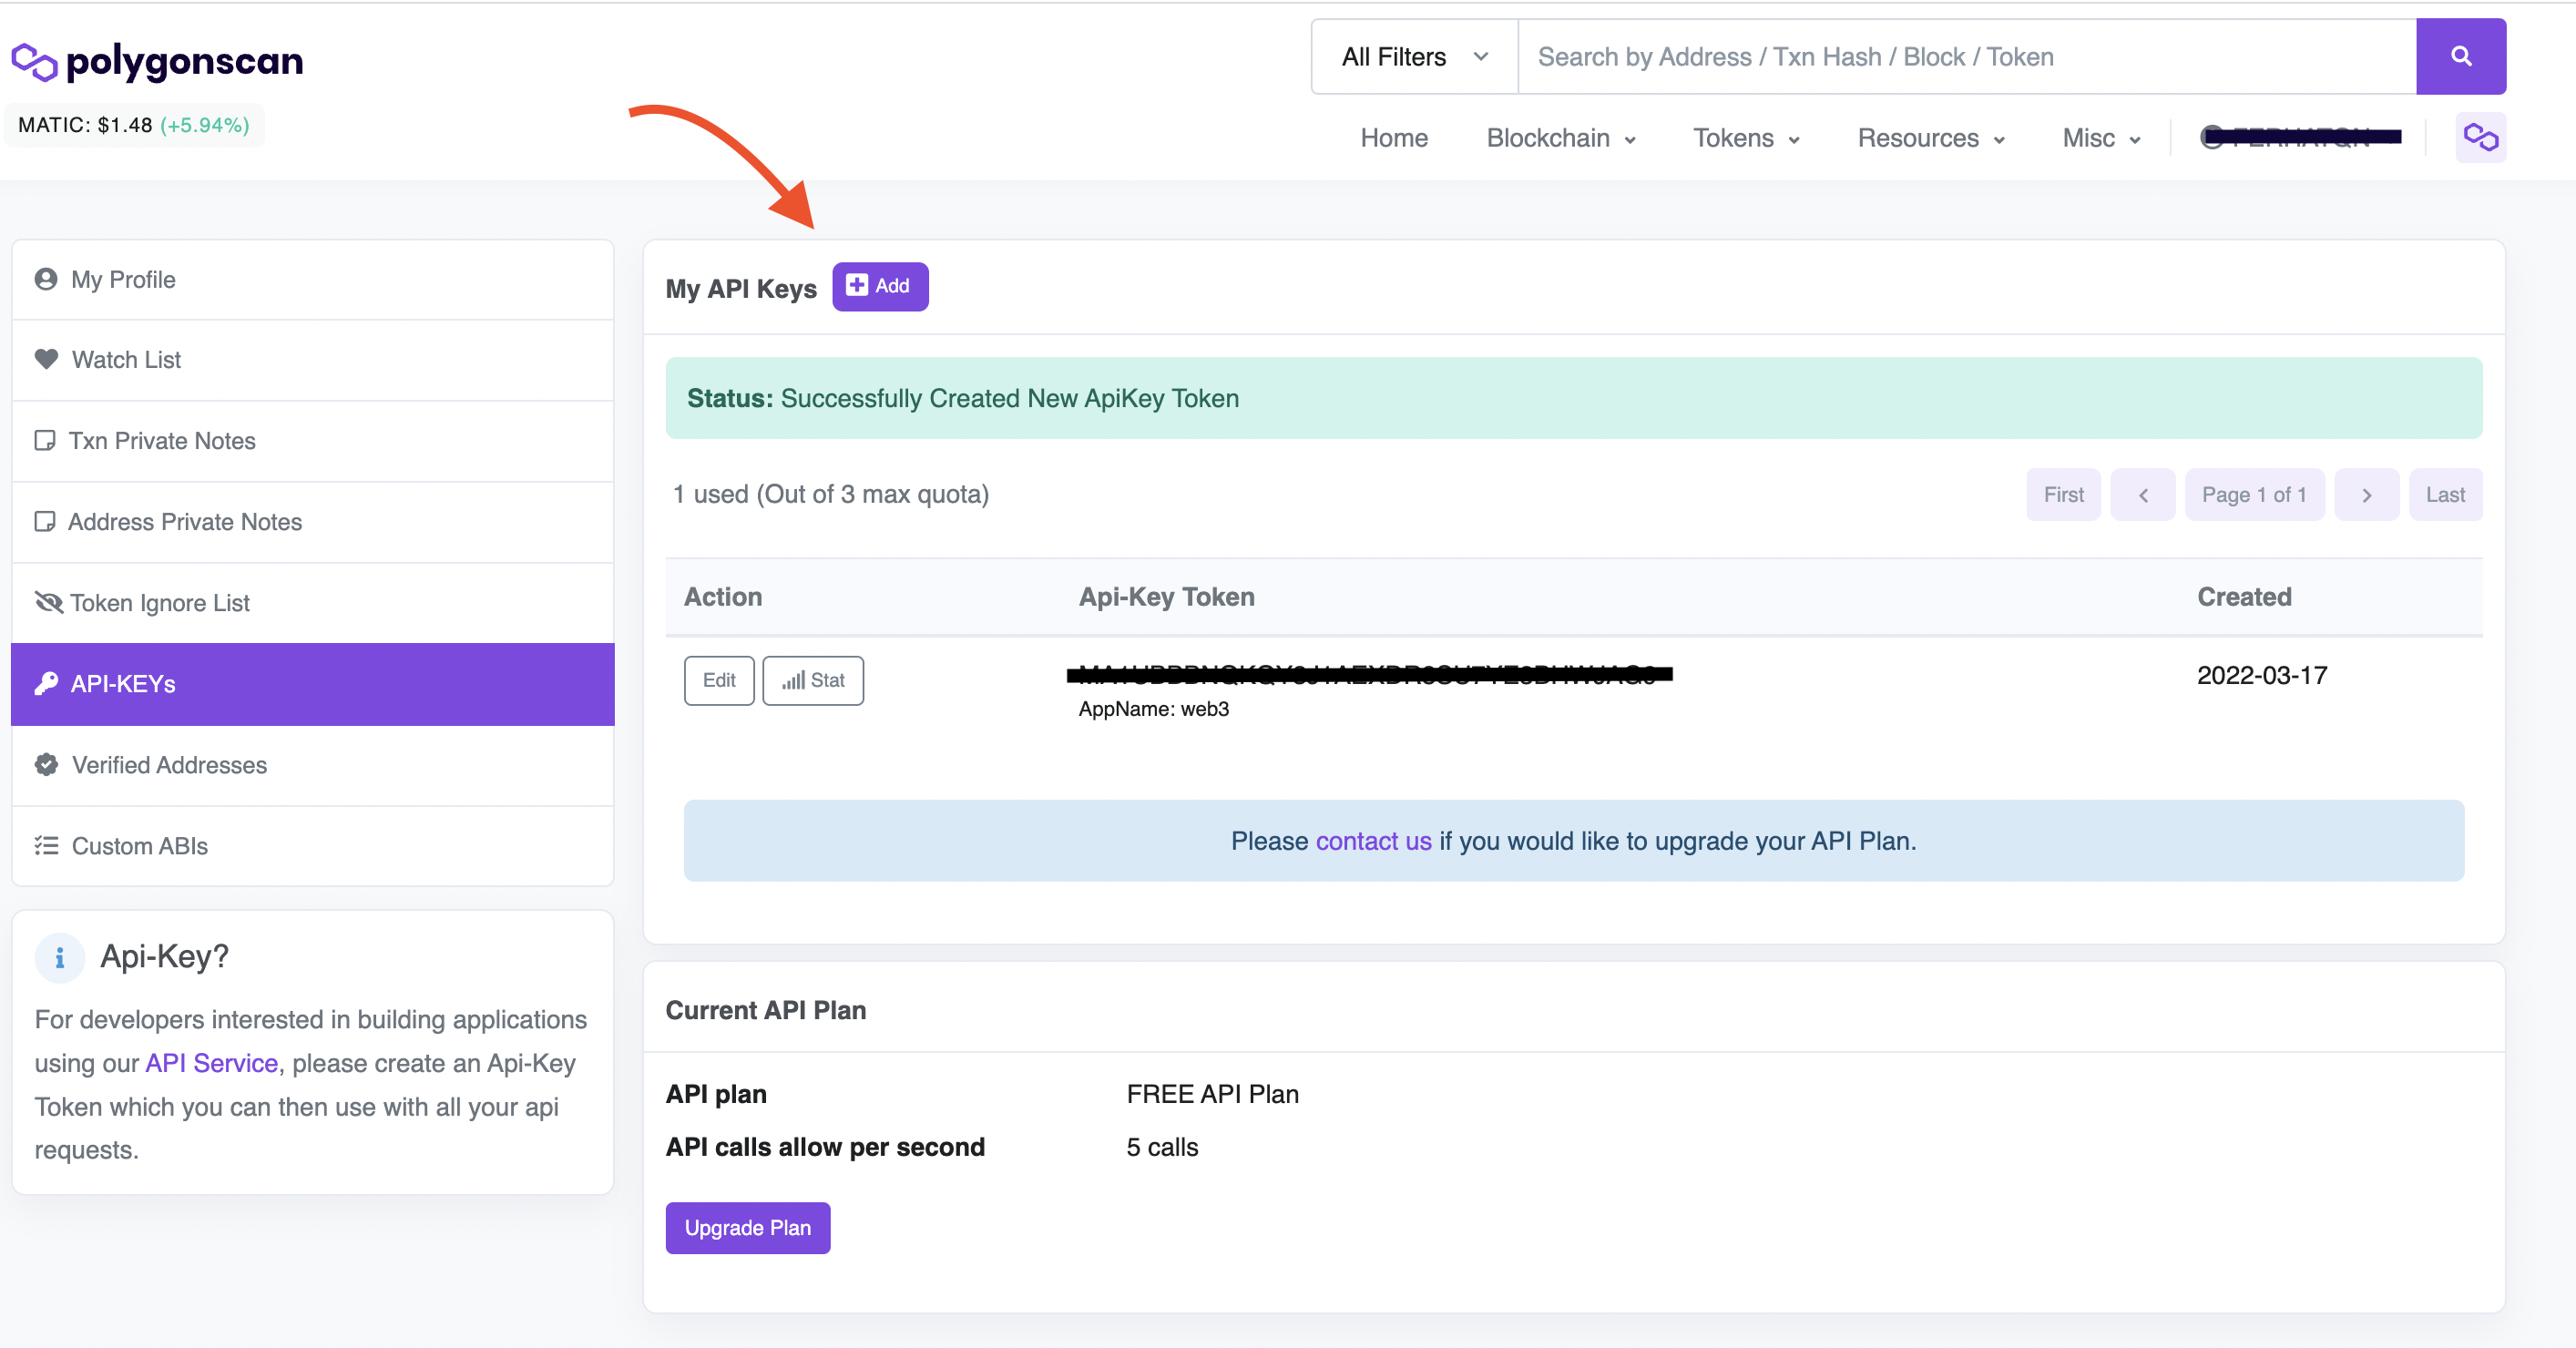
2. Navigate to Polygonscan's signup page and create an account. Once you are logged in, go to API Keys, and click "Add" to create API Keys. Once created, assign these keys to the variable `YOUR_POLYGONSCAN_API_KEY` in the truffle.config.js file under `api_keys`.
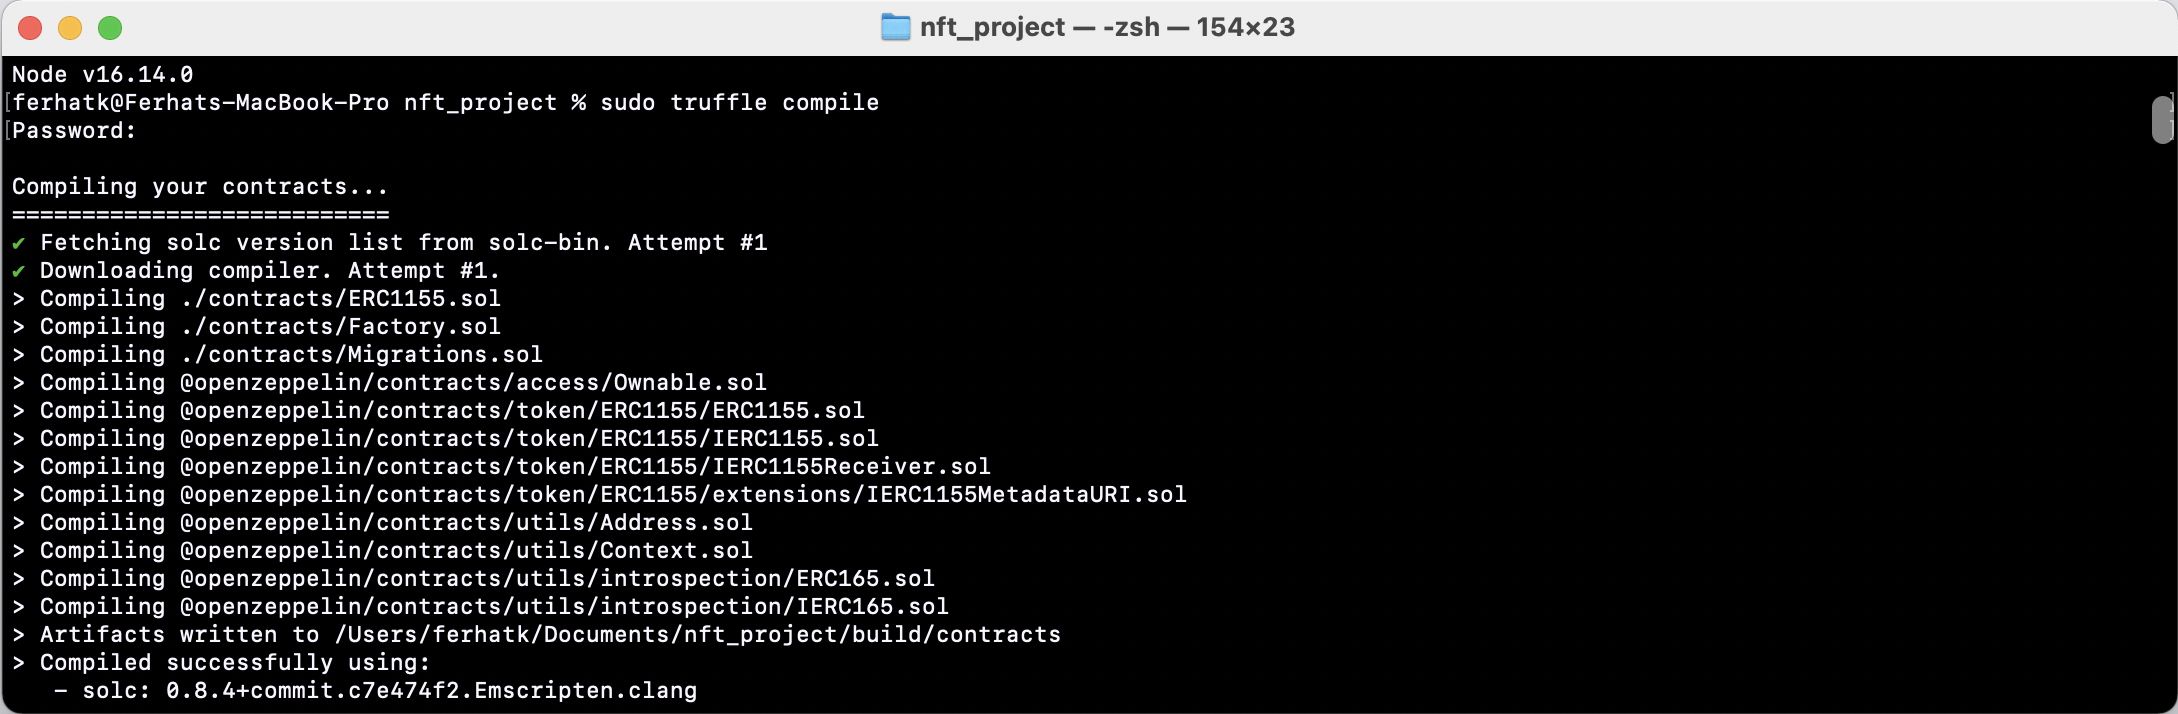
Before you compile, confirm that your project directory is setup correctly:
Save the file and then run the command below:
truffle compile
Unless otherwise specified, this command will compile contracts that have changed since the last compilation.
Deploy the Factory Contract and Mint NFTs
Note, before we run the last command to deploy our smart contract, we want to make sure we have at least 1 MATIC in the wallet we will be deploying from.
It's time to deploy your Factory ERC-1155 contract to Polygon mainnet. Run the command below to deploy:
truffle migrate --network polygon
You can use the --reset flag to the command above if you want to reset migrates from the beginning.
After the command is executed, you should see something similar to the following output:
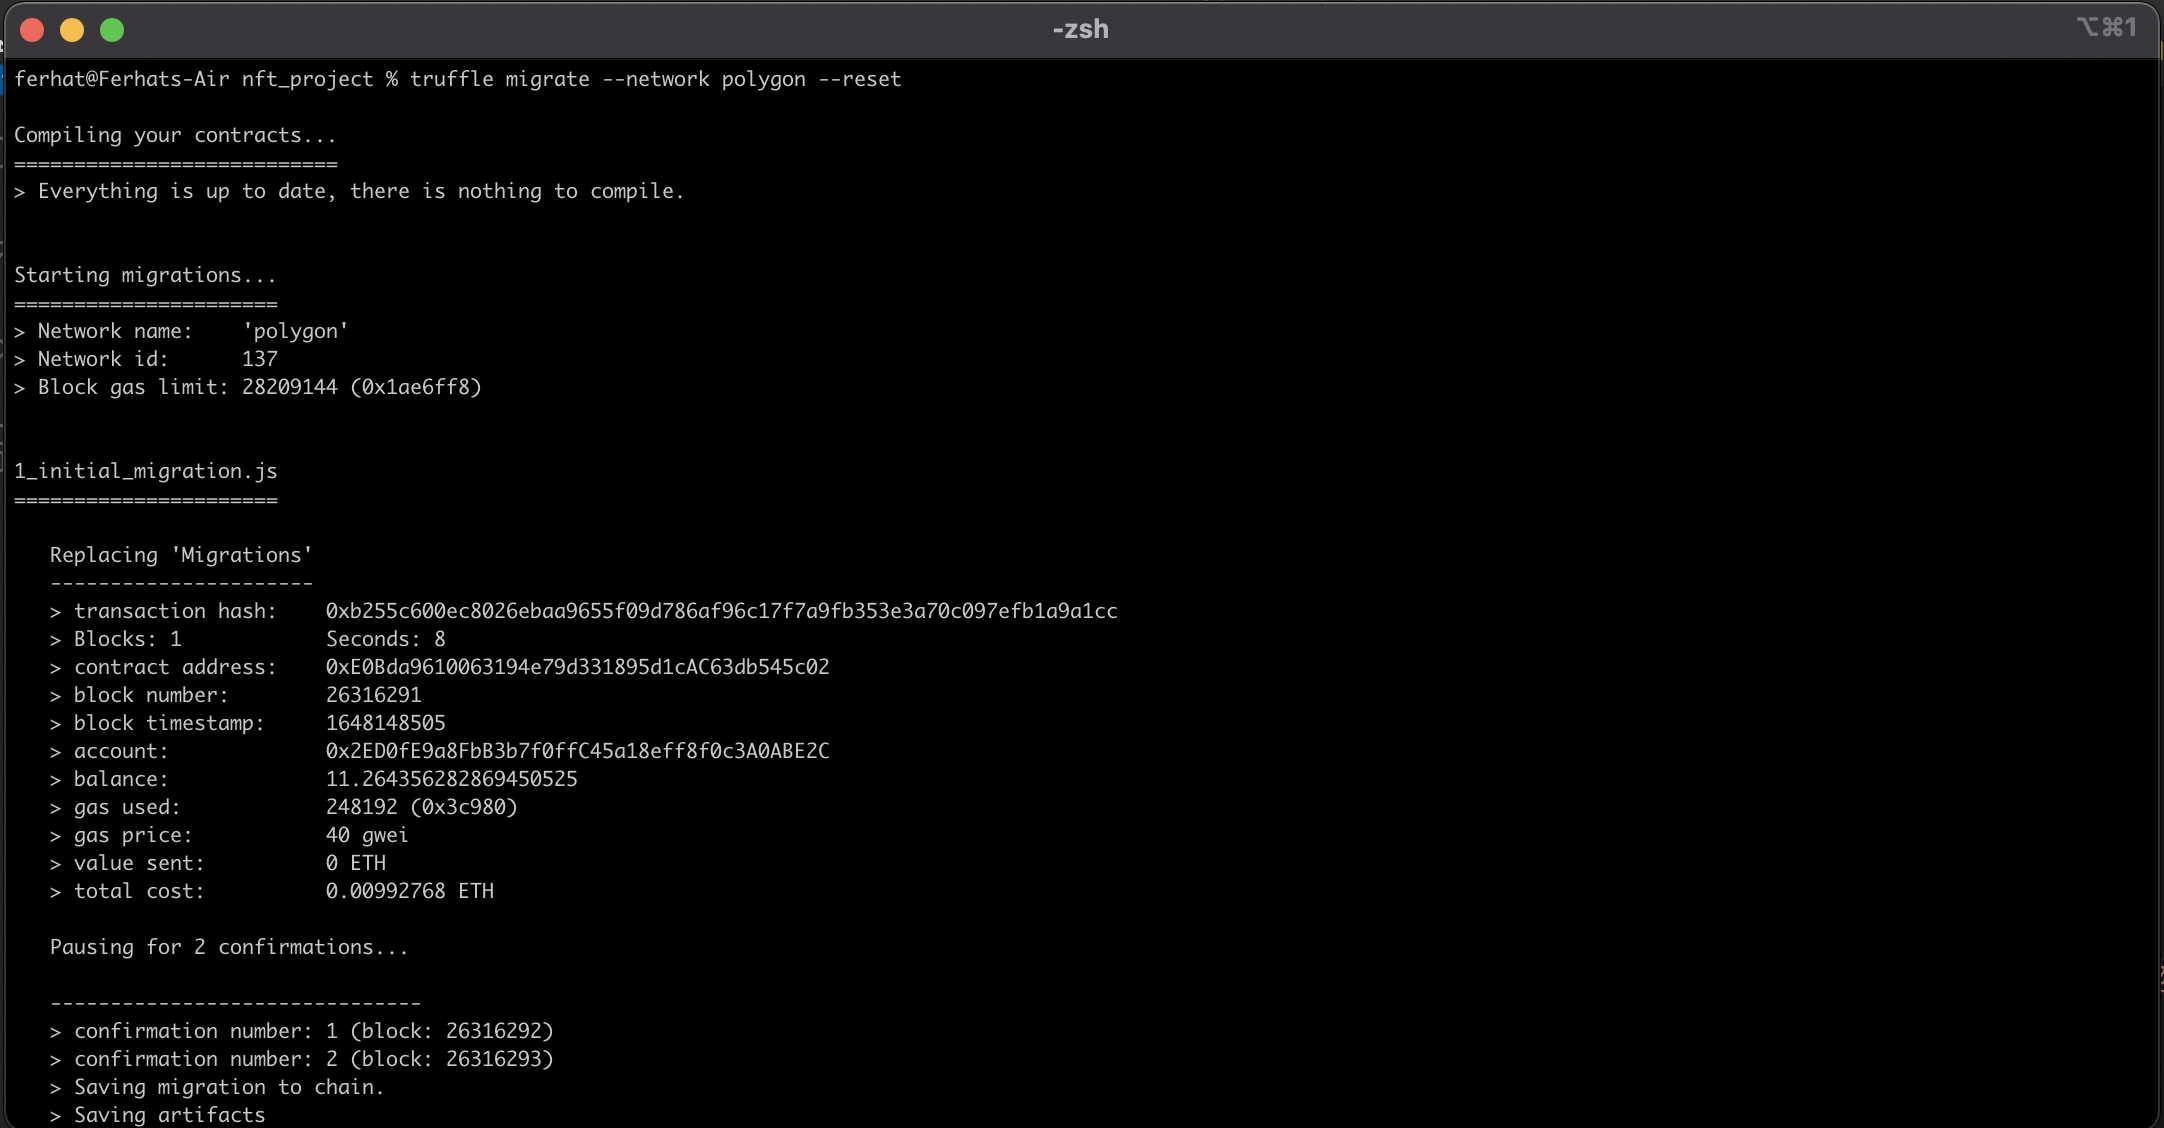

If you see output similar to the above, congrats! You can copy the transaction hash from the `ERC1155Factory.sol` migration process and paste it into Polygonscan to see the created contract.
In order to make calls via Polygonscan and allow others to view our source code, run the following command below in your terminal. This handy command will verify your contracts so everyone can see the source code and can use the call/write functions on your contract.
truffle run verify FactoryERC1155 --network polygon

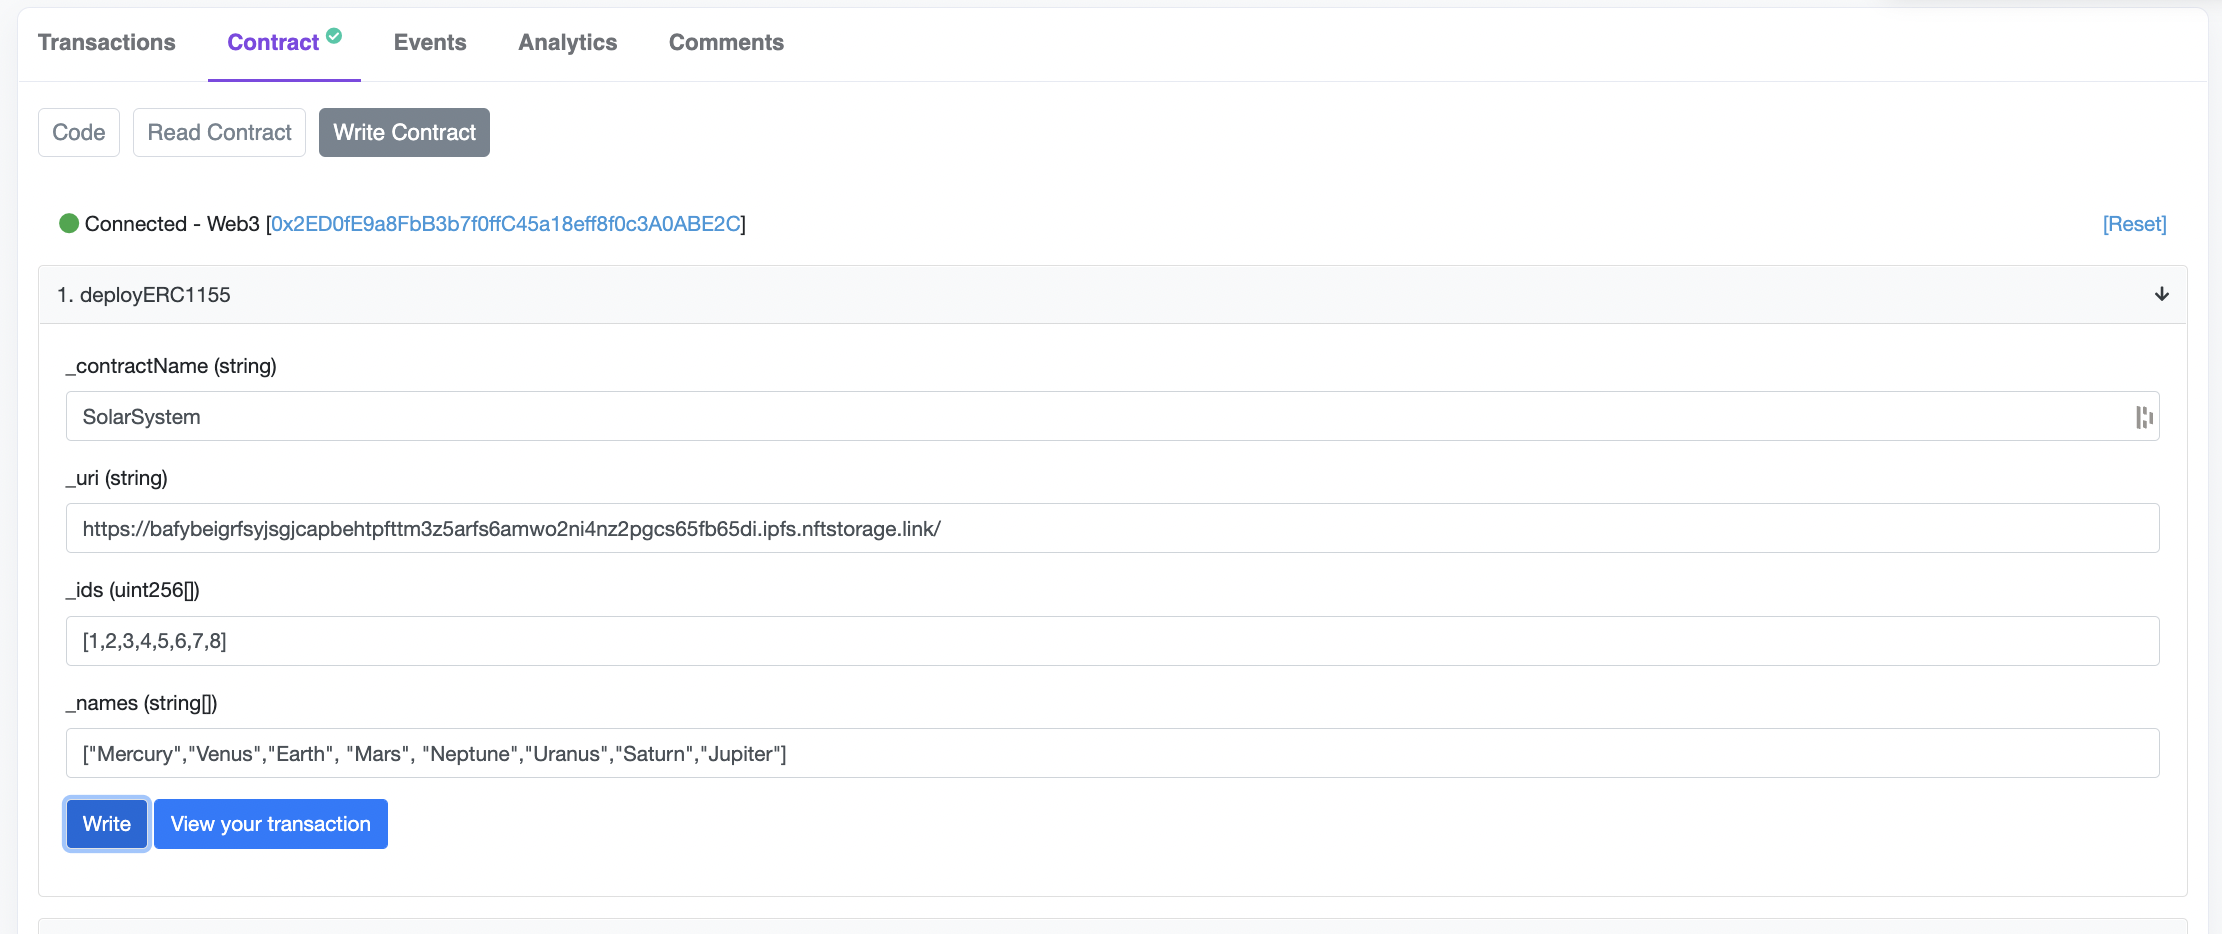
Once your contract is verified, navigate to your deployed contract address on Polygonscan, click the "Write Contract" button on the Contract tab, and connect your wallet.
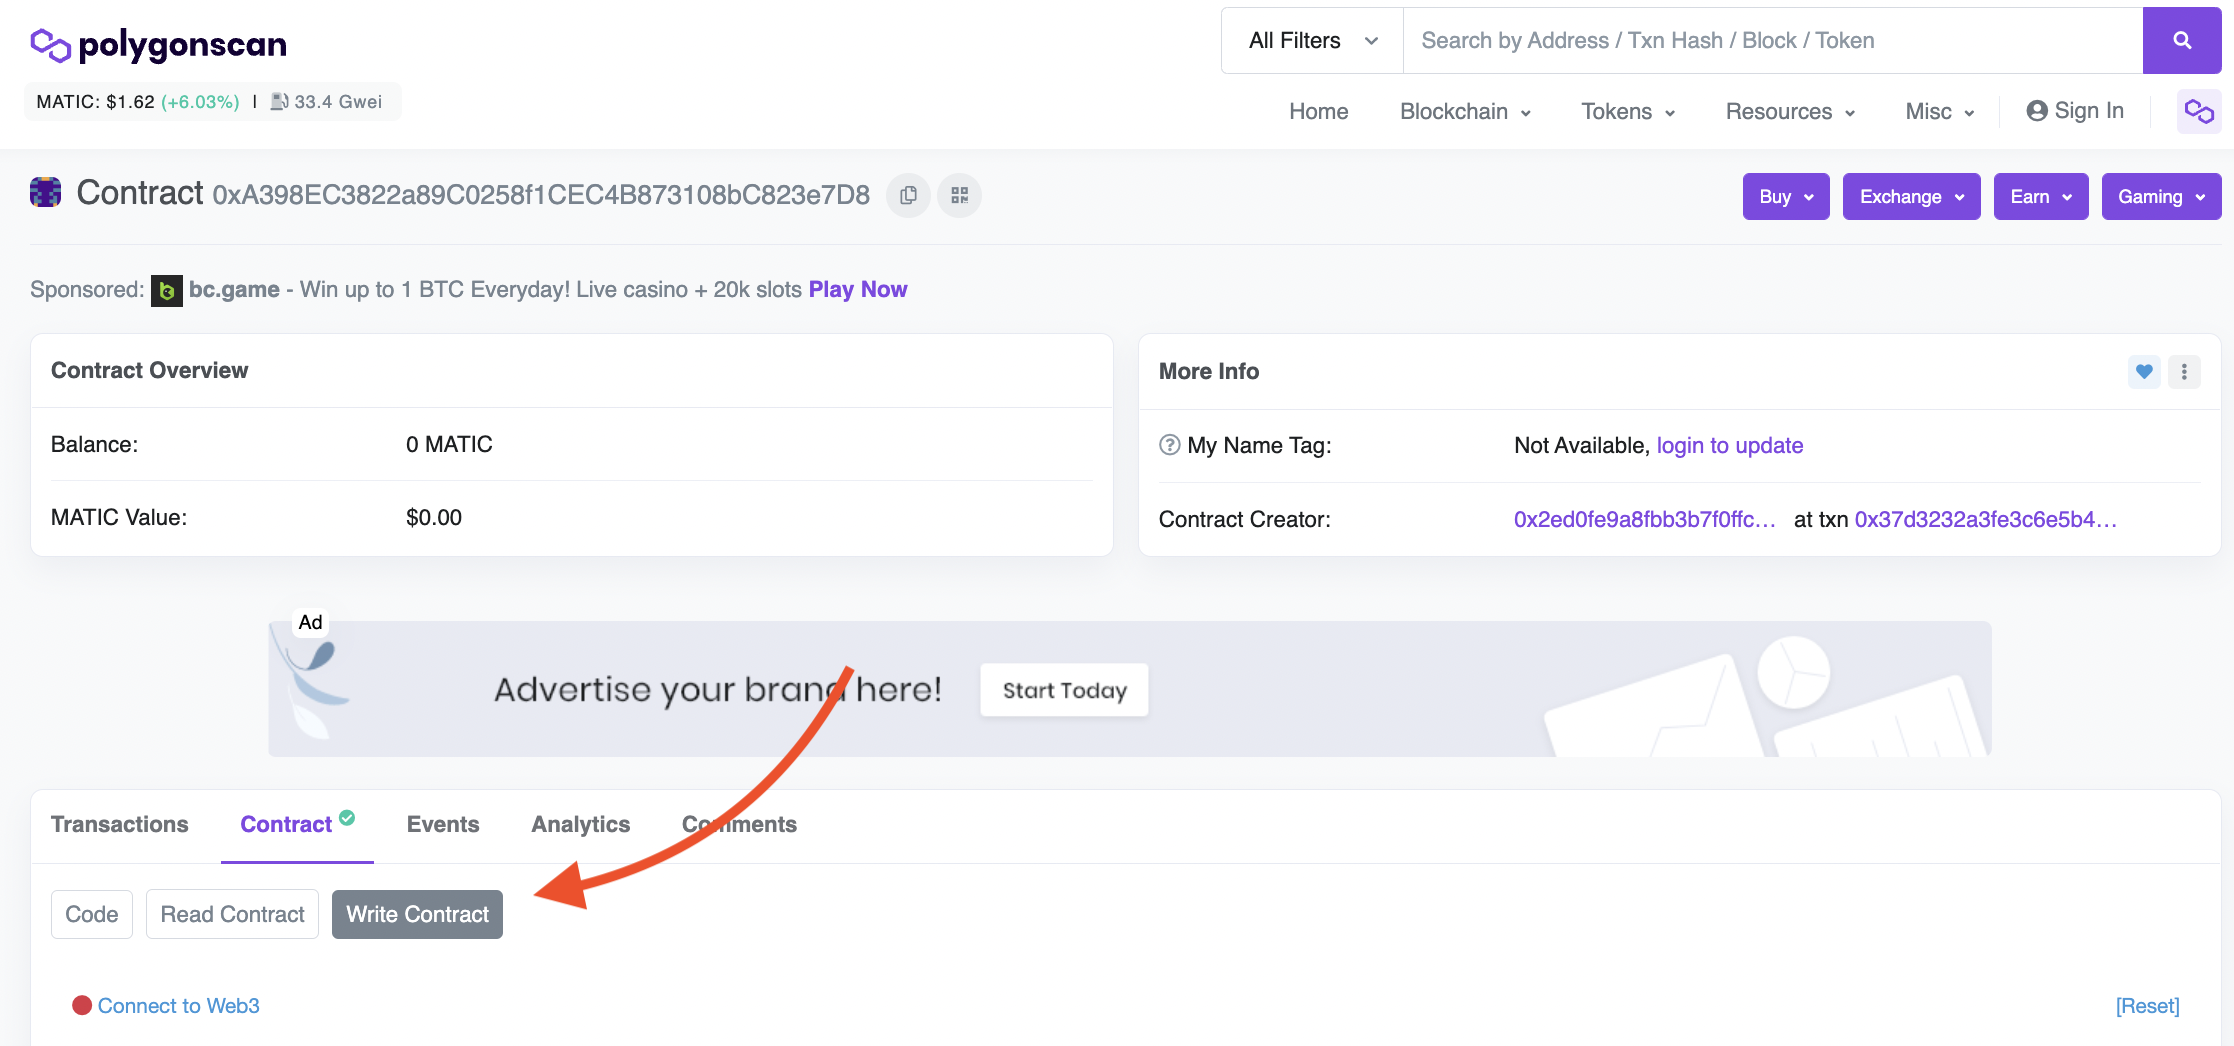
After you connect your wallet, navigate to the `deployERC1155` function. This function takes five arguments:
- the name of the ERC-1155 token
- the URI for metadata collection.
- IDs of your NFT collection.
- names of your NFTs.
Take a moment to upload your image and metadata assets to NFT.Storage. If you need to learn how take a look at the "Creating Metadata URI" section in this Quicknode guide. If you want to create the same collection as this guide, use the following inputs:
- SolarSystem
- https://bafybeigrfsyjsgjcapbehtpfttm3z5arfs6amwo2ni4nz2pgcs65fb65di.ipfs.nftstorage.link/
- [1,2,3,4,5,6,7,8]
- ["Mercury","Venus","Earth", "Mars", "Neptune","Uranus","Saturn","Jupiter"]
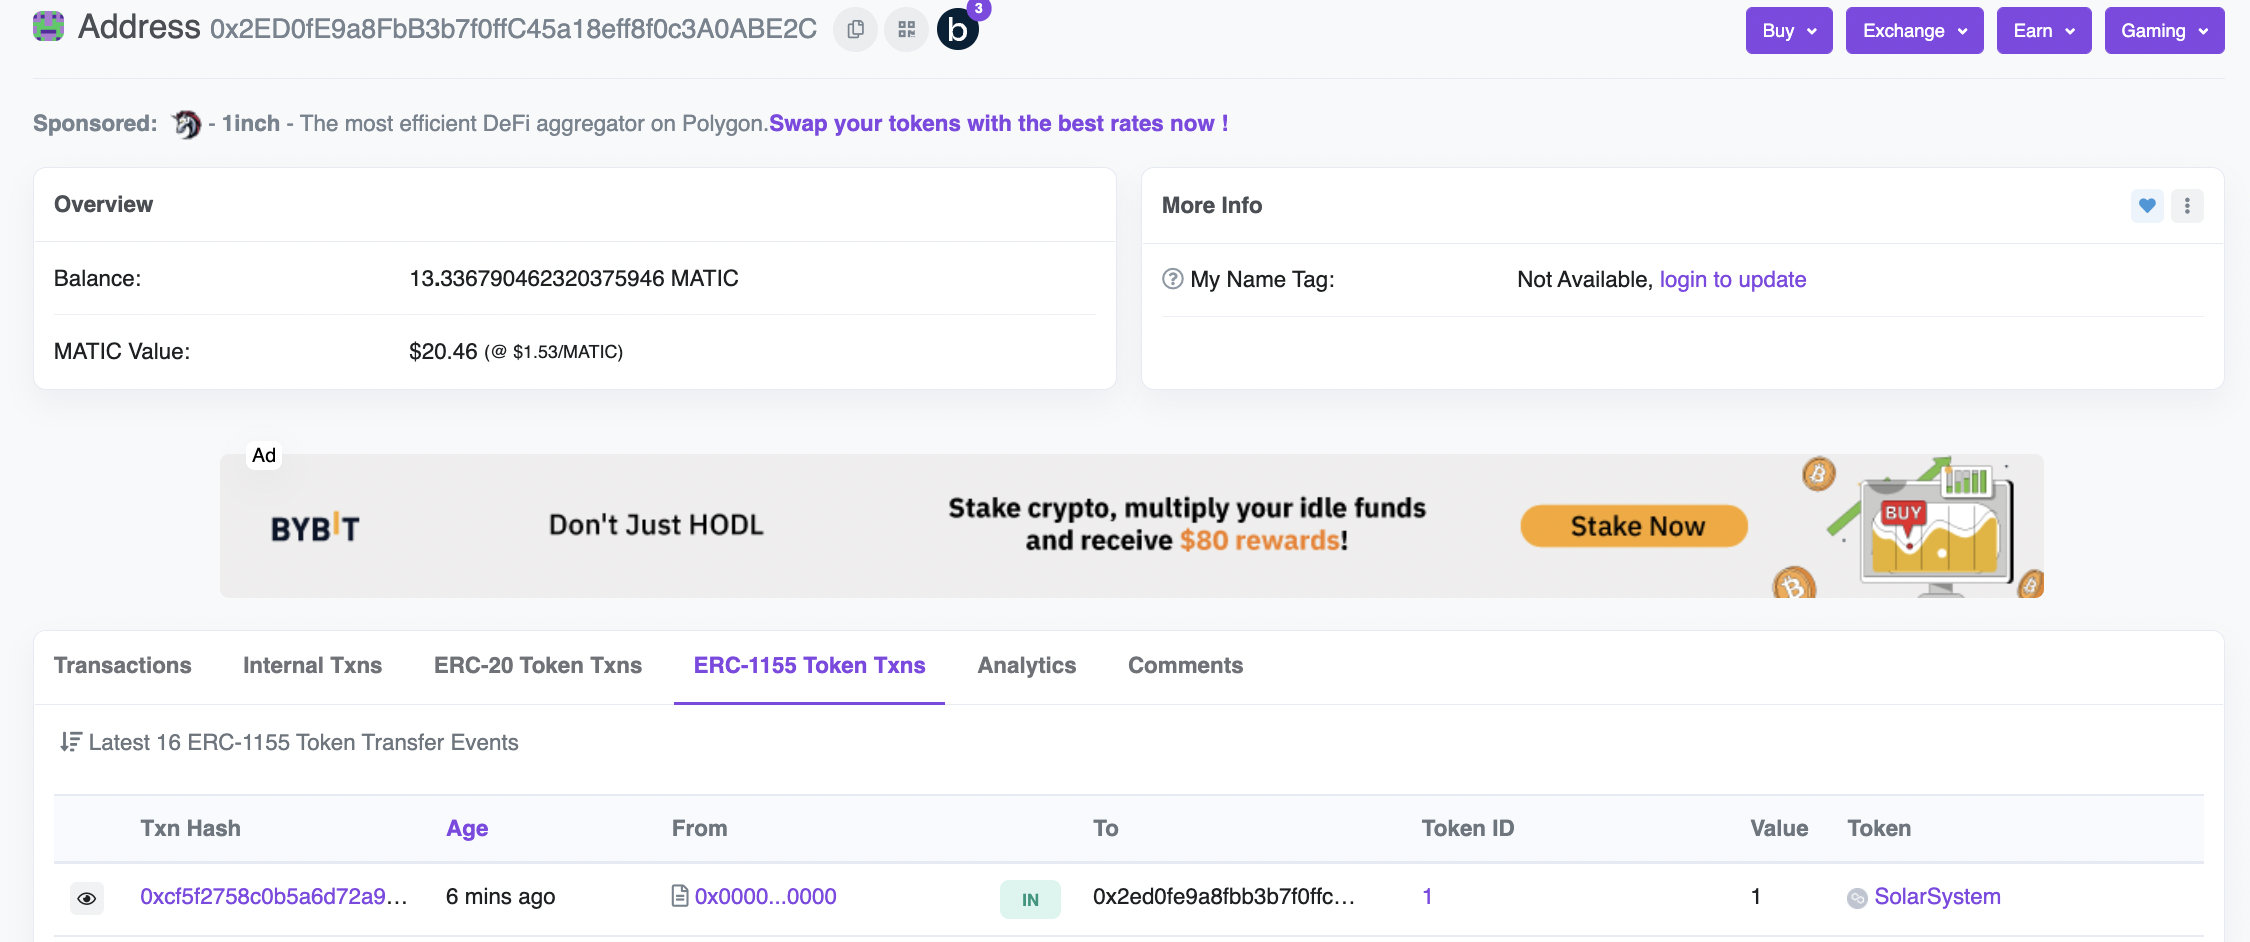
We can look at the transaction hash for more details:
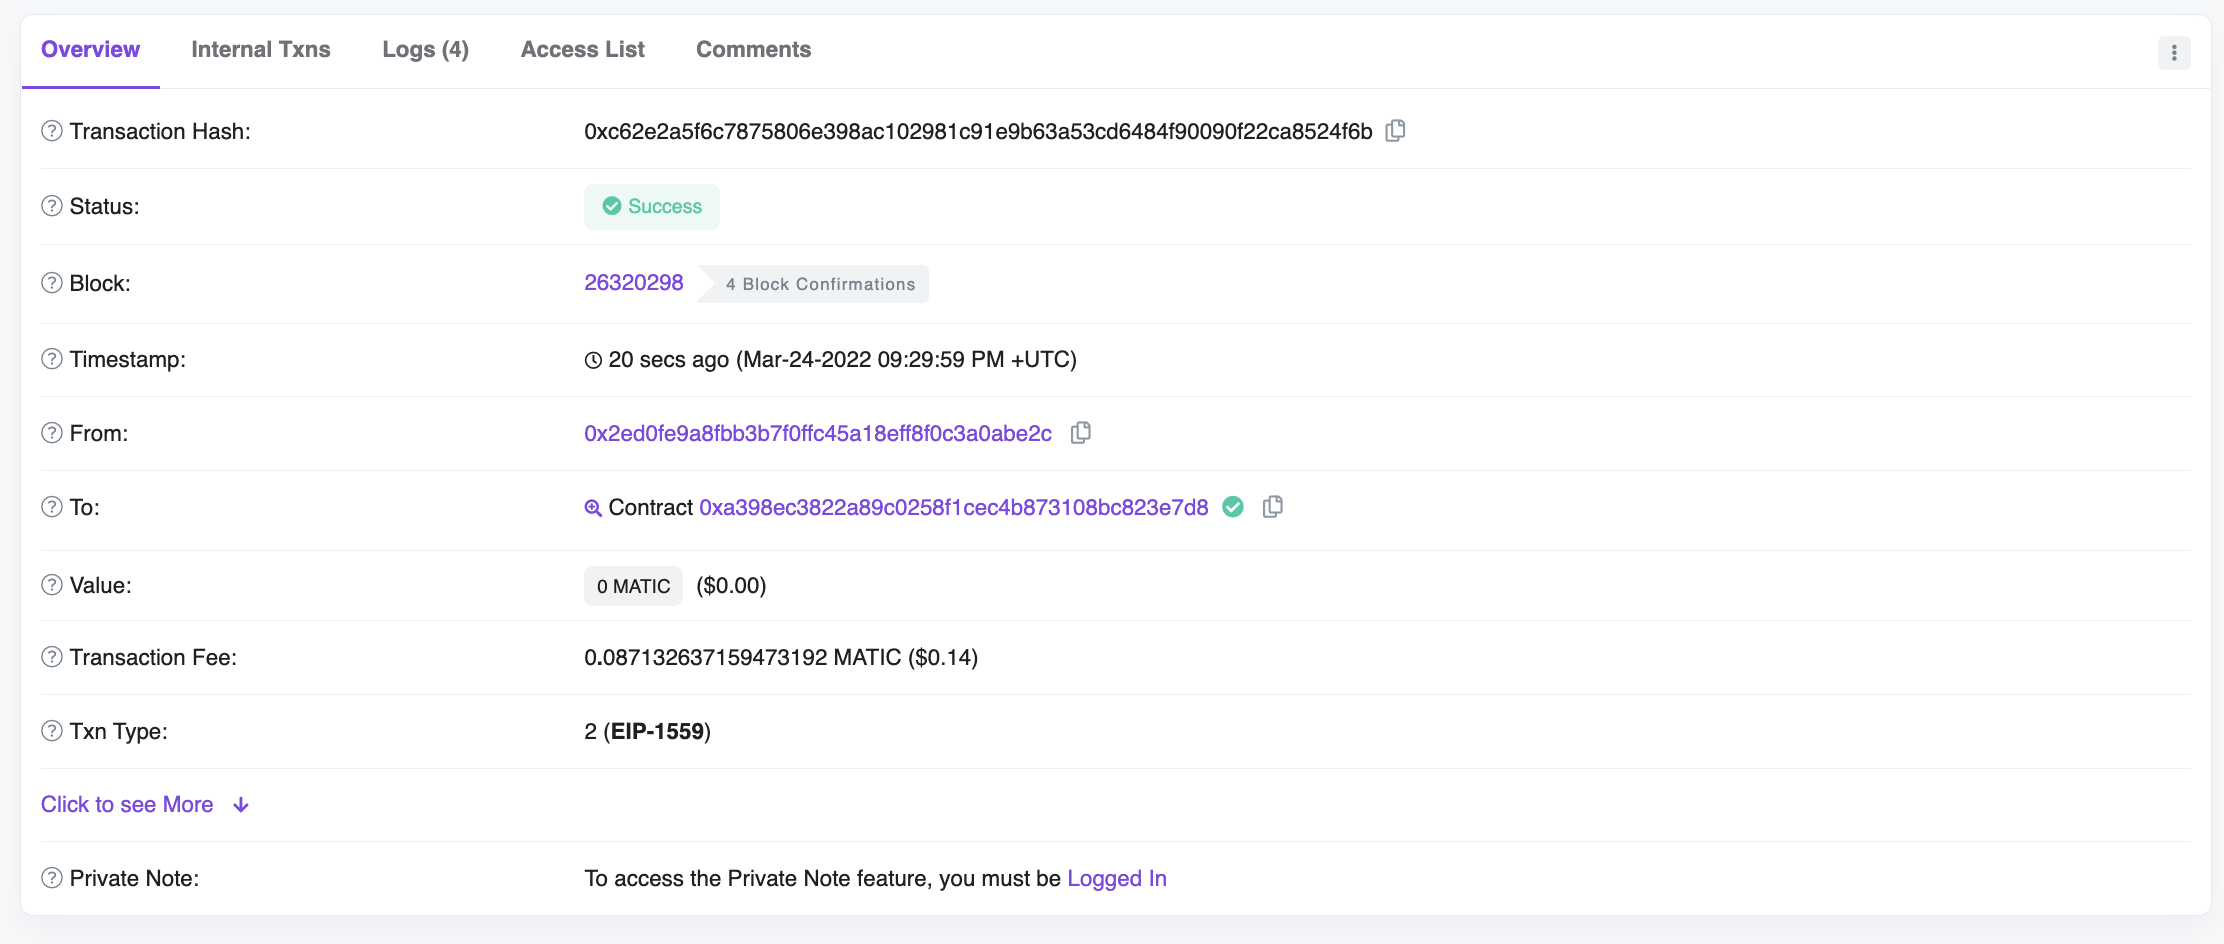
Note that you can click the logs tab to see the events emitted.
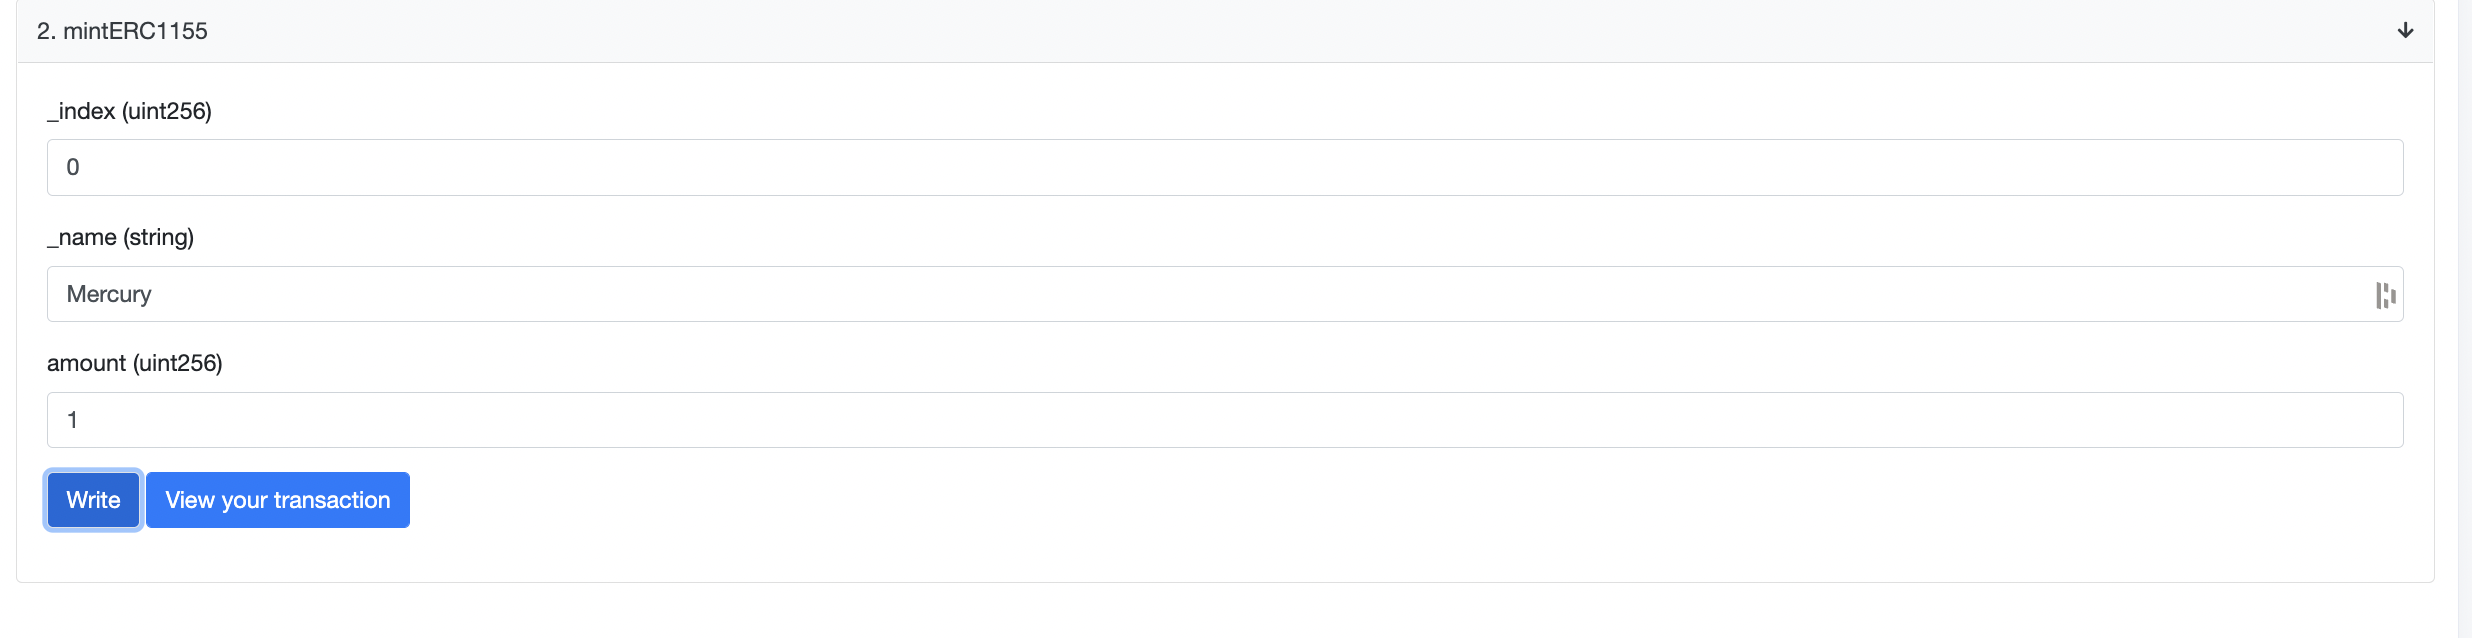
The transaction receipt above displays our deployed ERC-1155 token contract, but we have not minted any NFTs yet. To mint NFTs from our Solar System collection, we need to call the `mintERC1155` function. This function takes three parameters:
- The index of the ERC-1155 you want to interact with.
- The name of the token you wish to mint.
- The number of tokens you want to mint.
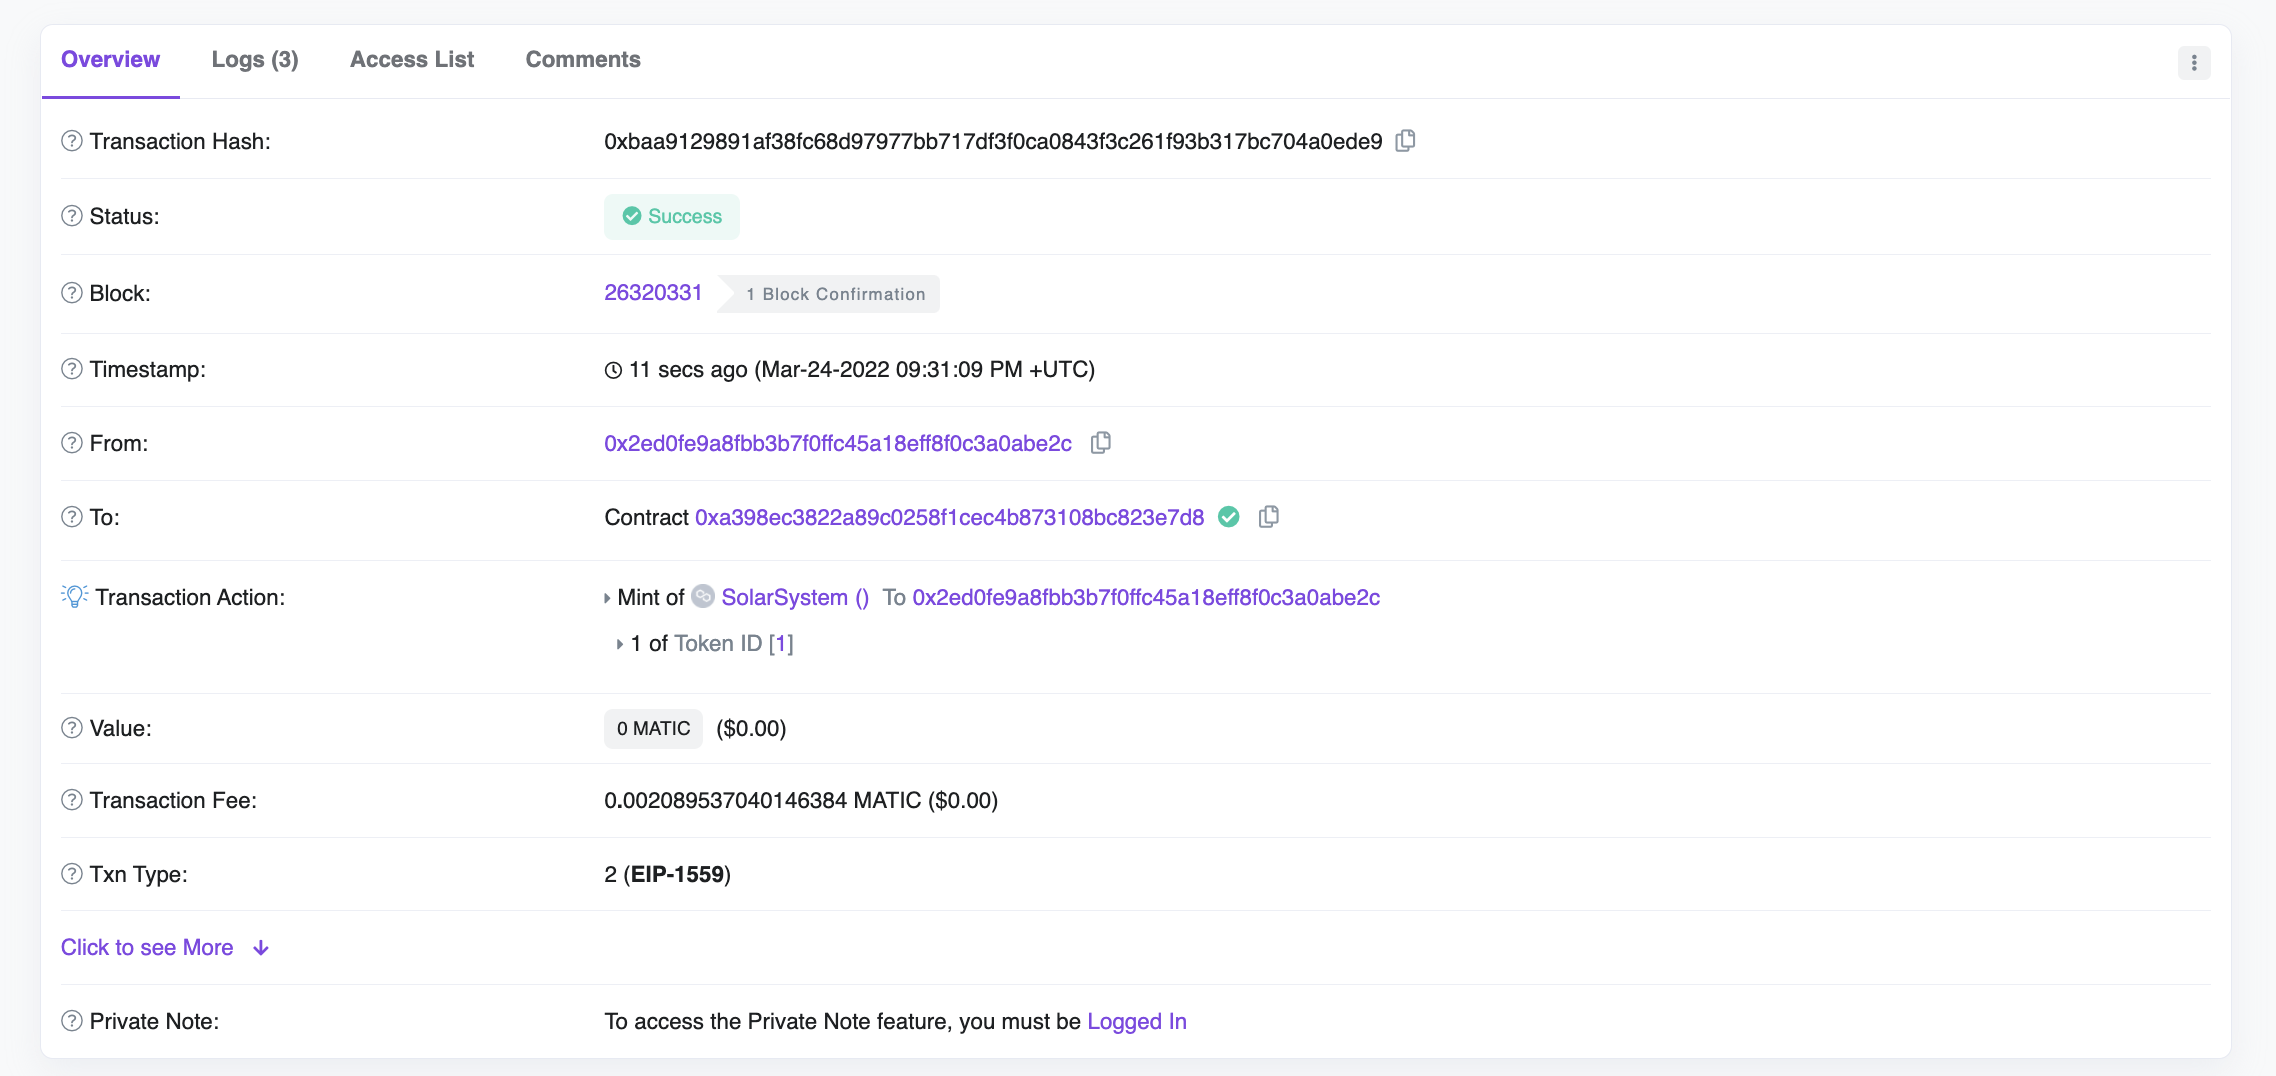
In this example, we will be minting an NFT of the planet Mercury. Here's how the transaction call and receipt would look:
Now that we have minted an ERC-1155 token, you can use the function `getERC1155byIndexAndId` to get more information:

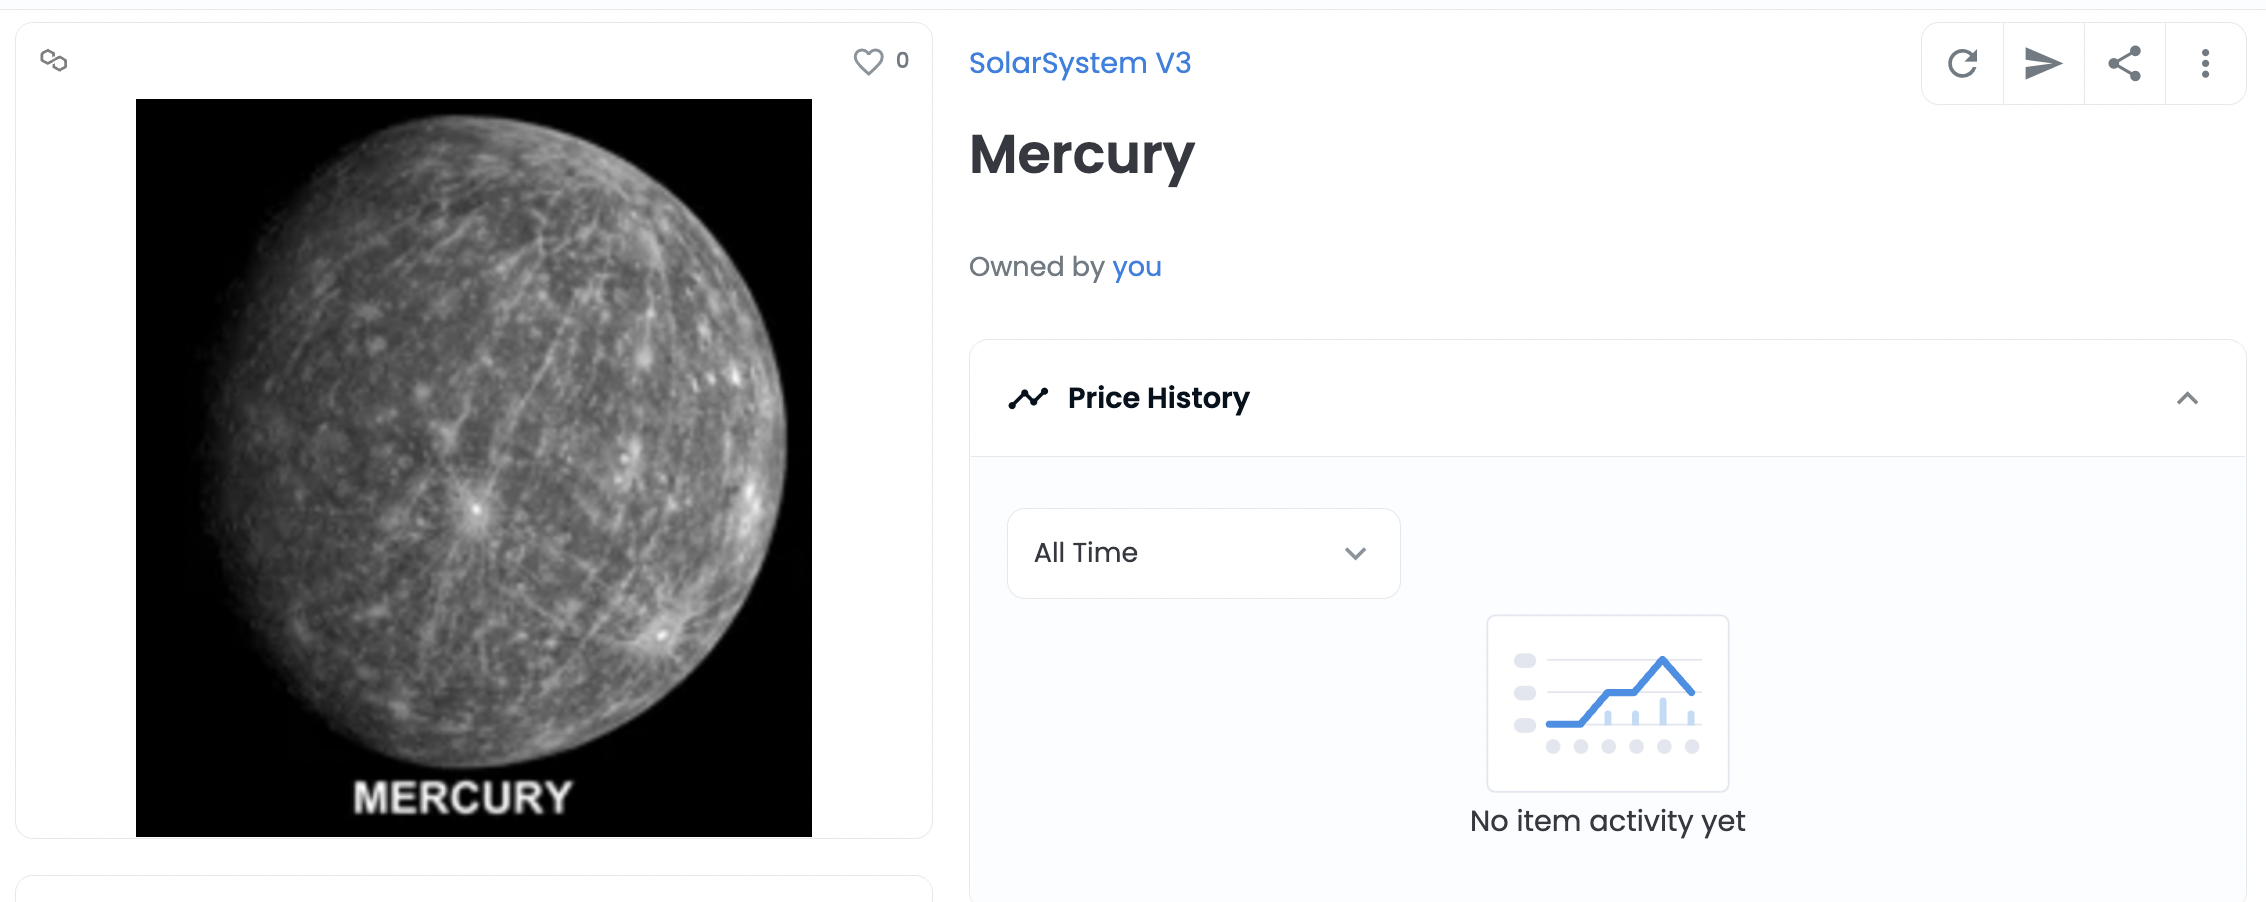
And that's a wrap! If you followed along with us, you should now have your newly minted NFTs in your wallet. Here's what ours looks like:
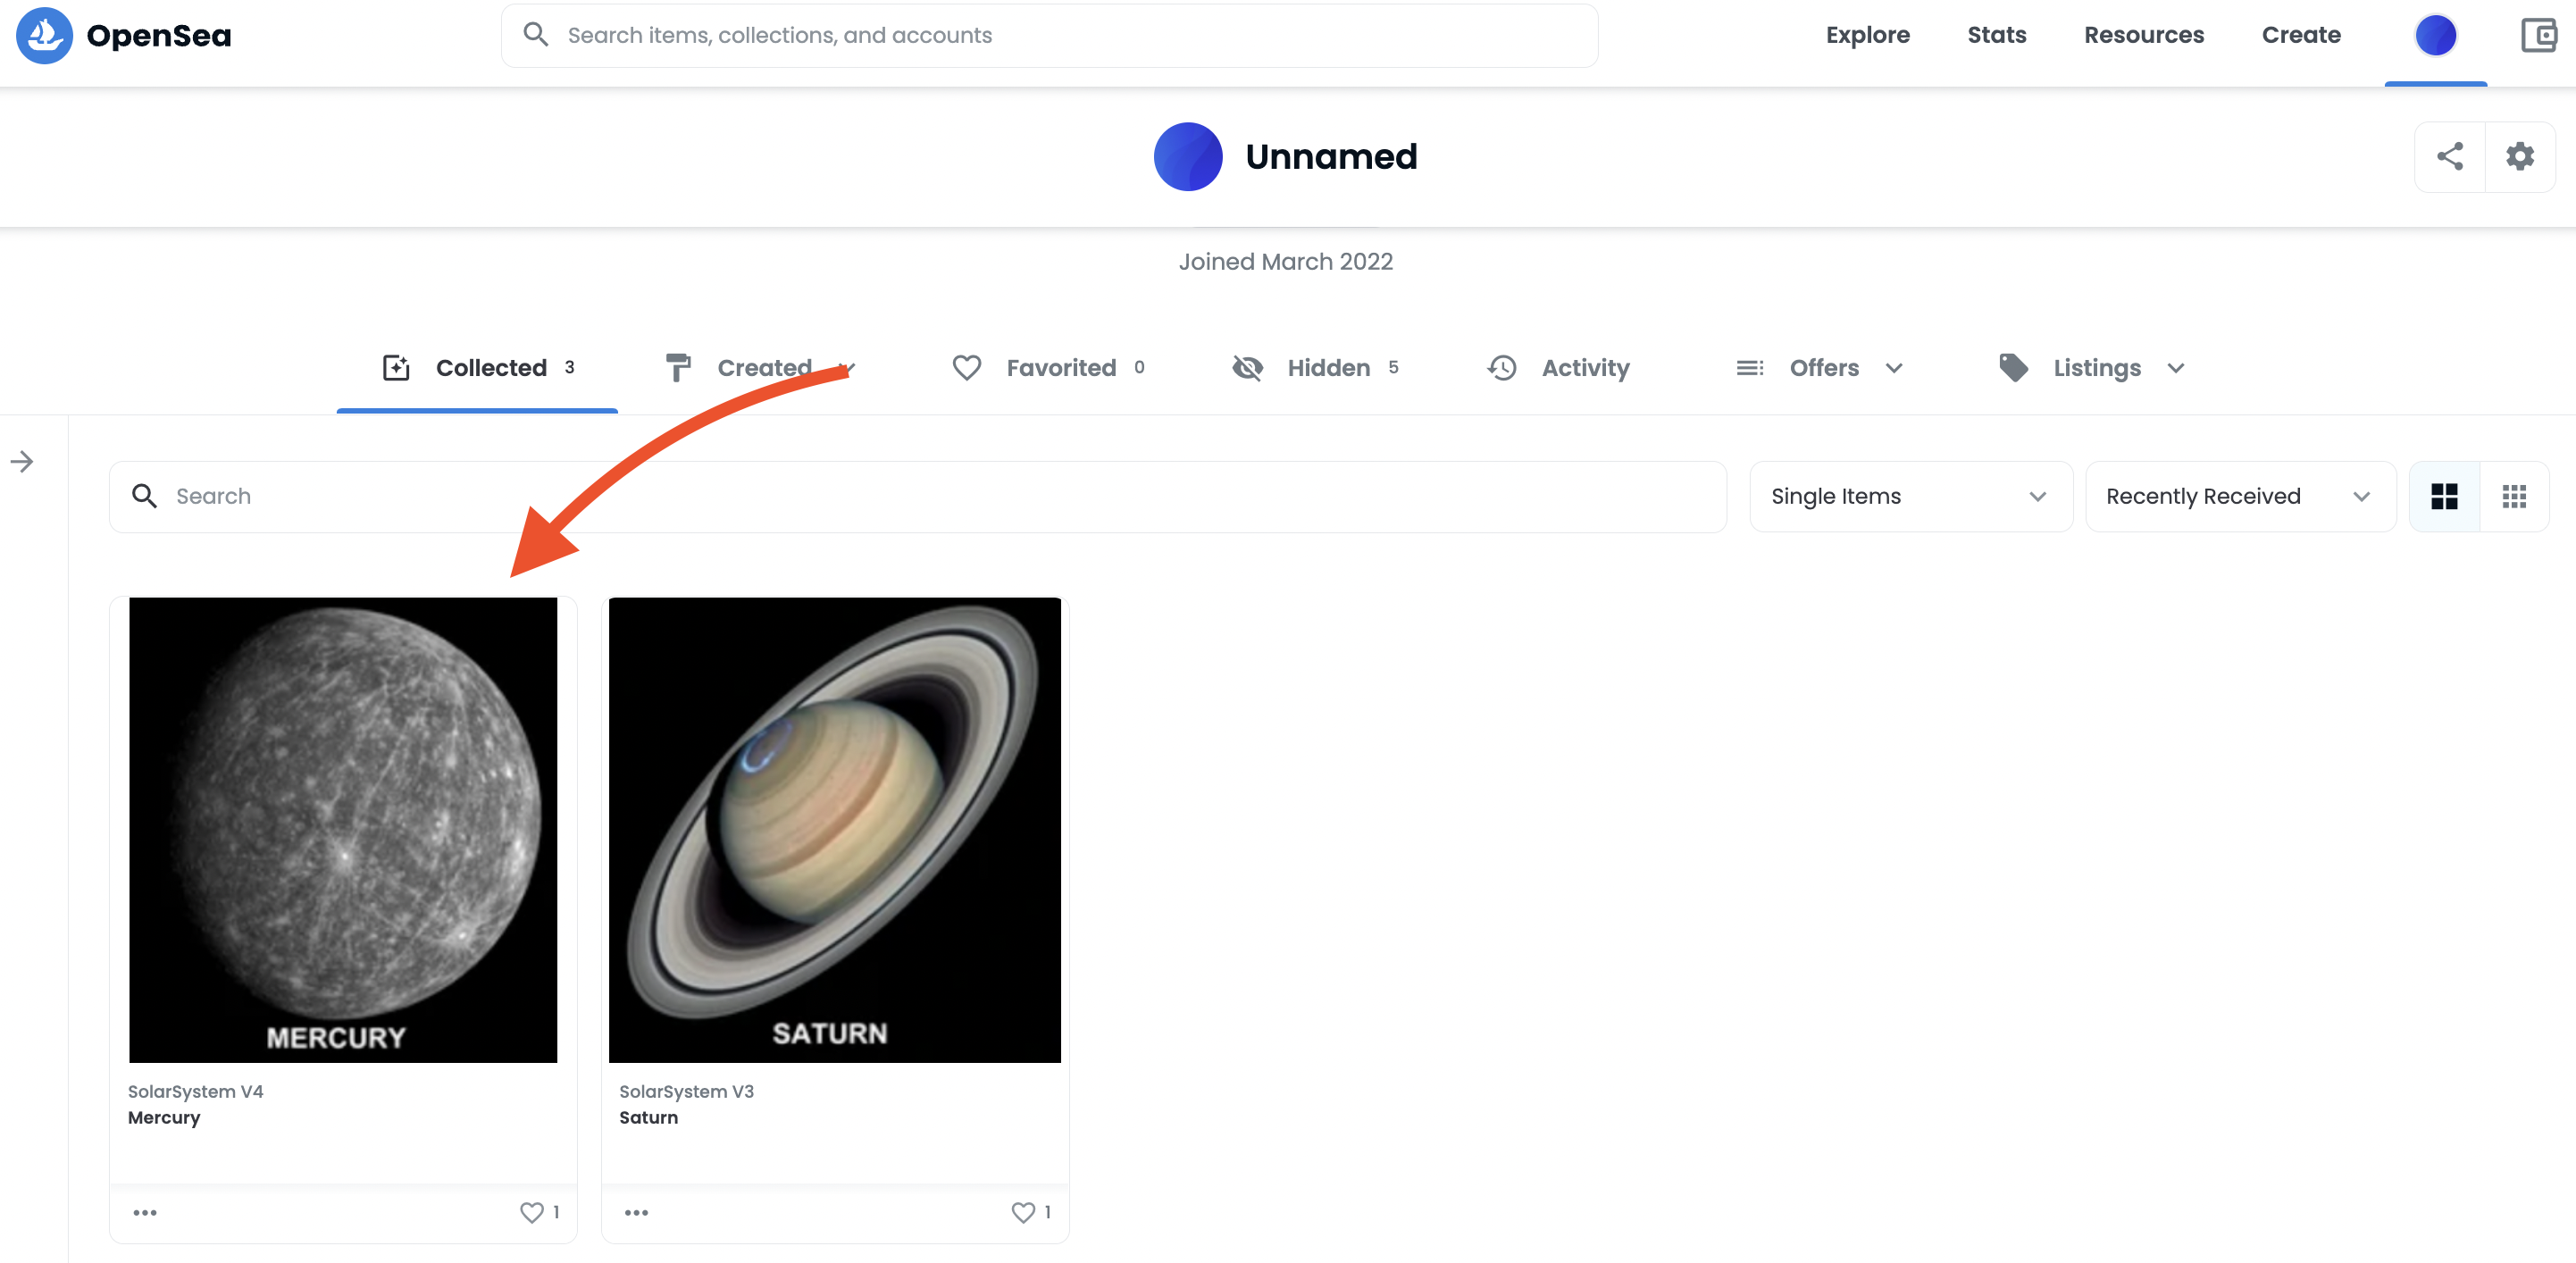
We can also go to our profile on OpenSea and see the minted NFT there:
Final Thoughts
If you made it this far, congrats! We know this guide was quite extensive, but hopefully, you learned a few things! A brief recap of what we went over in this guide:
- Deployed a factory ERC-1155 smart contract on the Polygon blockchain using Truffle
- Minted ERC-1155 tokens from our factory contract
- Verified our contract code to be visible on Polygonscan
- Made our ERC-1155 contract OpenSea compatible
Subscribe to our newsletter for more articles and guides on Ethereum. Feel free to reach out to us via Twitter if you have any feedback. You can always chat with us on our Discord community server, featuring some of the coolest developers you'll ever meet :)
We ❤️ Feedback!
Let us know if you have any feedback or requests for new topics. We'd love to hear from you.