9 min read
Overview
This guide demonstrates how to mint an NFT on the Polygon blockchain using the Ethers.js library and an ERC-721 token already deployed on the Polygon Mumbai test network. With the information you learn from this guide, you'll better understand how to interact with other smart contracts using Ethers.js.
Prerequisites
- Node.js installed
- Ethers.js installed (version
5<=) - A text editor
- Terminal
- MATIC tokens on Polygon Mumbai (you can get some at the Quicknode Multi-Chain Faucet)
What is Ethers.js?
Ethers.js is a complete Ethereum library and wallet implementation in Javascript. It has recently become the library of choice for dApp developers due to its efficient codebase, ease of use, and well-written documentation.
Ethers.js has several different modules. This guide will use the Providers, Signers, Contract Interact, and Utility modules.
- Providers - read-only abstraction to access the blockchain data.
- Signers - an abstraction of an Ethereum Account
- Contract Interaction - an abstraction of a smart contract
- Utilities - Useful tools for application developers (i.e., convert hex to number)
- Other Libraries - Ethers ASM Dialect, Hardware Wallets (i.e., Ledger)
- Experimental - experimental features
Smart Contract Recap
As a reminder, the act of "minting an NFT" is calling the mint function on an ERC-721 or ERC-1155 smart contract. Not all smart contracts may have the same naming convention.
Let us quickly review the solidity code for the function we will be calling to mint our ERC-721 Tokens:
    function safeMint(address to, string memory uri) public onlyOwner {
        uint256 tokenId = _tokenIdCounter.current();
        _tokenIdCounter.increment();
        _safeMint(to, tokenId);
        _setTokenURI(tokenId, uri);
    }
This code defines a Solidity function called safeMint. The function has two parameters: to (the recipient's address) and URI (a string representing a URI). The public keyword makes the function accessible from outside the contract.
The function does the following:
- It declares a uint256 variable called tokenId and initializes it with the current token ID counter value. The _tokenIdCounter.current() function call returns the current token ID.
- It increments the token ID counter by calling _tokenIdCounter.increment(). This is to ensure that each token has a unique identifier.
- It calls the _safeMint function, passing to and tokenId as parameters. This function is expected to create a new token and transfer it to the recipient's address.
- It calls the _setTokenURI function, passing tokenId and uri as parameters. This function is expected to set the token URI for the newly minted token.
Step 1: Setting Up Your Quicknode Polygon Endpoint
You'll need an API endpoint to communicate with the Polygon Mumbai test blockchain. You're welcome to use public nodes or deploy and manage your own infrastructure; however, if you'd like 8x faster response times, you can leave the heavy lifting to us. Sign up for an account here.
Once signed in, click Create Endpoint and then select the Polygon Mumbai test blockchain.

Step 2: Creating the Project
Time to write the code! Start by opening a terminal window and navigating to the directory you'd like to have this project live in. Then, run the following commands:
mkdir mintWithEthers && cd mintWithEthers && npm init -y
Next, we'll create our project files and install the required dependencies:
touch mint.js && touch abi.json && touch .secret && npm install ethers@5.4
Be sure to install ethers@5.4
Our project directory should now look similar to this:

We will start by pasting our private key into the .secret. file. To find out how to export your private key, check out this MetaMask Exporting Private Key Guide.
After, we will need to retrieve the ABI (application binary interface) of the contract we want to interact with. The ABI defines the methods and structures used to interact with the contract and is represented in JSON format. Check out this What is an ABI? guide to learn more.
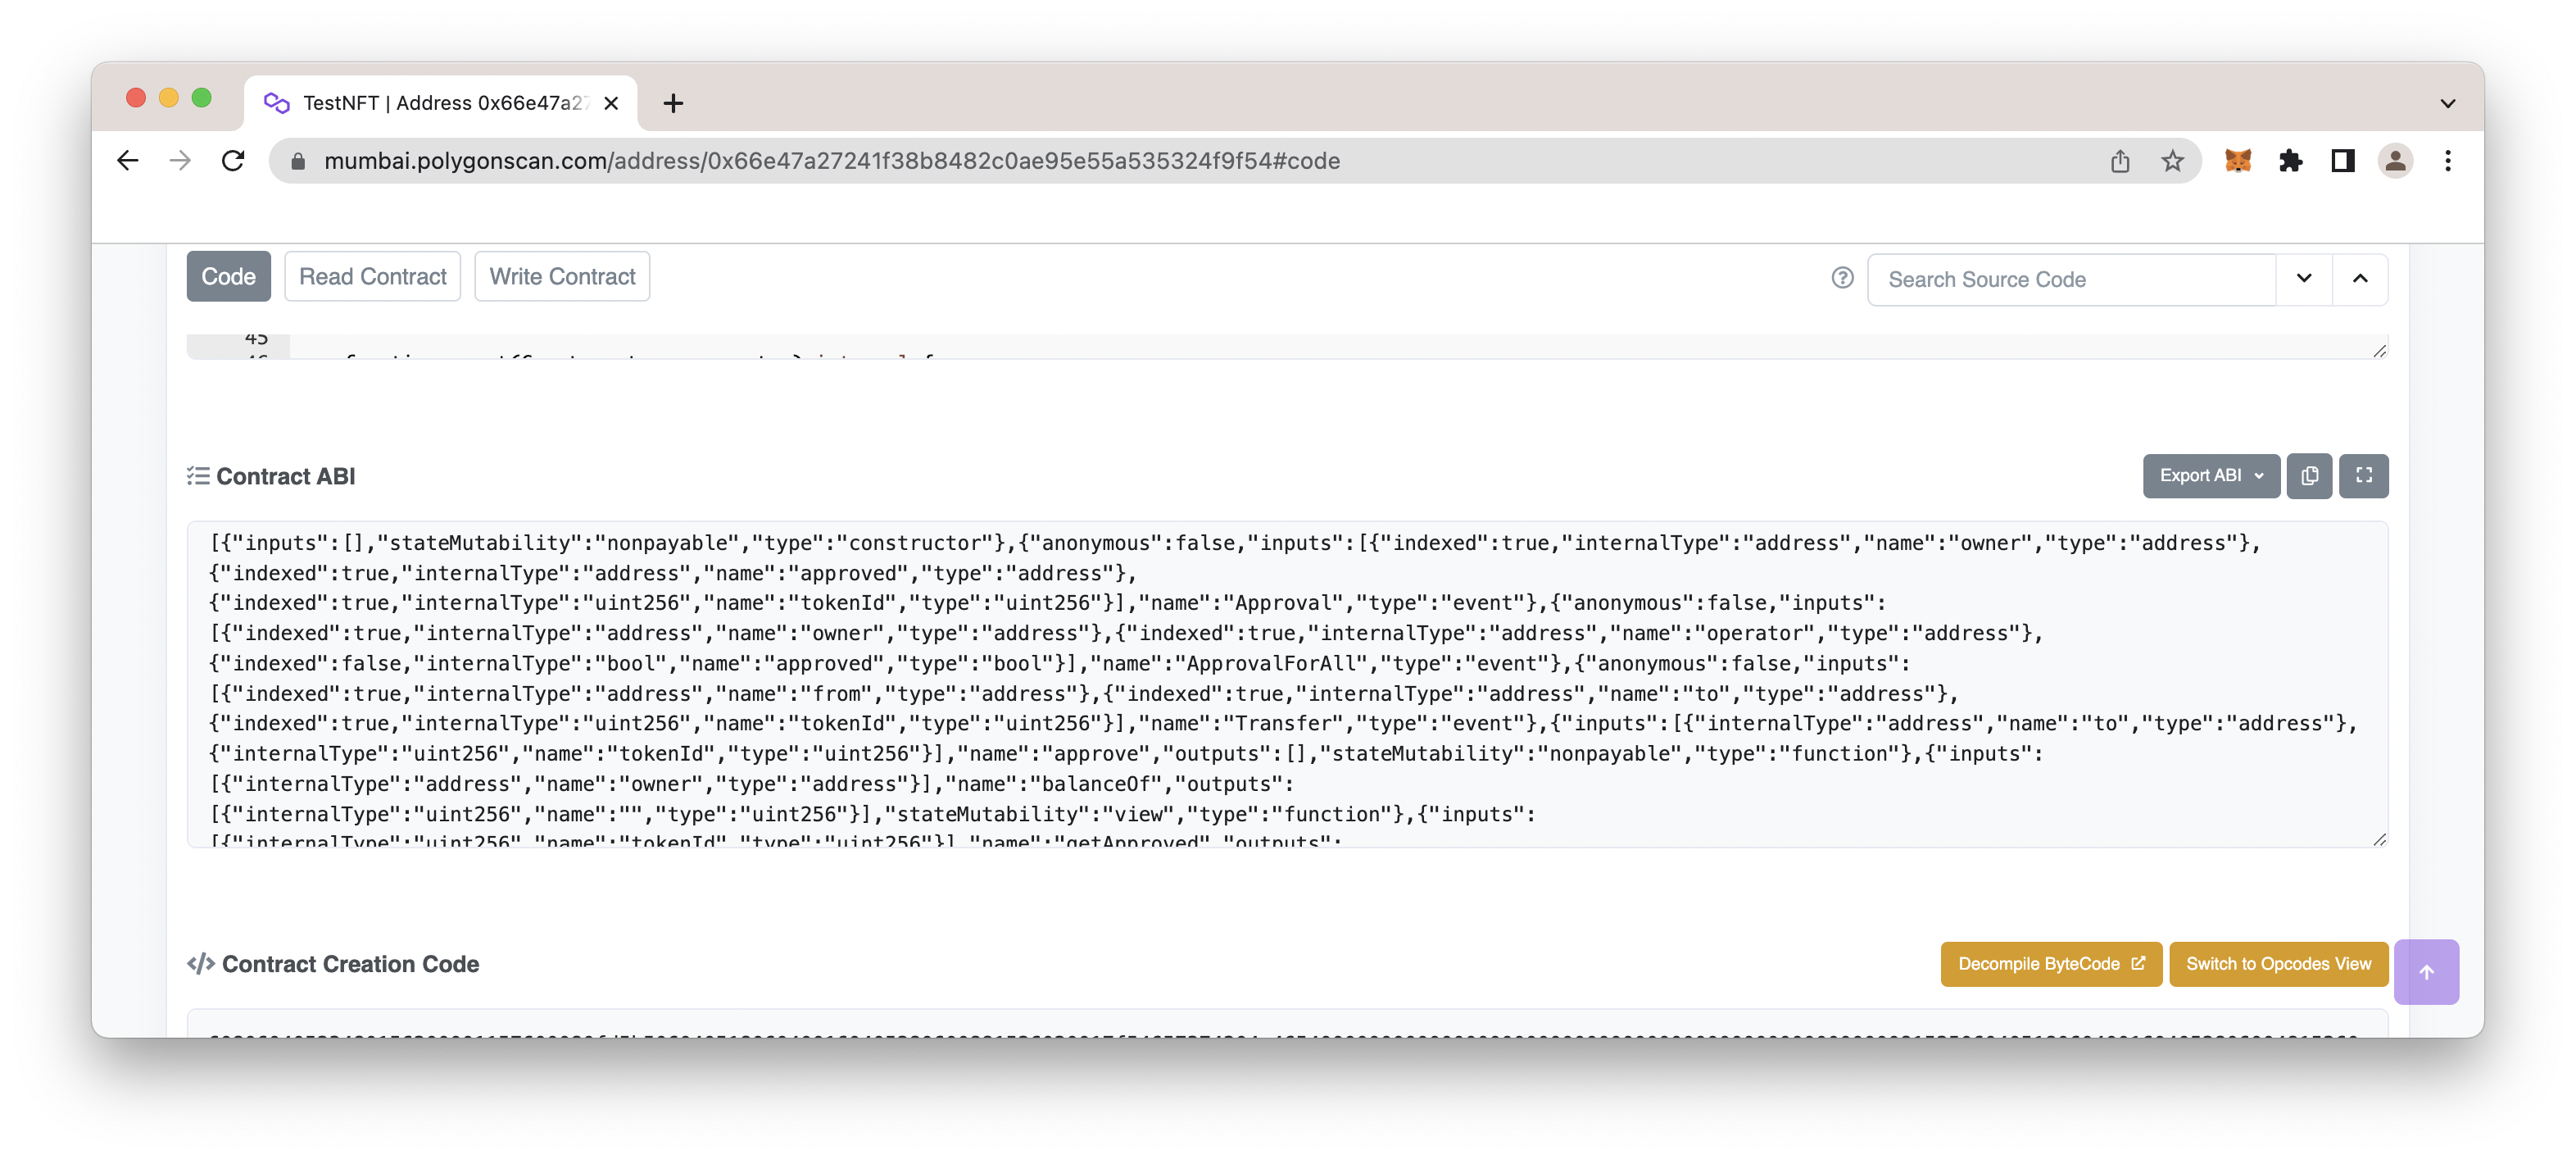
Since the NFT smart contract we want to interact with is deployed on Polygon, we will navigate to Polygonscan (a block explorer) and search this address: 0x66e47a27241f38b8482c0ae95e55a535324f9f54. Once you locate the page, click on the Contract tab and scroll down to the bottom to find the contract ABI. Click the copy button and paste the contents into your abi.json file.
Now it's time to write the script that will interact with ERC-721 smart contract. We will go over each section of code piece by piece and tie it all together in the end.
Open your mint.js file and start by adding the dependencies.
const { ethers } = require("ethers")
const fs = require('fs')
The line of code below uses the fs module to retrieve the private key stored in your .secret file contained in your project directory.
const privateKey = fs.readFileSync(".secret").toString().trim()
Ethers.js has several provider classes. We will be using the JsonRpcProvider, a popular method for interacting with Ethereum which is available in all major Ethereum node implementations. Add the following bit of code to your mint.js script and update the QUICKNODE_HTTP_ENDPOINT variable to include your Quicknode HTTP Provider URL.
const QUICKNODE_HTTP_ENDPOINT = "YOUR_QUICKNODE_HTTP_ENDPOINT"
const provider = new ethers.providers.JsonRpcProvider(QUICKNODE_HTTP_ENDPOINT)
Now, it's time to create an abstraction of the smart contract we want to interact with. A contract abstraction can be created like this:
const contractAddress = "0x66e47a27241f38b8482c0ae95e55a535324f9f54"
const contractAbi = fs.readFileSync("abi.json").toString()
const contractInstance = new ethers.Contract(contractAddress, contractAbi, provider)
To send transactions with Ethers.js, we will need a Signer object. You can create one with the following code:
const wallet = new ethers.Wallet(privateKey, provider)
We will also create some helper functions that will help us read and modify data to our needs:
async function getGasPrice() {
    let feeData = (await provider.getGasPrice()).toNumber()
    return feeData
}

async function getNonce(signer) {
    let nonce = await provider.getTransactionCount(wallet.address)
    return nonce
}
For example, the getGasPrice() function calls the getGasPrice() method on a provider object which returns its response with a big number. We will then convert this value to a number using the .toNumber() method. The getNonce() function calls the ethers.provider.getTransactionCount() method, which takes an address and returns its transaction count.
Next, we will create a mint function that will utilize all the helper functions we created above to send and sign a transaction. Let us dive a bit into the explanation of the code below:
This code defines an asynchronous function called mintNFT. The function has two parameters: address (the recipient's address) and URI (a string representing the URI for the NFT).
The function does the following:
- It calls the getNonce function, passing the wallet object, and awaits the result to be stored in the nonce variable. The getNonce function is expected to return the next transaction nonce for the wallet.
- It calls the getGasPrice function, awaits the result, and stores it in the gasFee variable. The getGasPrice function is expected to return the current gas price.
- It calls the populateTransaction.safeMint function of the contractInstance object, passing the address, URI, and an object that contains the gasPrice and nonce properties. The result is stored in the rawTxn variable.
- It logs a message with the gas price and nonce.
- It calls the sendTransaction method of the wallet object, passing rawTxn as a parameter. The result is stored in the signedTxn variable.
- It waits for the transaction to be processed, storing the receipt in the receipt variable.
- It checks the receipt object. If it's truthy, the function logs a success message with the transaction hash and block number. If it's falsy, the function logs an error message.
- If an error occurs in any of the above steps, the catch statement logs the error message.
async function mintNFT(address, URI) {
    try {
        const nonce = await getNonce(wallet)
        const gasFee = await getGasPrice()
        let rawTxn = await contractInstance.populateTransaction.safeMint(address, URI, {
            gasPrice: gasFee,
            nonce: nonce
        })
        console.log("...Submitting transaction with gas price of:", ethers.utils.formatUnits(gasFee, "gwei"), " - & nonce:", nonce)
        let signedTxn = (await wallet).sendTransaction(rawTxn)
        let reciept = (await signedTxn).wait()
        if (reciept) {
            console.log("Transaction is successful!!!" + '\n' + "Transaction Hash:", (await signedTxn).hash + '\n' + "Block Number: " + (await reciept).blockNumber + '\n' + "Navigate to https://polygonscan.com/tx/" + (await signedTxn).hash, "to see your transaction")
        } else {
            console.log("Error submitting transaction")
        }
    } catch (e) {
        console.log("Error Caught in Catch Statement: ", e)
    }
}
All that's left is to add the function call at the bottom of your script. In our example, we will be minting an NFT with the following metadata. To do this, we will call the safeMint function with the following parameters:
mintNFT("WALLET_ADDRESS", "METADATA URI")
The first argument (0) also refers to the address we want to mint the NFT, while the second address sets the token URI. If you do not know how to create metadata, take a look at the "Adding Files to IPFS" section in this Quicknode guide.
In the end, your complete script should look like this:
const { ethers, Signer } = require("ethers")
const fs = require('fs')

const privateKey = fs.readFileSync(".secret").toString().trim()

const QUICKNODE_HTTP_ENDPOINT = "YOUR_QUICKNODE_HTTP_ENDPOINT"
const provider = new ethers.providers.JsonRpcProvider(QUICKNODE_HTTP_ENDPOINT);

const contractAddress = "0x66e47a27241f38b8482c0ae95e55a535324f9f54"
const contractAbi = fs.readFileSync("abi.json").toString()
const contractInstance = new ethers.Contract(contractAddress, contractAbi, provider)

const wallet = new ethers.Wallet(privateKey, provider)

async function getGasPrice() {
    let feeData = (await provider.getGasPrice()).toNumber()
    return feeData
}

async function getNonce(signer) {
    let nonce = await provider.getTransactionCount(wallet.address)
    return nonce
}

async function mintNFT(address, URI) {
    try {
        const nonce = await getNonce(wallet)
        const gasFee = await getGasPrice()
        let rawTxn = await contractInstance.populateTransaction.safeMint(address, URI, {
            gasPrice: gasFee,
            nonce: nonce
        })
        console.log("...Submitting transaction with gas price of:", ethers.utils.formatUnits(gasFee, "gwei"), " - & nonce:", nonce)
        let signedTxn = (await wallet).sendTransaction(rawTxn)
        let reciept = (await signedTxn).wait()
        if (reciept) {
            console.log("Transaction is successful!!!" + '\n' + "Transaction Hash:", (await signedTxn).hash + '\n' + "Block Number: " + (await reciept).blockNumber + '\n' + "Navigate to https://polygonscan.com/tx/" + (await signedTxn).hash, "to see your transaction")
        } else {
            console.log("Error submitting transaction")
        }
    } catch (e) {
        console.log("Error Caught in Catch Statement: ", e)
    }
}


mintNFT("WALLET_ADDRESS", "METADATA_URL")
The last line of code calls the mintNFT function with the wallet address and metadata URL arguments. If you want some placeholder metadata for your NFT, use this URL: https://bafkreif4rv2kafqbmrmifwg7davpwmd4vgkehe63ryosdzajn7nnbifnfm.ipfs.nftstorage.link/
Step 3: Minting our NFT
Note, you will need some MATIC on Polygon Mumbai test network to proceed with this mint transaction
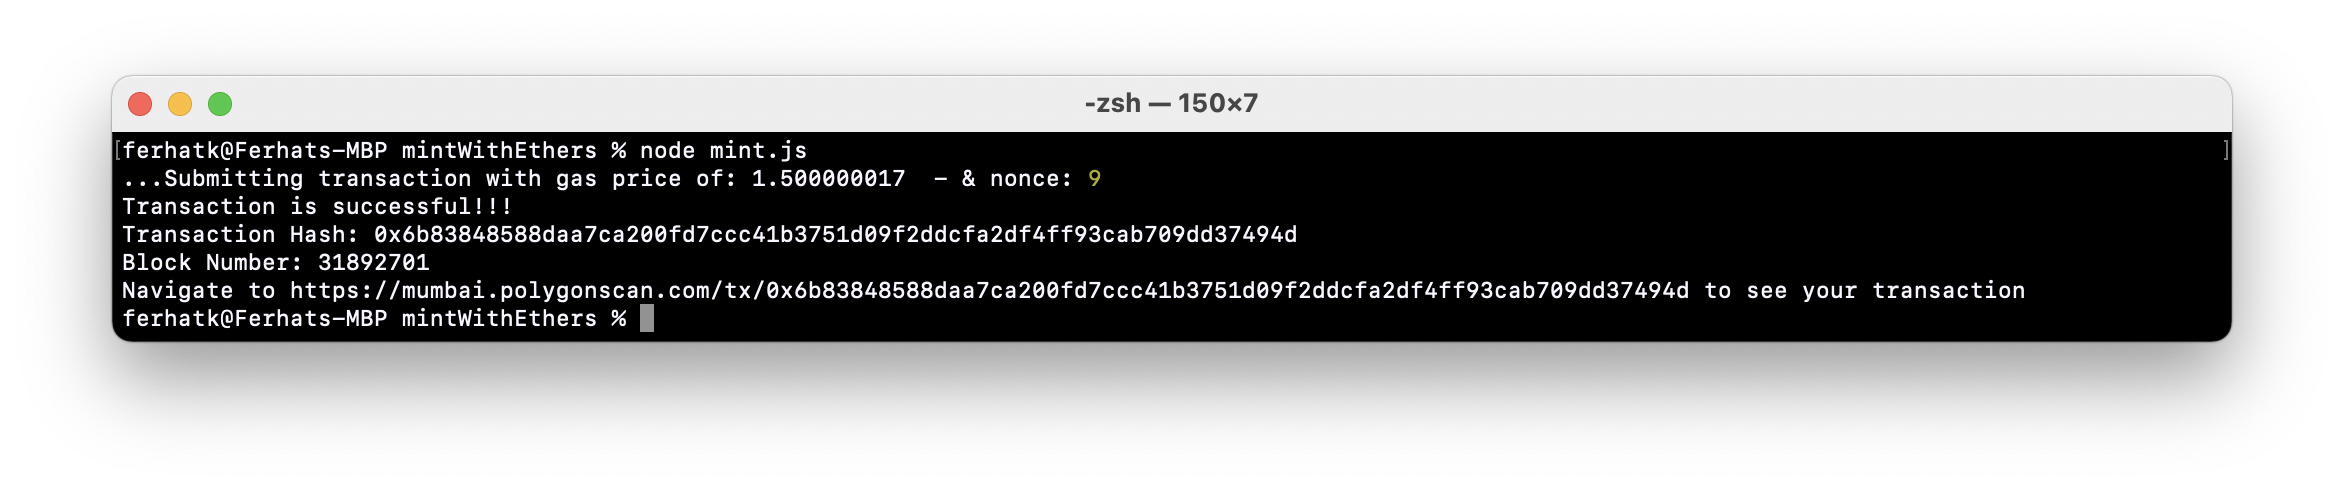
One command away from minting your NFT! Navigate to your terminal into your project's main directory and run the command node mint.js. The output should look like this:
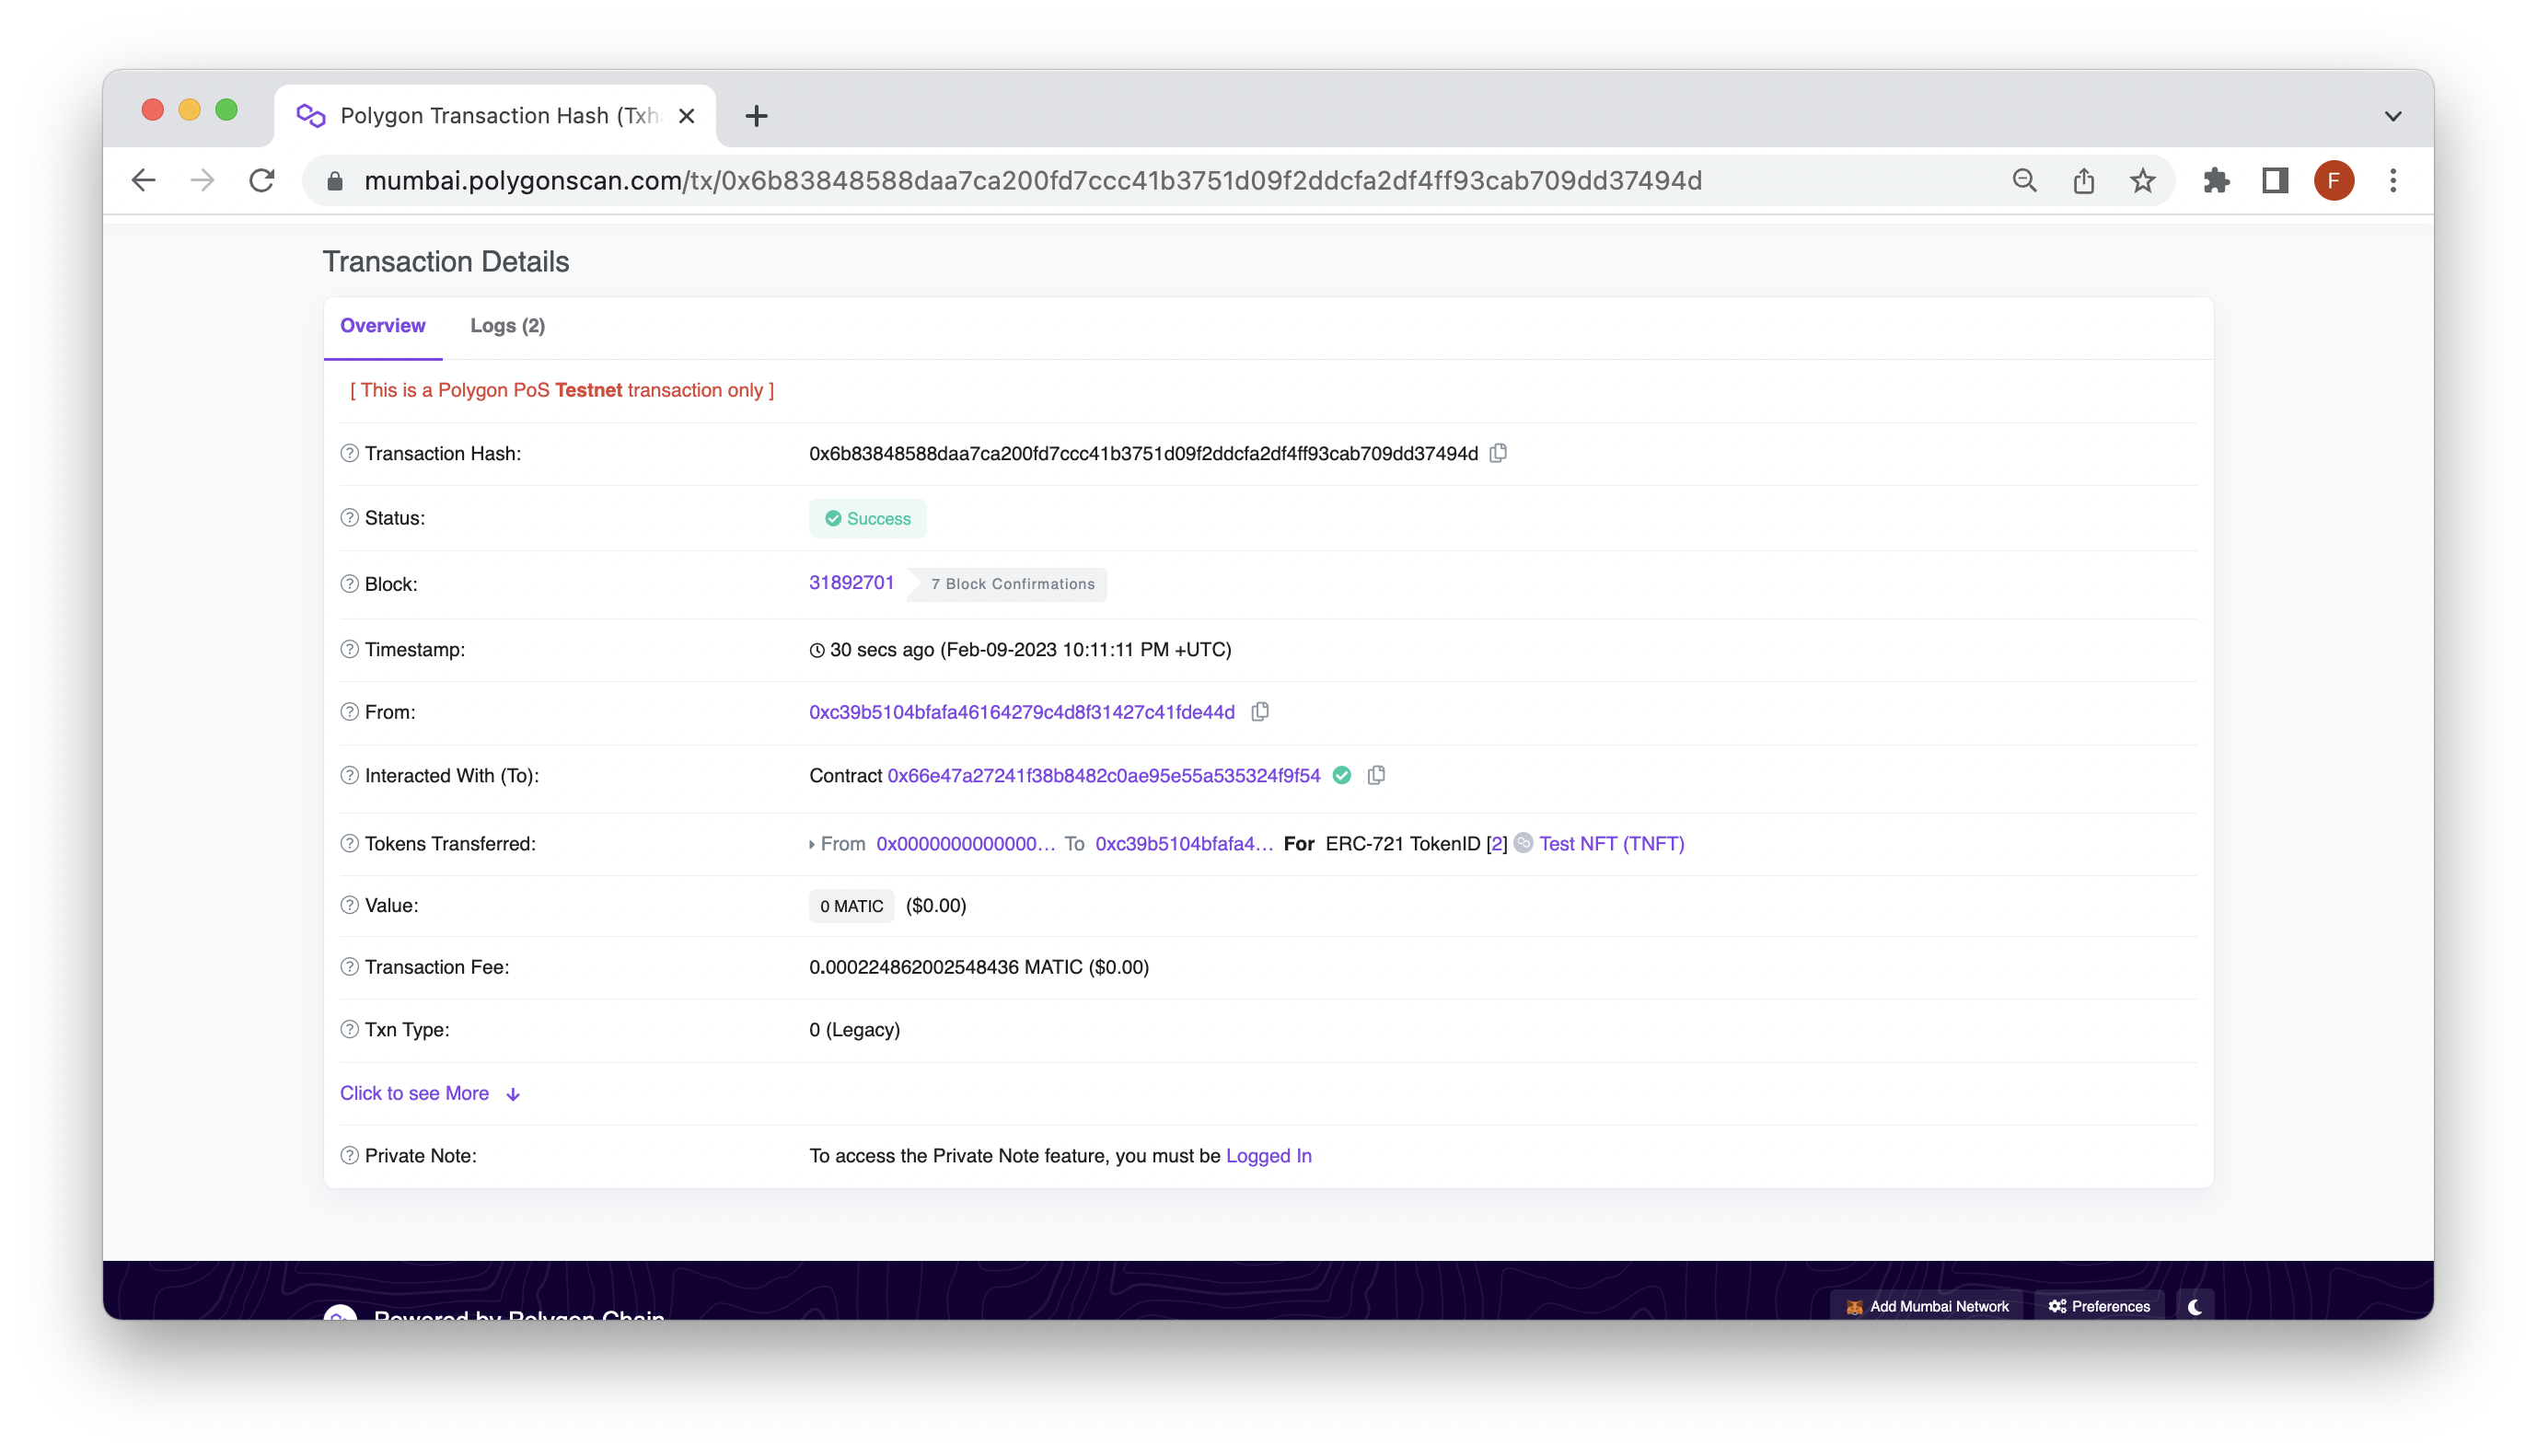
We can verify the NFT was minted by checking a Polygonscan and OpenSea:

Conclusion
That’s it! You have minted an NFT using Ethers.js! To learn more about Ethers, you can check out some of our other Web3 SDK guides or take a look at the Ethers documentation.
Subscribe to our newsletter for more articles and guides on Ethereum. If you have any feedback, feel free to reach out to us via Twitter. You can always chat with us on our Discord community server, featuring some of the coolest developers you'll ever meet :)