13 min read
Overview
A block explorer is a lifesaver whenever someone wants quick data about blocks or transactions. Block explorers like Etherscan are very popular amongst Ethereum developers and general Ethereum users. These explorers are used to read on-chain data, and sometimes explorers like Etherscan can also be used to interact with smart contracts. Today in this guide, we will see how we can make a very basic explorer to help you get started in your journey of becoming a blockchain data expert.
What You Will Need
- Knowledge of HTML, CSS, JavaScript & Bootstrap.
- Web3.js library.
- A Quicknode Ethereum node.
- A code editor (i.e., VScode).
What You Will Do
- Learn about block explorer.
- Create an Ethereum node endpoint.
- Create a block explorer in HTML, JavaScript using web3.js, and using Bootstrap CSS for styling.
What is a block explorer?
Blockchain data for public blockchains like Ethereum is accessible by anyone with an Ethereum node. Block explorer adds a layer of redefined data that can be accessed from a front-end, easy-to-use interface. Whether checking the status of a transaction, checking the transaction history of an account address, or even checking the entire block's transactions, we all use block explorers for all kinds of blockchain data review/analytics work. A lot of the time, block explorers are built to serve a specific functionality, and because of this, one might feel a need to create an explorer of their own with custom functionality.
Building a block explorer is a complex task because blockchain data is enormous and complex. Even after getting the blockchain data, one must filter and sort the data in the desired manner.
Quicknode provides easy access to blockchain data, so lifting at least some weight off your back. Now let's see how we can create our blockchain explorer, but before that, let us signup for an Ethereum node.
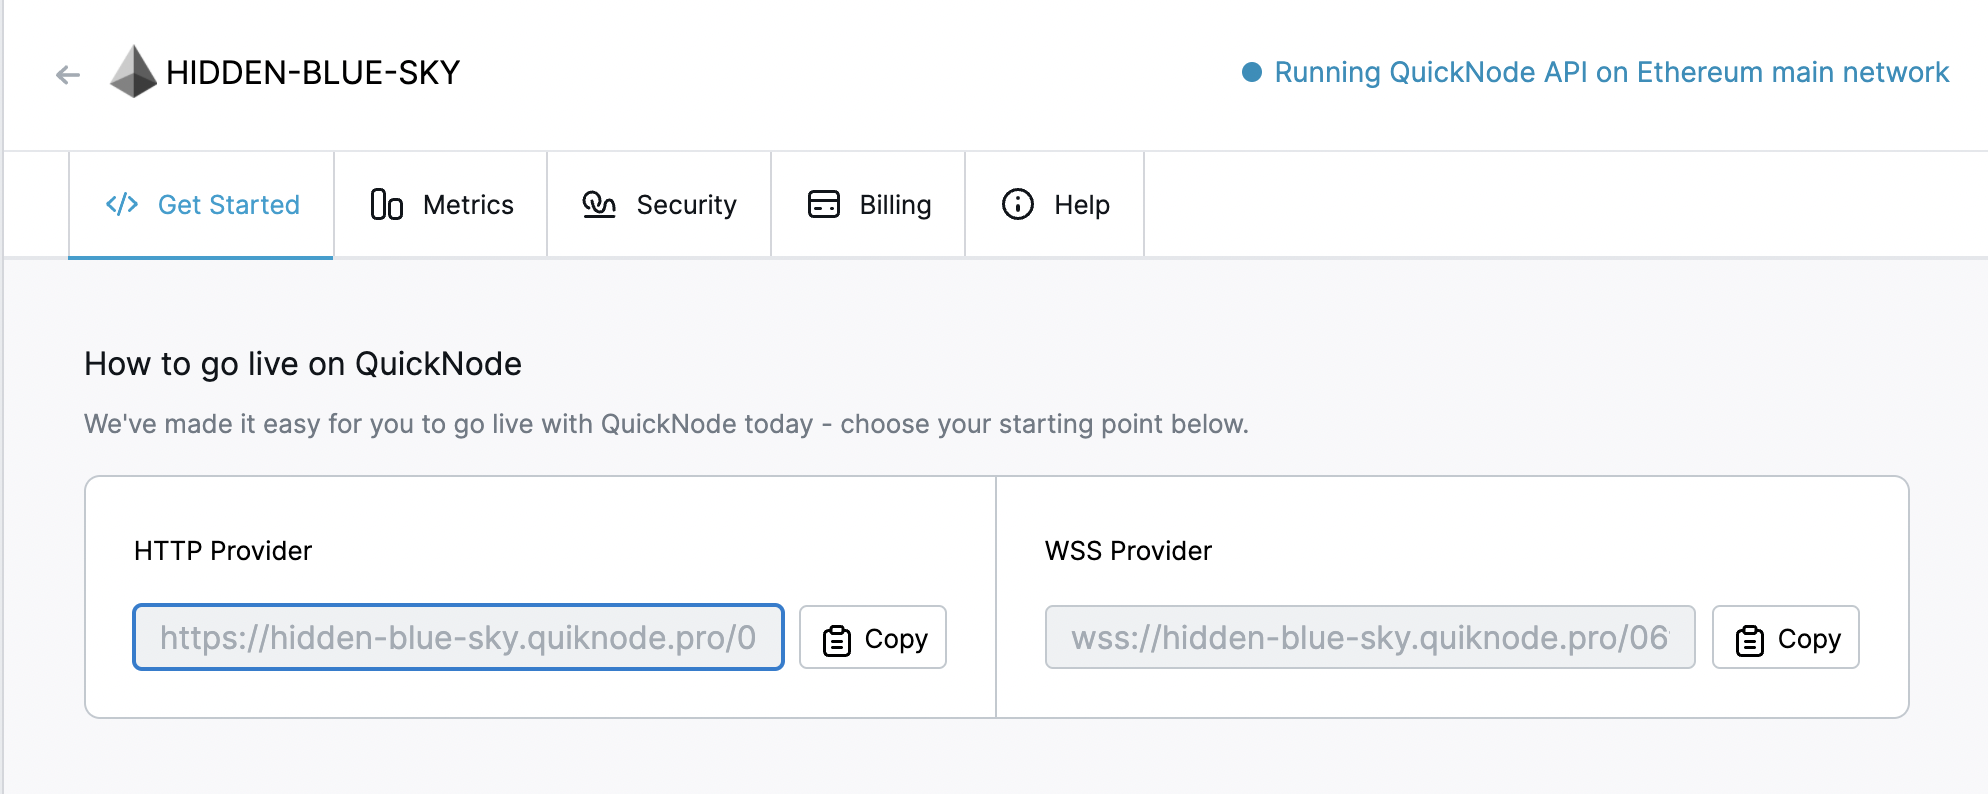
Getting a Quicknode Ethereum Endpoint
To get the raw blockchain data for our block explorer we will require an Ethereum node. We can use any public Ethereum RPC node but our application requires a lot of data and public RPCs are rate limited and slow. So, we'll use Quicknode to get fast access to on-chain data. You can sign up for a free Quicknode account here and set up an Ethereum endpoint.
Creating a block explorer
Now, let's create a very basic block explorer. We will make a webpage in plain HTML, Bootstrap for CSS, and JavaScript.
First, create a directory explorer and a directory named img, and copy-paste the following into your terminal:
mkdir explorer
cd explorer
mkdir img
Save any PNG format image in the img folder and name it logo.png, then go to the explorer directory and create a file explorer.html, open that in your code editor, and copy-paste the following in it.
<!DOCTYPE html>
<html lang="en">
  <head>
    <meta charset="utf-8">
    <meta http-equiv="X-UA-Compatible" content="IE=edge">
    <meta name="viewport" content="width=device-width, initial-scale=1">
    <title>Quicknode Explorer</title>
    <!-- Bootstrap -->
    <link rel="styleeet" href="https://maxcdn.bootstrapcdn.com/bootstrap/4.0.0/css/bootstrap.min.css" integrity="a384-Gn5384xqQ1aoWXA+058RXPxPg6fy4IWvTNh0E263XmFcJlSAwiGgFAW/dAiS6JXm" crossorigin="anonymous">
    <!-- Styles -->
    <style>
    body {
        margin: 0;
        padding-top: 15px;
        color: #ffffff;
        background-color: #171725;
    }

    h1 {
      margin: 15px 0px;
    }

    img {
      width: 15%;
    }

    canvas {
      display: block;
      vertical-align: bottom;
    }

    /* ---- particles.js container ---- */
    #particles-js {
      position: absolute;
      width: 100%;
      height: 100%;
    }
    </style>
  </head>
  <body>
    <!-- particles.js container -->
    <div id="particles-js"></div>
    <div class="container">
      <div class="row">
        <div class="col-lg-12 text-center" >
          <!-- Link to logo file here from full project -->
          <img src="img/logo.png" alt="logo">
          <h1>Quicknode Explorer</h1>
          <table class="table">
            <thead>
              <tr>
                <th scope="col">Block #</th>
                <th scope="col">Ha</th>
                <th scope="col">Gas_used</th>
                <th scope="col">Timestamp</th>
              </tr>
            </thead>
            <tbody>
            </tbody>
          </table>
        </div>
      </div>
    </div>

    <!-- Bootstrap -->
    <script src="https://code.jquery.com/jquery-3.2.1.slim.min.js" integrity="a384-KJ3o2DKtIkvYIK3UENzmM7KCkRr/rE9/Qpg6aAZGJwFDMVNA/GpGFF93hXpG5KkN" crossorigin="anonymous"></script>
    <script src="https://cdnjs.cloudflare.com/ajax/libs/popper.js/1.12.9/umd/popper.min.js" integrity="a384-ApNbgh9B+Y1QKtv3Rn7W3mgPxhU9K/ScQsAP7hUibX39j7fakFPskvXusvfa0b4Q" crossorigin="anonymous"></script>
    <script src="https://maxcdn.bootstrapcdn.com/bootstrap/4.0.0/js/bootstrap.min.js" integrity="a384-JZR6Spejh4U02d8jOt6vLEHfe/JQGiRRSQQxSfFWpi1MquVdAyjUar5+76PVCmYl" crossorigin="anonymous"></script>

    <!-- particles.js lib - https://github.com/VincentGarreau/particles.js -->
    <script src="https://cdn.jsdelivr.net/particles.js/2.0.0/particles.min.js"></script>

    <!-- Link to we3.min.js CDN delivery -->
    <script src="https://cdn.jsdelivr.net/npm/web3@latest/dist/web3.min.js"></script>

    <!--Explorer sccript which connects to node and gets values from blocks-->
    <script>
      var provider = 'ADD_YOUR_QUICKNODE_HERE'; // Add your quicknode HTTP provider link here
      var web3Provider = new Web3.providers.HttpProvider(provider);
      var web3 = new Web3(web3Provider);
      var numBlocks = 10; // Change the value based on the number of blocks to be retrieved.
      web3.eth.getBlockNumber().then((result) => {
        for (var i = 0; i < numBlocks; i++) {
          web3.eth.getBlock(result - i).then((block)=>{
            console.log("Latest Ethereum Block is ",block);
            var number = block.number;
            var ha = block.ha;
            var time = block.timestamp;
            var gas = block.gasUsed;
            $('tbody').append("<tr><td>" + number + "</td><td>" + ha + "</td><td>" + gas + "</td><td>" + time + "</td></tr>");
          });
        }
      });
    </script>

    <!--Background particles-->
    <script>
      particlesJS("particles-js", {
        "particles": {
          "number": {
            "value": 355,
            "density": {
              "enable": true,
              "value_area": 789.1476416322727
            }
          },
          "color": {
            "value": "#ffffff"
          },
          "ape": {
            "type": "circle",
            "stroke": {
              "width": 0,
              "color": "#000000"
            },
            "polygon": {
              "nb_sides": 5
            },
            "image": {
              "src": "img/github.svg",
              "width": 100,
              "height": 100
            }
          },
          "opacity": {
            "value": 0.48927153781200905,
            "random": false,
            "anim": {
              "enable": true,
              "speed": 0.2,
              "opacity_min": 0,
              "sync": false
            }
          },
          "size": {
            "value": 2,
            "random": true,
            "anim": {
              "enable": true,
              "speed": 2,
              "size_min": 0,
              "sync": false
            }
          },
          "line_linked": {
            "enable": false,
            "distance": 150,
            "color": "#ffffff",
            "opacity": 0.4,
            "width": 1
          },
          "move": {
            "enable": true,
            "speed": 0.2,
            "direction": "none",
            "random": true,
            "straight": false,
            "out_mode": "out",
            "bounce": false,
            "attract": {
              "enable": false,
              "rotateX": 600,
              "rotateY": 1200
            }
          }
        },
        "interactivity": {
          "detect_on": "canvas",
          "events": {
            "onhover": {
              "enable": true,
              "mode": "bubble"
            },
            "onclick": {
              "enable": true,
              "mode": "pu"
            },
            "resize": true
          },
          "modes": {
            "grab": {
              "distance": 400,
              "line_linked": {
                "opacity": 1
              }
            },
            "bubble": {
              "distance": 83.91608391608392,
              "size": 1,
              "duration": 3,
              "opacity": 1,
              "speed": 3
            },
            "repulse": {
              "distance": 200,
              "duration": 0.4
            },
            "pu": {
              "particles_nb": 4
            },
            "remove": {
              "particles_nb": 2
            }
          }
        },
        "retina_detect": true
      });
    </script>
  </body>
</html>
Now let us see what's going on in the code above.
- Line 1-7: Basic HTML code to include metadata for the title, viewport, etc.
- Line 9: Importing the bootstrap min file.
- Line 11-38: CSS for HTML elements and background animation for the page.
- Line 40-63: Creating HTML elements for the background and a table to show the data along with columns for Block #, Hash, Gas_used, and Timestamp.
- Line 66-74: Importing relevant libraries along with Web3.js.
- Line 77-94: Script to call the latest block number, run a loop to get past numBlocks blocks from the newest block, and run getBlock on the latest and past numBlocks blocks. Then printing the Block number, block hash, timestamp of when the block was mined, and gas used in the block.
- Line 96-207: Optional cosmetic script to move particles in the background.
Now go to line 78 and replace ADD_YOUR_QUICKNODE_HERE with your Quicknode HTTP URL we got in the last step.
Open the file in a browser; you would see something like this:
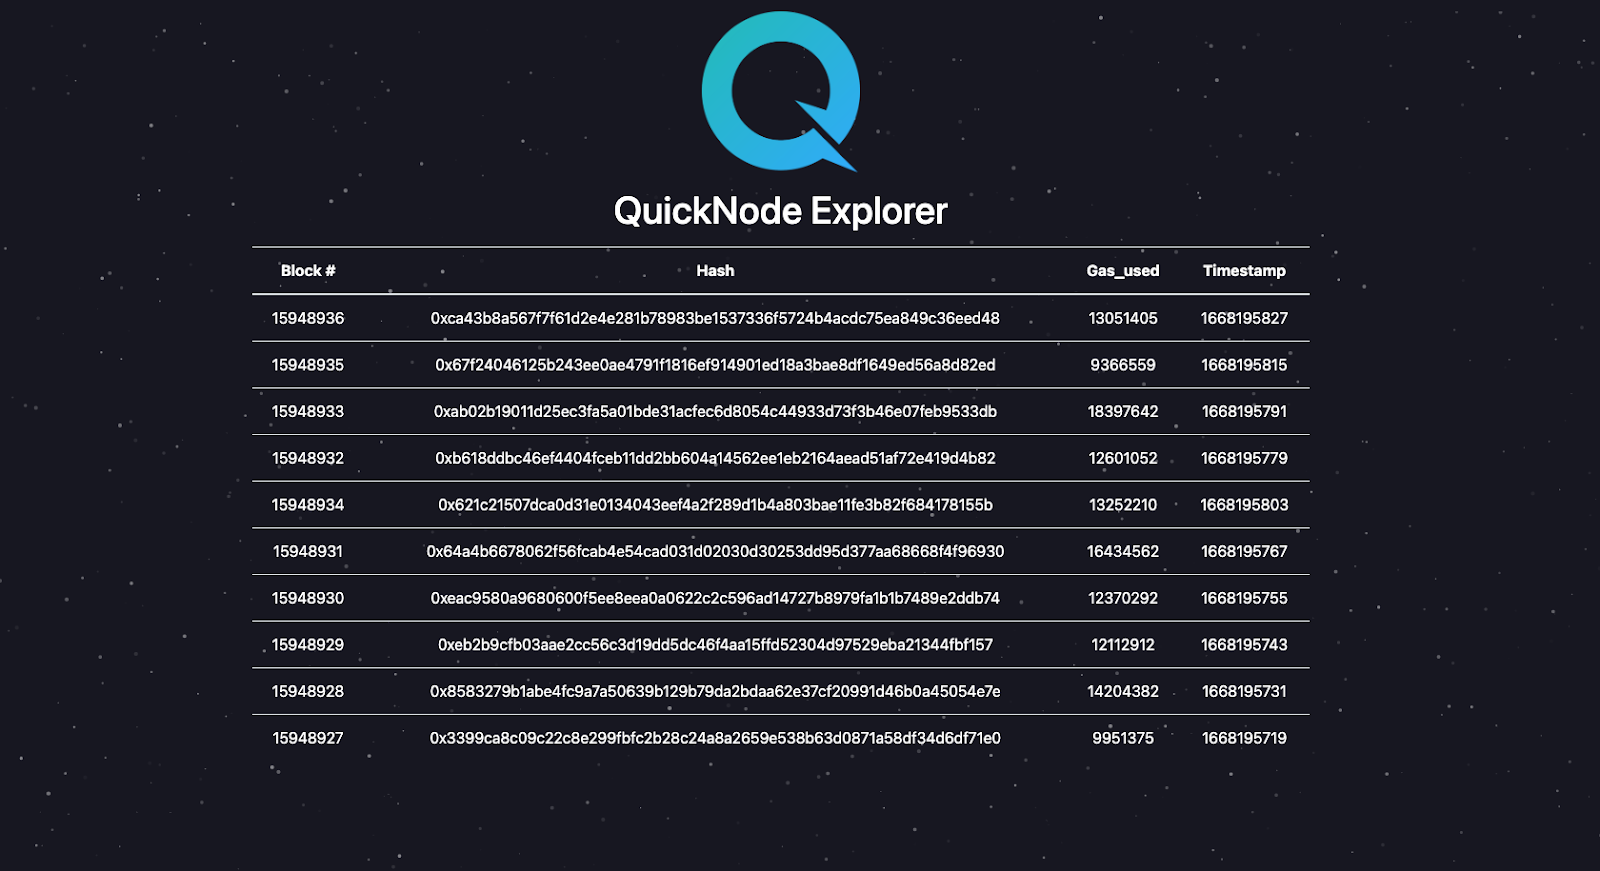
You can later play around with it and try to add more features. Like search functionality, in-depth block, and transaction data. You can also learn about how to get transaction and block data from Quicknode docs.
Conclusion
Kudos to making it here. Until now, we learned about block explorers and made a small block explorer. All the best to you in your journey.
Join our Discord if you have any questions, or reach out to us via Twitter.
We ❤️ Feedback!
If you have any feedback or questions on this guide, let us know. We'd love to hear from you!