
13 min read
Overview
In our Account Abstraction and ERC-4337 - Part 1 guide, we laid the foundation for understanding EIP-4337. In this follow-up guide, we'll get hands-on, diving into the practical steps of building and deploying an ERC-4337-compliant smart contract using Stackup. Ready to dive deeper? Let's go!
What You Will Need
- A fundamental understanding of how EIP-4337 works (check out Part 1)
- Yarn installed
- A Stackup API Key & the Stackup repository installed
- A code editor (e.g., VSCode)
- A terminal window
What You Will Do
- Recap your understanding of what is Account Abstraction (ERC-4337)
- Create a ERC-4337 smart contract using Stackup
- Send a transaction using a smart contract account and ERC-4337
Revisiting Account Abstraction in Ethereum: ERC-4337 Basics
What is Account Abstraction (ERC-4337)?
Before we delve deeper into ERC-4337 implementation, let's revisit the fundamental concepts of Account Abstraction in Ethereum as covered in Part 1 of this guide series:
- Ethereum's Account Challenges: We discussed the existing issues with Ethereum's account system. Externally Owned Accounts (EOA) have limitations in user experience, particularly when interacting with smart contracts, performing multi-step operations or managing seed phrases. Smart Contract Accounts offer some solutions, but they also have their own challenges.
- Introduction to ERC-4337: ERC-4337, often referred to as Account Abstraction Using Alt Mempool, emerged as a promising solution to the mentioned challenges. This Ethereum Improvement Proposal (EIP) focuses on enhancing the wallet user experience.
Key Components of ERC-4337
- UserOperations: This is the action the user wants to take. This could be transferring funds from the smart contract account, interacting with another smart contract, or doing a social recovery call.
UserOperationobjects have similar fields to transaction objects we see in Ethereum today. However, fields like nonce and signature are account-specific (as implemented by ERC-4337). - Bundlers: Whitelisted entities that gather and submit UserOperations to the Ethereum network via the
EntryPointcontract. Since Bundlers are incentivized to stay active, they receive fees and prioritize whichUserOperationthey bundle for maximum profitability. - EntryPoint: A single smart contract that validates and executes UserOperations. This is the contract most or all Bundlers on the network will be interacting with in order to send batched
UserOperationobjects. - Contract Accounts: These are contract accounts entities control.
- Paymaster: Optional entities that can sponsor transaction fees (e.g., another entity can pay for your transaction fees).
- Aggregators: Help validate signatures from multiple UserOperations together.
Now that we've refreshed our memory on the concepts of ERC-4337, let's delve into how to build and interact with ERC-4337 compliant smart contracts.
Exploring SimpleAccount.sol: An ERC-4337 Contract Example
The Ethereum foundation has implemented a minimalistic example of an ERC-4337 compliant contract called SimpleAccount.sol.
Let's take a few minutes to review the code below. We won't need to create a file with this code but instead just review it to understand the functionality.
// SPDX-License-Identifier: GPL-3.0
pragma solidity ^0.8.12;

/* solhint-disable avoid-low-level-calls */
/* solhint-disable no-inline-assembly */
/* solhint-disable reason-string */

import "@openzeppelin/contracts/utils/cryptography/ECDSA.sol";
import "@openzeppelin/contracts/proxy/utils/Initializable.sol";
import "@openzeppelin/contracts/proxy/utils/UUPSUpgradeable.sol";

import "../core/BaseAccount.sol";
import "./callback/TokenCallbackHandler.sol";

/**
  * minimal account.
  *  this is sample minimal account.
  *  has execute, eth handling methods
  *  has a single signer that can send requests through the entryPoint.
  */
contract SimpleAccount is BaseAccount, TokenCallbackHandler, UUPSUpgradeable, Initializable {
    using ECDSA for bytes32;

    address public owner;

    IEntryPoint private immutable _entryPoint;

    event SimpleAccountInitialized(IEntryPoint indexed entryPoint, address indexed owner);

    modifier onlyOwner() {
        _onlyOwner();
        _;
    }

    /// @inheritdoc BaseAccount
    function entryPoint() public view virtual override returns (IEntryPoint) {
        return _entryPoint;
    }


    // solhint-disable-next-line no-empty-blocks
    receive() external payable {}

    constructor(IEntryPoint anEntryPoint) {
        _entryPoint = anEntryPoint;
        _disableInitializers();
    }

    function _onlyOwner() internal view {
        //directly from EOA owner, or through the account itself (which gets redirected through execute())
        require(msg.sender == owner || msg.sender == address(this), "only owner");
    }

    /**
     * execute a transaction (called directly from owner, or by entryPoint)
     */
    function execute(address dest, uint256 value, bytes calldata func) external {
        _requireFromEntryPointOrOwner();
        _call(dest, value, func);
    }

    /**
     * execute a sequence of transactions
     * @dev to reduce gas consumption for trivial case (no value), use a zero-length array to mean zero value
     */
    function executeBatch(address[] calldata dest, uint256[] calldata value, bytes[] calldata func) external {
        _requireFromEntryPointOrOwner();
        require(dest.length == func.length && (value.length == 0 || value.length == func.length), "wrong array lengths");
        if (value.length == 0) {
            for (uint256 i = 0; i < dest.length; i++) {
                _call(dest[i], 0, func[i]);
            }
        } else {
            for (uint256 i = 0; i < dest.length; i++) {
                _call(dest[i], value[i], func[i]);
            }
        }
    }

    /**
     * @dev The _entryPoint member is immutable, to reduce gas consumption.  To upgrade EntryPoint,
     * a new implementation of SimpleAccount must be deployed with the new EntryPoint address, then upgrading
      * the implementation by calling `upgradeTo()`
     */
    function initialize(address anOwner) public virtual initializer {
        _initialize(anOwner);
    }

    function _initialize(address anOwner) internal virtual {
        owner = anOwner;
        emit SimpleAccountInitialized(_entryPoint, owner);
    }

    // Require the function call went through EntryPoint or owner
    function _requireFromEntryPointOrOwner() internal view {
        require(msg.sender == address(entryPoint()) || msg.sender == owner, "account: not Owner or EntryPoint");
    }

    /// implement template method of BaseAccount
    function _validateSignature(UserOperation calldata userOp, bytes32 userOpHash)
    internal override virtual returns (uint256 validationData) {
        bytes32 hash = userOpHash.toEthSignedMessageHash();
        if (owner != hash.recover(userOp.signature))
            return SIG_VALIDATION_FAILED;
        return 0;
    }

    function _call(address target, uint256 value, bytes memory data) internal {
        (bool success, bytes memory result) = target.call{value : value}(data);
        if (!success) {
            assembly {
                revert(add(result, 32), mload(result))
            }
        }
    }

    /**
     * check current account deposit in the entryPoint
     */
    function getDeposit() public view returns (uint256) {
        return entryPoint().balanceOf(address(this));
    }

    /**
     * deposit more funds for this account in the entryPoint
     */
    function addDeposit() public payable {
        entryPoint().depositTo{value : msg.value}(address(this));
    }

    /**
     * withdraw value from the account's deposit
     * @param withdrawAddress target to send to
     * @param amount to withdraw
     */
    function withdrawDepositTo(address payable withdrawAddress, uint256 amount) public onlyOwner {
        entryPoint().withdrawTo(withdrawAddress, amount);
    }

    function _authorizeUpgrade(address newImplementation) internal view override {
        (newImplementation);
        _onlyOwner();
    }
}
Let's recap the code.
The SimpleAccount contract above is controlled by an external owner address and is designed to interact with an EntryPoint contract (per the ERC-4337 standard), allowing the owner to execute transactions without paying gas themselves. The contract integrates with OpenZeppelin's library for other functionalities like cryptographic signature validation (ECDSA) and upgradeable contract patterns (UUPSUpgradeable and Initializable. It also imports the BaseAccount and callback handler. The BaseAccount is a core component that keeps track of the smart contract's nonce, assists in UserOperation payload validation, EntryPoint interaction, payment for execution (i.e., payPrefund()), and extensibility, allowing for custom implementations for functions like, _validateSignature(), _validateNonce(), and _payPrefund().
The state variable owner stores the account's owner address, and _entryPoint is an immutable reference to an external contract that serves as the EntryPoint.
Two main functions, execute and executeBatch, allow the owner or the relay system's entry point to send transactions or a sequence of transactions, respectively. Both functions first check if the sender is either the EntryPoint or the owner before processing.
The contract also supports upgradeability to a new owner, but any updates to the EntryPoint (e.g., _entryPoint) will require a new smart contract account deployment.
Now, to make things easier, we'll be using Stackup's SDK to deploy an ERC-4337 compatible contract and start conducting operations like approving ERC-20 tokens and transferring ETH and tokens.
Developing ERC-4337 Smart Contracts with Stackup
The ERC-4337 compliant contract we'll be developing in this section comes from Stackup. It's a good starter template for developers just getting started with Account Abstraction.
Developer Setup
1. First, open your terminal window and run the following terminal command:
git clone https://github.com/stackup-wallet/erc-4337-examples.git
cd erc-4337-examples
yarn install
The command above clones and installs the dependencies of the associated GitHub repository.
2. Next, we'll configure our ERC-4337 contract using the init command:
yarn run init
This will create a config.json file, with values such as:
rpcUrl: This RPC URL will support the methods we call from our ERC-4337 contract. An API Key from Stackup is needed for this fieldsigningKey: The key to generate a UserOperation signature. It is also used by the contract account to validate transactionspaymaster.rpcUrl: The key used to generate a UserOperation signature. The signature is used by the contract account to validate transactionspaymaster.context: Arbitrary field dependent on the paymaster you're interacting with
Create a Stackup API Key
3. Now, with the config.json generated, we'll need to fill in values such as the RPC URL. For this, navigate to https://app.stackup.sh/sign-in, create an account, and then you'll be prompted to select a chain. Select the Etheruem Sepolia chain (for the purposes of this guide), then click Next. Then, click on your created bundler instance and click the API Key button. With your API Key copied, navigate back to your config.json file and input the API Key into all the rpcUrl fields.
Your config.json should look similar to this:
{
  "rpcUrl": "https://api.stackup.sh/v1/node/cd9af3b13c47d203af0b48513615bef69ec8c9072c24bbf2fd9ed9c8f97d6428",
  "signingKey": "0xbeacd206e9870af02243e2c1cd253a1440966f04c553d7e696c0271a17edd9e",
  "paymaster": {
    "rpcUrl": "https://api.stackup.sh/v1/paymaster/cd9af3b13c47d203af0b48513615bef69ec8c9072c24bbf2fd9ed9c8f97d6428",
    "context": {}
  }
}
Remember to save the file!
Create the Smart Contract Account Address
4. With our configuration setup, we can create a smart contract account as defined in our config file. Run the command below in your terminal, and an address will be returned. The smart contract account is not deployed yet, but the address will be generated so we know beforehand.
yarn run simpleAccount address
To see what actually is being executed, navigate to the
scripts/simpleAccount/address.tsfile.
You should see an output like this:
$ ts-node scripts/simpleAccount/index.ts address
SimpleAccount address: 0xD4494616f04ebd65E407330672c4C5A07BA5270F
✨  Done in 1.75s.
In the next section, we'll fund the SimpleAccount address we just generated. Note that the contract is not deployed yet.
Fund the Smart Contract Account
Now, let's fund our smart contract account's (e.g. SimpleAccount) address that we generated in the last section.
You can use the Quicknode Multi-Chain Faucet and send some testnet ETH to your personal wallet and then transfer it to the SimpleAccount address. Note that the Facuet requires you have a mainnet balance on the address being funded. If you already have test ETH in another wallet, you can also transfer it to your smart contract (SimpleAccount) address instead of using the Faucet first.
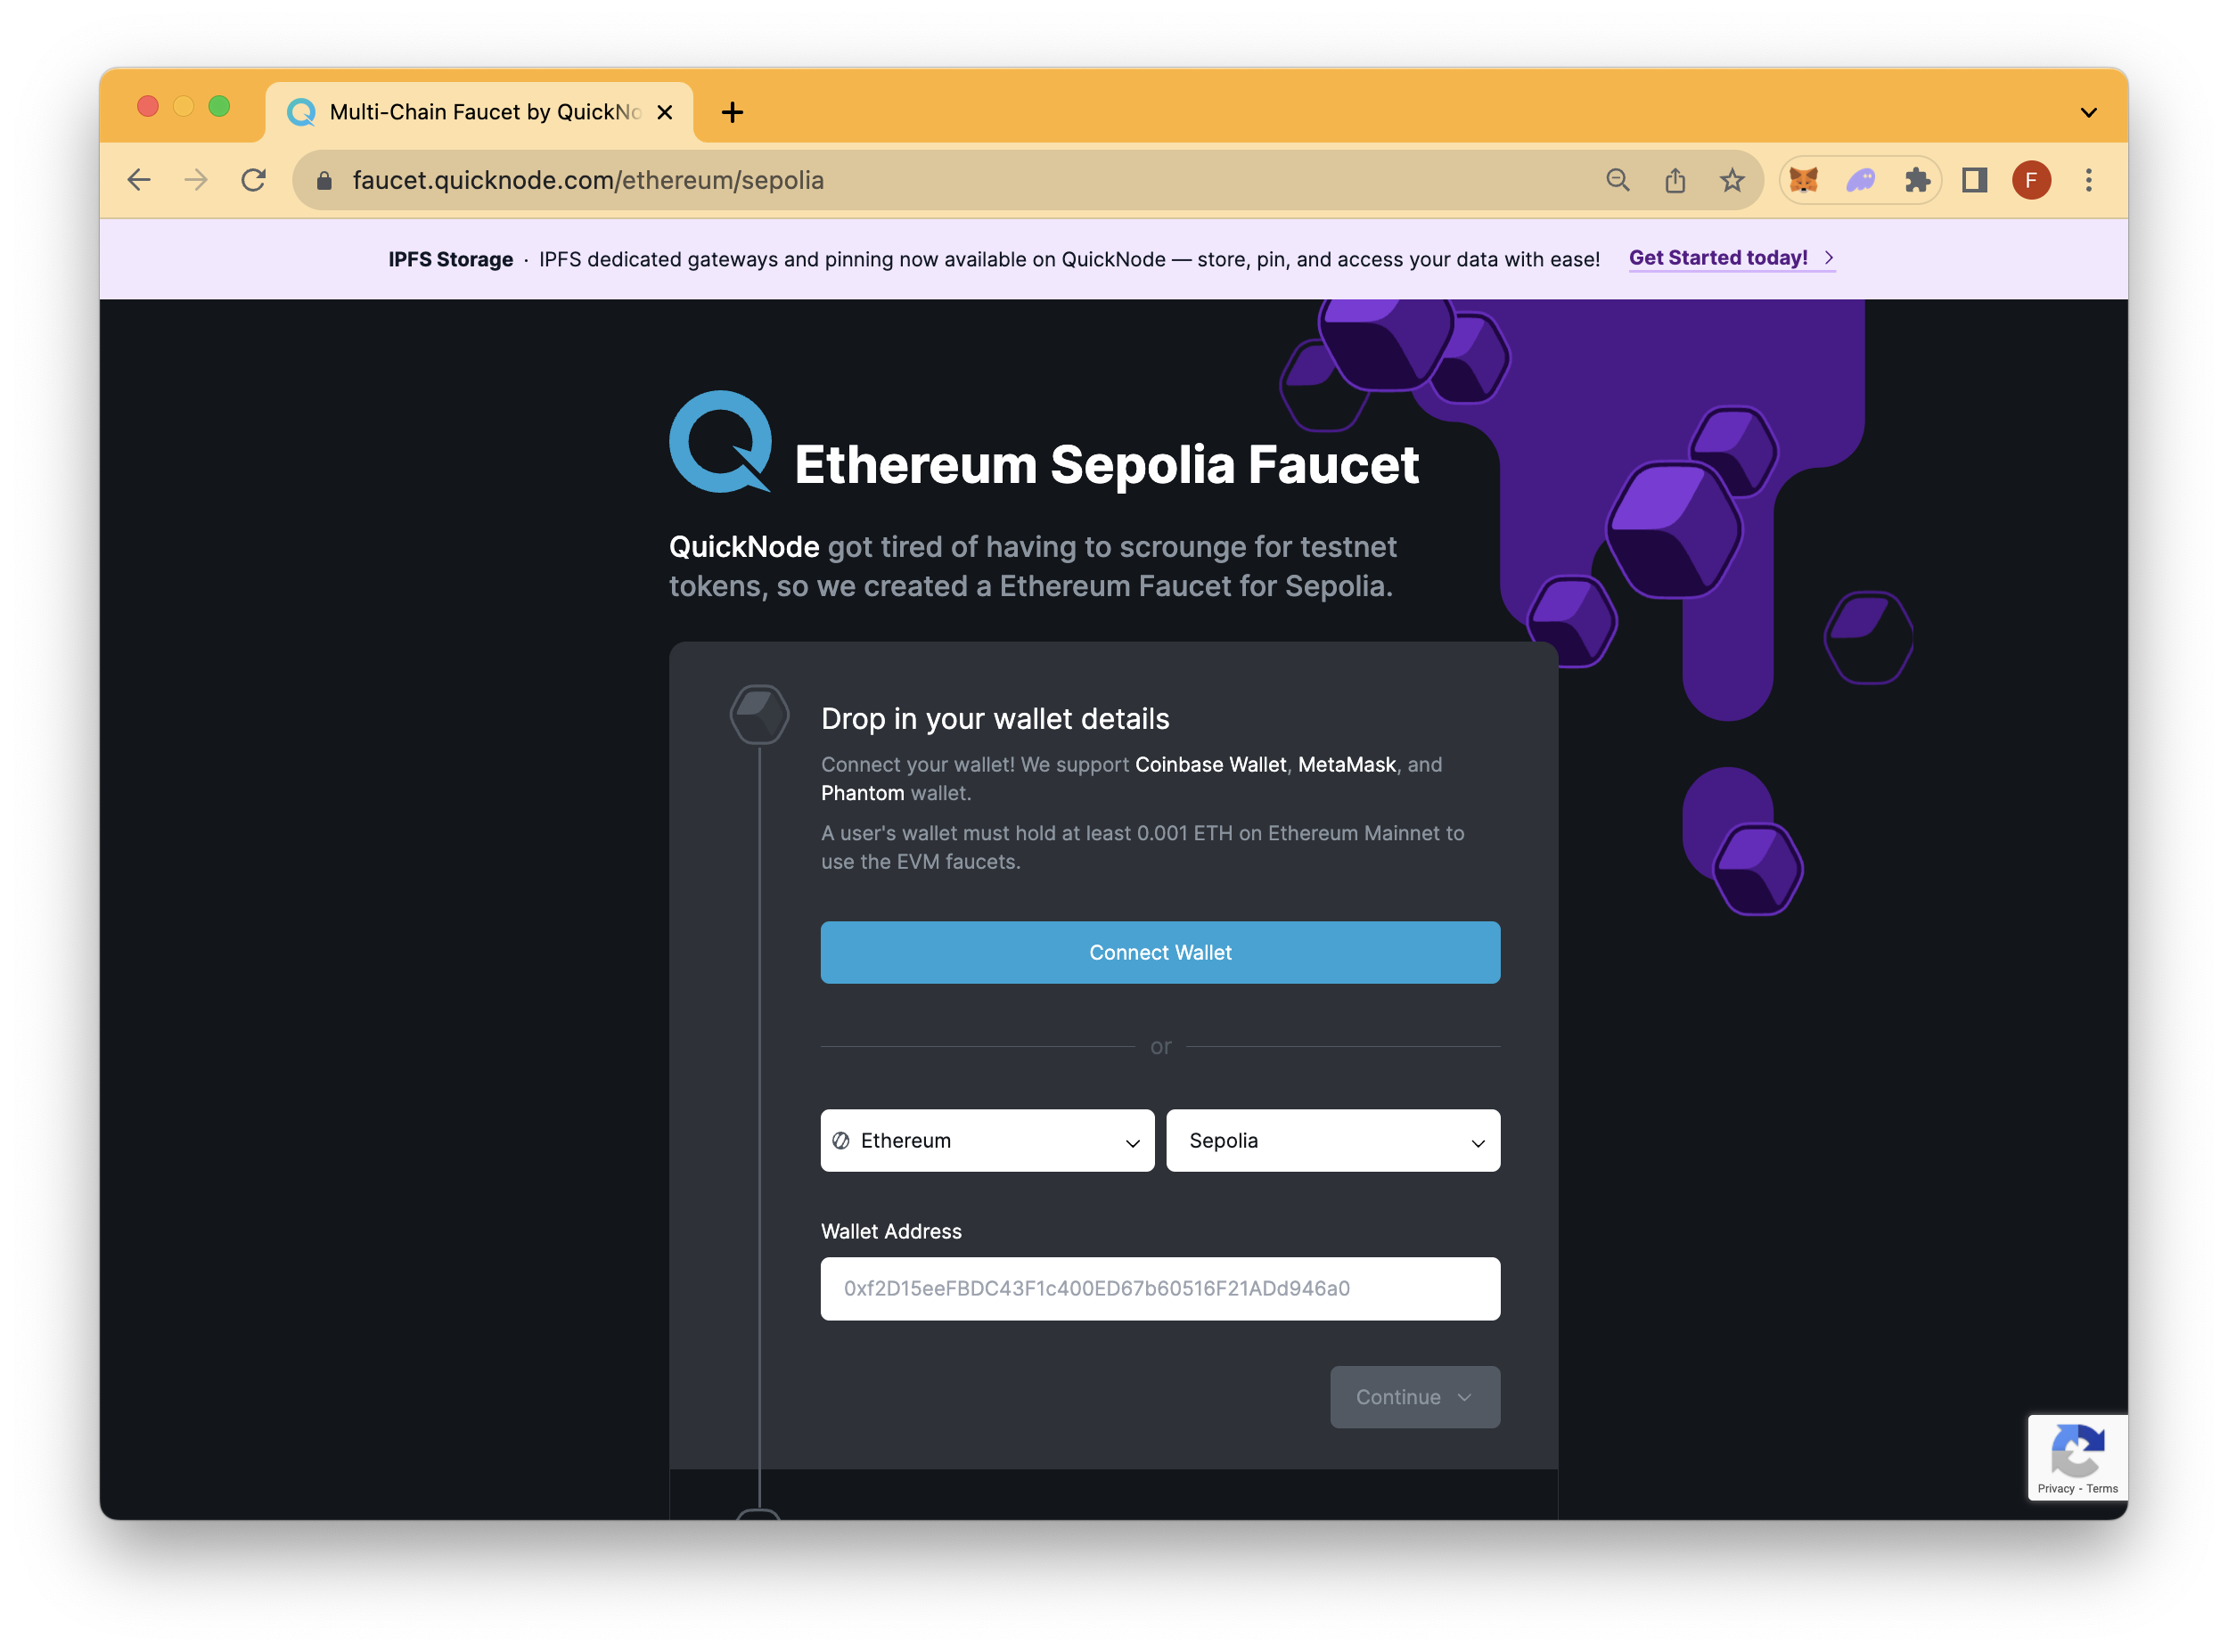
An alternative Sepolia Faucet can also be found here. Use at your own caution.
Initiate a Transfer from SimpleAccount to Another Address
With our smart contract account (e.g. SimpleAccount) funded, we can now initiate a transfer from our smart contract account. We recommend having at least .01 ETH to test a ETH transfer (plus gas fees). Paste the following command below into your terminal window, but remember to replace placeholder values such as address and eth with actual values.
yarn run simpleAccount transfer --to {address} --amount {eth}
To see what code is being executed when you run this command, navigate to the
scripts/simpleAccount/transfer.tsfile.
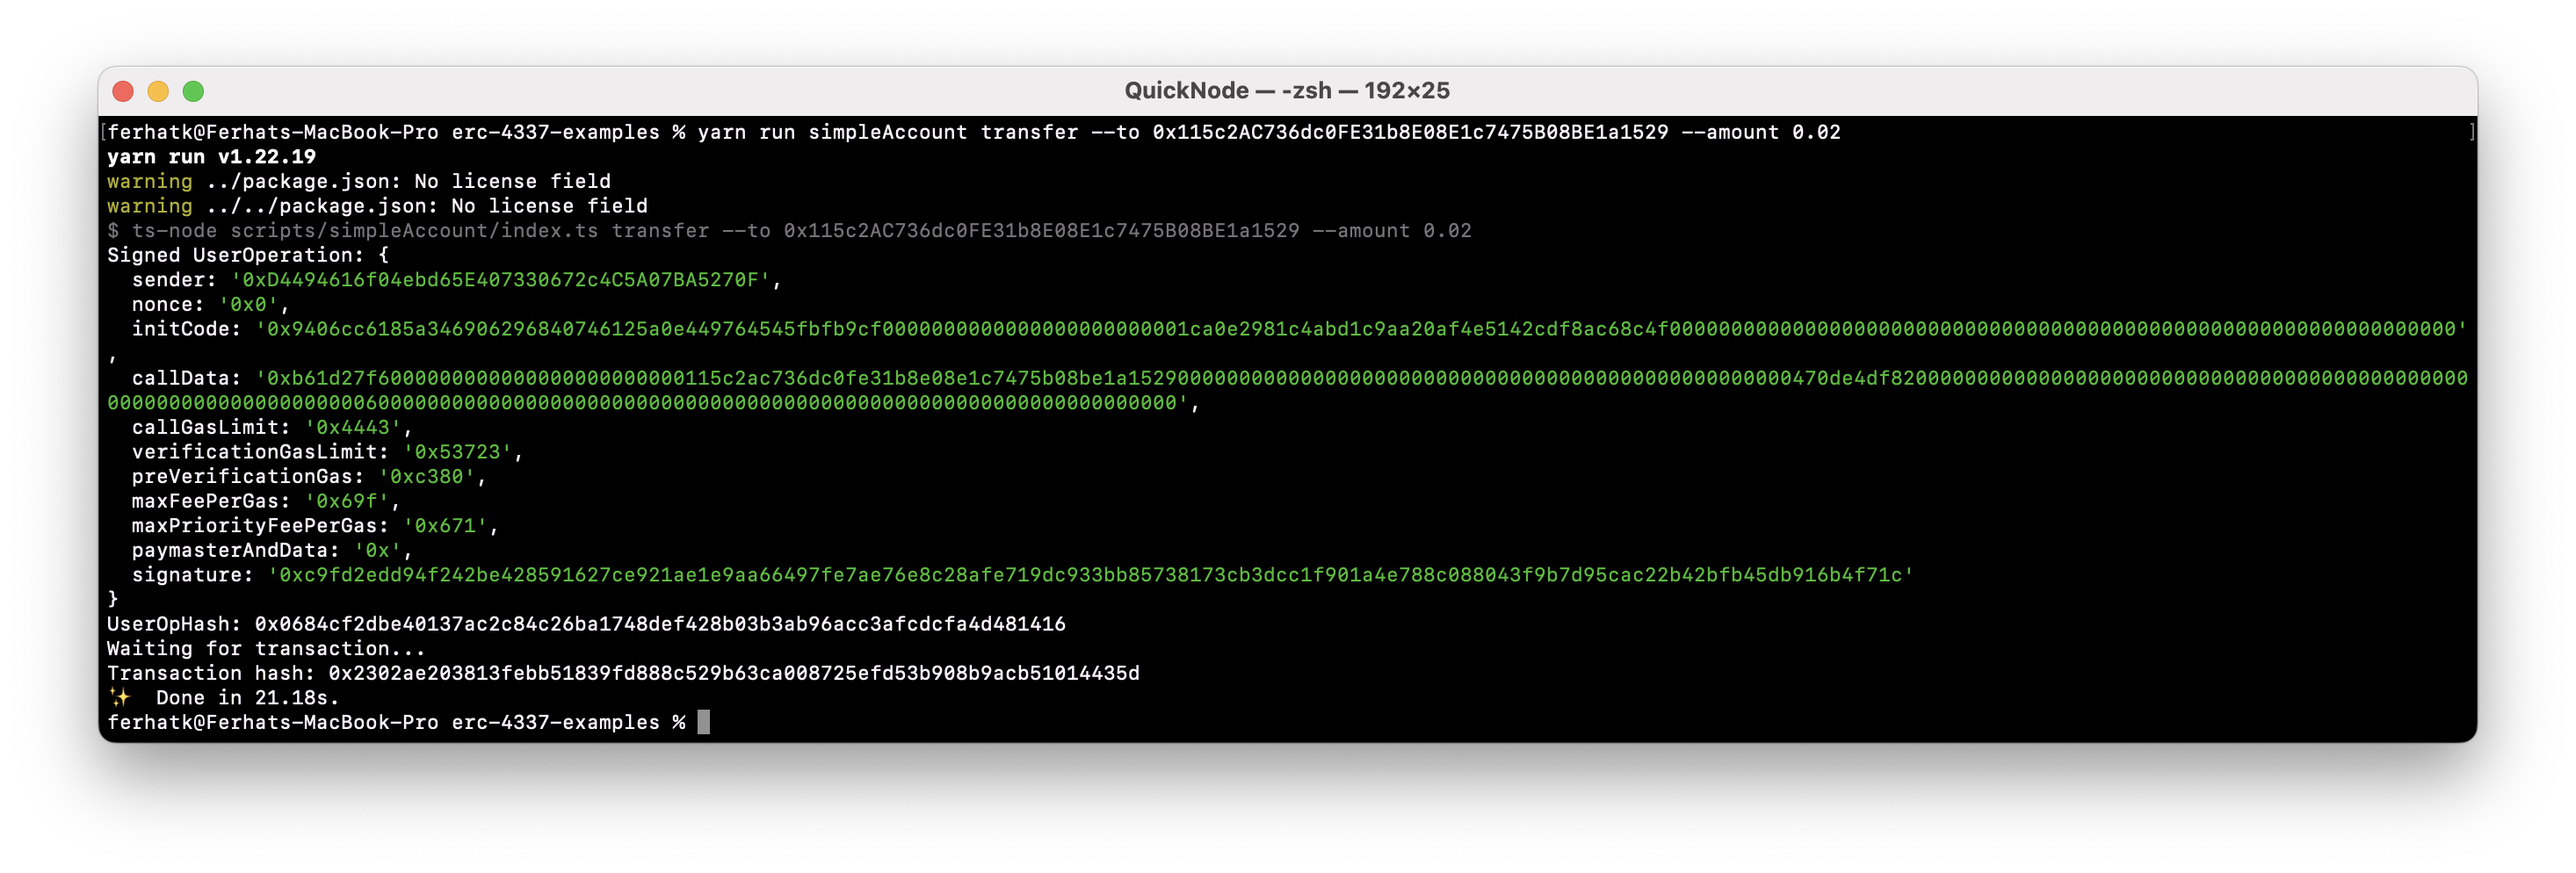
In simplified terms, the command above deploys the SimpleAccount contract, creates a UserOperation payload, signs it, and then sends it to the Bundler (as defined in config.json).
In technical terms, it:
- Takes the transfer to address (
t) and ether amount (amt) in themainfunction - The function will then check for middleware (in case of a paymaster)
- Initializes a SimpleAccount contract with the given config.json settings
- Parses the address and amount values
- Signs and calls the
executefunction passing in the values above - Returns the UserOperation hash and transaction hash
Now, take a moment to review the transaction on Etherscan by plugging in the transaction hash. In the next section, we'll dive into what exactly occurred during these steps and what we can do moving forward.
Analyzing the Lifecycle of the Smart Contract Account Transaction
With our transfer from our Smart Contract Account successful, let's dig into what actually happened.
Going back to Etherscan, we review the transaction hash the transfer occurred in:
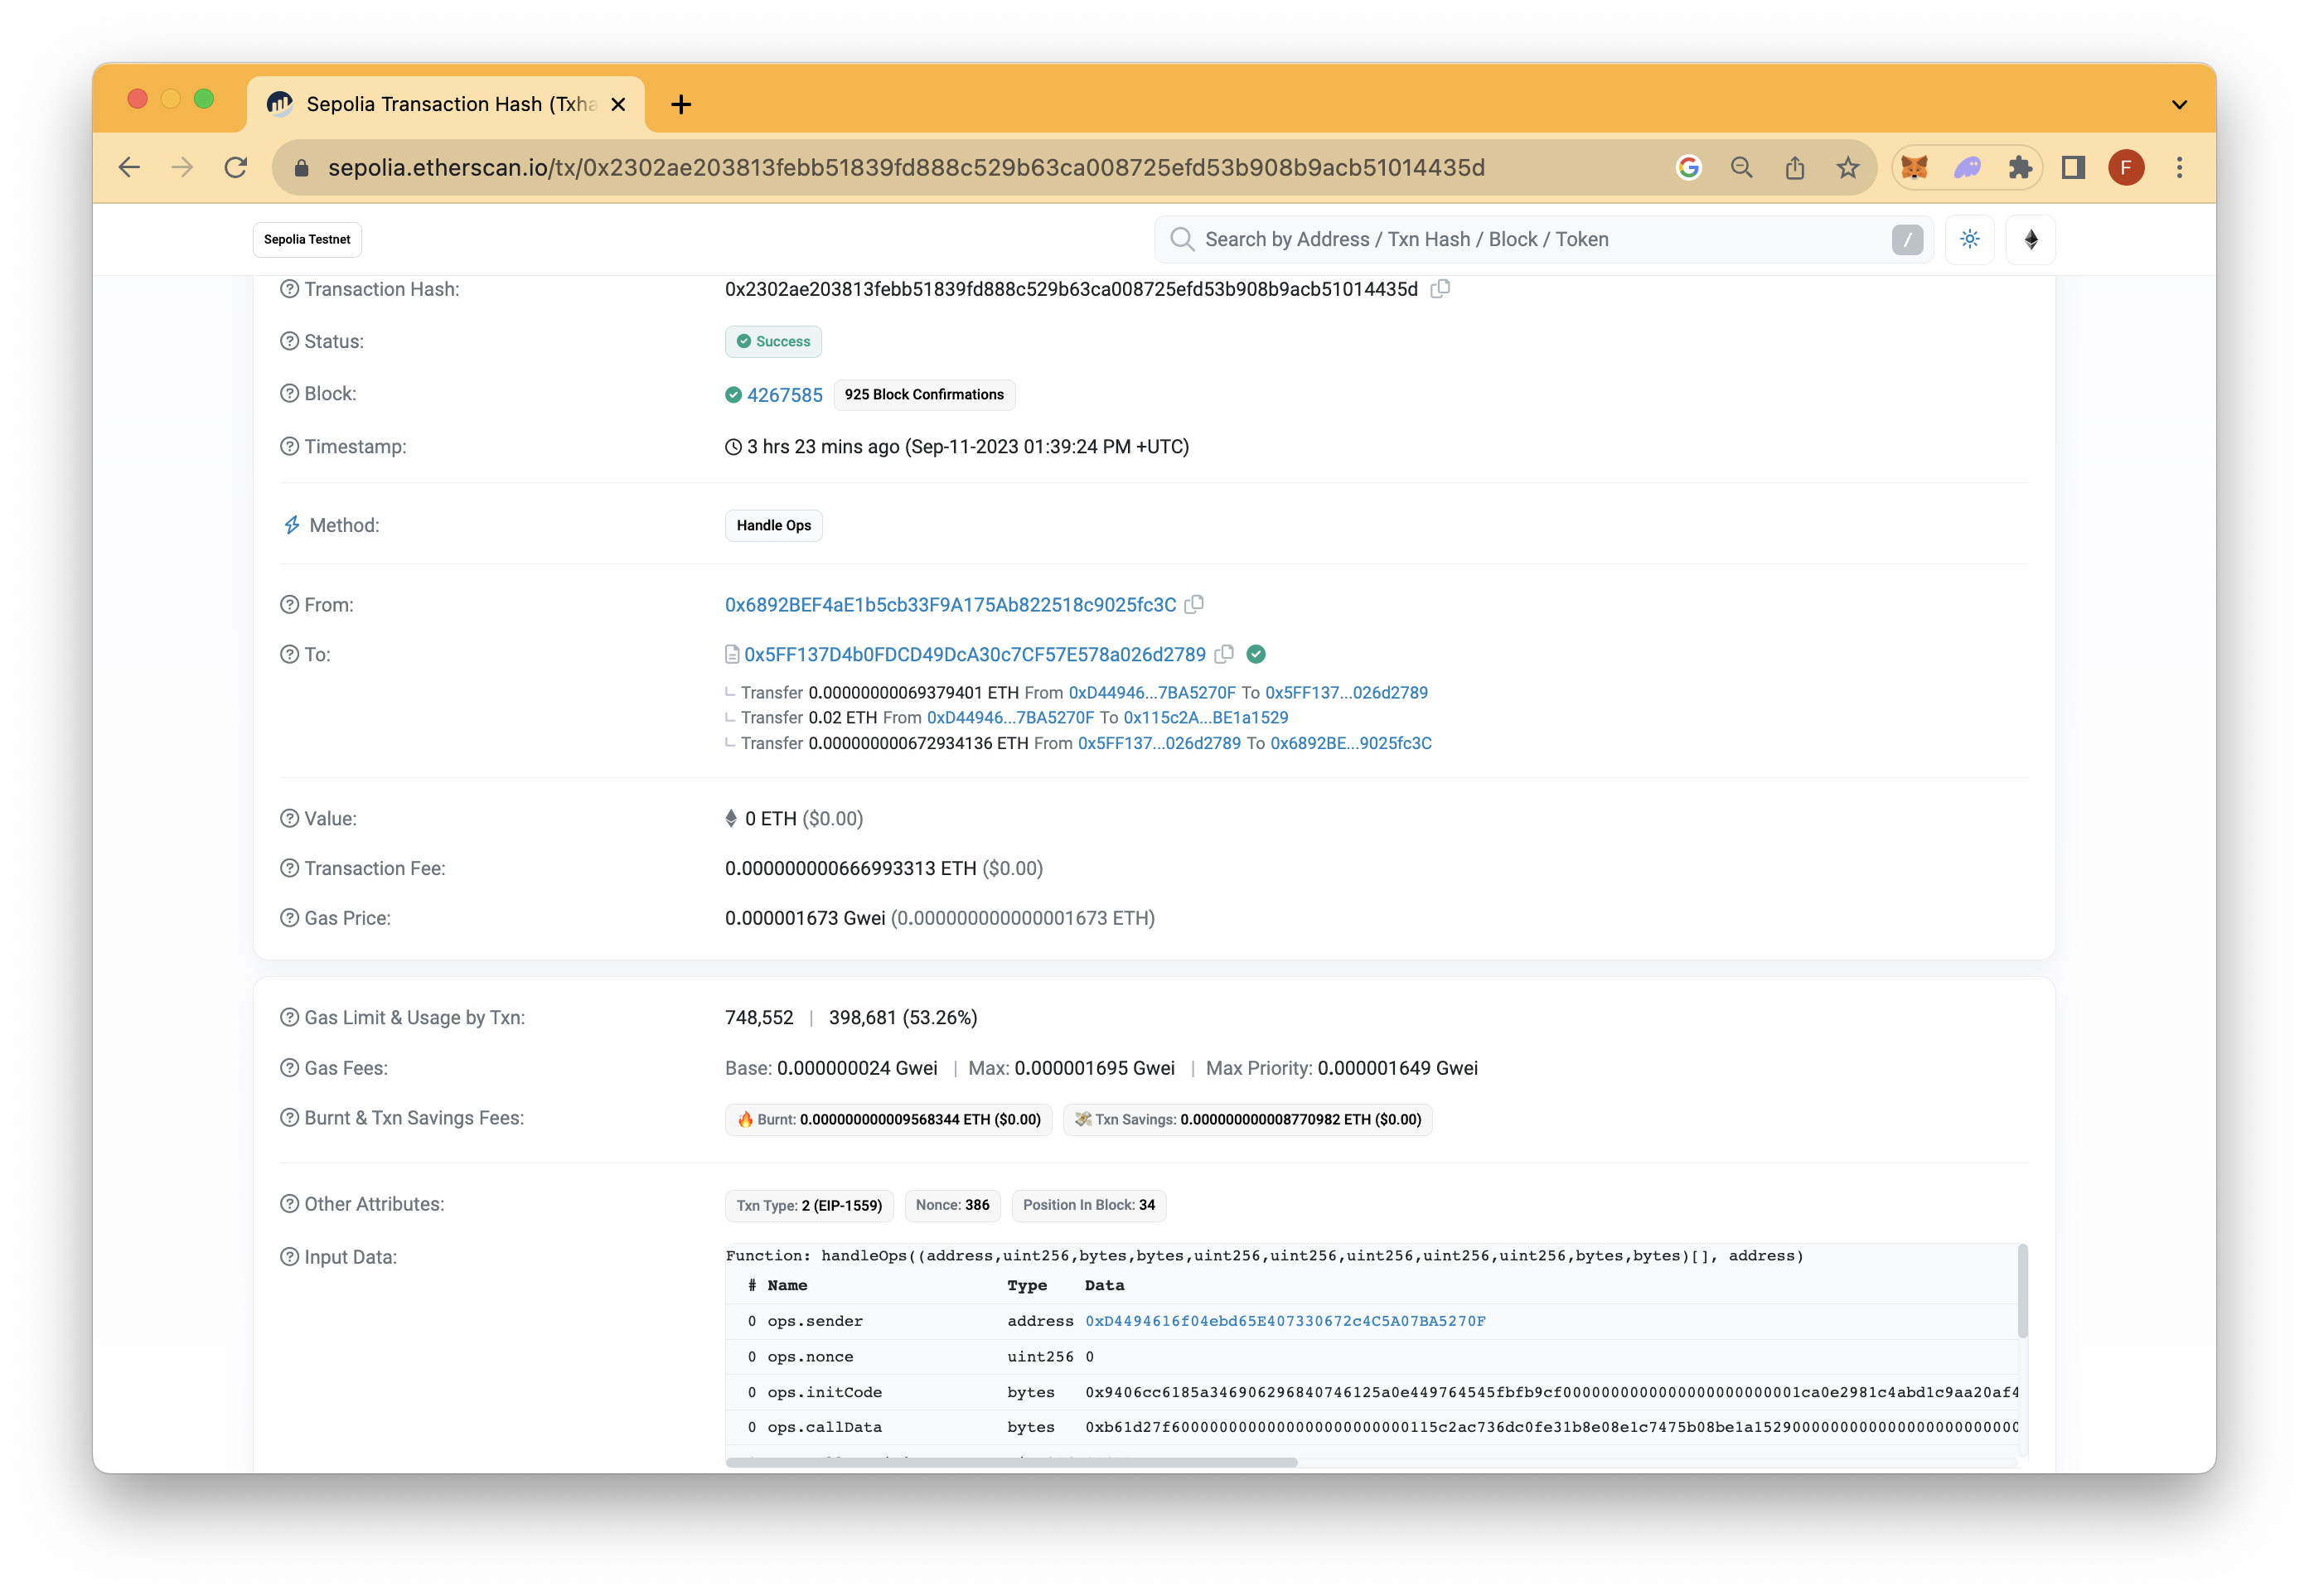
In the From field, we see the transaction was initiated by a different address (i.e., 0x6892BEF4aE1b5cb33F9A175Ab822518c9025fc3C), this is the Bundler taking the UserOperation object we created.
The To field address (e.g., 0x5FF137D4b0FDCD49DcA30c7CF57E578a026d2789) refers to the EntryPoint contract. This is the contract that the whitelisted Bundler calls to execute bundles of UserOperations.
Under the To field, you will see transfers such as - Transfer 0.00000000069379401 ETH From...; let us go over each transfer:
Transfer 0.00000000069379401 ETH From 0xD44946...7BA5270F To 0x5FF137...026d2789: This is the transfer from our Smart Contract Account to the EntryPoint contractTransfer 0.02 ETH From 0xD44946...7BA5270F To 0x115c2A...BE1a1529: This is the transfer of our 0.2 ETH from the Smart Contract Address to the address we inputted on thetransfer --to {address}command.Transfer 0.000000000672934136 ETH From 0x5FF137...026d2789 To 0x6892BE...9025fc3C: This is the transfer from the EntryPoint to Bundler as a fee.
In the Input Data field, we see that the handleOps method was called by our Smart Contract Account, and data passed in such as:
Function: handleOps((address,uint256,bytes,bytes,uint256,uint256,uint256,uint256,uint256,bytes,bytes)[], address)
# Name  Type  Data
0 ops.sender  address 0xD4494616f04ebd65E407330672c4C5A07BA5270F
0 ops.nonce uint256 0
0 ops.initCode  bytes 0x9406cc6185a346906296840746125a0e449764545fbfb9cf0000000000000000000000001ca0e2981c4abd1c9aa20af4e5142cdf8ac68c4f0000000000000000000000000000000000000000000000000000000000000000
0 ops.callData  bytes 0xb61d27f6000000000000000000000000115c2ac736dc0fe31b8e08e1c7475b08be1a152900000000000000000000000000000000000000000000000000470de4df82000000000000000000000000000000000000000000000000000000000000000000600000000000000000000000000000000000000000000000000000000000000000
0 ops.callGasLimit  uint256 17475
0 ops.verificationGasLimit  uint256 341795
0 ops.preVerificationGas  uint256 50048
0 ops.maxFeePerGas  uint256 1695
0 ops.maxPriorityFeePerGas  uint256 1649
0 ops.paymasterAndData  bytes 0x
0 ops.signature bytes 0xc9fd2edd94f242be428591627ce921ae1e9aa66497fe7ae76e8c28afe719dc933bb85738173cb3dcc1f901a4e788c088043f9b7d95cac22b42bfb45db916b4f71c
2 beneficiary address 0x6892BEF4aE1b5cb33F9A175Ab822518c9025fc3C
What occurred was we sent a UserOperation (as defined in scripts/transfer.ts), to a mempool of Bundlers (as defined in our RPC URL settings), then Bundlers take our UserOperation object and created a transaction making a call to the handleOps function on the EntryPoint contract, effectively executing our transfer of ETH from our Smart Contract Account to our defined address.
Test Your Knowledge
To challenge your understanding of ERC-4337, check out this short 6 question quiz!
Wrap Up
Congrats! You have created a smart contract account using ERC-4337 and Stackup and then transferred funds from your smart contract address to another address. This process may seem simple and doable with/without ERC-4337, however, note you have opened the door to many other possibilities that ERC-4337 offers like sponsered gas fees and batched transactions. Now that we have accomplished a simple transfer, we can explore other functionalities!
If you have any questions, check out the Quicknode Forum for help. Stay up to date with the latest by following us on Twitter (@Quicknode) or Discord.
We ❤️ Feedback!
Let us know if you have any feedback or requests for new topics. We'd love to hear from you.