7 min read
Web3.js, the popular JavaScript library for Ethereum, is no longer being actively maintained. For all new development, we recommend using either Ethers.js or Viem instead. Both options offer modern tooling and active community support.
If you have any questions or need guidance in transitioning to alternative solutions, please reach out to us.
Overview
ENS is the leading naming system based on Ethereum; it maps Ethereum addresses to tangible names. Today in this guide, we will learn more about ENS and how to resolve ENS domains using the JavaScript library web3.js and QuickNode.
Prerequisites
- Node.js installed
- MetaMask browser extension installed
- A QuickNode Account (create one for free here)
| Dependency | Version |
|---|---|
| node.js | 16.13.2>= |
| web3 | ^4.1.2 |
What is an ENS domain?
ENS or Ethereum Name Service is an Ethereum dApp that allows users to map their Ethereum address readable by EVM (Ethereum Virtual Machine) to human-readable form like name.eth. ENS is similar to the DNS (Domain Name Service) of the internet as it allows its users to register for .eth domains. ENS domains are mapped within the network. There is no top-level authority or copyright over the domains that ICANN manages.
Anyone can register an ENS domain to map their Etheruem wallet address or Contract address to a .eth domain name that is currently available and not registered by someone else. Registrar contracts of ENS manage this. The registry contract maintains a list of domains, subdomains, owner of the domains, resolver for the domain, and cache for time-to-live. If it has to do with the domain, it is probably in the registry contract. A resolver is a smart contract that follows ENS contract standards; anyone can be resolved if they follow ENS rules and standards.
So, for example, if someone wishes to find and address for name.eth they will have to send a request to the ENS registry to get the address for the resolver of name.eth. Then once they get that address, they send a request to the resolver to get the mapped address registered for the ENS name.
Now before we learn how to register for an ENS domain through their dApp, let's make sure we have ETH on Sepolia testnet (in order to pay for the domain and transaction fees) along with creating a QuickNode endpoint so we have a fast access to Ethereum's Sepolia test network.
Set Up Your QuickNode Ethereum Endpoint
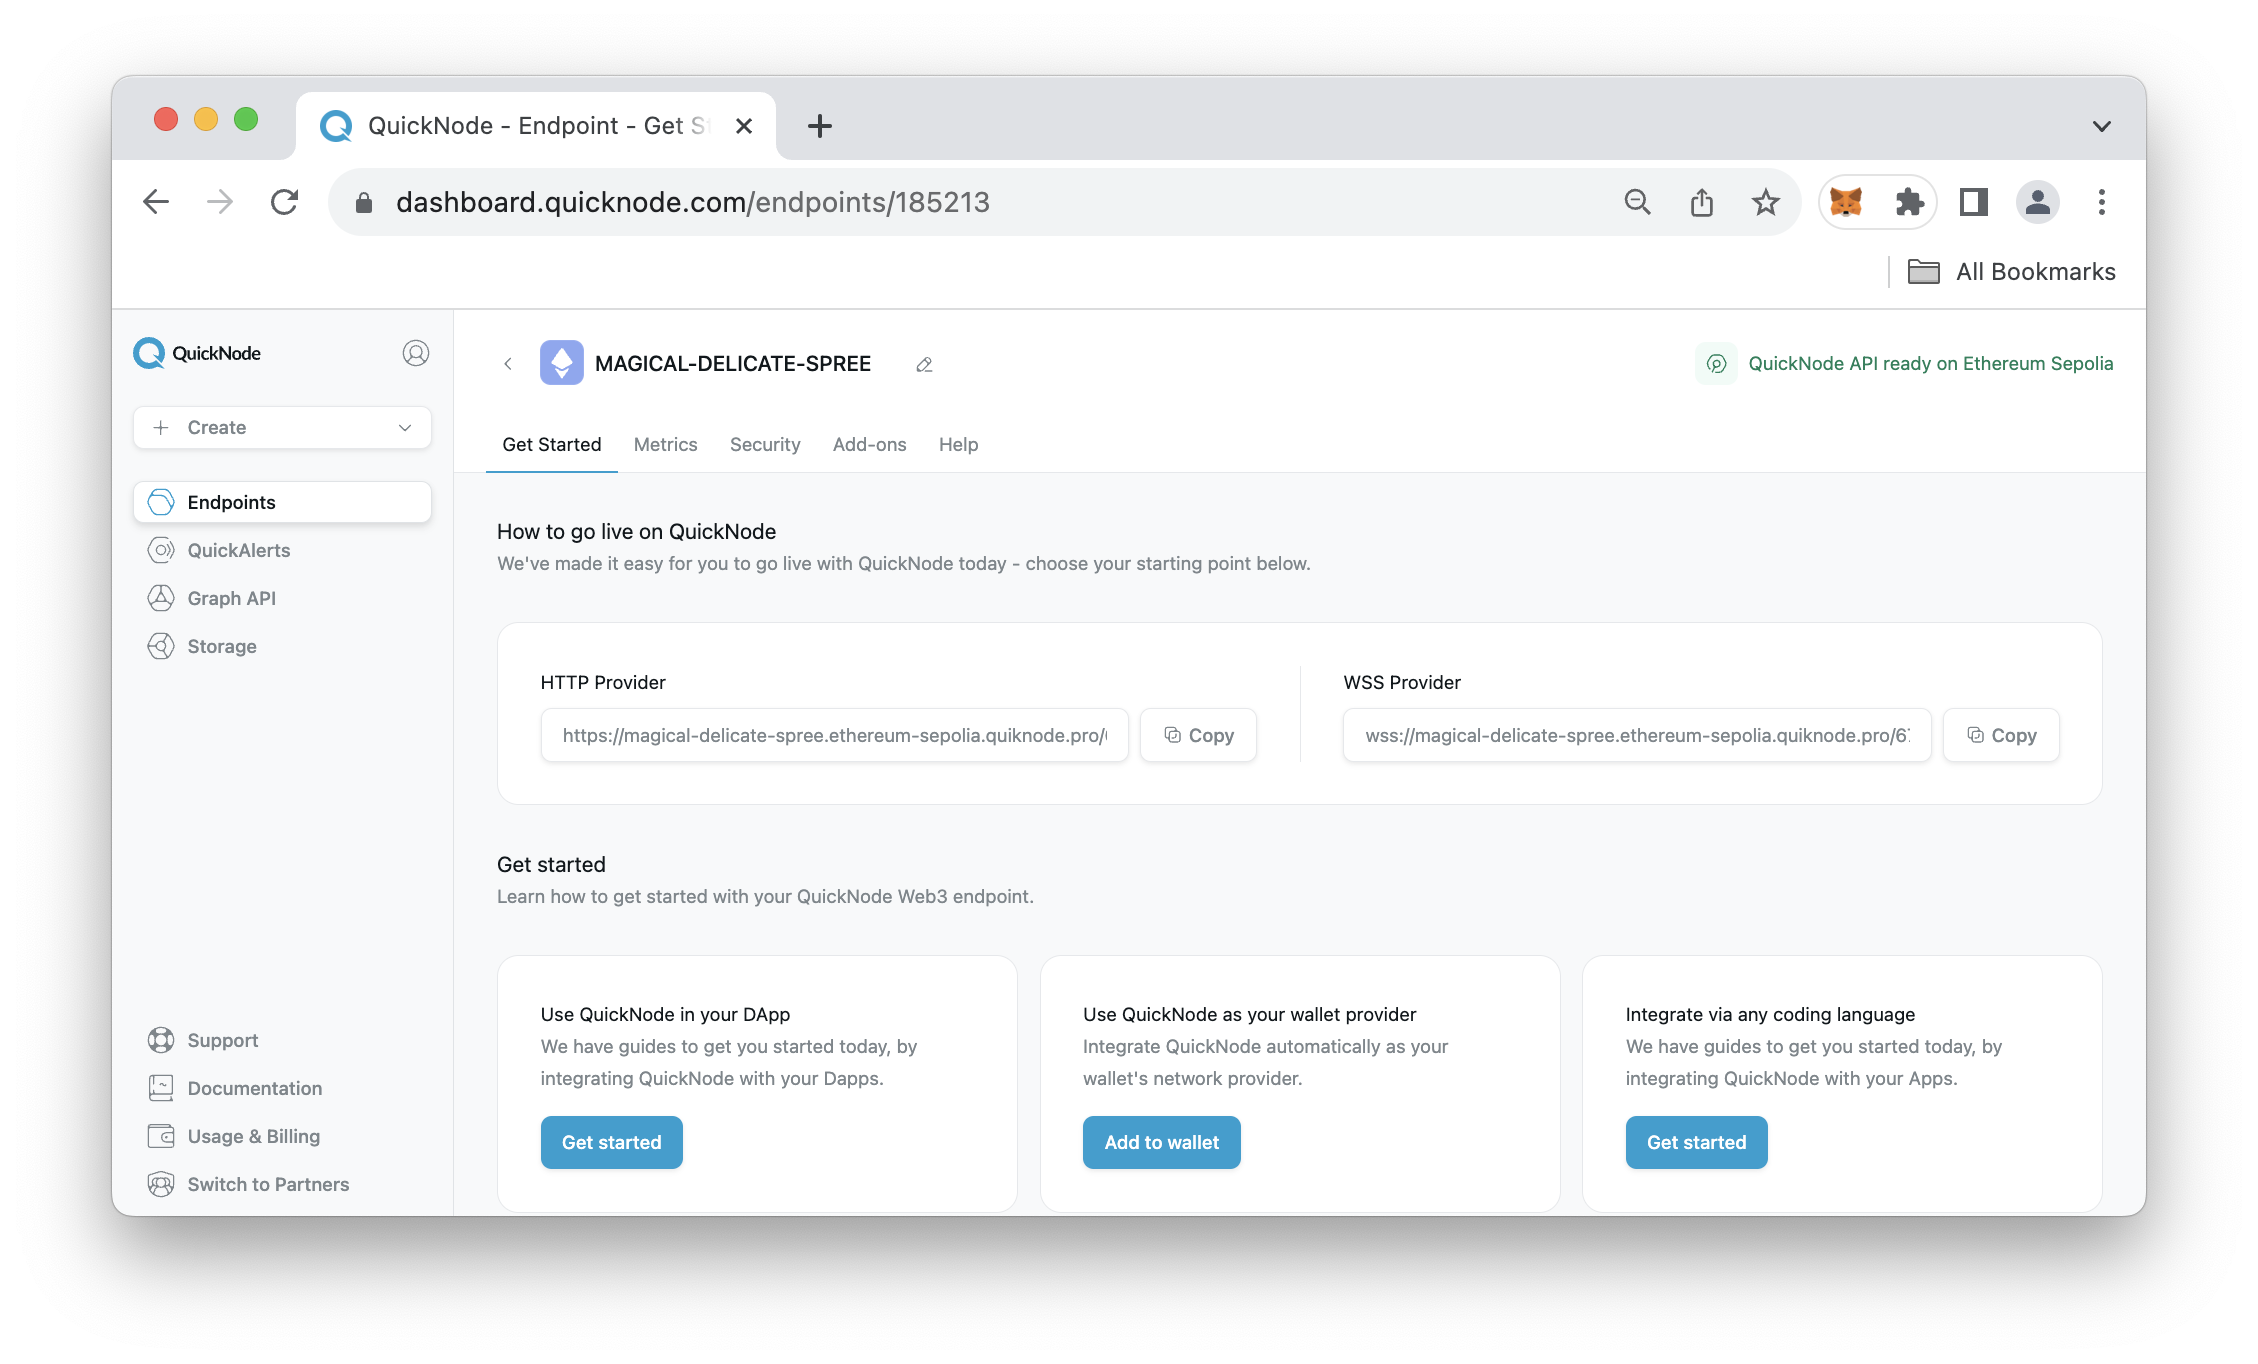
To serve our purpose today, let us set up a free QuickNode account here and easily create an Ethereum endpoint to get data from the Ethereum Sepolia Testnet.
On the endpoints page, click Create an Endpoint, then select the Ethereum Sepolia testnet. Once your endpoint is created, keep the HTTP Provider URL handy as you'll need it in the following section.
Add Custom Network on MetaMask
Now, you may be wondering why we want to set a custom network in MetaMask. Although we could use the default Sepolia testnet found in the networks list. We'll use a custom one so we're not rate-limited and can enjoy up to 8x faster times.
Open your MetaMask wallet and click the elippses in the top-right. Click Settings --> Networks --> Add Network. Once the new page opens, click the Add a network manually button in the bottom of the MetaMask extension page.
You'll be asked to input the following fields:
- Network name: Ethereum QuickNode (you can adjust this to your liking)
- New RPC URL:
YOUR QUICKNODE HTTP PROVIDER URL - Chain ID: 11155111
- Currency symbol: ETH
- Block explorer URL (Optional): https:/etherscan.io/
After, click Save. If you navigate back to your MetaMask extension, and click the Networks tab, you should now see your QuickNode Sepolia network available. Make sure it is selected.
In the next section, we'll fund our MetaMask wallet using QuickNode's Multi-Chain Faucet.
QuickNode Multi-Chain Faucet
So far we have created a QuickNode endpoint and added our custom network in MetaMask. Next, we'll need to get some test ETH in order to pay for the purchase of the ENS Domain and to also pay for gas fees.
Navigate to the QuickNode Multi-Chain Faucet and connect your wallet or paste in your wallet address. You'll need to select the Ethereum chain and Sepolia network and then request funds.
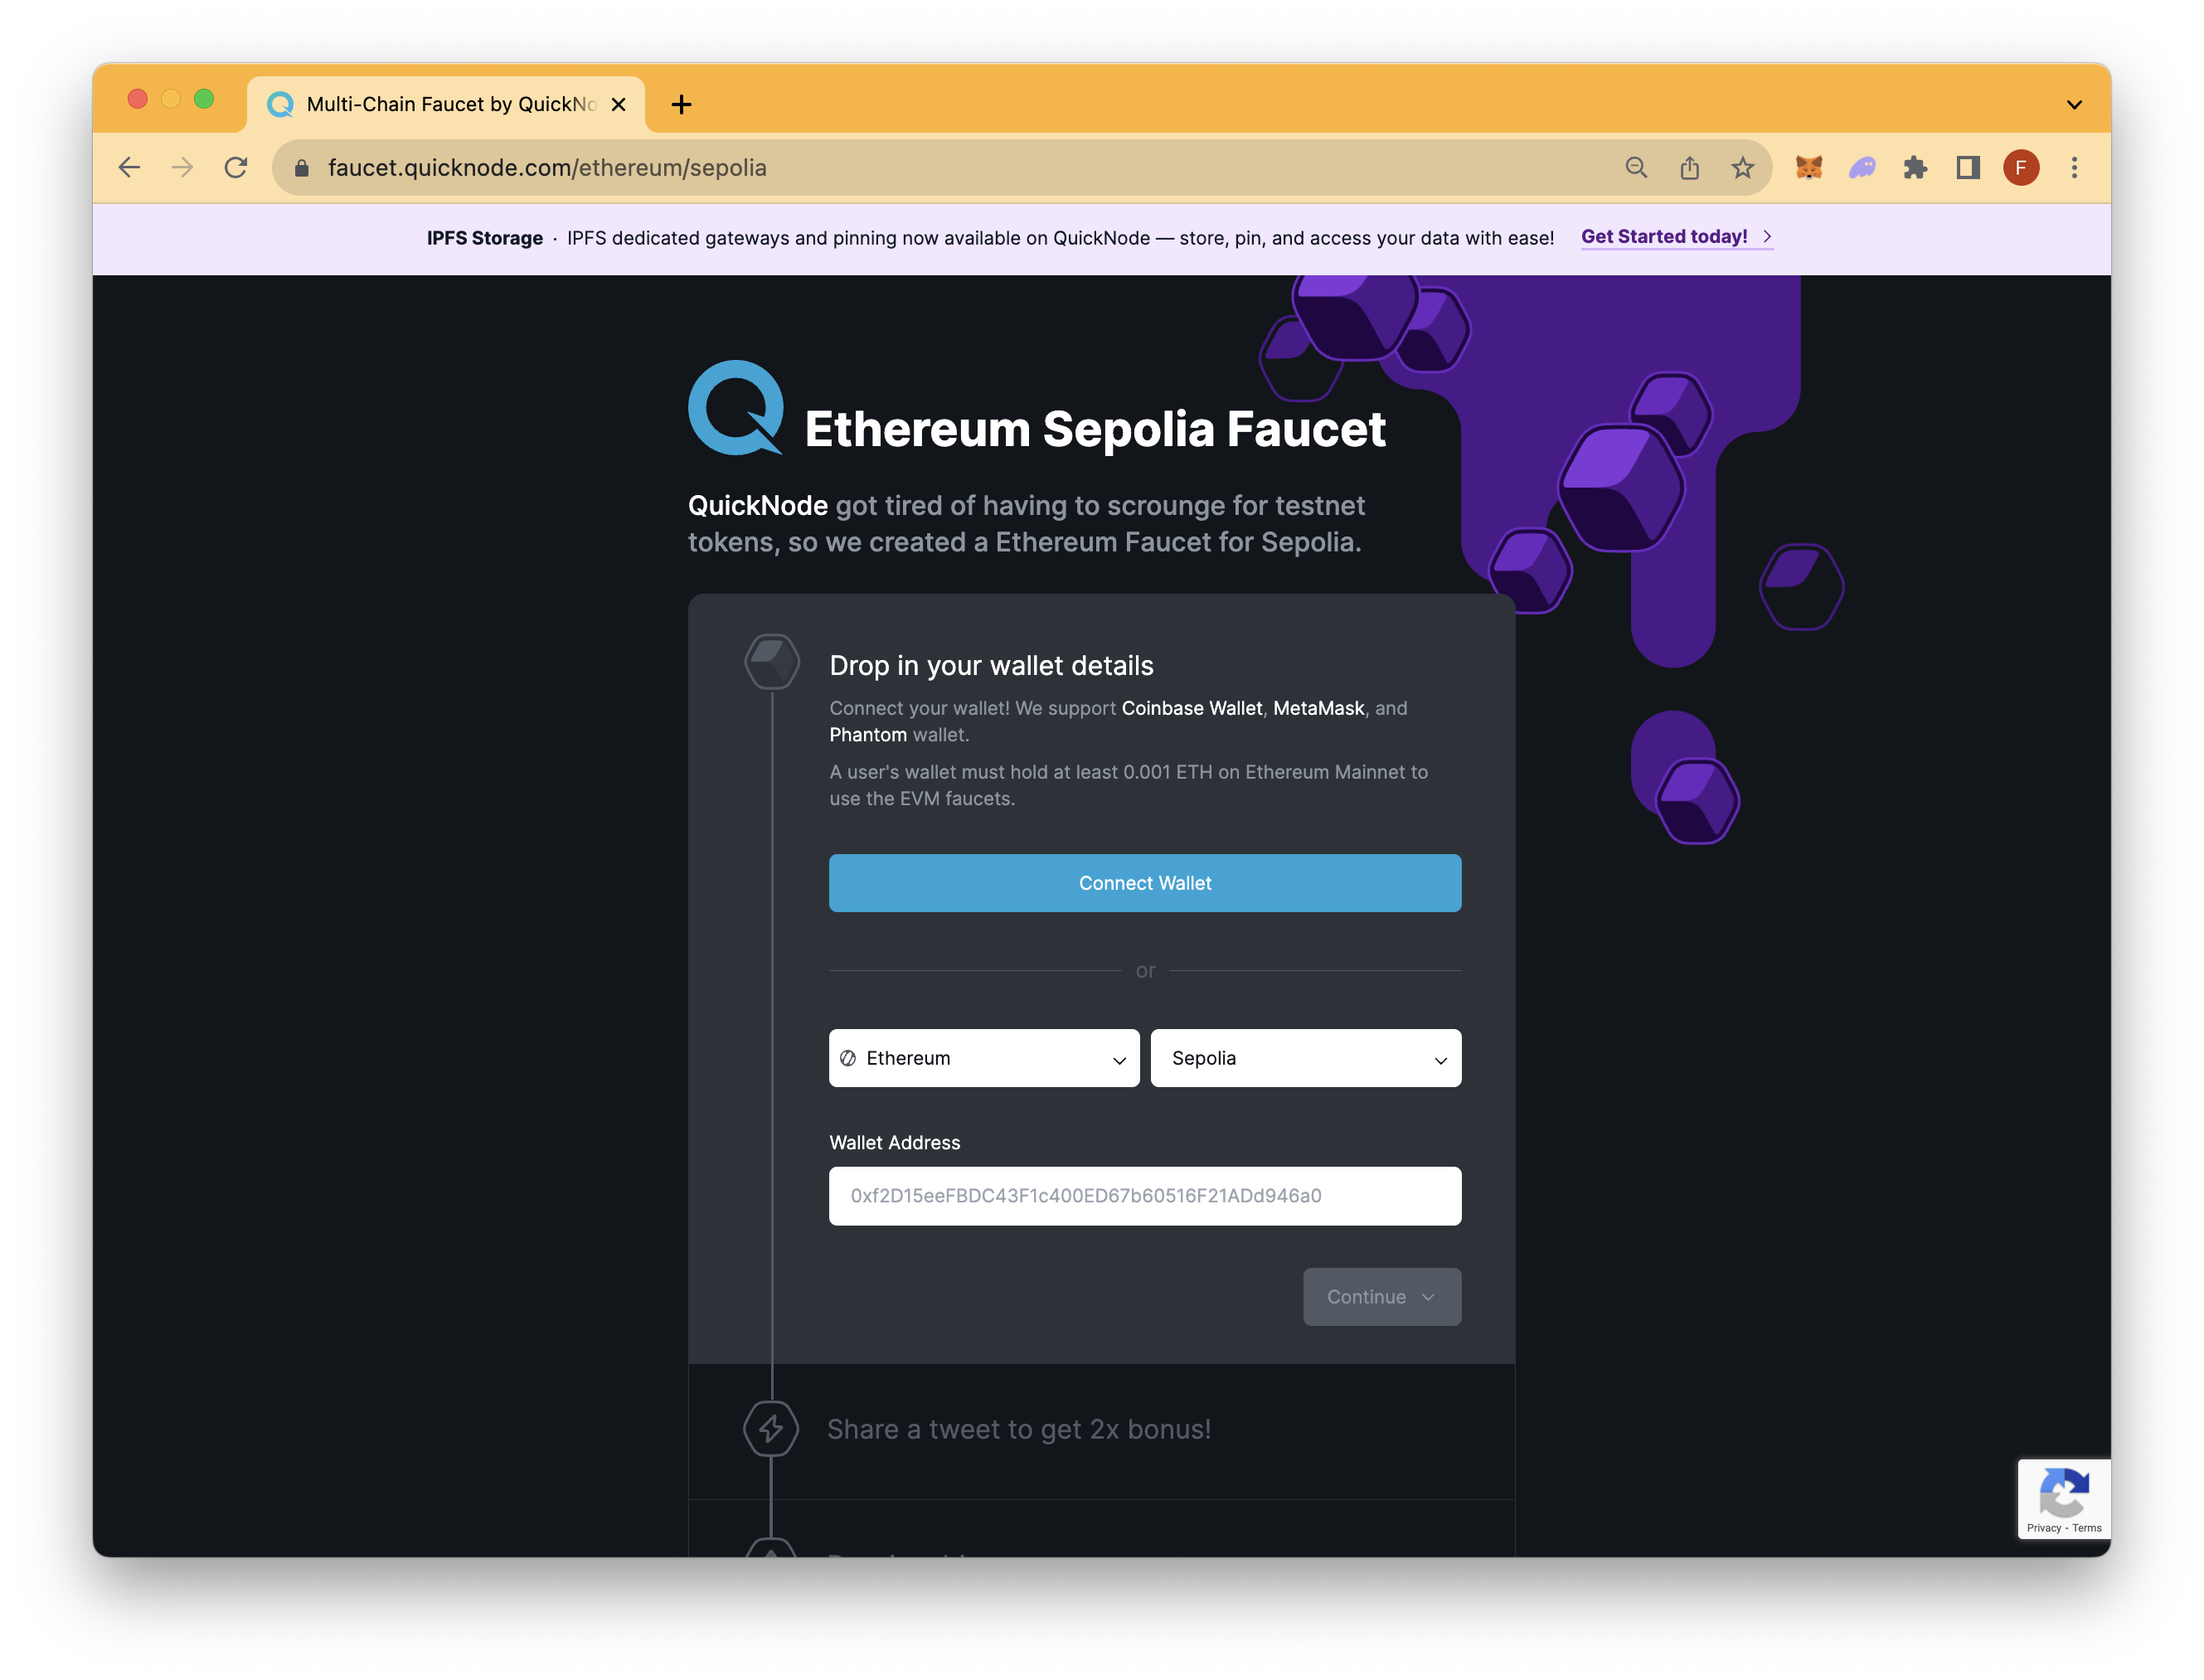
With our wallet funded, we can move onto the registration of the ENS domain.
How to Register an ENS domain
We will register our ENS on the Sepolia testnet as registering a domain on mainnet requires real ETH to be sent to the registry contract and also for the gas fees. So before moving forward, make sure you have MetaMask installed on your browser and have some ETH on Sepolia testnet. Also verify that you are on the custom Sepolia network you added in your MetaMask.
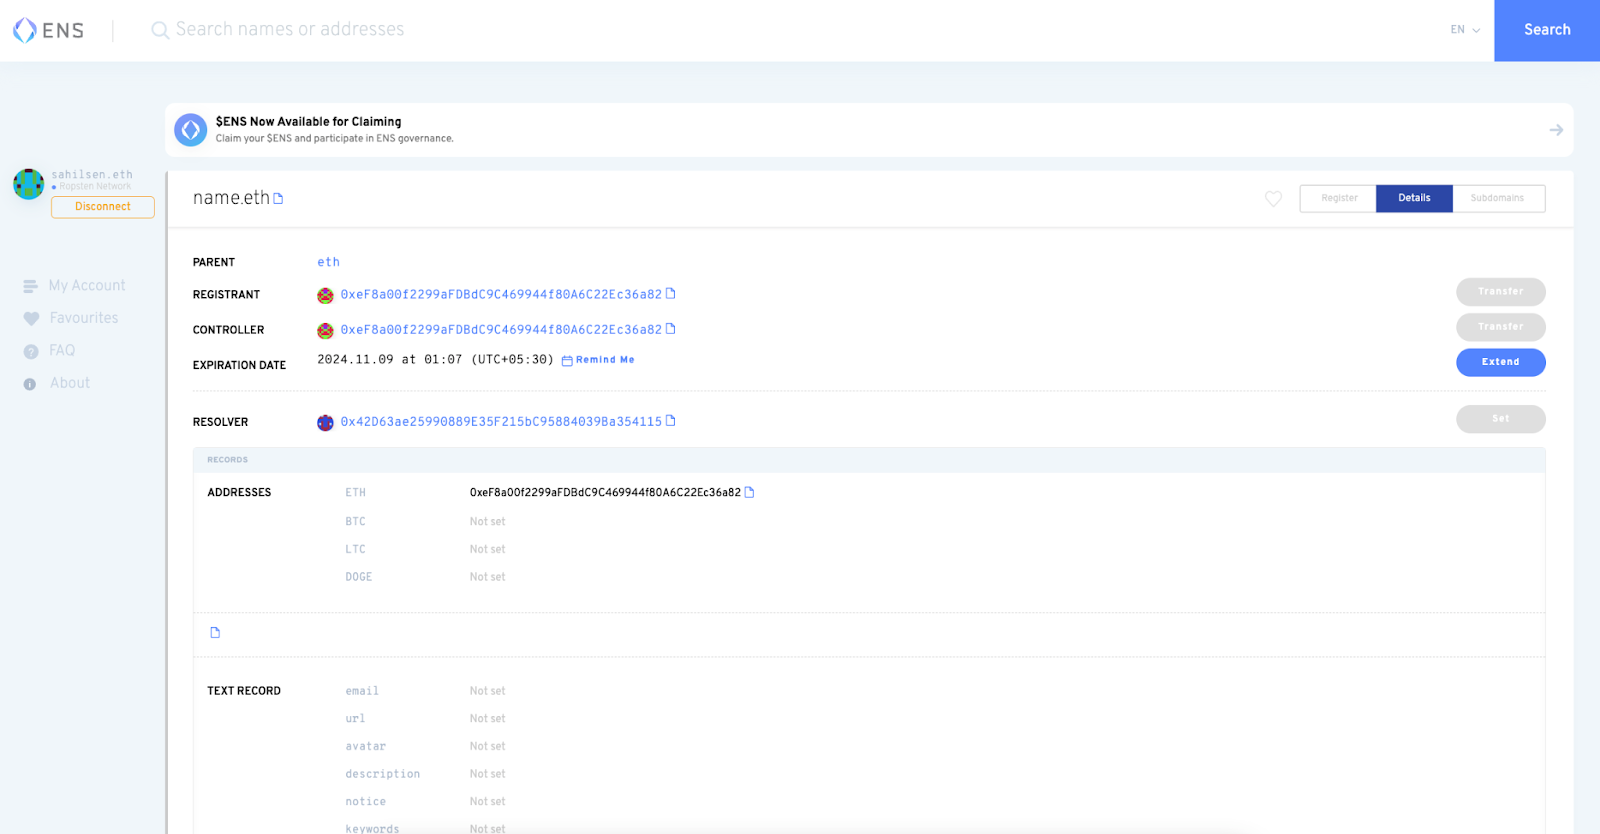
Next, head over to ENS website; click connect to MetaMask wallet. Now, search the name you would like to register your address with.
If the searched name is already registered, you will be presented with the following screen:
If the searched term (testname.eth) name is available to register, you will be presented with information like the required ETH to register the domain, the gas fee, and how many years you want to hold the domain.
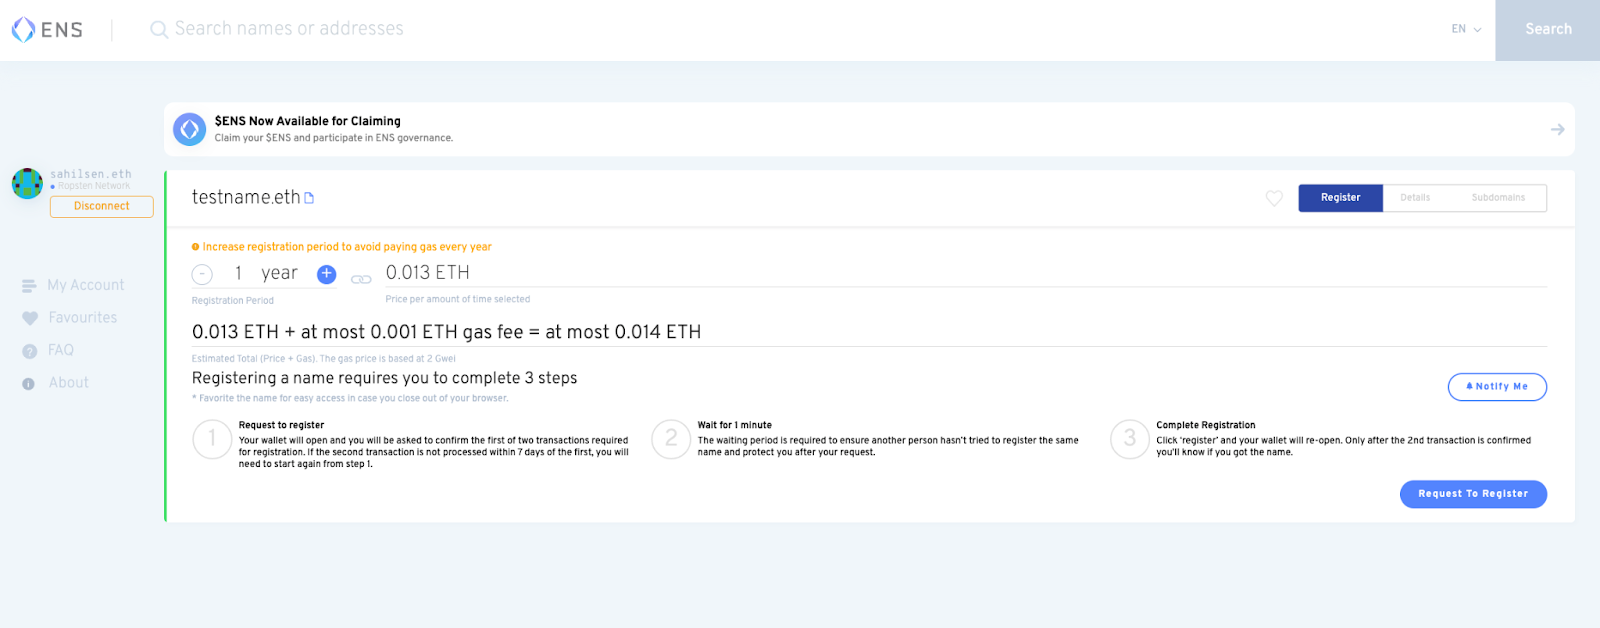
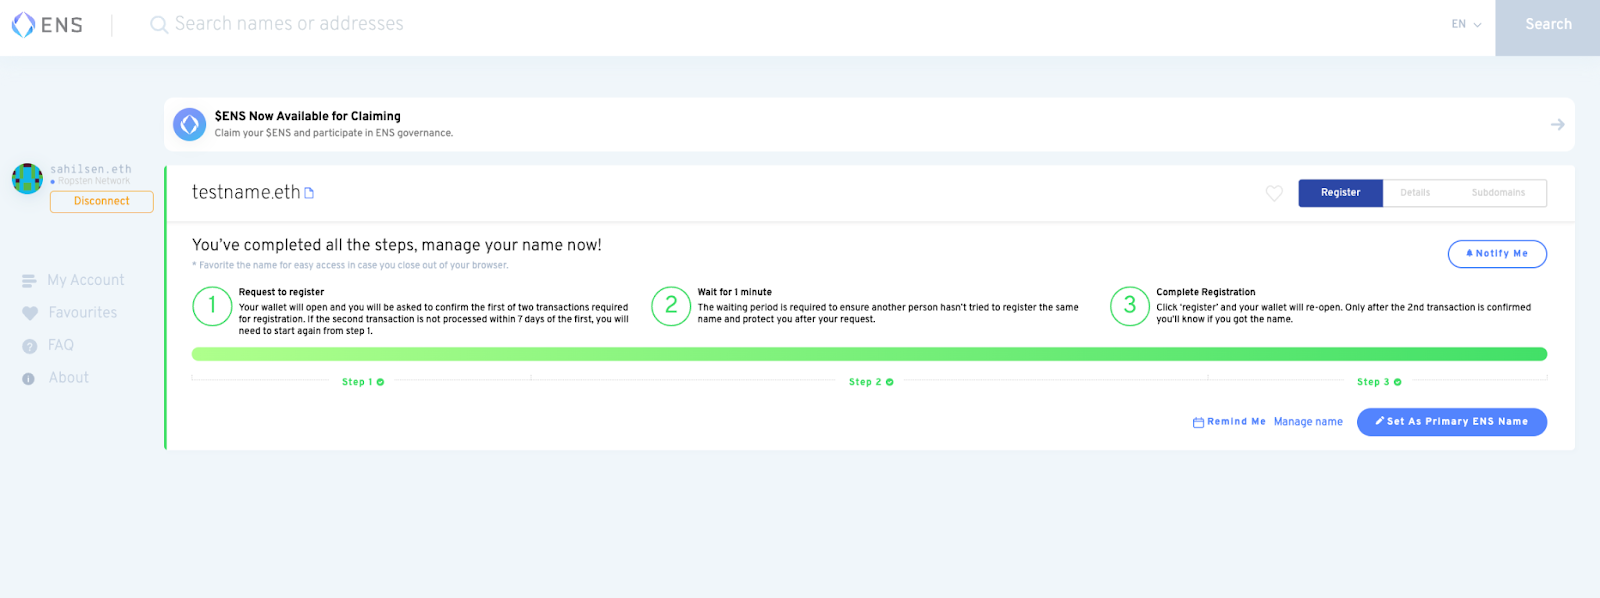
Click on 'Request To Register' and confirm the transaction in the MetaMask popup window. Once the transaction is confirmed step 1 will be completed. Wait for at least a minute (but not more than 24 hours) for the step to get completed. This is a measure to prevent frontrunning. Then confirm the second transaction from your MetaMask window.
Transaction number one generates a secret commitment hash for the name we want to generate, and it is submitted to the registry controller. Transaction number two submits a registration request for the domain name along with the secret commitment hash transaction one generated.
Now, set the name as the primary ENS name:
Now that we have our ENS domain registered, next let's see how to resolve it using code. To do so, we will use web3.js, and our previously created QuickNode endpoint to connect with the Sepolia blockchain.
How to resolve an ENS domain using JavaScript
Open up a terminal window and paste the following command in your terminal to create a project folder, create an index.js file and install the required dependencies:
mkdir ensResolver
cd ensResolver
npm init --y
npm install web3@4.1.2
echo > index.js
Now, open the index.js file in your project directory and copy-paste the following code into it:
const { Web3 } = require('web3');

const web3 = new Web3("YOUR_QUICKNODE_ENDPOINT");

async function getBalanceForENS(ensName) {
    try {
        const ownerAddress = await web3.eth.ens.getAddress(ensName);
        if (!ownerAddress || ownerAddress === '0x0000000000000000000000000000000000000000') {
            console.error('Invalid ENS owner address.');
            return;
        }

        const balance = await web3.eth.getBalance(ownerAddress);
        console.log(`Balance for address ${ownerAddress}: ${web3.utils.fromWei(balance, 'ether')} ETH`);
    } catch (error) {
        console.error('Error occurred:', error);
    }
}

getBalanceForENS('YOUR_ENS_DOMAIN_HERE');
You can now access Logs for your RPC endpoints, helping you troubleshoot issues more effectively. If you encounter an issue with your RPC calls, simply check the logs in your QuickNode dashboard to identify and resolve problems quickly. Learn more about log history limits on our pricing page.
Replace YOUR_QUICKNODE_ENDPOINT with the HTTP provider URL we got in the last step and YOUR_ENS_DOMAIN_HERE with the ENS domain we got earlier.
Explanation of the above code:
Key Components:
1. Web3 Initialization:
The script initializes Web3 by requiring the Web3 library and then creating a new web3 instance (i.e., const web3 = new Web3()) using a QuickNode endpoint provided as YOUR_QUICKNODE_ENDPOINT.
2. Function: getBalanceForENS:
This asynchronous function retrieves the Ethereum balance for a given ENS name.
Key Steps:
- Resolve ENS to Address: The function first resolves the ENS name to its corresponding Ethereum address using
web3.eth.ens.getAddress. - Check Valid Address: The resolved Ethereum address is checked for validity. If it's null or the Ethereum zero address (0x000...000), an error message is displayed, indicating an invalid ENS owner address.
- Retrieve Balance: If the Ethereum address is valid, the balance is fetched using
web3.eth.getBalance. - Display Balance: The balance (originally in Wei) is converted to Ether using
web3.utils.fromWei, and then displayed in the console.
At the script's end, the function getBalanceForENS is invoked with the function input (i.e., the ENS name) as the ENS name to query.
Error Handling:
The script has built-in error handling. If any issues arise during the resolution of the ENS name or the fetching of the Ethereum balance, the error is caught and displayed in the console.
Save the file and execute it using the following command in your terminal:
node index.js
The output should look something like this:

Conclusion
Cheers for all the work. In this guide, we learned what ENS is, how to register an ENS domain, and how to resolve an ENS domain using JavaScript library web3.js and QuickNode. Now you can follow these steps on mainnet to claim your very own .eth domain!
Subscribe to our newsletter for more articles and guides on Ethereum. If you have any feedback, feel free to reach out to us via Twitter. You can always chat with us on our Discord community server, featuring some of the coolest developers you'll ever meet :)
We ❤️ Feedback!
Let us know if you have any feedback or requests for new topics. We'd love to hear from you.