
7 min read
Overview
Nimbus is a lightweight Ethereum consensus client that contributes to Ethereum's client diversity ecosystem. As one of several consensus client implementations available for Ethereum, Nimbus offers validators and node operators an efficient, resource conscious alternative for participating in network consensus. This guide will walk you through setting up and running a Nimbus beacon node.
What You Will Learn
- Understand the role of consensus clients in Ethereum
- Install and configure Nimbus
- Sync your beacon node using trusted checkpoint sync
- Connect Nimbus to an execution client
- Monitor your consensus client's performance
- Interact with the Nimbus Beacon API
What You Will Need
- Nimbus client installed
- The minimum system requirements
- Linux, macOS, or Windows operating system
- Git and Git LFS installed
- Basic familiarity with command line
- An execution client (like Reth, Geth, Erigon, etc.) - you'll need to follow a separate execution client guide to set this up properly
Important: A consensus client alone is not sufficient to run a complete Ethereum node. You must also run an execution client alongside Nimbus. We recommend following our How to Run a Reth Node guide to set up the execution client.
Understanding Ethereum Clients
What is a Consensus Client?
Since Ethereum's transition to Proof of Stake with "The Merge" in September 2022, the network operates using two types of clients working together.
A consensus client manages the Proof of Stake consensus mechanism, validator operations, and block production, while the execution client manages transaction execution, state management, and the JSON-RPC API interface that developers and dApps use to communicate with Ethereum. These clients communicate via the Engine API, coordinating with each other, creating a complete Ethereum node.
What is an Execution Client?
If you want to learn more about the EVM, or how to run your own execution client, check out the list of guides here.
What is Nimbus?
Nimbus is an Ethereum consensus client built by Status, designed to:
- Minimal system requirements, runs well on constrained devices like Raspberry Pi
- Low power consumption with stable operation, ideal for solo stakers
- Written in Nim programming language, with security-first principles
- Contributes to Ethereum's client diversity and maintains good peer connectivity
System Requirements
Before proceeding, ensure your system meets the minimum requirements.
Installation
In this technical guide, we'll be using an AWS EC2 instance with Amazon Linux 2023. Note that some installation commands may change based on your operating system.
First, let's install the required system tools:
sudo dnf install gcc gcc-c++ make git bash coreutils -y
Nimbus requires Git LFS (Large File Storage) for handling large repository files, let's install those dependencies next:
curl -s https://packagecloud.io/install/repositories/github/git-lfs/script.rpm.sh | sudo bash
sudo dnf install git-lfs -y
Then, clone the Nimbus repository and navigate inside it:
git clone https://github.com/status-im/nimbus-eth2
cd nimbus-eth2
After, build the Nimbus beacon node and its dependencies:
make -j4 nimbus_beacon_node
This may take 10-20 minutes depending on your system
Finally, create a JWT secret file. This will be used for secure communication between the consensus (Nimbus) and execution client:
openssl rand -hex 32 | tr -d "\n" > /opt/jwtsecret
Note: If you already created this for your execution client (e.g., Reth), skip the step above.
Now that we have our dependencies installed and Nimbus node built. Let's quickly get up and running by using a trusted checkpoint sync in the next section.
Configuration and Sync
When starting a beacon node for the first time, it normally syncs from genesis (a process that can take several hours or even days). To prevent this, we can use checkpoint sync (also called trusted node sync) to start from a recent verified state instead, reducing sync time to just minutes. The tradeoff here is that you must trust the checkpoint provider to give you the correct chain state. So if the checkpoint provider is malicious or compromised, they could give you a false version of the blockchain state, and your node wouldn't be able to detect this deception. This is generally considered an acceptable risk when using reputable providers, but it's important to understand the trust assumption you're making.
Now, run the command below to use a trusted checkpoint sync:
build/nimbus_beacon_node trustedNodeSync \
  --network=hoodi \
  --trusted-node-url=https://checkpoint-sync.hoodi.ethpandaops.io
The command above will download a recent checkpoint from the trusted node, verify the checkpoint's validity and start the node from that point.
It may take a couple of minutes, and once successful, you'll see log outputs such as:
Writing checkpoint state
Writing checkpoint block
...
Done, your beacon node is ready to serve you! Don't forget to check that you're on the canonical chain by comparing the checkpoint root with other online sources.
See https://nimbus.guide/trusted-node-sync.html for more information.
Connection with Execution Client
In the next section, we'll start the Nimbus beacon node. However, ensure your execution client is properly configured by following one of these guides:
Make sure your execution client is:
- Running and accessible on port 8551
- Configured with the same JWT secret file (
/opt/jwtsecret) - Properly exposing the Engine API endpoint
Run the Nimbus Beacon Node
In the following section, we'll start Nimbus first (especially with checkpoint sync) and then start the execution client.
- Terminal (Foreground Process)
- Systemd Service (System Service/Daemon)
Running Nimbus via Terminal
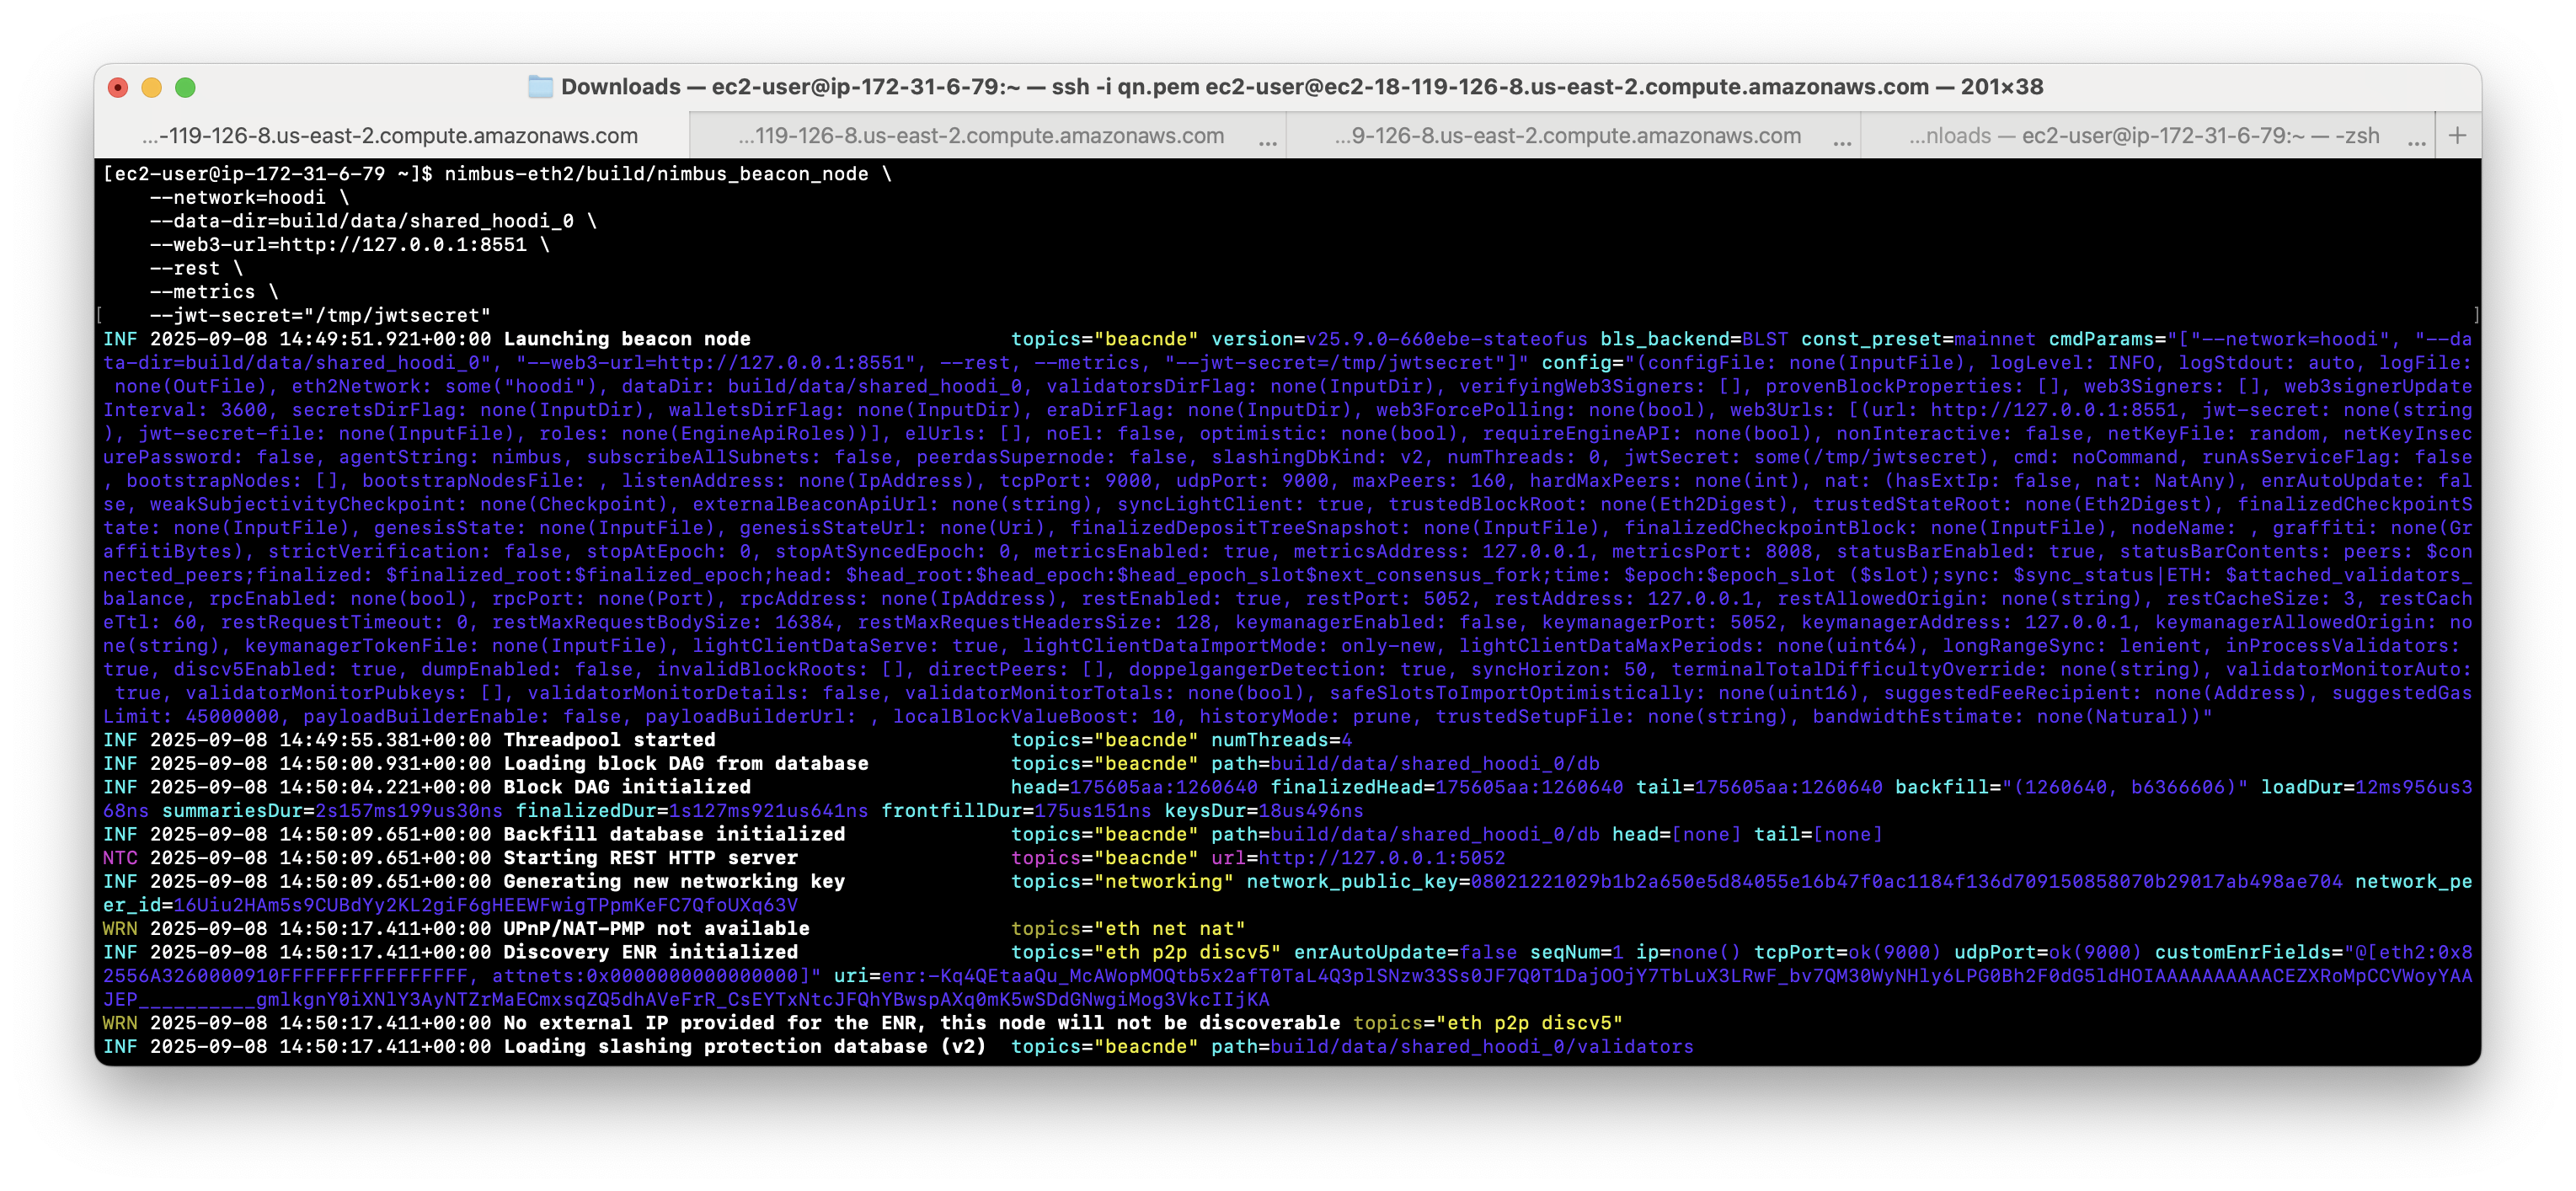
Ready? Let's now launch the Nimbus beacon node with the following command:
Skip this section if you're setting up the Nimbus node with Systemd
/nimbus-eth2/build/nimbus_beacon_node \
  --network=hoodi \
  --data-dir=build/data/shared_hoodi_0 \
  --web3-url=http://127.0.0.1:8551 \
  --rest-port=5052 \
  --rest \
  --metrics \
  --jwt-secret="/opt/jwtsecret"
Let's understand the key configuration parameters:
--network=hoodi: Specifies the Ethereum network (Hoodi testnet in this example)--data-dir: Directory where blockchain data and node state are stored--web3-url: Connection endpoint to your execution client (Engine API)--rest: Enables the REST API for monitoring and external integrations--metrics: Enables metrics collection for performance monitoring--jwt-secret: Path to the JWT secret file for client authentication
Running Nimbus via Systemd Service
To ensure your Nimbus beacon node automatically starts on boot and restarts if it fails, create a systemd service file:
sudo nano /etc/systemd/system/nimbus.service
Add the following configuration:
[Unit]
Description=Nimbus Beacon Node
After=network.target
Wants=network.target

[Service]
User=YOUR_USERNAME
Group=YOUR_USERNAME
Type=simple
Restart=always
RestartSec=5
TimeoutStopSec=180
ExecStart=./nimbus-eth2/build/nimbus_beacon_node \
--network=hoodi \
--data-dir=./nimbus-eth2/build/data/shared_hoodi_0 \
--web3-url=http://127.0.0.1:8551 \
--rest \
--rest-port=5052 \
--metrics \
--jwt-secret=/opt/jwtsecret

# Security settings
NoNewPrivileges=yes
PrivateTmp=yes
ProtectSystem=strict
ReadWritePaths=/home/YOUR_USERNAME/nimbus-eth2/build/data
ProtectHome=read-only

[Install]
WantedBy=multi-user.target
Important: Replace
YOUR_USERNAMEwith your actual username. You can find your current username by runningwhoamiin the terminal.
Then, run the following commands in sequence:
Reload systemd to recognize the new service:
sudo systemctl daemon-reload
Enable the service to start on boot
sudo systemctl enable nimbus.service
Start the service:
sudo systemctl start nimbus.service
Check service status:
sudo systemctl status nimbus.service
View logs:
sudo journalctl -u nimbus.service -f
When Nimbus starts successfully, you'll see output similar to:
Monitoring Your Nimbus Node Client
Check Sync Status
The logs in the window will show you peer connections, block processing and sync status updates.
Interact with Beacon REST API Endpoints
With the --rest flag enabled, you can query your node's status via HTTP:
# Node version
curl http://localhost:5052/eth/v1/node/version

# Peer count
curl http://localhost:5052/eth/v1/node/peer_count

# Get sync status
curl http://localhost:5052/eth/v1/node/syncing
The commands above on a synced node will look like this:
# Node version
{"data":{"version":"Nimbus/v25.9.0-660ebe-stateofus"}}

# Peer count
{"data":{"disconnected":"302","connecting":"0","connected":"64","disconnecting":"0"}}

# Sync status
{"data":{"head_slot":"1269662","sync_distance":"1","is_syncing":false,"is_optimistic":false,"el_offline":false}}
Now that our node is synced with the latest tip, we can also fetch Beacon chain data:
# Genesis information
curl http://localhost:5052/eth/v1/beacon/genesis

# Current head block root
curl http://localhost:5052/eth/v1/beacon/blocks/head/root

# Block attestations
curl http://localhost:5052/eth/v1/beacon/blocks/head/attestations
Response:
# Genesis
{"data":{"genesis_time":"1742213400","genesis_validators_root":"0x212f13fc4df078b6cb7db228f1c8307566dcecf900867401a92023d7ba99cb5f","genesis_fork_version":"0x10000910"}}

# Head block root
{"execution_optimistic":false,"finalized":false,"data":{"root":"0x1c18e87530d2209cbd806adc5697583cda490fff83ca7b1b98d50773ddbe035a"}}

# Block attestations
{
  "aggregation_bits": "0xebfffffff7ffffdeff...",
  "data": {
    "slot": "1269703",
    "index": "0",
    "beacon_block_root": "0xa6ec2573440ff2db4ec1bff907dfde73922ca3b05e5f1bb12ce1ef88938cec3d",
    "source": {
      "epoch": "39677",
      "root": "0x3ec79147d1c4346f7463afa4d9e938b07a62d94270d512735231a73c873b12d9"
    },
    "target": {
      "epoch": "39678",
      "root": "0x1c18e87530d2209cbd806adc5697583cda490fff83ca7b1b98d50773ddbe035a"
    }
  },
  "signature": "0xb8c18ddbfaf9008228...",
  "committee_bits": "0xffffffffffffffff..."
}
Congrats if you've made it this far! We have configured and run a Nimbus node on Hoodi testnet and interacted with the Beacon API to fetch blockchain data.
If you plan to run this node long term, you'll want to use the systemd service we demonstrated earlier in the guide so it automatically starts up again after any system restarts.
Switching to Mainnet
This guide uses the Hoodi testnet for safe experimentation. When you're ready for mainnet, here are the key changes needed for mainnet:
- Change
--network hoodito--network mainnet(or omit since mainnet is default) - Change the data directory to
--data-dir=build/data/shared_mainnet_0 - Ensure you have adequate storage (2TB+ SSD) and bandwidth for mainnet
- Update your execution client to use mainnet (e.g.,
--chain mainnetfor Reth) - Update your trusted sync URL accordingly
Note that mainnet requires significantly more storage than Hoodi testnet and the sync time could take days or weeks depending on your machine's capabilities. You can also look into using a snapshot, which is a compressed archive of a blockchain's database at a specific point in time. This can reduce the sync time significantly, however, the tradeoff is that you trust the state of the blockchain from the snapshot.
Alternative: Use Quicknode's Managed Infrastructure
While running your own Nimbus Beacon node gives you complete control and contributes to network decentralization, it also requires significant time, resources, and ongoing maintenance. If you prefer to focus on building applications rather than managing infrastructure, Quicknode offers a reliable alternative with enterprise-grade performance and 99.9% uptime.
Quicknode's Core API provides instant access to Ethereum without waiting for sync times, serving requests from a diverse set of execution clients to ensure reliability and performance. Their global network reduces latency through worldwide node distribution, and the platform handles all the complexity of client updates, security patches, and system maintenance automatically.
For applications requiring specific client implementations or enhanced performance, Quicknode's Dedicated Clusters allow you to select your preferred execution client (including Reth, Geth, etc.). These dedicated resources provide customizable configurations and let you scale as your application grows without worrying about infrastructure limitations.
Final Thoughts
Subscribe to our newsletter for more articles and guides on Ethereum. If you have any feedback, feel free to reach out to us via X. You can always chat with us on our Discord community server, featuring some of the coolest developers you'll ever meet :)
We ❤️ Feedback!
Let us know if you have any feedback or requests for new topics. We'd love to hear from you.