11 min read
Before you start this guide
This guide will give you an in-depth walkthrough of how to mint an NFT on Solana using TypeScript through a series of technical steps. If you’d like to accomplish this task quicker and leave the heavy lifting to us, we recommend the Crossmint NFT Mint API [mainnet] add-on. By using the Crossmint NFT Mint API [mainnet], you can airdrop NFTs to Solana users and email addresses with a single POST request. Use the NFT Mint API to create collections and mint NFTs easily!
Try the Crossmint NFT Mint API [mainnet]
Overview
Minting 10,000 NFTs with a Candy Machine is fun, but there are many instances where we might need to mint a single NFT (e.g., 1 of 1 art, music, etc.). Metaplex, the organization that created the Solana metadata standard, has recently developed some handy JS SDKs that make creating an NFT from your terminal easy.
What You Will Do
In this guide, you will mint an NFT with metadata to Solana's devnet from your terminal using Metaplex Umi JS libraries. We will cover three key steps to NFT minting:
- Upload an Image
- Upload Metadata
- Mint NFT
What You Will Need
Solana NFT Background Info
Before building our app, let's talk about NFTs and Solana's NFT architecture. So what the heck is an NFT? A non-fungible token is effectively a set of data stored on chain that is unique from any other. In short, there's just one of them. On Solana, we achieve this by using the SPL Token Program and creating a token with a supply of 1. Further, NFTs cannot be subdivided, meaning you cannot have a third of an NFT (note: there are some advanced NFT protocols around fractionalization, but typically an NFT cannot be broken into smaller units). On Solana, we also achieve this using the SPL Token Program by setting decimals to 0 (meaning it cannot be fractionalized).
Though creating an SPL token with a supply of 1 and decimals of 0 is technically an NFT defined by its unique Mint ID, the SPL token program is limited regarding some of the types and amount of data that can be stored. Enter Metaplex. The Metaplex Metadata program sets a standard for on and off-chain metadata. Through a Program Derived Address associated with the Mint account, Metaplex allows users to assign more detailed metadata to a mint (e.g., name, description, mutability, seller fees, etc.). One notable field in the Metaplex metadata is called "URI." This is an address that points to specific off-chain metadata. Due to rent fees and speed constraints, Metaplex expects certain data to be stored off-chain (e.g., image/image URI, NFT traits/characteristics). The following figure from Metaplex visualizes the relationships between these fields:
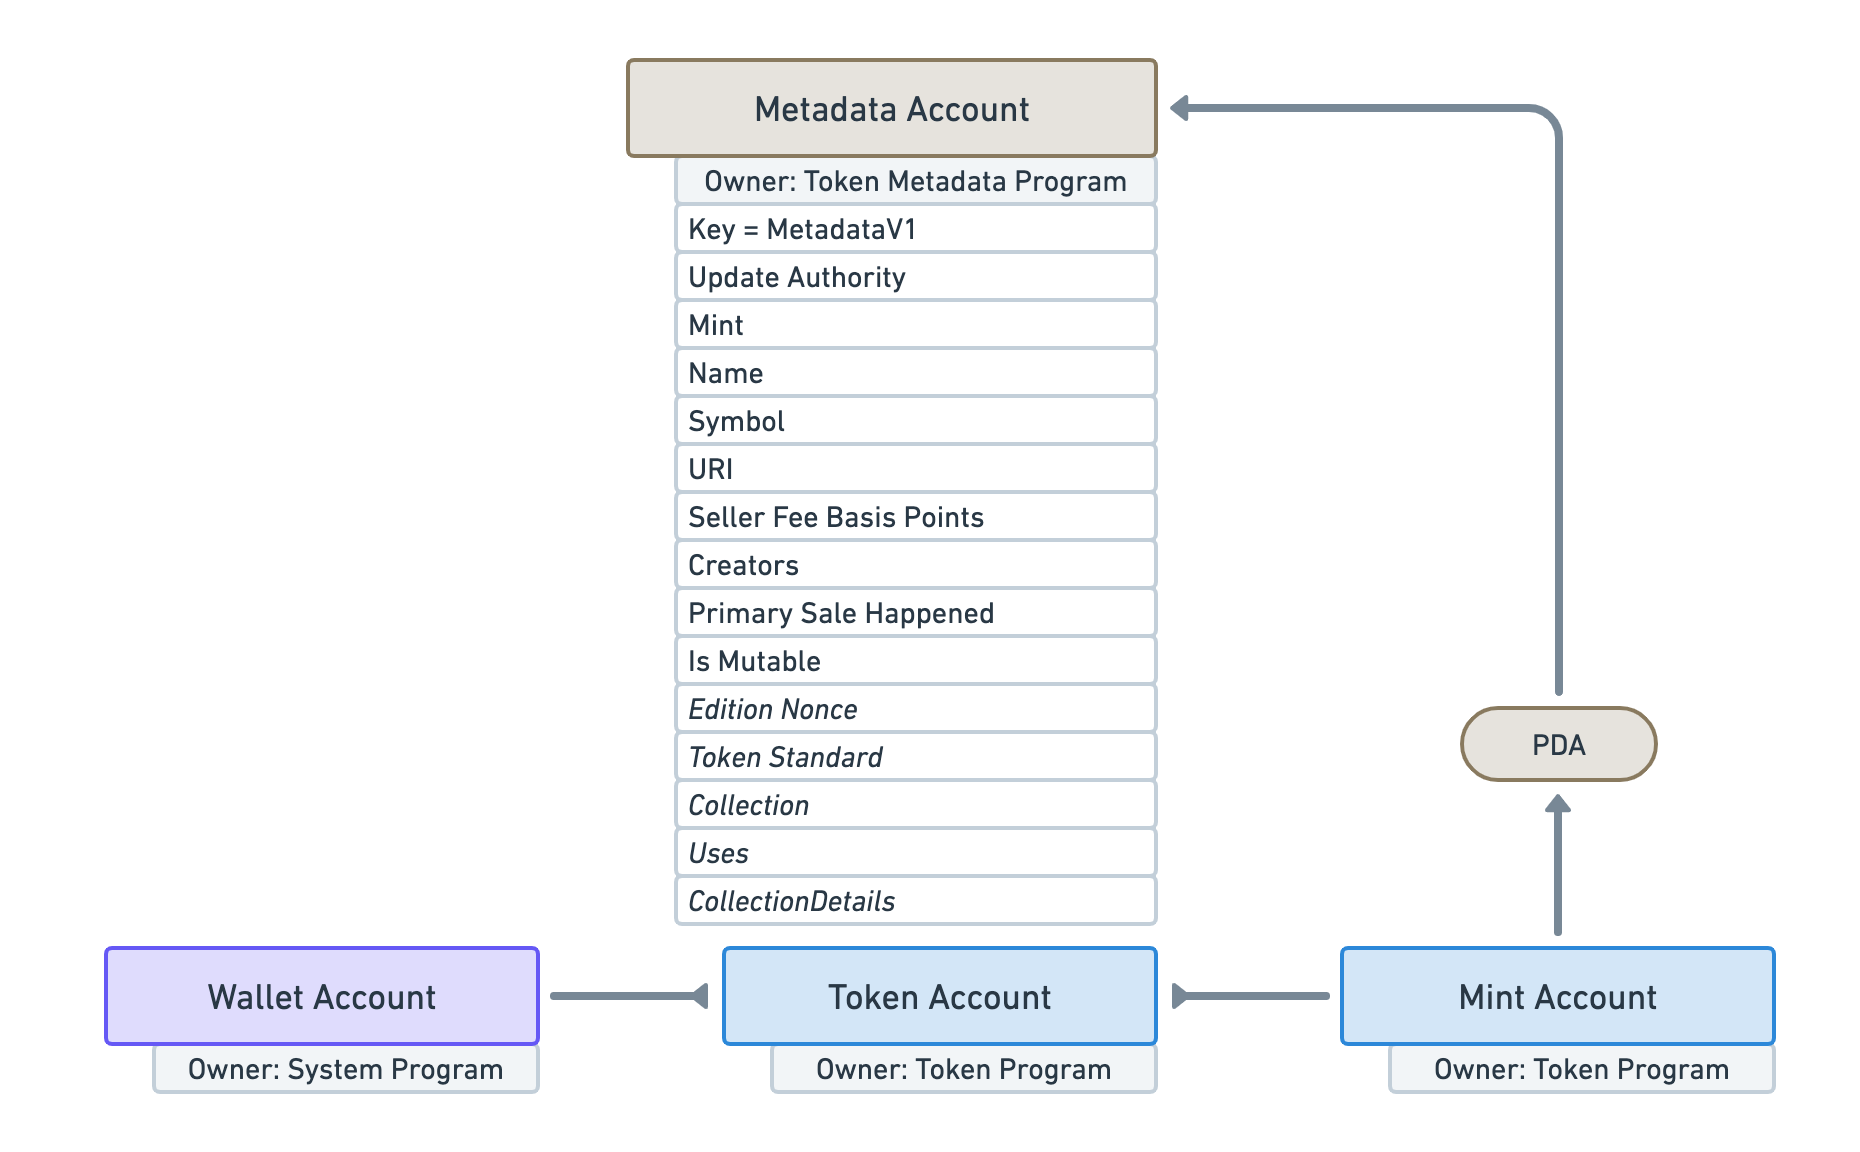
Source: *https://docs.metaplex.com/programs/token-metadata/overview
*
In this guide, we will first upload our image to Arweave and fetch its URI, then we will create the off-chain metadata and upload it to Arweave, and finally, we will mint our token and define on-chain metadata that points to our off-chain metadata.
Set Up Your Project
Create a new project directory in your terminal with:
mkdir mint-nft
cd mint-nft
Create a file for your app, app.ts:
echo > app.ts
Initialize your project with the "yes" flag to use default values for your new package:
yarn init --yes
#or
npm init --yes
Create a tsconfig.json with .json importing enabled:
tsc -init --resolveJsonModule true
Finally, create a folder for your uploads:
mkdir uploads
Save an image (.png or .jpg) to this folder as image.png. We will be using this pixelated beauty:

Install Solana Web3 Dependency
We will need to add the Solana Web3 and SPL Token libraries for this exercise. Additionally, we will use Metaplex's JS SDK and MPL Token Metadata libraries. In your terminal type:
yarn add @metaplex-foundation/umi @metaplex-foundation/umi-bundle-defaults @metaplex-foundation/mpl-token-metadata @metaplex-foundation/umi-storage-mock
#or
npm install @metaplex-foundation/umi @metaplex-foundation/umi-bundle-defaults @metaplex-foundation/mpl-token-metadata @metaplex-foundation/umi-storage-mock
Create a Wallet and Airdrop SOL
You'll need to create a Solana File System Wallet (keypair written to a wallet.json file) and airdrop some SOL to it. From your terminal, type:
solana-keygen new --silent --no-bip39-passphrase --outfile wallet.json
This will create a new wallet and save it to a file called wallet.json. You can then airdrop some SOL to this wallet using the the QuickNode Faucet or Solana Faucet. You can get your wallet's address by typing:
solana address -k wallet.json
When you are done, you should be able to see your wallet balance with:
solana balance -ud -k wallet.json
If the balance is still 0, try the faucet again. You will need about 0.1 Devnet SOL before proceeding with the next steps.
Set Up Your App
Import Necessary Dependencies
Open app.ts, and paste the following imports on line 1:
import { createNft, mplTokenMetadata } from '@metaplex-foundation/mpl-token-metadata'
import { createUmi } from '@metaplex-foundation/umi-bundle-defaults'
import { createGenericFile, createSignerFromKeypair, generateSigner, keypairIdentity, percentAmount, sol } from '@metaplex-foundation/umi';
import { mockStorage } from '@metaplex-foundation/umi-storage-mock';
import * as fs from 'fs';
import secret from './wallet.json';
You can now access Logs for your RPC endpoints, helping you troubleshoot issues more effectively. If you encounter an issue with your RPC calls, simply check the logs in your QuickNode dashboard to identify and resolve problems quickly. Learn more about log history limits on our pricing page.
In addition to the wallet we created in the previous step, we are also importing a few essential methods and classes from the Metaplex Umi libraries. Also, since we will be uploading files from our system, we need to import fs, the file system library.
Set Up Your QuickNode Endpoint
To build on Solana, you'll need an API endpoint to connect with the network. You're welcome to use public nodes or deploy and manage your own infrastructure; however, if you'd like 8x faster response times, you can leave the heavy lifting to us.
You can now pay for a QuickNode plan using USDC on Solana. As the first multi-chain provider to accept Solana payments, we're streamlining the process for developers — whether you're creating a new account or managing an existing one. Learn more about paying with Solana here.
See why over 50% of projects on Solana choose QuickNode and sign up for a free account here. We're going to use a Solana Devnet node.
Copy the HTTP Provider link:
Inside app.ts under your import statements, declare your RPC and establish your Connection to Solana by initiating a new Umi instance:
const QUICKNODE_RPC = 'https://example.solana-devnet.quiknode.pro/0123456/'; //Replace with your QuickNode RPC Endpoint
const umi = createUmi(QUICKNODE_RPC);
Declare Variables
You will need to a couple of things before you can run your script:
-
Define your Umi-compatible creator Signer
-
Configure your Umi instance
-
Define your NFT's metadata
Add the following declarations below your Umi declaration to define your creator and configure your Umi instance:
const creatorWallet = umi.eddsa.createKeypairFromSecretKey(new Uint8Array(secret));
const creator = createSignerFromKeypair(umi, creatorWallet);
umi.use(keypairIdentity(creator));
umi.use(mplTokenMetadata());
umi.use(mockStorage());
Define NFT Characteristics
We will create a nftDetail object containing some metadata that we want to include in our NFT. Create a new const, nftDetail, and include the following attributes:
const nftDetail = {
    name: "QuickNode Pixel",
    symbol: "QP",
    uri: "IPFS_URL_OF_METADATA",
    royalties: 5.5,
    description: 'Pixel infrastructure for everyone!',
    imgType: 'image/png',
    attributes: [
        { trait_type: 'Speed', value: 'Quick' },
    ]
};
Feel free to use your own values here.
Upload Your Image
Before doing anything, we will need to upload the image we will use for our NFT to a decentralized storage platform. This is because we must pass the URI of the NFT image into the NFT's metadata. If you already have an image hosted with a URI, feel free to define that value in your main function and skip this step.
To upload our image, we will use the Umi uploader. The Umi uploader is a simple way to upload files to Arweave, IPFS, or other decentralized storage platforms. We will use fs to create an image buffer and then upload it using the Umi uploader. Add the following function to your app.ts file:
async function uploadImage(): Promise<string> {
    try {
        const imgDirectory = './uploads';
        const imgName = 'image.png'
        const filePath = `${imgDirectory}/${imgName}`;
        const fileBuffer = fs.readFileSync(filePath);
        const image = createGenericFile(
            fileBuffer,
            imgName,
            {
                uniqueName: nftDetail.name,
                contentType: nftDetail.imgType
            }
        );
        const [imgUri] = await umi.uploader.upload([image]);
        console.log('Uploaded image:', imgUri);
        return imgUri;
    } catch (e) {
        throw e;
    }

}
If you were paying close attention to our dependency installation and imports earlier, you may have noticed that we are using a package called @metaplex-foundation/umi-storage-mock. This is as the name implies, a mock storage system that allows us to test our code without actually uploading files to a decentralized storage platform. This is useful for testing and debugging (and doesn't cost any money to use!). One of the great aspects of Umi is that it includes primative generics for storage (and other common operations) that can be easily swapped out for real storage systems like Arweave or IPFS. This is done through the UploaderInterface. This means you can swap the mock storage for a different plug-in with a simple import and configuration change. Here's a list of current alternative UploaderInterface options. All you need to do is import the relevant package and change the umi.use(mockStorage()) line to umi.use(newStoragePlugin()).
Pretty cool!
Upload Metadata
Metadata is more or less what makes your NFT special. It includes the image, any defining traits, assigns it to a collection, etc. We will use a similar upload method as we did with our image in the previous step, but there is a special method to handle .json files. Add the following function to your app.ts file:
async function uploadMetadata(imageUri: string): Promise<string> {
    try {
        const metadata = {
            name: nftDetail.name,
            description: nftDetail.description,
            image: imageUri,
            attributes: nftDetail.attributes,
            properties: {
                files: [
                    {
                        type: nftDetail.imgType,
                        uri: imageUri,
                    },
                ]
            }
        };
        const metadataUri = await umi.uploader.uploadJson(metadata);
        console.log('Uploaded metadata:', metadataUri);
        return metadataUri;
    } catch (e) {
        throw e;
    }
}
Here we are creating a JSON object with the metadata we want to include in our NFT. We then upload this JSON object using the Umi uploader, uploadJson method. The metadata object includes the name, description, image URI, attributes, and properties of our NFT. You can tweak this a bit, but make sure it complies with the Metaplex Metadata standard for NFTs.
Mint NFT
Like our previous functions, the Metaplex API simplifies this process and allows us to mint our NFT with a single method, createNft. Unlike the metadata in the previous step, in this final step, we must pass in some metadata that will be stored on the Solana chain directly.
After your uploadMetadata() function and before main(), create a new async function, mintNft():
async function mintNft(metadataUri: string) {
    try {
        const mint = generateSigner(umi);
        await createNft(umi, {
            mint,
            name: nftDetail.name,
            symbol: nftDetail.symbol,
            uri: metadataUri,
            sellerFeeBasisPoints: percentAmount(nftDetail.royalties),
            creators: [{ address: creator.publicKey, verified: true, share: 100 }],
        }).sendAndConfirm(umi)
        console.log(`Created NFT: ${mint.publicKey.toString()}`)
    } catch (e) {
        throw e;
    }
}
This function will mint a token on-chain that links to our metadata using the Metaplex Metadata Program.
Create and Call Main Function
Create an async function, main, that we will use to execute all of the steps of our code:
async function main() {
    const imageUri = await uploadImage();
    const metadataUri = await uploadMetadata(imageUri);
    await mintNft(metadataUri);
}

main();
As you can see, we will need to define three functions: uploadImage, uploadMetadata, and mintNft. We will call these functions in our main function. Let's start with uploadImage.
Now all you need to do is run your code!
Run Your Code💨
You're all set! When you're ready, in terminal type:
ts-node app
YES! Do you see something like this?
ts-node app
Uploaded image: https://mockstorage.example.com/QuickNode Pixel
Uploaded metadata: https://mockstorage.example.com/Km5iewgZoHUE1dIQJZx7
Created NFT: 2dgA2xB4MebkQTMZeucoN1crDrPcLPaBryWChaUBcU6x
Great job.
Next Steps and Wrap Up
You now have a handy and reusable script to mint NFTs right from your terminal! Pretty handy, right? Want to keep building? Here are a couple of ideas to keep building off what you just learned:
- Use an SPL token transfer to send this NFT to another wallet. (Guide: SPL Token Transfers on Solana: A Complete Guide)
- Use the Solana dApp Scaffold to create an NFT minting widget. (Guide: How to Connect Users to Your dApp with the Solana Wallet Adapter and Scaffold) Note: You'll have to use a Wallet Adapter Identity instead of keypairIdentity to create your instance of Metaplex in a front end with Solana Wallet Adapter.
If you give either a shot or have any questions for us, let us know! Find us on Discord and Twitter!
We ❤️ Feedback!
Let us know if you have any feedback or requests for new topics. We'd love to hear from you.