11 min read
Overview
Building on web3 is sometimes seen as a challenge greater than building on web2. The majority of web2 development features and technologies are well-documented and have stood the test of time, thus not requiring much innovation. Web3 is still in many ways the new kid on the block and development in it can often seem exciting yet daunting. Fortunately, there are services, like thirdweb, which help streamline the web3 development process and make it quick and easy to get started. In this guide, we will demonstrate two ways in which you can mint an NFT on thirdweb - through the thirdweb dashboard (with no code!) and then using thirdweb's SDK with TypeScript. Let's jump in!
What We Will Do
- Navigate the thirdweb dashboard
- Deploy an NFT collection contract and mint from it
- Set permissions for our NFT collection contract
- Mint an NFT with the thirdweb SDK using Typescript
What You Will Need
- A basic understanding of Typescript
- A web3 wallet (e.g., MetaMask, Phantom, WalletConnect compatible) with test ETH (you can get some at the Multi-Chain Quicknode Faucet)
- A free Quicknode account
- Node.js installed
- Image assets (you can use NFT.storage to host images for free)
If you have a paid Quicknode account, you can use Quicknode's IPFS Storage tool to host images on IPFS easily; learn how to use the IPFS tool in this guide.
We will cover installing the packages listed below during the guide.
| Dependency | Version |
|---|---|
| @thirdweb-dev/sdk | ^3.10.65 |
| ethers | ^5.7.2 |
| dotenv | ^16.3.1 |
| ts-node | 10.9.1 |
Wallet Configuration & Funding
Before we jump into minting NFTs with thirdweb, we will need to set up a MetaMask wallet account. You can create a MetaMask wallet by following this quick setup guide. Once your wallet is set up, you'll need to configure your MetaMask wallet to the Sepolia test network. To do this, click the "Ethereum Mainnet" dropdown on the Metamask app and then click Show/hide test networks and select Sepolia Test Network (more info).
You will also need some test ETH to pay for this transaction. If you don't have some already, go to the Multi-Chain Quicknode Faucet and connect your wallet to request free funding on the Sepolia network.
Minting NFTs from the thirdweb Dashboard
Connecting Your Wallet
First, navigate to the thirdweb's dashboard. You will be prompted to connect your wallet.
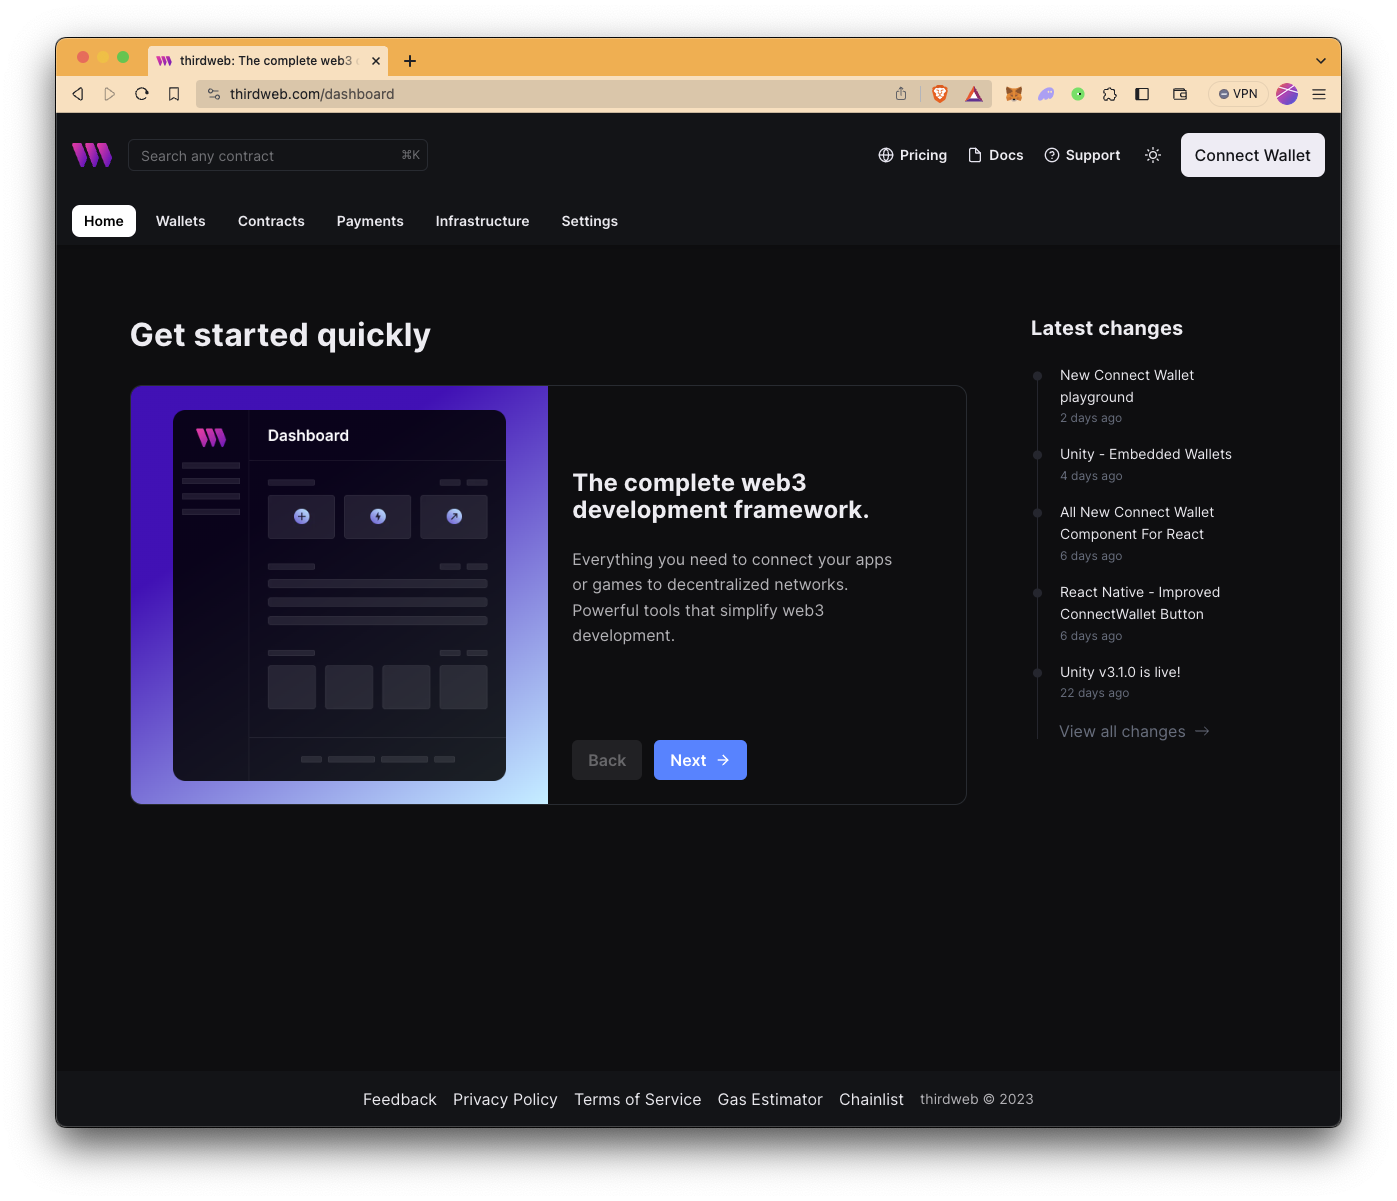
Since we are using a MetaMask wallet for this guide, we will click on the Connect Wallet button and select MetaMask as our sign-in option. Then, follow the instructions on pop ups to sign in.
Deploying the NFT Collection Contract
In this section, we will deploy an NFT collection contract. After connecting to our MetaMask wallet, we are directed to thirdweb's dashboard with a few options to get started quickly. Click Contracts.
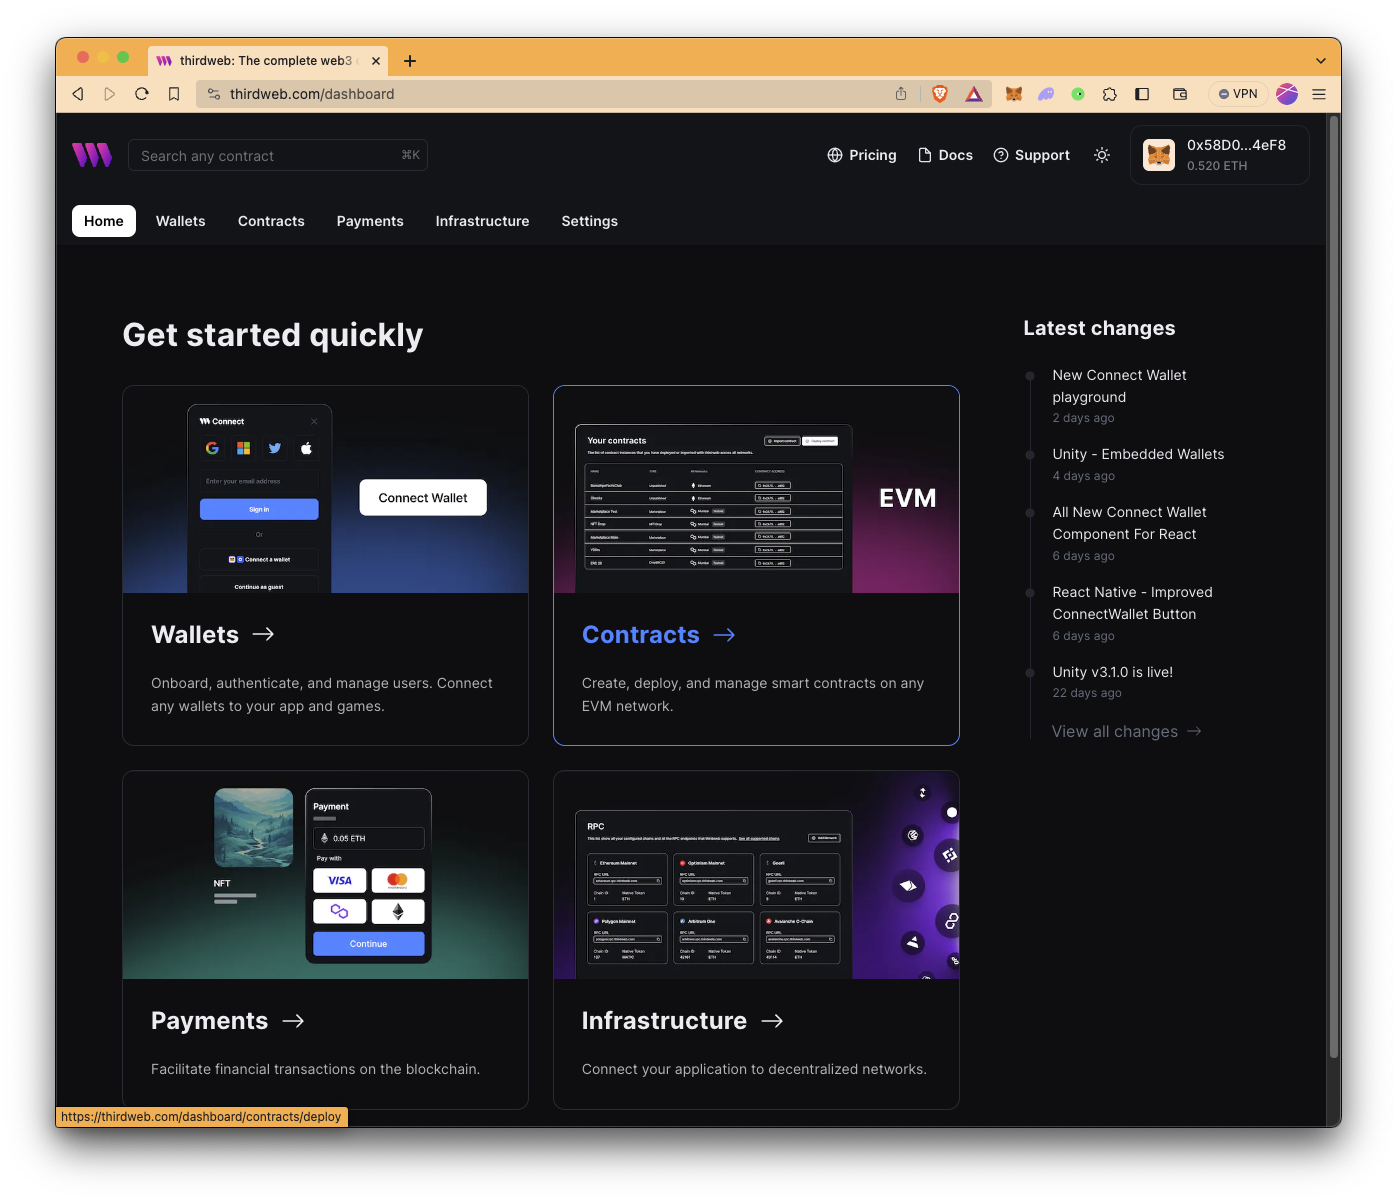
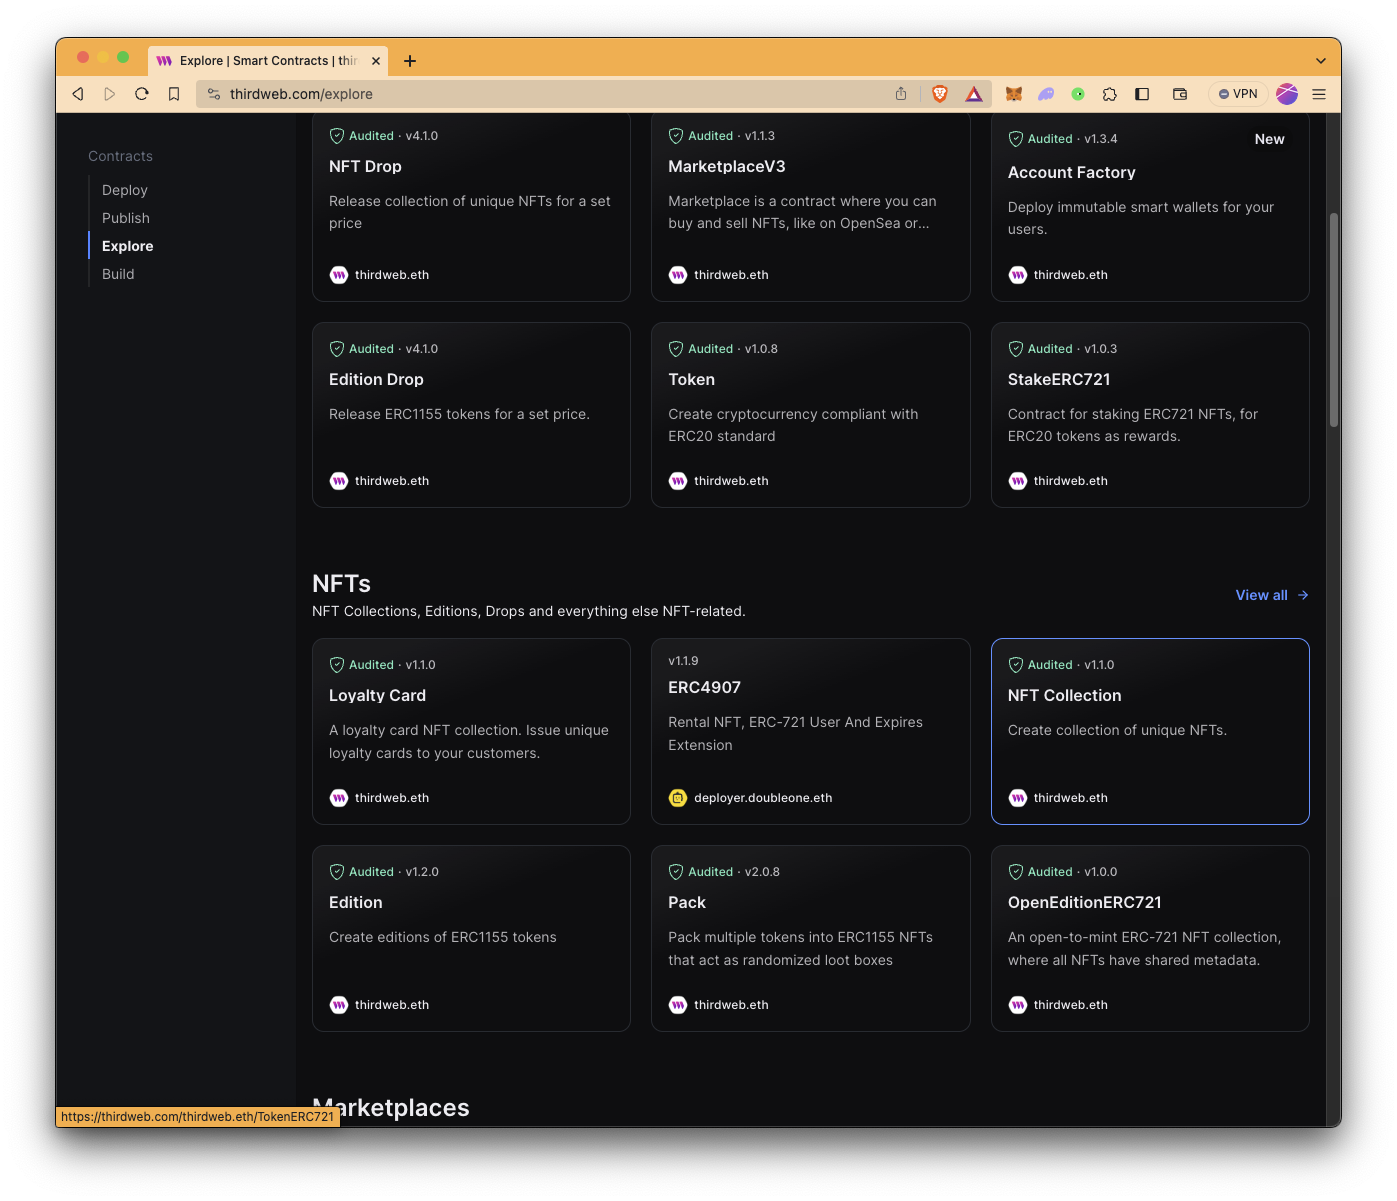
To continue, click on the Ready-to-deploy button, and you'll be redirected to the contracts page. thirdweb allows us to deploy pre-built contracts through their frontend or via the thirdweb cli. This allows technical and non-technical users to easily deploy smart contracts. There is a wide variety of pre-built contracts you can easily deploy, such as NFT Drops, NFT Collections, Edition Drops, Tokens (ER20), Voting contracts, NFT marketplaces, and much more! For this guide's purpose, we will select NFT Collection.
Next, on the NFT collection page, we will configure our NFT collection contract. After clicking the Deploy now button, we will populate the following fields under the Contract Metadata:
- Name
- Symbol
- Description
- Image
Note that in the Primary Sales and Royalties section, the default recipient address is set to your connected wallet address. Primary sales refer to the initial sales when users mint from your NFT Collection contract. Royalty sales derive from secondary market sales such as OpenSea, Rarible, LooksRare, etc.
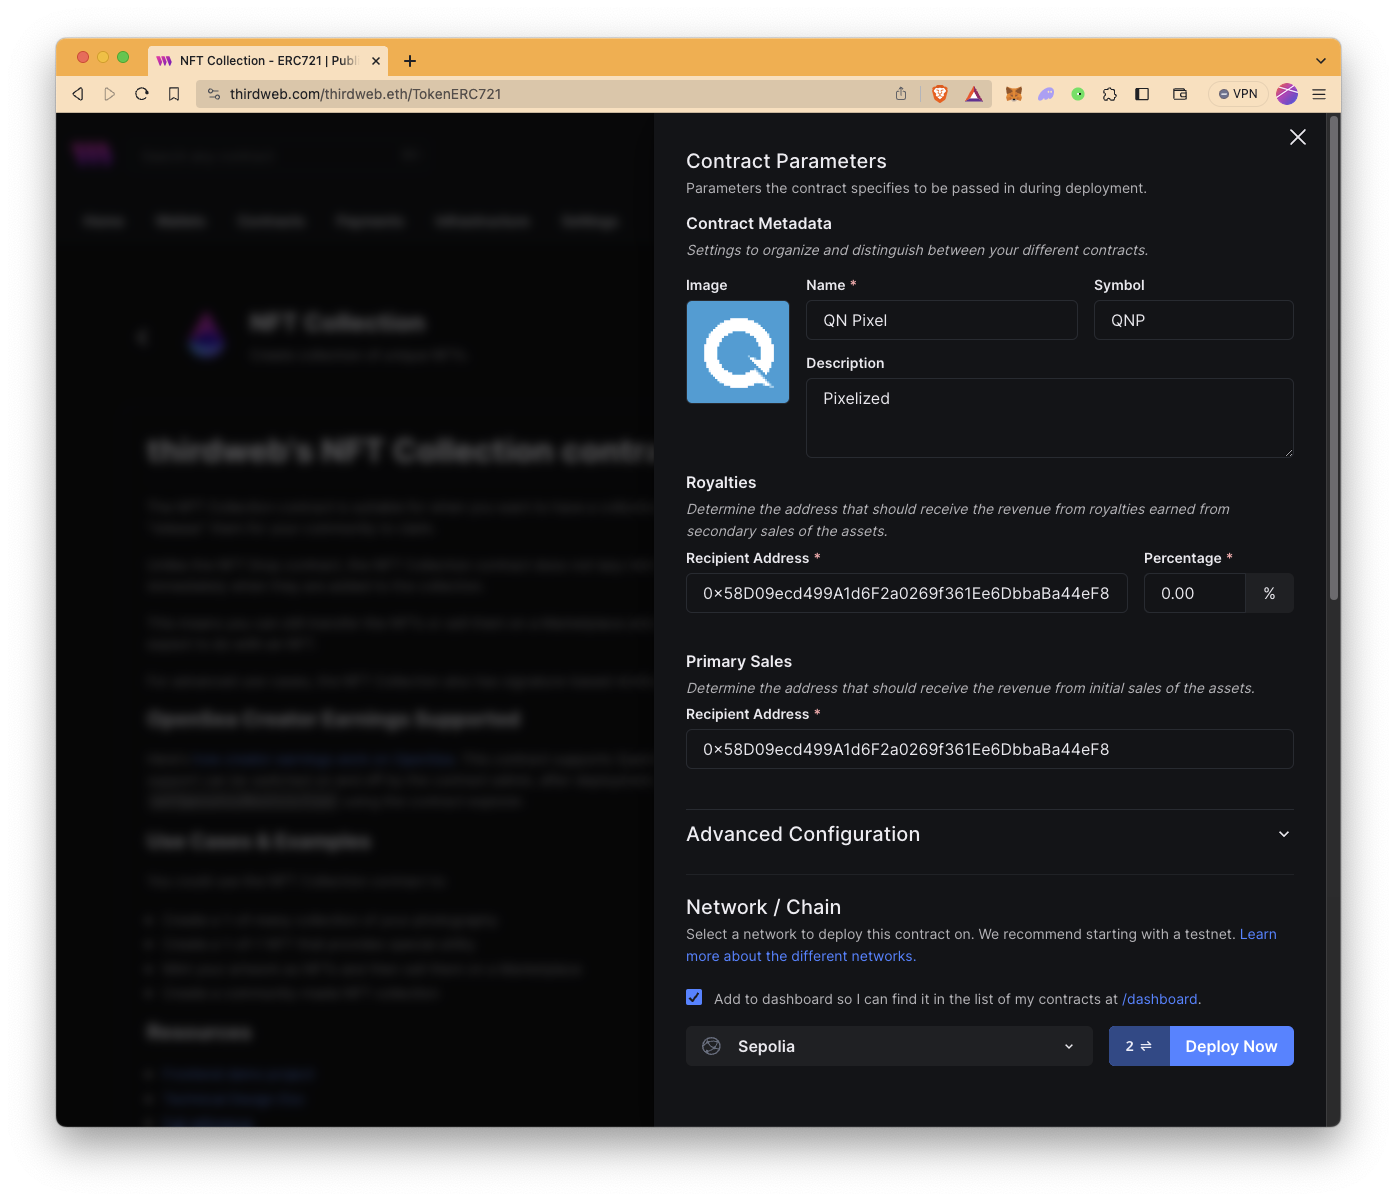
Once we are done filling in the contract information, we need to select which network to deploy this contract on. Expand the Network/Chain dropdown and select Sepolia testnet. Click the Deploy Now button, and MetaMask will pop up. Next, confirm the transactions on MetaMask.
The number left to the Deploy Now button indicates the amount of transaction that needs to be signed. So, in this example, we will need to confirm two transactions.
Minting an NFT Under our NFT Collection
After the deployment of the NFT Collection contract, you will be redirected to the collection dashboard. In this section, we will mint an NFT under the NFT collection we just deployed on the Sepolia testnet.
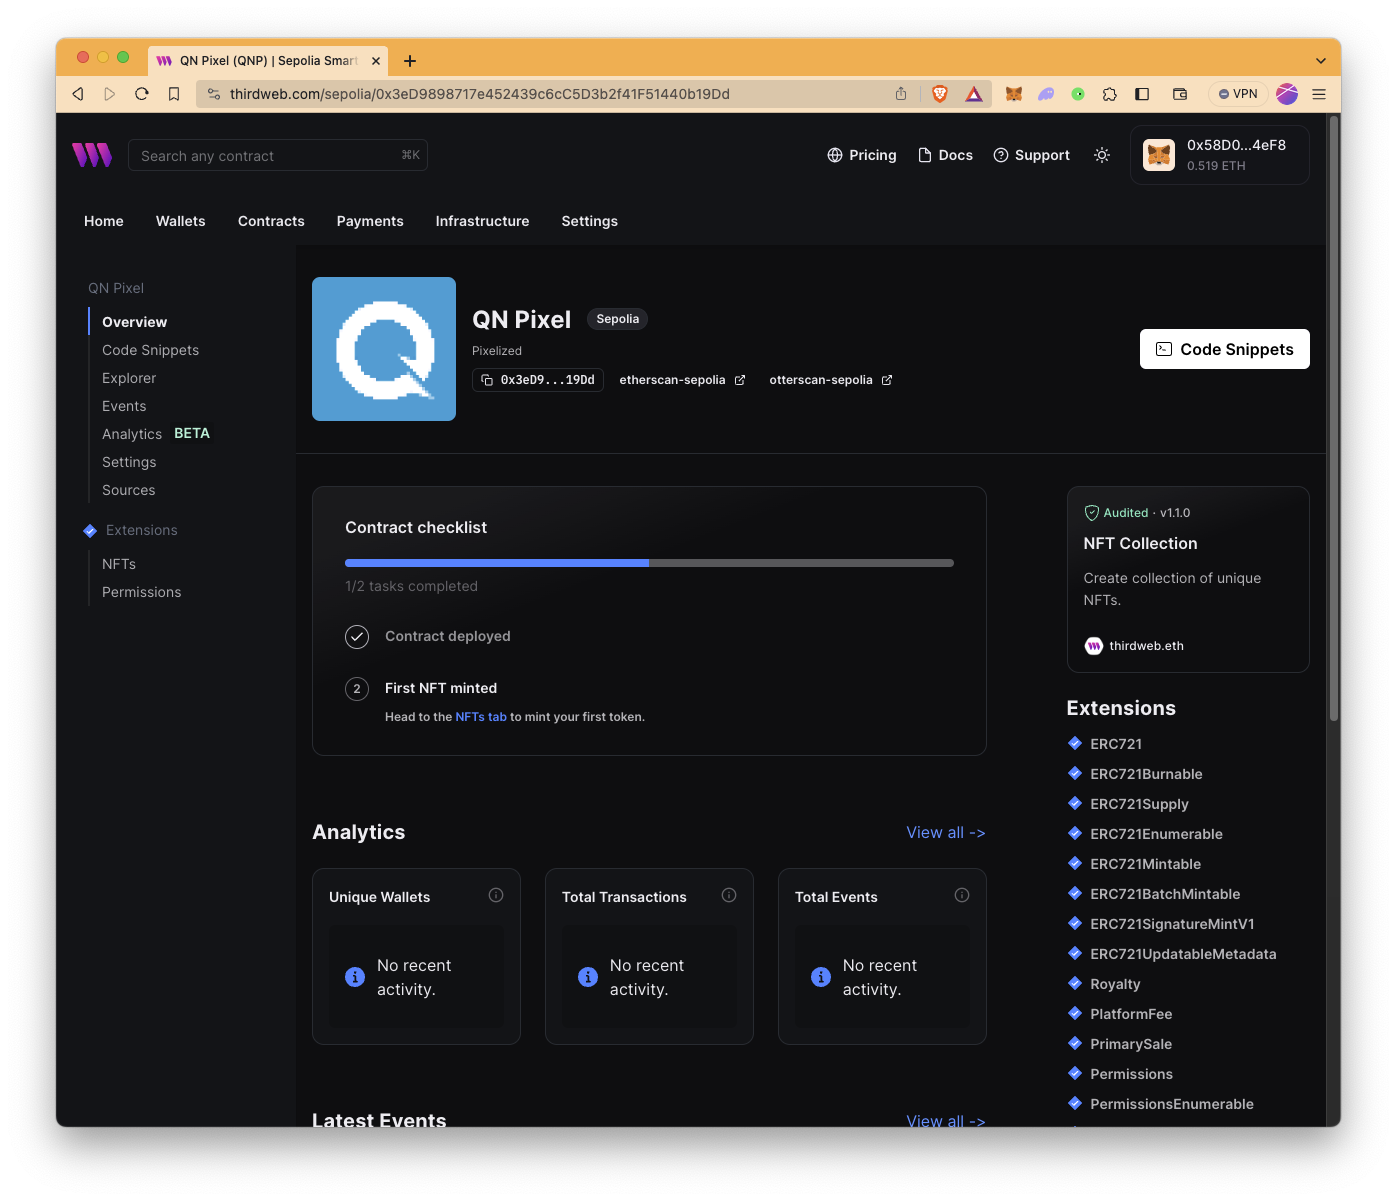
To mint an NFT under the collection, all we have to do is heading to the NFTs tab, and then clicking on the + Mint button.
When we click on the + Mint NFT button, a panel opens up to the right for us to fill in the information for the NFT, like the name, description, image, and any properties for the NFT if we like. NFTs can range from images to videos and other kinds of digital documents like texts, PDFs, etc.
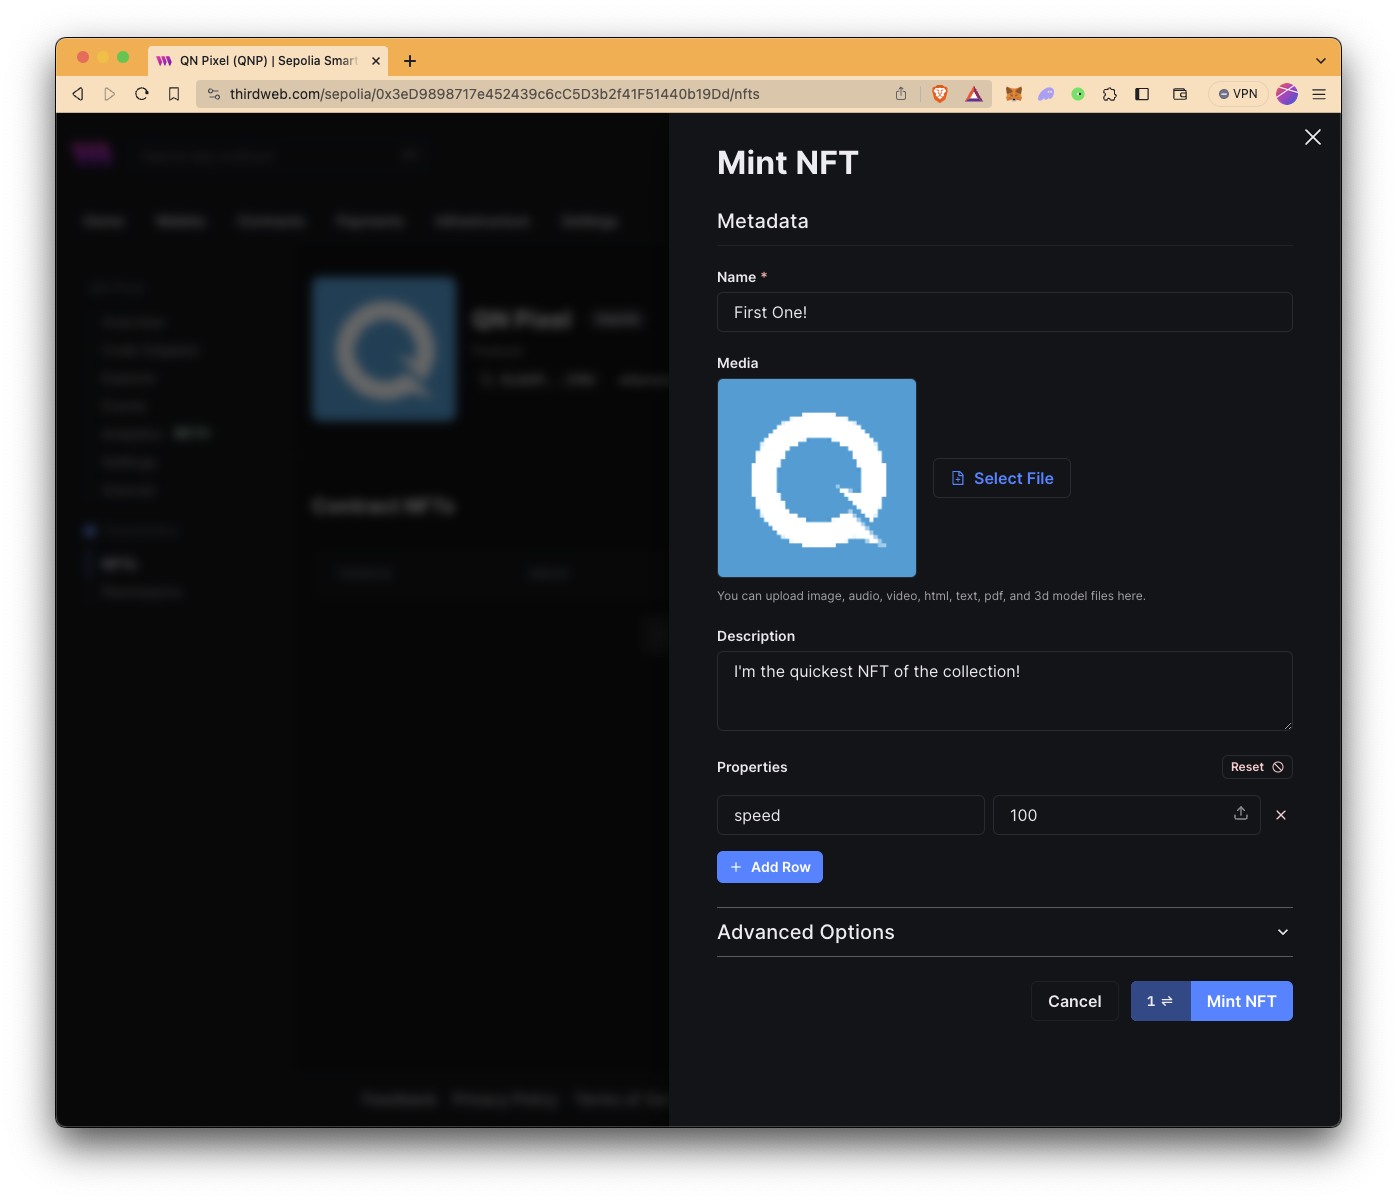
After filling out all the information for the NFT, we click the + Mint NFT button, and again we will be prompted by MetaMask to sign the transaction.
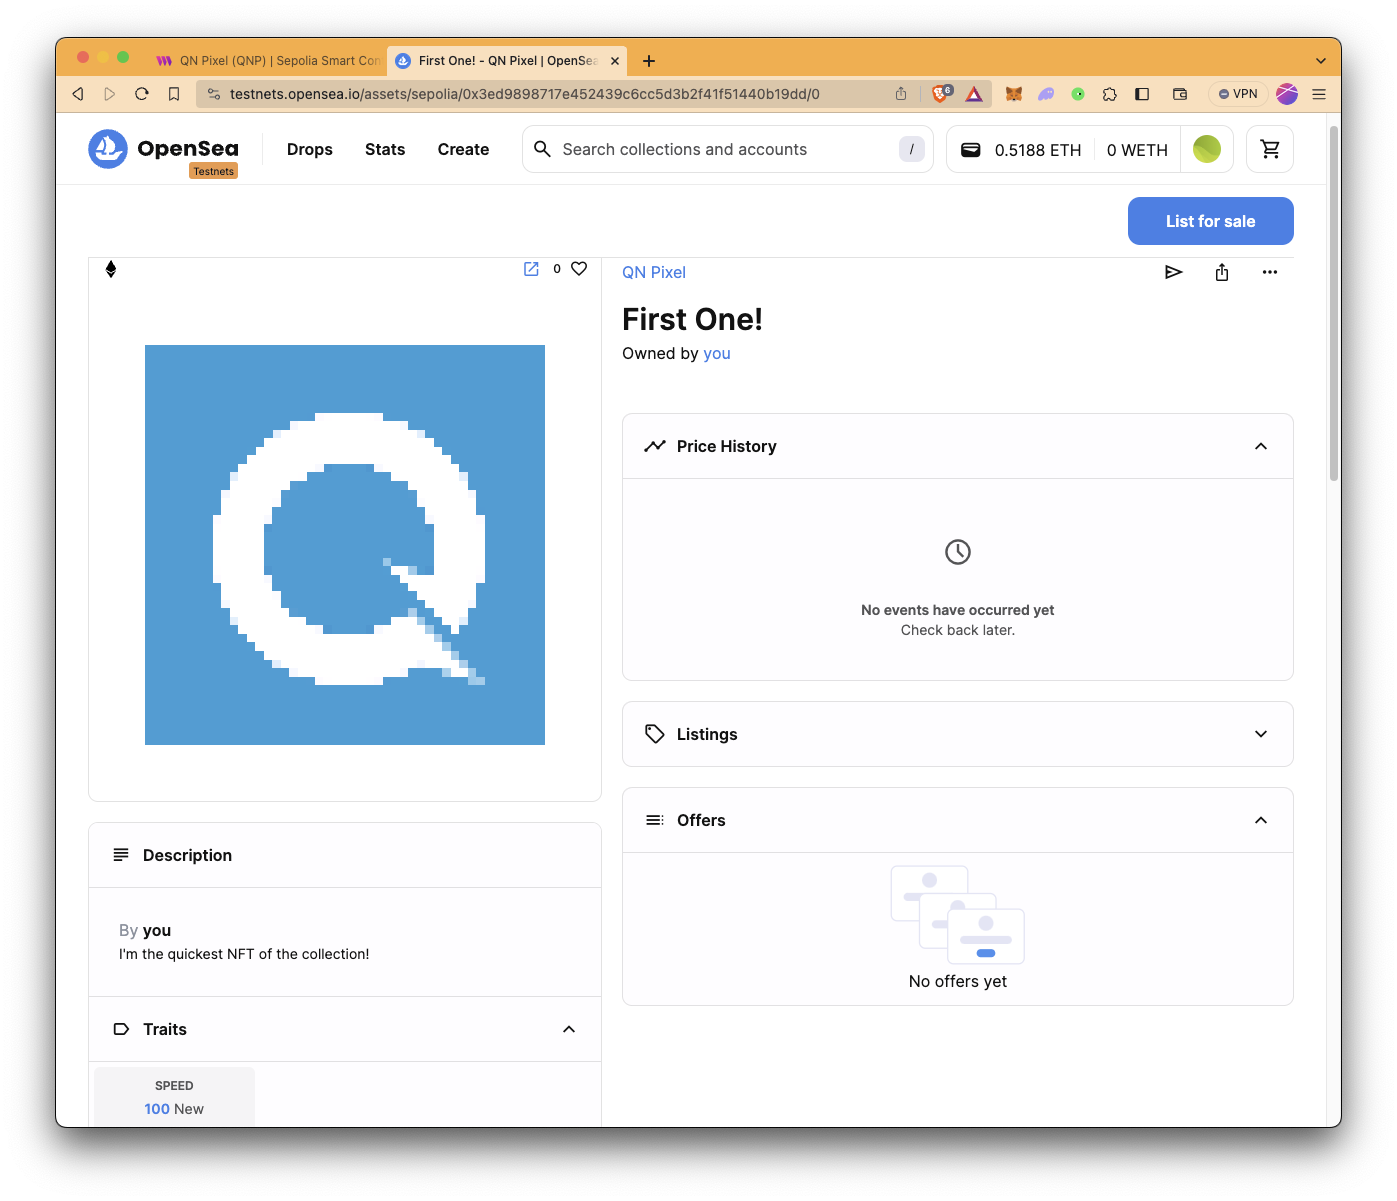
Once we confirm the transaction, that's it! We minted our first NFT without writing a single line of code! We can view this NFT on our dashboard (and other NFT marketplaces such as OpenSea) and do whatever we want with the NFT, such as transferring it to another wallet or burning it (which would essentially remove it from your wallet).
Permission Manager
Now, let's look at some permissions we can set to manage the NFT we minted. To adjust permissions features, switch to the Permissions tab next to the Overview tab.
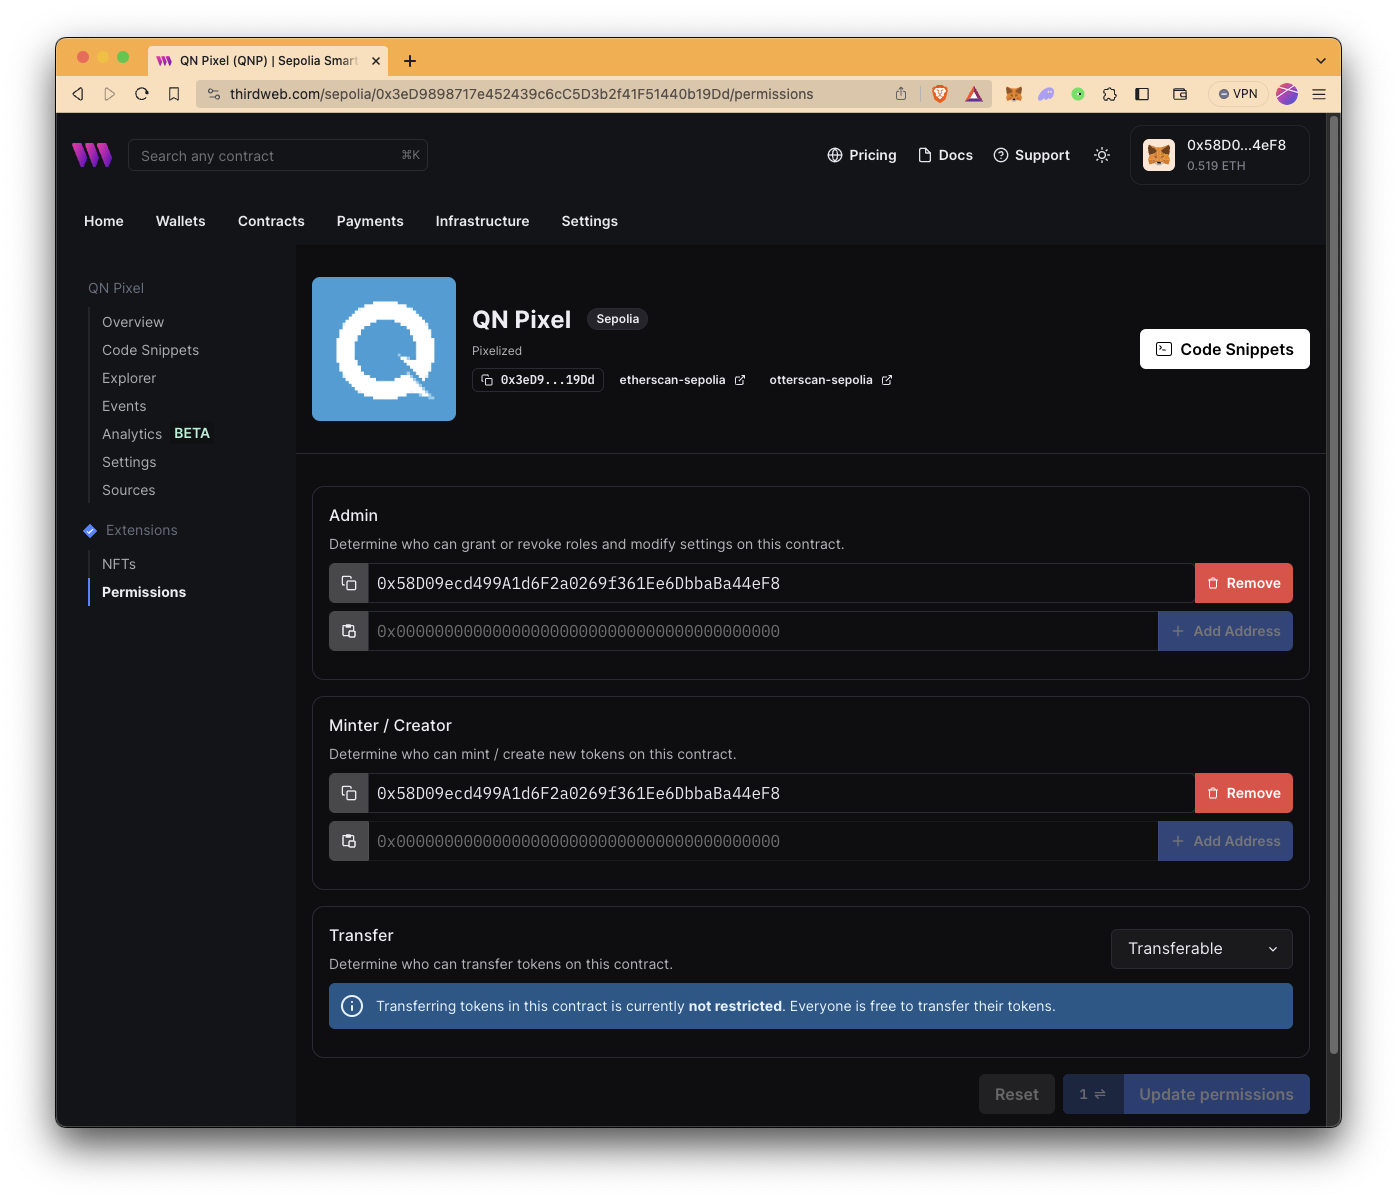
Here we can see the roles and permissions we can set up for this NFT. Under the Admin section, we can transfer the account to those who we want to have admin privileges over the NFT or add new accounts to manage the NFT. We can also change the creator or add accounts that will be able to create NFTs under the contract in the creator heading. Lastly, we can decide to set the NFT to transferable or non-transferable. Once you are done with setting permissions, click on the update permissions button.
Minting NFTs from the thirdweb SDK using Typescript
Now that we've seen how minting an NFT can be done through the thirdweb dashboard, let's see how this can also be achieved with code using Typescript and the thirdweb SDK. We will install and use the thirdweb SDK to programmatically create an NFT collection and mint from it. Let's get started!
Note: This demonstration will create another NFT collection from scratch, but you can also mint NFTs programmatically from your already created NFT collection on the thirdweb dashboard by clicking the Code tab and looking under the related code example.
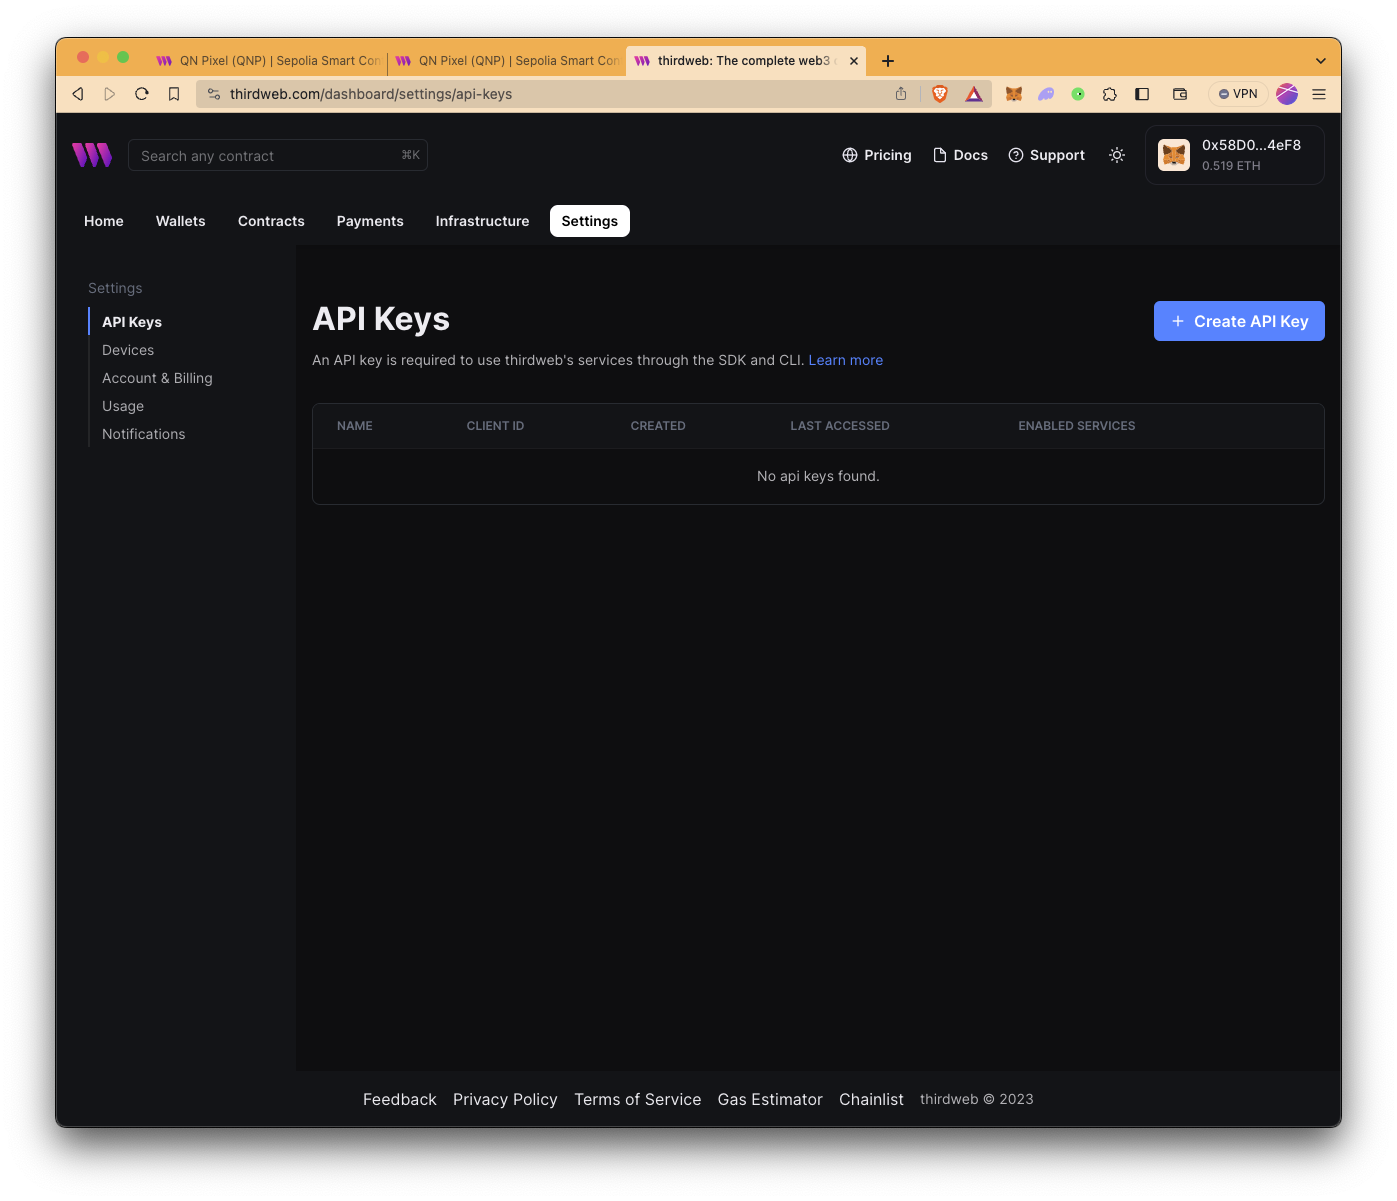
Before diving into the coding, we need to create an API key on thirdweb since an API key is required to use thirdweb's products such as the CLI and SDKs.
To create an API key:
- Go to the API Keys page under Settings
- Click the + Create API Key button
- Give a name
- Choose services, you may leave it as is
- Set access restrictions, you may leave it as is
- Save the Secret Key and Client ID safely and keep them handy
Installing the thirdweb SDK
To set up our project, first run the following command in a terminal window to create a folder and navigate inside it:
mkdir nft-collection-thirdweb && cd nft-collection-thirdweb
Next, run the command below to create a new typescript file.
echo > mintNft.ts
Then, run the command to initialize an npm project and install the required dependencies in order to use the thirdweb SDK:
npm init --yes
npm install @thirdweb-dev/sdk ethers@5 dotenv
npm install -g ts-node
If you have already installed ts-node globally on your system, you may skip installing ts-node.
Setting Environment Variable
Now that everything is installed, we can move on to the next step, which is creating a .env file. A .env file (environment file) is a simple text configuration file for controlling your project's environment. We will use this method to securely store our private key and prevent it from being sourced from our TypeScript file.
Run the command to create a .env file at the root folder of your directory. We will define the private key of the wallet and Quicknode endpoint URL in the .env file.
echo > .env
Ethereum Sepolia Endpoint
To interact with blockchains, you'll need API endpoints to communicate with the network. You're welcome to use public nodes or deploy and manage your own infrastructure; however, if you'd like faster response times, you can leave the heavy lifting to us. Sign up for an account here.
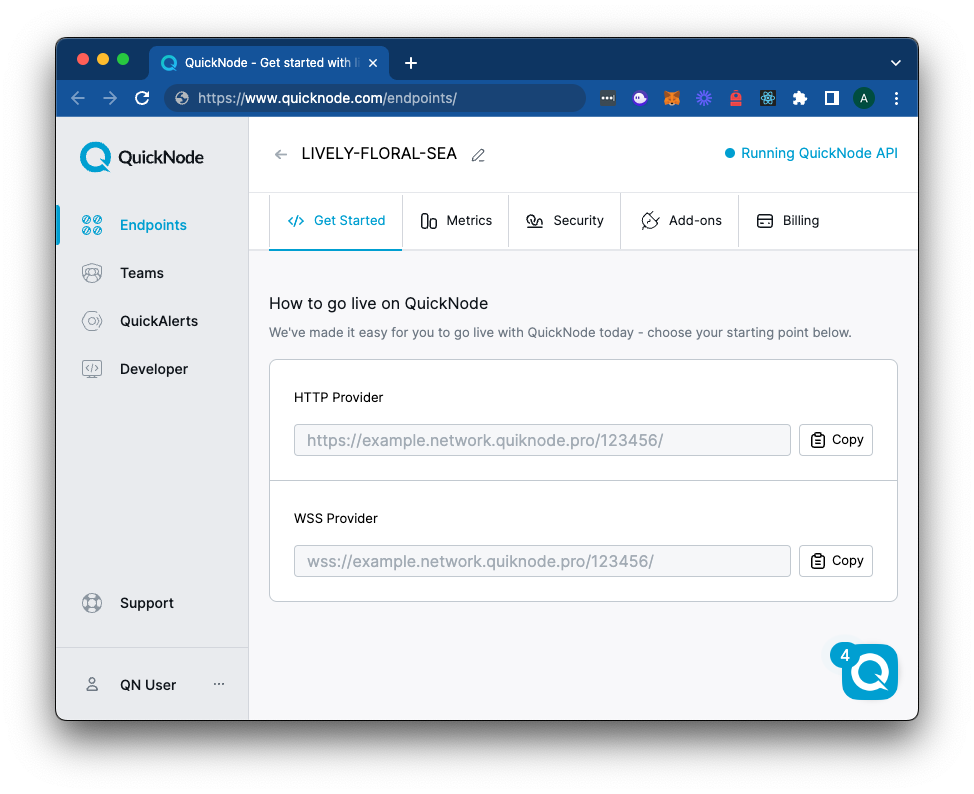
Once logged in, click the Create an endpoint button, then select the Ethereum chain and Sepolia network.
After creating your endpoint, copy the HTTP Provider link and keep it handy, as you'll need it next.
You can use your endpoint in your MetaMask instead of using the public RPC to have better and faster connection. Check the link to learn more about adding a custom network RPC.
Private Key
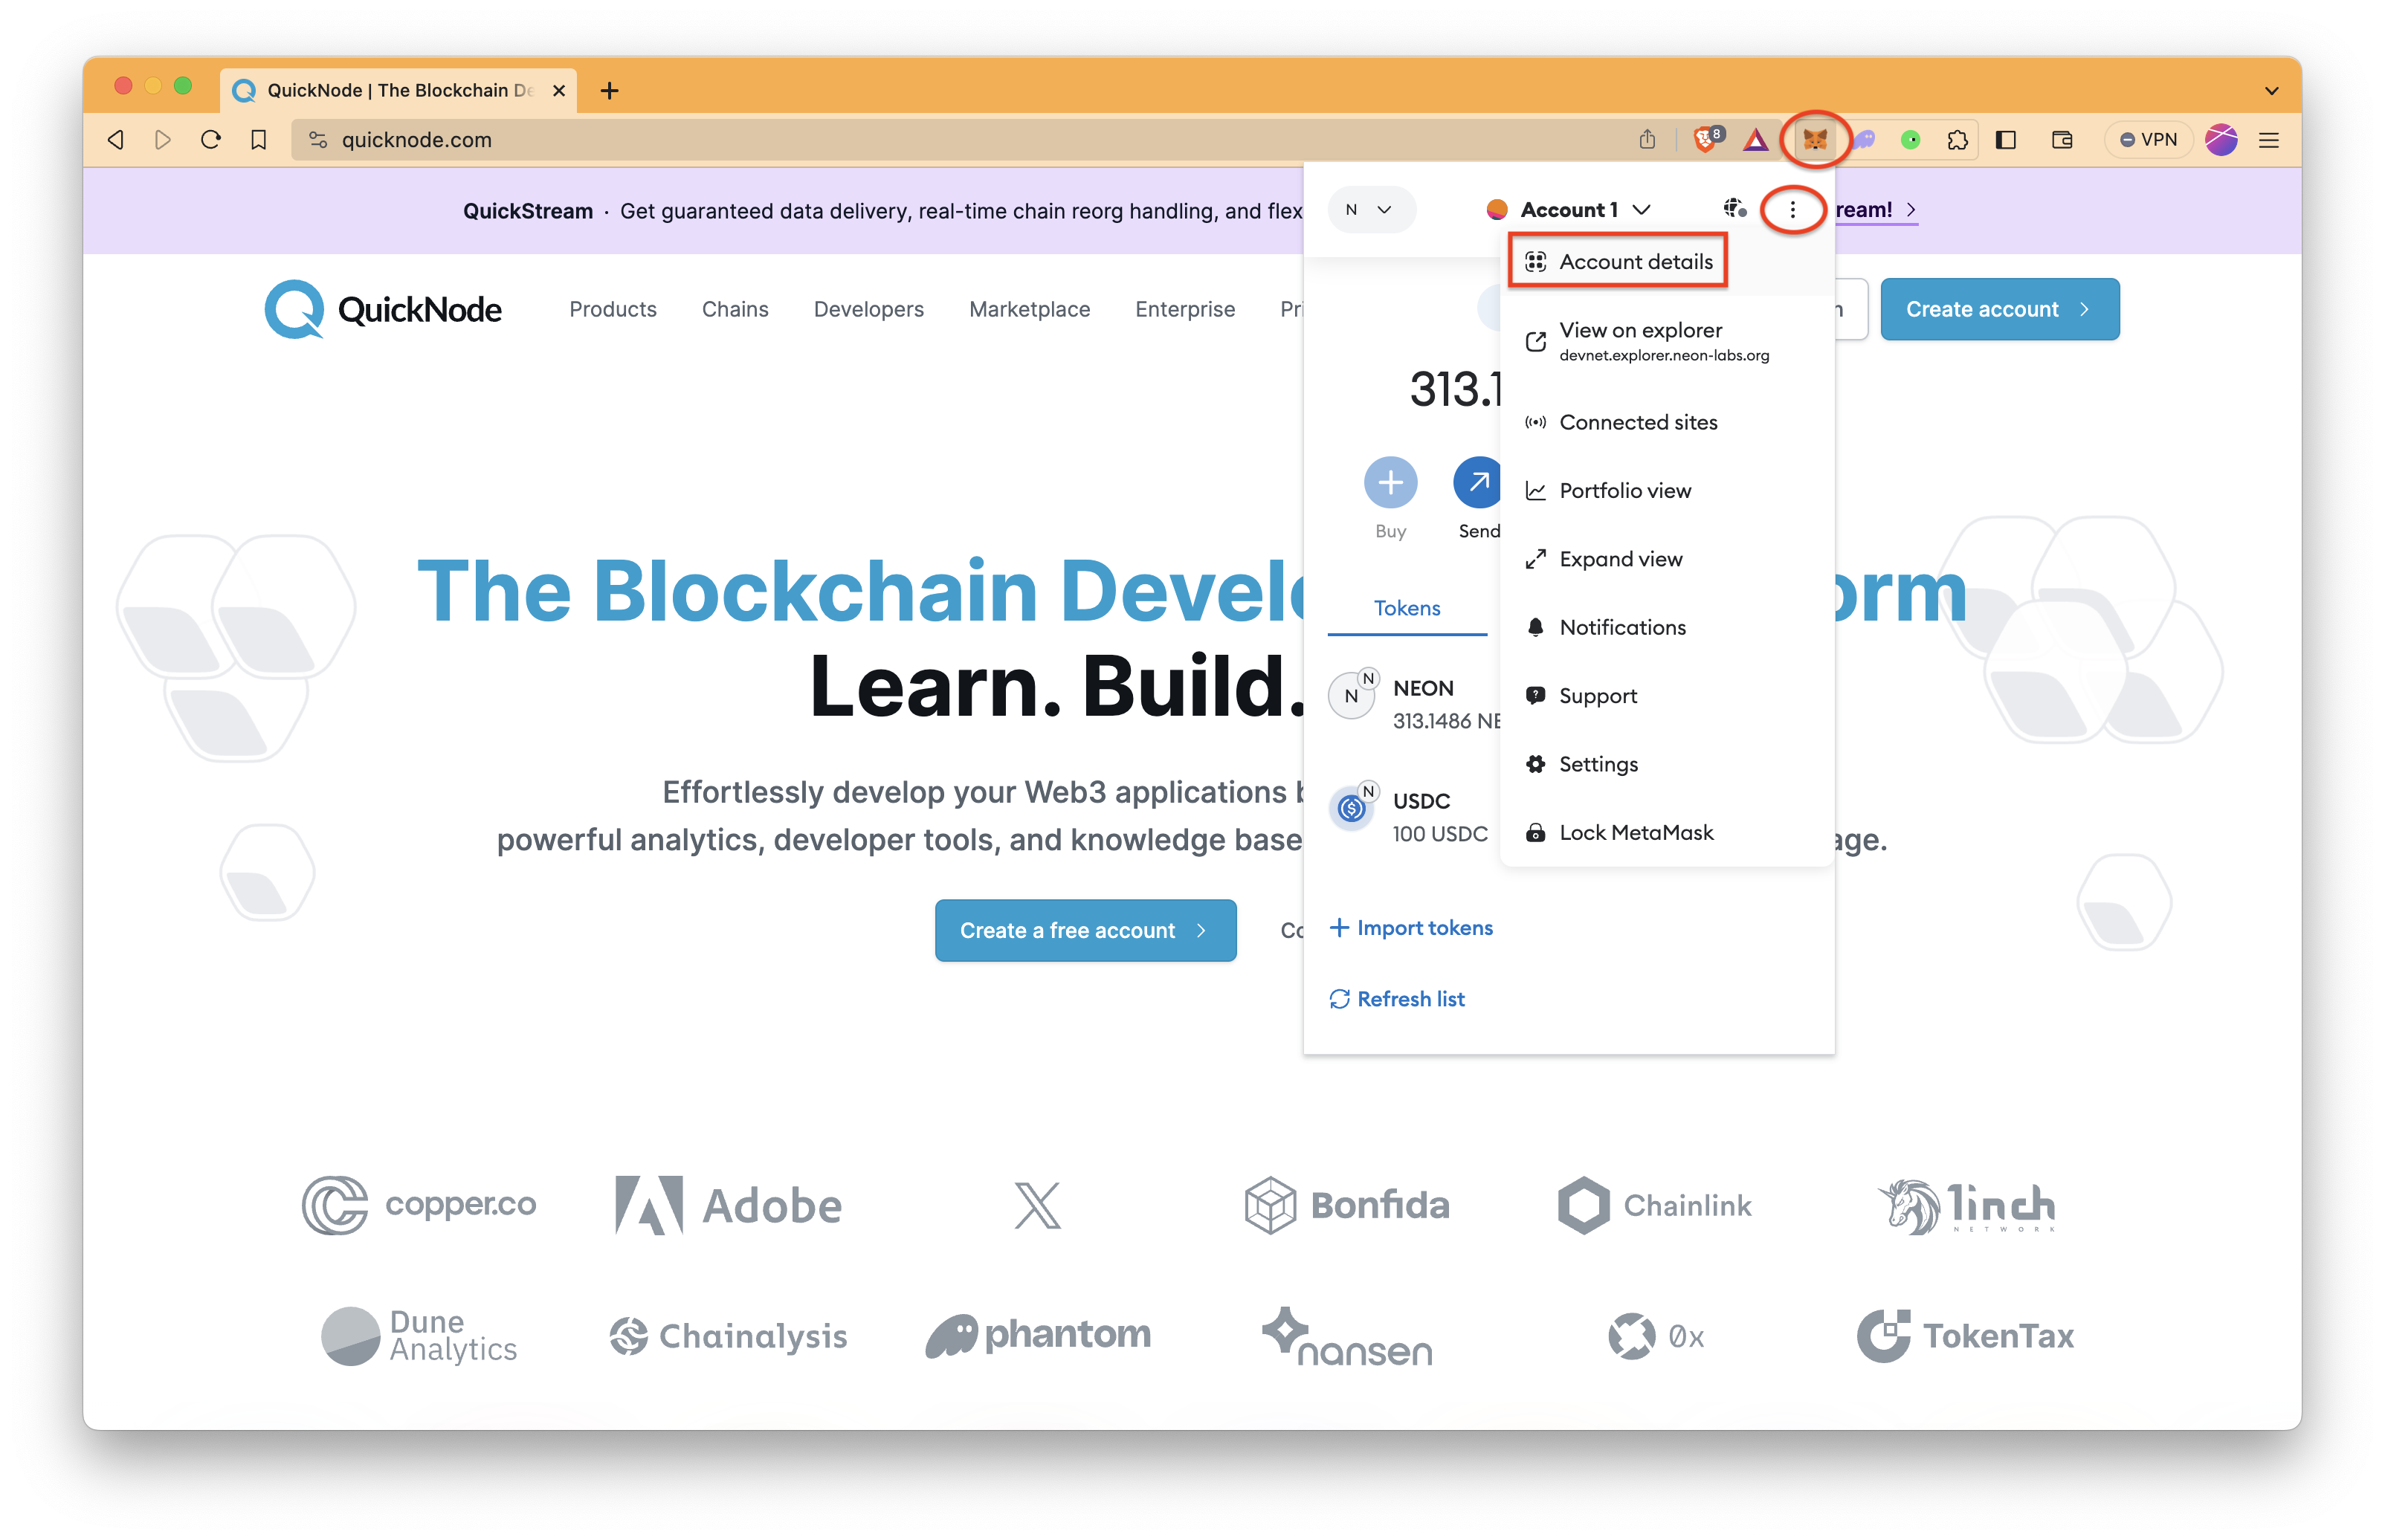
To get your private key;
- Click MetaMask icon, a stylized fox head, on your browser. If it is not seen, check the Extensions page of your browser.
- Click ⋮ symbol and then Account details.
- Then, click Show private key and follow instructions.
Since we have HTTP provider link for Ethereum Sepolia Endpoint, private key, and secret key of thirdweb, add them into the .env file in the following format by using your favorite code editor.
PRIVATE_KEY="YOUR_PRIVATE_KEY"
QUICKNODE_HTTP_URL="YOUR_QUICKNODE_HTTP_URL"
SECRET_KEY="YOUR_SECRET_KEY"
Remember to replace YOUR_PRIVATE_KEY, YOUR_QUICKNODE_HTTP_URL, and YOUR_SECRET_KEY with your private key, HTTP provider link, and thirdweb secret key.
Importing Dependencies
Once our environment variable is set up, open the mintNft.ts file in a code editor and paste the following code snippets (in order) to the file:
import { ethers } from "ethers";
import { ThirdwebSDK, TransactionResult } from "@thirdweb-dev/sdk";
require('dotenv').config();
Initializing the thirdweb SDK
const privateKey = process.env.PRIVATE_KEY as string;
const quicknodeEndpoint = process.env.QUICKNODE_HTTP_URL as string;
const thirdwebSecretKey = process.env.SECRET_KEY as string;
const sdk = new ThirdwebSDK(
  new ethers.Wallet(privateKey, ethers.getDefaultProvider(quicknodeEndpoint)),
  { secretKey: thirdwebSecretKey }
);

let collectionAddress: string;
let mintTxnHash: TransactionResult;
The code above accomplishes a few tasks:
- Imports the required modules to interact with the thirdweb SDK
- Requires the dotenv module in order to import our environment variable
- Initializes a thirdweb SDK instance by using the function ThirdwebSDK() and the Ethers.Wallet library
- Declares two string variables that will be used when creating and minting NFTs.
Next, we will create a function that will help us deploy an NFT collection via thirdweb CLI.
Creating the NFT Collection
In the mintNft.ts file, paste the following code at the bottom of the file.
async function createCollection() {

    collectionAddress = await sdk.deployer.deployNFTCollection({
        name: "Fruit Basket",
        symbol: "FRUIT",
        primary_sale_recipient: "0x2ED0fE9a8FbB3b7f0ffC45a18eff8f0c3A0ABE2C",
        image: "https://bafkreie4zdcentifeqoukitd32lvd3k3kr3y5va7kqfdewd7budjkoanui.ipfs.nftstorage.link/",
        description: "A fruit basket that lives on the Sepolia blockchain! 🍎🧺",
        /* Optional fields below */
        // platform_fee_recipient: "0x00000",
        // platform_fee_basis_points: "5",
        // fee_recipient: "0x00000",
        // seller_fee_basis_points: "10",
        // external_link: "YOUR_HTTP_URL",
    })
    console.log("NFT Collection Address: ", collectionAddress)
}
Our async function createCollection() calls the deployNFTCollection() function which takes our NFT collection metadata as an argument. Our example uses the following fields - name, symbol, primary_sale_reciepient, image and description. You can also uncomment the other fields for additional contract specifications.
Now that we have the code required to deploy an NFT collection, let's move on to creating the code logic to mint NFTs from our collection.
Mint an NFT under the Collection
In this section, we will create the logic for minting an NFT from our collection. Minting an NFT to yourself is now as simple as calling the mintToSelf method on the initialized NFT contract.
async function mint() {
  const nftCollection = await sdk.getContract(collectionAddress, "nft-collection");
  mintTxnHash = await nftCollection.mint?.({
    name: "Orange",
    description: "An orange living on the Sepolia blockchain",
    image:
      "https://bafkreidxzweunukaruhyfvepkjrep76vi75y6yl5fq3pqedallz6nwoori.ipfs.nftstorage.link/",
    properties: {
      "Orange Type": "Navel", // Optional field to set attributes
    },
  });
  console.log(
    "Minted NFT Transaction Hash: ",
    mintTxnHash.receipt.transactionHash
  );
}
We will also add a helper function that will run our code synchronously. This is helpful because it allows each function to run before the next function is executed.
async function main() {
    createCollection().then(
    () => mint())
}
Lastly, we will call main function.
main()
The final script should look like this:
import { ethers } from "ethers";
import { ThirdwebSDK, TransactionResult } from "@thirdweb-dev/sdk";
require("dotenv").config();

const privateKey = process.env.PRIVATE_KEY as string;
const quicknodeEndpoint = process.env.QUICKNODE_HTTP_URL as string;
const thirdwebSecretKey = process.env.SECRET_KEY as string;
const sdk = new ThirdwebSDK(
  new ethers.Wallet(privateKey, ethers.getDefaultProvider(quicknodeEndpoint)),
  { secretKey: thirdwebSecretKey }
);

let collectionAddress: string;
let mintTxnHash: TransactionResult;

async function createCollection() {
  collectionAddress = await sdk.deployer.deployNFTCollection({
    name: "Fruit Basket",
    symbol: "FRUIT",
    primary_sale_recipient: "0x2ED0fE9a8FbB3b7f0ffC45a18eff8f0c3A0ABE2C",
    image:
      "https://bafkreie4zdcentifeqoukitd32lvd3k3kr3y5va7kqfdewd7budjkoanui.ipfs.nftstorage.link/",
    description: "A fruit basket that lives on the Sepolia blockchain! 🍎🧺",
    /* Optional fields below */
    // platform_fee_recipient: "0x00000",
    // platform_fee_basis_points: "5",
    // fee_recipient: "0x00000",
    // seller_fee_basis_points: "10",
    // external_link: "YOUR_HTTP_URL",
  });
  console.log("NFT Collection Address: ", collectionAddress);
}

async function mint() {
  const nftCollection = await sdk.getContract(
    collectionAddress,
    "nft-collection"
  );
  mintTxnHash = await nftCollection.mint?.({
    name: "Orange",
    description: "An orange living on the Sepolia blockchain",
    image:
      "https://bafkreidxzweunukaruhyfvepkjrep76vi75y6yl5fq3pqedallz6nwoori.ipfs.nftstorage.link/",
    properties: {
      "Orange Type": "Navel", // Optional field to set attributes
    },
  });
  console.log(
    "Minted NFT Transaction Hash: ",
    mintTxnHash.receipt.transactionHash
  );
}

async function main() {
  createCollection().then(() => mint());
}

main();
Once you have saved the changes in your mintNft.ts file, open the terminal and run the following command to run the script:
ts-node mintNft.ts
You should see the following output printed in your terminal window:
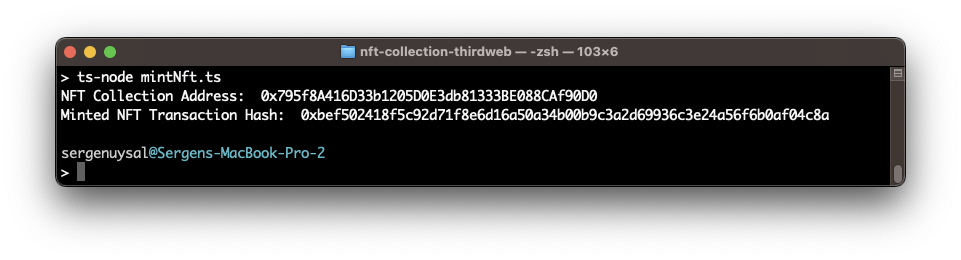
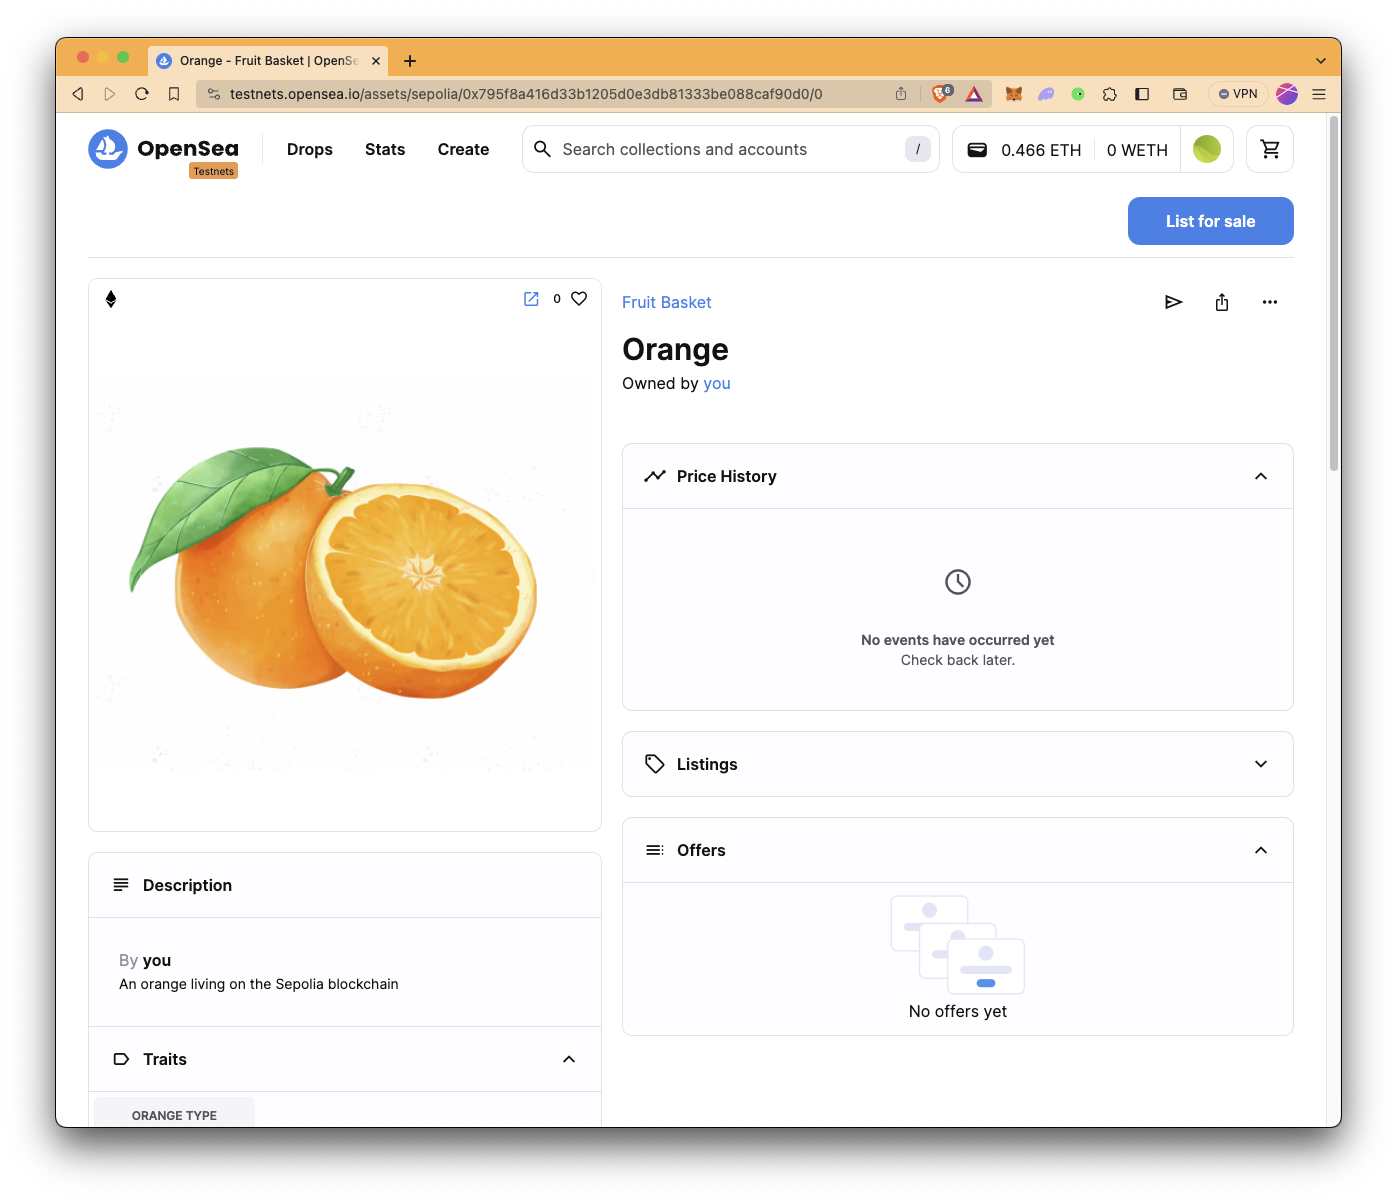
From the screenshot above, we can see that our Fruit Basket NFT collection has been deployed to the address: 0x795f8A416D33b1205D0E3db81333BE088CAf90D0.
Additionally, we can take the transaction hash and look for it on Etherscan to see the mined transaction. You can see the NFT minted on NFT marketplaces such as OpenSea by either searching the collection address or viewing your NFTs on your profile.
Conclusion
That's a wrap! In this guide, we demonstrated two ways in which you can mint an NFT with thirdweb: through the thirdweb dashboard without any code and with the thirdweb SDK using Typescript.
Subscribe to our newsletter for more articles and guides. Feel free to reach out to us via Twitter if you have any feedback. You can always chat with us on our Discord community server, featuring some of the coolest developers you'll ever meet :)
We ❤️ Feedback!
Let us know if you have any feedback or requests for new topics. We'd love to hear from you.