
11 min read
Overview
In blockchain development, Ethereum stands out as a popular platform for building decentralized applications (dApps) and smart contracts. The web3.py library provides Python developers a convenient way to interact with the Ethereum network.
In this guide, we will walk you through the process of sending transactions with both EIP-1559 and legacy methods on Ethereum using web3.py. By the end, you'll have a solid understanding of how to leverage this powerful library to initiate transactions securely and efficiently. Additionally, you'll learn the effect of the EIP-1559 update on transactions.
We will use the Sepolia Testnet of Ethereum in this guide for convenience. However, it is totally applicable to Ethereum Mainnet as well.
What You Will Need
- Basic understanding of Ethereum transactions and the EIP-1559 upgrade
- Python (version 3.6 or higher)
- web3.py - installing instructions will be explained during the guide.
- A code editor (e.g. Visual Studio Code)
You can download and install each dependency by clicking the links above and following their instructions.
Dependencies Used in this Guide
| Dependency | Version |
|---|---|
| python | 3.6.0 |
| web3.py | 6.5.0 |
What You Will Do
- Learn about EIP-1559 and its effects for developers
- Send transactions using both Type-2, new dynamic fee method introduced by EIP-1559, and Type-0, legacy method, to the Ethereum blockchain using web3.py
Overview of web3.py and Ethereum Transactions
web3.py is a Python library that serves as a powerful interface for interacting with the Ethereum blockchain. It enables developers to write Python code to interact with Ethereum nodes, send transactions, deploy smart contracts, and more.
Ethereum transactions involve sending value (Ether) or interacting with smart contracts on the Ethereum network. Transactions contain essential details such as sender and recipient addresses, transaction value, gas price, and data.
We cover only sending Ether with both Type-0 (legacy transaction method) and Type-2 (new dynamic fee method which EIP-1559 introduces) transactions in this guide. Interacting with smart contracts will be the content of a new guide.
Effect of EIP-1559 on Sending Transactions
EIP-1559 was introduced to reduce the volatility of gas prices on-chain by implementing a more efficient method for Ethereum gas prices.
Prior to EIP-1559, transactions with lower gas fees on the Ethereum chain frequently remained pending for lengthy periods since blocks were always filled with the highest-paying transactions. To address this, EIP-1559 established a more complex and equitable system of gas costs, including a base fee and a priority fee.
- Base Fee is the required amount of the fee to be included in the next block. The base fee may be changed based on the fullness of the block compared to the previous block.
- Priority Fee is optional and is determined by the user. It is basically an incentive to be included in a block.
The EIP-1559 upgrade is fully compatible with previous versions. Thus, legacy transactions continue to function normally as well.
How is it different for developers?
Before EIP-1559, developers had to specify a gasPrice value to send a transaction. The gasPrice parameter is now replaced by maxFeePerGas and maxPriorityFeePerGas.
- maxFeePerGas is the maximum amount of gas fee a user is willing to pay per unit of gas for a transaction.
- maxPriorityFeePerGas is an optional fee that is set by the user. Using this variable, users may pay a premium for a high-priority transaction. Whenever a block reaches 100% capacity, this parameter determines transaction priority, the same as before EIP-1559.
We will cover sending transactions in both ways in this guide.
Developer Set Up
Accessing Ethereum with Quicknode
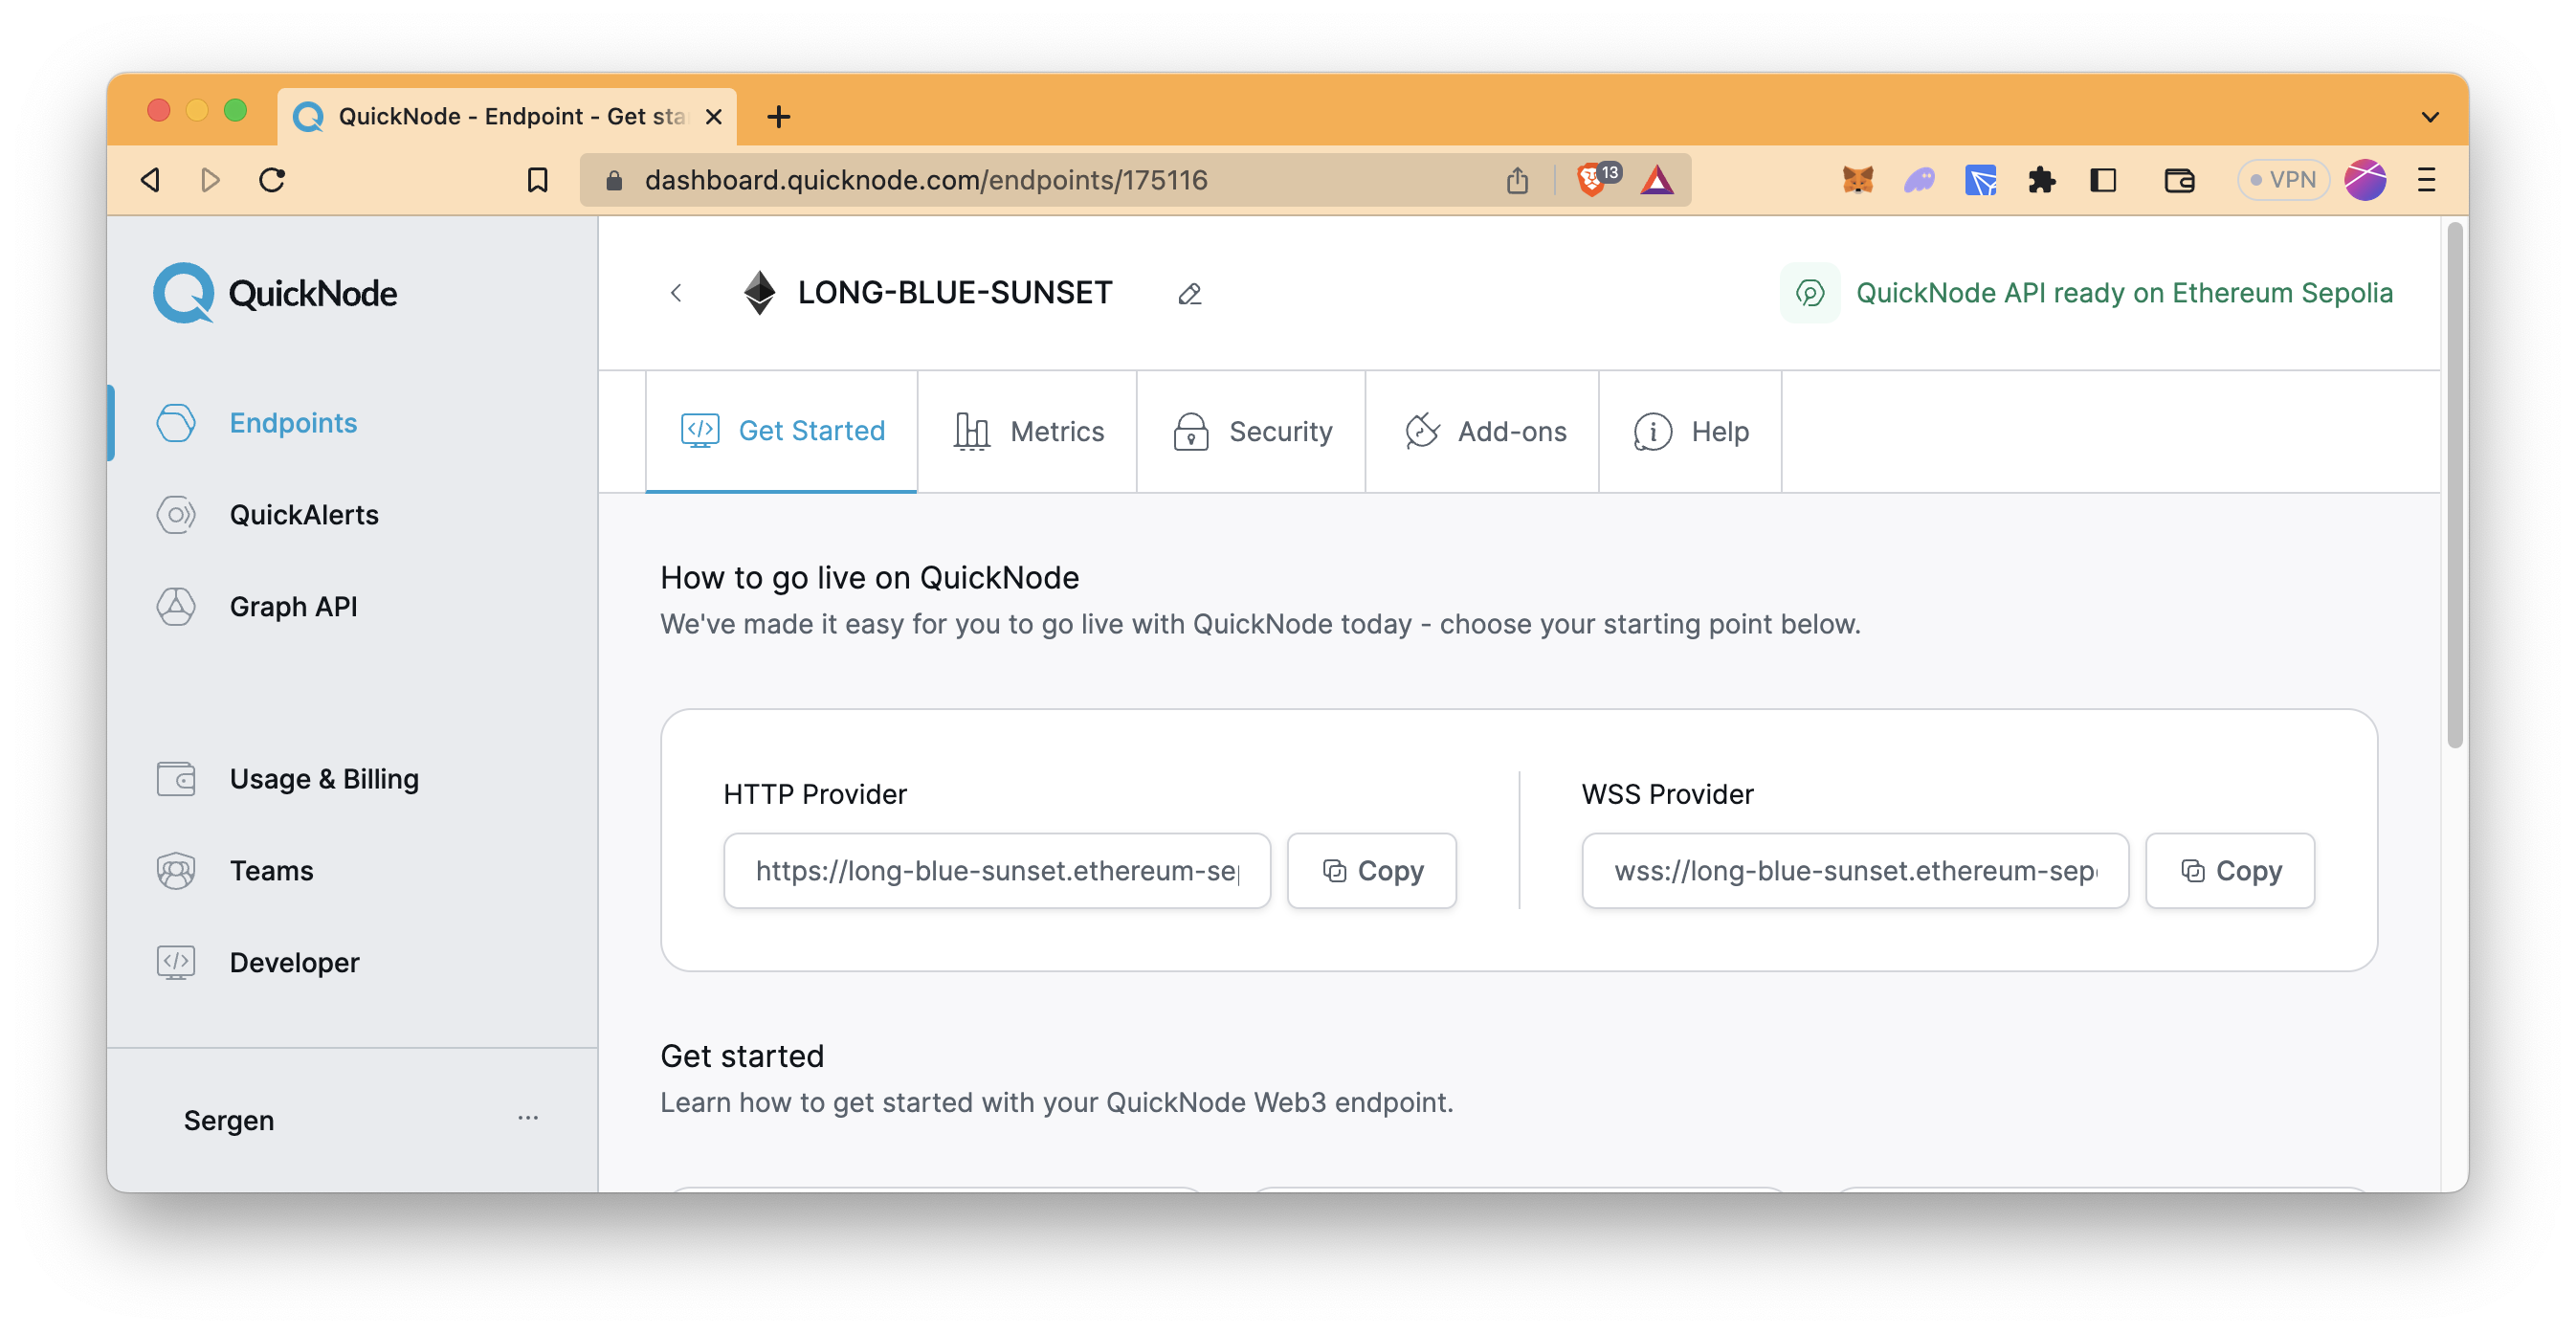
To interact with Ethereum, such as sending a transaction, you'll need an API endpoint to connect with the network. You're welcome to use public nodes or deploy and manage your own infrastructure; however, if you'd like 8x faster response times, you can leave the heavy lifting to us. Sign up for an account here.
After creating your account, click the Create an Endpoint button. Then, select the chain of your choice. We use Ethereum Sepolia Testnet in this guide.
Then, copy your HTTP Provider URL; you'll use it in the following sections to access the Ethereum blockchain.
Creating a Wallet
Let's create a new wallet with our Generate Wallet component. Simply click on the Generate Wallet button, and the component creates a new wallet for you.
If you already have a wallet (e.g., Metamask), you can extract your private key for use in this guide.
Save your public address and private key; you will use them in this guide.
Use the created wallet for your testing purposes only. Do not use it for production purposes.
Funding the Wallet
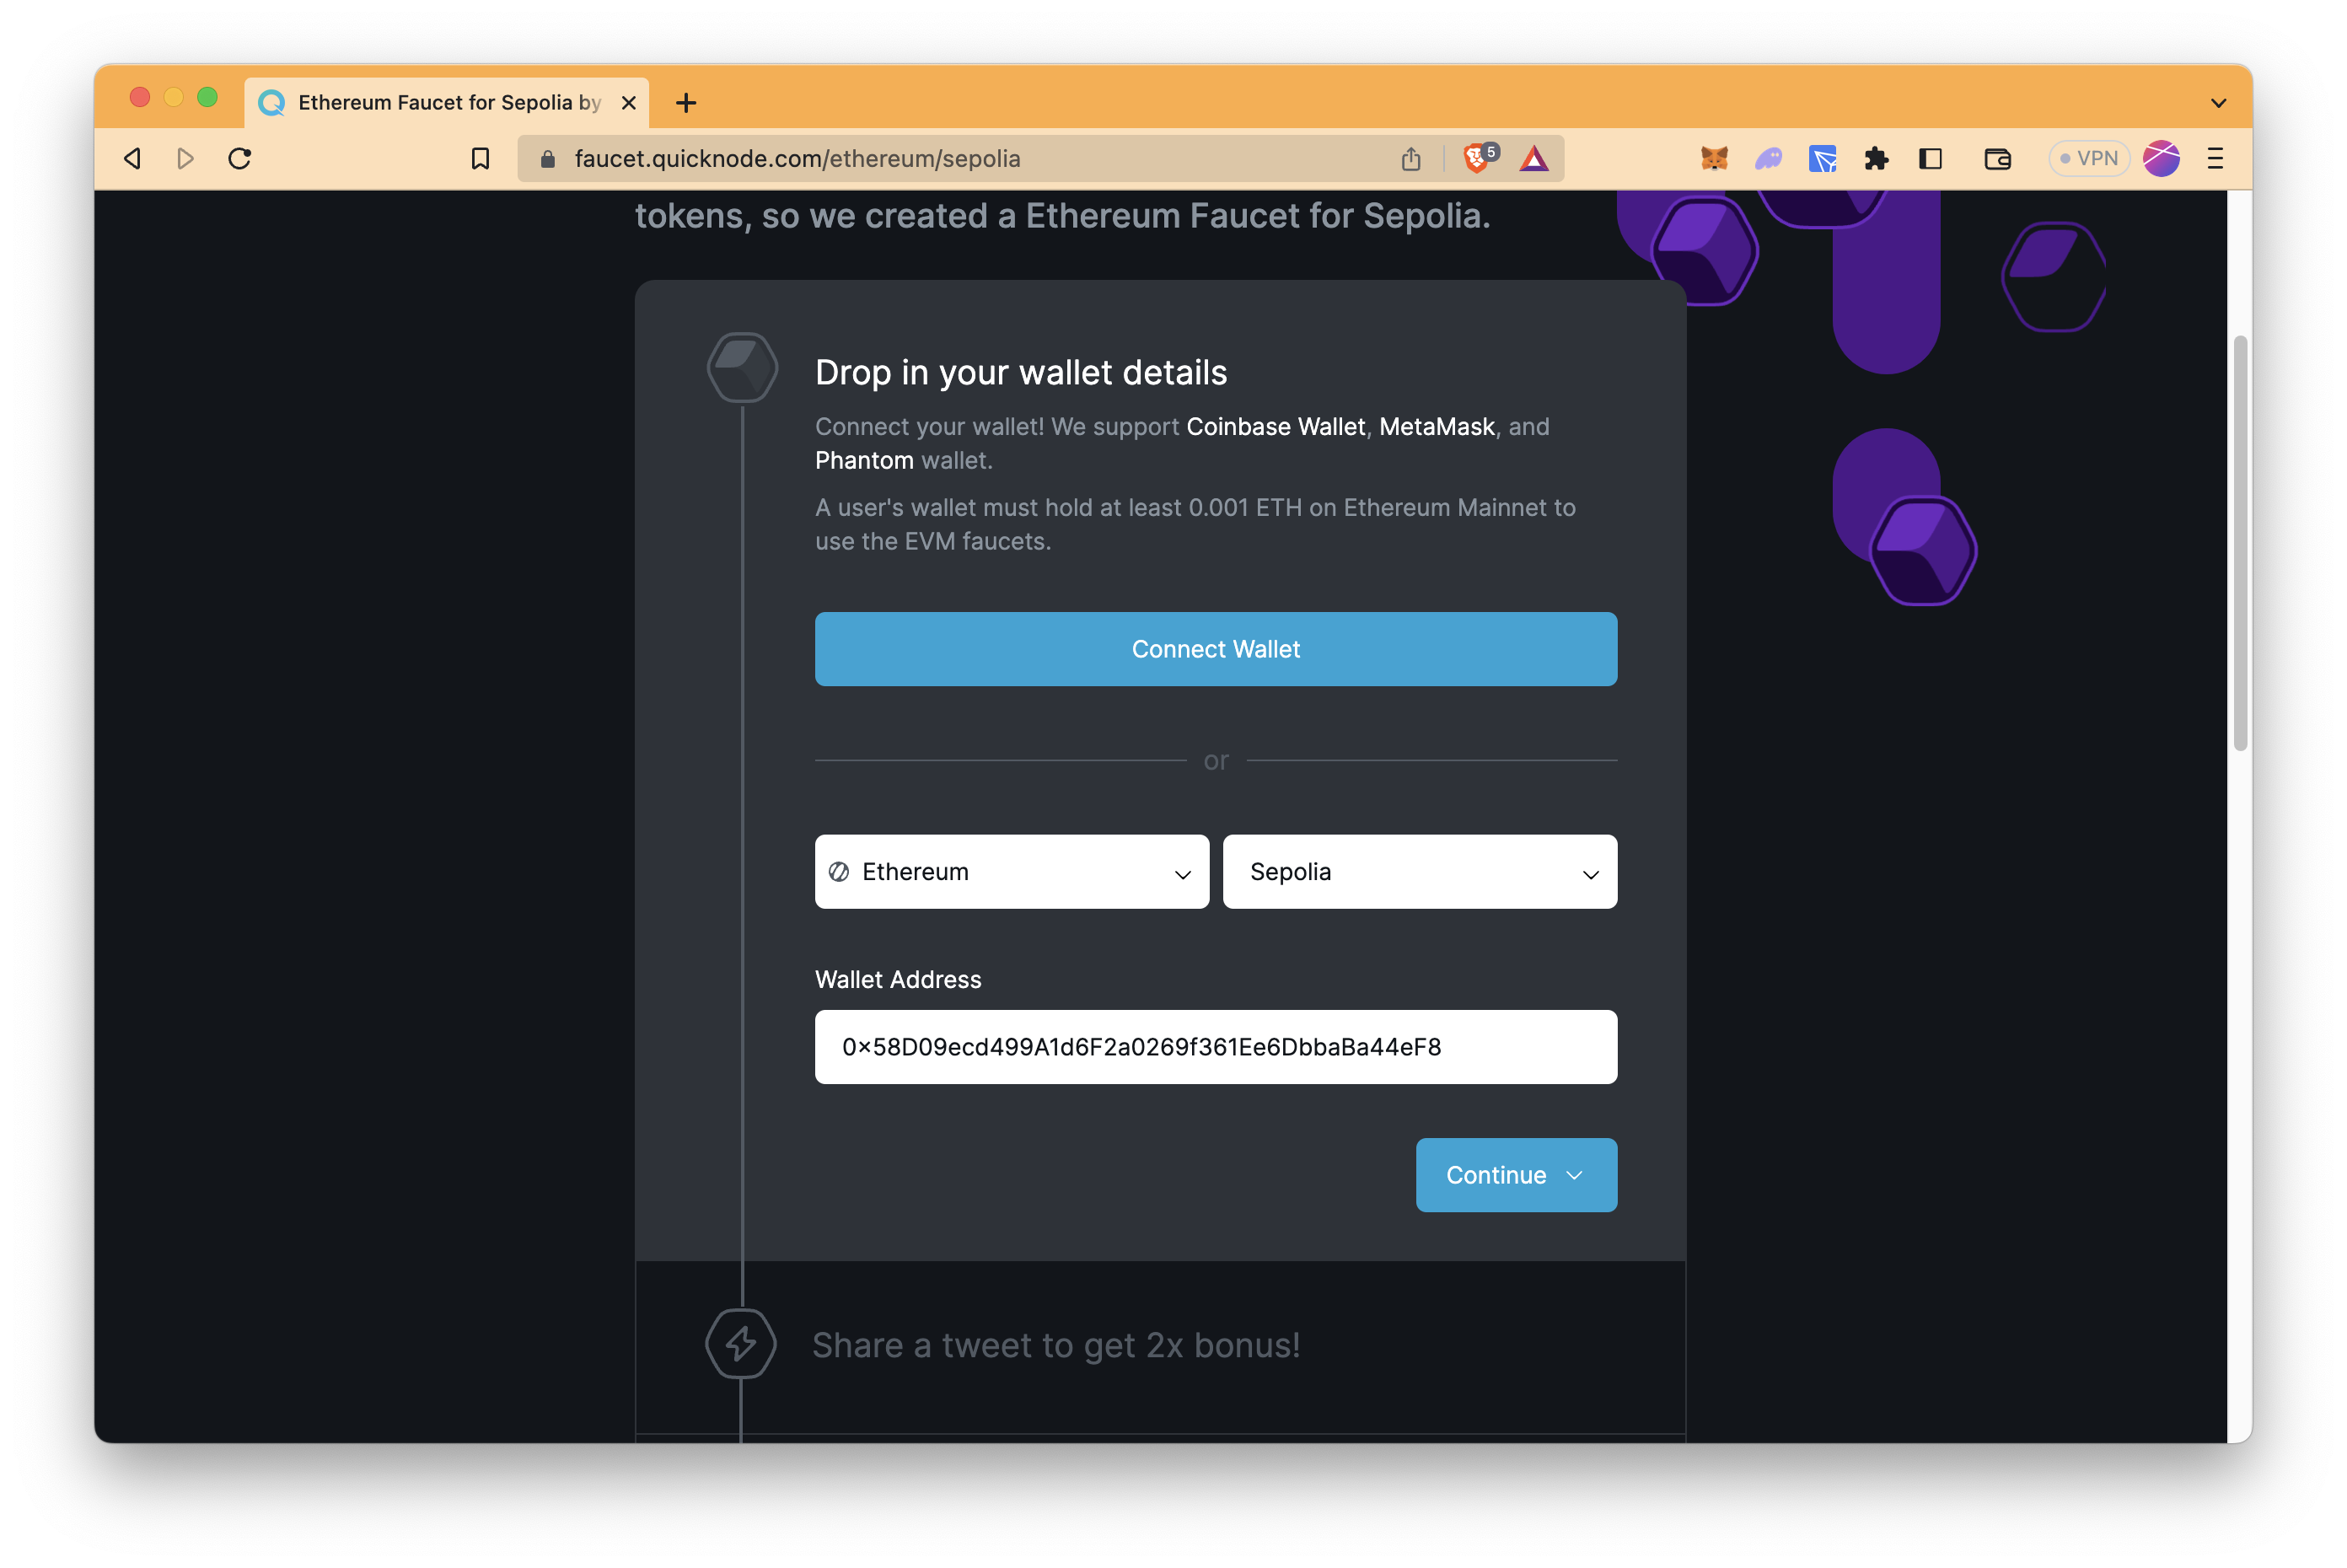
To send a transaction to the blockchain, you need a wallet that includes some amount of the native cryptocurrency of the blockchain. In this case, you will need Ether (ETH), the native cryptocurrency of Ethereum.
Now, it is time to fund your wallet because each transaction on a blockchain needs some amount of ETH for gas fees. If you want to learn more about the gas, see this guide for details.
Since we use the Sepolia Testnet, we can freely get some ETH from Quicknode's faucet. To get some ETH,
- Go to the Quicknode Faucet
- Select Ethereum and Sepolia
- Type your wallet address
- Click the Continue button and follow instructions
You need to have at least 0.001 ETH on Ethereum Mainnet in order to use the faucet. If you don't, you can get some test ETH from other faucets, as well.
Setting Up the Project
You created your wallet and got test ETHs via the faucet. It's time to create scripts. You need a terminal window (i.e., Terminal, Windows PowerShell) and code editor (i.e., Visual Studio Code) to set up the project.
Run the following code in your terminal to create a folder to store all of the files you'll be building throughout this guide.
mkdir send-tx-python && cd send-tx-python
Now, install the web3.py library using pip, the package manager for Python.
If your system has both Python 2 and Python 3, you may need use
pip3instead ofpip.
pip install web3
Sending ETH with Type-2 Ethereum Transactions
Then, create a Python file to send a Type-2 transaction using parameters after the EIP-1559 upgrade.
echo > send-tx-type-2.py
Now, open the file with your code editor and paste the code below into it. We include an explanation of the code just below it.
Don't forget to replace these placeholders in your code with actual values:
- QUICKNODE_HTTP_PROVIDER_URL: Your endpoint's HTTP URL that you got in the Accessing Ethereum with Quicknode section
- YOUR_ADDRESS: Your wallet's public address that you saved in the Creating a Wallet section
- RECIPIENT_ADDRESS: Any other wallet's public address. (e.g. Vitalik's address - 0xd8dA6BF26964aF9D7eEd9e03E53415D37aA96045)
- YOUR_PRIVATE_KEY: Your wallet's private key that you saved in the Creating a Wallet section
In our guide, we use 11155111 as the chain ID, a transaction parameter, since it is the chain ID of Sepolia Testnet. If you use a different blockchain, you may refer to ChainList to get the chain ID of the blockchain that you want to use. Then, you can replace it in the code.
# Import required libraries
from web3 import Web3

# Connect to an Ethereum node
web3 = Web3(Web3.HTTPProvider('QUICKNODE_HTTP_PROVIDER_URL'))

# Set sender and recipient addresses
sender_address = 'YOUR_ADDRESS'
recipient_address = 'RECIPIENT_ADDRESS'

# Set private key for the sender's account.
# DO NOT SHARE YOUR PRIVATE KEY.
private_key = 'YOUR_PRIVATE_KEY'

# Fetch balance data
balance_sender = web3.from_wei(web3.eth.get_balance(sender_address), 'ether')
balance_recipient = web3.from_wei(web3.eth.get_balance(recipient_address), 'ether')

print(f'The balance of { sender_address } is: { balance_sender } ETH')
print(f'The balance of { recipient_address } is: { balance_recipient } ETH')

# Get and determine gas parameters
latest_block = web3.eth.get_block("latest")
base_fee_per_gas = latest_block.baseFeePerGas   # Base fee in the latest block (in wei)
max_priority_fee_per_gas = web3.to_wei(1, 'gwei') # Priority fee to include the transaction in the block
max_fee_per_gas = (5 * base_fee_per_gas) + max_priority_fee_per_gas # Maximum amount you’re willing to pay

# Define the transaction parameters
transaction_params = {
    'from': sender_address,
    'to': recipient_address,
    'value': web3.to_wei(0.01, 'ether'),  # Transaction value (0.1 Ether in this example)
    'nonce': web3.eth.get_transaction_count(sender_address),
    'gas': 21000,  # Gas limit for the transaction
    'maxFeePerGas': max_fee_per_gas, # Maximum amount you’re willing to pay
    'maxPriorityFeePerGas': max_priority_fee_per_gas, # Priority fee to include the transaction in the block
    'chainId': 11155111 # ChainId of Sepolia Testnet
}

# Sign the transaction
transaction = web3.eth.account.sign_transaction(transaction_params, private_key)

# Send the transaction
transaction_hash = web3.eth.send_raw_transaction(transaction.rawTransaction)

# Wait for the transaction to be mined
transaction_receipt = web3.eth.wait_for_transaction_receipt(transaction_hash)

# Check the transaction status
if transaction_receipt.status:
    print('Transaction successful!')
    print('Transaction hash:', transaction_hash.hex())
    print(f'Explorer link: https://sepolia.etherscan.io/tx/{transaction_hash.hex()}')
else:
    print('Transaction failed.')

# Fetch balance data after the transaction
balance_sender = web3.from_wei(web3.eth.get_balance(sender_address), 'ether')
balance_recipient = web3.from_wei(web3.eth.get_balance(recipient_address), 'ether')

print(f'The balance of { sender_address } is: { balance_sender } ETH')
print(f'The balance of { recipient_address } is: { balance_recipient } ETH')
Code Explanation
The send-tx-type-2.py file is designed to send a Type-2 transaction using parameters after the EIP-1559 upgrade. This file includes a transaction to send 0.01 ETH to the recipient's address. Here's a breakdown of the logic behind the code.
-
Importing Libraries: The necessary library, web3, is imported to interact with the Ethereum blockchain.
-
Connecting to Ethereum Node: The code establishes a connection to an Ethereum node using the Quicknode HTTP Provider URL.
-
Setting Addresses: The sender's and recipient's Ethereum addresses are specified as
sender_addressandrecipient_address, respectively. -
Setting Private Key: The private key associated with the sender's Ethereum account is set as
private_key. It's essential to keep this private and not share it with anyone. -
Fetching Balance: The code retrieves and prints the sender and recipient addresses balances using the
get_balancemethod. The balances are converted from Wei to Ether for readability. -
Determining Gas Pararemeters: The code fetches the latest block from the Ethereum blockchain using the
get_blockmethod and stores it in the variablelatest_block. Then, retrieves the base fee per gas from thelatest_blockand stores it in the variablebase_fee_per_gas.max_priority_fee_per_gasis a user-defined priority fee that the sender is willing to pay to ensure their transaction is included in a block quickly. In this code, it's set to 1 gwei (1 billion wei). Themax_fee_per_gasis the maximum amount the sender is willing to pay for each unit of gas in the transaction. It is determined by adding themax_priority_fee_per_gasto five times thebase_fee_per_gas. Five is a user-defined constant, and it is for ensuring the sender offers a higher-than-base fee to incentivize to be included the transaction in the block. -
Defining Transaction Parameters: The transaction parameters are set as
transaction_params, including the sender and recipient addresses, transaction value (0.01 Ether in this example), nonce (number of transactions sent from the sender's address), gas limit, maximum fee per gas, maximum priority fee per gas, and the chain ID of the Sepolia Testnet. -
Signing the Transaction: The transaction is signed using the
sign_transactionmethod with thetransaction_paramsandprivate_keyas inputs. This ensures the authenticity and authorization of the transaction. -
Sending the Transaction: The signed transaction is sent to the Ethereum network using the
send_raw_transactionmethod, which returns the transaction hash. -
Waiting for Confirmation: The code waits for the transaction to be mined by using the
wait_for_transaction_receiptmethod, which returns the transaction receipt. -
Checking Transaction Status: The status of the transaction is checked by evaluating
transaction_receipt.status. If the status is true, the transaction is considered successful, and the transaction hash is printed. Otherwise, the transaction is considered failed. -
Fetching Balance After Transaction: The balances of the sender and recipient addresses are fetched again after the transaction and printed to show the updated values.
Now, let's run the script.
If your system has both Python 2 and Python 3, you may need use
python3instead ofpython.
python send-tx-type-2.py
The script will log the balances of both the senders and recipient's accounts before the transaction is sent and again after it is sent, along with the transaction hash.
The balance of 0x58D09ecd499A1d6F2a0269f361Ee6DbbaBa44eF8 is: 0.55 ETH
The balance of 0x833Cd8457F481274c794d2ac4eb277EC44252686 is: 0 ETH
Transaction successful!
Transaction hash: 0xed096c6914458c3886550f0094fd813d85ce5c5881c91feb5c9a7f4bd180b5cc
Explorer link: https://sepolia.etherscan.io/tx/0xed096c6914458c3886550f0094fd813d85ce5c5881c91feb5c9a7f4bd180b5cc
The balance of 0x58D09ecd499A1d6F2a0269f361Ee6DbbaBa44eF8 is: 0.539978999998845 ETH
The balance of 0x833Cd8457F481274c794d2ac4eb277EC44252686 is: 0.01 ETH
Note that, due to the gas fee, the balance of the sender's account was reduced by slightly more than the amount sent.
Sending ETH with Type-0 Ethereum Transactions
It's time to create a Python file to send a Type-0 (legacy) transaction using parameters before the EIP-1559 upgrade.
echo > send-tx-type-0.py
Open the file with your code editor and paste the code below into it. Do not forget to replace placeholders corresponding to your values as you did in the previous section.
# Import required libraries
from web3 import Web3

# Connect to an Ethereum node
web3 = Web3(Web3.HTTPProvider('QUICKNODE_HTTP_PROVIDER_URL'))

# Set sender and recipient addresses
sender_address = 'YOUR_ADDRESS'
recipient_address = 'RECIPIENT_ADDRESS'

# Set private key for the sender's account.
# DO NOT SHARE YOUR PRIVATE KEY.
private_key = 'YOUR_PRIVATE_KEY'

# Fetch balance data
balance_sender = web3.from_wei(web3.eth.get_balance(sender_address), 'ether')
balance_recipient = web3.from_wei(web3.eth.get_balance(recipient_address), 'ether')

print(f'The balance of { sender_address } is: { balance_sender } ETH')
print(f'The balance of { recipient_address } is: { balance_recipient } ETH')

# Define the transaction parameters
transaction_params = {
    'from': sender_address,
    'to': recipient_address,
    'value': web3.to_wei(0.01, 'ether'),  # Transaction value (0.1 Ether in this example)
    'nonce': web3.eth.get_transaction_count(sender_address),
    'gas': 21000,  # Gas limit for the transaction
    'gasPrice': web3.eth.gas_price, # Returns the current gas price in Wei
    'chainId': 11155111 # ChainId of Sepolia Testnet
}

# Sign the transaction
transaction = web3.eth.account.sign_transaction(transaction_params, private_key)

# Send the transaction
transaction_hash = web3.eth.send_raw_transaction(transaction.rawTransaction)

# Wait for the transaction to be mined
transaction_receipt = web3.eth.wait_for_transaction_receipt(transaction_hash)

# Check the transaction status
if transaction_receipt.status:
    print('Transaction successful!')
    print('Transaction hash:', transaction_hash.hex())
    print(f'Explorer link: https://sepolia.etherscan.io/tx/{transaction_hash.hex()}')
else:
    print('Transaction failed.')

# Fetch balance data after the transaction
balance_sender = web3.from_wei(web3.eth.get_balance(sender_address), 'ether')
balance_recipient = web3.from_wei(web3.eth.get_balance(recipient_address), 'ether')

print(f'The balance of { sender_address } is: { balance_sender } ETH')
print(f'The balance of { recipient_address } is: { balance_recipient } ETH')
As mentioned before, the only difference is to use the gasPrice parameter instead of maxFeePerGas and maxPriorityFeePerGas.
Now, run the script.
If your system has both Python 2 and Python 3, you may need use
python3instead ofpython.
python send-tx-type-0.py
If everything goes well, your output should be like the one below. As you may notice, it is so similar to the output of the Type-2 transaction.
The balance of 0x58D09ecd499A1d6F2a0269f361Ee6DbbaBa44eF8 is: 0.539978999998845 ETH
The balance of 0x833Cd8457F481274c794d2ac4eb277EC44252686 is: 0.01 ETH
Transaction successful!
Transaction hash: 0xa7e12254ffc483467051027c2d5ccd164d2161ed75c09ba974d324b3347acc00
Explorer link: https://sepolia.etherscan.io/tx/0xa7e12254ffc483467051027c2d5ccd164d2161ed75c09ba974d324b3347acc00
The balance of 0x58D09ecd499A1d6F2a0269f361Ee6DbbaBa44eF8 is: 0.529978999968815 ETH
The balance of 0x833Cd8457F481274c794d2ac4eb277EC44252686 is: 0.02 ETH
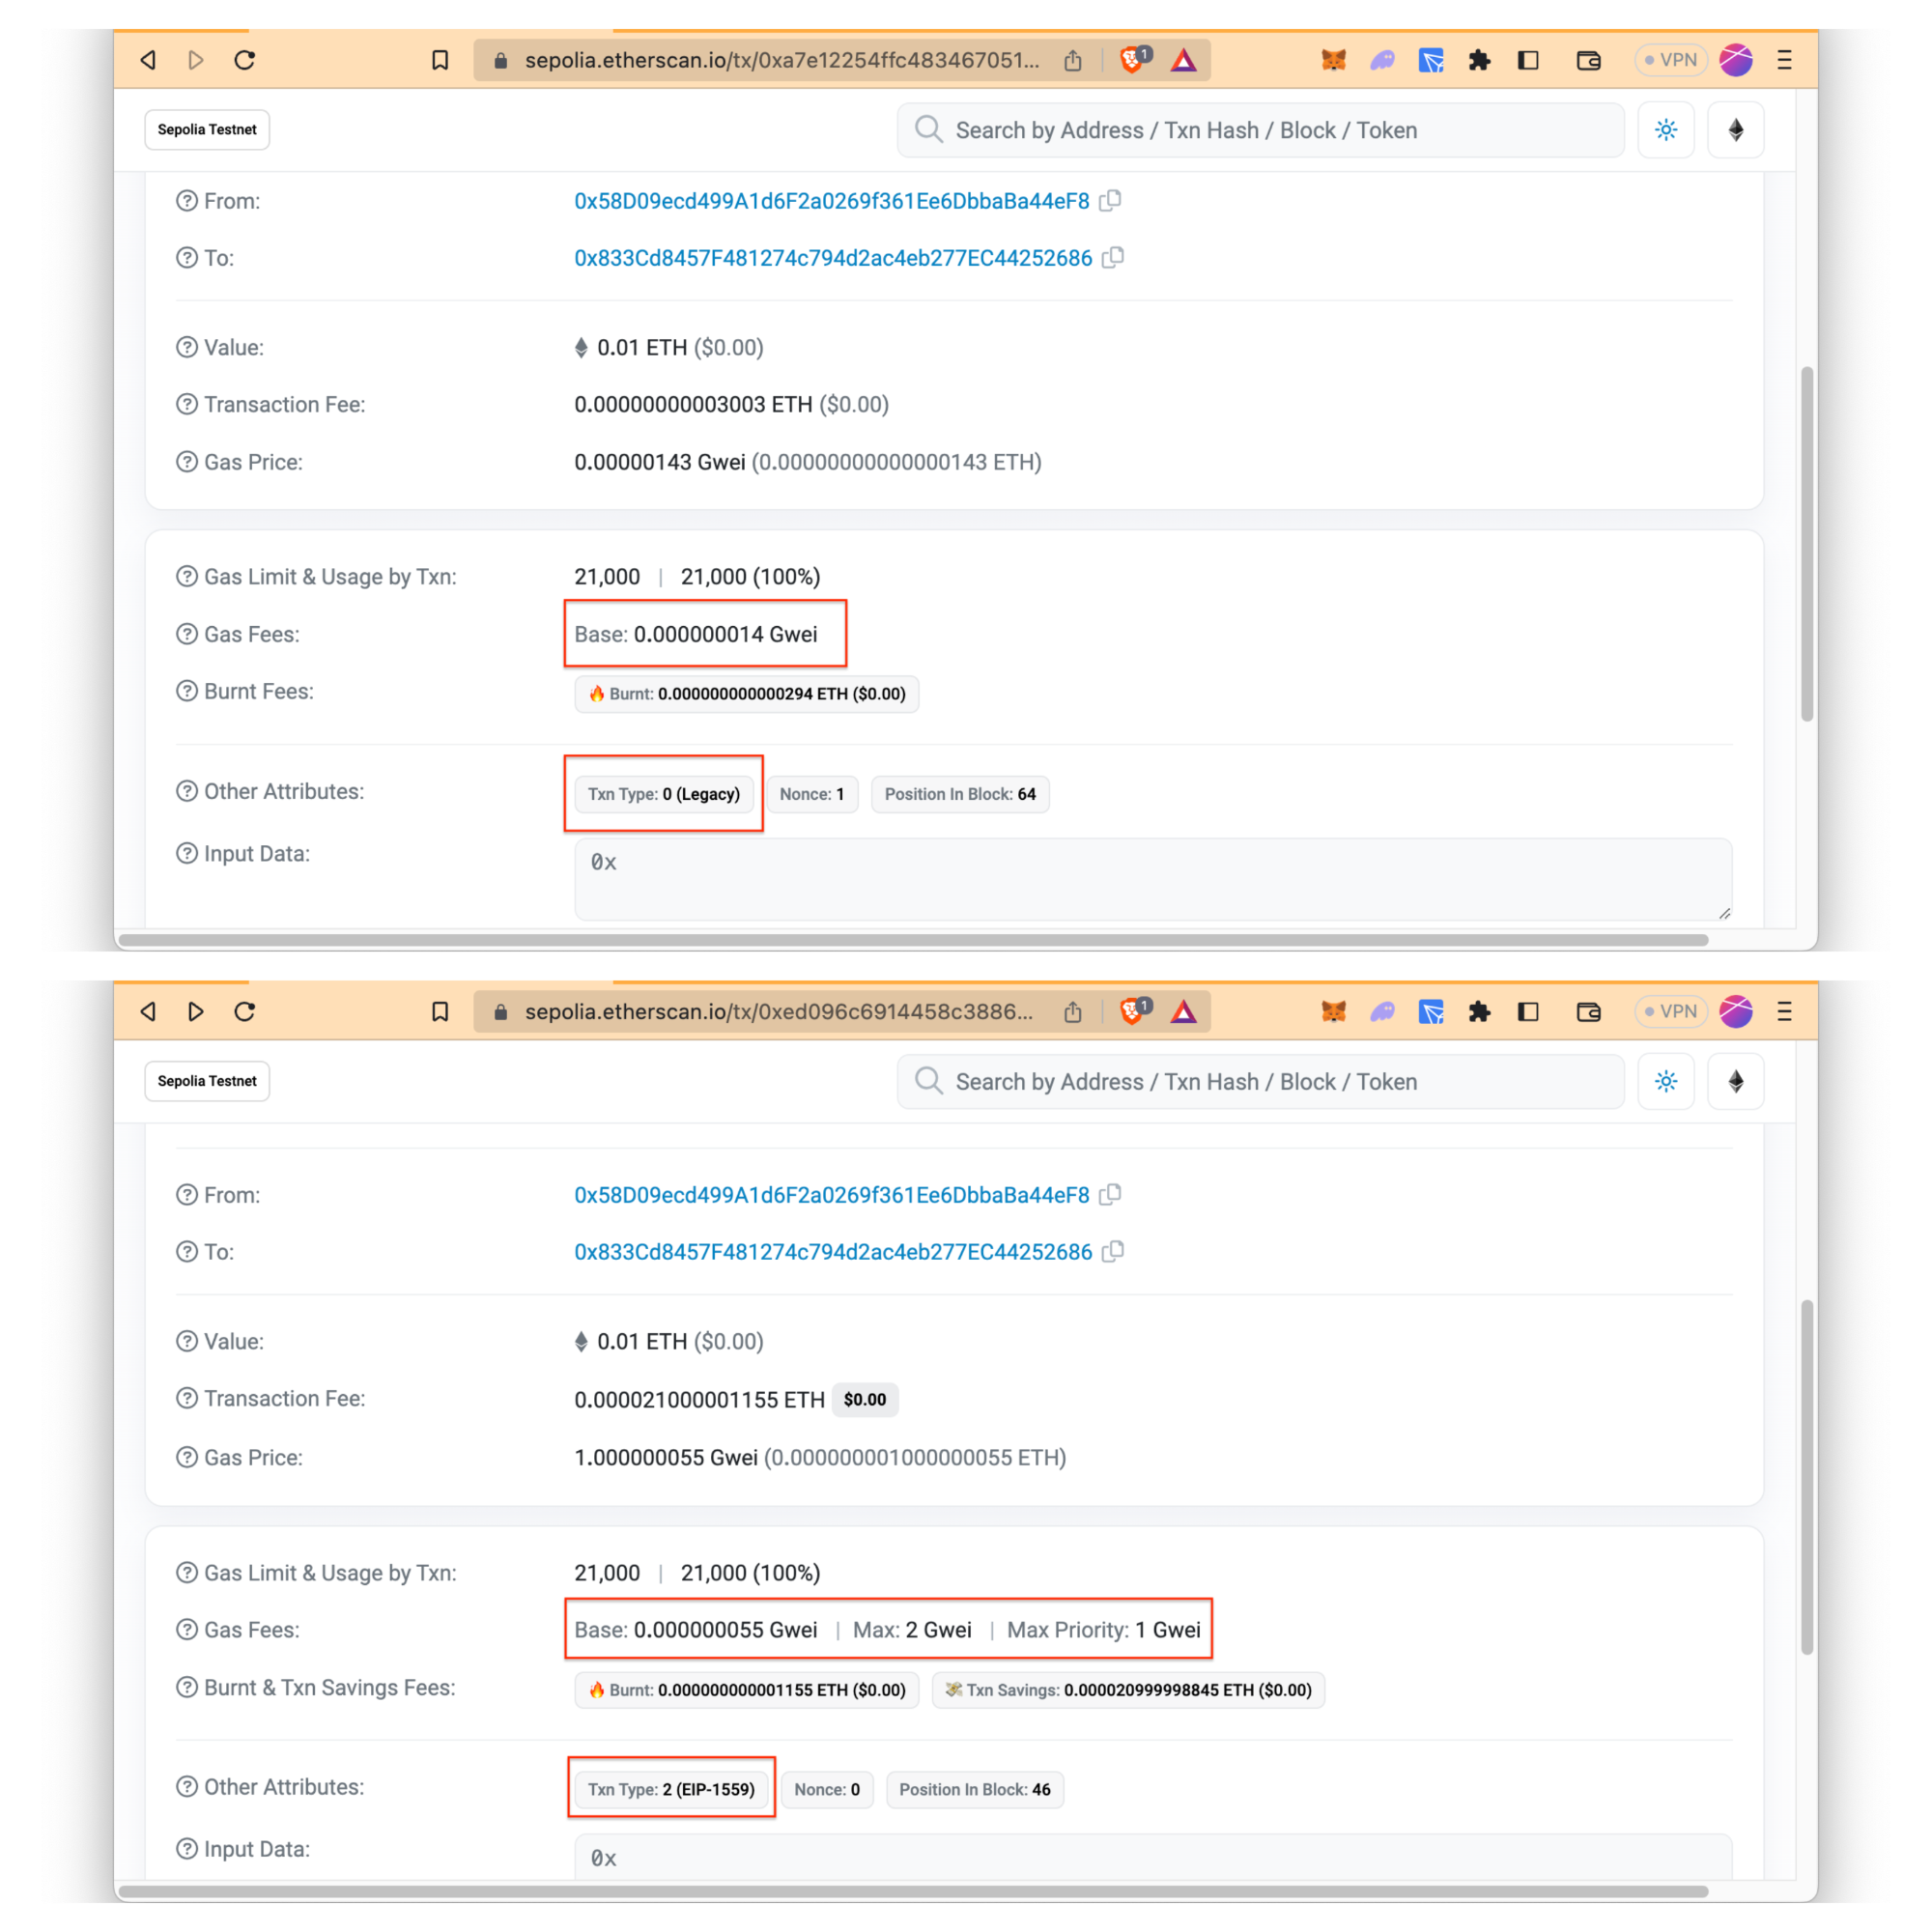
Now, let's check both transactions on the Sepolia Testnet block explorer, allowing us to see transaction details, addresses, tokens, and blocks.
- Go to the Ethereum Sepolia Testnet Explorer
- Paste the transaction hash of your transaction into the search bar and press Enter
- Under the More Details field, click the Click to show more to see additional details
If you check both transactions, one is type-0 (legacy) transaction, while the other is type-2 (EIP-1559). Also, the gas fee details are different. The legacy transaction has only one gas fee parameter, whereas EIP-1559 transaction has three gas fee parameters.
Conclusion
Congratulations on acquiring foundational knowledge of structuring and sending transactions to the Ethereum blockchain using Web3.py!
This guide provided a comprehensive walkthrough of utilizing the web3.py library to send transactions on the Ethereum network. By exploring both the EIP-1559 and legacy methods, you gained a deep understanding of the transaction initiation process and the impact of the EIP-1559 update.
If you encounter any problems or have any questions, we'd love to help you! Find us on Discord or Twitter.
We ❤️ Feedback!
Let us know if you have any feedback or requests for new topics. We'd love to hear from you.