
9 min read
Overview
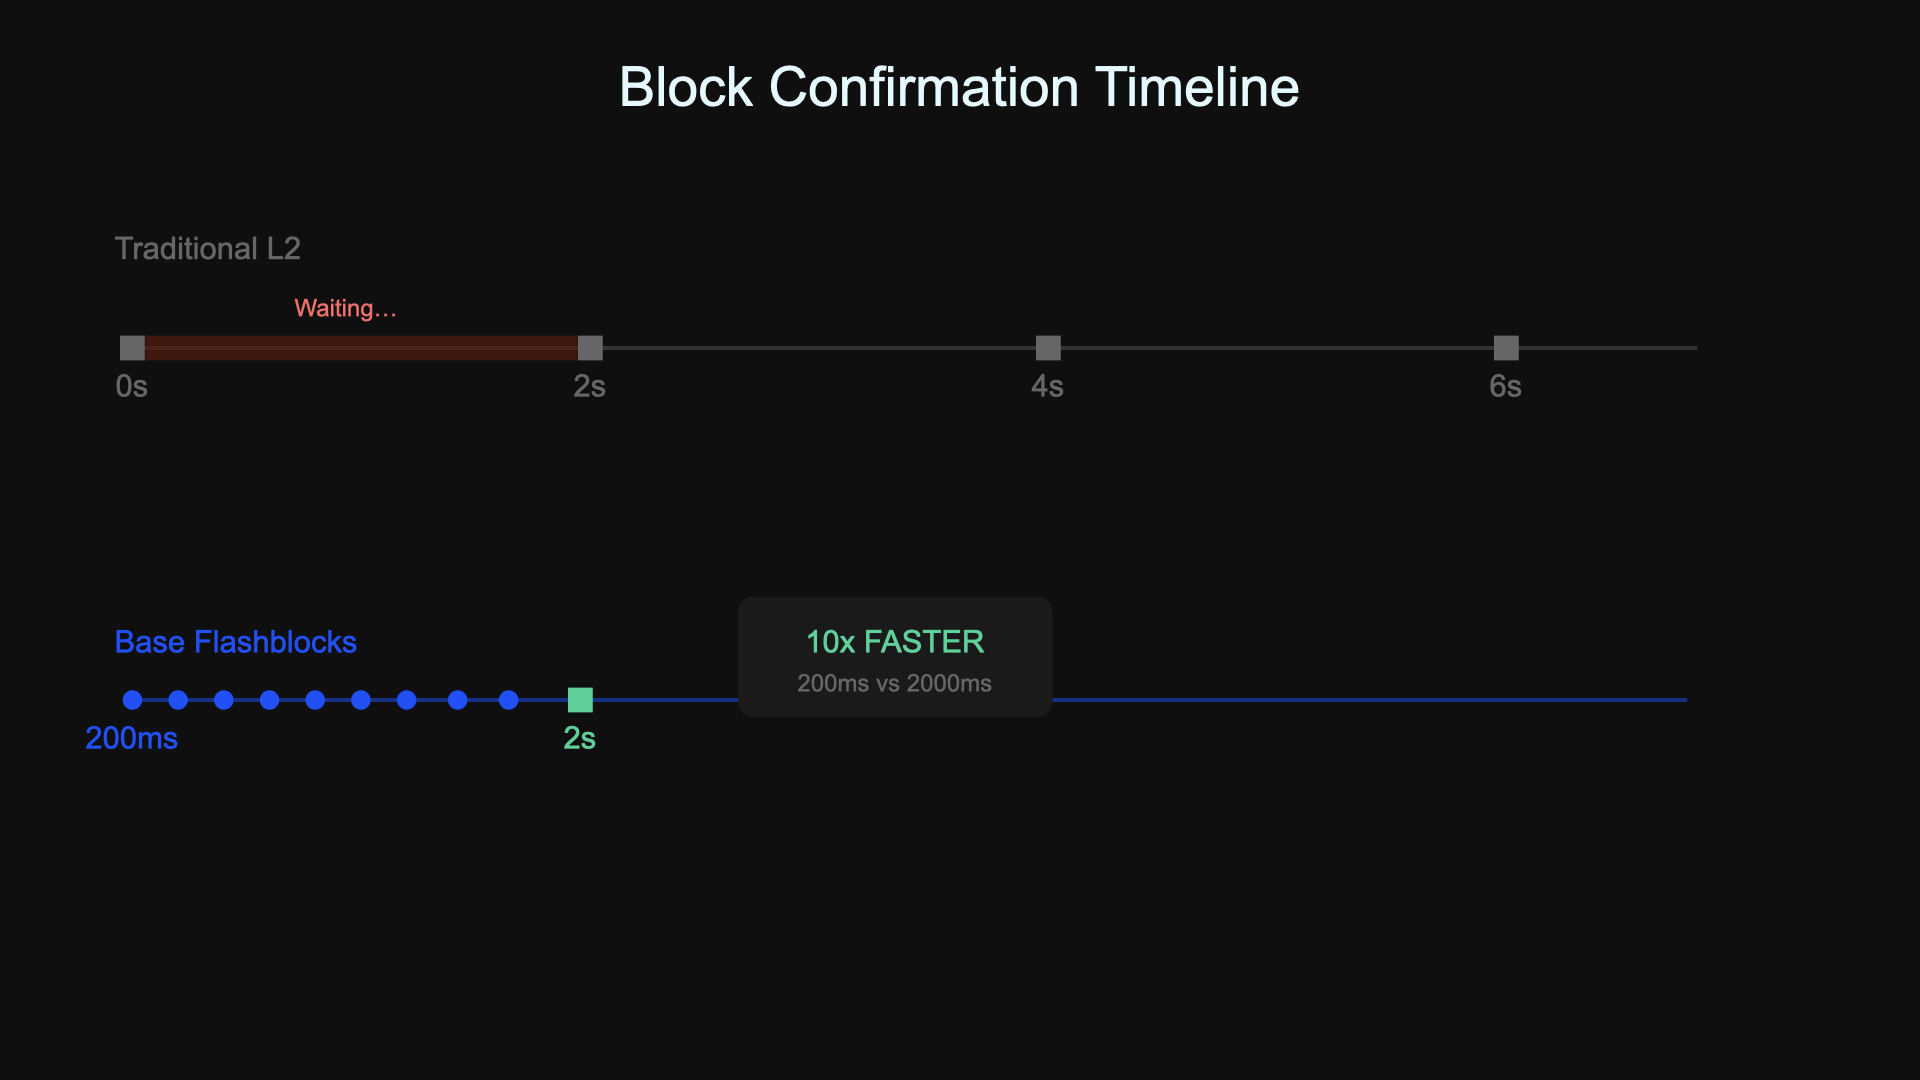
Slow transaction confirmation times can be a major setback for user experience in decentralized applications. Base Flashblocks offer a powerful solution, providing transaction preconfirmations in as little as 200 milliseconds—up to 10 times faster than Base's standard 2-second block time. This technology breaks traditional blocks into mini-blocks that stream every 200 milliseconds, providing near-instant transaction feedback while maintaining cryptographic security.
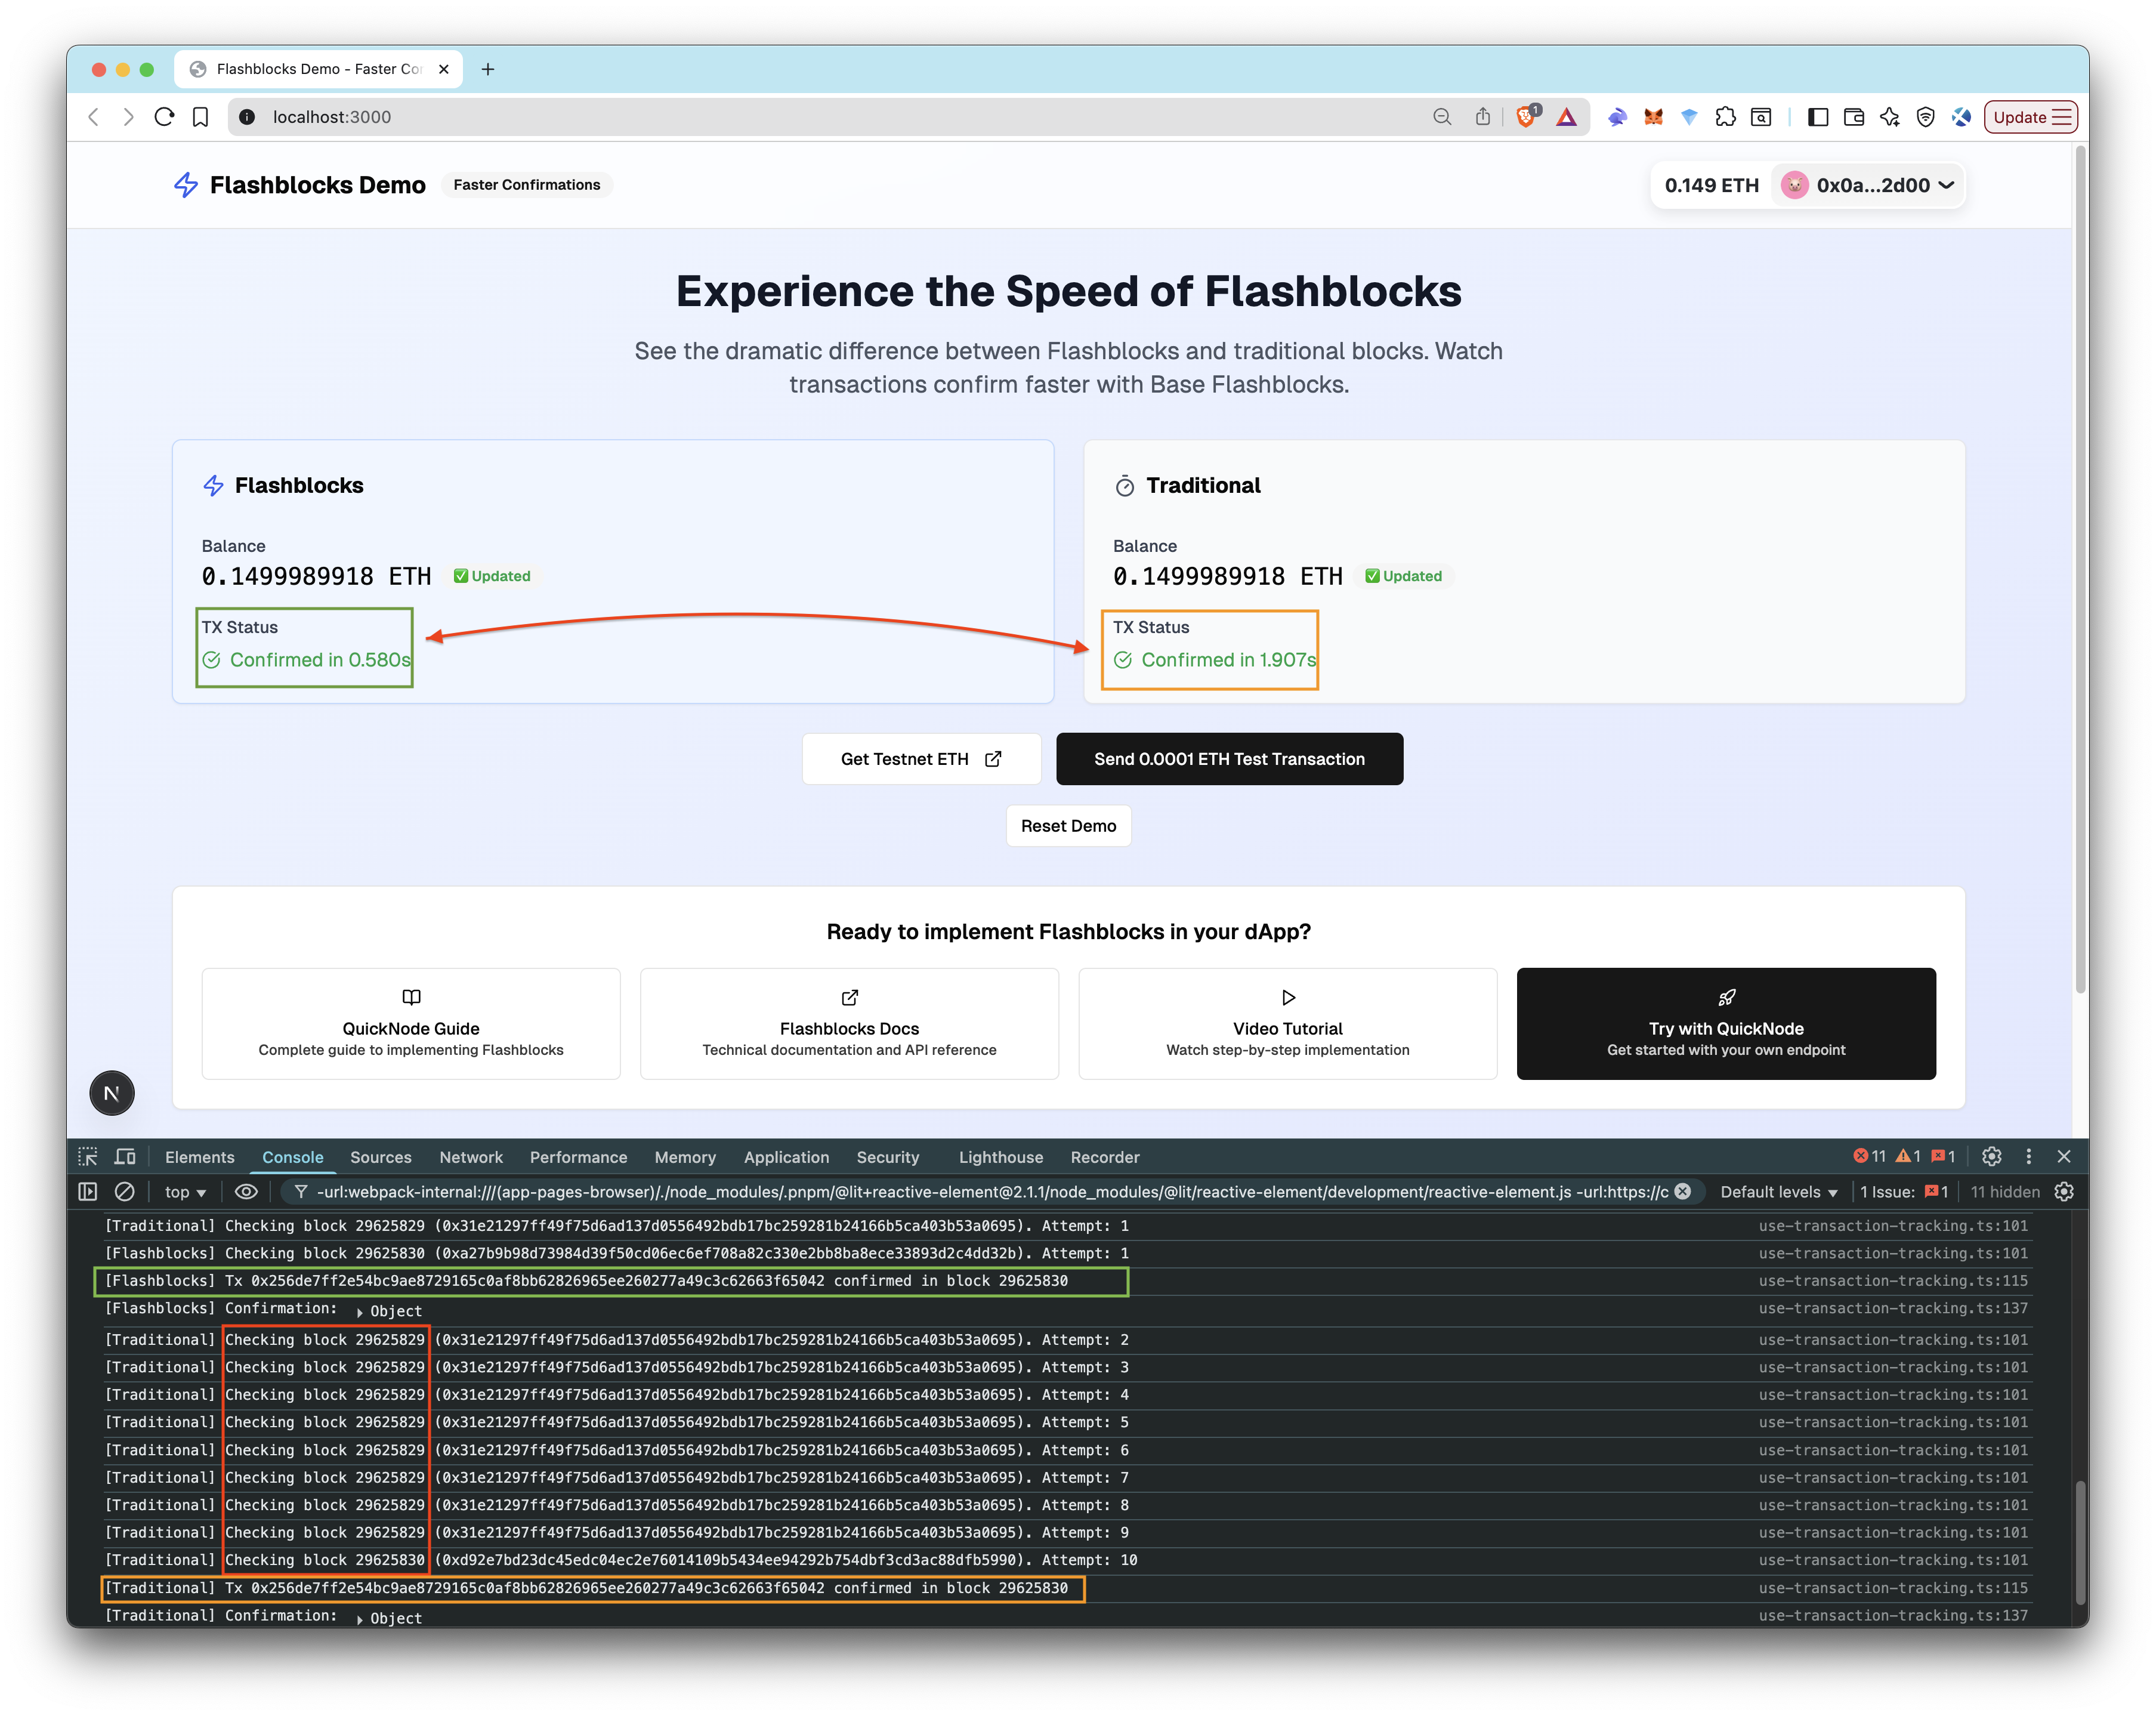
In this guide, we’ll build a visual comparison dApp that demonstrates this speed difference in action using Quicknode's Flashblocks-enabled endpoints. Here's how the app and console outputs look:
This sample app is also featured in the Quicknode Sample App Library. Check it out for more ready-to-use Web3 projects, tools, and inspiration to kickstart your next build!
What You Will Learn
- How Flashblocks work at a protocol level
- Which RPC methods are supported to access Flashblocks data
- How to integrate Flashblocks in your app using Viem and Wagmi
- Considerations for implementing Flashblocks in production
What You Will Need
- A Quicknode account with Base Sepolia endpoint enabled
- Basic knowledge of React and TypeScript
- Node.js installed on your machine
- A browser wallet (MetaMask, Rabby, or similar)
- Small amount of Base Sepolia ETH for testing (get testnet ETH from Quicknode's faucet)
- Project ID from Reown (formerly WalletConnect) for wallet connectivity
Understanding Flashblocks
Flashblocks fundamentally change how transactions are processed on Base by providing a preconfirmation layer that operates much faster than traditional block creation. Instead of waiting 2 seconds for a standard L2 block, Flashblocks stream updates every 200 milliseconds, offering a user experience that feels nearly instant.
For a technical deep-dive, we highly recommend watching our detailed video explanation. For the purpose of this guide, we'll cover the core concepts you need to know.
For a technical deep-dive into Flashblocks architecture and implementation details, check out this video.
How Flashblocks Work
Streaming Preconfirmations
Every 200 milliseconds, a new flashblock is created containing pending transactions. These aren't just status updates – each flashblock represents a cryptographically secure snapshot of the blockchain state at that moment.
Progressive Block Building
Ten flashblocks progressively accumulate over 2 seconds to form one complete block. This means while the final block still takes 2 seconds to produce, users get 10 confirmation updates during that time instead of waiting for the entire duration.
 Source: Quicknode Youtube Video - Flashblocks Explained
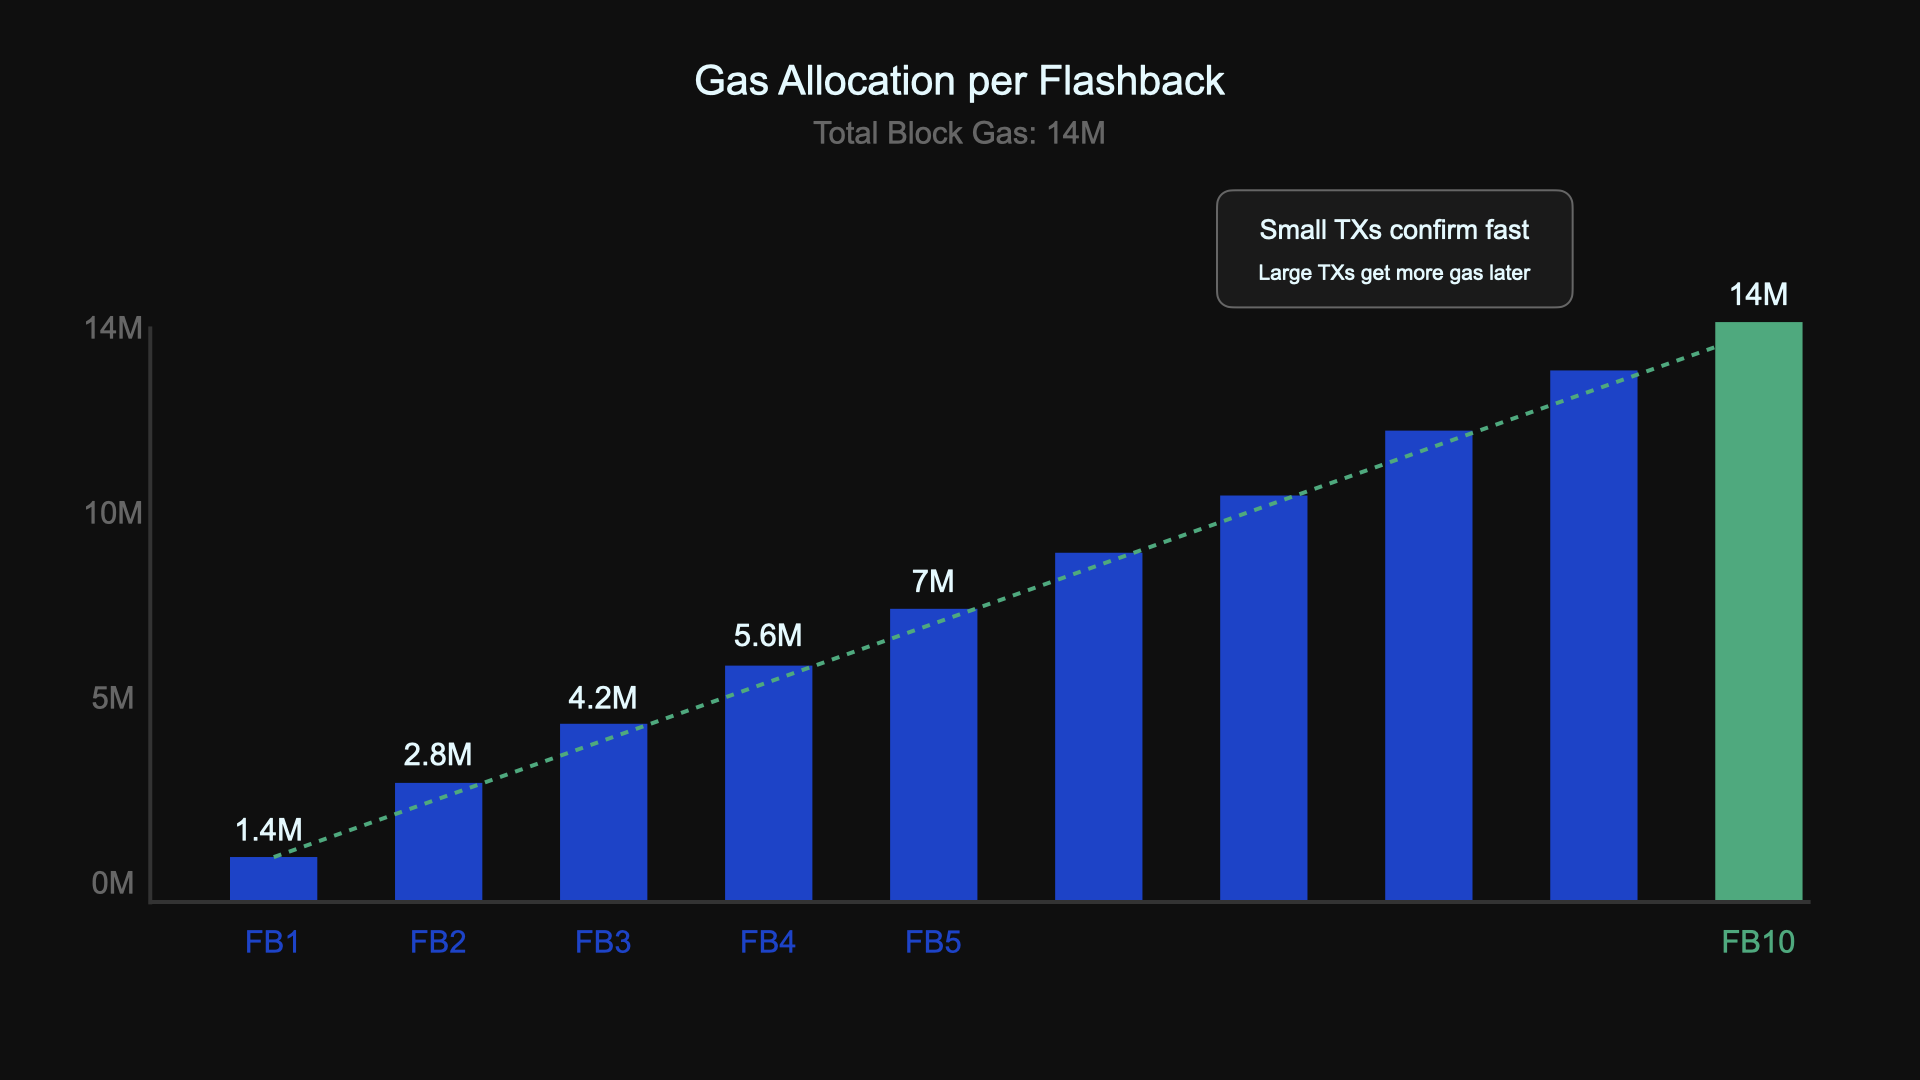
Intelligent Gas Allocation
Gas is allocated progressively across these ten flashblocks. The first flashblock has a smaller gas limit (1.4M), which increases with each subsequent one until the full block gas limit is reached in the final flashblock. This allows smaller, time-sensitive transactions to confirm quickly.
 Source: Quicknode Youtube Video - Flashblocks Explained
Cryptographic Security
Each flashblock includes its own state root, ensuring cryptographic verification at every 200ms interval. This maintains the same security guarantees as traditional blocks while delivering faster feedback.
Final Settlement
After 10 flashblocks accumulate, the complete block is submitted to Ethereum L1 for final settlement, ensuring the same finality guarantee as traditional Base blocks.
This design allows applications to see state changes earlier and update UI quickly without waiting for a full block cycle.
Supported RPC Methods for Flashblocks
Flashblocks integrate seamlessly with existing standard RPC methods, but there are a few differences to be aware of. While some methods must be used with the pending tag, other Flashblocks-enabled methods can be called without it.
| Method | Description | Flashblocks Usage |
|---|---|---|
eth_getBlockByNumber | Retrieves block by number | With pending, returns the most recent Flashblock |
eth_getTransactionReceipt | Gets transaction receipt | Returns receipts for preconfirmed transactions in Flashblocks |
eth_getBalance | Queries account balance | With pending, reflects balance changes from the latest Flashblock |
eth_getTransactionCount | Gets account nonce | With pending, returns the latest nonce from Flashblocks |
eth_getTransactionByHash | Retrieves transaction by hash | Returns the transaction with the specified hash |
For a more detailed breakdown of the RPC methods, refer to our Flashblocks documentation.
eth_getTransactionReceipt and eth_getTransactionByHashA key behavior to be aware of when using the eth_getTransactionReceipt and eth_getTransactionByHash methods is that on a Flashblocks-enabled endpoint, these RPC calls will always return the preconfirmed data.
Unlike other Flashblocks-supported methods, these methods do not accept a block tag parameter (like pending or latest). This means you cannot use it to fetch a traditionally confirmed receipt from a Flashblocks endpoint.
Quicknode supports Flashblocks on both the Base Mainnet and the Base Sepolia testnet. In this guide, we will use Base Sepolia as the example, but the process is the same for the Base Mainnet.
Viem and Wagmi Integration for Flashblocks
Your dApp or script needs to be configured correctly with the pending block tag for relevant RPC methods to interact with Flashblocks. Viem offers a few ways to achieve this, and as Wagmi uses Viem under the hood, integrating Flashblocks for your dApp is as simple as configuring the chain.
-
Explicitly for Each Method: You can manually set the
blockTagto'pending'on every individual method call (e.g.,client.getBalance({ ..., blockTag: 'pending' })). This offers granular control but can be repetitive. -
Set on the Client: You can set a default
blockTagwhen creating your Viem client using theexperimental_blockTagproperty (e.g.,createPublicClient({ ..., experimental_blockTag: 'pending' })). This applies the setting to all the method calls made with that client instance. See details here. -
Use a Pre-configured Chain (Recommended): The most convenient approach is to use a chain configuration that already has a pre-confirmation mechanism built-in, like
baseSepoliaPreconf. This automatically sets the default block tag topendingwithout extra configuration.
For this project, we use Viem's baseSepoliaPreconf chain. This configuration automatically ensures that relevant API calls fetch data from the latest flashblock rather than the last finalized block.
Automatic Block Tag Behavior
When using a configuration like baseSepoliaPreconf, the pending block tag is automatically applied as the default for several key Viem Actions, including:
callestimateGasgetBalancegetBlocksimulateContractwaitForTransactionReceiptwatchBlocks
For the latest information, always refer to the official Viem documentation.
In this app, we will run two client instances, one for the traditional blocks and one for the flashblocks. Then, we'll use the getBlock method to see when the transaction is included in a block, and the getBalance method to fetch the updated balance.
Setting Up the Flashblocks App
Let's set up the development environment and get the comparison dApp running locally.
Prerequisites Configuration
Step 1: Create a Quicknode Endpoint
- Sign up for a Quicknode account
- Create a new endpoint for Base Sepolia testnet
- Copy your HTTPS endpoint URL from the dashboard
Step 2: Set Up Reown (WalletConnect)
- Visit Reown Cloud and create a new project
- Name your project (e.g., "Flashblocks Demo")
- Copy your Project ID from the project dashboard
Project Installation
Step 1: Clone and Navigate
git clone https://github.com/quiknode-labs/qn-guide-examples.git
cd qn-guide-examples/sample-dapps/flashblocks-base
Step 2: Install Dependencies
pnpm install
# or
npm install
# or
yarn install
Step 3: Configure Environment Variables
Copy the example environment file:
cp .env.example .env.local
Edit .env.local with your credentials:
NEXT_PUBLIC_QUICKNODE_ENDPOINT=your_quicknode_endpoint_here
NEXT_PUBLIC_WALLETCONNECT_PROJECT_ID=your_project_id_here
Step 4: Start Development Server
pnpm dev
# or
npm run dev
# or
yarn dev
Navigate to http://localhost:3000 to see the application running.
Building the Flashblocks App
The Flashblocks app is ready. Now let's explore the core implementation details that make the side-by-side comparison work.
Step 1: Configure Viem Clients
The core of the comparison logic lies in using two distinct Viem publicClient instances. You’ll find this configuration in the /lib/clients.ts file. The key to this setup is the difference between the Viem chain configurations we use for each client: baseSepoliaPreconf and baseSepolia.
-
baseSepoliaPreconf(For Flashblocks): This is a special configuration provided by Viem designed specifically for Flashblocks. This chain configuration has a pre-confirmation mechanism and thus, Viem automatically sets the default block tag for RPC requests topending. -
baseSepolia(For Traditional Blocks): This is the standard configuration for the Base Sepolia testnet. It uses the default block tag oflatest.
// lib/clients.ts
import { createPublicClient, http } from 'viem'
import { baseSepolia, baseSepoliaPreconf } from 'viem/chains'

const QUICKNODE_ENDPOINT = process.env.NEXT_PUBLIC_QUICKNODE_ENDPOINT!

// Flashblocks client automatically uses "pending" for supported actions
export const flashblocksClient = createPublicClient({
	chain: baseSepoliaPreconf,
	transport: http(QUICKNODE_ENDPOINT),
})

// Traditional client uses "latest" by default
export const traditionalClient = createPublicClient({
	chain: baseSepolia,
	transport: http(QUICKNODE_ENDPOINT),
})
Step 2: Fetch Balances
We’ll fetch the initial balances from both clients and display them in the app. This is done in the use-balance-tracker.ts hook.
// hooks/use-balance-tracker.ts
// ...
const client =
	clientType === 'flashblocks' ? flashblocksClient : traditionalClient
const newBalance = await client.getBalance({ address })
setBalance(newBalance)
// ...
Step 3: Implement Transaction Tracking
The transaction confirmation strategy is managed in the use-transaction-tracking.ts hook. For this demonstration, instead of using Viem's waitForTransactionReceipt, we implement a custom polling mechanism to highlight the difference in block availability.
Here’s the flow:
- When a user sends a transaction, its hash is captured.
- The application starts two parallel polling loops, one for each client (Flashblocks and Traditional).
- Each loop calls
getBlockevery 100 milliseconds (a hypothetical interval) - The loop checks if the transaction hash exists in the block's transactions array.
- Once the transaction is found, the time taken is recorded and displayed as the confirmation time.
- Lastly, the latest balance is fetched from each client and displayed.
This polling implementation is designed to demonstrate the concept effectively by logging each trial to the console. For production applications, you should use a more robust method like waitForTransactionReceipt to ensure transaction finality.
Here's the partial code for the polling loop:
// hooks/use-transaction-tracking.ts
// ...
try {
	// Get the latest block with transactions
	const block = await client.getBlock({
		includeTransactions: true,
	})

	console.log(
		`[${clientName}] Checking block ${block.number} (${block.hash}). Attempt: ${attempts}`
	)

	// Check if our transaction hash is in the block's transactions
	const txInBlock = block.transactions.find((tx: any) => tx.hash === hash)

	if (txInBlock) {
		confirmed = true
		confirmationTime = Date.now() - startTime
		// Get the full receipt for additional data
		receipt = await client.getTransactionReceipt({ hash })

		console.log(`[${clientName}] Tx ${hash} confirmed in block ${block.number}`)
		break
	}

	// Wait before next attempt
	await new Promise(resolve => setTimeout(resolve, 100))
} catch (blockError) {
	console.warn(`[${clientName}] Block fetch attempt failed:`, blockError)
	// Continue trying
	await new Promise(resolve => setTimeout(resolve, 100))
}
// ...
Testing the Application
Now let's see the Flashblocks in action. Follow these steps to test the application:
-
Connect Your Wallet: Make sure your development server is running. Click the Connect Wallet button in the app and approve the connection in your browser wallet. Ensure you are connected to the Base Sepolia network.
-
Get Test ETH: If you need Base Sepolia ETH, visit Quicknode's Base Sepolia Faucet and enter your wallet address. You'll receive test ETH for transactions.
-
Send a Test Transaction: Click Send 0.0001 ETH Test Transaction and confirm the transaction in your wallet. You can watch both panels for confirmation updates.
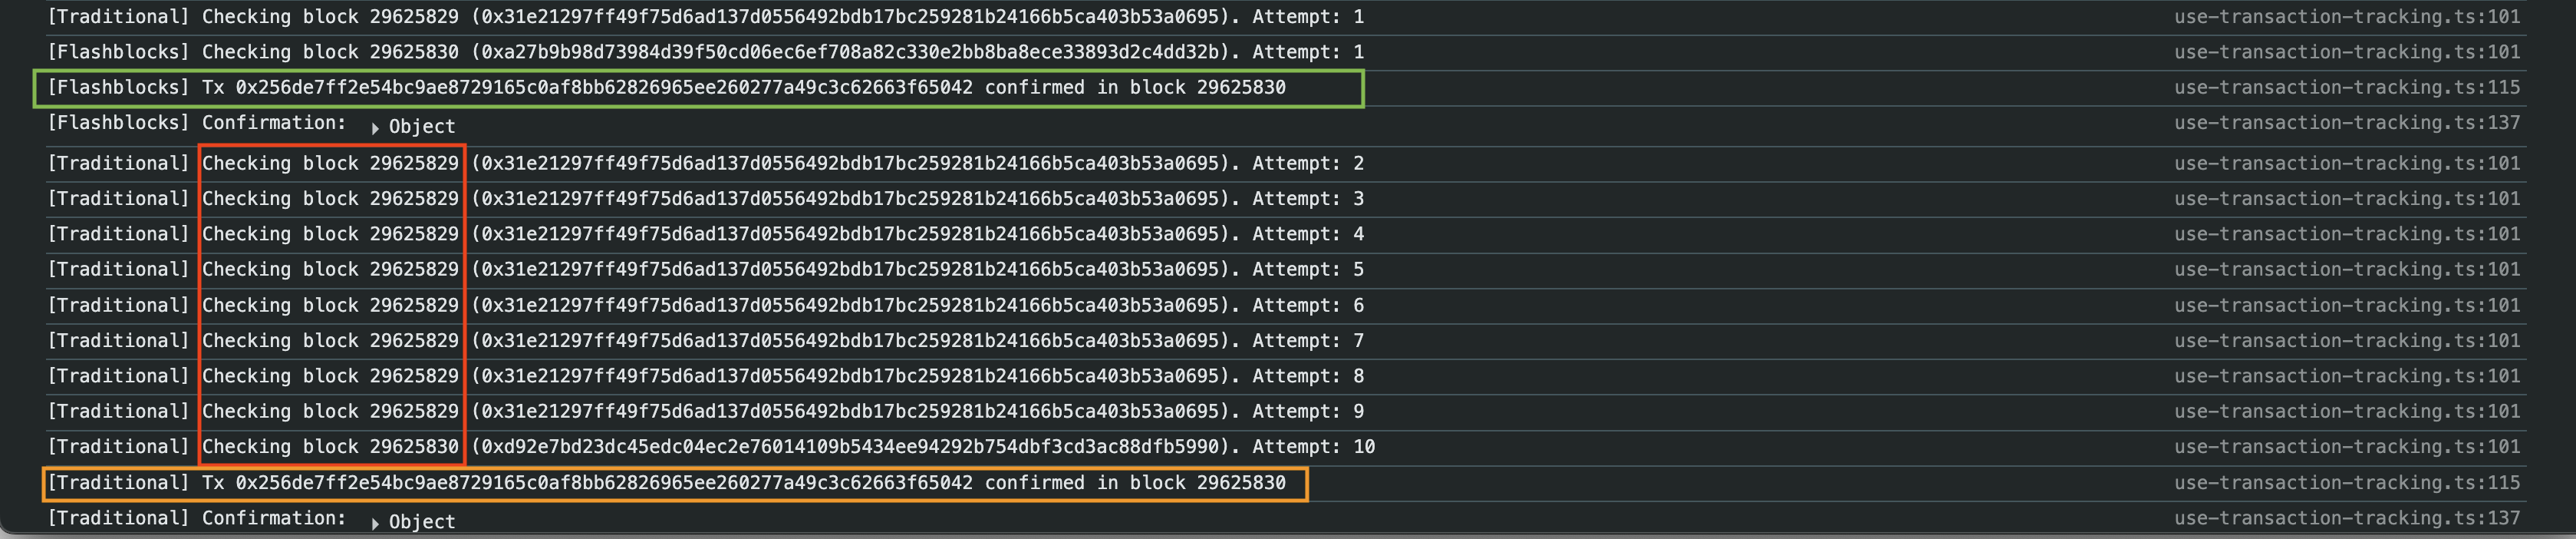
You should observe the Flashblocks panel (left) updating faster than the traditional panel (right). The updates should be near-instantaneous. You can also check the console logs for the polling mechanism.
Occasionally, you might notice the Flashblocks panel does not display a confirmation time for a sent transaction. This can happen because Flashblocks are so fast that the transaction may be included in a block before the application's simple polling loop begins to check for it.
This is a nuance of the demonstration's getBlock polling method. In a production application, using a more robust function like waitForTransactionReceipt would reliably capture the transaction confirmation.
Implementation Considerations
The techniques used in this guide are designed to clearly demonstrate the speed of Flashblocks. When building a production application, keep the following considerations in mind:
-
Use
waitForTransactionReceiptfor Production Code: The manual polling withgetBlockin our demo is for visualization. In a real-world dApp, you must use Viem'swaitForTransactionReceiptfunction. It is more efficient, robust, and optimized for production use, handling retries and polling internally. Also, use theconfirmationsflag if you need to wait for a specific number of confirmations. -
Distinguish Between Preconfirmation and Finality: Flashblocks provide a high-confidence preconfirmation in milliseconds. This is great for user experience. However, it is not the same as final on-chain settlement. For critical transactions, you can wait for the transaction to be fully finalized in a subsequent block to protect against rare cases like block reorganizations.
-
Optimize Your Data Fetching: Our demo pools every 100ms to see the effect of Flashblocks. You can choose polling intervals in relevant actions based on your use case. Also, for applications requiring the absolute lowest latency updates, you can consider using a WebSocket (WSS) connection. Note that Flashblocks are not supported yet by WSS connections on Quicknode.
Conclusion
You learned how Flashblocks work, how to configure Viem to use them via pre-defined chains, and how to build a comparison dApp to see the benefits firsthand. By integrating Flashblocks with Quicknode, you can significantly enhance your dApp's user experience, providing the speed and responsiveness that users expect.
Further Resources
- Official Base Flashblocks Documentation
- Quicknode Base Flashblocks Documentation
- Video Tutorial: Flashblocks Explained
- Complete Code Repository for this Guide
- Viem Documentation
We would love to hear more about what you are building. Drop us a line in Discord, or give us a follow on X to stay up to date on all the latest information!
We ❤️ Feedback!
Let us know if you have any feedback or requests for new topics. We'd love to hear from you.