5 min read
Overview
BEP20 is the BNB Smart Chain equivalent to the popular ERC20 specification for tokens on the Ethereum network. The difference is the BEP20 Token isn't run on the Ethereum Network, but the BNB Smart Chain network. Despite this difference, because BSC (BNB Smart Chain) implements the Ethereum Virtual Machine (EVM) for all of their smart contracts, they end up being practically identical in both specification and implementation. This guide will walk you through how to create your very own BEP20 Token.
Prerequisites:
- MetaMask browser extenstion
- Familiarity with Remix IDE
Adding BSC Testnet to your MetaMask Wallet
The first thing you will want to do for this new project is set up the BSC Testnet with your MetaMask wallet.
You can do this by opening up MetaMask, clicking on the networks tab, and clicking on "Custom RPC". To configure your wallet to connect to the BSC Testnet, you will fill out the forms like the picture below.
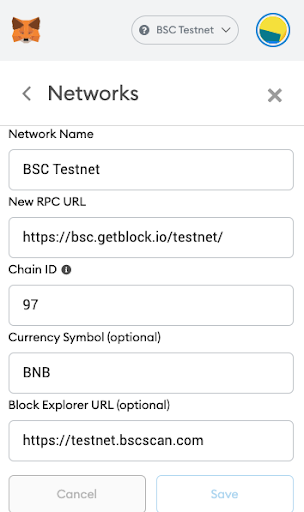
With that setup, your wallet can now connect to the BSC Testnet!
Adding Test BNB to Your Wallet
The Next thing we will need to do is get some BNB to play around with. BNB is BSC's native currency; BNB is to BSC what ETH is to Ethereum. To get some test BNB, we will head over here
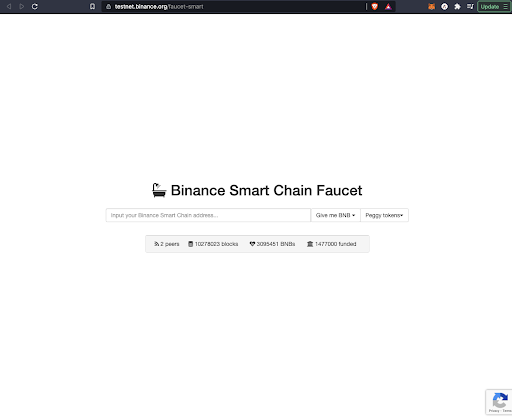
You can copy your wallet address from the MetaMask browser extension and paste it into the field to get BNB sent to you. With fresh BNB burning a hole in our wallet, we can go spend some!
Coding the Token
Because BSC uses the EVM, the code for deploying an ERC-20 Token and the BEP20 token is the same. What that enables us to do, is grab the ERC-20 specification from OpenZepplin and use it in our smart contract.
The next thing to do is open up a new browser tab and go to the Remix IDE and start a new Workspace.
Under the contracts folder, we will create a file called **BEP20.sol
**
In this new file you can write the following code:
// contracts/BEP20.sol
// SPDX-License-Identifier: MIT
pragma solidity ^0.8.0;

import "@openzeppelin/contracts/token/ERC20/ERC20.sol";

contract BEP20 is ERC20 {
    constructor(uint256 initialSupply) ERC20("BEP20Test", "BPT") {
        _mint(msg.sender, initialSupply);
    }
}
You can now access Logs for your RPC endpoints, helping you troubleshoot issues more effectively. If you encounter an issue with your RPC calls, simply check the logs in your QuickNode dashboard to identify and resolve problems quickly. Learn more about log history limits on our pricing page.
Line 1/2: The license and where this file should be located.
Line 3: We set the solidity complier to version 0.8.0.
Line 5: This imports the ERC20 package from OpenZepplin. We can use the specification to implement the new token. It is this standard that allows other wallets and programs to easily interface with the new token.
Line 7: This is specifying a new contract. You could rename BEP20 to something else arbitrary. However the ERC20 portion is the part that lets solidity know we want to use the ERC20 package that we are importing on line 5.
Line 8: The constructor portion of the contract is going to be called whenever we deploy our contract onto the BSC Testnet. We are giving it a single parameter initialSupply of type uint256. Then we call use the ERC20 functionality that we imported from OpenZepplin. This has two parameters: the first of which is the name of your token, and the second is what the token's ticker will be. In our case I called the token BEP20Test and it will show up with the BPT ticker.
Line 9: The _mint call that is implemented in the ERC20 contract. _mint will create the token, and send all of the newly minted tokens to msg.sender which will be whoever deploys the contract onto the testnet. In this case, you! It will create however many tokens we pass to the initialSupply parameter.
Note: It will create InitialSupply amount of tokens in the WEI format. which is 1e-18. So to create 100 tokens you need to pass the function 100000000000000000000
Deploying the Token
With the initial BEP20.sol written out, we can now deploy it onto the BSC Testnet.
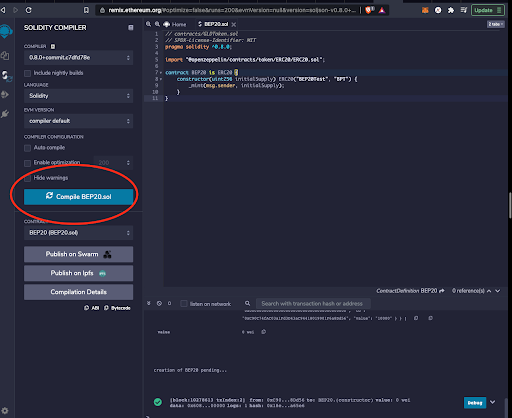
Click on BEP20.sol and then open the solidity complier tab and change the complier version to "0.8.0+commit.c7dfd78e". Then click on the blue "Compile BEP20.sol" button.
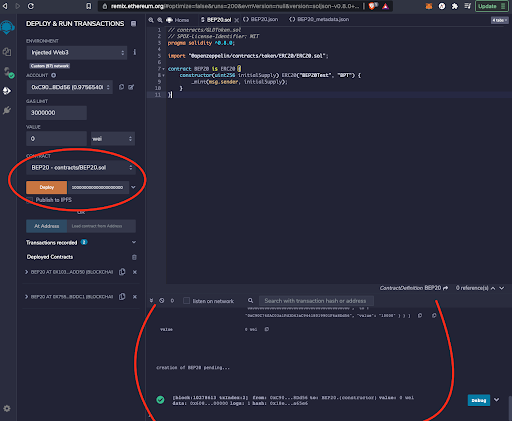
After compiling the contract you are now ready to deploy! Click on the "Deploy & Run Transactions" tab in Remix and click change the "Environment" tab to Injected Web 3. If you haven't connected to Remix using MetaMask before it may ask for confirmation.
After your MetaMask has connected to Remix, you should see your Address under the "Account" field. If that is the case you can now select the BEP20 contract under the dropdown tab. You should see an orange deploy button, and a form to the right of it. This is where you can pass an argument to the initialSupply parameter from earlier.
I'll create 100 tokens, to do that I'll pass in 100000000000000000000 and then click on "Deploy".
You will need to accept a MetaMask transaction as it will cost BNB to deploy something to the network.
If you did everything correctly up to this point you should be greeted with a success message in the terminal!
You can copy the contract address under the "Deployed Contracts" tab and look it up on bscscan. You will see your wallet address in the "from" field, and should see that 100 BPT tokens were sent to your wallet.
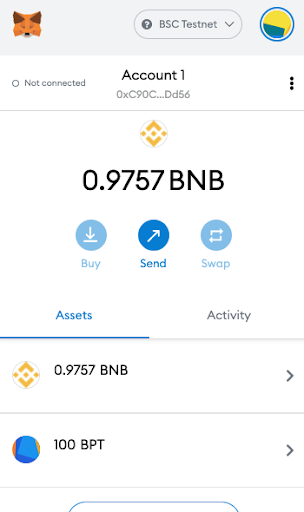
Adding the Token to your Wallet
In order to view this in your MetaMask UI you will need to click on Add Token, under the "Assets" tab. This should bring you to a menu with 3 fields to fill out. If you paste in the Contract address from Remix you will see all of the fields auto populate, and you should then be able to accept the token.
It should look like this by the end.
Conclusion
Congratulations! You made it to the end. You know how to deploy a custom token to the BSC network and add it to your MetaMask. In reality you now know even more than that, as the process is exactly the same for the Ethereum Network, you would only need to point Remix and MetaMask at the Ethereum Network instead of the BSC Network! If you're interested in doing exactly that, you can find our step-by-step guide right here
Subscribe to our newsletter for more articles and guides on Ethereum. If you have any feedback, feel free to reach out to us via Twitter. You can always chat with us on our Discord community server, featuring some of the coolest developers you’ll ever meet :)