
14 min read
Overview
Security is a crucial factor when it comes to protecting web resources. One way to protect those resources is by integrating JSON Web Tokens (JWT) in your web applications. JWT is an open standard that defines a compact way for securely transmitting information between parties. In this guide, you will learn about the core concepts behind JWTs and how to enable JWT on your blockchain node with Quicknode. We will demonstrate this process by creating a React app that will fetch a JWT from our backend server (Express.js) and then use it to request and display the blockchain data on our frontend.
What You Will Need
- An Ethereum endpoint powered by Quicknode (create an account here)
- Node.js installed
- A Terminal Window
- (Optional) Basic knowledge of React and Express.js to create the frontend and backend application
What You Will Do
- Learn about JSON Web Tokens (JWT)
- Create a simple Node.js script to generate and validate JWTs
- Test JWT authentication using cURL
- Create an API using Express.js to serve JWT tokens
- Build a frontend with React that uses JWT authentication
| Dependency | Version |
|---|---|
| node.js | ^18.16.0 |
| express | ^4.19.2 |
| jsonwebtoken | ^9.0.2 |
| react | ^18.3.1 |
What is a JWT?
The idea behind JSON Web Tokens (JWT), also referred to as JOT is to create a standard and secure way for two parties to communicate. JWTs can be beneficial because they allow for stateless session management (no session cookies) where a backend server does not need to communicate with an authorization server. JWTs can be sent through a URL, POST parameter, or inside an HTTP header. They are also efficient due to their size. A JWT is composed of three components: A Header, Payload, and Signature. Each part is separated by a period (".") and is derived from a JSON object, which is then encoded via BASE64 into a text string. All the components put together are represented in the following format:
header.payload.signature
The RFC-7519 has more details on how this standard is defined. To understand each component in depth and how to decode a JWT, visit JWT.io.
These components combined are what make up a JWT. An example of a JWT would look something like this:
eyJhbGciOiJSUzI1NiIsInR5cCI6IkpXVCJ9.eyJleHAiOjE2Njk0Mzg4MDAsImlhdCI6MTY0ODgzNjY3Mn0.N4aNN5cwnYcMeZHeElrYtWcLxjfR-PqqLAvZNdCTGa-5wD_O3yFIM3F4ACX7egGXMCdob7UQwytMcMoAtnpKs8wyzdOlJgWyJIg3NsIWYdjnzuLz_EqNvIPdm3TEi7m0mZbgXLOGRQ_JS1RAF2i3XKPmhQuXq_ObSryPFfsLITimXJyoi5fiyX7WkUwJELIQVAlW5M5Um1fqIK791g52lIfM9vTU_PKIEJaMaBfUJMx92M04Mt8kYBjj7Eh1rxbEWeFA545HF_QKJe3j4EKoAx6BhL6oPCmoPoZXIAYlgAX6kf-FcbFfJ76u1ppeWsC0z_tfM5eDpVxHr2GY9d0o-A
kid (Key Id)
With JWTs, the "kid" (key ID) header parameter identifies which key should be used to verify the JWT's signature. This optional case-sensitive string value (e.g., "0123456789") will be useful for us as we may have multiple JWTs under one blockchain node endpoint, and it allows the verifier to know which public key to use when multiple keys are available. More information on this parameter can be found here.
JWT with Quicknode
Users can now use the JWT authentication method to protect their blockchain nodes. Quicknode supports JWT stand-alone or integrated with our other security methods, such as authorization tokens, referral whitelisting, and domain masking. However, note that if multiple authentication services are enabled on a blockchain node, each method must pass its security check, or the user request will return an error.
Quicknode supports JWTs created from key pairs using the RS256 or ECDSA256 algorithm, and there are no limits to how many JWTs you can activate on a blockchain node at once (you will just need to ensure you use your appropriate key ID). Now, we’re ready to create our React app!
Basic JWT Example
Let's start with a simple demonstration of JWT authentication using Node.js scripts and cURL. This will help understand the core concepts before building the full React web application.
First, create a new directory and initialize it:
mkdir quicknode-jwt-demo
cd quicknode-jwt-demo
npm init -y
npm install jsonwebtoken
Next, let's create the keypair.
Generate a Keypair
Create a file called generateKeys.js within your project's folder and input the following code (you can use the RSA256 or ES256 version depending on your needs):
- RSA256 JavaScript
- ES256 JavaScript
// Imported dependencies
const fs = require('fs')
const { generateKeyPairSync } = require('crypto');
var jwt = require('jsonwebtoken');

// Generate RSA keys
const { publicKey, privateKey } = generateKeyPairSync('rsa', {
    modulusLength: 2048,
    publicKeyEncoding: {
        type: 'spki',
        format: 'pem'
    },
    privateKeyEncoding: {
        type: 'pkcs8',
        format: 'pem',
    }
});

// Write key pairs to file
fs.writeFileSync('private_key.pem', privateKey);
console.log('Saved private_key.pem');

fs.writeFileSync('public_key.pem', publicKey);
console.log('Saved public_key.pem');
// Imported dependencies
const fs = require('fs')
const { generateKeyPairSync } = require('crypto');
var jwt = require('jsonwebtoken');

// Generate ES256 keys
const { publicKey, privateKey } = generateKeyPairSync('ec', {
    namedCurve: 'P-256',
    publicKeyEncoding: {
        type: 'spki',
        format: 'pem'
    },
    privateKeyEncoding: {
        type: 'pkcs8',
        format: 'pem',
    }
});

// Write key pairs to file
fs.writeFileSync('private_key.pem', privateKey);
console.log('Saved private_key.pem');

fs.writeFileSync('public_key.pem', publicKey);
console.log('Saved public_key.pem');
Run the script with the following command:
node generateKeys.js
This will create a keypair based on your configuration (e.g., algorithm, 2048 bit key length (standard secure length), and spki/pem format) and the following files:
- private_key.pem: Keep this secure and never share it
- public_key.pem: You'll add this to your Quicknode dashboard
Add Public Key to Quicknode Node Endpoint
First, create a Quicknode endpoint for Ethereum Mainnet. Then, navigate to your Node's Security tab and click the Disable JWTs toggle to enable the setting, then click the Add JWT button.
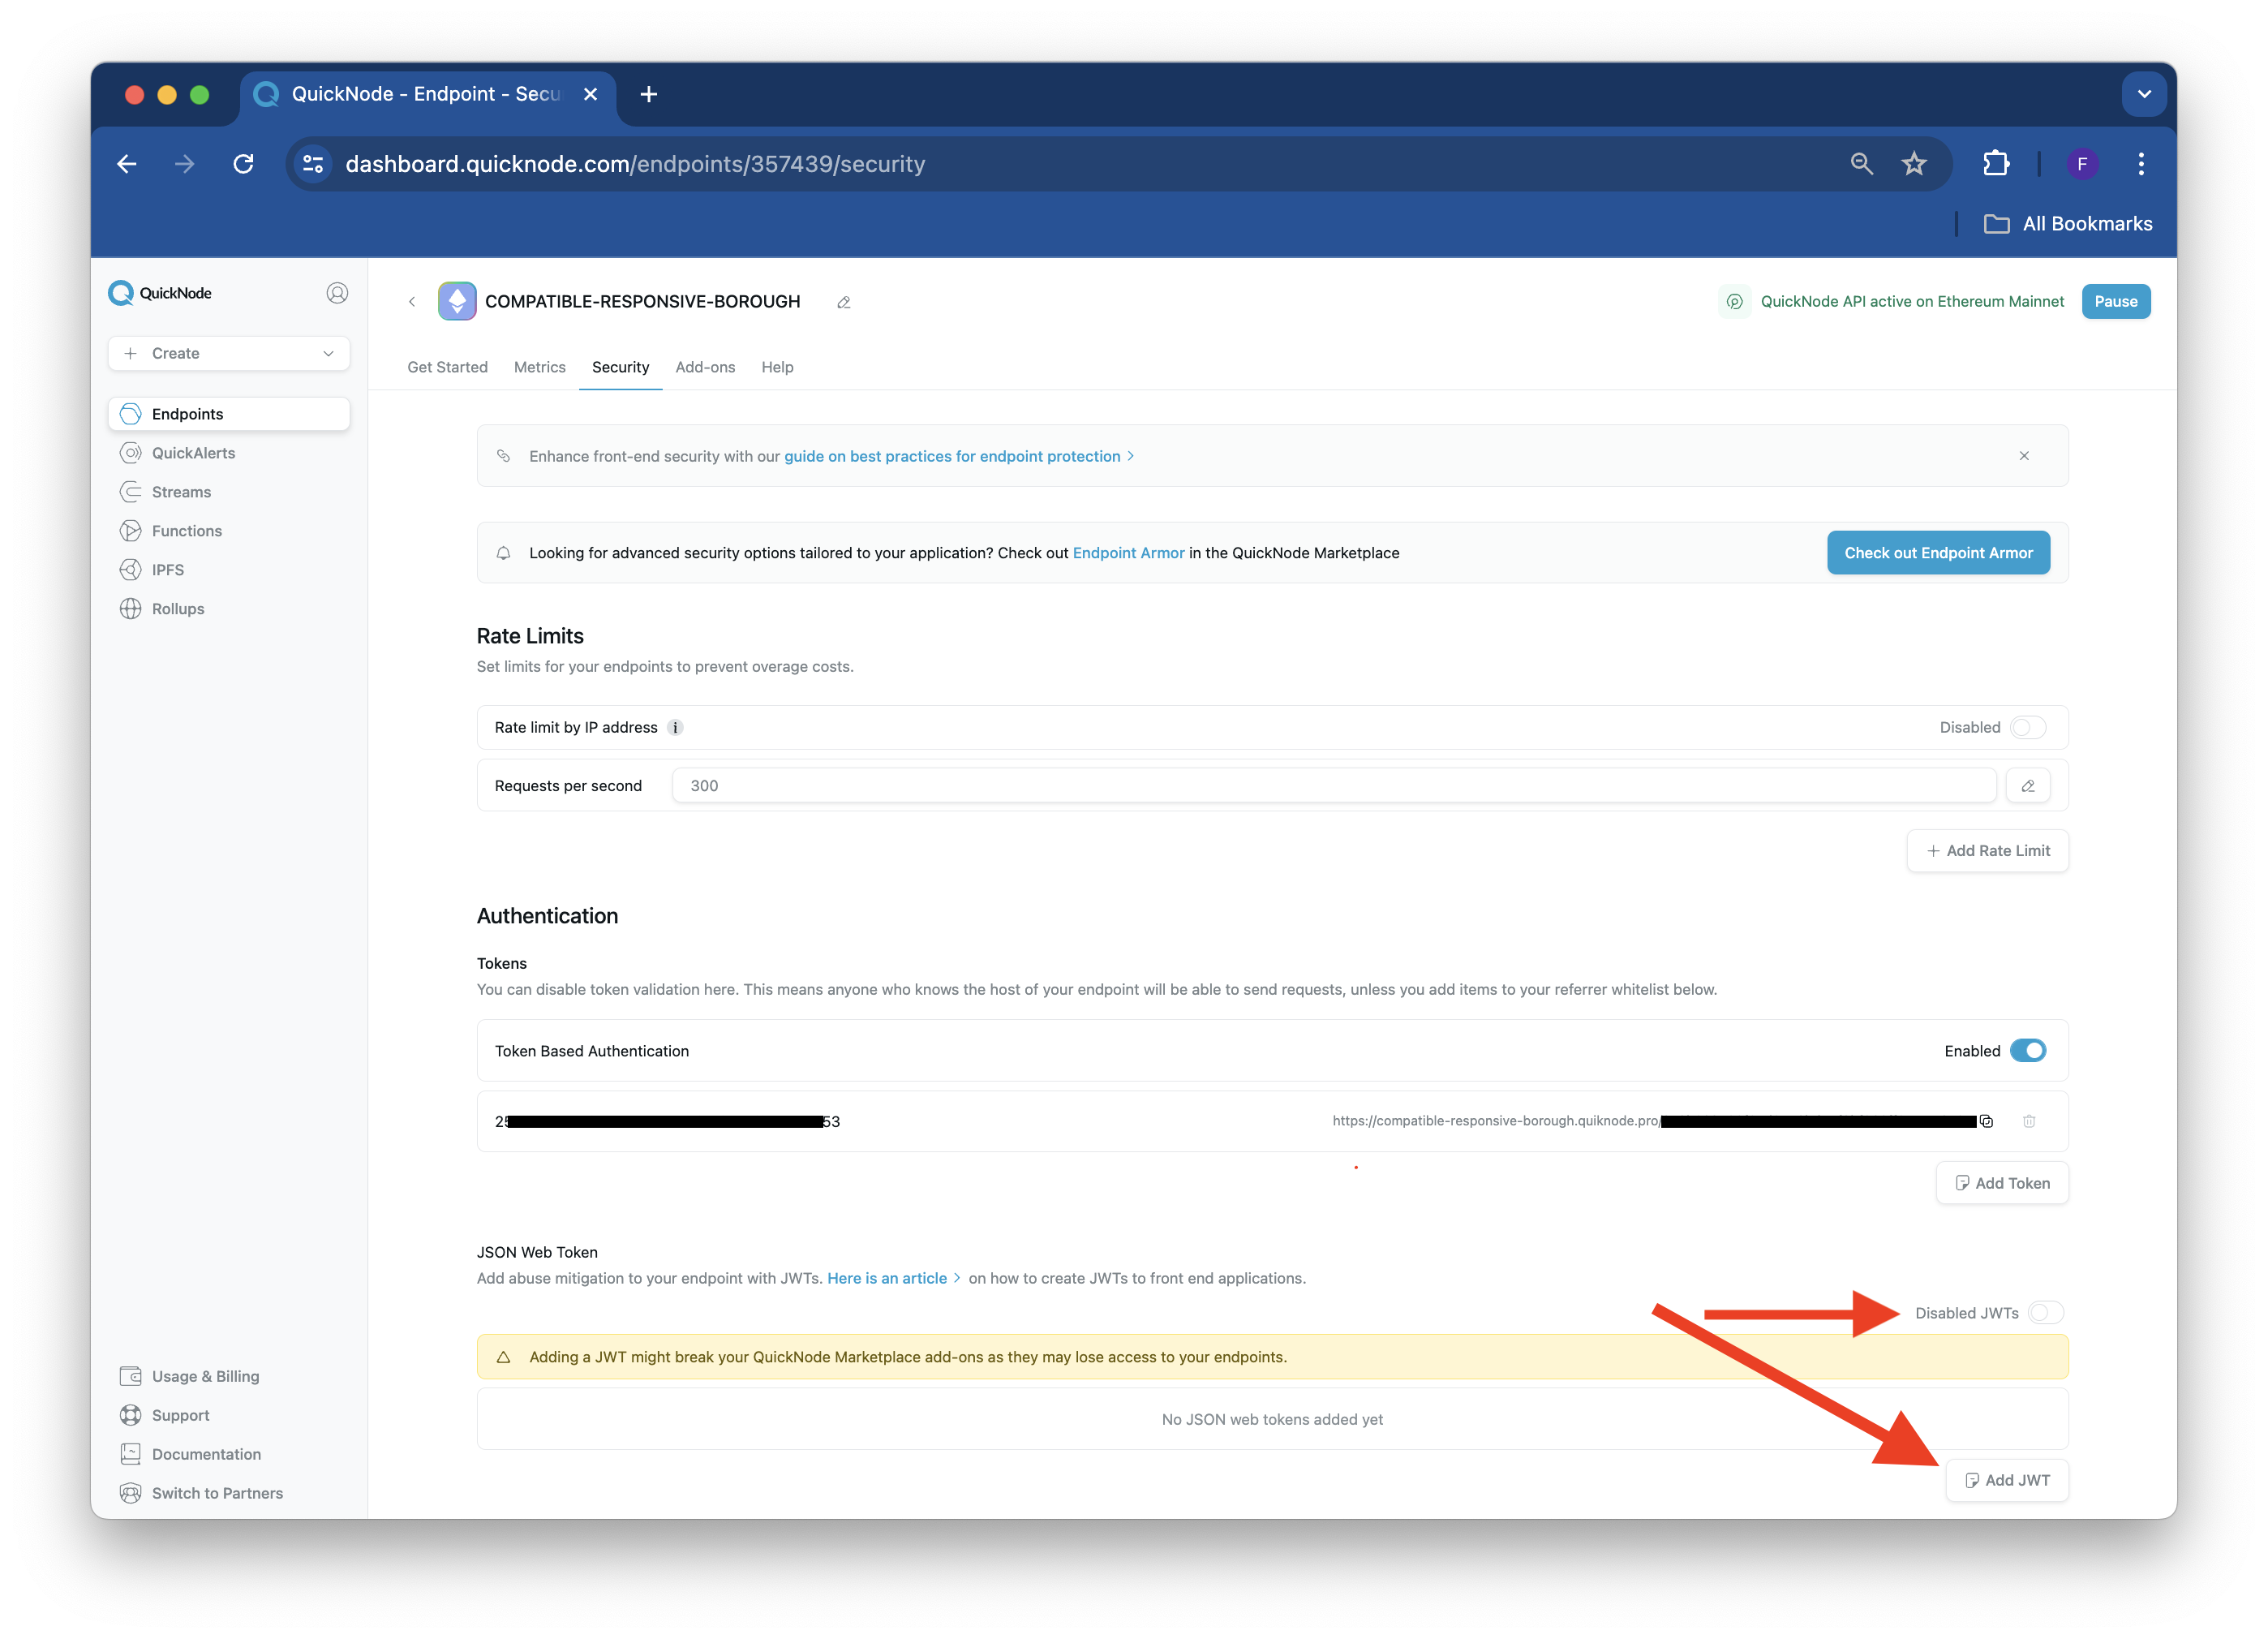
Enter a name for your JWT and paste the public key previously generated in your public_key.pem file into the second field, titled "Public Key."
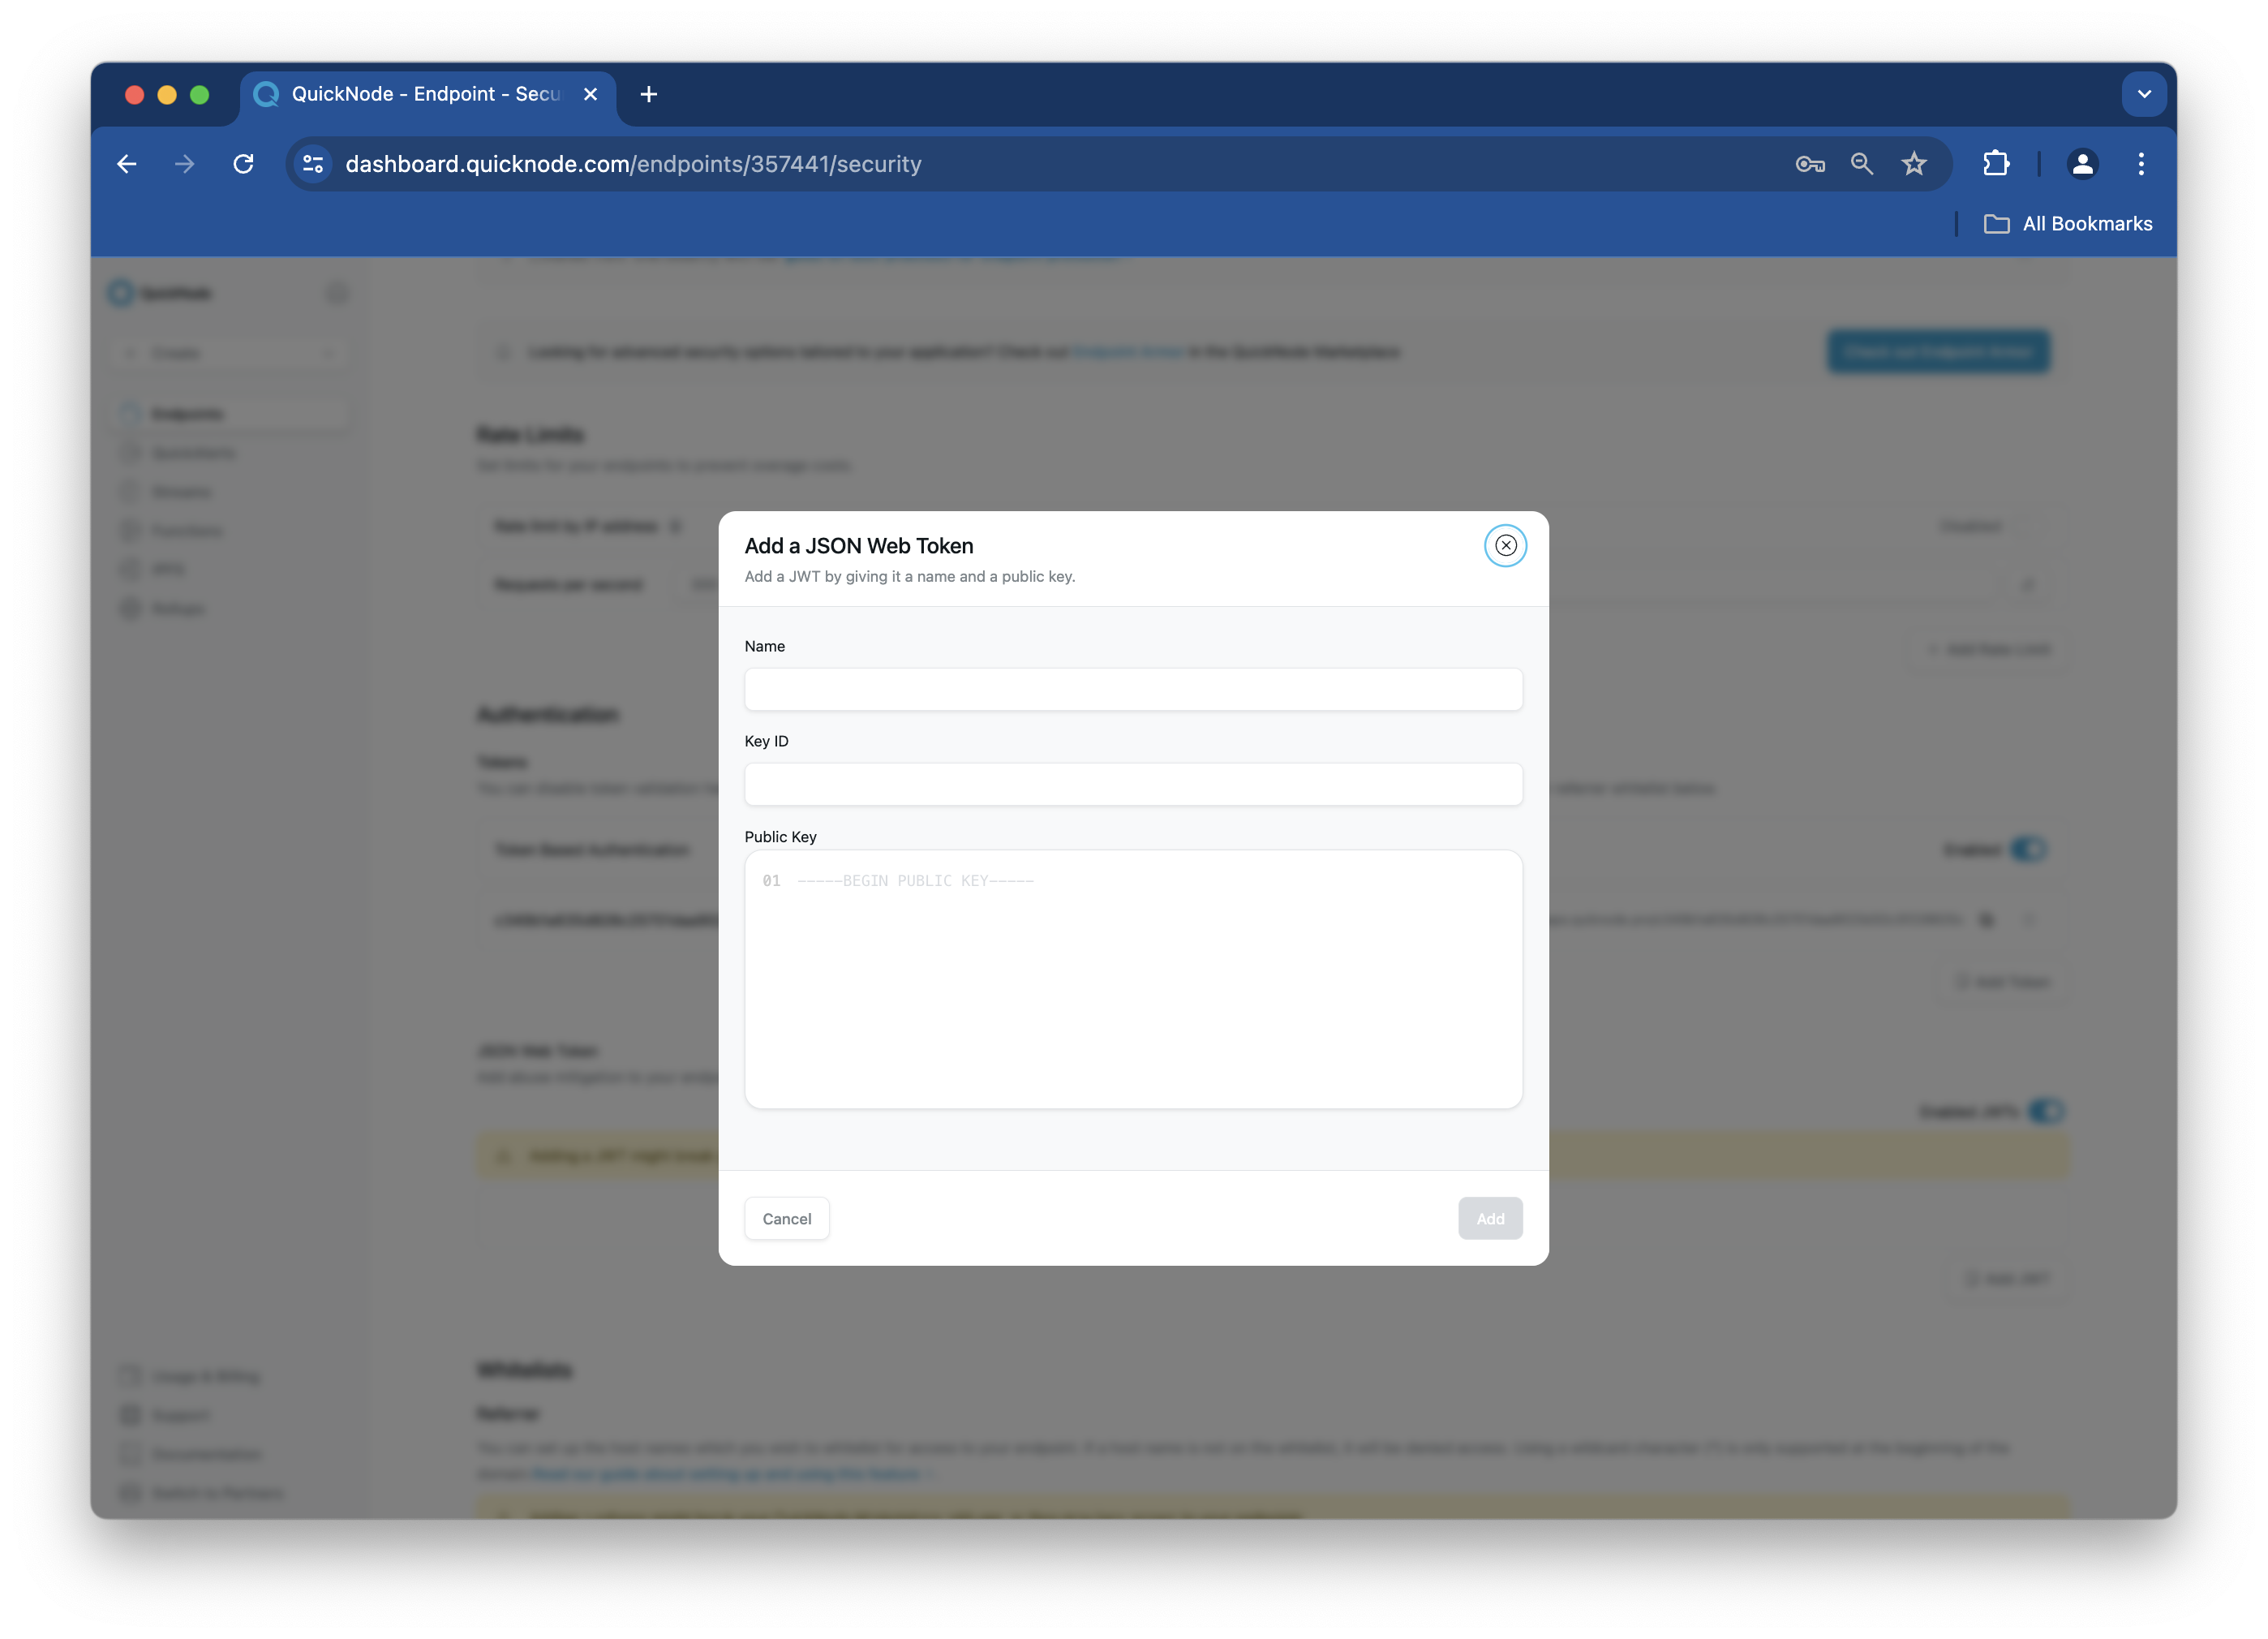
Note that the format of the public key should match the image above.
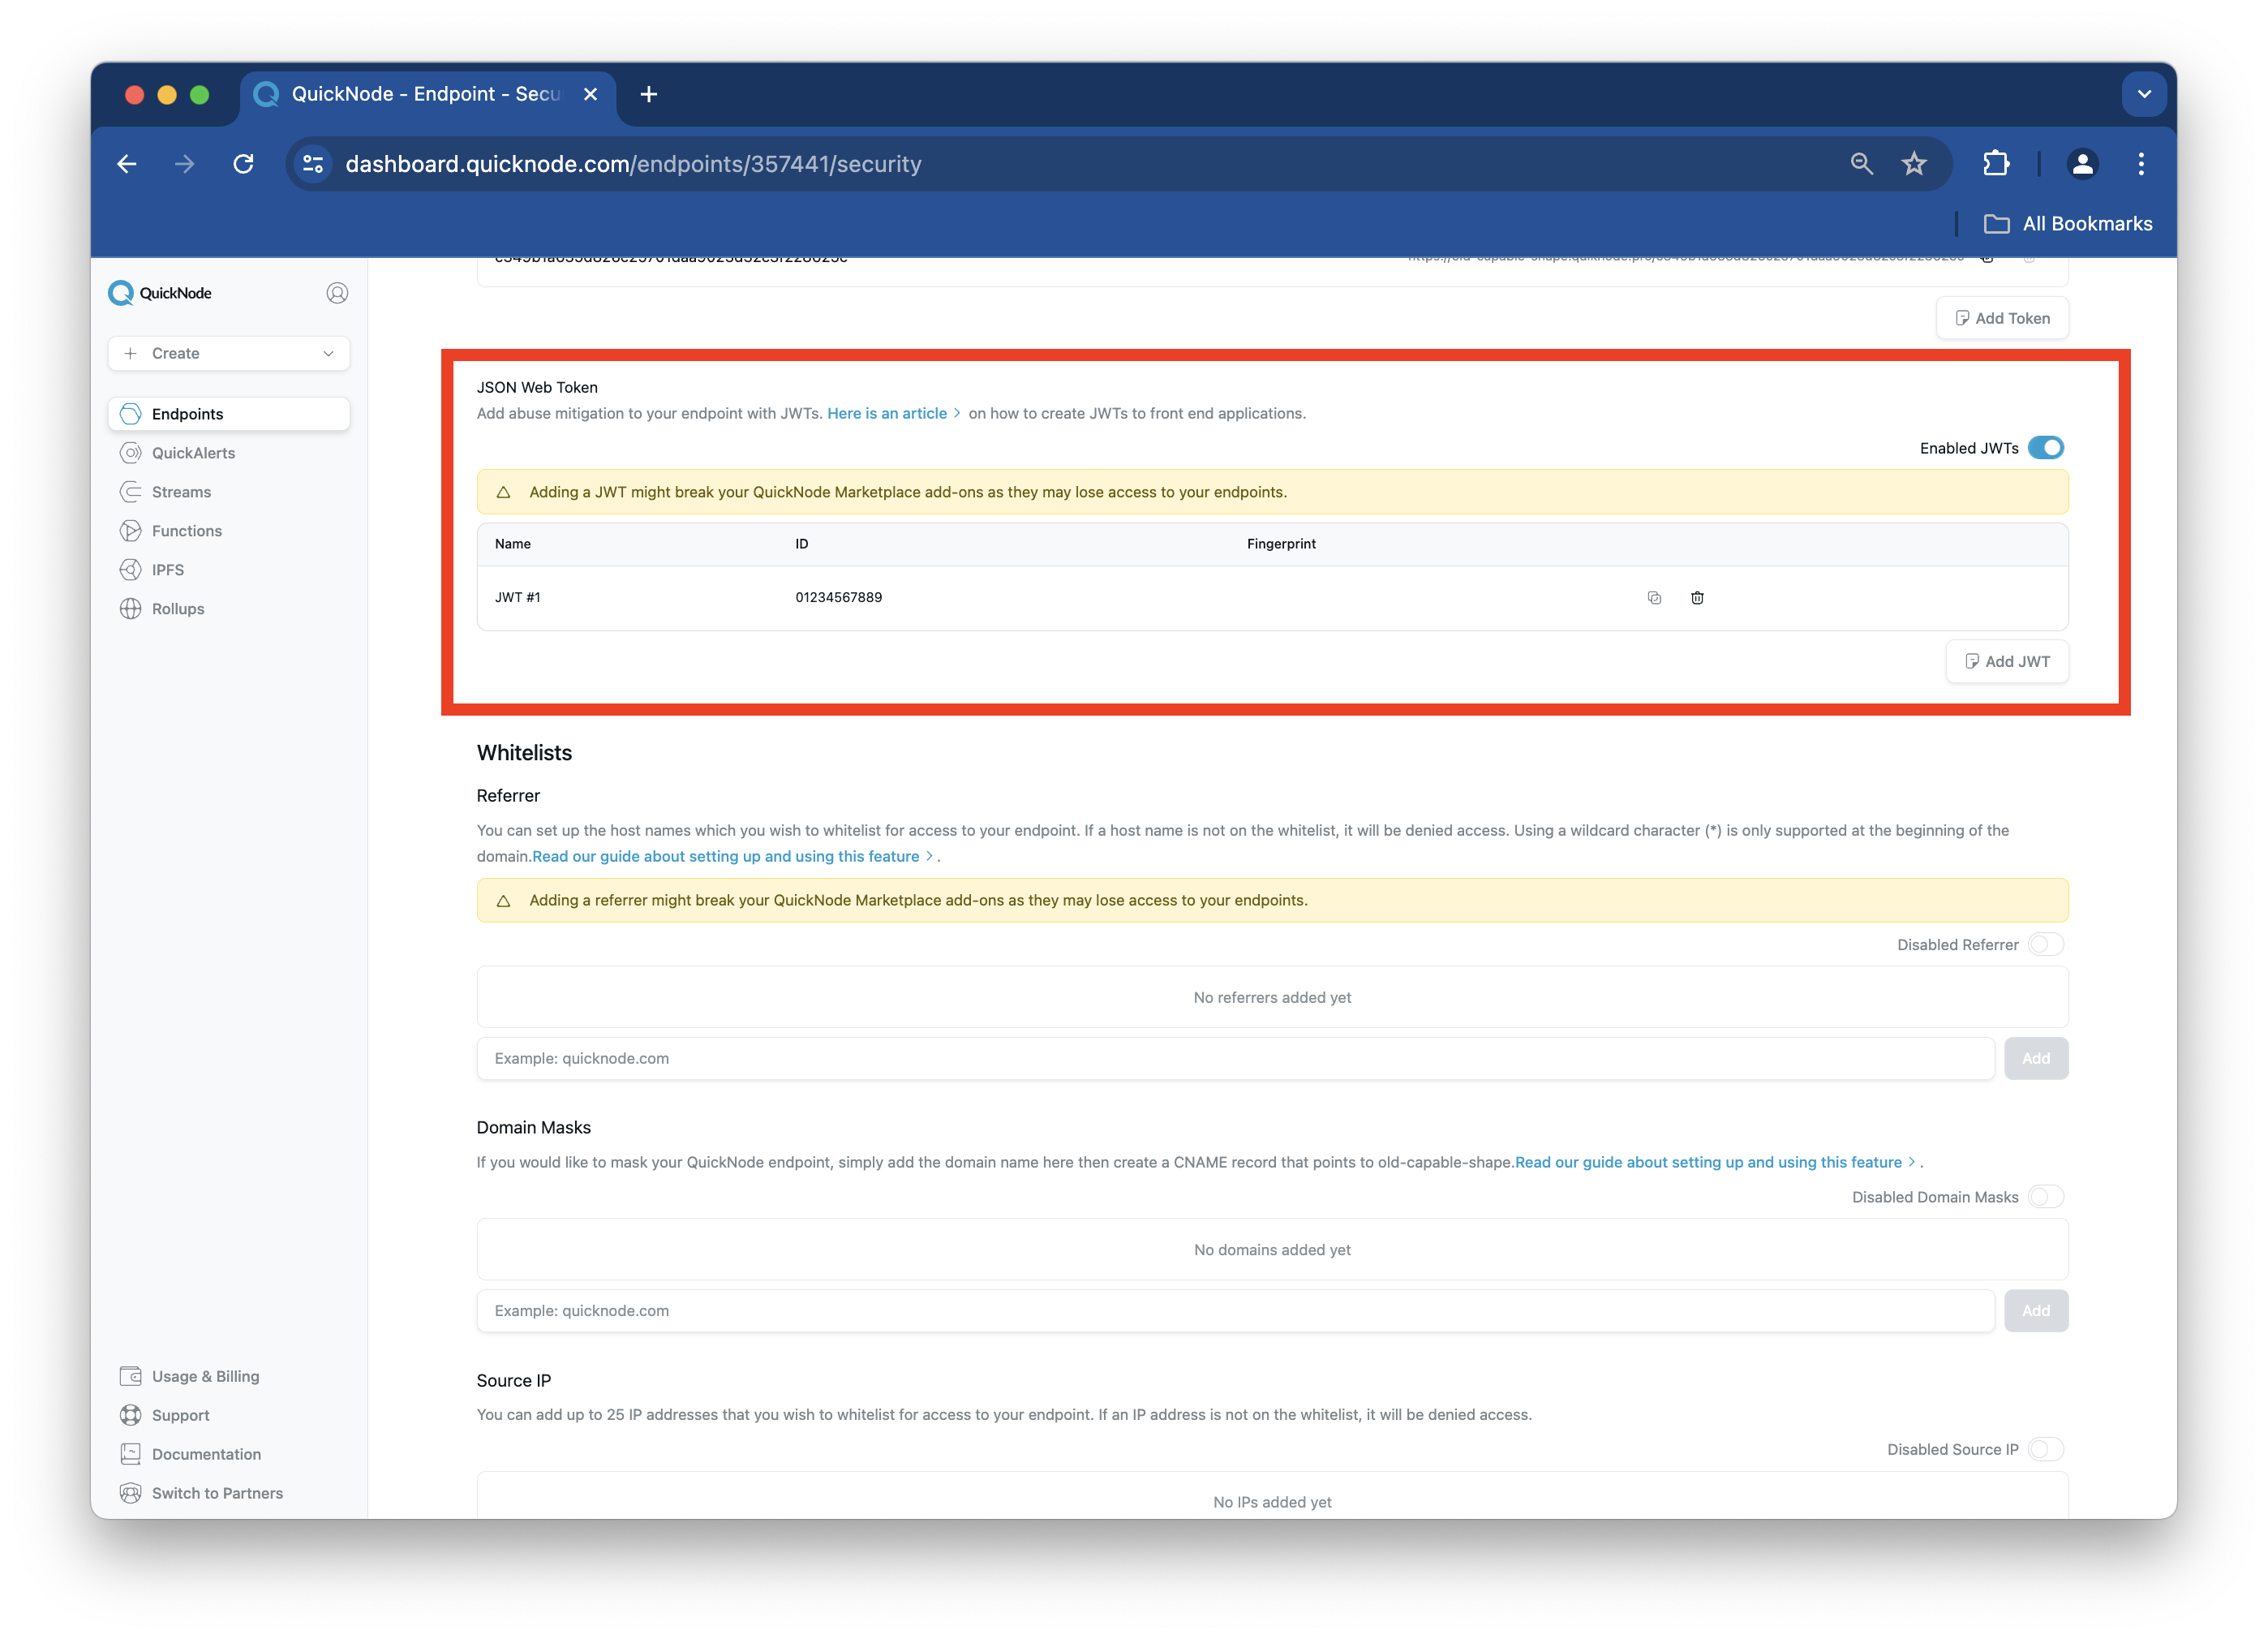
Once added, the public key's Name, ID, and Fingerprint will be displayed in the JSON Web Token section. Important: the value in the ID field should match the keyid value in your script (i.e., index.js), or you will run into an unauthorized error.
Next, we'll create a JWT based off the keypair we just created.
Generate a JWT
Create another file called generateJWT.js and input the following code:
// generateToken.js
const jwt = require('jsonwebtoken');
const fs = require('fs');

const privateKey = fs.readFileSync('private_key.pem');

// Generate a token
const token = jwt.sign({}, privateKey, {
  algorithm: 'RS256',
  expiresIn: '2d',
  keyid: '0123456789' // Your arbitrary JWT ID
});

console.log(token);
Run the script to get the token:
node generateJWT.js > token.txt
Test the JWT
Now test the token with curl:
TOKEN=$(cat token.txt)
curl -X POST \
  YOUR_QUICKNODE_HTTP_ENDPOINT \
  -H "Content-Type: application/json" \
  -H "Authorization: Bearer $TOKEN" \
  -d '{"jsonrpc":"2.0","method":"eth_blockNumber","params":[],"id":1}'
Remember to replace the
YOUR_QUICKNODE_HTTP_ENDPOINTwith your actual Quicknode endpoint
If successful, you'll see the latest block number returned as a hex value. This confirms your JWT setup is working correctly.
That's it! You just learned how to create a keypair, generate a JWT and verify the JWT works using cURL. In the next section, we'll walk you through a similar process but instead build a React app and backend server using Express.js.
Building a React app with JWT
Our app will be created using Express.js for the backend, which will create a REST API that will serve JWT tokens through a specific endpoint. Our React front-end will fetch this JWT and then use it to make a request to our blockchain node. The following steps will show you how to create the required files in your terminal window but feel free to use a code editor such as VScode.
Open a terminal window in the directory you'd like to create the project in and run the following command:
npx create-react-app jwt-app && cd jwt-app
Once our React app is initialized, let's install the required dependencies for this JWT implementation:
npm i express jsonwebtoken
Then we'll create the required files, one for our backend server in Express.js, and another for our key pair generation.
touch index.js && touch generateKeys.js
We'll also need to configure the package.json file to include a proxy field. The proxy field will allow for a gateway between our React app and our backend server running on Express.js. Include the following field in your package.json file:
"proxy": "http://localhost:3001"
Create the JWT Tokens
Next, in your terminal window, run the command nano generateKeys.js to open the file (or use a code editor like VSCode). Then include one of the following code snippets below (e.g., the RSA256 JavaScript or ES256 JavaScript example):
- RSA256 JavaScript
- ES256 JavaScript
// Imported dependencies
const fs = require('fs')
const { generateKeyPairSync } = require('crypto');
var jwt = require('jsonwebtoken');

// Generate RSA keys
const { publicKey, privateKey } = generateKeyPairSync('rsa', {
    modulusLength: 2048,
    publicKeyEncoding: {
        type: 'spki',
        format: 'pem'
    },
    privateKeyEncoding: {
        type: 'pkcs8',
        format: 'pem',
    }
});

// Write key pairs to file
fs.writeFileSync('private_key.pem', privateKey);
console.log('Saved private_key.pem');

fs.writeFileSync('public_key.pem', publicKey);
console.log('Saved public_key.pem');
// Imported dependencies
const fs = require('fs')
const { generateKeyPairSync } = require('crypto');
var jwt = require('jsonwebtoken');

// Generate ES256 keys
const { publicKey, privateKey } = generateKeyPairSync('ec', {
    namedCurve: 'P-256',
    publicKeyEncoding: {
        type: 'spki',
        format: 'pem'
    },
    privateKeyEncoding: {
        type: 'pkcs8',
        format: 'pem',
    }
});

// Write key pairs to file
fs.writeFileSync('private_key.pem', privateKey);
console.log('Saved private_key.pem');

fs.writeFileSync('public_key.pem', publicKey);
console.log('Saved public_key.pem');
Save the file by pressing CTRL + X, then click Enter on your keyboard. Once the file is saved, we’ll run the command node generateKeys.js to create a key pair (public_key.pem and private_key.pem) and store it in the same directory. Note that this file should only be ran once, or you will generate new key pairs each time the file is executed.
The next step is to create our server code. Run the command nano index.js and input the following code:
// Import libraries
const express = require("express");
const fs = require("fs");
const jwt = require("jsonwebtoken");

// Server code
const PORT = process.env.PORT || 3001;
const app = express();

// In-memory storage for the token
let currentToken = null;
let tokenExpiration = null;

app.get('/get_token', (req, res) => { // endpoint to retrieve JWT
  try {
    // Check if the current token is still valid
    if (currentToken) {
      try {
        const privateKey = fs.readFileSync(__dirname + "/private_key.pem");
        jwt.verify(currentToken, privateKey);
        if (tokenExpiration > Date.now()) {
          console.log("Using existing token, expires in:", (tokenExpiration - Date.now()) / 1000, "seconds");
          return res.json({ token: currentToken }); // Return existing valid token
        }
      } catch (err) {
        console.log("Token expired or invalid, generating new one");
        currentToken = null;
      }
    }

    // Token is expired or does not exist, create a new one
    const privateKey = fs.readFileSync(__dirname + "/private_key.pem");
    currentToken = jwt.sign({}, privateKey, {
      algorithm: 'RS256', // algo used to create JWT, change to ES256 if necessary
      expiresIn: "2d", // Set expiration to 2 days
      keyid: '12345' // ID from JSON Web Token section
    });

    // Set the expiration time
    tokenExpiration = Date.now() + (2 * 24 * 60 * 60 * 1000); // 2 days in milliseconds
    console.log("Generated new token, expires in 2 days");
    return res.json({ token: currentToken }); // return the newly created JWT

  } catch (error) {
    console.error('Token generation error:', error);
    return res.status(500).json({ error: 'Failed to generate token' });
  }
});

app.listen(PORT, () => {
  console.log(`Server listening on ${PORT}`); // listen on specified port
});
If you previously used ES256 to generate a public and private key pair (instead of RS256), change the value above in the algorithm field to ES256.
Remember to save the file! Now, we are off to creating our frontend code.
Create the React Frontend
Open the App.js file located within the src directory and input the code below. Also, remember to replace the string - "YOUR_QUICKNODE_HTTP ENDPOINT" with your actual Quicknode Endpoint. If you don't have an endpoint already, you can sign up for a free Quicknode account here and easily set up an endpoint!
import React from "react";
import "./App.css";

function App() {
  const [data, setData] = React.useState(null);

  React.useEffect(() => {
    fetch("/get_token")
      .then((res) => res.json())
      .then((token) => {

        fetch("YOUR_QUICKNODE_HTTP_ENDPOINT", { // don't have one? go to quicknode.com and create one now!
          method: 'POST',
          headers: {
            'Accept': 'application/json',
            'Content-Type': 'application/json',
            'Authorization': `Bearer ${token.token}`
          },
          body: JSON.stringify({ method: "eth_blockNumber", params: [], id: 1, jsonrpc: "2.0" })
        }).then(res => res.json()).then(content => {
          console.log(content)
          setData(parseInt(content.result))
        });

      });
  })

  return (
    <div className="App">
      <header className="App-header">
        <p>{!data ? "Loading..." : data}</p>
      </header>
    </div>
  );
}

export default App;
We're almost done! Before we can start our app, we’ll need to add our public key pair to our blockchain node. Let’s set up JWT authentication on Quicknode next.
Add Public Key to Quicknode Node Endpoint
First, create a Quicknode endpoint for Ethereum Mainnet. Then, navigate to your Node's Security tab and click the Disable JWTs toggle to enable the setting, then click the Add JWT button.
Enter a name for your JWT and paste the public key previously generated in your public_key.pem file into the second field, titled "Public Key."
Note that the format of the public key should match the image above.
Once added, the public key's Name, ID, and Fingerprint will be displayed in the JSON Web Token section. Important: the value in the ID field should match the keyid value in your script (i.e., index.js), or you will run into an unauthorized error.
Starting the React App
Before starting the Express API and React app, let's summarize how they will work together.
- The Express.js API will serve our
/get_tokenendpoint, which, once invoked, will read the local private key, create and sign a JWT payload, then return the signed JWT. - The React app will call the
/get_tokenendpoint and fetch the signed JWT (i.e., bearer token) - The React app then makes a call to the Quicknode endpoint to fetch the latest block number using the
eth_blockNumberRPC method and includes the signed JWT in the header - The React app returns the latest block number if the call is successful and JWT is authorized
Now, we'll need to open two terminal windows so we can run the backend server and React app simultaneously.
To start the backend server, run the command node index.js in one of your terminal windows. If the server is running, you should see the following output: "Server listening on 3001"
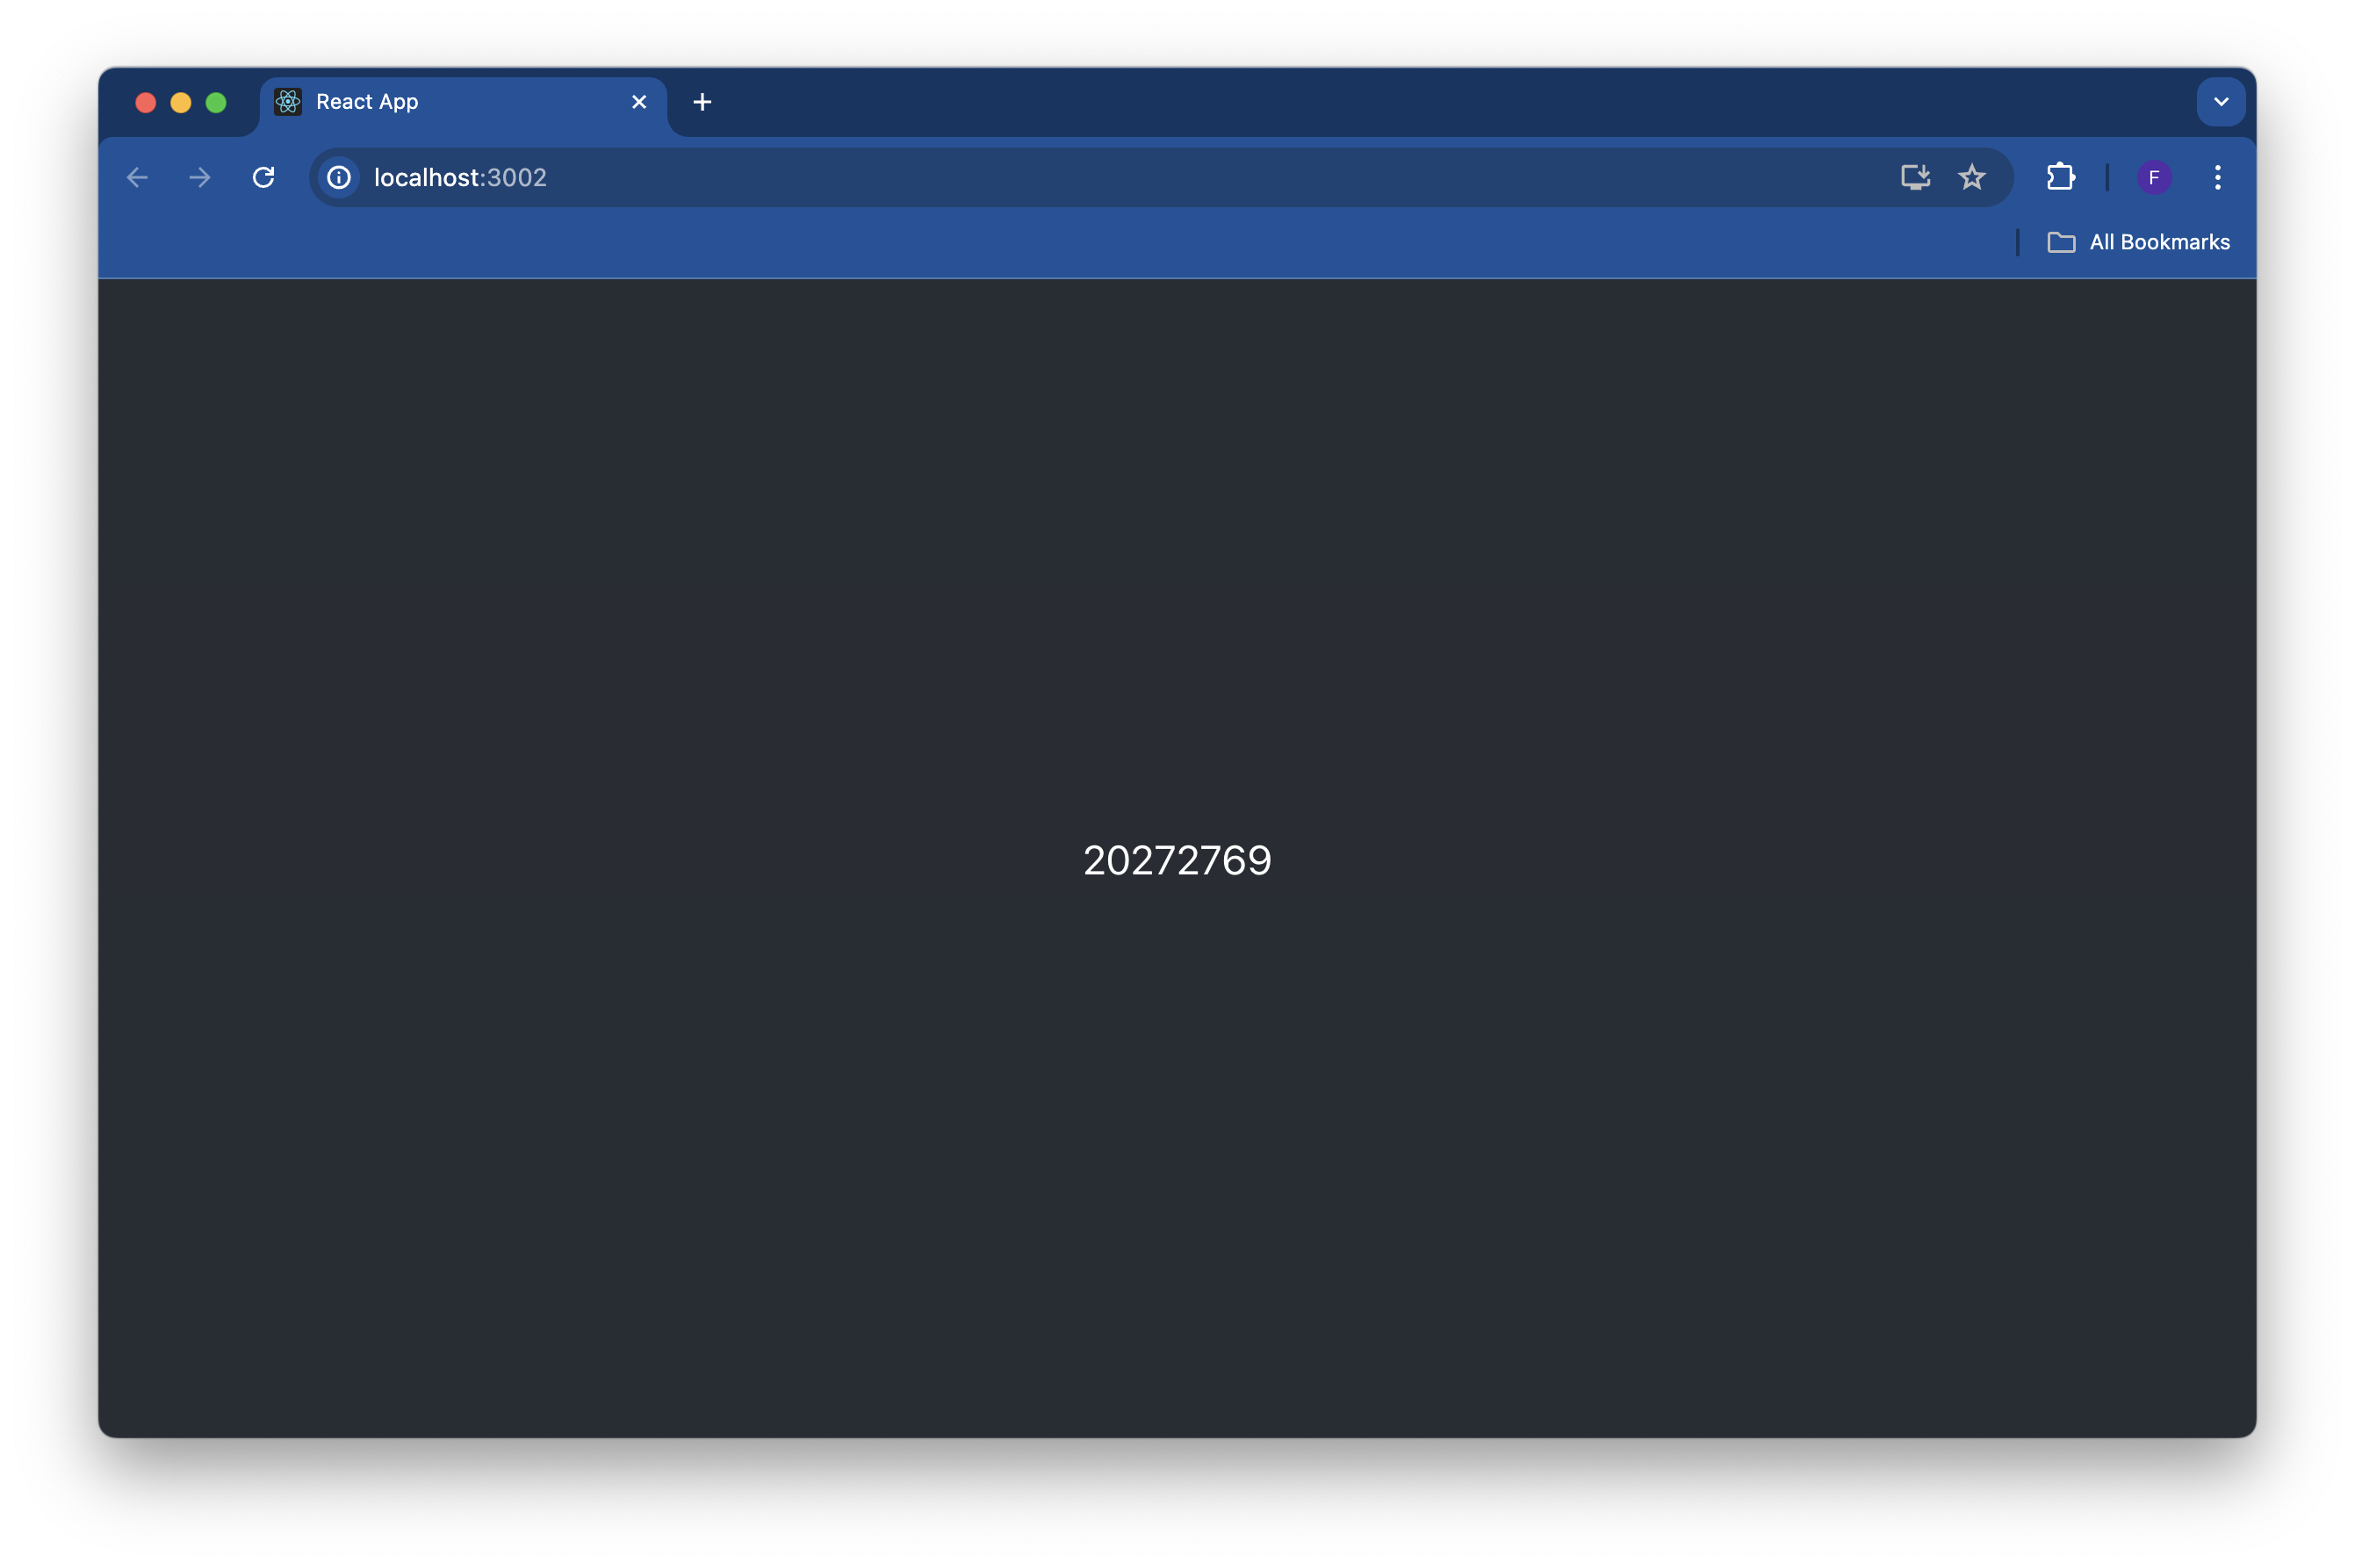
Then, in the other terminal window, run the command npm start to start the React app. A browser window should automatically open to the port the app is running on, and you should see a result similar to the one below:
If you want to dive deeper, check out this awesome GitHub repository that shows you how to implement Cloudflare workers with JWT authorization on Quicknode.
Below are some answers to common questions a user might have when using JWT on Quicknode. If you have any further questions regarding this feature or any others, please don't hesitate to reach out to us!
Questions You May Have
Q: Which chains are JWT supported on?
A: JWT is supported on all chains
Q: How do I discard a JWT before it expires?
A: If your JWT might have been exposed and you want to prevent it from being used, you can remove the public key from the Node's security tab.
Q: Can I add multiple JWTs to a blockchain node?
A: There are no limits to how many JWTs you can activate on a blockchain node at once. If multiple JWTs are active, ensure you are using the proper ID value in the keyid field, which corresponds to the public/private key you are using when signing the JWT. More information can be found here.
Q: Which cipher does Quicknode support?
A: RSA 256 (RS256) and ECDSA 256 (ES256), as specified in RFC7518 table 3.1, are only supported at this time.
Q: How do I resolve 401 errors?
A: You may have other forms of security methods enabled on your blockchain node. Check to ensure your requests meet all security checks.
Q: What expiration date should I choose? A: You can set any expiration date in the future you'd like. Generally, the shorter the expiration time, the more secure your JWT is.
Conclusion
Congratulations on completing this guide! We've learned about JWTs and how to enable it on your blockchain node with Quicknode. Subscribe to our newsletter for more articles and guides on Ethereum. If you have any feedback, feel free to reach out to us via Twitter. You can always chat with us on our Discord community server, featuring some of the coolest developers you'll ever meet 😃
We ❤️ Feedback!
Let us know if you have any feedback or requests for new topics. We'd love to hear from you.