
61 min read
Overview
Flow is a fast, decentralized, and developer-friendly L1 blockchain designed for the next generation of games, apps, and digital assets. Flow’s multi-role architecture is purpose-built for internet-scale performance, with low fees, upgradable smart contracts, and user-friendly tools like the Flow Emulator and flow-cli. Cadence, the next-generation smart contract language for Flow, stores digital assets directly in accounts thus guaranteeing direct ownership of assets held within. Cadence incorporates security and other language native concepts for handling on-chain digital assets, enabling developers to focus their effort on building products. Contracts can call other contracts, even dynamically if required, transactions are ACID, and scripts simplify read-access to on-chain data. Creating complex, decentralized applications which store data and logic together on-chain has never been easier. Flow unlocks productivity gains and true composability for Web3 like never before.
In this guide, you will learn about Flow. Here, you will discover how to create an NFT collection and build a frontend using Cadence, Flow CLI, and NextJS.
While our exploratory journey takes place in Flow Testnet's sandbox, rest assured that the skills you'll acquire are completely transferable to Flow Mainnet. Let's turn the tides and transform the complex into simplicity together!
What You Will Need
- A basic knowledge of Flow
- A basic knowledge of web development experience
- Node.js installed (version 18.16 or higher)
- The Flow Command Line Interface installed (Flow CLI)
- A code editor (e.g. Visual Studio Code)
- A Flow-compatible wallet (For wallet options, you may check Flow's Wallets page)
You can download and install each dependency by clicking the links above and following their instructions.
Dependencies Used in This Guide
| Dependency | Version |
|---|---|
| node.js | 18.16.0 |
| flow-cli | 1.4.2 |
What You Will Do
- Learn about the Flow blockchain
- Learn about the Cadence programming language
- Create a Flow wallet using Flow CLI
- Create NFT collection smart contract, transaction, and script files with Cadence
- Deploy the smart contract on the Flow blockchain
- Build a frontend to mint NFTs
Flow Blockchain Overview
Key Features of Flow
Multi-Role Architecture
Flow applies pipelining to transaction processing by separating the jobs of a validator node into four different roles: Collection, Consensus, Execution, and Verification. This unique multi-node architecture allows Flow to scale significantly without compromising the security or long-term decentralization of the network. More details can be found here if needed.
Resource-Oriented Programming
Flow's adoption of Resource-oriented programming is a game-changer in the world of smart contracts. Cadence allows developers to define their own Resource types and enforce custom rules for their use. Cadence's design reduces the risk of programming errors and vulnerabilities in other smart contract languages since Resources cannot be duplicated or destroyed and can only be stored in an account. During code execution, functions will abort if a Resource is not left stored within an Account upon completion.
For developers who are familiar with Solidity, Cadence introduces a lot of new concepts and patterns that differ from what you may be used to. We recommend reviewing Guide for Solidity developers for a more detailed understanding of these differences.
Account Concept
Flow’s account model defines each account to associate with an address, and hold one or more public keys, contracts, and other account storage. More detailed information can be found in Accounts in Flow's developer docs.
- Address: The account's unique identification.
- Public Keys: public keys that have been approved on the account.
- Contracts: Cadence contracts have been deployed to the account.
- Storage: The region of the account where resource assets are kept.
Flow accounts support multiple public keys, granting flexibility in access control, and owners of the corresponding private keys can sign transactions to modify the account's state, offering a departure from Ethereum's single key-pair account model.
Upgradability
EVM-based chains have always enforced contract immutability which pushes developers to work around that limitation using proxy patterns. By contrast Flow allows developers to upgrade smart contracts to a limited degree.
Why create an NFT collection on Flow?
Non-fungible tokens (NFTs) have taken the digital world by storm, revolutionizing ownership and creativity in the digital realm. While NFTs are often associated with Ethereum's ERC-721 and ERC-1155 standards, Flow presents a compelling alternative with its unique advantages. This section explores why creators and collectors should consider creating an NFT collection on Flow.
Developer Tooling
Flow improves developer productivity with easy-to-use developer and testing tooling, SDKs, wallets, the Flow Playground, Cadence support built into VS Code and GoLand, and much more. Together with Flow’s extensive developer docs, the experience of building on Flow can be both productive and enjoyable!
Resource-Oriented Programming and Cadence
Resources exist in Cadence specifically to represent assets or tokens which are supply limited, making them ideal for blockchain. Linear types, as this type concept is known, are when the programming language enforces the constraint that each variable can exist only once and are unique. NFTs are themselves a type of Resource - what makes them a NFT is that they adhere to the standards detailed below. However, Resources have an infinite range of possible tokenization use-cases which may be useful for identity, rights assignment or other uses. Transactions involving an exchange of assets, for example selling a NFT in exchange for Fungible-Token Resources, are handled in a peer-to-peer way - sender assets are deposited directly to the receiver and vice versa, rather than being brokered through a central contract.
Decentralized Ownership: All storage on Flow is handled exclusively inside accounts. Unlike ledger-based blockchains, the Resource owned is not a mapping of asset ID to owner ID. When an asset is within a given account, only that account holder has the ability to take actions to move that Resource elsewhere.
Capability-based Access Control: Cadence uses Capabilities to restrict access to protected functions or objects. A Capability is a key-like entity which is provided to the holding account ahead of time which only allows them to initiate specific operations. Capabilities can be provided directly to specific accounts or otherwise revoked if needed.
The Non-Fungible Token Standard
At the heart of Flow's NFT ecosystem is the NonFungibleToken contract, which defines a set of essential functionality for NFTs. Any implementation of the NonFungibleToken interface on Flow is required to implement two resource interfaces:
1. NFT - A Resource Describing a Single NFT: This resource outlines the structure of an individual NFT, including its unique characteristics and properties.
2. Collection - A Resource for Holding Multiple NFTs of the Same Type: Collections are repositories that can store multiple NFTs of the same type. Users typically maintain one collection per NFT type, which is stored at a predefined location in their account storage.
For instance, imagine a user owning NBA Top Shot Moments NFTs. These NFTs would be stored within a TopShot.Collection in the user's account at the path /storage/MomentCollection.
Strong NFT Ecosystem
Flow has established itself as a mainstream ready blockchain and is known for sports NFT projects such as NBA TopShot, NFL AllDay and UFC Strike, which allow users to own and trade digital moments of varying rarities from their favorite sports. Many hundreds of other NFTs projects have also launched on Flow, including Doodles, Flovatar, and many others.
Developer Set Up
Accessing Flow with Quicknode
To build on Flow, you'll need an endpoint to connect with the Flow network. You're welcome to use Flow's public endpoints that are powered by Quicknode or deploy and manage your own infrastructure; however, if you'd like faster response times, you can leave the heavy lifting to us. See why Flow chose Quicknode as their public node's provider and sign up for an account here.
In this guide, we will use public endpoints that are powered by Quicknode.
Setting Up Your Development Environment
You need a terminal emulator (i.e., Terminal, Windows PowerShell) and code editor (i.e., Visual Studio Code) to set up the project.
We assume that you have already installed Flow-CLI since it is mentioned in What You Will Need, but if not, please check the relevant section to install the necessary programs and packages.
Creating a Flow Project
Run the following code in your terminal to set up the project. Our project folder's name will be nft-collection-qn, but you can modify the name as you wish. The --scaffold flag is for using provided scaffolds, which are project templates you can use to bootstrap your development.
flow setup nft-collection-qn --scaffold
If the terminal needs your input for scaffold number, you can select the fifth option [5] FCL Web Dapp. It creates all the necessary files and folders to build a simple TypeScript web application using next.js, FCL, and Cadence. The console output should look like the below one.
Enter the scaffold number: 5

🎉 Congrats! your project was created.

Start development by following these steps:
1. 'cd nft-collection-qn' to change to your new project,
2. 'flow emulator' or run Flowser to start the emulator,
3. 'flow dev' to start developing.

You should also read README.md to learn more about the development process!
Run the command to change your directory.
cd nft-collection-qn
With the project folder created, you can now move on to creating a Flow wallet.
Configuring Your Flow Account
You must create an account on the Flow blockchain using Flow CLI to deploy a smart contract. Luckily, Flow CLI has a useful command to create a wallet and fund it automatically.
To set up the wallet, run the following code in your terminal.
flow accounts create
Then, enter an account name and select the network. We type testnet-account as the account name and select "Testnet" as the network.
The console output should be like the one below.
🎉 New account created with address 0xbcc2fbf2808c44b6 and name testnet-account on Testnet network.

Here’s a summary of all the actions that were taken:
 - Added the new account to flow.json.
 - Saved the private key to testnet-account.pkey.
 - Added testnet-account.pkey to .gitignore.
Save the account address since it will be necessary for the following sections.
As mentioned in the output, this command performs these actions:
- Adds the new account to the
flow.jsonfile - Saves the private key to the
pkeyfile - Adds the
pkeyfile to the.gitignorefile
After this step, your account is created and funded.
Checking the Configuration File
Flow configuration file (flow.json) is used to define networks (, i.e., mainnet, testnet), accounts, deployment targets, and contracts that will be deployed. Thus, the following properties should be included in the configuration file:
networkswhich predefines the Flow emulator, testnet, and mainnet connection configurationaccountswhich predefines the Flow emulator account and your newly created accountdeploymentswhere all deployment targets can be definedcontractswhere all contracts that will be used in the project can be defined
The file's default state may not have all the mentioned properties. It is not a problem; we will walk through to update the file when we are ready for deployment.
When we created a wallet using the flow accounts create command previously, our account was added to this config file automatically. However, if you had wallet credentials you wanted to import, you would add them here. (See Flow CLI Configuration documentation for details.)
There is no need to update anything in this file for now, but we highly recommend that you review the file for a better understanding of the configuration file.
So far, the folder structure should be like the one below.
├── README.md              # Documentation for your app.
├── cadence                # Cadence language files (smart contracts, transactions, and scripts).
├── components             # React components used in your app.
├── config                 # Configuration files for your app.
├── constants              # Constants used in your app.
├── emulator.key           # Emulator key file (for local development).
├── flow.json              # Flow blockchain configuration or settings.
├── helpers                # Helper functions or utilities for your app.
├── hooks                  # Custom React hooks used in your app.
├── jest.config.js         # Configuration file for Jest testing framework.
├── layouts                # Layout components for your app.
├── next.config.js         # Configuration file for Next.js.
├── package-lock.json      # Automatically generated file to lock dependency versions.
├── package.json           # Package configuration file for Node.js.
├── pages                  # Next.js pages for routing.
├── public                 # Static files served by Next.js.
├── styles                 # Stylesheets and CSS for your app.
├── testnet-account.pkey   # Testnet account private key (for testing purposes).
├── tsconfig.json          # TypeScript configuration for your app.
└── types                  # TypeScript type declarations for your app.
Creating an NFT Collection on Flow
For an NFT collection dApp, we need the following files:
- a smart contract (
QuickNFT.cdc) - script files (
GetIDsQuickNFT.cdc,TotalSupplyQuickNFT.cdc, andGetMetadataQuickNFT.cdc) - transaction files (
MintNFT.cdcandSetUpAccount.cdc)
Script: A script is executable Cadence code that queries the Flow network but does not modify it. Unlike Flow transactions, they don’t need signing, and they can return a value. You can think of executing scripts as a read-only operation.
Transaction: Transactions are cryptographically signed data messages that contain a set of instructions that update the Flow state. They are a basic unit of computation that gets executed by execution nodes. In order for a transaction to be included in the Flow blockchain, a fee is required from the payer.
However, before jumping into the coding, let's learn more about Flow's native NFT standard.
Flow's Native NFT Standard
Flow's native NFT standard, often referred to as the NonFungibleToken contract, defines a set of essential functionalities that ensure the secure and efficient management of NFTs. This standard offers a streamlined approach to creating, trading, and interacting with NFTs, underlining Flow's commitment to simplicity and user-friendly development.
The core features of the NonFungibleToken contract encompass two essential resource interfaces: NFT, which describes a single NFT's structure, and Collection, designed to hold multiple NFTs of the same type. Users typically organize their NFTs by saving one collection per NFT type in a predefined location within their account storage. For instance, a user might store all their NBA Top Shot Moments in a TopShot.Collection located at /storage/MomentCollection.
To create a new NFT collection, developers can utilize the createEmptyCollection function, which generates an empty collection void of any NFTs. Users often save these new collections in a recognizable location within their account and make use of the NonFungibleToken.CollectionPublic interface to establish a public capability for linking.
When it comes to depositing an NFT into a Collection, the deposit function comes into play. This action triggers the Deposit event and is accessible through the NonFungibleToken.CollectionPublic interface, allowing individuals to deposit NFTs into a collection without needing access to the entire collection.
Creating Smart Contract
Go to the ./cadence/contracts directory. Then, create a file named QuickNFT.cdc in it by running the commands below.
echo > QuickNFT.cdc
Then, open the QuickNFT.cdc file with your code editor. Copy the code below and paste it into the file.
The code may seem complicated, but we'll guide you through it step by step just after the code snippet. Also, many functions are standard and explained in Flow's documentation.
import NonFungibleToken from 0x631e88ae7f1d7c20
import ViewResolver from 0x631e88ae7f1d7c20
import MetadataViews from 0x631e88ae7f1d7c20

pub contract QuickNFT: NonFungibleToken, ViewResolver {

    /// Total supply of QuickNFTs in existence
    pub var totalSupply: UInt64

    /// The event that is emitted when the contract is created
    pub event ContractInitialized()

    /// The event that is emitted when an NFT is withdrawn from a Collection
    pub event Withdraw(id: UInt64, from: Address?)

    /// The event that is emitted when an NFT is deposited to a Collection
    pub event Deposit(id: UInt64, to: Address?)

    /// Storage and Public Paths
    pub let CollectionStoragePath: StoragePath
    pub let CollectionPublicPath: PublicPath

    /// The core resource that represents a Non Fungible Token.
    /// New instances will be created using the NFTMinter resource
    /// and stored in the Collection resource
    ///
    pub resource NFT: NonFungibleToken.INFT, MetadataViews.Resolver {

        /// The unique ID that each NFT has
        pub let id: UInt64

        /// Metadata fields
        pub let name: String
        pub let description: String
        pub let thumbnail: String
        access(self) let metadata: {String: AnyStruct}

        init(
            id: UInt64,
            name: String,
            description: String,
            thumbnail: String,
            metadata: {String: AnyStruct},
        ) {
            self.id = id
            self.name = name
            self.description = description
            self.thumbnail = thumbnail
            self.metadata = metadata
        }

        /// Function that returns all the Metadata Views implemented by a Non Fungible Token
        ///
        /// @return An array of Types defining the implemented views. This value will be used by
        ///         developers to know which parameter to pass to the resolveView() method.
        ///
        pub fun getViews(): [Type] {
            return [
                Type<MetadataViews.Display>(),
                Type<MetadataViews.Editions>(),
                Type<MetadataViews.ExternalURL>(),
                Type<MetadataViews.NFTCollectionData>(),
                Type<MetadataViews.NFTCollectionDisplay>(),
                Type<MetadataViews.Serial>(),
                Type<MetadataViews.Traits>()
            ]
        }

        /// Function that resolves a metadata view for this token.
        ///
        /// @param view: The Type of the desired view.
        /// @return A structure representing the requested view.
        ///
        pub fun resolveView(_ view: Type): AnyStruct? {
            switch view {
                case Type<MetadataViews.Display>():
                    return MetadataViews.Display(
                        name: self.name,
                        description: self.description,
                        thumbnail: MetadataViews.HTTPFile(
                            url: self.thumbnail
                        )
                    )
                case Type<MetadataViews.Editions>():
                    // There is no max number of NFTs that can be minted from this contract
                    // so the max edition field value is set to nil
                    let editionInfo = MetadataViews.Edition(name: "Example NFT Edition", number: self.id, max: nil)
                    let editionList: [MetadataViews.Edition] = [editionInfo]
                    return MetadataViews.Editions(
                        editionList
                    )
                case Type<MetadataViews.Serial>():
                    return MetadataViews.Serial(
                        self.id
                    )
                case Type<MetadataViews.ExternalURL>():
                    return MetadataViews.ExternalURL("https://example-nft.onflow.org/".concat(self.id.toString()))
                case Type<MetadataViews.NFTCollectionData>():
                    return MetadataViews.NFTCollectionData(
                        storagePath: QuickNFT.CollectionStoragePath,
                        publicPath: QuickNFT.CollectionPublicPath,
                        providerPath: /private/QuickNFTCollection,
                        publicCollection: Type<&QuickNFT.Collection{QuickNFT.QuickNFTCollectionPublic}>(),
                        publicLinkedType: Type<&QuickNFT.Collection{QuickNFT.QuickNFTCollectionPublic,NonFungibleToken.CollectionPublic,NonFungibleToken.Receiver,MetadataViews.ResolverCollection}>(),
                        providerLinkedType: Type<&QuickNFT.Collection{QuickNFT.QuickNFTCollectionPublic,NonFungibleToken.CollectionPublic,NonFungibleToken.Provider,MetadataViews.ResolverCollection}>(),
                        createEmptyCollectionFunction: (fun (): @NonFungibleToken.Collection {
                            return <-QuickNFT.createEmptyCollection()
                        })
                    )
                case Type<MetadataViews.NFTCollectionDisplay>():
                    let media = MetadataViews.Media(
                        file: MetadataViews.HTTPFile(
                            url: "https://assets.website-files.com/5f6294c0c7a8cdd643b1c820/5f6294c0c7a8cda55cb1c936_Flow_Wordmark.svg"
                        ),
                        mediaType: "image/svg+xml"
                    )
                    return MetadataViews.NFTCollectionDisplay(
                        name: "The Example Collection",
                        description: "This collection is used as an example to help you develop your next Flow NFT.",
                        externalURL: MetadataViews.ExternalURL("https://example-nft.onflow.org"),
                        squareImage: media,
                        bannerImage: media,
                        socials: {
                            "twitter": MetadataViews.ExternalURL("https://twitter.com/flow_blockchain")
                        }
                    )
                case Type<MetadataViews.Traits>():
                    // exclude mintedTime and foo to show other uses of Traits
                    let excludedTraits = ["mintedTime", "foo"]
                    let traitsView = MetadataViews.dictToTraits(dict: self.metadata, excludedNames: excludedTraits)

                    // mintedTime is a unix timestamp, we should mark it with a displayType so platforms know how to show it.
                    let mintedTimeTrait = MetadataViews.Trait(name: "mintedTime", value: self.metadata["mintedTime"]!, displayType: "Date", rarity: nil)
                    traitsView.addTrait(mintedTimeTrait)

                    // foo is a trait with its own rarity
                    let fooTraitRarity = MetadataViews.Rarity(score: 10.0, max: 100.0, description: "Common")
                    let fooTrait = MetadataViews.Trait(name: "foo", value: self.metadata["foo"], displayType: nil, rarity: fooTraitRarity)
                    traitsView.addTrait(fooTrait)

                    return traitsView

            }
            return nil
        }
    }

    /// Defines the methods that are particular to this NFT contract collection
    ///
    pub resource interface QuickNFTCollectionPublic {
        pub fun deposit(token: @NonFungibleToken.NFT)
        pub fun getIDs(): [UInt64]
        pub fun borrowNFT(id: UInt64): &NonFungibleToken.NFT
        pub fun borrowQuickNFT(id: UInt64): &QuickNFT.NFT? {
            post {
                (result == nil) || (result?.id == id):
                    "Cannot borrow QuickNFT reference: the ID of the returned reference is incorrect"
            }
        }
    }

    /// The resource that will be holding the NFTs inside any account.
    /// In order to be able to manage NFTs any account will need to create
    /// an empty collection first
    ///
    pub resource Collection: QuickNFTCollectionPublic, NonFungibleToken.Provider, NonFungibleToken.Receiver, NonFungibleToken.CollectionPublic, MetadataViews.ResolverCollection {
        // dictionary of NFT conforming tokens
        // NFT is a resource type with an `UInt64` ID field
        pub var ownedNFTs: @{UInt64: NonFungibleToken.NFT}

        init () {
            self.ownedNFTs <- {}
        }

        /// Removes an NFT from the collection and moves it to the caller
        ///
        /// @param withdrawID: The ID of the NFT that wants to be withdrawn
        /// @return The NFT resource that has been taken out of the collection
        ///
        pub fun withdraw(withdrawID: UInt64): @NonFungibleToken.NFT {
            let token <- self.ownedNFTs.remove(key: withdrawID) ?? panic("missing NFT")

            emit Withdraw(id: token.id, from: self.owner?.address)

            return <-token
        }

        /// Adds an NFT to the collections dictionary and adds the ID to the id array
        ///
        /// @param token: The NFT resource to be included in the collection
        ///
        pub fun deposit(token: @NonFungibleToken.NFT) {
            let token <- token as! @QuickNFT.NFT

            let id: UInt64 = token.id

            // add the new token to the dictionary which removes the old one
            let oldToken <- self.ownedNFTs[id] <- token

            emit Deposit(id: id, to: self.owner?.address)

            destroy oldToken
        }

        /// Helper method for getting the collection IDs
        ///
        /// @return An array containing the IDs of the NFTs in the collection
        ///
        pub fun getIDs(): [UInt64] {
            return self.ownedNFTs.keys
        }

        /// Gets a reference to an NFT in the collection so that
        /// the caller can read its metadata and call its methods
        ///
        /// @param id: The ID of the wanted NFT
        /// @return A reference to the wanted NFT resource
        ///
        pub fun borrowNFT(id: UInt64): &NonFungibleToken.NFT {
            return (&self.ownedNFTs[id] as &NonFungibleToken.NFT?)!
        }

        /// Gets a reference to an NFT in the collection so that
        /// the caller can read its metadata and call its methods
        ///
        /// @param id: The ID of the wanted NFT
        /// @return A reference to the wanted NFT resource
        ///
        pub fun borrowQuickNFT(id: UInt64): &QuickNFT.NFT? {
            if self.ownedNFTs[id] != nil {
                // Create an authorized reference to allow downcasting
                let ref = (&self.ownedNFTs[id] as auth &NonFungibleToken.NFT?)!
                return ref as! &QuickNFT.NFT
            }

            return nil
        }

        /// Gets a reference to the NFT only conforming to the `{MetadataViews.Resolver}`
        /// interface so that the caller can retrieve the views that the NFT
        /// is implementing and resolve them
        ///
        /// @param id: The ID of the wanted NFT
        /// @return The resource reference conforming to the Resolver interface
        ///
        pub fun borrowViewResolver(id: UInt64): &AnyResource{MetadataViews.Resolver} {
            let nft = (&self.ownedNFTs[id] as auth &NonFungibleToken.NFT?)!
            let QuickNFT = nft as! &QuickNFT.NFT
            return QuickNFT as &AnyResource{MetadataViews.Resolver}
        }

        destroy() {
            destroy self.ownedNFTs
        }
    }

    /// Allows anyone to create a new empty collection
    ///
    /// @return The new Collection resource
    ///
    pub fun createEmptyCollection(): @NonFungibleToken.Collection {
        return <- create Collection()
    }

    /// Mints a new NFT with a new ID and deposit it in the
    /// recipients collection using their collection reference
    ///
    /// @param recipient: A capability to the collection where the new NFT will be deposited
    /// @param name: The name for the NFT metadata
    /// @param description: The description for the NFT metadata
    /// @param thumbnail: The thumbnail for the NFT metadata
    ///
    pub fun mintNFT(
        recipient: &{NonFungibleToken.CollectionPublic},
        name: String,
        description: String,
        thumbnail: String,
    ) {
        let metadata: {String: AnyStruct} = {}

        // this piece of metadata will be used to show embedding rarity into a trait
        metadata["foo"] = "bar"

        // create a new NFT
        var newNFT <- create NFT(
            id: QuickNFT.totalSupply,
            name: name,
            description: description,
            thumbnail: thumbnail,
            metadata: metadata,
        )

        // deposit it in the recipient's account using their reference
        recipient.deposit(token: <-newNFT)

        QuickNFT.totalSupply = QuickNFT.totalSupply + 1
    }

    /// Function that resolves a metadata view for this contract.
    ///
    /// @param view: The Type of the desired view.
    /// @return A structure representing the requested view.
    ///
    pub fun resolveView(_ view: Type): AnyStruct? {
        switch view {
            case Type<MetadataViews.NFTCollectionData>():
                return MetadataViews.NFTCollectionData(
                    storagePath: QuickNFT.CollectionStoragePath,
                    publicPath: QuickNFT.CollectionPublicPath,
                    providerPath: /private/QuickNFTCollection,
                    publicCollection: Type<&QuickNFT.Collection{QuickNFT.QuickNFTCollectionPublic}>(),
                    publicLinkedType: Type<&QuickNFT.Collection{QuickNFT.QuickNFTCollectionPublic,NonFungibleToken.CollectionPublic,NonFungibleToken.Receiver,MetadataViews.ResolverCollection}>(),
                    providerLinkedType: Type<&QuickNFT.Collection{QuickNFT.QuickNFTCollectionPublic,NonFungibleToken.CollectionPublic,NonFungibleToken.Provider,MetadataViews.ResolverCollection}>(),
                    createEmptyCollectionFunction: (fun (): @NonFungibleToken.Collection {
                        return <-QuickNFT.createEmptyCollection()
                    })
                )
            case Type<MetadataViews.NFTCollectionDisplay>():
                let media = MetadataViews.Media(
                    file: MetadataViews.HTTPFile(
                        url: "https://assets.website-files.com/5f6294c0c7a8cdd643b1c820/5f6294c0c7a8cda55cb1c936_Flow_Wordmark.svg"
                    ),
                    mediaType: "image/svg+xml"
                )
                return MetadataViews.NFTCollectionDisplay(
                    name: "The Example Collection",
                    description: "This collection is used as an example to help you develop your next Flow NFT.",
                    externalURL: MetadataViews.ExternalURL("https://example-nft.onflow.org"),
                    squareImage: media,
                    bannerImage: media,
                    socials: {
                        "twitter": MetadataViews.ExternalURL("https://twitter.com/flow_blockchain")
                    }
                )
        }
        return nil
    }

    /// Function that returns all the Metadata Views implemented by a Non Fungible Token
    ///
    /// @return An array of Types defining the implemented views. This value will be used by
    ///         developers to know which parameter to pass to the resolveView() method.
    ///
    pub fun getViews(): [Type] {
        return [
            Type<MetadataViews.NFTCollectionData>(),
            Type<MetadataViews.NFTCollectionDisplay>()
        ]
    }

    init() {
        // Initialize the total supply
        self.totalSupply = 0

        // Set the named paths
        self.CollectionStoragePath = /storage/QuickNFTCollection
        self.CollectionPublicPath = /public/QuickNFTCollection

        // Create a Collection resource and save it to storage
        let collection <- create Collection()
        self.account.save(<-collection, to: self.CollectionStoragePath)

        // create a public capability for the collection
        self.account.link<&QuickNFT.Collection{NonFungibleToken.CollectionPublic, QuickNFT.QuickNFTCollectionPublic, MetadataViews.ResolverCollection}>(
            self.CollectionPublicPath,
            target: self.CollectionStoragePath
        )

        emit ContractInitialized()
    }
}
Let's explain the smart contract step by step.
Imports:
The code imports three interfaces: NonFungibleToken, ViewResolver, and MetadataViews. These interfaces provide functionalities needed for creating and managing non-fungible tokens (NFTs) on the Flow blockchain.
Since the Flow team has already deployed these interfaces on the testnet, we use their addresses to import these interfaces. Feel free to check the Non-Fungible Token Contract page to see NonFungibleToken address for each network.
When you want to deploy your smart contract to the mainnet, you should change the addresses accordingly.
#### Contract Declaration:
This code defines a contract named QuickNFT, which is used to create and manage NFTs. It declares that the contract implements the NonFungibleToken and ViewResolver interfaces.
Contract State:
-
totalSupply: A variable that tracks the total number of QuickNFTs in existence.
-
Events: The contract defines several events, such as
ContractInitialized,Withdraw, andDeposit, which can be emitted to record important contract actions.
Storage and Paths:
CollectionStoragePath and CollectionPublicPath are storage and public paths used for storing and accessing NFT collections and their metadata.
NFT Resource:
NFT resource represents an individual NFT with various properties like id, name, description, thumbnail, and metadata. NFTs are minted and managed using this resource.
Functions in NFT Resource:
-
getViews(): Returns an array of supported metadata views for an NFT.
-
resolveView(_ view: Type): Resolves a specific metadata view for an NFT. The functions create and return metadata views for different aspects of an NFT, such as its display, editions, external URL, collection data, and more.
QuickNFTCollectionPublic:
This is a resource interface defining methods for depositing, retrieving, and borrowing NFTs from a collection.
Collection Resource:
Collection resource represents a collection of NFTs owned by an account.
Functions like deposit, withdraw, getIDs, and borrowNFT are defined to manage NFTs within the collection.
The destroy() function is used to clean up the collection when it's no longer needed.
Creating Collections and Minting NFTs:
-
createEmptyCollection(): Creates an empty NFT collection.
-
mintNFT(...): Mints a new NFT and deposits it into a recipient's collection.
Metadata Views for the Contract:
The contract defines functions for resolving metadata views for the contract itself, such as resolveView and getViews. These views provide information about the contract and its collections.
Initialization:
In the init() function, the contract initializes its state, sets storage paths, creates a collection, and links it to a public path.
It emits a ContractInitialized event to indicate that the contract has been initialized.
Creating Scripts
Now, it is time to create scripts. Go to the ./cadence/scripts directory.
Then, create three files named GetIDsQuickNFT.cdc, TotalSupplyQuickNFT.cdc, and GetMetadataQuickNFT.cdc in it by running the commands below.
echo > GetIDsQuickNFT.cdc
echo > TotalSupplyQuickNFT.cdc
echo > GetMetadataQuickNFT.cdc
GetIDsQuickNFT
The GetIDsQuickNFT script aims to retrieve the IDs of NFTs associated with a given address, leveraging the MetadataViews resource and the capabilities provided by the Flow blockchain.
Open the GetIDsQuickNFT.cdc file with your code editor. Copy the code below and paste it into the file. The code explanation can be found immediately after the code.
import MetadataViews from 0x631e88ae7f1d7c20;

pub fun main(address: Address): [UInt64] {

  let account = getAccount(address)

  let collection = account
    .getCapability(/public/QuickNFTCollection)
    .borrow<&{MetadataViews.ResolverCollection}>()
    ?? panic("Could not borrow a reference to the collection")

  let IDs = collection.getIDs()
  return IDs;
}
Here is the code explanation:
-
The script imports an interface named
MetadataViewsfrom a specific address on the Flow blockchain. -
The contract defines a function called
mainthat takes anAddressas a parameter. -
Inside the
mainfunction, it uses the providedAddressto retrieve an account object associated with that address on the Flow blockchain. -
It then attempts to borrow a reference to a collection of NFTs associated with the account. This collection is expected to support the
MetadataViews.ResolverCollectioninterface. -
If the attempt to borrow a reference to the collection fails, it will trigger a panic with the message "Could not borrow a reference to the collection".
-
Assuming the reference is successfully borrowed, the function then calls the
getIDs()method on the collection to retrieve an array of UInt64 values representing the IDs of the NFTs in the collection. -
Finally, the function returns this array of NFT IDs.
TotalSupplyQuickNFT
The TotalSupplyQuickNFT script imports the smart contract of QuickNFT and returns the total supply of QuickNFT.
Open the TotalSupplyQuickNFT.cdc file with your code editor. Copy the code below and paste it into the file.
Replace DEPLOYER_ACCOUNT_ADDRESS with the account address that you created in the Creating a Flow Wallet section.
import QuickNFT from DEPLOYER_ACCOUNT_ADDRESS

pub fun main(): UInt64 {
    return QuickNFT.totalSupply;
}
GetMetadataQuickNFT
The GetMetadataQuickNFT script provides a way to fetch detailed information about a specific NFT owned by a given address, leveraging the MetadataViews interface and the capabilities provided by the Flow blockchain.
Open the GetMetadataQuickNFT.cdc file with your code editor. Copy the code below and paste it into the file. The code explanation can be found immediately after the code.
import MetadataViews from 0x631e88ae7f1d7c20;

pub fun main(address: Address, id: UInt64): NFTResult {

  let account = getAccount(address)

  let collection = account
      .getCapability(/public/QuickNFTCollection)
      .borrow<&{MetadataViews.ResolverCollection}>()
      ?? panic("Could not borrow a reference to the collection")

  let nft = collection.borrowViewResolver(id: id)

  var data = NFTResult()

  // Get the basic display information for this NFT
  if let view = nft.resolveView(Type<MetadataViews.Display>()) {
    let display = view as! MetadataViews.Display

    data.name = display.name
    data.description = display.description
    data.thumbnail = display.thumbnail.uri()
  }

  // The owner is stored directly on the NFT object
  let owner: Address = nft.owner!.address

  data.owner = owner
  data.id = id

  return data
}

pub struct NFTResult {
  pub(set) var name: String
  pub(set) var description: String
  pub(set) var thumbnail: String
  pub(set) var owner: Address
  pub(set) var id: UInt64

  init() {
    self.name = ""
    self.description = ""
    self.thumbnail = ""
    self.owner = 0x0
    self.id = 0
  }
}
Here is the code explanation:
-
The script starts by importing a resource named
MetadataViewsfrom a specific address on the Flow blockchain. -
The
mainfunction takes two parameters: anAddressrepresenting the owner's address and aUInt64 ID, which identifies the NFT of interest. -
Inside the
mainfunction, it retrieves the account associated with the provided address on the Flow blockchain. -
It then attempts to borrow a reference to a collection of NFTs associated with the account. This collection is expected to support the
MetadataViews.ResolverCollectioninterface. If the borrowing attempt fails, it triggers a panic with the message "Could not borrow a reference to the collection." -
After successfully borrowing a reference to the collection, the function calls
borrowViewResolveron the collection to retrieve a reference to the specific NFT identified by the given ID. -
The function initializes a variable named
dataof typeNFTResultto store information about the NFT. -
It begins by retrieving the basic display information for the NFT. If the NFT supports the
MetadataViews.Displayview, it extracts the name, description, and thumbnail URI from the view and stores them in the data struct. -
Finally, the function populates the
datastruct with the owner's address, NFT ID, and other details before returning it as the result. -
The script also defines an
NFTResultstruct, which includes the information about the NFT to be returned. It includes fields for the name, description, thumbnail URI, owner's address, and the NFT's ID.
Creating Transactions
Go to the ./cadence/transactions directory.
Then, create two files named SetUpAccount.cdc and MintNFT.cdc in it by running the commands below.
echo > SetUpAccount.cdc
echo > MintNFT.cdc
SetUpAccount
This file is a Flow blockchain transaction that is designed to create a new empty collection of QuickNFT on the user's account to be able to mint a QuickNFT.
Open the SetUpAccount.cdc file with your code editor. Copy the code below and paste it into the file. The code explanation can be found immediately after the code.
Replace DEPLOYER_ACCOUNT_ADDRESS with the account address that you created in the Creating a Flow Wallet section.
This transaction file needs to import the QuickNFT smart contract from your account address. You already created your account, and you have your account address. However, we haven't covered the deployment topic yet, and your QuickNFT smart contract is not deployed on the testnet yet.
Since the QuickNFT smart contract will be deployed on your account, it will work as intended.
import NonFungibleToken from 0x631e88ae7f1d7c20
import MetadataViews from 0x631e88ae7f1d7c20
import QuickNFT from DEPLOYER_ACCOUNT_ADDRESS

transaction {

    prepare(signer: AuthAccount) {
        // Return early if the account already has a collection
        if signer.borrow<&QuickNFT.Collection>(from: QuickNFT.CollectionStoragePath) != nil {
            return
        }

        // Create a new empty collection
        let collection <- QuickNFT.createEmptyCollection()

        // Save it to the account
        signer.save(<-collection, to: QuickNFT.CollectionStoragePath)

        // Create a public capability for the collection
        signer.link<&{NonFungibleToken.CollectionPublic, QuickNFT.QuickNFTCollectionPublic, MetadataViews.ResolverCollection}>(
            QuickNFT.CollectionPublicPath,
            target: QuickNFT.CollectionStoragePath
        )
    }
}
Here is the code explanation:
-
It imports two interfaces,
NonFungibleToken, andMetadataViews, and the smart contract that we built,QuickNFT. -
The transaction is defined within a
transactionblock, indicating that it contains both aprepareand anexecutephase. -
In the
preparephase, which is executed before the transaction is committed, the contract performs the following actions:-
It checks if the account (represented by
signer) already has a collection of NFTs. If it does, the transaction returns early, indicating that no further setup is required. -
If the account doesn't have a collection, it creates a new empty collection of NFTs using the
QuickNFT.createEmptyCollection()function. -
The newly created collection is then saved to the account using
signer.save(). -
It also creates a public capability for the collection, enabling others to interact with it.
-
MintNFT
This file is a Flow blockchain transaction designed to mint a new QuickNFT and deposit it into the collection of a specified recipient.
Open the MintNFT.cdc file with your code editor. Copy the code below and paste it into the file. The code explanation can be found immediately after the code.
Replace DEPLOYER_ACCOUNT_ADDRESS with the account address that you created in the Creating a Flow Wallet section.
import NonFungibleToken from 0x631e88ae7f1d7c20
import MetadataViews from 0x631e88ae7f1d7c20
import QuickNFT from DEPLOYER_ACCOUNT_ADDRESS

transaction(
    recipient: Address,
    name: String,
    description: String,
    thumbnail: String,
) {

    /// Reference to the receiver's collection
    let recipientCollectionRef: &{NonFungibleToken.CollectionPublic}

    /// Previous NFT ID before the transaction executes
    let mintingIDBefore: UInt64

    prepare(signer: AuthAccount) {
        self.mintingIDBefore = QuickNFT.totalSupply

        // Borrow the recipient's public NFT collection reference
        self.recipientCollectionRef = getAccount(recipient)
            .getCapability(QuickNFT.CollectionPublicPath)
            .borrow<&{NonFungibleToken.CollectionPublic}>()
            ?? panic("Could not get receiver reference to the NFT Collection")
    }

    execute {

        // Mint the NFT and deposit it to the recipient's collection
        QuickNFT.mintNFT(
            recipient: self.recipientCollectionRef,
            name: name,
            description: description,
            thumbnail: thumbnail,
        )
    }

    post {
        self.recipientCollectionRef.getIDs().contains(self.mintingIDBefore): "The next NFT ID should have been minted and delivered"
        QuickNFT.totalSupply == self.mintingIDBefore + 1: "The total supply should have been increased by 1"
    }
}
Here is the code explanation:
-
It imports two interfaces,
NonFungibleToken, andMetadataViews, and the smart contract that we built,QuickNFT. -
It defines a transaction that takes several parameters, including the recipient (the address of the NFT recipient), name, description, and thumbnail.
-
Within the transaction, there are three main parts:
prepare,execute, andpost. -
In the
preparephase (executed before the transaction is confirmed), the contract performs the following tasks:-
It stores the current total supply of NFTs in the
mintingIDBeforevariable, which represents the NFT ID before the transaction executes. -
It attempts to borrow a reference to the recipient's public NFT collection using the recipient's address.
-
If borrowing the collection reference fails, it triggers a panic, indicating that it could not retrieve the reference.
-
-
In the
executephase (executed when the transaction is confirmed), the contract mints a new NFT using theQuickNFT.mintNFTfunction. This function deposits the newly minted NFT into the recipient's collection and includes the provided metadata (name, description, and thumbnail). -
In the
postphase (executed after theexecutephase), the contract verifies two conditions:-
It checks if the NFT ID has been incremented by one (indicating that a new NFT has been minted and delivered to the recipient).
-
It ensures that the total supply of NFTs has increased by one.
-
Now, all smart contract related files are completed.
Preparing for Deployment
As you remember, we explained the flow.json file and its properties. Now, it's time to update the file to define all contracts that will be used in the project.
Open the flow.json file. We will make some changes.
First, modify the contracts object like the one below. If you use a different contract name, please change it accordingly.
"contracts": {
    "QuickNFT": "cadence/contracts/QuickNFT.cdc"
  }
Then, modify the deployments object like the one below. It basically says, "Deploy QuickNFT contract by testnet-account on testnet".
"deployments": {
    "testnet": {
      "testnet-account": ["QuickNFT"]
    }
  }
If your configuration file doesn't have deployments object so far, you can add it after other objects such as accounts. Feel free to check the final version of the file below.
There is no need to modify networks and accounts objects in this guide. But, if you want to use your custom Quicknode endpoint instead of public endpoints, you should modify the networks object.
To sum up, the final version of the flow.json file should be like the one below. Of course, your address in testnet-account will be different.
{
  "contracts": {
    "QuickNFT": "cadence/contracts/QuickNFT.cdc"
  },
  "networks": {
    "emulator": "127.0.0.1:3569",
    "mainnet": "access.mainnet.nodes.onflow.org:9000",
    "testnet": "access.devnet.nodes.onflow.org:9000"
  },
  "accounts": {
    "emulator-account": {
      "address": "f8d6e0586b0a20c7",
      "key": {
        "type": "file",
        "location": "./emulator.key"
      }
    },
    "testnet-account": {
      "address": "bcc2fbf2808c44b6",
      "key": {
        "type": "file",
        "location": "testnet-account.pkey"
      }
    }
  },
  "deployments": {
    "testnet": {
      "testnet-account": ["QuickNFT"]
    }
  }
}
Thanks to the scaffold feature, all necessary files and folders to build a simple decentralized application were created at the beginning. Now, it's time to deploy the smart contract to the testnet and run the dApp at once.
Be sure that your terminal points to the project's main directory.
First, run the command.
npm install
Then, run the following command. This command deploys the smart contract to the testnet and runs the web application locally.
Note that it continues to run the project locally until you end the command. We won't end the command to instantly see the effect of the updates we make.
npm run dev:testnet:deploy
The console output should be similar to the one below.
> fcl-next-scaffold@0.3.1 dev:testnet:deploy
> flow project deploy --network=testnet --update && cross-env NEXT_PUBLIC_FLOW_NETWORK=testnet next dev


Deploying 1 contracts for accounts: testnet-account

QuickNFT -> 0xbcc2fbf2808c44b6 (1976e0c6fcfba3349a258073dc8b2c626175c3c8ee761c51d300bd66abab7086)

🎉 All contracts deployed successfully


ready - started server on 0.0.0.0:3000, url: http://localhost:3000
event - compiled client and server successfully in 227 ms (198 modules)
You can check your account balance, smart contracts, and transactions on the Flow block explorer.
- Go to the Flow Testnet Explorer
- Paste your account address (0x...) into the form
- Click Explore button
Now, open http://localhost:3000 with your browser. The website should look like the one below.
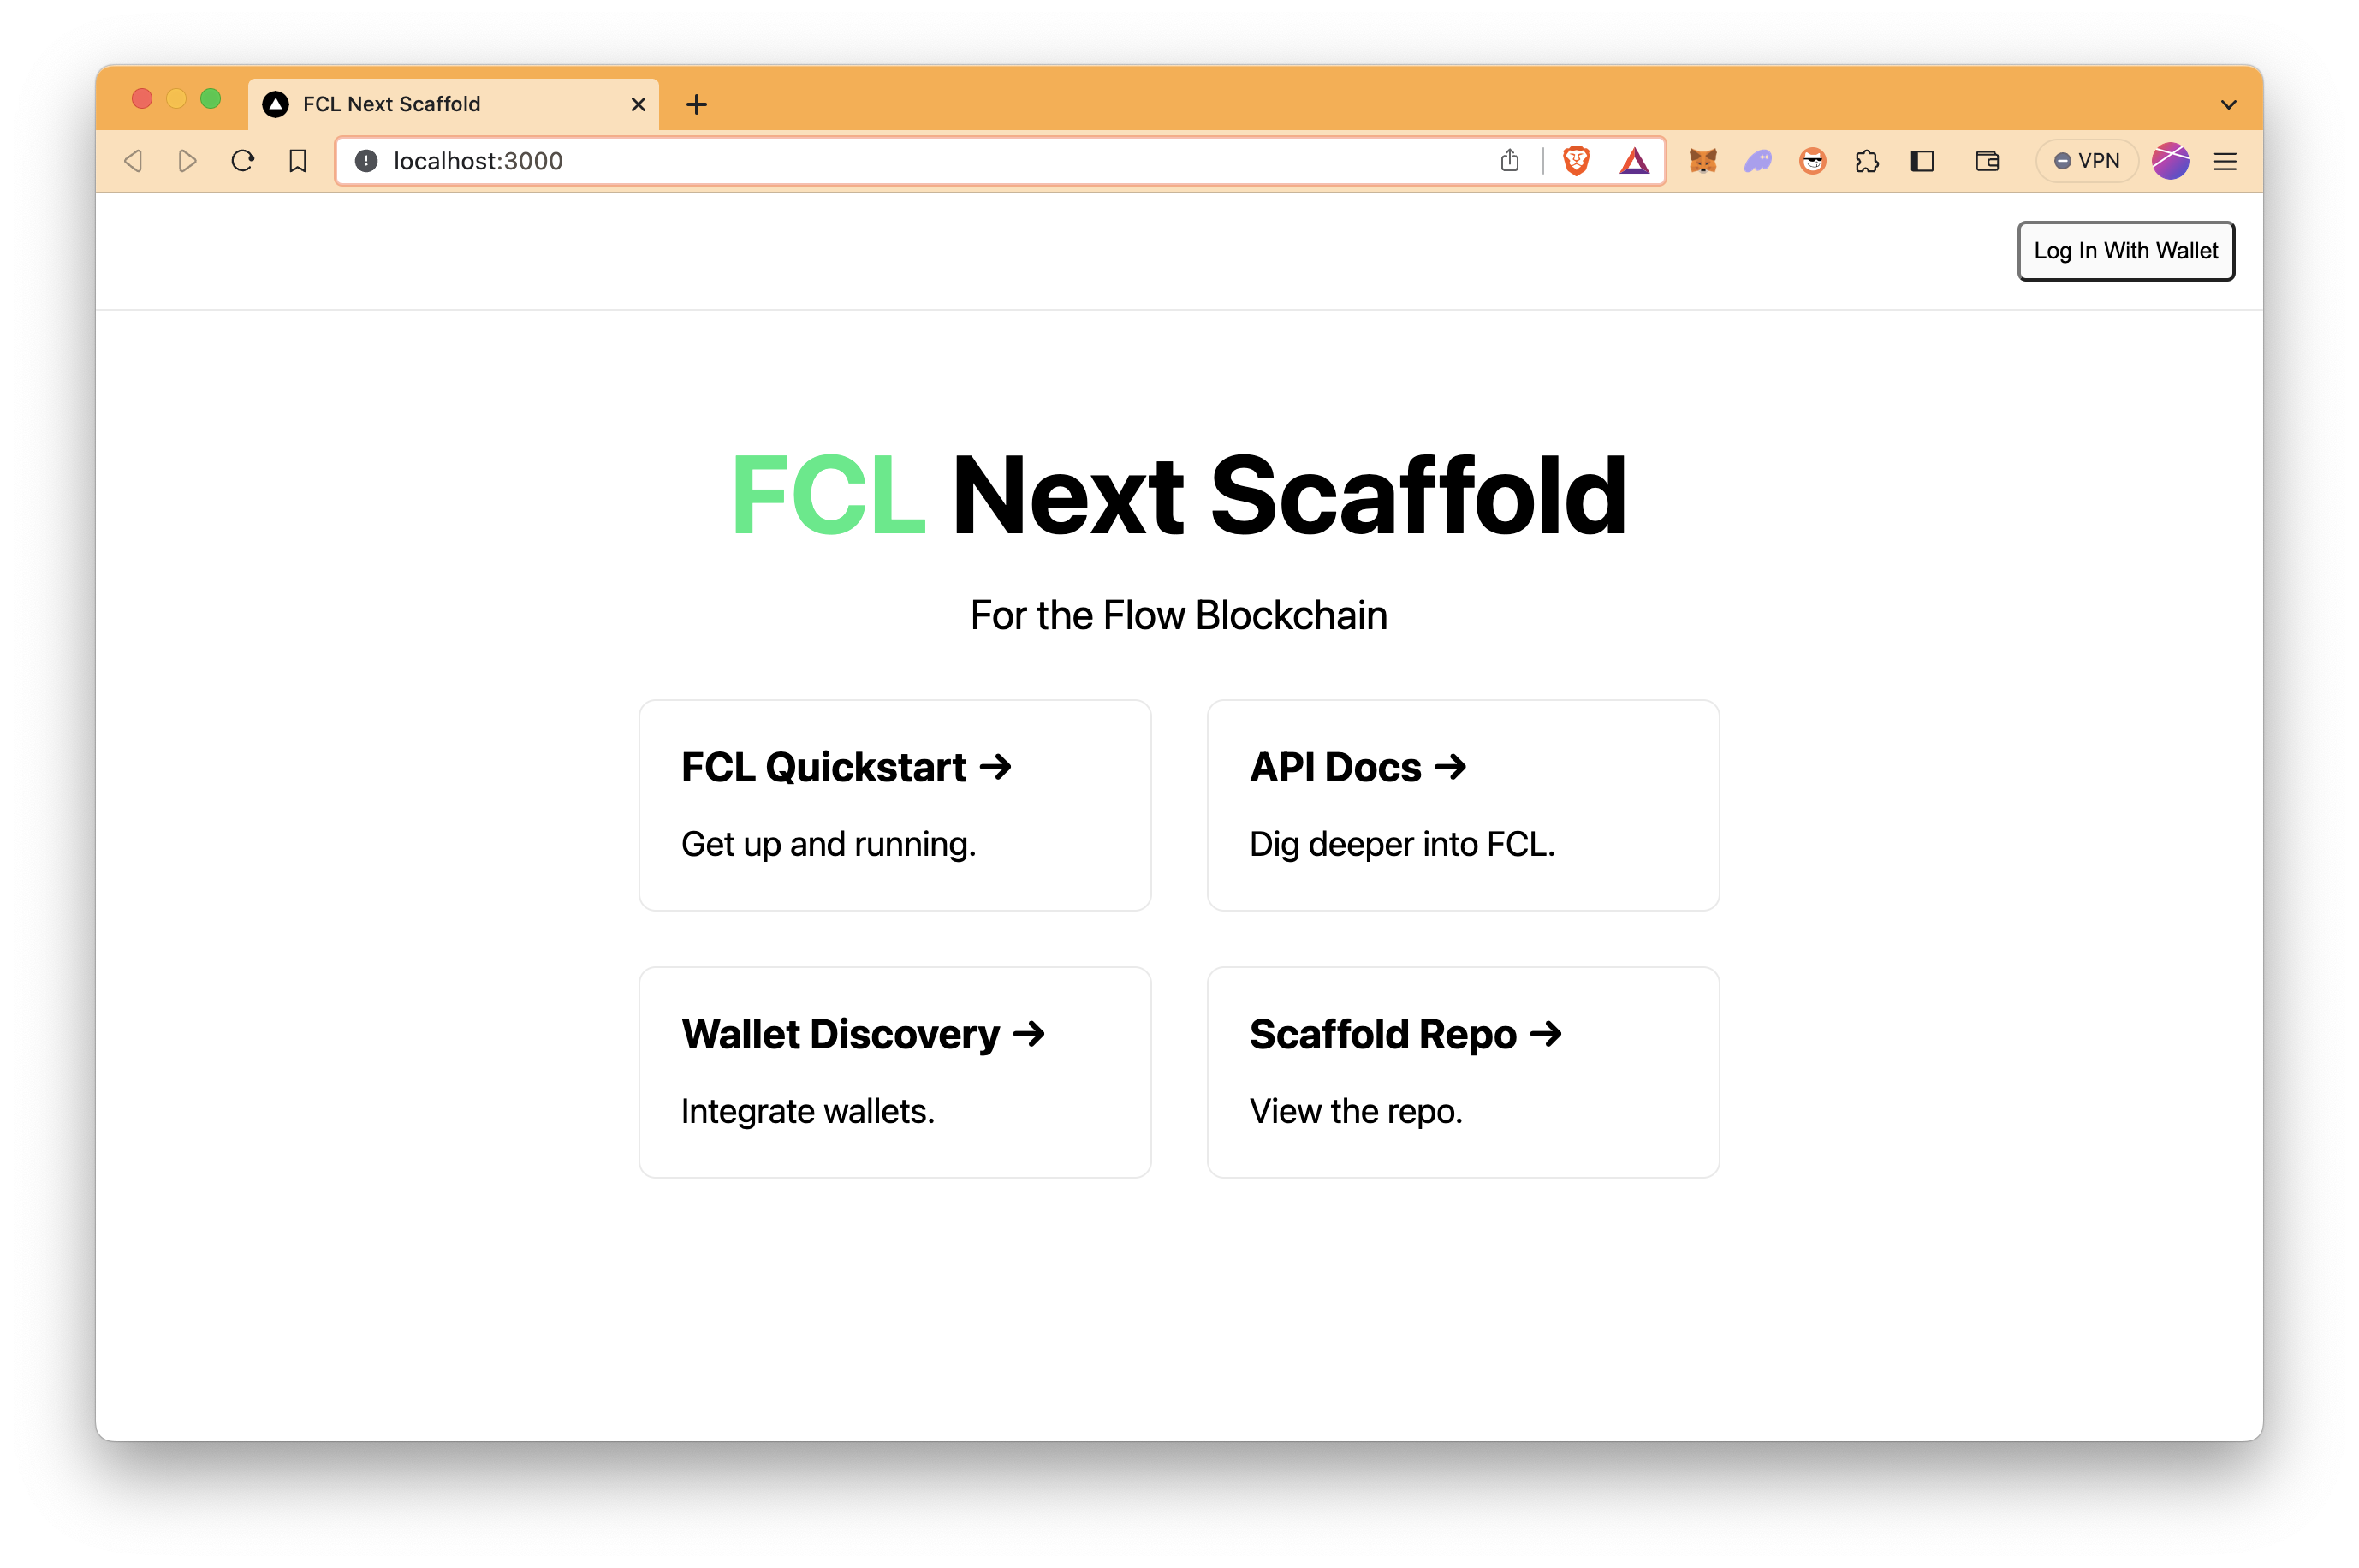
As you may notice, we haven't done anything for the web application yet. However, due to the scaffold that we selected ([5] FCL Web Dapp), the base web application is ready.
Now, let's jump into the frontend and modify the app to make it an NFT collection dapp.
Building a Frontend
As Next.js is used in the development of the application, our components are already in the components folder, styling-related files are in the styles folder, and the homepage's file is located in the ./pages/index.tsx. Our modifications will be in these folders.
Homepage
Open the ./pages/index.tsx to modify the homepage.
Replace the code below with the existing code. See the comments in the code for details.
In summary, this file represents a homepage that displays information about the "QuickNFT Collection" on the Flow blockchain. It includes conditional rendering based on user authentication status and sets metadata for the page.
// Import necessary modules and components
import Head from "next/head";
import styles from "../styles/Home.module.css";
import Links from "../components/Links";
import Container from "../components/Container";
import useCurrentUser from "../hooks/useCurrentUser";

export default function Home() {
  // Use the useCurrentUser hook to check if a user is logged in
  const { loggedIn } = useCurrentUser();

  // Return the JSX structure for the web page
  return (
    <div className={styles.container}>
      <Head>
        <title>QuickNFT on Flow</title>
        <meta name="description" content="QuickNFT Collection" />
        <link rel="icon" href="/favicon.ico" />
      </Head>

      {/* Main content section */}
      <main className={styles.main}>
        <h1 className={styles.title}>QuickNFT Collection</h1>

        <p className={styles.description}>For the Flow Blockchain</p>

        {/* Render the Container component conditionally if the user is logged in */}
        {loggedIn && <Container />}

        {/* Render the Links component */}
        <Links />
      </main>
    </div>
  );
}
Container Component
The Container component is a React component responsible for managing various aspects of the NFT collection application. It includes functions to fetch a user's owned NFTs from the blockchain, mint new NFTs with randomized metadata, and set up an account to receive NFTs. Additionally, it displays the user's total minted NFT count, provides transaction links for users to monitor their actions on the blockchain, and visually presents the user's NFT collection with thumbnails and descriptions.
Metadata for NFTs is defined as
nftMetadatain the code. If you want to change their metadata, such as thumbnails, feel free to editnftMetadata. Check our guide if you are interested in storing your thumbnails with IPFS.
Open the ./components/Container.tsx to modify the Container component.
Replace the code below with the existing code. See the comments in the code for details.
As you may notice, the scripts and transactions that are defined in the previous section are used in this component.
// Import necessary modules and components
import * as fcl from "@onflow/fcl"; // Flow Client Library for interacting with the blockchain
import * as types from "@onflow/types"; // Flow types for argument types
import useCurrentUser from "../hooks/useCurrentUser"; // Custom hook for user authentication
import { useEffect, useState } from "react"; // React hooks for managing state
import TotalSupplyQuickNFT from "../cadence/scripts/TotalSupplyQuickNFT.cdc"; // Cadence script to get total NFT supply
import GetMetadataQuickNFT from "../cadence/scripts/GetMetadataQuickNFT.cdc"; // Cadence script to get NFT metadata
import GetIDsQuickNFT from "../cadence/scripts/GetIDsQuickNFT.cdc"; // Cadence script to get NFT IDs
import SetUpAccount from "../cadence/transactions/SetUpAccount.cdc"; // Cadence transaction to set up a user account
import MintNFT from "../cadence/transactions/MintNFT.cdc"; // Cadence transaction to mint an NFT
import elementStyles from "../styles/Elements.module.css"; // CSS styles for elements
import containerStyles from "../styles/Container.module.css"; // CSS styles for containers
import useConfig from "../hooks/useConfig"; // Custom hook for configuration
import { createExplorerTransactionLink } from "../helpers/links"; // Helper function to create transaction links

// Function to generate a random integer between 0 and 2
function randomInteger0To2(): number {
  return Math.floor(Math.random() * 3);
}

// Define the Container component as the default export
export default function Container() {
  // State variables to store data and transaction information
  const [totalSupply, setTotalSupply] = useState(0);
  const [datas, setDatas] = useState([]);
  const [txMessage, setTxMessage] = useState("");
  const [txLink, setTxLink] = useState("");

  // Custom hook to get network configuration
  const { network } = useConfig();

  // Custom hook to get user authentication status
  const user = useCurrentUser();

  // Function to query the blockchain for total NFT supply
  const queryChain = async () => {
    const res = await fcl.query({
      cadence: TotalSupplyQuickNFT,
    });

    setTotalSupply(res);
  };

  // Function to handle the setup of a user account to receive NFTs
  const mutateSetUpAccount = async (event) => {
    event.preventDefault();

    // Reset transaction-related states
    setTxLink("");
    setTxMessage("");

    // Execute the setUpAccount transaction on the blockchain
    const transactionId = await fcl.mutate({
      cadence: SetUpAccount,
    });

    // Generate a transaction link for the user to check the transaction status
    const txLink = createExplorerTransactionLink({ network, transactionId });

    // Update transaction-related states to inform the user
    setTxLink(txLink);
    setTxMessage("Check your setup transaction.");
  };

  // Function to handle the minting of a new NFT
  const mutateMintNFT = async (event) => {
    event.preventDefault();

    // Reset transaction-related states
    setTxLink("");
    setTxMessage("");

    // Generate a random integer to select NFT metadata
    const rand: number = randomInteger0To2();

    // Define an array of predefined NFT metadata
    const nftMetadata = [
      {
        name: "Quick NFT",
        description: "Original QNFT",
        thumbnail: "ipfs://QmYXV94RimuC3ubtyEHptTHLbh86cSRNtPuscfXmJ9jmmc",
      },
      {
        name: "Quick NFT",
        description: "Grainy QNFT",
        thumbnail: "ipfs://QmYRvjpozSu8JE1jfnWDYXyT8VWVVYqsDUjuUwXwzPLwdq",
      },
      {
        name: "Quick NFT",
        description: "Faded QNFT",
        thumbnail: "ipfs://QmSiswWjzwPwyW1eJvHQfd9E98DjHXovWXTggYdbFKKv8J",
      },
    ];

    // Execute the mintNFT transaction on the blockchain
    const transactionId = await fcl.mutate({
      cadence: MintNFT,
      args: (arg, t) => [
        arg(user.addr, types.Address),
        arg(nftMetadata[rand].name, types.String),
        arg(nftMetadata[rand].description, types.String),
        arg(nftMetadata[rand].thumbnail, types.String),
      ],
    });

    // Generate a transaction link for the user to check the transaction status
    const txLink = createExplorerTransactionLink({
      network,
      transactionId,
    });

    // Update transaction-related states to inform the user
    setTxLink(txLink);
    setTxMessage("Check your NFT minting transaction.");

    // Fetch the updated list of user's NFTs
    await fetchNFTs();
  };

  // Function to fetch the user's NFTs
  const fetchNFTs = async () => {
    // Reset the datas state to an empty array
    setDatas([]);
    // Initialize an array to store NFT IDs
    let IDs = [];

    try {
      // Query the blockchain to get the IDs of the user's owned NFTs
      IDs = await fcl.query({
        cadence: GetIDsQuickNFT,
        args: (arg, t) => [arg(user.addr, types.Address)],
      });
    } catch (err) {
      console.log("No NFTs Owned");
    }

    // Initialize an array to store NFT metadata
    let _src = [];

    try {
      // Iterate through each NFT ID and fetch metadata from the blockchain
      for (let i = 0; i < IDs.length; i++) {
        const result = await fcl.query({
          cadence: GetMetadataQuickNFT,
          args: (arg, t) => [
            arg(user.addr, types.Address),
            arg(IDs[i].toString(), types.UInt64),
          ],
        });

        // Handle cases where the thumbnail URL is an IPFS URL
        let imageSrc = result["thumbnail"];
        if (result["thumbnail"].startsWith("ipfs://")) {
          imageSrc =
            "https://quicknode.myfilebase.com/ipfs/" + imageSrc.substring(7);
        }

        // Add NFT metadata to the _src array
        _src.push({
          imageUrl: imageSrc,
          description: result["description"],
          id: result["id"],
        });
      }

      // Update the datas state with the fetched NFT metadata
      setDatas(_src);
    } catch (err) {
      console.log(err);
    }
  };

  // Effect hook to fetch user's NFTs when the user is authenticated
  useEffect(() => {
    if (user && user.addr) {
      fetchNFTs();
    }
  }, [user]);

  return (
    <div className={containerStyles.container}>
      <div>
        <button onClick={queryChain} className={elementStyles.button}>
          Query Total Supply
        </button>
        <h4>Total Minted NFT: {totalSupply}</h4>
      </div>
      <hr />
      <div>
        <h2>Mint Your NFT</h2>
        <div>
          <button onClick={mutateSetUpAccount} className={elementStyles.button}>
            Set Up Account
          </button>

          <button onClick={mutateMintNFT} className={elementStyles.button}>
            Mint NFT
          </button>
        </div>
        <div>
          {txMessage && (
            <div className={elementStyles.link}>
              <a href={txLink} target="_blank" rel="noopener noreferrer">
                {txMessage}
              </a>
            </div>
          )}
        </div>
      </div>
      <hr />
      <div>
        <h2>Your NFTs</h2>
        <div className={containerStyles.nftcontainer}>
          {datas.map((item, index) => (
            <div className={containerStyles.nft} key={index}>
              <img src={item.imageUrl} alt={"NFT Thumbnail"} />
              <p>{`${item.description} #${item.id}`}</p>
            </div>
          ))}
        </div>
      </div>
    </div>
  );
}
Container Styling
The Container.module.css file is for CSS styles for containers. We want to modify this file to display NFTs owned by the connected account in a gallery view.
Open the ./styles/Container.module.css.
Replace the code below with the existing code. See the comments in the code for details.
.container {
  text-align: center;
  padding: 20px 0 50px 0;
}

.nftcontainer {
  display: flex;
  flex-wrap: wrap;
  justify-content: space-between;
  margin: -10px;
  /* Negative margin to offset the padding on child items */
}

/* Style each NFT item */
.nft {
  width: calc(20% - 20px);
  /* Adjust the width as needed for your layout */
  margin: 10px;
  padding: 10px;
  border: 1px solid #ddd;
  text-align: center;
}

.nft img {
  max-width: 100%;
  height: auto;
}

.nft p {
  margin-top: 10px;
}
Minting NFTs on Frontend
Now, let's try minting NFTs.
Go to the application on your browser again (http://localhost:3000).
Click Log In With Wallet and select your Flow wallet. In the case of using Lilico, after setting your wallet, you should create your Flow account with your public key here. In this guide, we use Blocto for ease of use since it only needs an e-mail address to create an account.
After you connect your wallet to the website, it should be seen like the below.
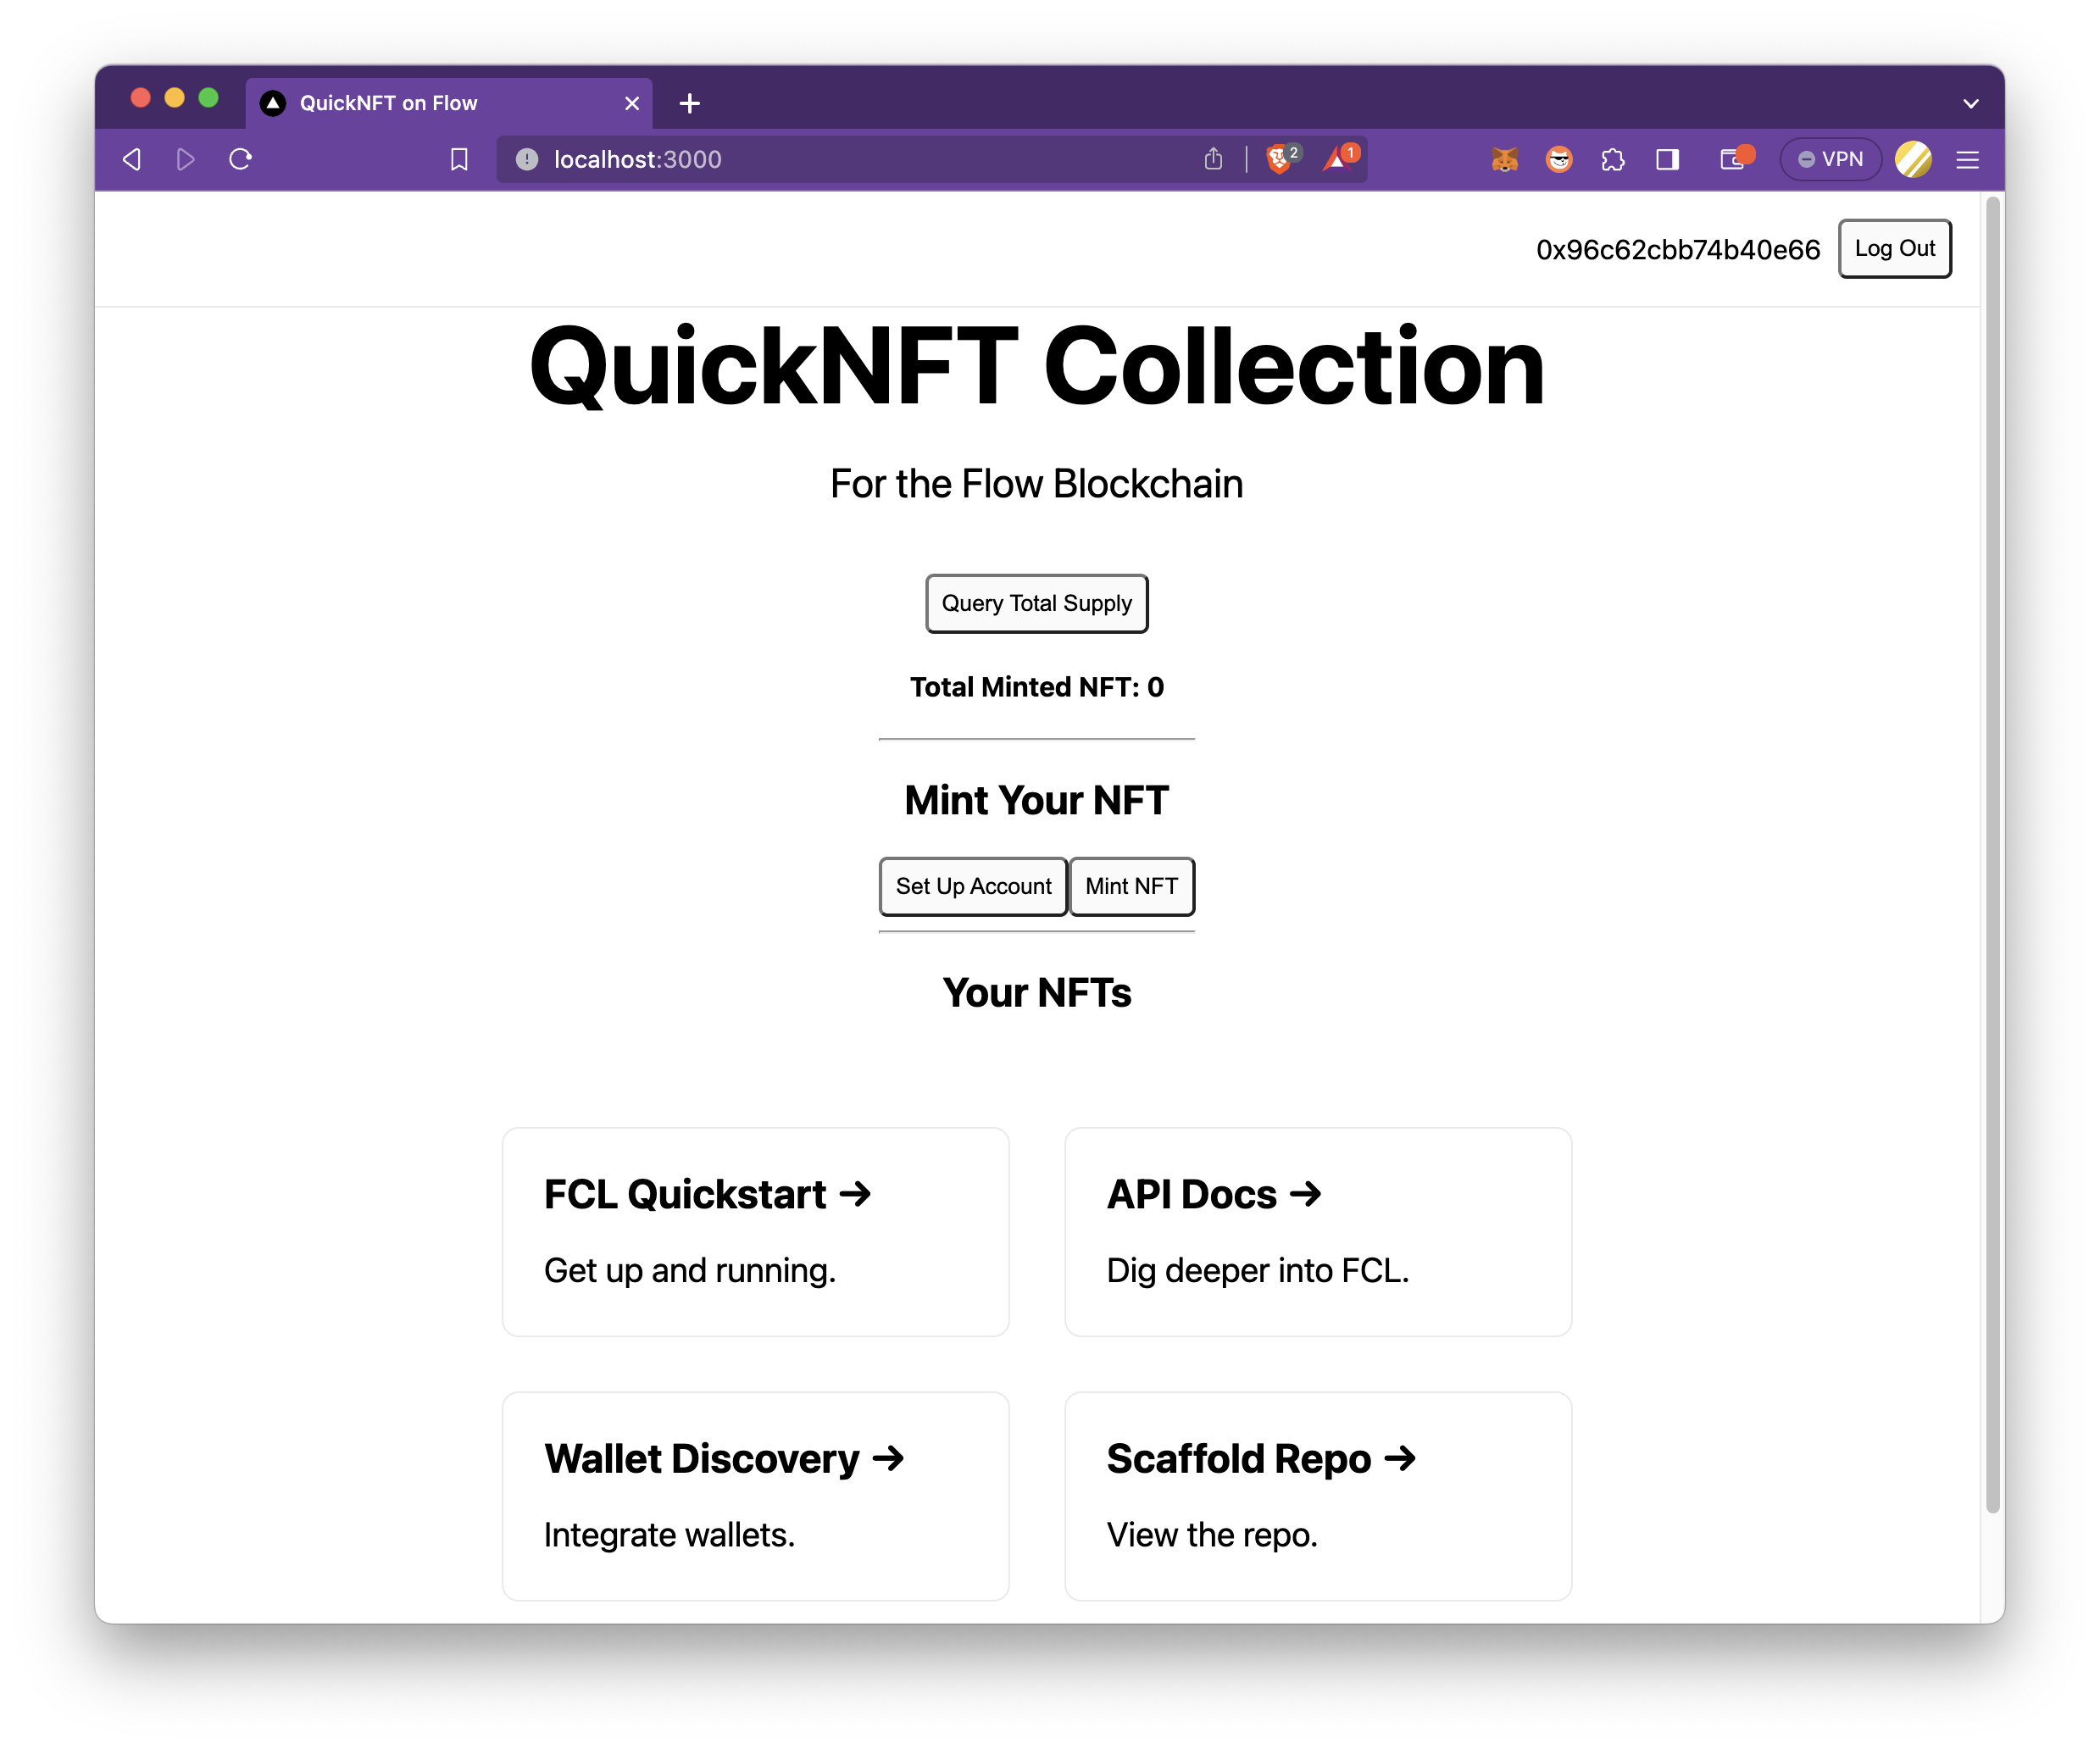
Firstly, as we mentioned during the smart contract development, users should set up their accounts to be able to mint NFTs.
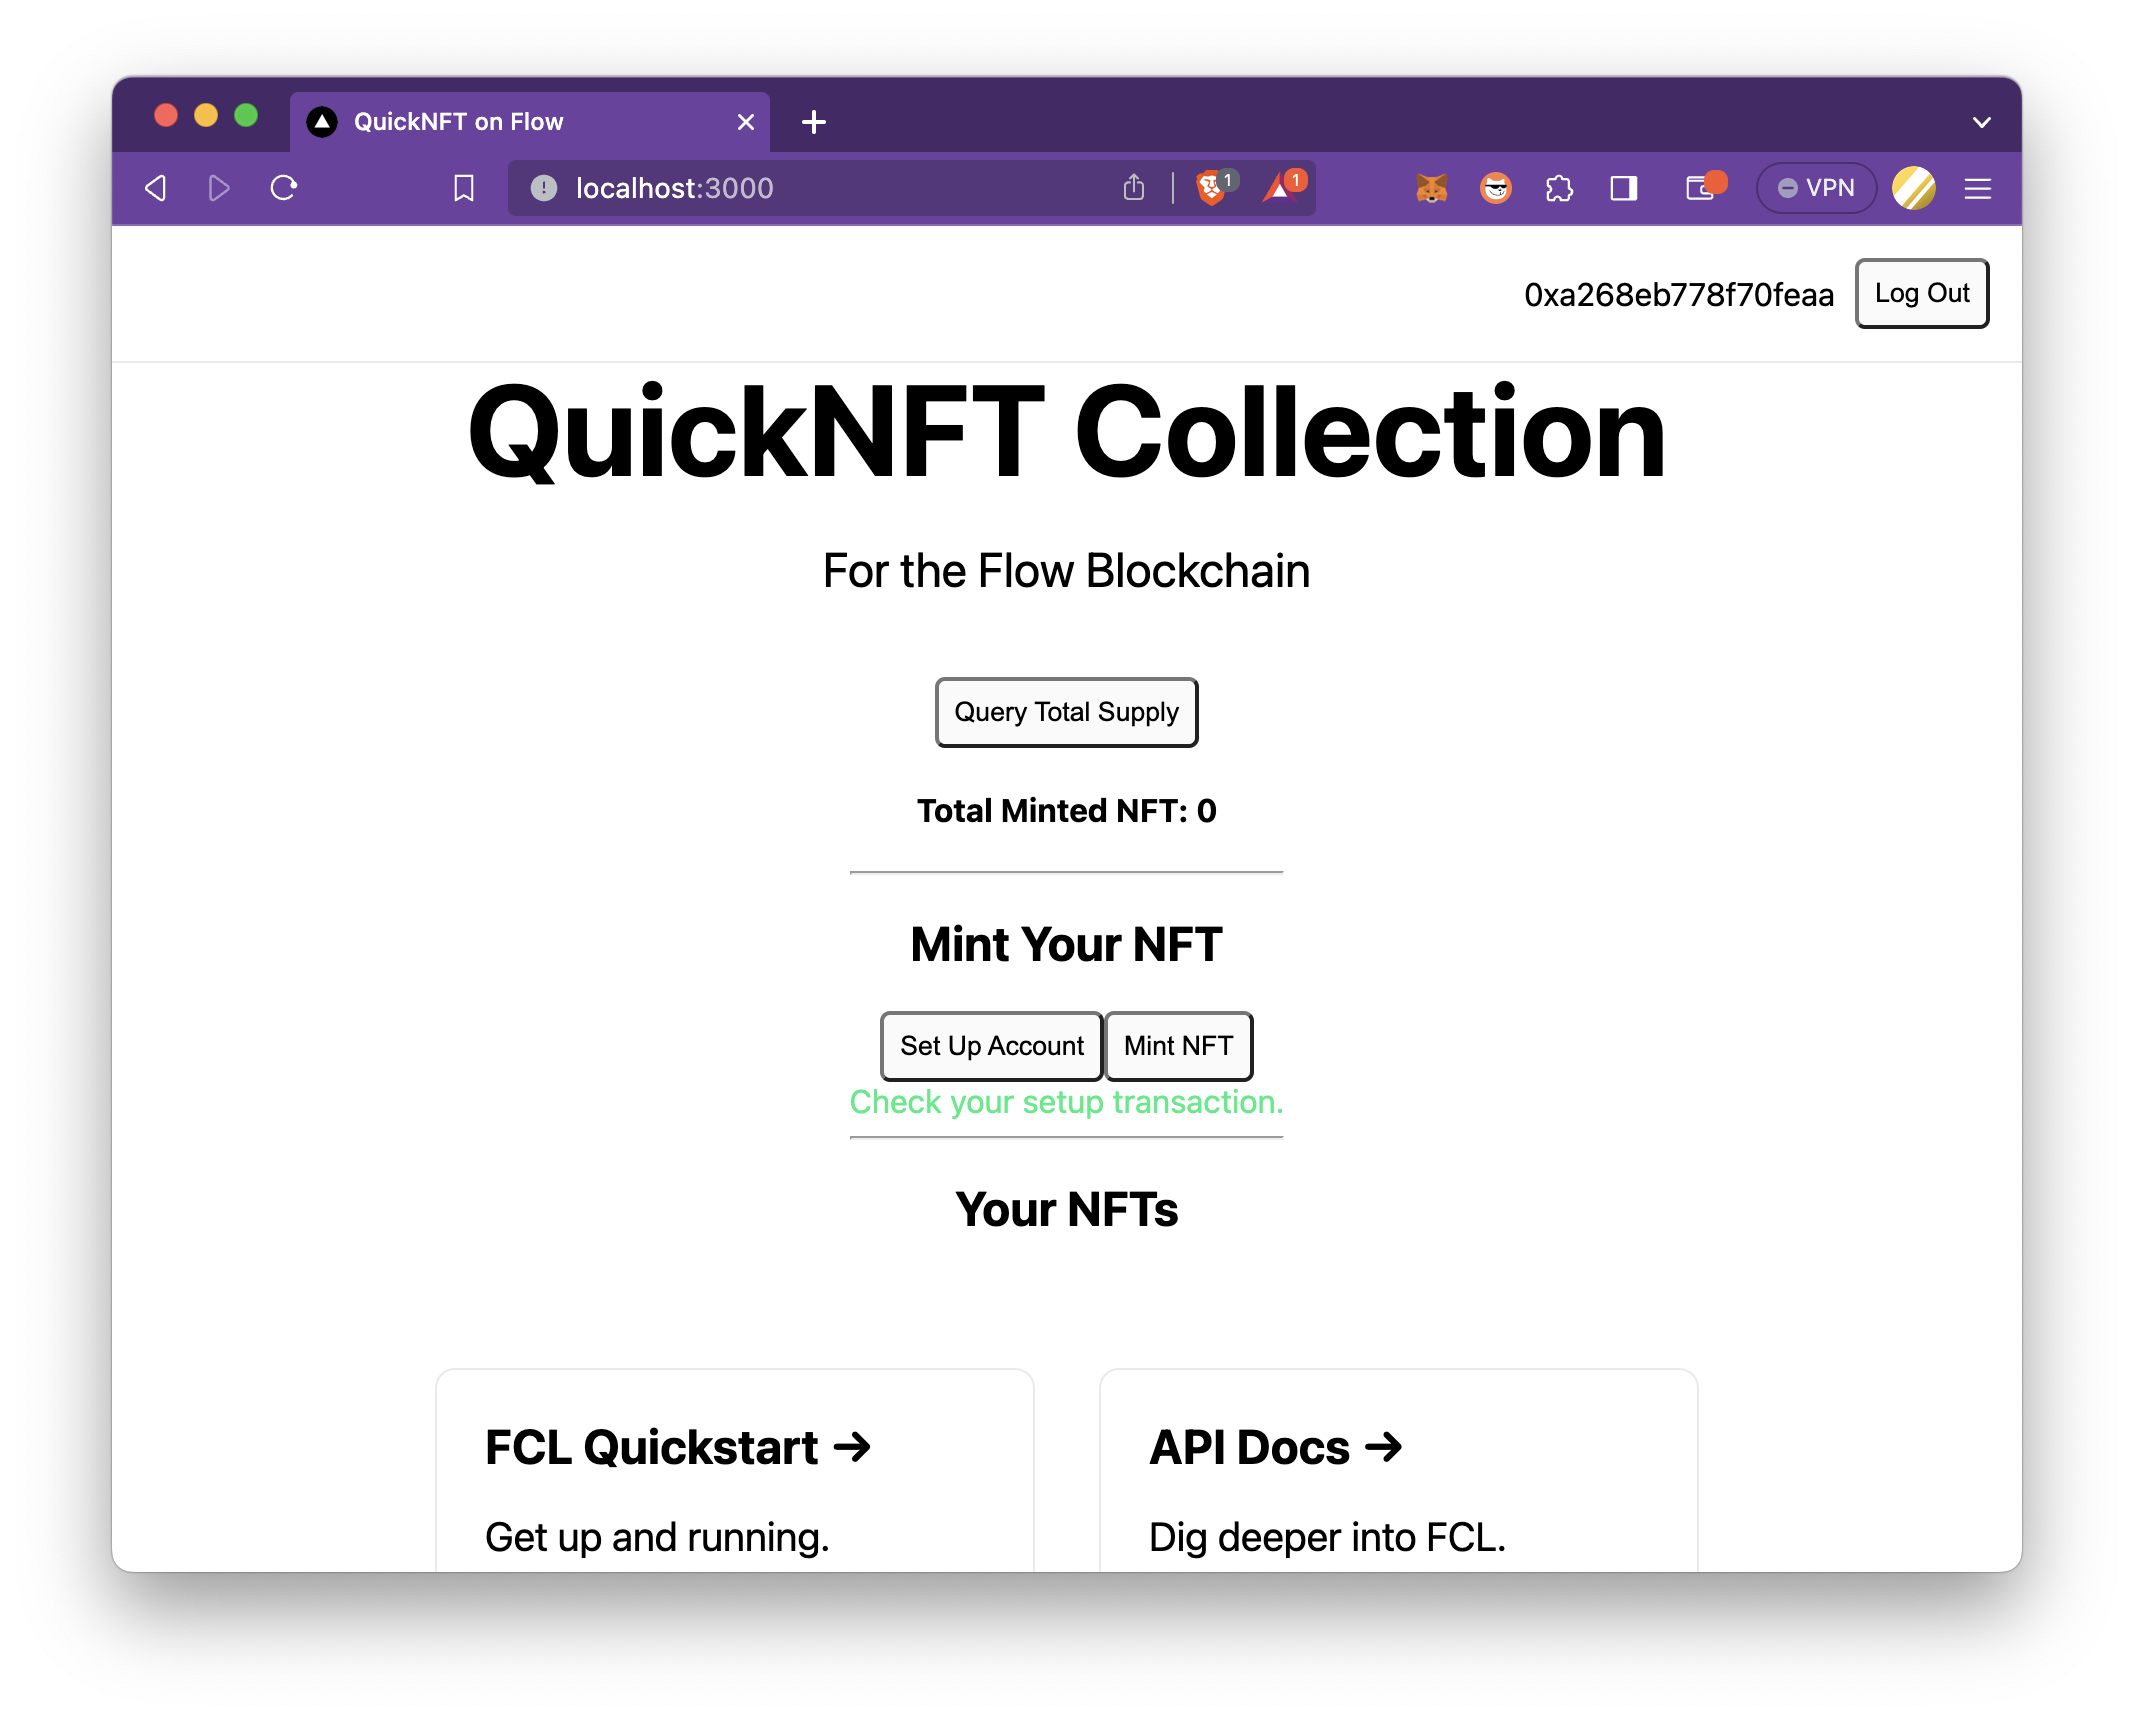
Click Set Up Account, and it pops out a Confirm Transaction page. Then, click Approve. After the transaction is sent to the blockchain, you can check your transaction by clicking the Check your setup transaction message.
Then, click Mint NFT and approve the transaction. If everything goes as expected, your NFT should be displayed under the Your NFTs section.
Also, if you click Query Total Supply, the total minted NFT amount for the collection is fetched from the blockchain and displayed.
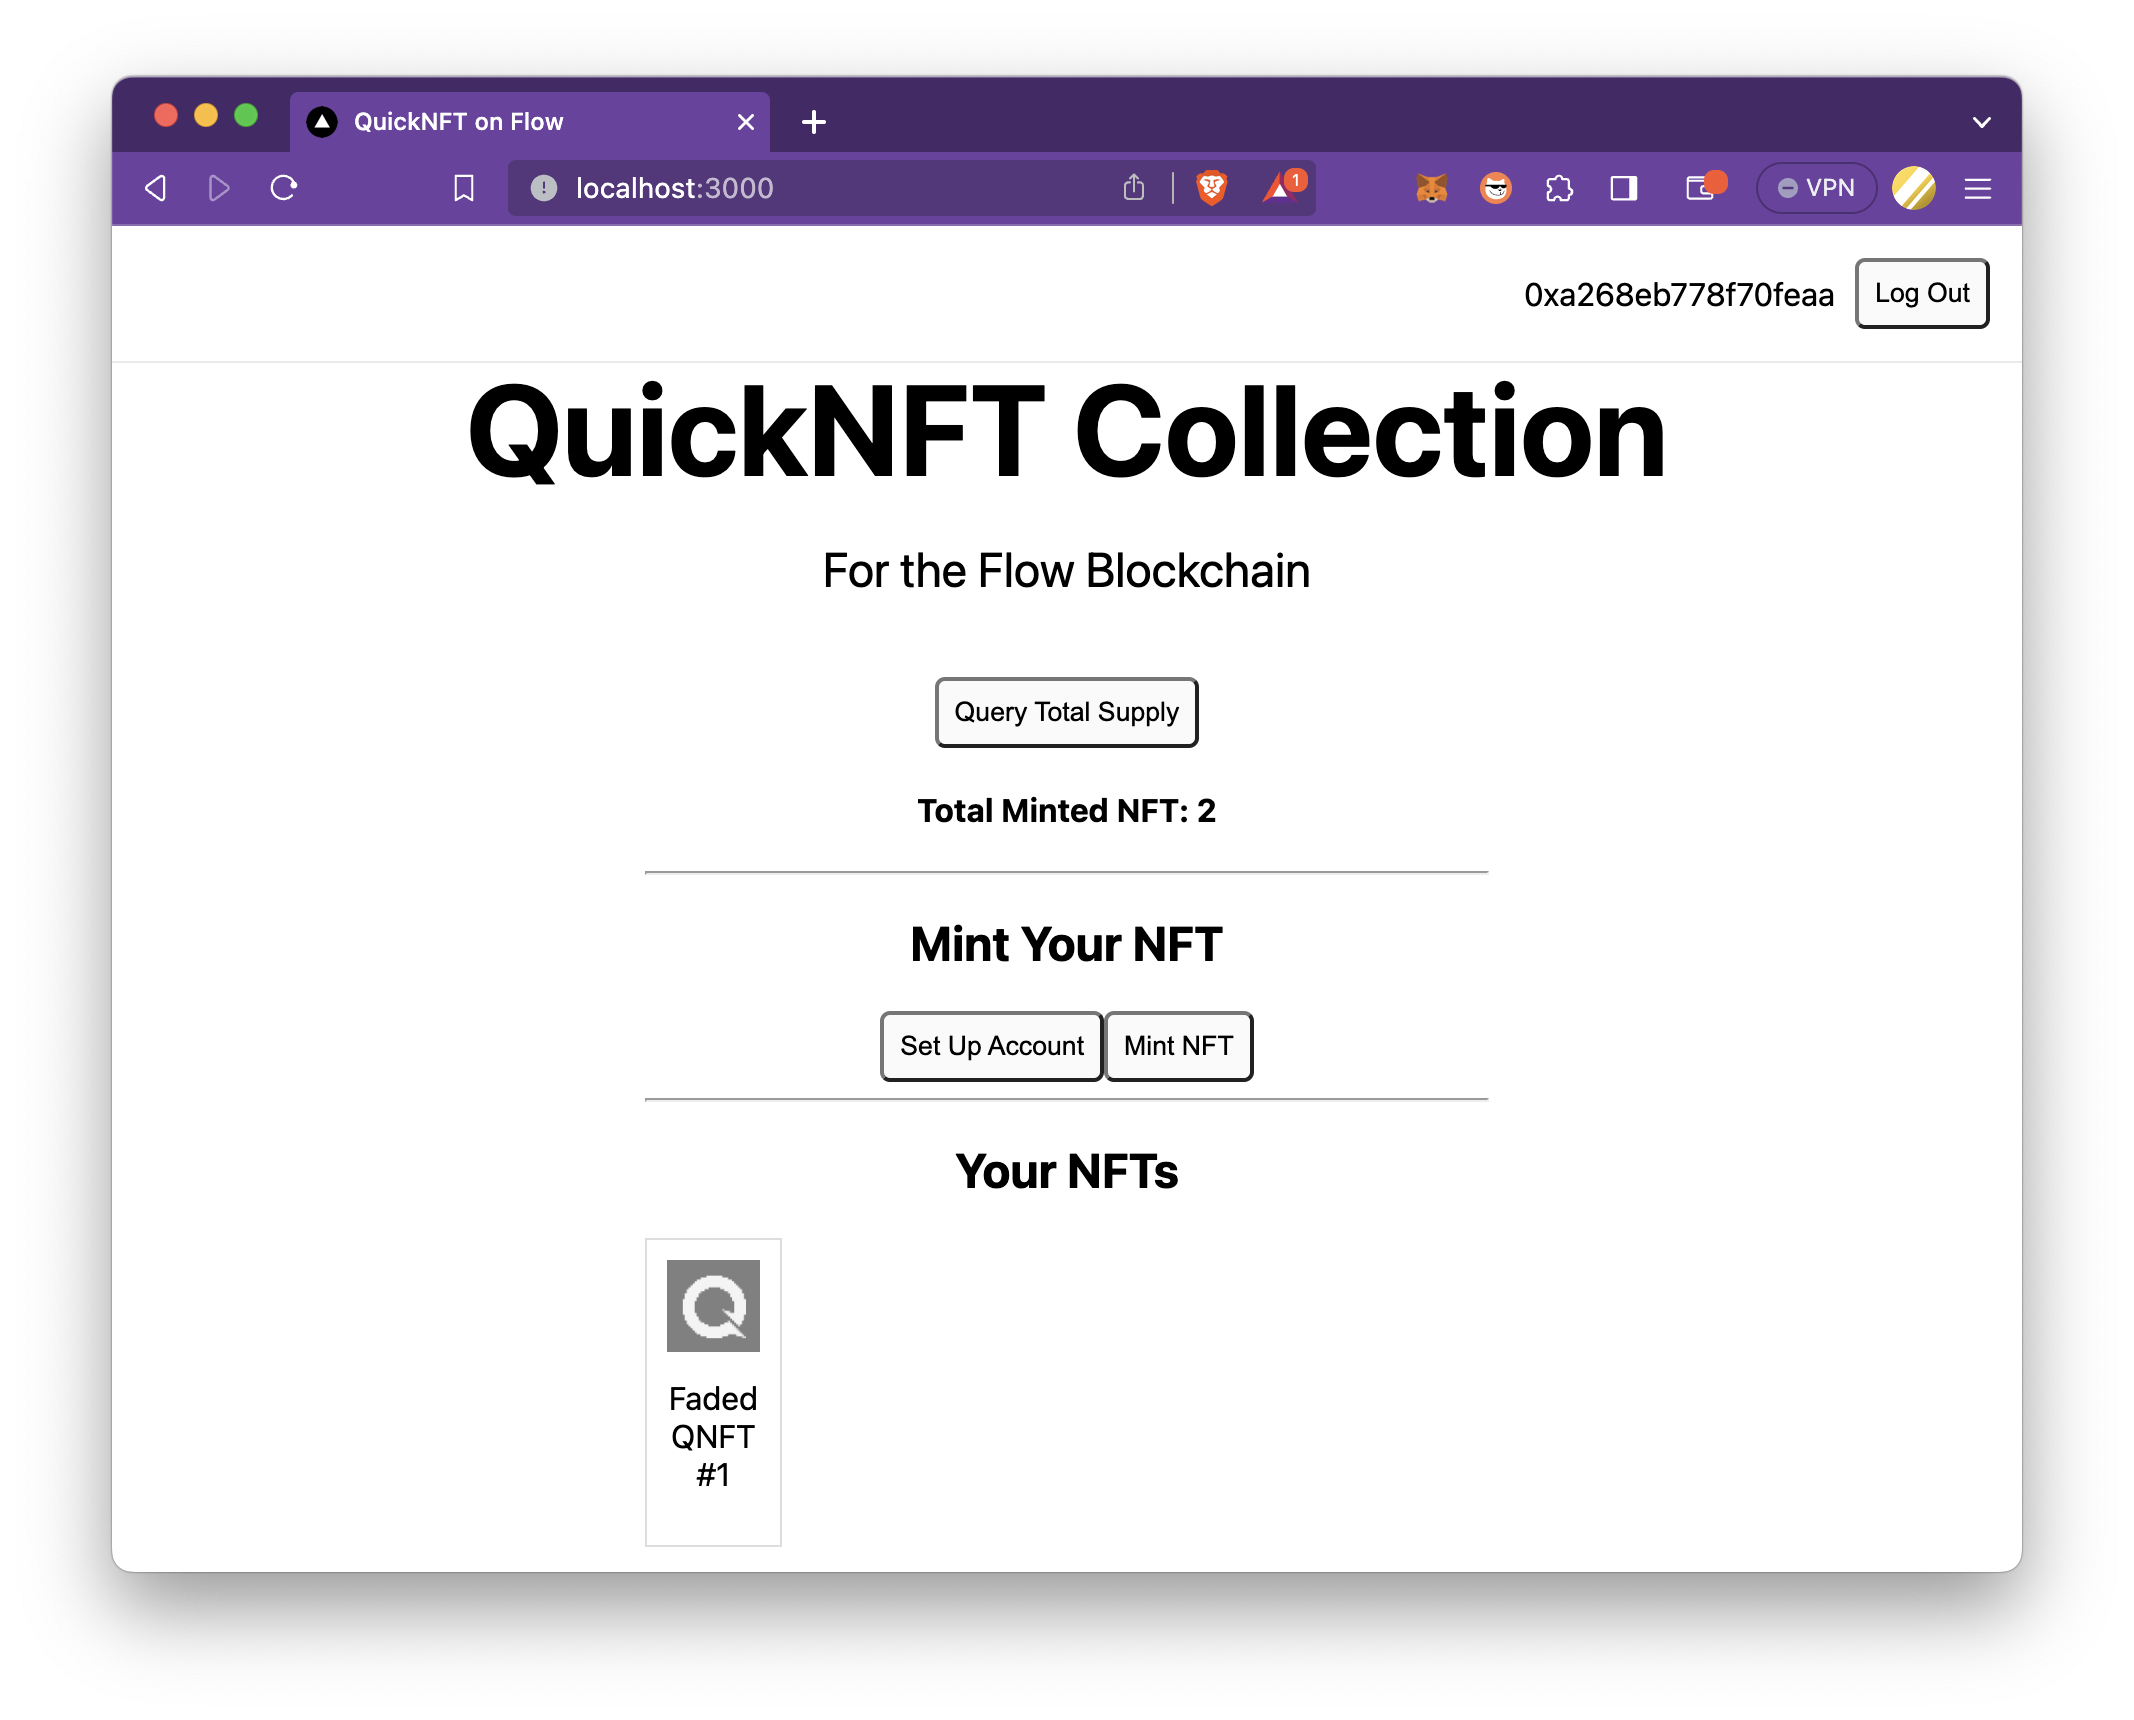
Congratulations! You just created an NFT collection on Flow Testnet and managed to mint an NFT through Flow wallets on the frontend.
For now, we have completed the development side. Now, let's examine why Flow is a suitable blockchain for NFT projects.
How Cadence Realizes Composition and How That Differs From EIP-6551
Revisiting Ownership in Cadence
As you will hopefully now understand from earlier in this guide, NFTs in Flow are simply Resources that implement the Non-Fungible Token standard. Resources in Cadence are an instance of a typed object and because Cadence is an object-oriented language it means you can store Resources within another.
In other blockchain ecosystems ownership is handled by mapping an account address identifier to the ID of the asset, handled within a specific token contract that is not owned by either the user or the application. By contrast, Flow takes ownership to a deeper and more intuitive level by enabling developers to explicitly declare relationships between Resources directly. This enables true encapsulation, combining both logic and data within a given Resource and allowing developers to apply domain-driven-design principles when organizing their code.
The object-oriented encapsulation possible with Cadence revolutionizes what is possible in terms of complex on-chain applications. Logic which is internalized in Resources, and which controls access to that logic through capabilities, results in well secured solutions that cannot be exploited. The portability this provides is also very powerful. If NFT A, which internally stores other NFTs (B & C), is sent to another account, then the receiving user can expect A still contains NFTs B & C when they receive it. The entire graph of nested Resources are transferred atomically from sender account to the receiver with no change to how B & C are stored in A. At no time does the transaction need to reference B or C to achieve this, the only NFT being sent through the transaction is A.
Flow vs EIP-6551
At a practical level EIP-6551 is a framework that enables ERC-721 tokens on EVM chains to ‘store’ other NFTs within a NFT. Importantly, it’s an extension to Solidity (hence the EIP) which aims to standardize the means by which NFTs owning other NFTs can be made possible. The proposal makes no changes to the Solidity language, and the work of ensuring the ownership relationships is managed through the EIP-6551 framework.
The major difference with Cadence is that ownership and encapsulation is built directly into the syntax as a result of its object-oriented language design. It’s a programming model that many developers are be familiar with. Cadence directly addresses blockchain use-cases and challenges of traditional blockchain engineering by natively building in the solution. In doing so, Cadence greatly simplifies what developers need to concern themselves with as they build.
Key Differences Between Flow and EIP-6551
ERC-6551 employs a permissionless registry that enhances compatibility with existing ERC-721 NFTs. This registry acts as both a factory and a directory for Token-Bound Accounts (TBAs), allowing anyone to create a TBA for an ERC-721 token by simply calling a registry function and paying a nominal fee. The resulting proxy contract inherits all the properties and metadata of the original ERC-721 token, enabling it to interact with various smart contracts and even hold other assets. The ‘interaction’ referred to above is in fact brokered by the TBA to which the NFT is linked, rather than the NFT itself.
Notably, developers who wish to use the framework must themselves deploy and operate the registry system as additional engineering work from their application logic.
Key differences between Flow's approach and EIP-6551 are detailed below:
- EIP-6551 is more complex to implement, and less intuitive to use, than directly coding your OO (object-oriented) model in Cadence.
- EIP-6551 emulates a degree of object-composition to work around Solidity's lack of native support. There may be practical limits to the types or complexity of composition possible, eg: nested object graphs, which can be achieved when using EIP-6551
- EIP-6551 remains in the proposal stage and is still under development. This means there is limited support from existing NFT projects and chains. Cadence has been running on Flow mainnet since October 2020.
- The complexity of EIP-6551 adds considerable surface area to an application which in turn may result in security problems.
- Cadence's design means each Resource can uniquely define it's own security model and controls in tandem the neccessary capabilities. As applications become more complex, this becomes increasingly important.
- NFTs in Cadence are always stored in an account. However, they are not intrinsically linked to an account which 'they own'; this construct is only needed in EIP-6551 to make the solution work. Resources in Cadence can internalize an AuthAccount object if this is desired although this advanced topic is beyond the scope of this summary.
- Portability of nested Resources is guaranteed by the language. Given how EIP-6551 is designed, bulk transferral of owned NFTs from the owning NFT needs to be coded for
Conclusion
That's it! By now, you should have a clear understanding of Flow's unique features, such as resource-oriented architecture and Resources Owning Resources concept, and how to create an NFT collection decentralized application on Flow using Cadence and Flow CLI.
In summary, this guide explains key features of Flow and its programming language, Cadence, and helps you create your own NFT collection dApp on Flow, taking advantage of Flow's special features. With this knowledge, you can join the world of digital assets and decentralized apps, bringing your creative ideas to life in the blockchain space.
If you encounter any problems or have any questions, we'd love to help you! Find us on Discord or Twitter.
Flow Ecosystem
Check out the following links to get more information on Flow:
We ❤️ Feedback!
Let us know if you have any feedback or requests for new topics. We'd love to hear from you.