
9 min read
Overview
As your organization scales, you face two distinct challenges: managing people and managing resources.
- People Management: You have multiple internal squads (e.g., Wallet Team, Cloud Team, DevOps) that need specific permissions and isolation.
- Resource Management: You have hundreds of endpoints across various networks that need to be organized, filtered, and tracked for usage costs.
Without a clear structure, large accounts commonly run into issues such as:
- Teams seeing resources they do not own
- Increased risk of accidental changes to critical infrastructure
- Difficulty finding the right endpoints quickly
- Limited visibility into which teams or projects are consuming usage

In this guide, you will learn how to organize a large Quicknode account so teams only see what is relevant to them, resources stay easy to manage, and usage can be monitored and reported clearly.
TLDR
- Use tags (e.g.,
env:prod,owner:wallet) to organize and filter endpoints without affecting who can access them - Use team assignments to restrict endpoint visibility: only team members can see assigned endpoints
- Design your tag taxonomy before creating assignments for consistent filtering and reporting
- Automate bulk tagging and team operations with the Admin API or Quicknode CLI
- Filter by tags in the Usage tab to generate per-team cost attribution reports
What You Will Need
- A Quicknode account on a paid plan
- Familiarity with the Quicknode dashboard and basic resource management
- Familiarity with RBAC
What You Will Do
- Design an account organization strategy (tagging taxonomy)
- Use tags to logically group endpoints across networks
- Configure team visibility to isolate sensitive infrastructure
- Programmatically tag endpoints using the Admin API
- Monitor and export usage data for internal reporting
Key Concepts
Before diving into implementation, let's clarify the tools you'll use to organize your account.
Members are everyone with access to your Quicknode account. Roles (Admin, Billing, or Viewer) are assigned at the member level and control what each person can view and manage across the dashboard. You manage members at the Members page.
Teams are groups of members used to control endpoint visibility. You manage team membership from the Members page (inviting to the account) and the Teams page (adding to a team). RBAC roles (Admin, Billing, or Viewer) are assigned at the member level, not the team level. For a full breakdown of roles and member management, see the Team Management and RBAC guide.
Tags are metadata labels you attach to endpoints for organization and filtering. Unlike team assignments (which control access), tags are purely organizational. They help you categorize, search, and report on endpoints.
These tools serve different purposes and work together: tags help you organize and filter resources, while team assignments control who can see and interact with them. For a deeper understanding of RBAC roles and team management basics, refer to the Team Management and RBAC guide.
Why Account Organization Matters
Without intentional structure, large Quicknode accounts become difficult to manage. Team members see resources they don't need, making it harder to find what they're looking for. Access controls are either too loose (everyone can modify everything) or too rigid (admins become bottlenecks for routine tasks). Usage data is available but not actionable because there's no way to attribute consumption to specific teams or projects.
Proper organization delivers three key benefits:
-
Security and access control ensures teams can only access resources relevant to their work, reducing the risk of accidental modifications or exposure to sensitive configurations.
-
Operational efficiency means team members find their resources quickly without navigating through unrelated items.
-
Cost visibility allows you to attribute resource consumption to specific teams or projects for internal chargebacks and capacity planning.
The combination of RBAC roles, tags, and team-based visibility gives you the flexibility to implement these benefits without the overhead of managing multiple accounts.
Organizing Resources with Tags
The first step is designing a Taxonomy. This is a naming convention that defines how you group resources. A consistent strategy is critical for accurate filtering and reporting later.
Choosing a Taxonomy Strategy
Most enterprises use one of the following patterns:
| Strategy | Pattern Example | Best For |
|---|---|---|
| By Project | project:wallet, project:dex | Organizations where cross-functional teams work on distinct products. |
| By Environment | env:prod, env:staging | Teams with strict compliance requirements between Production and Dev. |
| By Team | owner:devops, owner:data | Organizations where distinct departments own specific infrastructure. |
| Hybrid (Recommended) | team:wallet AND env:prod | Large enterprises requiring granular reporting (e.g., "Show me Wallet usage in Production"). |
Tag Naming Best Practices
- Key:Value Format: Use colons to create a hierarchy (e.g.,
env:prodis better thanproduction). - Consistency: Choose one term and stick to it (e.g., don't mix
stageandstaging). - Lowercase: Keep tags lowercase to avoid case-sensitivity confusion during filtering.
- Documentation: Maintain a shared document outlining your tagging conventions for team reference.
Managing Resources via Dashboard
This section covers how to organize and manage your resources using the Quicknode dashboard interface.
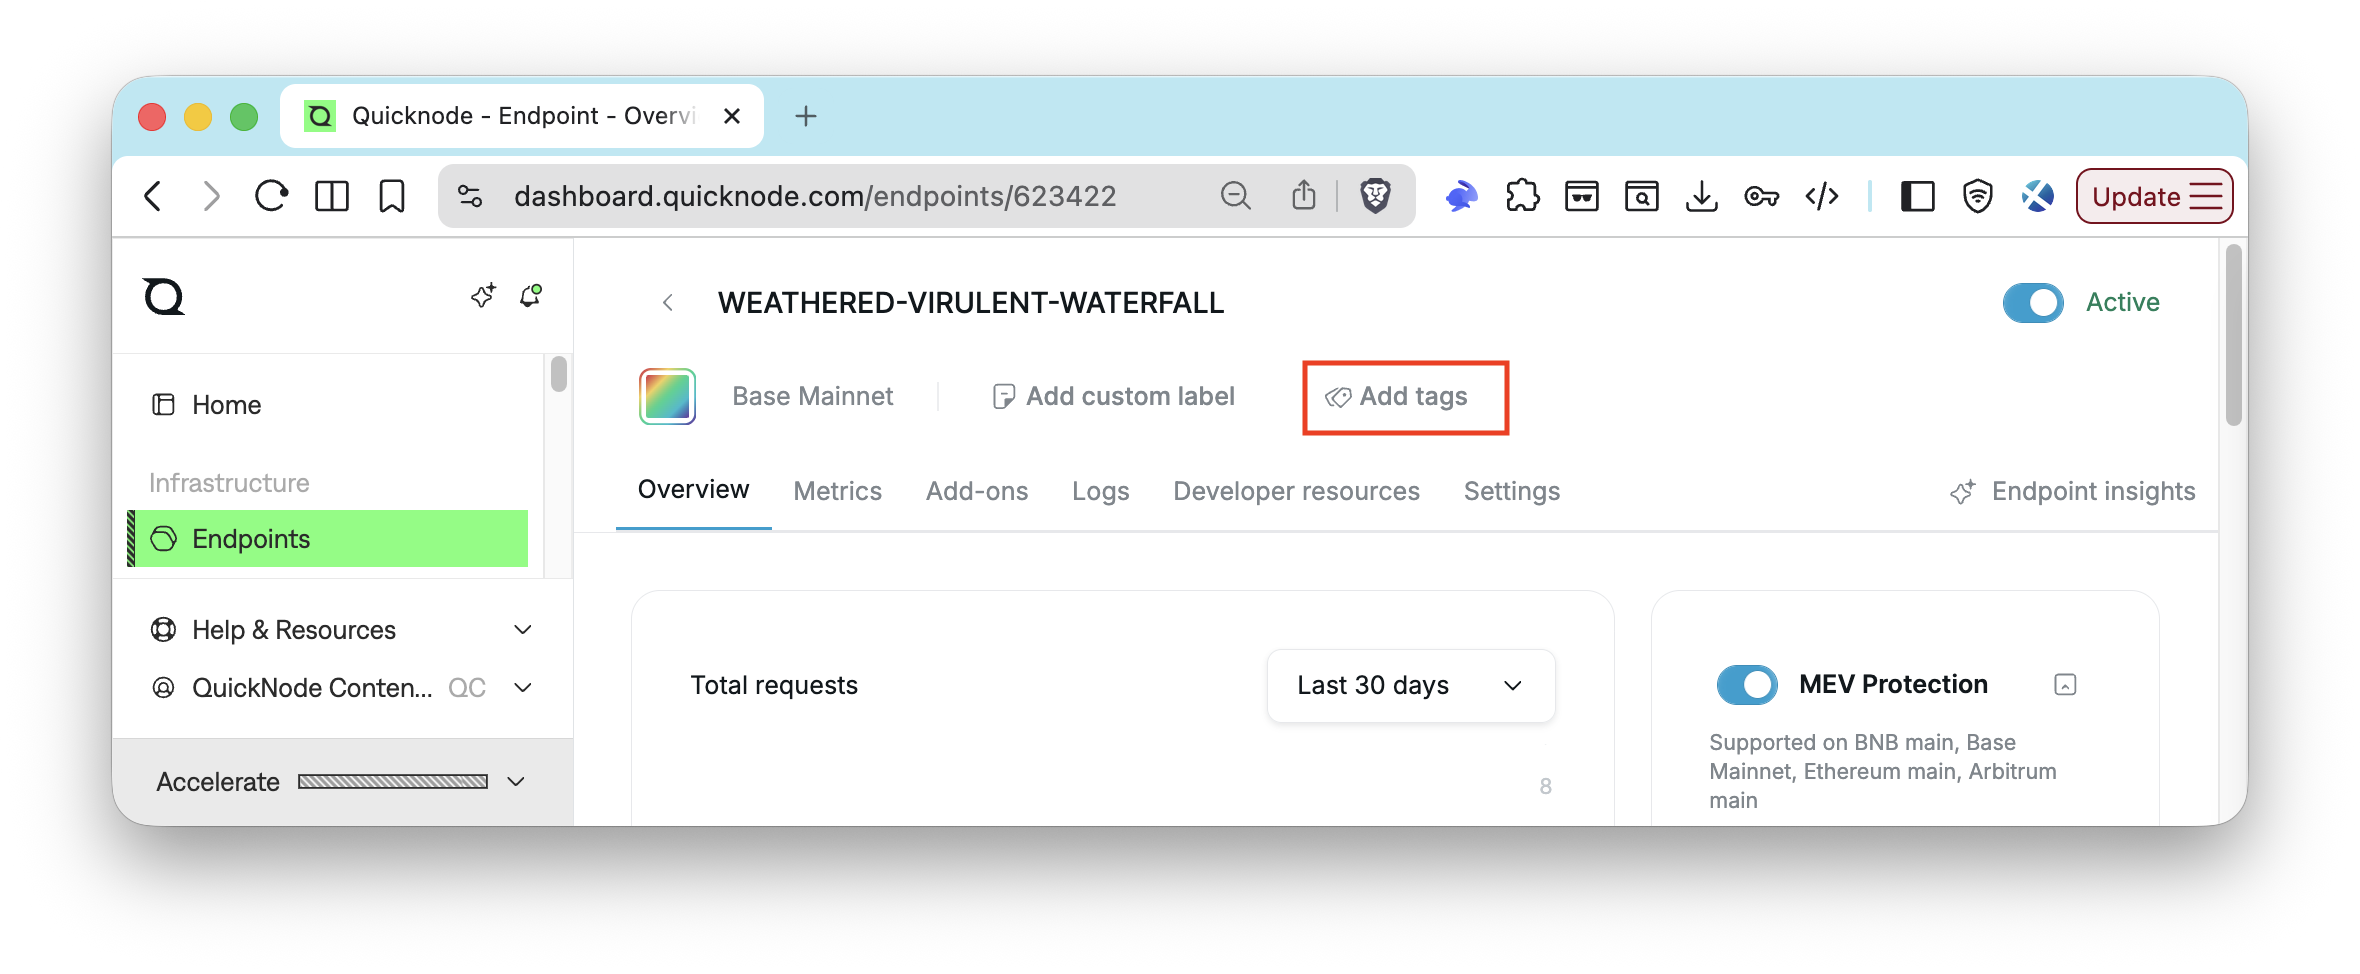
Applying Tags to Endpoints
Once you've identified the right taxonomy, you can start applying tags to endpoints through the dashboard.
- Navigate to the Endpoints List and select an endpoint.
- In the endpoint details panel, locate the Tags.
- Type your tag (e.g.,
env:prod) and press Enter. - Repeat for all relevant tags.
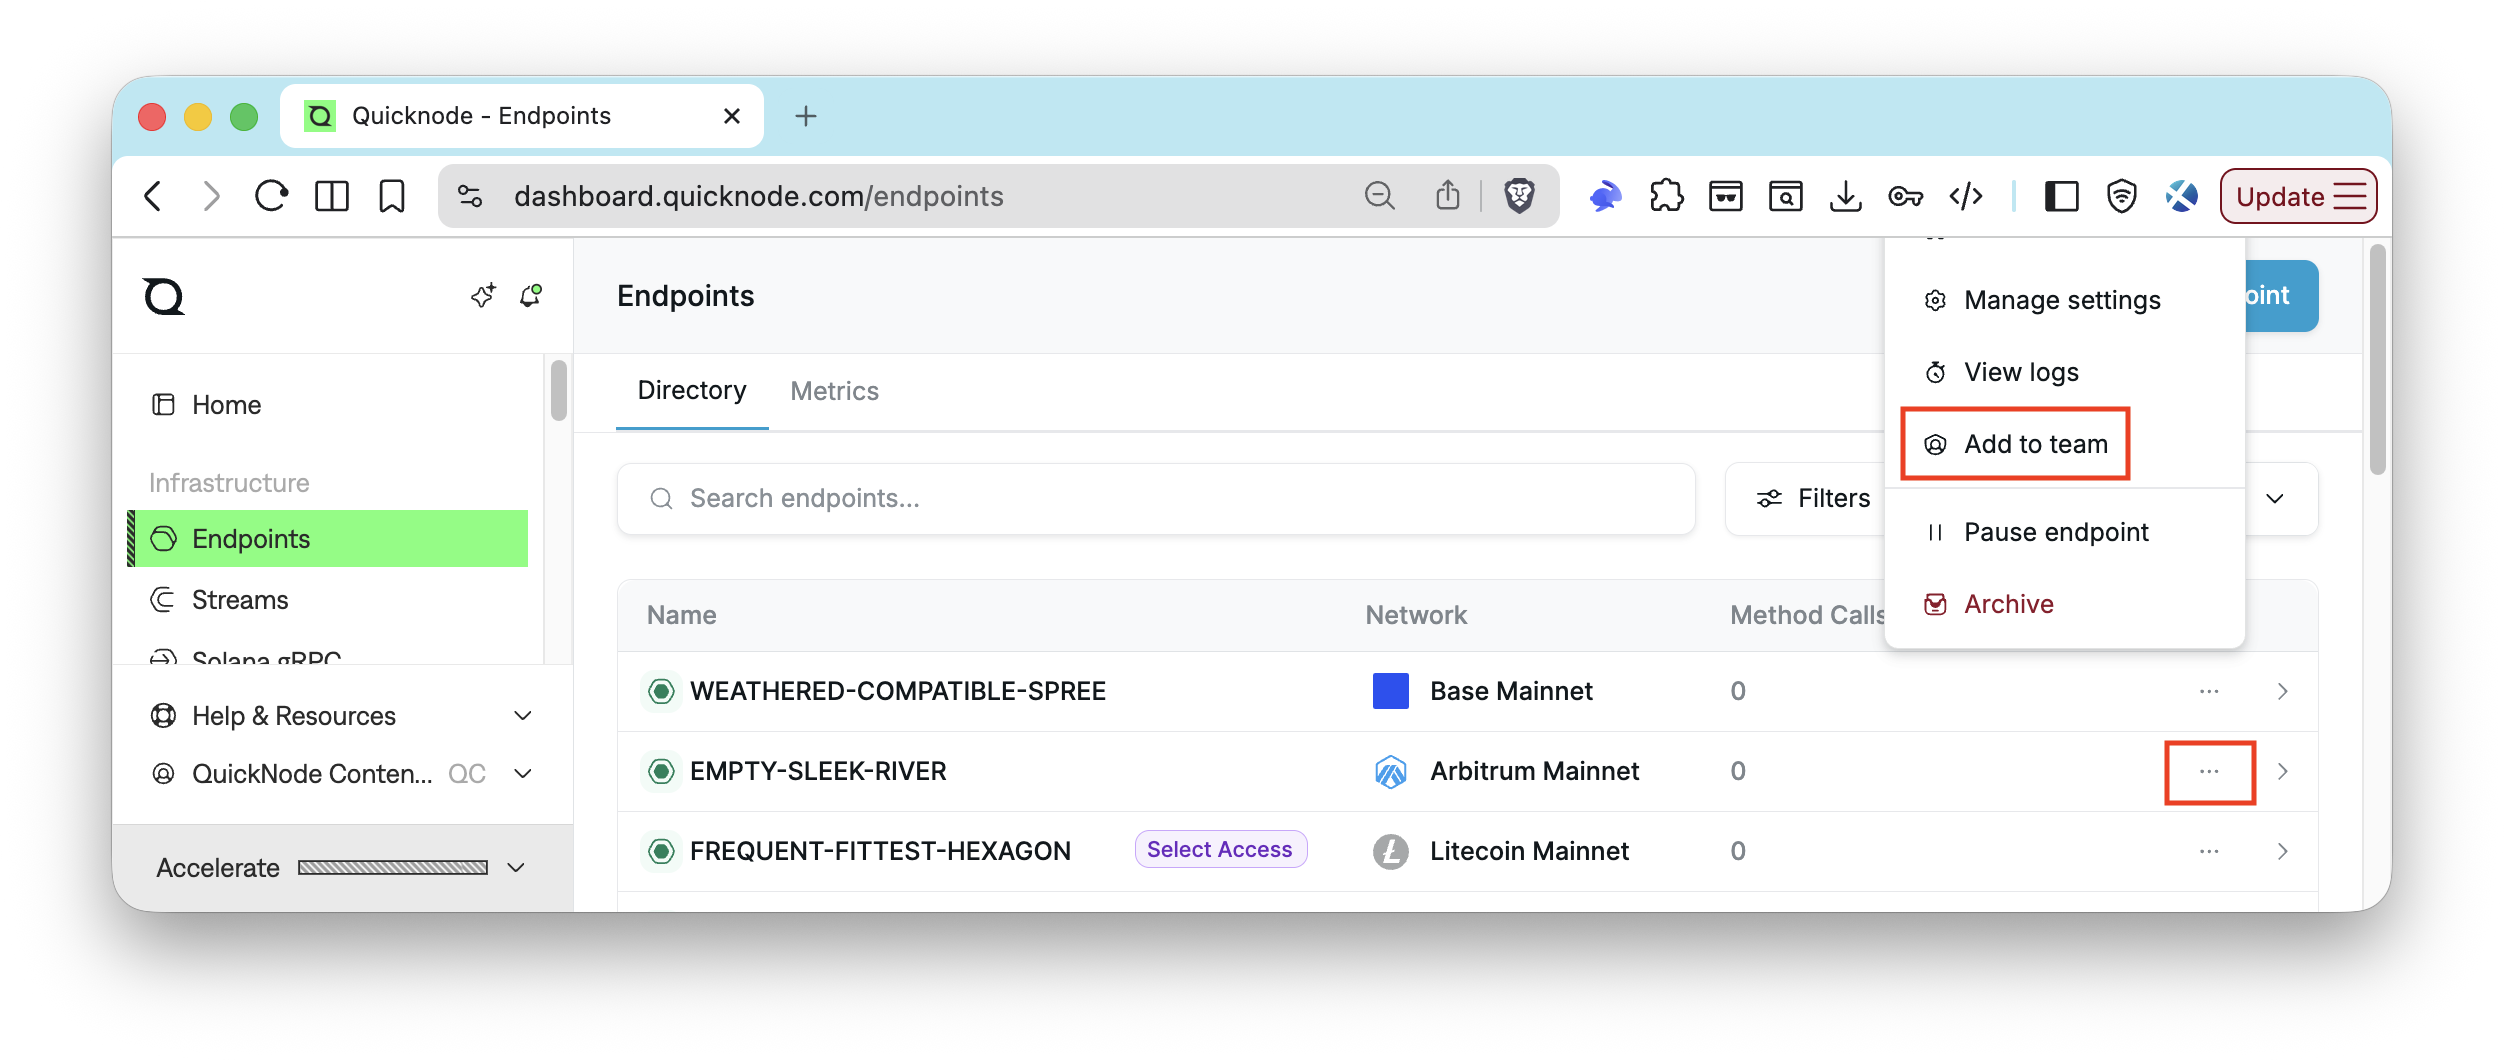
Assigning Teams to Endpoints
Endpoints can be assigned to teams through the Settings option on the main endpoints list, not from individual endpoint pages.
- Navigate to your Endpoints page.
- Click the three dots (
⋯) next to the endpoint you want to assign to a team. - Select Add to team from the dropdown menu.
- Choose the team(s) you want to assign the endpoint to.
- Click Update.
Repeat this process for each endpoint you want to assign to a team.
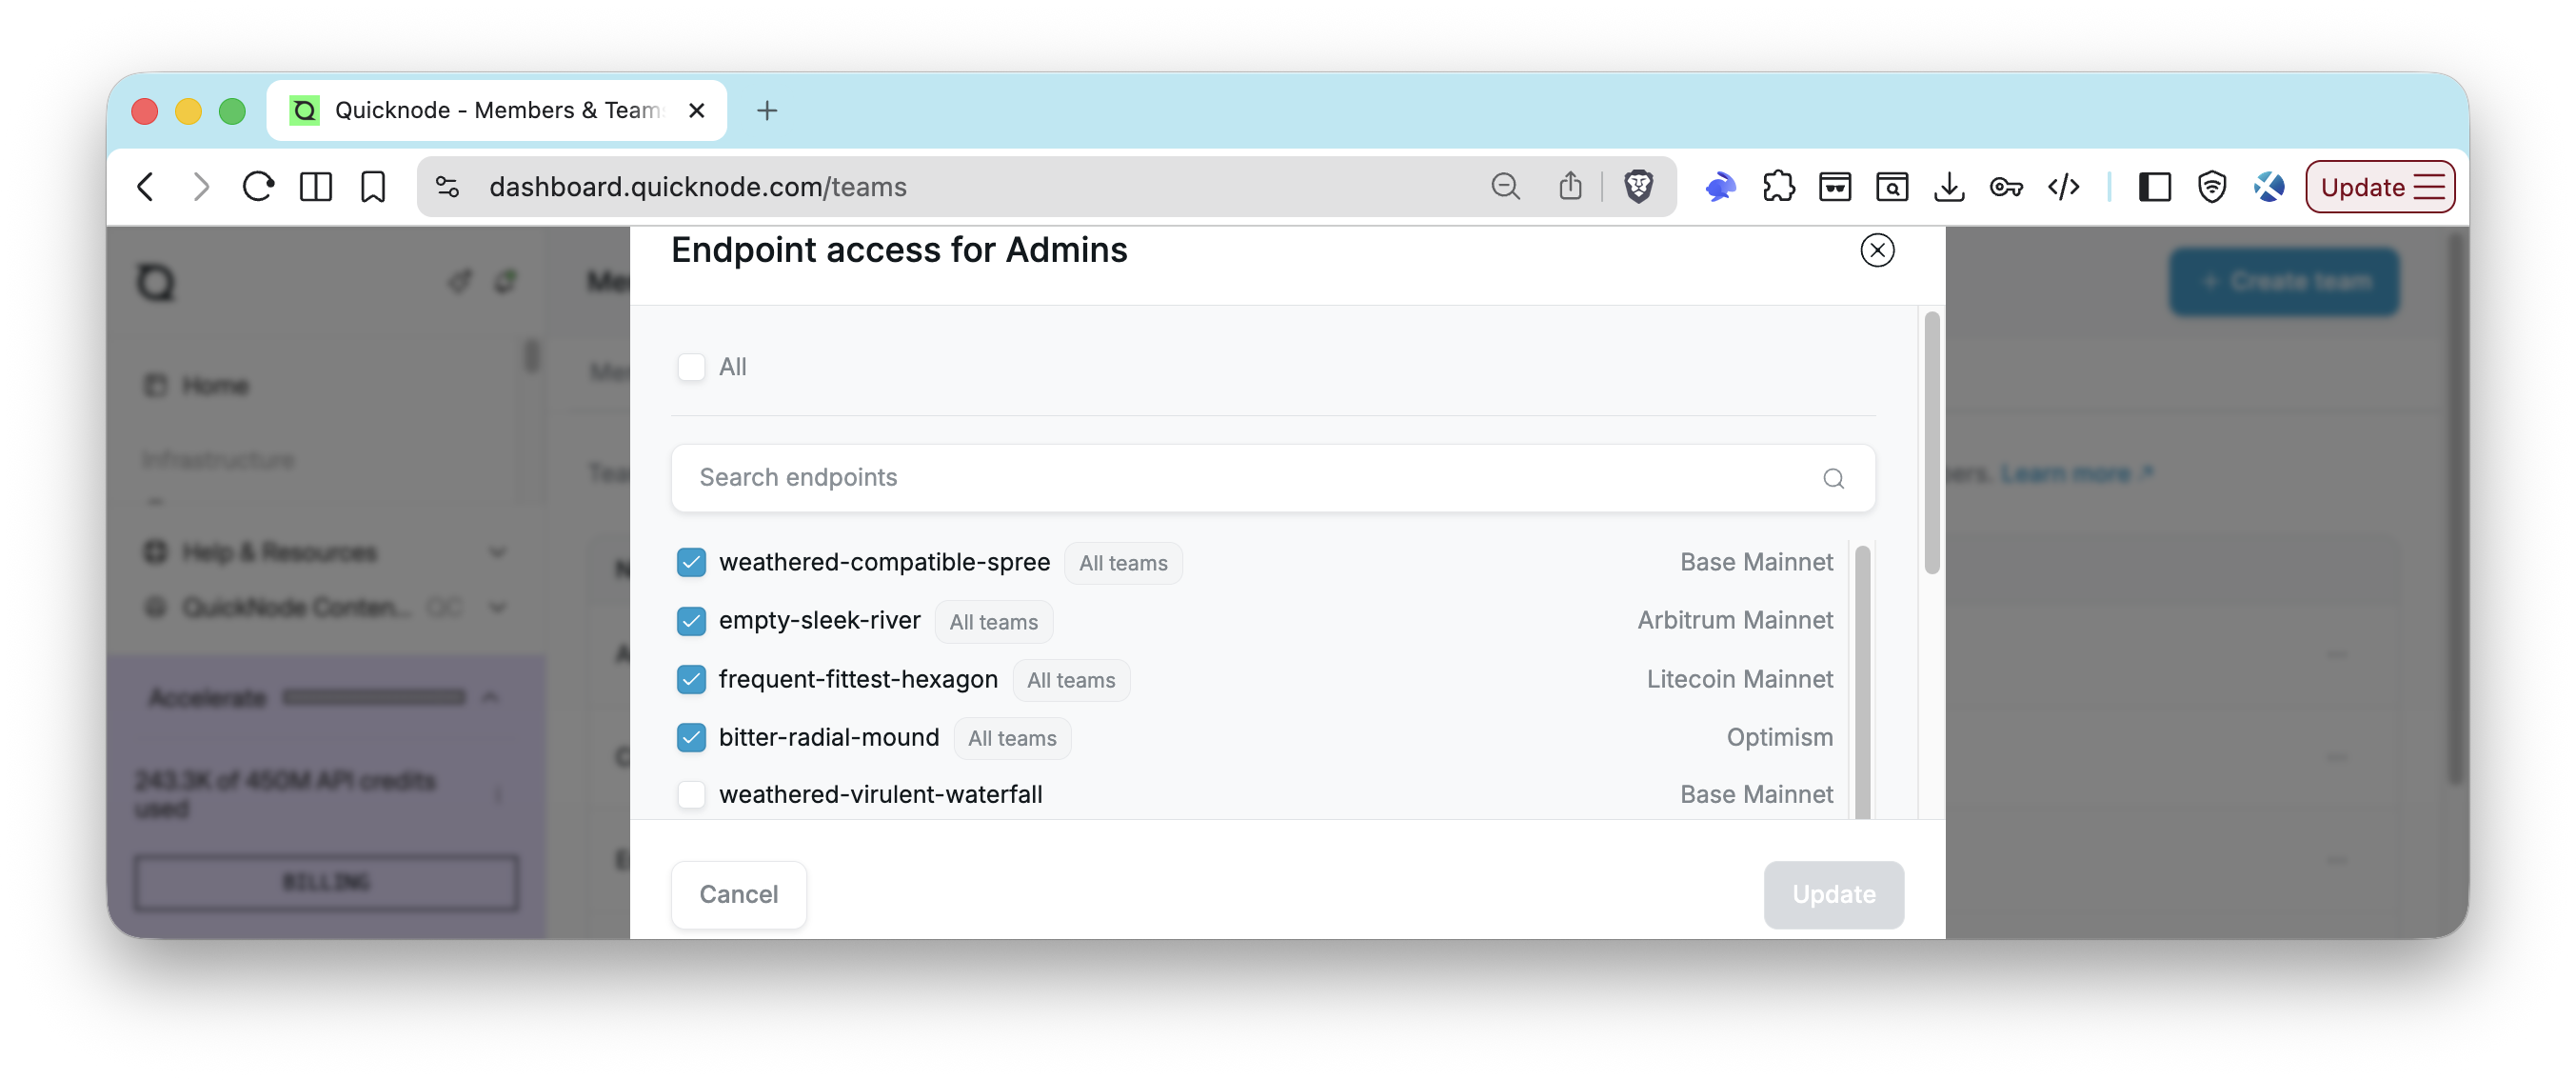
Bulk Endpoint Assignments to Teams
For accounts with many endpoints, you can assign multiple endpoints to a team at once.
- Navigate to the Teams page by opening the account dropdown in the bottom-left corner and selecting Account and then Teams.
- Click the three dots (
⋯) next to the team you want to manage. - Select Endpoint access from the dropdown menu.
- Choose the endpoints you want to assign to the team by checking the boxes next to them.
- Click Update to save your changes.
For large-scale or repeatable bulk endpoint assignments, use the Admin API or the Quicknode CLI instead of doing this manually. See the Managing Resources via Admin API section for examples.
Managing Resources via Admin API
For organizations managing large numbers of endpoints, the Admin API enables programmatic management. The Quicknode CLI is a higher-level alternative for the same operations, useful for scripting and CI workflows without constructing raw HTTP requests. This approach is ideal for automation and scaling beyond manual dashboard operations. If your organization needs repeatable workflows, use the Admin API or CLI for team operations and endpoint management.
Tagging Endpoints Programmatically
Retrieving Current Tags
To view existing tags on an endpoint or all endpoints at once, use the Get Endpoint Tags or Get All Endpoints endpoints:
curl -X GET "https://api.quicknode.com/v0/endpoints/{endpoint_id}/tags" \
  -H 'accept: application/json' \
  -H "x-api-key: YOUR_API_KEY"

# or
curl -X 'GET' \
  'https://api.quicknode.com/v0/endpoints' \
  -H 'accept: application/json' \
  -H 'x-api-key: YOUR_API_KEY'
Adding Tags to an Endpoint
To add tags programmatically, use the Add Endpoint Tags endpoint:
curl -X POST "https://api.quicknode.com/v0/endpoints/{endpoint_id}/tags" \
  -H "x-api-key: YOUR_API_KEY" \
  -H "Content-Type: application/json" \
  -d '{
  "label": "env:prod"
}'
Assigning Endpoints to Teams Programmatically
Team management capabilities are available through the Admin API, enabling you to programmatically manage teams, members, and endpoint assignments. This includes:
- Creating and deleting teams
- Inviting and removing team members
- Resending invitations
- Updating endpoint access for teams (assign/unassign)
Retrieving Accessible Endpoints for a Team
To retrieve a list of endpoints accessible to a specific team, use the Get Team Endpoints endpoint:
curl -X 'GET' \
  'https://api.quicknode.com/v0/teams/{id}/endpoints' \
  -H 'accept: application/json' \
  -H 'x-api-key: YOUR_API_KEY'
Updating Endpoint Access for a Team
To update the endpoints accessible to a team, use the Update Team Endpoints endpoint:
curl -X 'PATCH' \
  'https://api.quicknode.com/v0/teams/{id}/endpoints' \
  -H 'accept: application/json' \
  -H 'x-api-key: YOUR_API_KEY' \
  -d '{
  "endpoint_ids": [12345, 67890]
}'
What You Can Automate
The Admin API supports:
- Creating and updating endpoints
- Retrieving endpoint details and metrics
- Managing tags (as shown above)
- Setting rate limits at endpoint and method levels
- Configuring security settings
- Monitoring usage and retrieving invoices
- Managing teams and team members
- and more...
For accounts with hundreds of endpoints, automating these operations saves significant time and ensures consistency.
Tip: Interested in real-time endpoint monitoring? Check out the Monitor RPC Infrastructure with Prometheus Exporter guide.
Controlling Team Visibility and Access
While tags help you organize and filter endpoints, team assignments control who can see them. This section covers how RBAC roles and team visibility work together to provide access control.
In this guide, we won't cover RBAC roles (Admin, Billing, or Viewer) in detail. For more information, refer to the Team Management and RBAC guide.
Team assignments determine which endpoints users can see. By default, endpoints without a team assignment are visible to all users in your account. Once you assign an endpoint to a specific team, it becomes visible only to members of that team.
These two concepts work together. For example, a Viewer on the Wallet Team can see Wallet Team endpoints but cannot modify them. An Admin on the Cloud Team can fully manage Cloud Team endpoints but won't see endpoints assigned exclusively to other teams.
Note: Team assignments are for endpoint visibility scoping. They do not replace RBAC roles:
Adminusers can manage teams and endpoint assignments across the account, whileBillingandViewerusers have read-only access to the endpoints they can see.
Team assignment steps are covered in the Managing Resources via Dashboard and Managing Resources via Admin API sections above.
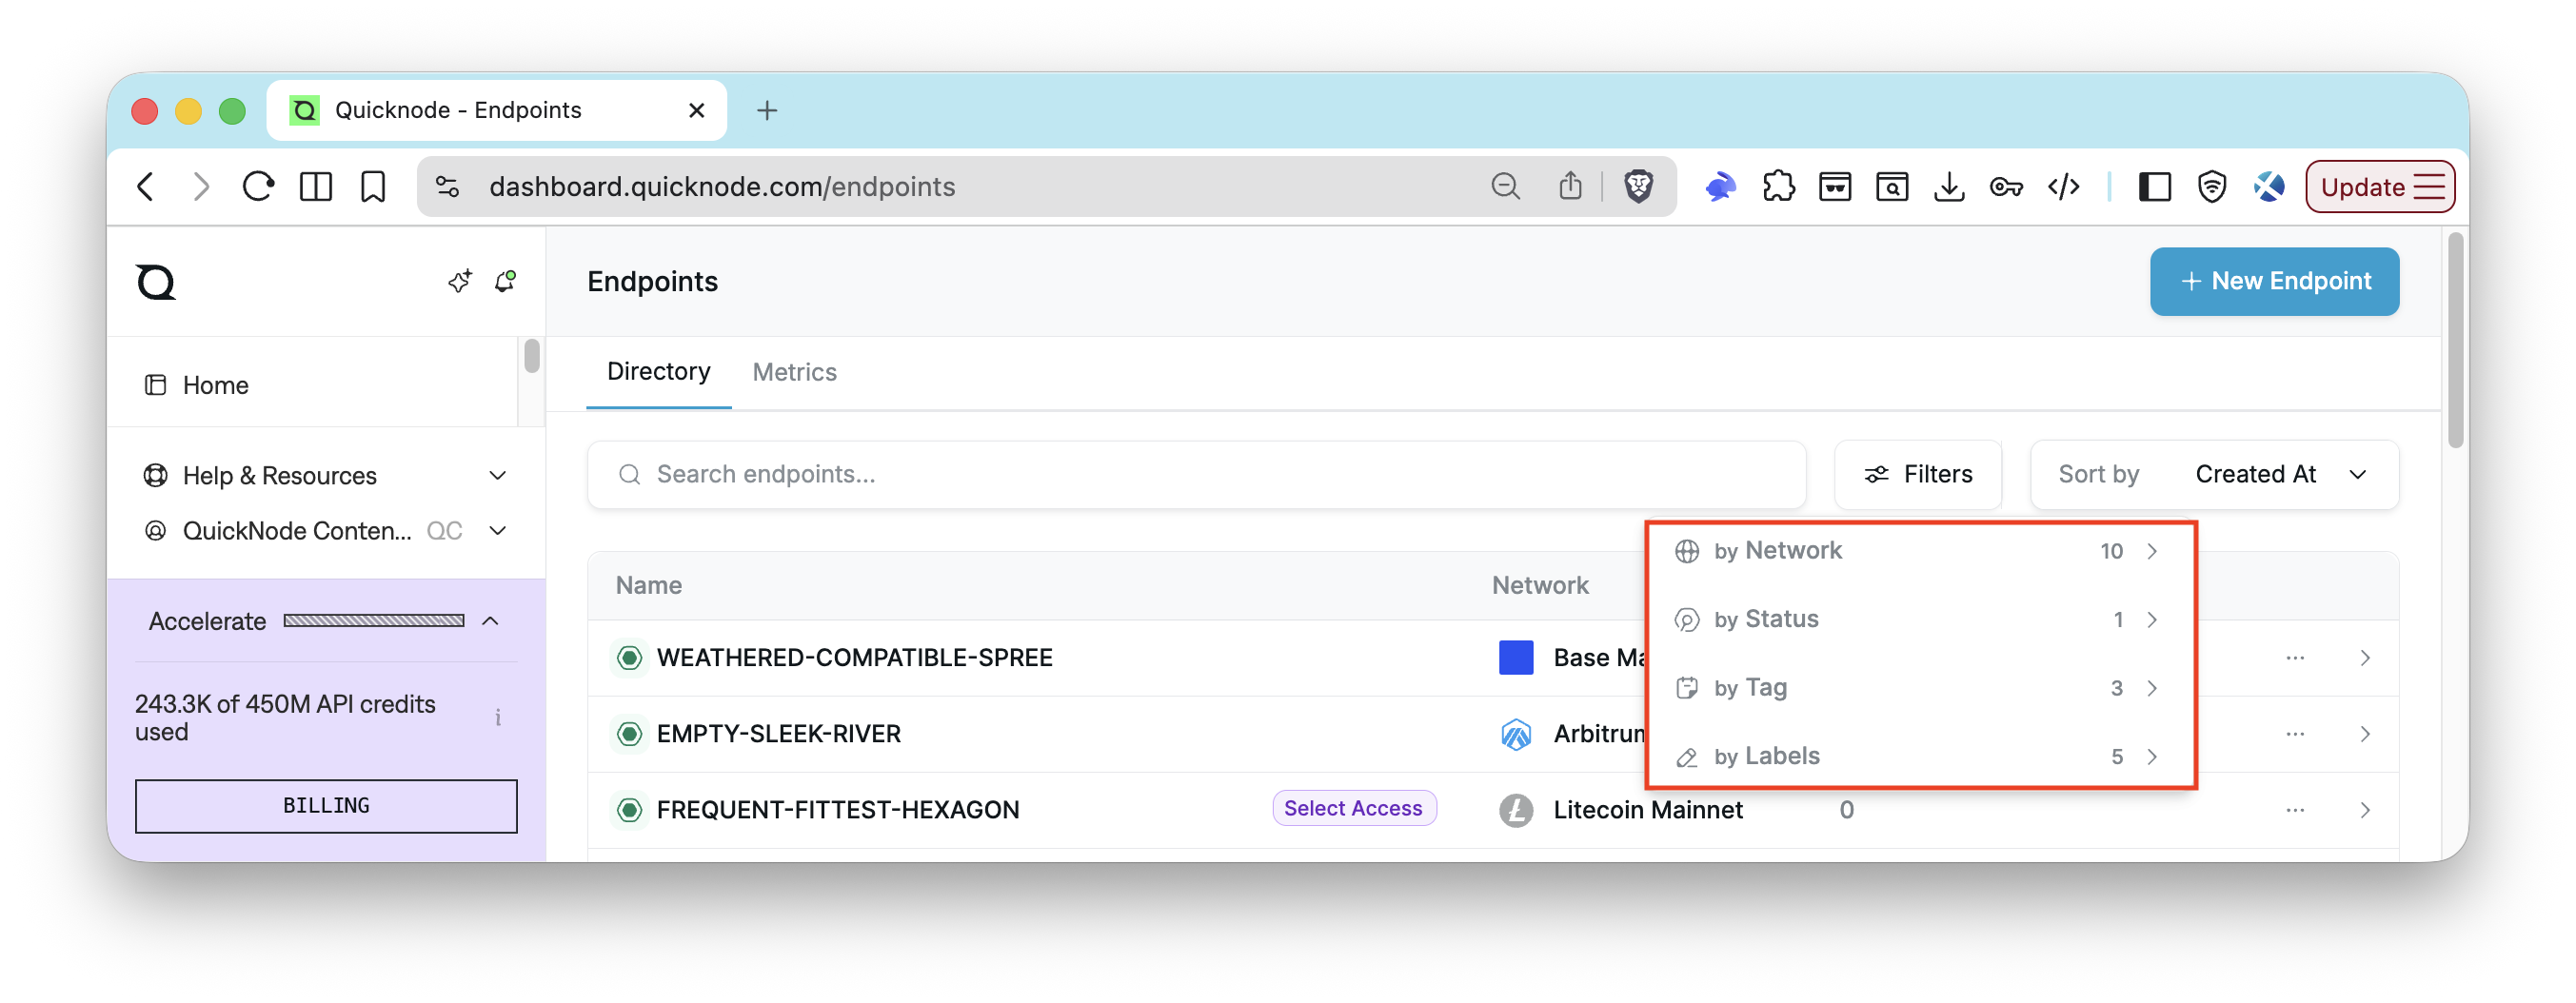
Using Filters Effectively
Even with team-based visibility limiting what users see, filters help navigate within your accessible endpoints. The Quicknode dashboard provides several filtering dimensions that work together.
Available Filters
- Network filters by blockchain and network type. Select Ethereum Mainnet, Solana Devnet, or any other supported network to narrow your view.
- Status shows only endpoints in a particular state, such as Active endpoints.
- Tag filters by your custom tags. Select either a specific tag or multiple tags to find endpoints with those tags.
- Label filters by endpoint labels if you're using them alongside tags.
Filters combine with AND logic. Selecting Ethereum Mainnet and the tag env:prod shows only Ethereum Mainnet endpoints that are also tagged as production.
Monitoring Usage and Reporting
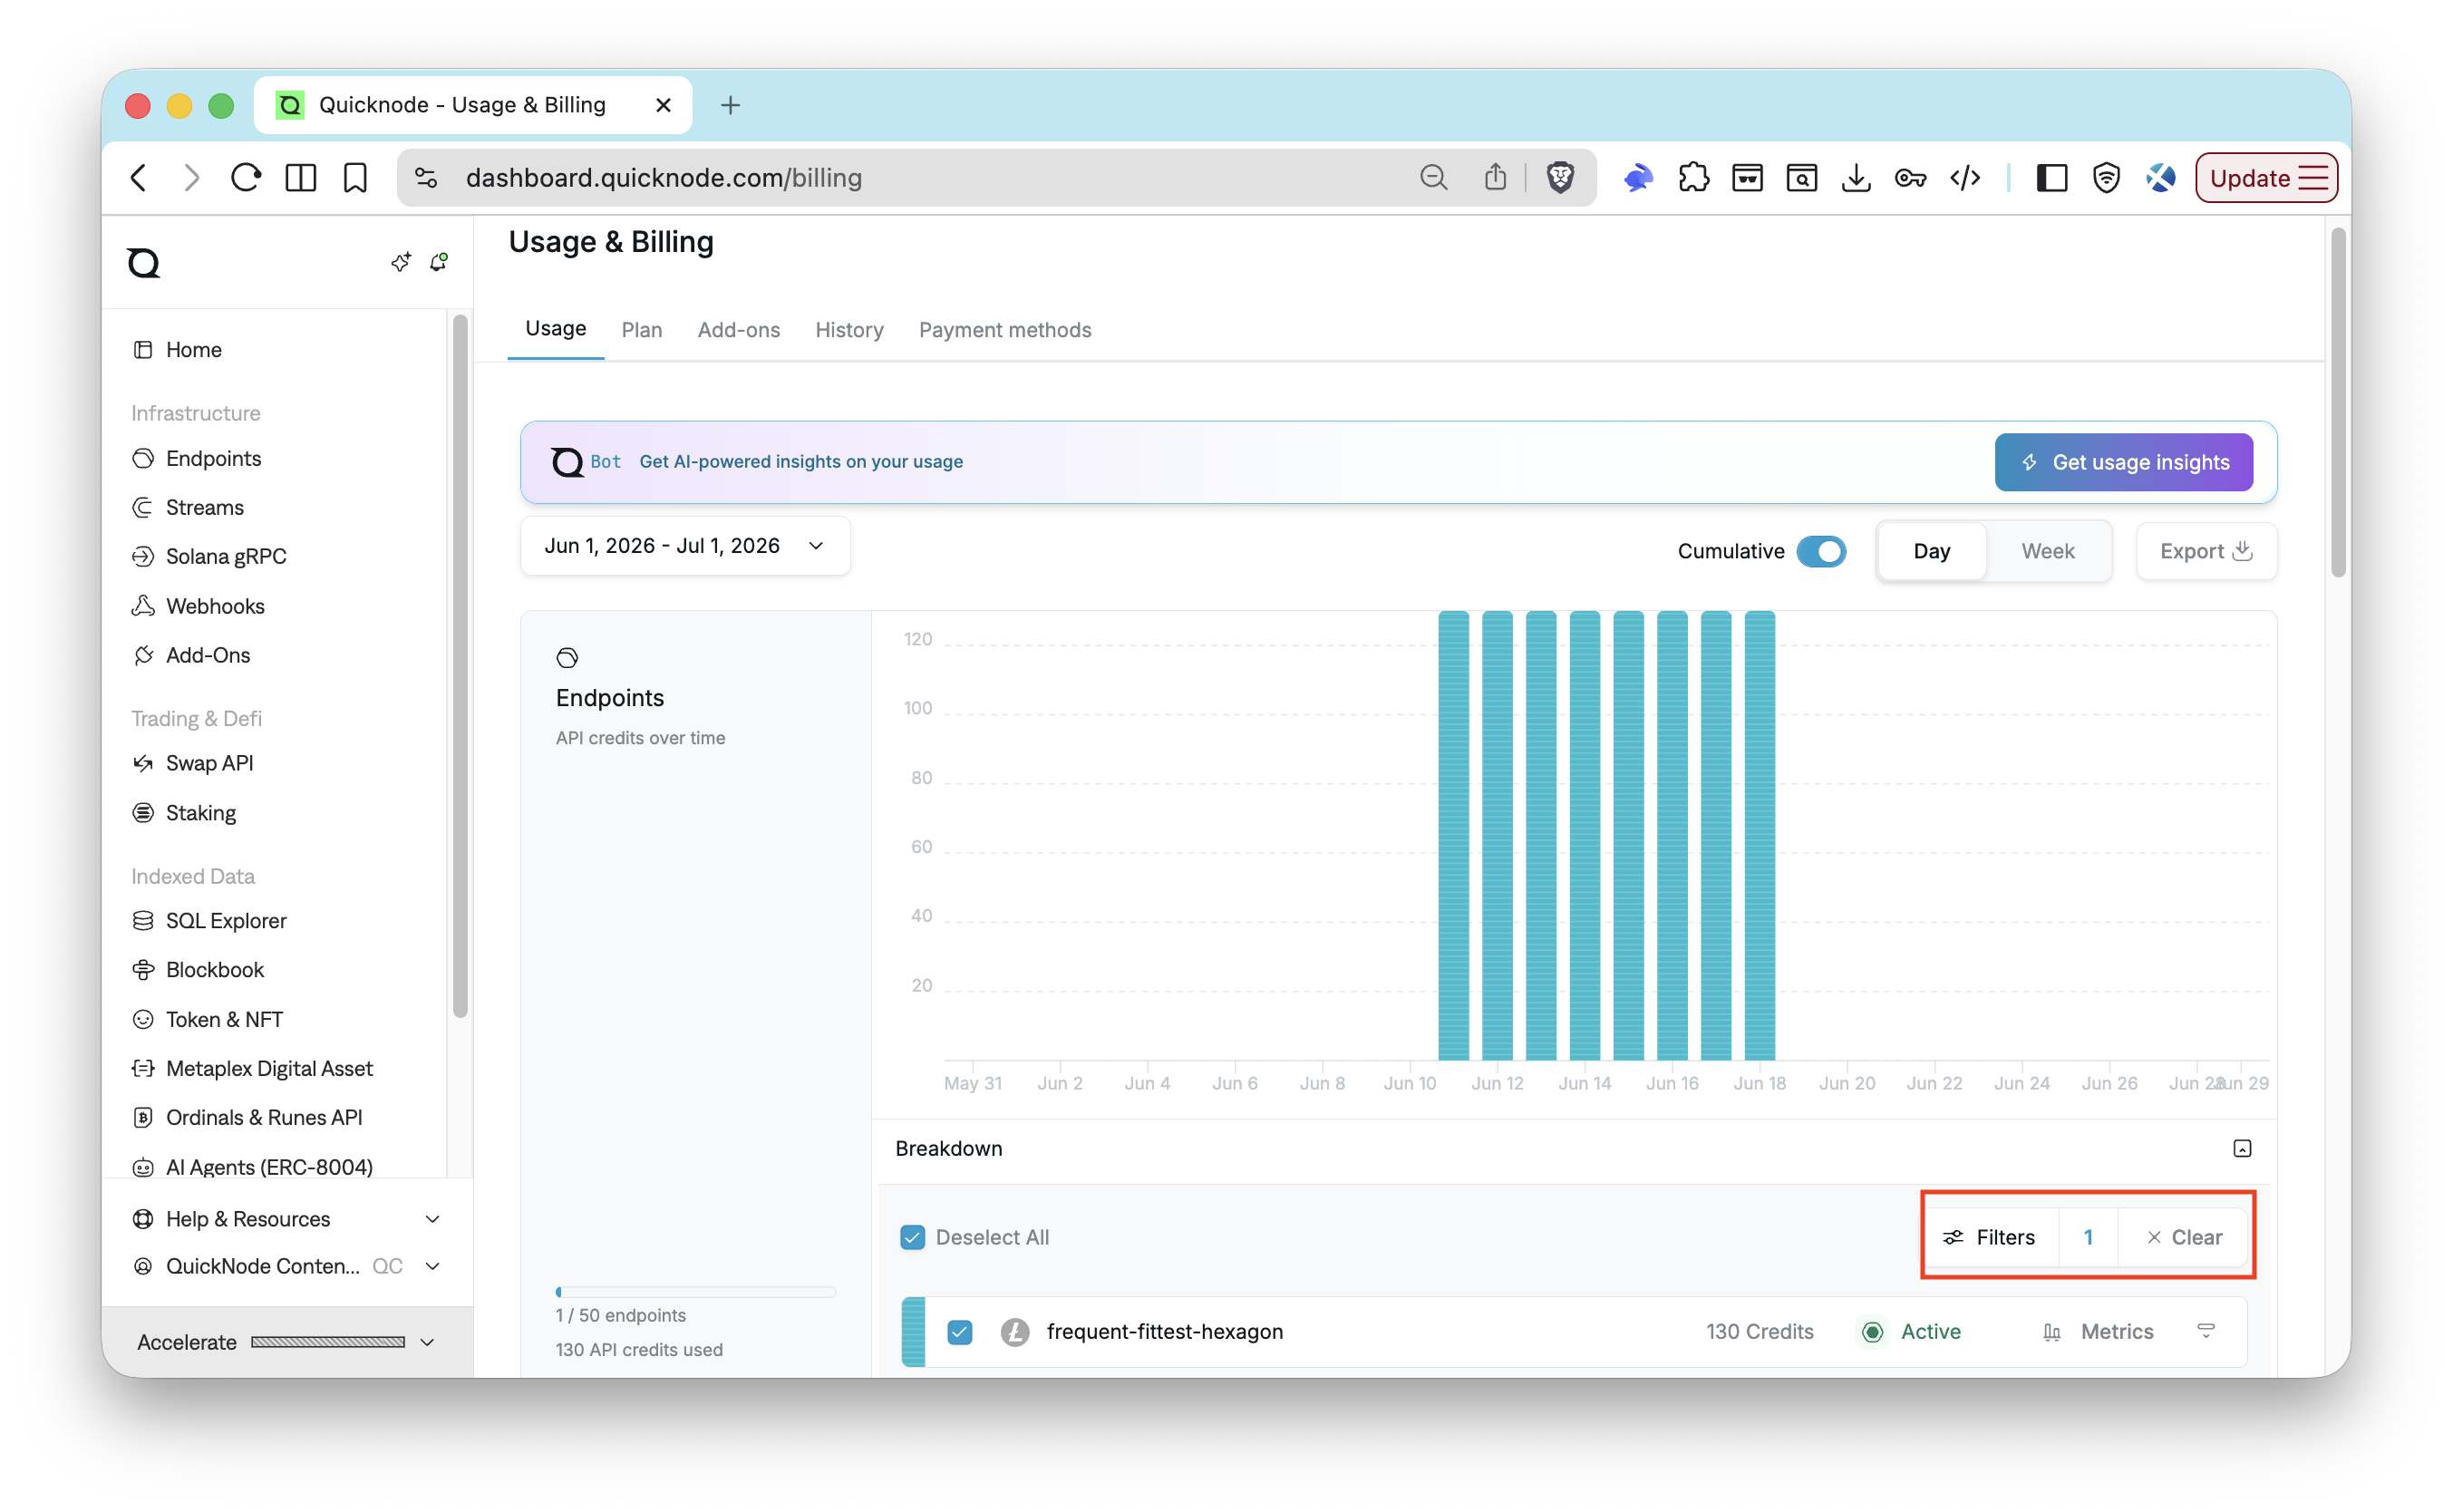
Visibility into usage is just as critical as visibility into infrastructure. The Usage tab allows you to perform cost attribution using the tags you defined earlier.
- Navigate to the Usage & Billing tab.
- Apply a Tag Filter (e.g., project:dex).
- The usage chart now reflects only the API credits consumed by endpoints with that tag.
Tip: You can also export usage data to a CSV file for further analysis.
Tip: For real-time monitoring of RPC usage and setting up alerts, check out the Monitor RPC Usage and Set Up Alerts with Admin API guide.
Practical Example
Let's walk through setting up an organization with three teams: Wallet, Cloud, and Infrastructure. Each team needs isolated access to their endpoints, with shared visibility into some common infrastructure.
Step 1: Define Your Tag Taxonomy
Establish tags before creating any assignments:
- Team ownership:
owner:wallet,owner:cloud,owner:infra - Environment:
env:prod,env:staging,env:dev - Project:
project:dex,project:indexer,project:mobile-wallet
Step 2: Create Teams
If not already created, set up your teams in the dashboard:
- Wallet Team
- Cloud Team
- Infrastructure Team
Then, invite users to their respective teams with appropriate RBAC roles.
Step 3: Tag All Endpoints
Apply tags consistently to all endpoints. For example, a production Ethereum Mainnet endpoint used by the Wallet team for the DEX project would receive: env:prod, owner:wallet, and project:dex.
Step 4: Assign Endpoints to Teams
From the Endpoints list, use Settings to assign each endpoint to its owning team:
- Wallet Team endpoints → assign to Wallet Team
- Cloud Team endpoints → assign to Cloud Team
- Infrastructure Team endpoints → assign to Infrastructure Team
- Shared infrastructure endpoints → leave unassigned (visible to all users)
Step 5: Verify the Configuration
Ask each team member to log in and verify they see only their assigned endpoints. Check that filters work correctly within each team's view.
Step 6: Set Up Usage Monitoring
With tags in place, navigate to the Usage tab and filter by team tags (e.g., owner:wallet) to verify you can generate per-team consumption reports. Export a sample CSV to confirm the data format meets your reporting needs.
Conclusion
Managing a large Quicknode account doesn't require separate accounts for each team. By combining RBAC roles, team-based endpoint visibility, and a thoughtful tagging strategy, you can provide each team with isolated access to their resources while maintaining centralized administration and billing.
This guide covered designing an organizational strategy, implementing tags and team assignments, using filters effectively, and monitoring usage for cost allocation. With these tools, your account scales cleanly as your organization grows.
For foundational concepts, review the Team Management and RBAC guide. To automate endpoint management at scale, explore the Admin API guide. For real-time monitoring dashboards, see How to Build a Grafana Dashboard.
If you have questions or need assistance implementing these patterns, reach out through our Discord server. Stay up to date with the latest by following us on X and our Telegram announcement channel.
Frequently Asked Questions
What is the difference between tags and team assignments?
Tags are metadata labels for organizing and filtering endpoints (e.g., `env:prod`, `owner:wallet`). They do not affect who can access an endpoint. Team assignments control which members can see a given endpoint. You use tags to organize your view; you use teams to restrict access.
What happens to endpoints that have no team assignment?
Endpoints with no team assignment are visible to all members on the account, regardless of which teams those members belong to. Assign an endpoint to a team only when you want to restrict its visibility to that team's members.
Can an Admin see endpoints assigned to teams they are not a member of?
No. Admin role grants full management permissions, but endpoint visibility is always determined by team membership, not role. An Admin who is not a member of the Wallet Team cannot see Wallet Team endpoints. To see all endpoints, an Admin must join all relevant teams or view unassigned endpoints.
How do I generate a per-team cost report?
Navigate to Usage and Billing and apply a tag filter matching your team's tag (e.g., `owner:wallet`). The usage chart updates to show only API credits consumed by endpoints with that tag. You can also export the data as a CSV for further analysis.
Can I automate tagging and team assignments at scale?
Yes. The Admin API supports programmatically adding tags to endpoints and updating team endpoint assignments. The Quicknode CLI provides a higher-level interface for the same operations, useful for scripting and CI workflows without constructing raw HTTP requests.
Do I need separate accounts for each team?
No. Quicknode's Members and Teams model is designed for multi-team organizations within a single account. Each team sees only its assigned endpoints, and RBAC roles control what each member can do across the dashboard. Separate accounts are not needed.
We ❤️ Feedback!
Let us know if you have any feedback or requests for new topics. We'd love to hear from you.