5 min read
Overview
Security is one of the most significant aspects when developing an application. If a resource like an endpoint falls into the hands of an unauthorized individual, it can exhaust your limits and resources. In this guide, we will see how to avoid this and learn how to set up a referrer whitelist on a QuickNode endpoint.
The Referrer Whitelist security feature is only available to users on the Build plan or above.
What is Referrer Whitelisting?
First, let's clarify what a referrer is. In the HTTP standard, 'referrer' is commonly spelled 'referer.' It is part of the HTTP request header that indicates the origin of a web request, usually pointing to the web page that linked to a requested resource. This information helps servers identify the source of requests.
In the context of QuickNode, referrer whitelisting is a crucial security feature that allows developers building decentralized applications (dApps) to specify which domains are permitted to make requests to their endpoints. Imagine you are developing a dApp that interacts with the blockchain using your QuickNode endpoint. When your codebase is hosted on a platform like GitHub, your active QuickNode endpoint URL might become publicly accessible. If someone obtains this URL, they could make unauthorized calls to your endpoint, resulting in excess usage not initiated by you.
This is where QuickNode's Referrer Whitelist feature becomes valuable. By whitelisting a referrer, you can restrict requests to only those originating from specific domains, rejecting all others. This ensures that only legitimate requests from approved sources are processed by your endpoint.
Implementing referrer whitelisting enhances the security of your applications and helps prevent unauthorized access to your QuickNode endpoints.
QuickNode treats both the Referer and Origin headers similarly for referrer whitelisting. This means that a request with either header matching a whitelisted domain will be accepted. However, these headers can serve different purposes in your frontend logic, so ensure consistency when setting them in your application.
How to Set Up a Referrer in QuickNode
Let us have a look at how we can set up a referrer whitelist with QuickNode. First of all, you will need access to an endpoint. If you don't have it already, you can easily sign up with a free QuickNode account here, set up an endpoint.
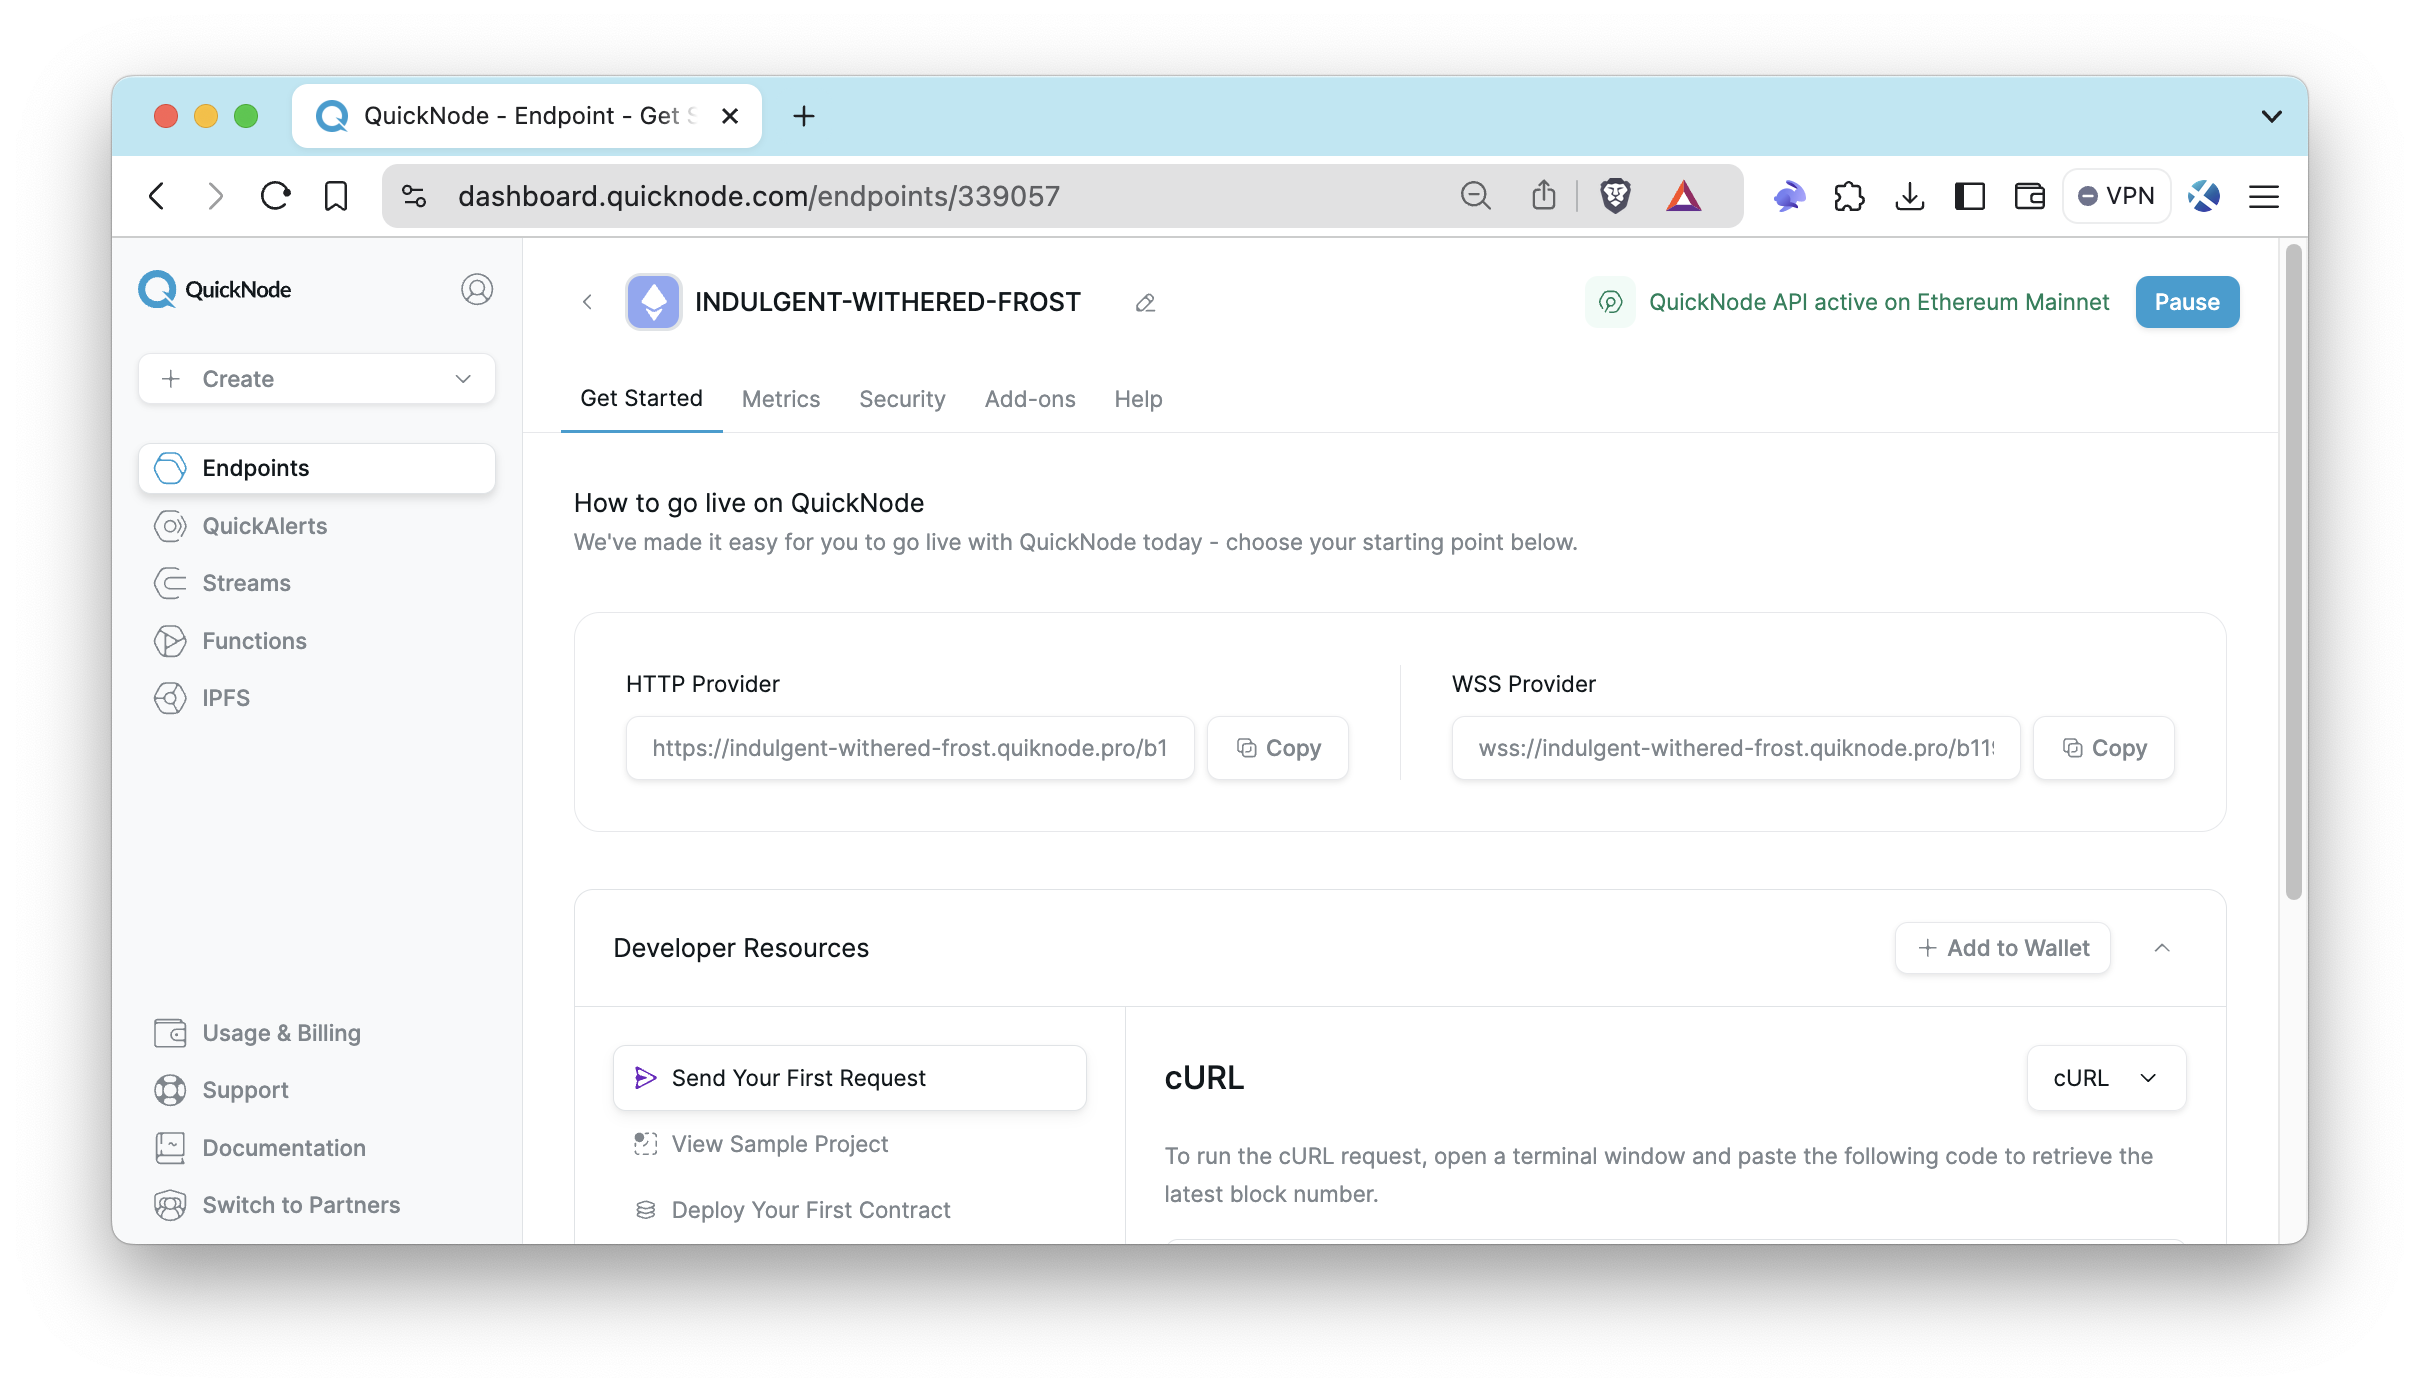
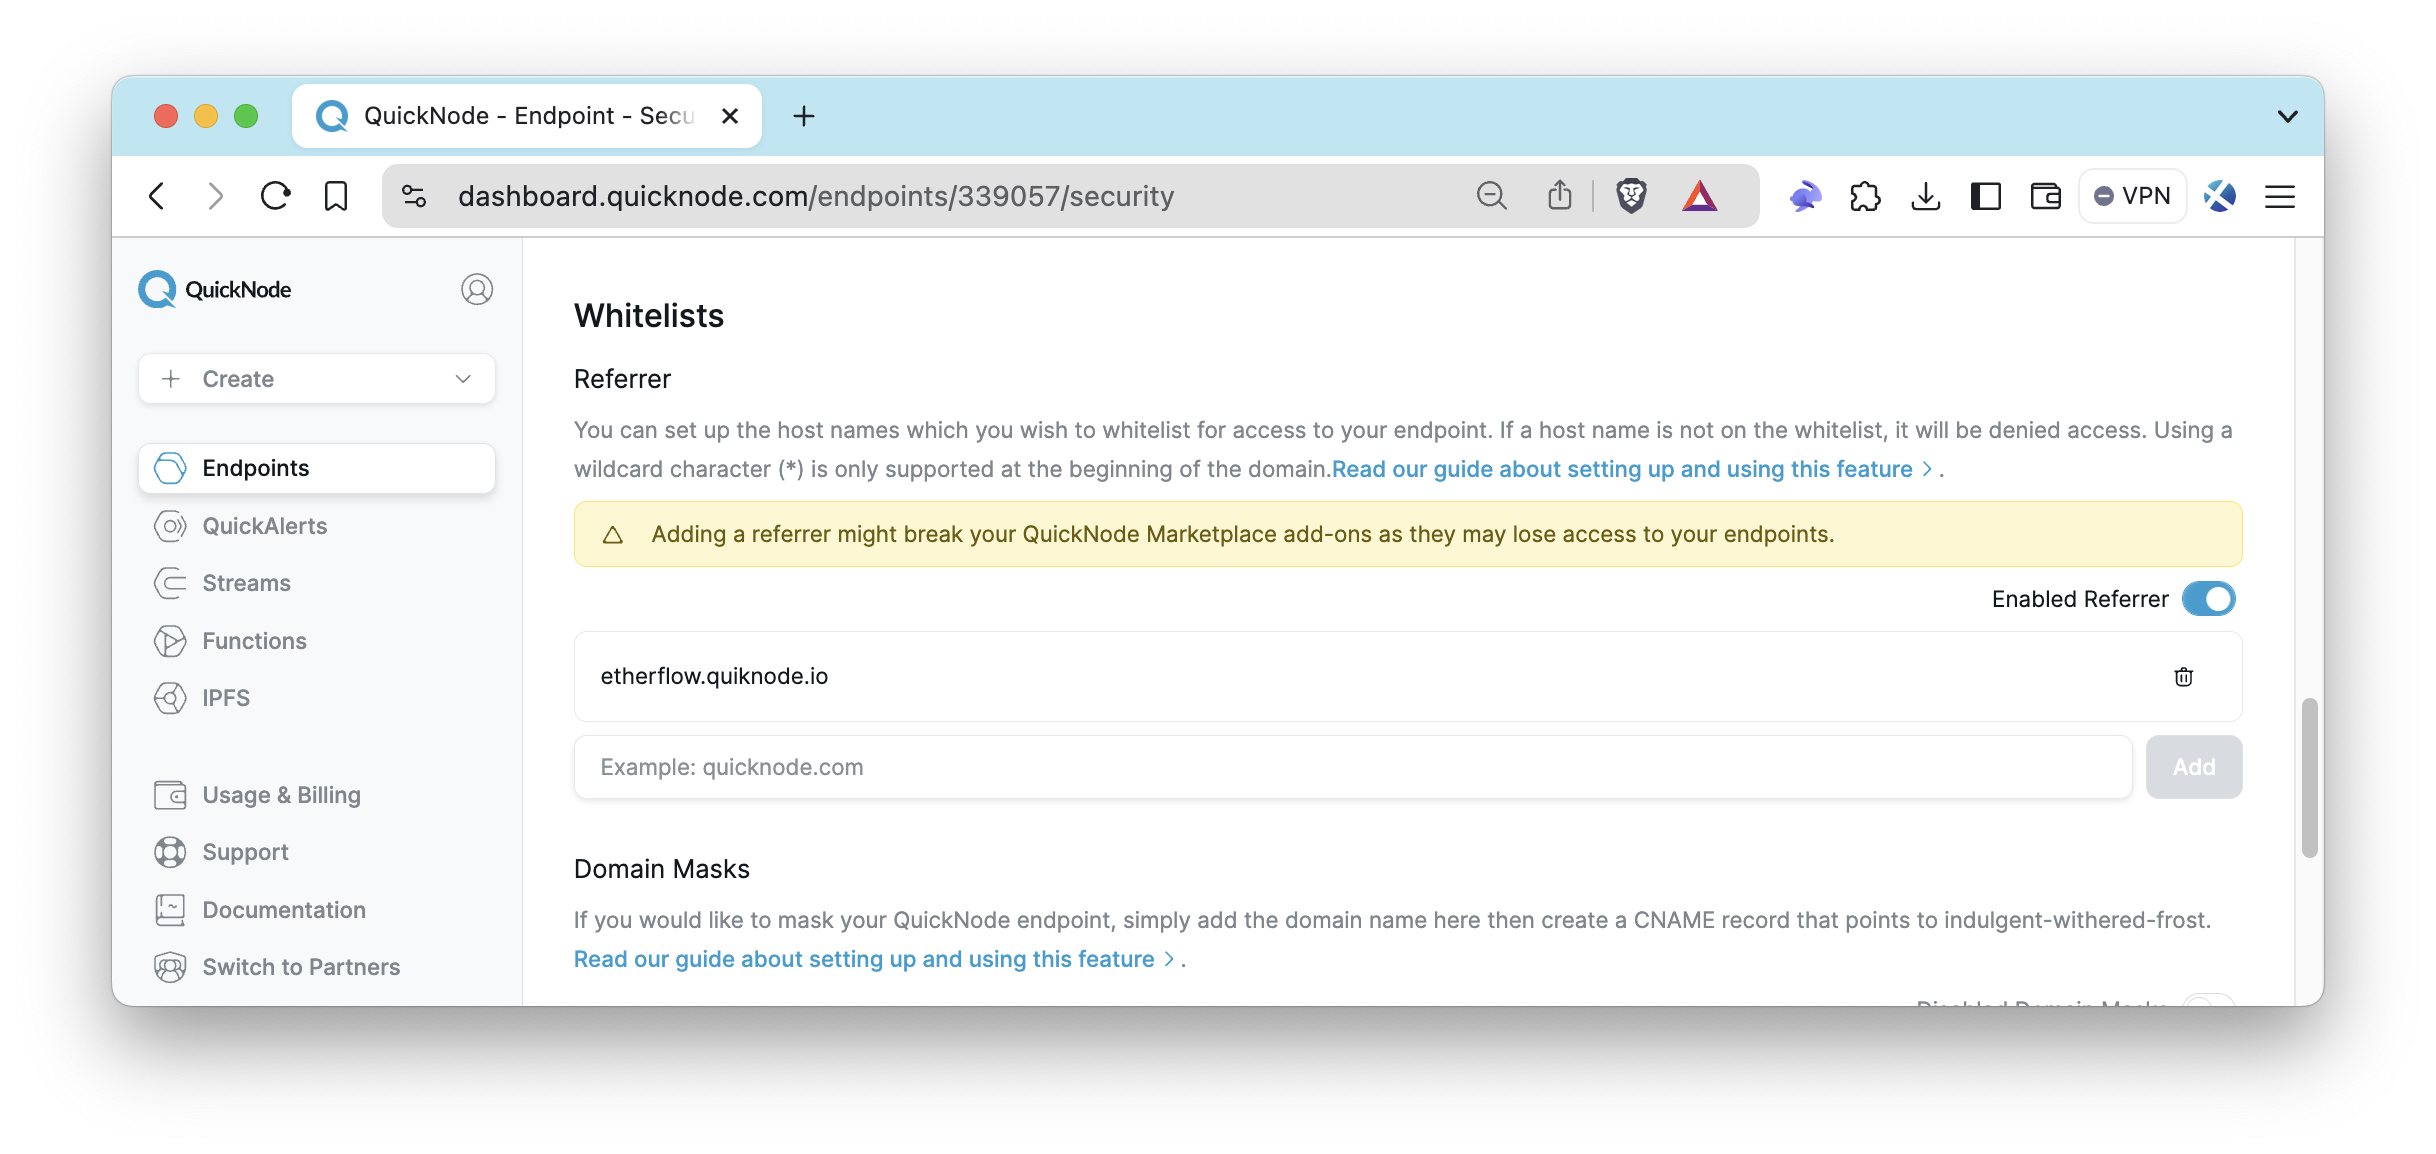
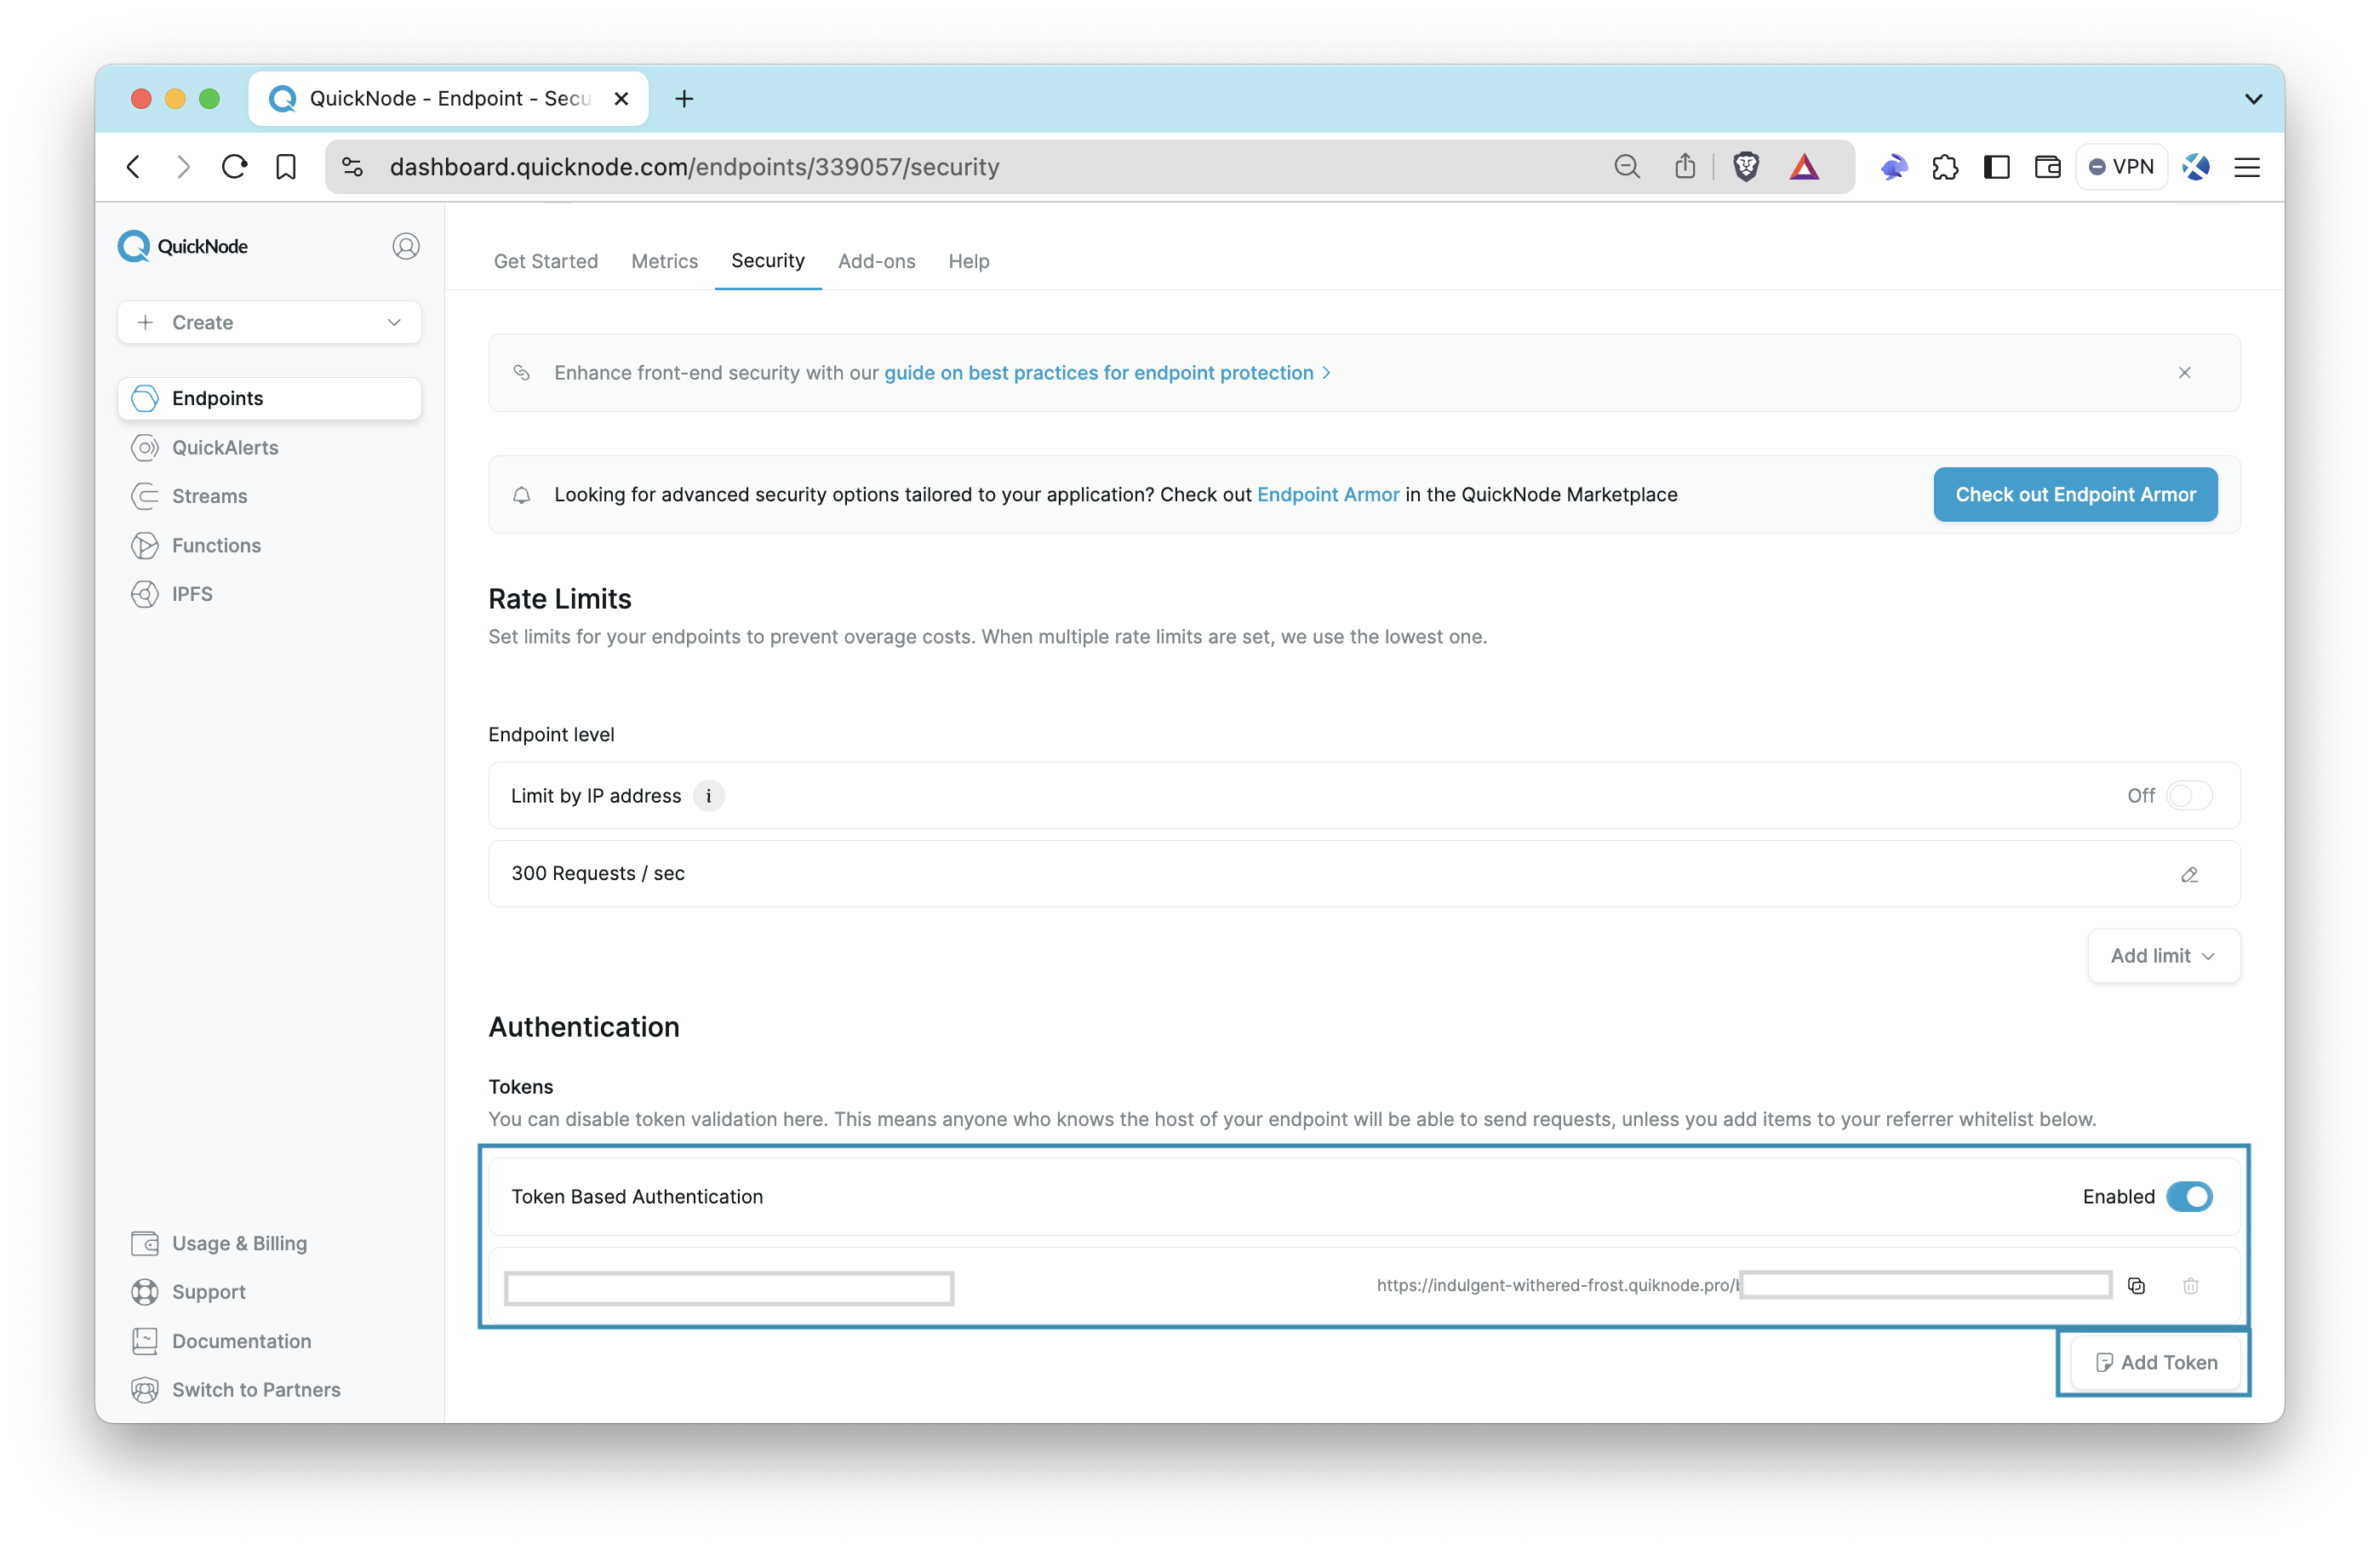
After setting up your endpoint, visit the Security section for that endpoint and go to the Referrer section.
Enable referrer whitelist by clicking the referrer toggle. Then, enter the desired hostname or domain you want to whitelist, excluding URL fragments such as #section or /resource, and any user information like username:password. Simply input the domain without including the HTTP/HTTPS protocol. You can check the examples below for guidance:
| Correct (✅) | Incorrect (❌) |
|---|---|
| etherflow.quiknode.io | https://etherflow.quiknode.io/ |
| mysite.example.com | https://mysite.example.com/#about |
| app.example.net | app.example.net/resource |
| docs.yourdomain.org | docs.yourdomain.org/resource/page |
Now, only the requests to your endpoint made directly from https://etherflow.quiknode.io/ will be served. Let's test this!
Calls From a Whitelisted Domain
EtherFlow is a tool that makes it easier to send RPC calls to endpoints. Thus, we will use EtherFlow domain as a whitelisted referrer. If you want to use it as well, feel free to follow the steps below:
- Visit EtherFlow.
- Enter your endpoint's HTTP Provider URL in the box at the top.
- Choose a Web3 library (either Web3.js or Ethers.js).
- Select a method from the available options.
- Click the Send Request To Node button.
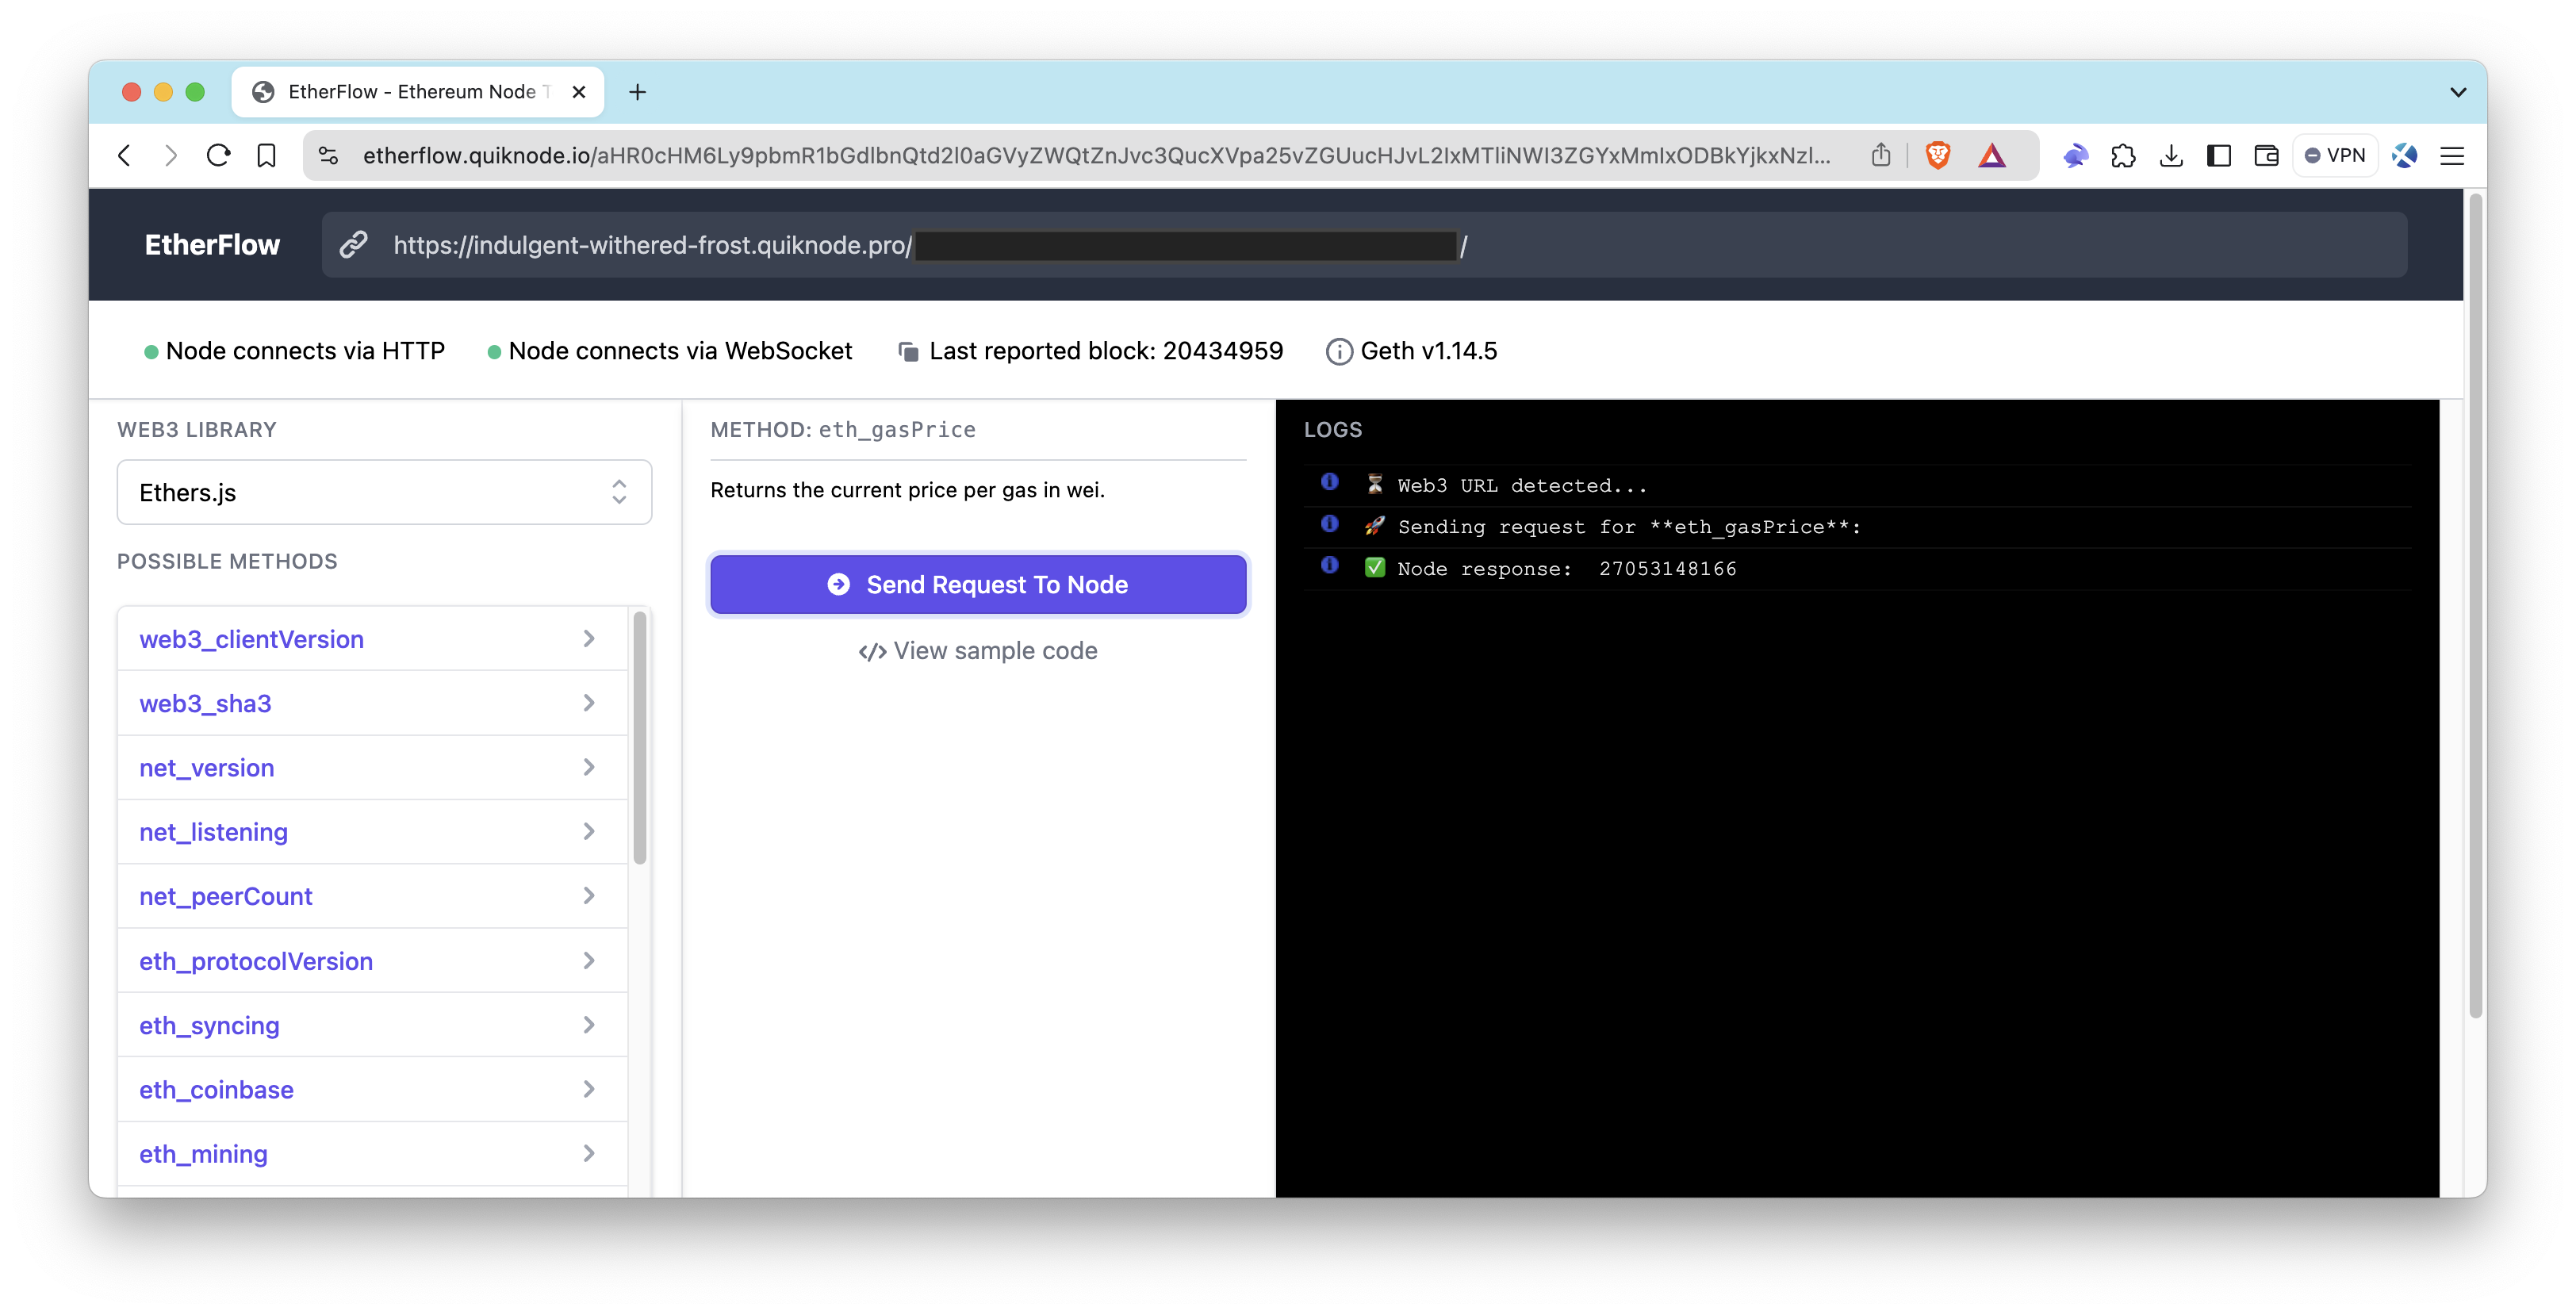
As you can see, the endpoint is responding completely fine on that domain now. Let us try to make a cURL call to our endpoint.
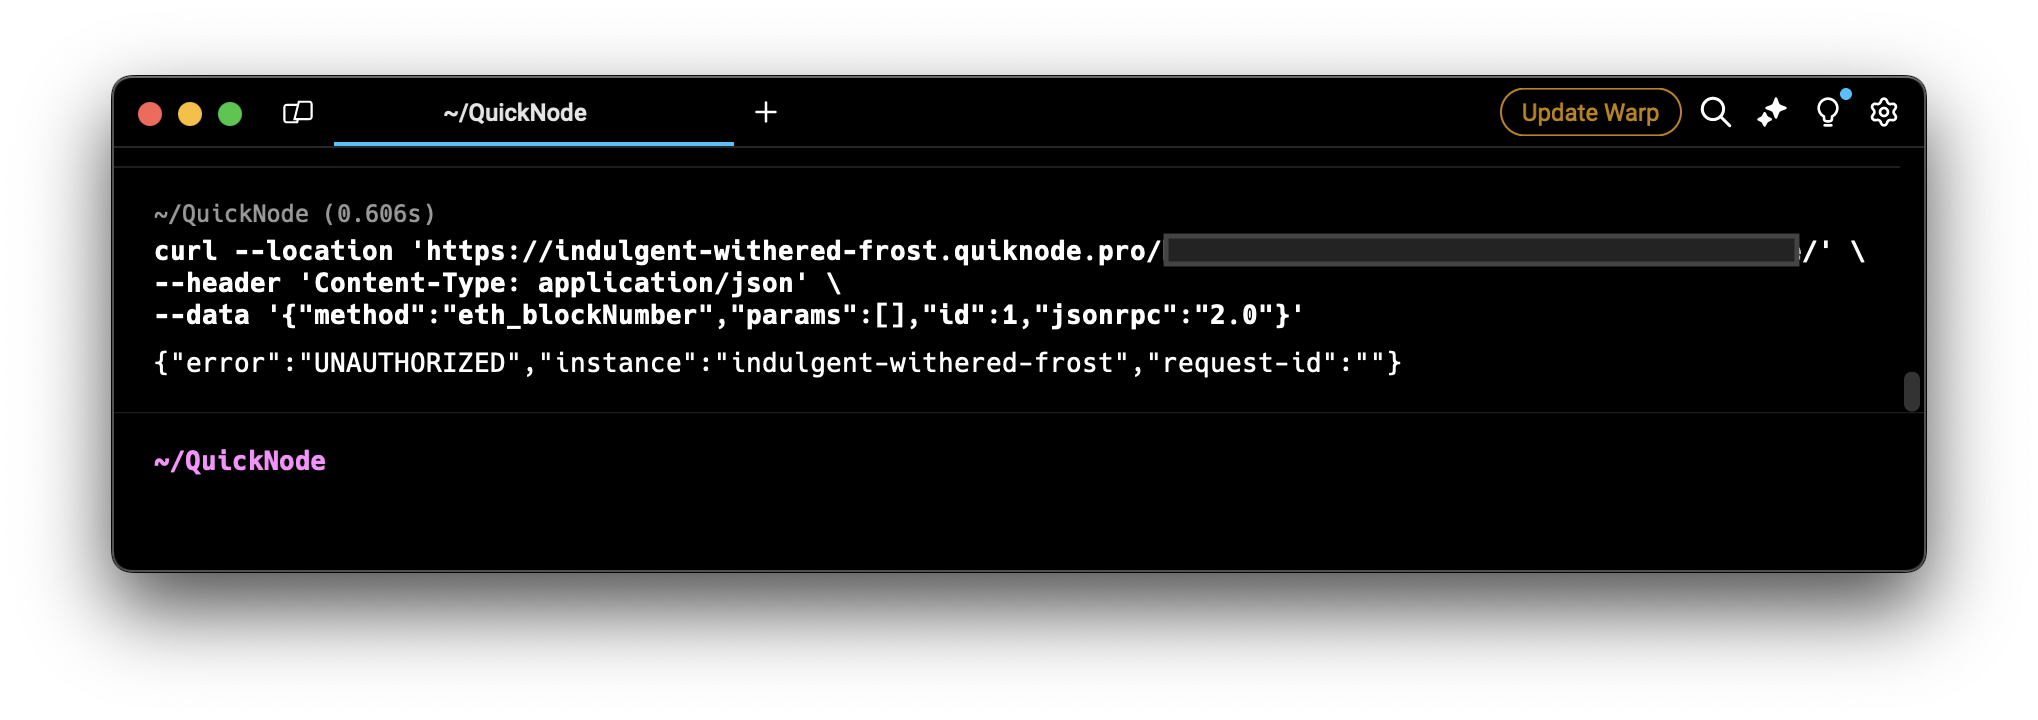
cURL Call Without a Referer Header
Open your terminal and run the following command. Do not forget to replace the <YOUR_QUICKNODE_ENDPOINT_URL> placeholder in the CURL request below with the your QuickNode endpoint URL.
curl --location '<YOUR_QUICKNODE_ENDPOINT_URL>' \
--header 'Content-Type: application/json' \
--data '{"method":"eth_blockNumber","params":[],"id":1,"jsonrpc":"2.0"}'
As you can see, the endpoint did not respond and gave an UNAUTHORIZED error. It will only respond to the requests made by the whitelisted referrer.
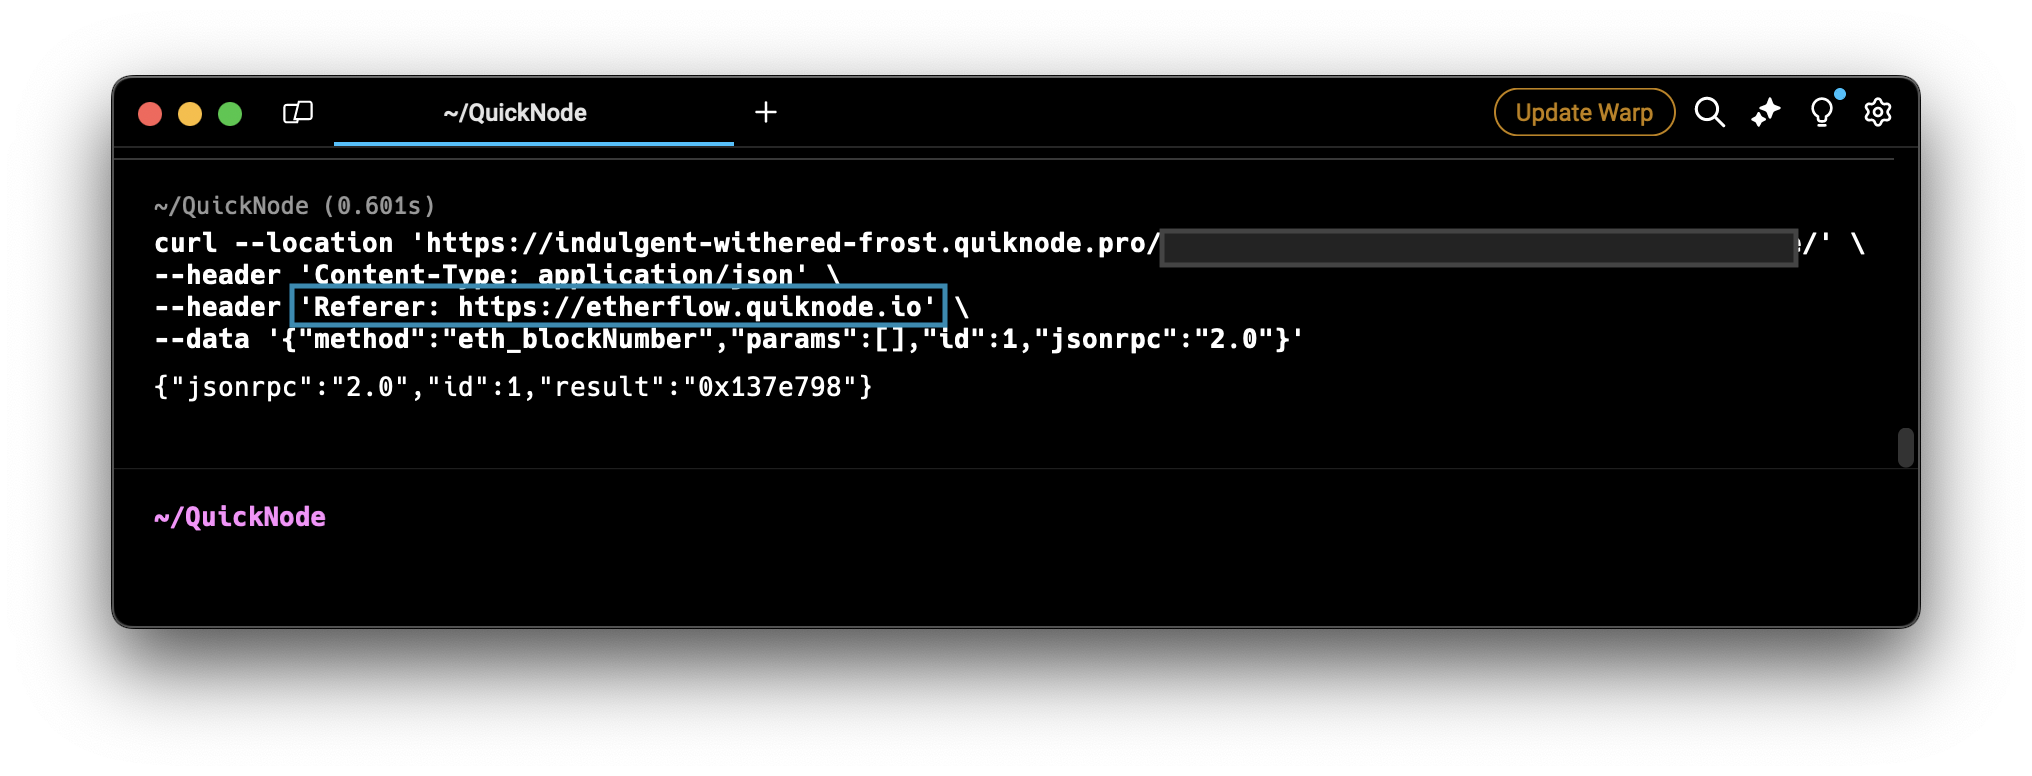
cURL Call With a Referer Header
While using this feature, you must ensure that all requests your website sends to the endpoint have either the Referer or Origin HTTP header set to exactly match what you've whitelisted in the QuickNode UI. For example, if you've added example.com in the QuickNode UI, your HTTP request should have https://example.com as the Referer Header or Origin Header. For WebSocket (WSS) endpoints, the Origin header must match the whitelisted domain.
Let's try to make a cURL call with the referer header to our endpoint.
Open your terminal and run the following command. Do not forget to replace the <YOUR_QUICKNODE_ENDPOINT_URL> placeholder in the CURL request below with your QuickNode endpoint URL. Also, modify the Referer Header with your whitelisted domain.
curl --location '<YOUR_QUICKNODE_ENDPOINT_URL>' \
--header 'Content-Type: application/json' \
--header 'Referer: https://etherflow.quiknode.io' \
--data '{"method":"eth_blockNumber","params":[],"id":1,"jsonrpc":"2.0"}'
As you can see, the endpoint responded without any error.
While referrer whitelisting enhances security, it is not foolproof. HTTP headers like Referer and Origin can be manipulated by bad actors using tools like cURL. For example, someone with your endpoint URL and knowledge of the whitelisted domain could craft a request with the correct headers to bypass this restriction. For stronger protection, consider combining referrer whitelisting with other security features like rate limiting or authentication tokens.
cURL Call With a Origin Header
Now, let’s test the same endpoint using the Origin header, which QuickNode also accepts for referrer whitelisting.
Open your terminal and run the following command. Replace the <YOUR_QUICKNODE_ENDPOINT_URL> placeholder with your QuickNode endpoint URL and modify the Origin Header with your whitelisted domain.
curl --location '<YOUR_QUICKNODE_ENDPOINT_URL>' \
--header 'Content-Type: application/json' \
--header 'Origin: https://etherflow.quiknode.io' \
--data '{"method":"eth_blockNumber","params":[],"id":1,"jsonrpc":"2.0"}'
You will see that the endpoint responds successfully, just as it did with the Referer header, demonstrating that QuickNode treats both headers equivalently for this feature. As a quick test, you can also change the origin value and verify requests will fail (i.e, {"error":"UNAUTHORIZED","instance":"orbital-crimson-energy","request-id":""})
Authentication Tokens
Another notable security feature is the ability to manage authentication tokens. If you suspect that someone has access to your endpoint URL, you can generate a new token and delete the existing one. This action will render the old endpoint URL obsolete.
Additional Resources
For further information on enhancing your endpoint security, consider exploring the following guides. These resources provide valuable insights and best practices for securing your QuickNode endpoints.
- How to Protect Your Endpoint - Front End Best Practices
- How to Implement JSON Web Tokens (JWT) Authorization with QuickNode
- How to Set Up Multi-Token Authentication on QuickNode
- How to Set Up Domain Masking on QuickNode
Conclusion
In this guide, we learned how to set the Referrer and Origin header correctly in HTTP requests to utilize QuickNode's referrer whitelisting feature, ensuring secure and authorized access to your endpoints.
Subscribe to our newsletter for more articles and guides on Ethereum. If you have any feedback, feel free to reach out to us via Twitter. You can always chat with us on our Discord community server, featuring some of the coolest developers you'll ever meet :)
We ❤️ Feedback!
Let us know if you have any feedback or requests for new topics. We'd love to hear from you.