
8 min read
Your Quicknode Stream can now deliver to multiple destinations simultaneously from a single pipeline. No duplicate streams, no config drift, and no additional charge per destination. Available destinations per stream vary by plan. Learn more.
Overview
If you ever wanted to stream blockchain data in real-time in an easy and scalable matter, you probably got discouraged due to the complexity of creating the infrastructure and the management needed to keep operations running smoothly. Streams by Quicknode is a blockchain data streaming solution enabling you to stream historical and real-time blockchain data to your application or service. You no longer have to worry about building or managing your own data pipeline, as with Streams, data delivery and scaling are all done for you.
In this guide, we will dive more into Streams and how it works; later, we'll show you how to build a React app that streams real-time blockchain data to your frontend using Express.js and ngrok as the API services.
What You Will Do
- Learn about Streams
- Learn how to request and receive real-time data with Streams
- Create a Stream (create an account here)
- Visualize real-time blockchain data using React as the frontend, ngrok as the backend, and Streams for blockchain data source
What You Will Need
- Basic understanding of programming concepts
- A Stream created on Quicknode
- A code editor (e.g., VSCode)
- Node.js installed along with React and ngrok
| Dependency | Version |
|---|---|
| node.js | 18.13.0 |
| ngrok | 3.3.1 |
| react | ^18.2.0 |
What is Streams?
Streams pushes real-time blockchain data to you in an event-driven model designed for efficient and consistent data delivery. Developers can stream historical and real-time blockchain data to a number of destinations such as Webhooks (HTTP Endpoints), AWS S3 Object Storage, and more coming soon. Streams removes the complexity of having to constantly poll blockchain data to get updates, handle errors/retries, and navigate chain reorgs.
In the next section, we will start developing the React app that streams block data to our frontend.
Datasets
With Streams, users have a variety of tailored datasets they can choose from. Each dataset provides a different view of blockchain data and can be selected based on the use case/need for the data. Current datasets include:
- Block - This dataset represents the block schema you would see when making the JSON-RPC call to eth_getBlockByHash or eth_getBlockbyNumber and includes field such as:
hash,nonce,transactions[]and more. - Block with Receipts - This dataset represents a block schema along with receipts of transactions included in the block. This schema is similar to what you would see when calling the eth_getBlockByNumber and eth_getBlockReceipts JSON-RPC methods.
- Receipts - The receipts data includes only transaction receipts and excludes block header data. This dataset corresponds to the eth_getBlockReceipts JSON-RPC method.
- Transactions - The transactions dataset narrows data down to focus on transaction details; this is useful for use cases when transaction data in a block is the only data you need, excluding block header data you might not need. This dataset corresponds to similar fields you would receive when using the eth_getTransactionByHash method.
- Logs - The logs dataset corresponds to events that occur within smart contracts. This can be related to various activities, such as token swapping (DeFi), NFT minting, etc. This schema is useful when analyzing, storing, or decoding smart contract interactions is important. This dataset corresponds to fields similar to what you would see when using eth_getLogs
To find out the exact specifications of datasets, take a look at the Streams documentation. The datasets above can be sent to a number of destinations, which we will get into next.
Destinations
There are different destinations you can use depending on your Streams use case. Let's recap the options available at a high level, and if you want to learn more specifics, check out the Streams - Destinations Documentation.
Webhooks
Webhooks enable you to transmit data to a designated HTTP endpoint in real-time, such as https://app.com/webhook, making them ideal for lightweight applications. Additionally, for larger amounts of data, it can be compressed using Gzip.
S3
Object storage solutions like S3 buckets enable users to archive or store blockchain data. This is common for use cases that require the storage of large amounts of blockchain data. S3 offers enterprise data durability and availability for users who need storage solutions for their extensive data requirements.
How Does Streams Handle Reorgs?
When streaming blockchain data in real-time, it is possible the blockchain you are using incurs a reorg. This is important to detect and handle and you want to make sure you have the ground truth data.
Reorgs occur when a new block is proposed, but the previous hash it proposes does not match the previous mined block's hash. Streams ensure that if a reorg does occur, you have options to handle it properly.
Two reorg options you can enable on Streams are:
- Latest block delay: Where you can set a delay from the chain tip to reduce reorg risks in near-real-time streamed data
- Restream on reorg: This option enables you to stream updated chain segments immediately after a reorg occurs
For this guide's demonstration, we won't enable either option, but note that the application we create may include reorgs. To prevent this, you can enable the block delay to a value like 7 to be more secure against reorgs.
Refer to our documentation for more specifics or our blog for more details on reorgs - Understanding Blockchain Reorgs: Why Block Numbers Don't Matter as Much as You Think.
Now that we have a better understanding of how reorgs on Streams work, let's pivot to the technical portion of this guide.
Build a React App that Streams Blockchain Data
For the remainder of the guide, we'll demonstrate how to set up your React app. This will consist of creating your backend API, frontend React server, and Stream on Quicknode.
The process of building our functioning React app that streams real-time blockchain data to our frontend includes the following:
- Initialize an Express.js HTTP server that listens to incoming Webhook requests. We will run this server both locally and on a production domain using ngrok
- Render a React app that streams incoming requests using WebSockets and renders pages that display Stream data differently (e.g., Logs tab, Dashboard tab)
- Create a Stream that pushes real-time blockchain data; more specifically, we will use the Block with Receipts dataset. This will allow us to stream both high-level block information and transaction receipt info that contains value transferred and smart contract event info (via logs).
Now to building, first, open a terminal window and run the following commands in order to clone the Github repository the code lives in:
git clone https://github.com/quiknode-labs/qn-guide-examples.git
cd qn-guide-examples && cd Streams
Next, let's open the project in a code editor (e.g., VSCode) and start installing dependencies and running the server:
Set Up A Backend Server with Express.js
The API server performs the following functions with the tech stack:
- Initialize an Express.js HTTP API server that utilizes CORS for middleware and libraries like socket.io and body-parser to parse data.
- Serve a
/webhookPOST endpoint that listens to incoming requests, processes the response, emits the response to the socket.io server, and sends a200OK response back
First, install dependencies:
npm install
Next, ensure that you have a ngrok account that is authenticated and the CLI tool installed. Then start the ngrok server with the following command:
ngrok http 3000
This will create an HTTPS endpoint on a randomly assigned ngrok domain. Keep this server running, as we'll need it for the remainder of this guide. Let's dive into the core API endpoint (/webhook) being served at this endpoint in the app.js file:
app.post('/webhook', (req, res) => {
    message = req.body;
    console.log('Received a POST request');
    console.log('Headers:', req.headers);
    console.log('Received message:', message);

    if (!req.body) {
        return res.sendStatus(400);
    }

    const processedData = processData(message);
    // Emit the data to all connected clients
    io.emit('stream', processedData);

    res.status(200).end('Message received');

});
Open another terminal window within the same directory and run the command below to start the local server. Ensure you still have the ngrok server running in another terminal window.
node app.js
You'll see a message in your terminal: App is listening on port 3000. Now, our API is listening to incoming POST requests. With our server running properly, let's transition to the React frontend code located in the qs-react-app folder.
Run the Frontend
In this section, we'll explain the tech stack the frontend uses and show you how to install dependencies and start the frontend server properly.
Navigate to the qs-react-app folder and install dependencies with the command npm install:
cd qs-react-app
npm install
Let's cover the main code logic being used to stream the data to React and render it on our frontend.
- In the App.js file, we open a socket at the same port our Express server is running on (e.g., 3000), process the data and render it in our
MainPagecomponent (which is imported). - In the LogsTab.js file, we declare a React component called
Logsthat renders a list of blockchain data, including metrics like the count of specific USDC transfer per block. This is tracked via the event signature displayed in the logs. In the case of a USDC transfer, it is:
const ERC20_TRANSFER_EVENT_SIGNATURE = Web3.utils.sha3('Transfer(address,address,uint256)');
The code we define uses the function countERC20Transfers to loop over each receipt in the block response and check if the log.topics[0] matches that event signature. It also uses the Web3 library to parse raw blockchain data into a more human-readable format.
- The DashboardTab.js contains the
Dashboardcomponent and compiles unique metrics for the USDC transfers we detect in each real-time block response. Both Logs.js and Dashboard files utilize tailwind CSS for styling. - The MainPage.js file renders the
MainPagecomponent of your React app and allows toggles between yourLogsandDashboardcomponents.
After, start your frontend server with the npm run start command. You can visit the page at PORT 3001 (e.g., http://localhost:3001).
Create a Stream
Up until this point, you should now have a ngrok http port running (serving you a unique HTTP URL to your Express API), a local backend running, and your React frontend running. Starting our Stream after this infrastructure has been deployed (or paused) is crucial as Streams have to retry and terminate logic if too many unnecessary bad requests hit your destination source.
First, navigate to your Quicknode dashboard, then navigate to the Streams tab and click Create Stream.
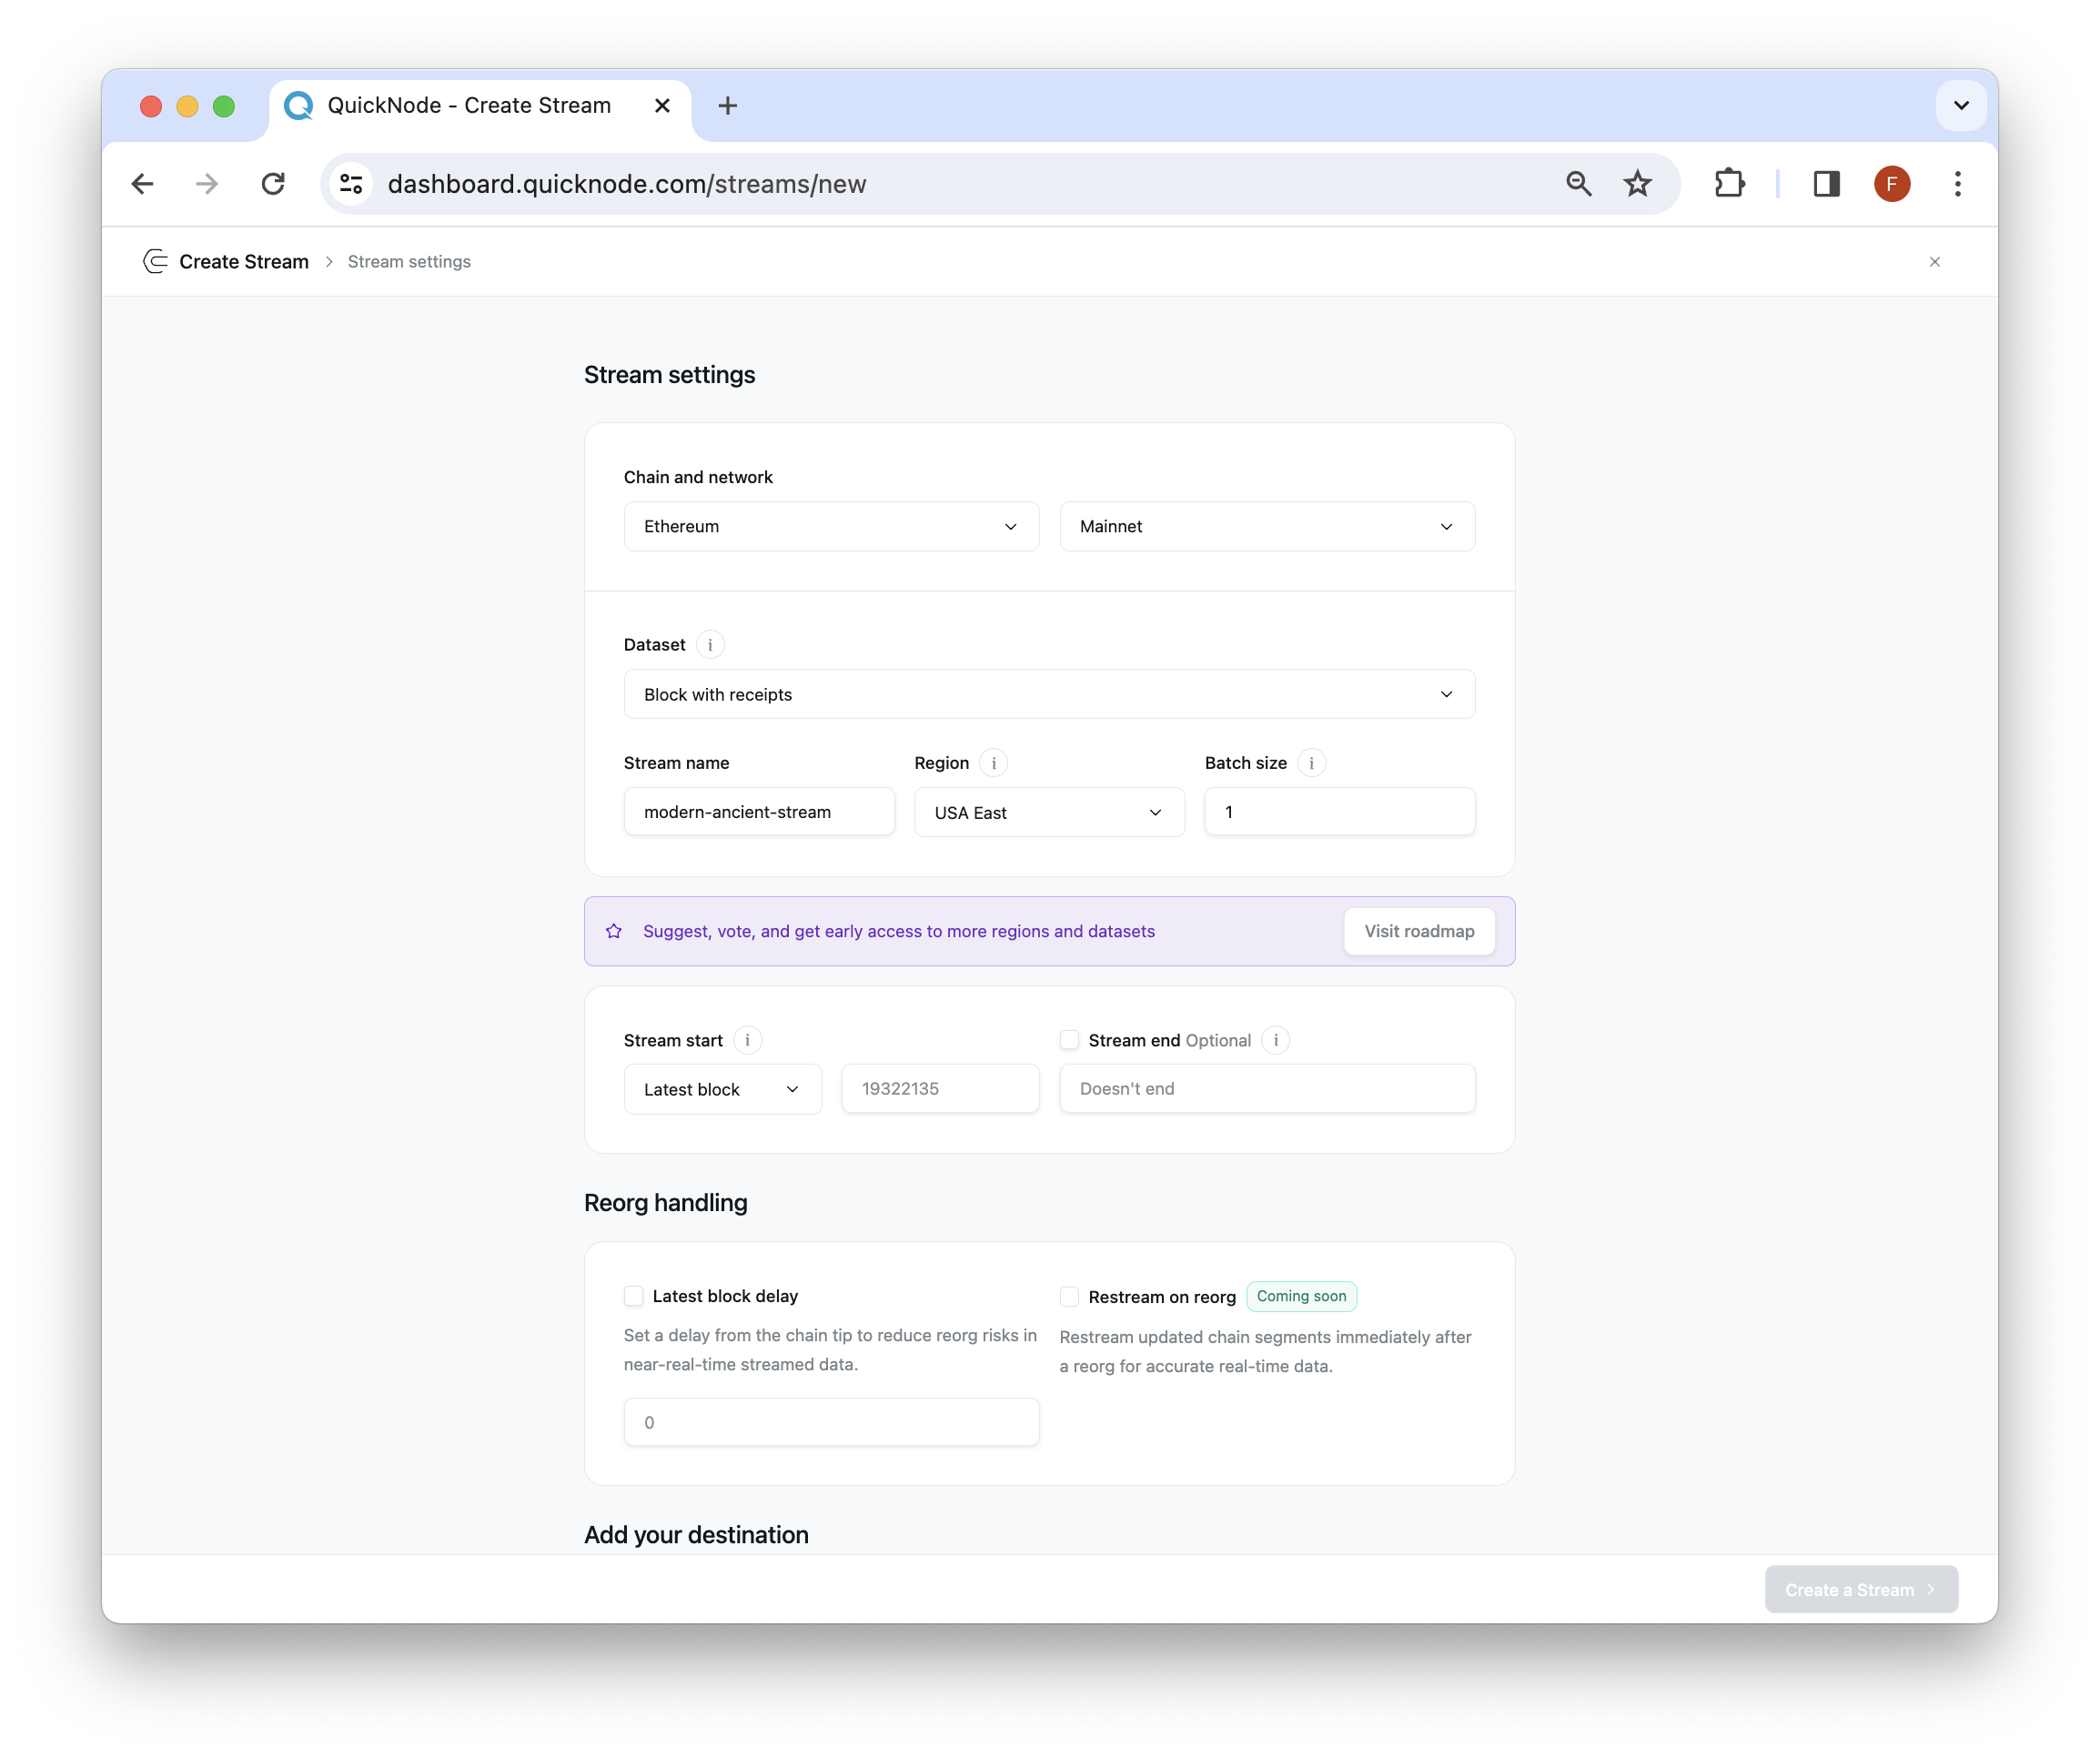
In the Stream Settings section, follow this configuration:
Stream Settings
- Chain: Ethereum; Network: Mainnet
- Dataset: Block with Receipts
- Stream start: Latest block + doesn't end
- Reorg Handling: Leave unchecked
For any other fields not mentioned above, leave them as their default values.
Destination Settings
- Destination type: Webhook
- URL: Add your
ngrokURL +/webhookto the end (e.g.,https://your-ngrok-domain.ngrok-free.app/webhook) - Custom headers: Content-type: application/json
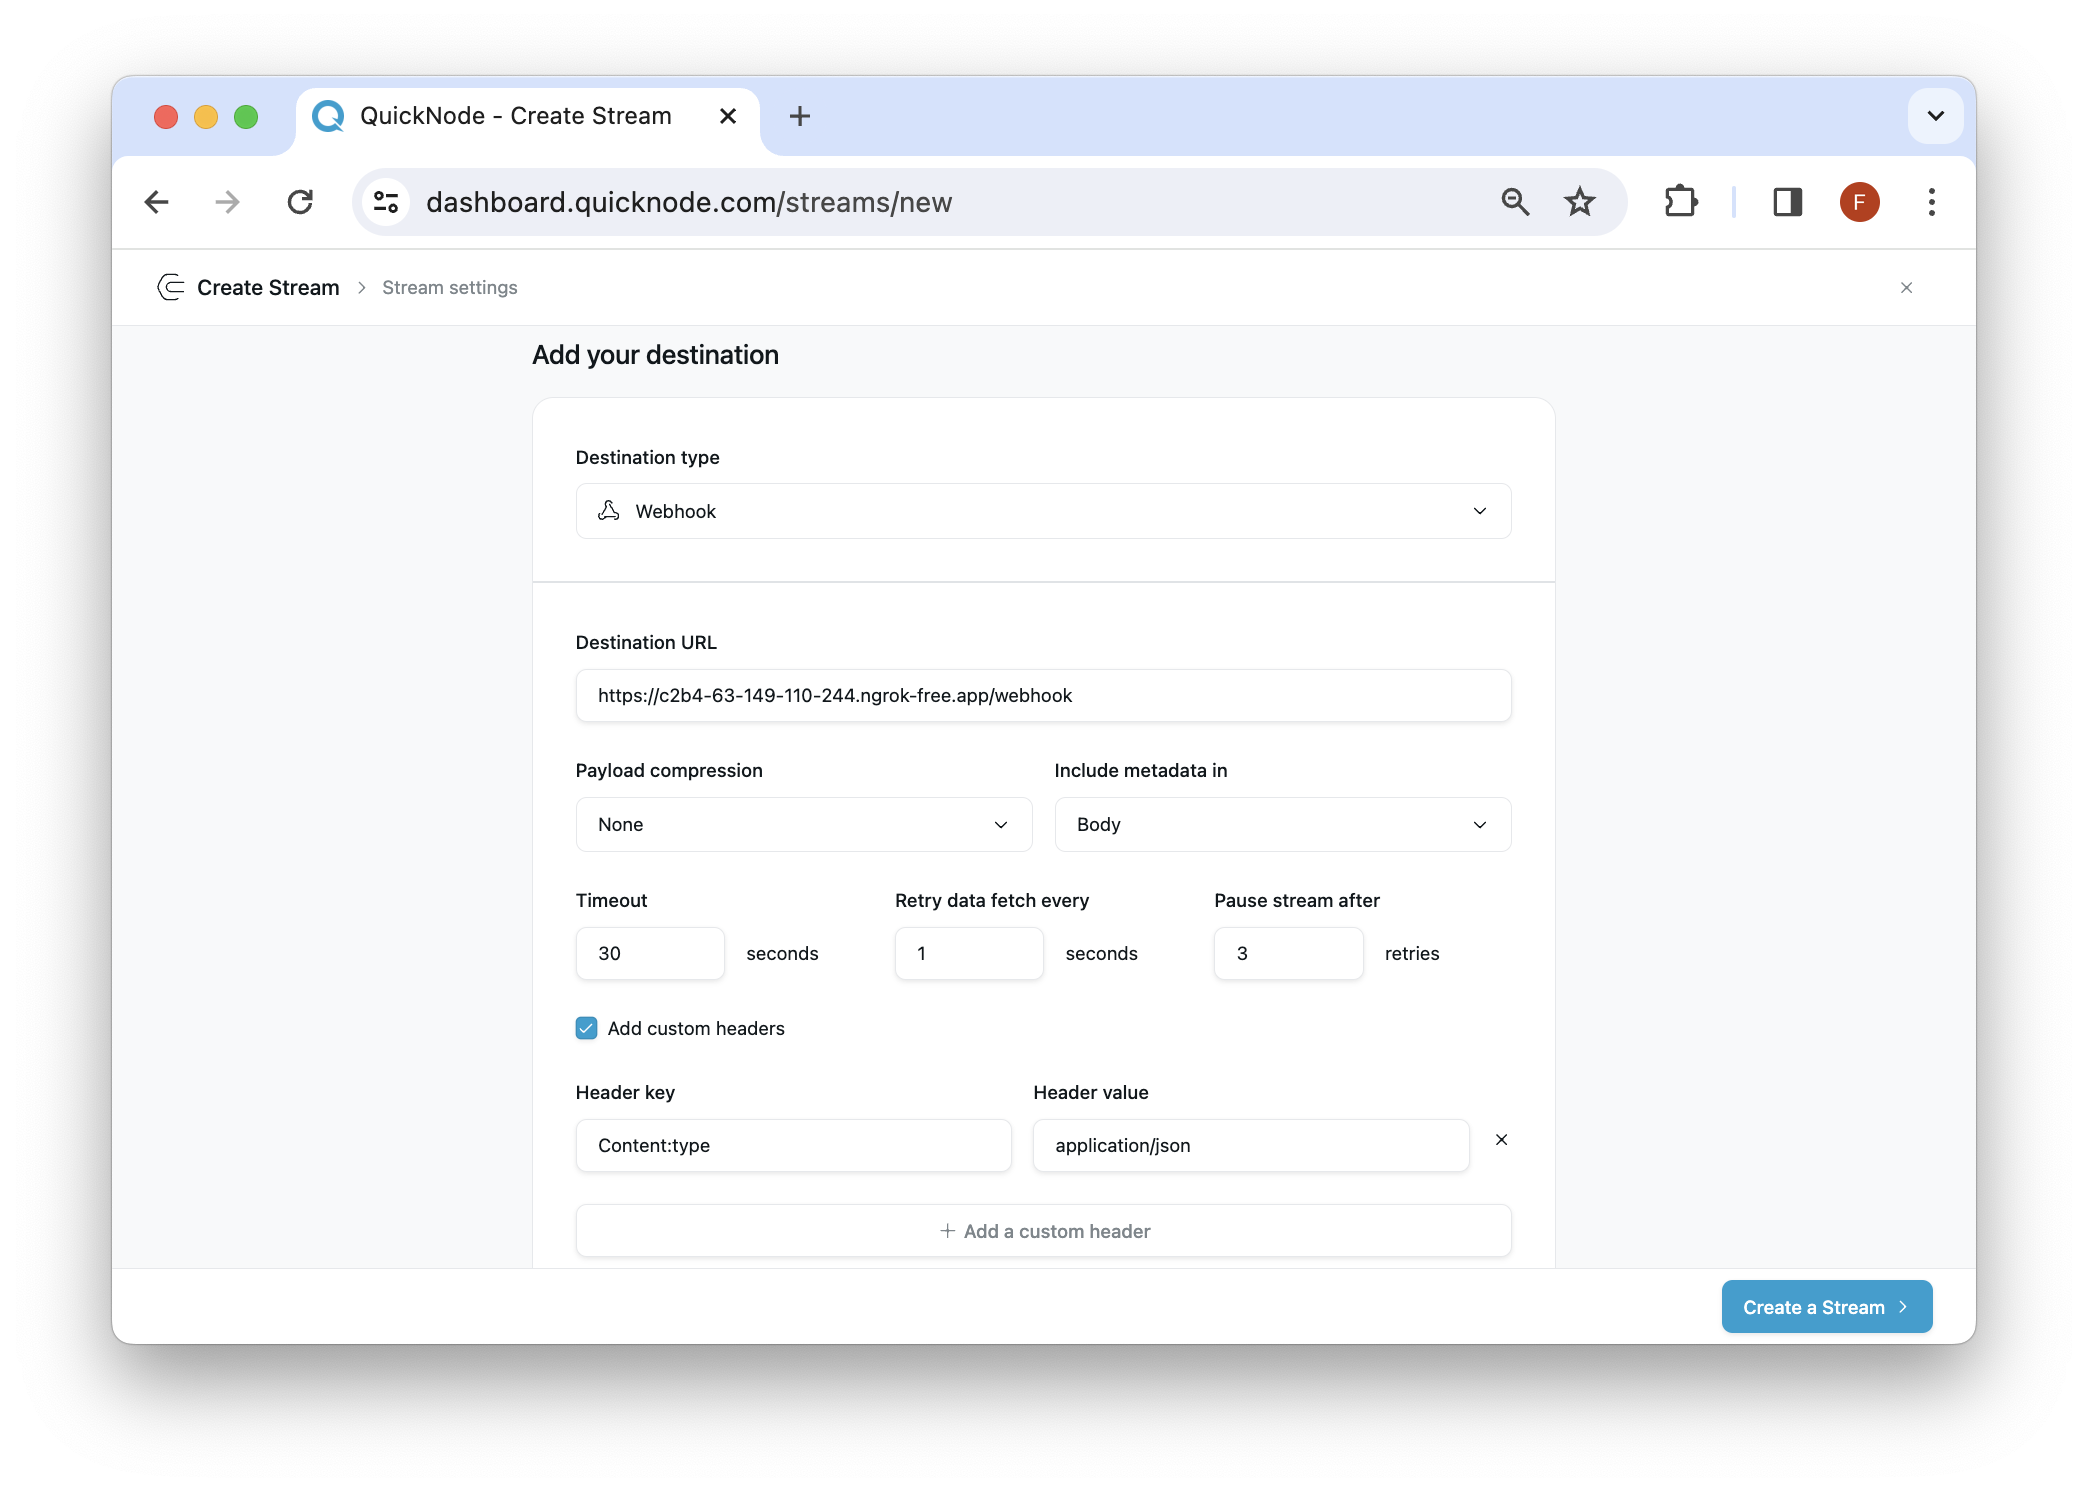
Other important fields you may want to adjust in the future include the timeout, retry, and pause properties as they manage when your Stream should time, pause, and terminate.
For any fields not mentioned, leave them as-is and click Create Stream.
If you navigate back to the React app, you should see blocks streaming to the frontend and each tab showing its respective information.
Logs

Dashboard

If you want to challenge yourself, try forking the project repository (it's open source!) and adjusting the code to be adaptable to other datasets or filter by a specific address or set of event signatures.
Final Thoughts
Hopefully, this guide has given you a good foundation to learn how to use Streams and the capabilities it offers.
If you have questions, please contact us directly. If you have any ideas or suggestions, such as new destinations, features, metrics, or datasets, you want us to support.
Also, stay up to date with the latest by following us on Twitter and joining our Discord and Telegram announcement channel.
We ❤️ Feedback!
Let us know if you have any feedback or requests for new topics. We'd love to hear from you.