
9 min read
Your Quicknode Stream can now deliver to multiple destinations simultaneously from a single pipeline. No duplicate streams, no config drift, and no additional charge per destination. Available destinations per stream vary by plan. Learn more.
Overview
Quicknode Streams helps you receive only the relevant blockchain data you need through filtering. With compression enabled, you can reduce bandwidth and delivery payload size by up to 90% on your filtered data without altering your core workflow.
This guide walks you through enabling compression for Streams, implementing decompression in your application, and understanding bandwidth reduction with real-world examples.
What You Will Do
- Learn how Streams filtering and compression reduce bandwidth and delivery payload size
- Enable compression for your Streams destination
- Handle compressed
gzipdata in a Node.js Express server, with both automatic and manual methods
What You Will Need
- A Quicknode account with a paid plan
- Basic knowledge of JavaScript
- ngrok or a similar tool to expose your local server to the internet (for testing purposes)
Like the real-time data capabilities Streams provides? Check out our new Webhooks product. It's built on top of Streams and offers pre-defined filter templates and compression features in a streamlined, easy-to-use interface. Webhooks is specifically designed for simple, event-driven notifications, offering a quicker path to get real-time data to your HTTP endpoints without the full complexity of Streams.
Blockchain Data Compression in Streams
With Streams, you have filtering capabilities to receive only the relevant onchain data you need. When you add compression to your filtered Streams, you can significantly reduce bandwidth and delivery payload size.
- Streams Filtering: Delivers only the data you care about
- Gzip Compression: Further reduces the filtered data payload by up to 90%
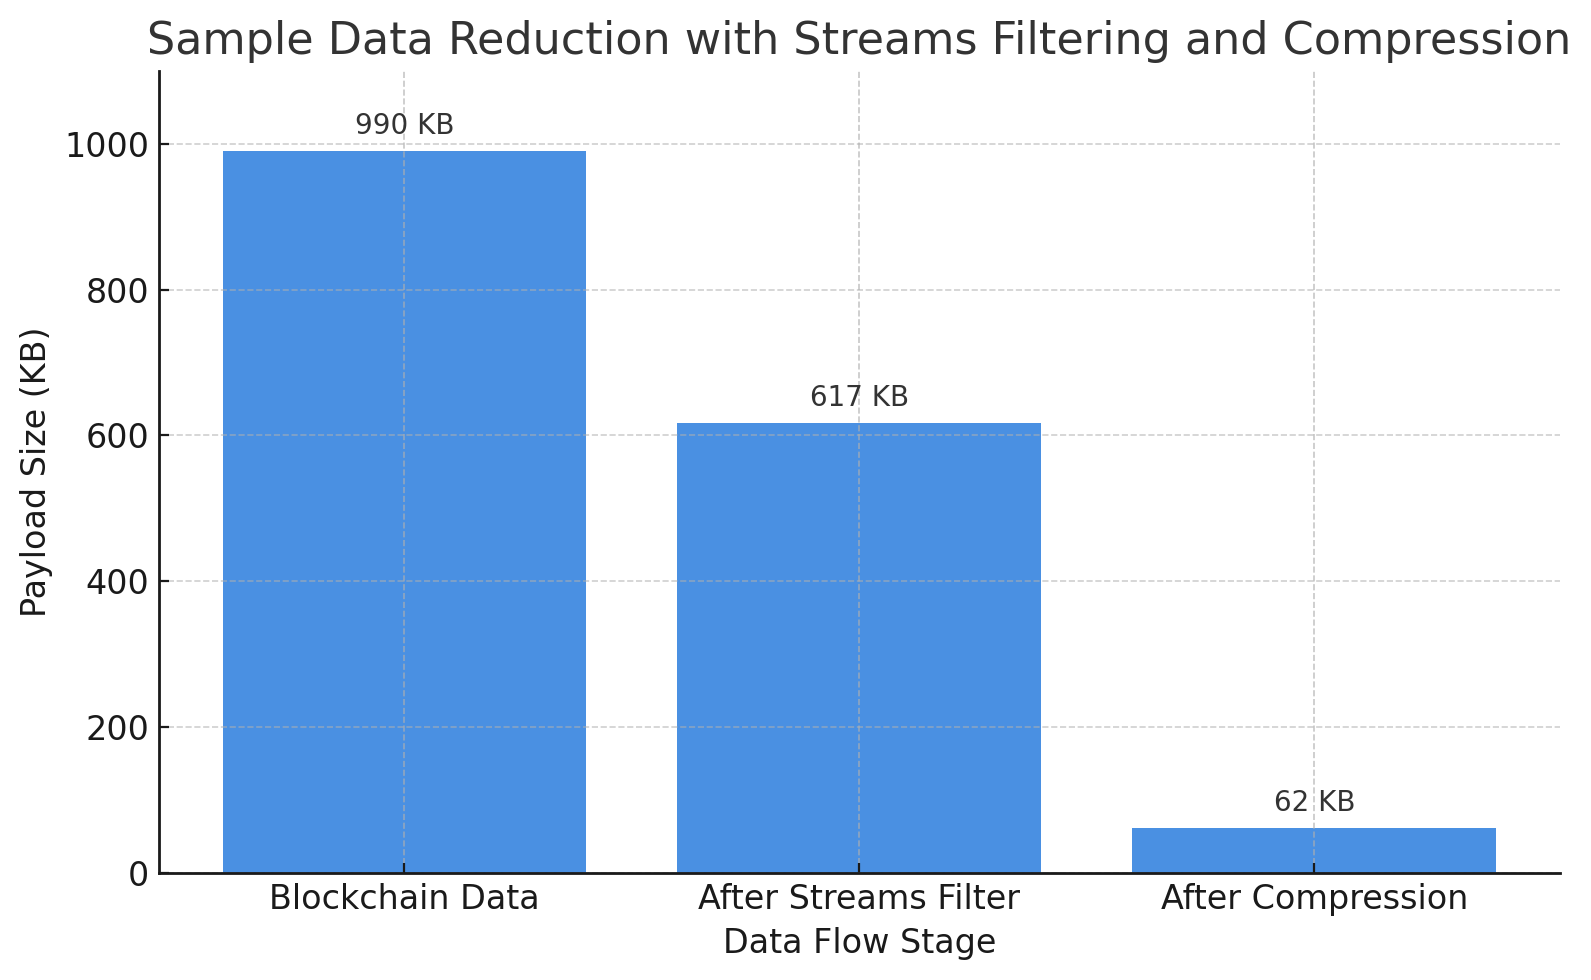
Let's look at a real-world example using the payload size for token transfers within a single Ethereum block:
- Unfiltered Raw Data: The raw data for all transactions in the block is ~990 KB.
- With Streams Filtering: By using Streams to filter for only decoded ERC-20 token transfers, you reduce the payload size to ~617 KB — a nearly 38% reduction in data from filtering alone.
- With Filtering AND Compression: By enabling compression on your filtered stream, the data shrinks to just ~62 KB.
Note: All data sizes are estimates and may vary based on the actual data processed.
As there are approximately 220,000 blocks per month on Ethereum, the bandwidth and delivery payload size reductions can be substantial:
| Approach | Monthly Data Size |
|---|---|
| Unfiltered Raw Data | 218 GB |
| Filtering | 135 GB |
| Filtering + Compression | 13 GB |
How to Use Compression in Streams
In this guide, we will enable compression for a Stream with a webhook destination and set up a Node.js Express server to handle the compressed data.
Step 1: Enable GZIP Compression in Your Stream
You can enable compression with a single click in your Quicknode dashboard.
- Navigate to the Streams section in your Quicknode dashboard
- Select the Stream you wish to modify or create a new one
- (Optional) Filter your Stream in the Stream dataset section. Feel free to use a template (i.e., Decoded ERC20 transfers) or create a custom one
- In the Stream's Destination section, select Gzip from the Payload compression dropdown menu
- Check how the Estimated data volume changes to reflect the reduced size with compression enabled
Note: The compression feature is available for Webhook and S3 destinations.
Once the compression is enabled, Quicknode will begin sending all webhook payloads for this Stream in a compressed gzip format. The webhook will also include the header Content-Encoding: gzip to signal that the payload is compressed. So, your application should check for this header to determine if decompression is needed.
Now let's build the Node.js Express server that will receive your compressed data. We'll finish creating the Stream after your server is up and running.
Step 2: Set Up Your App to Handle Compressed Data
To handle compressed data, you'll need to decompress it in your application. In this example, we'll use a Node.js Express server to receive the compressed data and decompress it.
2.1 Create a Node.js Project
Create a new Node.js project:
mkdir streams-compression-example
cd streams-compression-example
npm init -y
2.2 Install Dependencies
Install the necessary dependency for the server:
npm install express
2.3 Create a Server
The code below sets up a basic Express server to demonstrate how to handle compressed payloads from Streams. It includes two distinct routes:
-
/webhook/auto: This is the primary route. It uses theexpress.raw({ inflate: true })middleware, which automatically detects theContent-Encoding: gzipheader and decompresses the request body. This makes the payload directly available inreq.bodyas if it were never compressed. -
/webhook/manual: This optional route shows you how to manually handle decompression if you need more control over the process. We will add the code for this route later in the guide.
Create a server file (app.js) and add the following code:
const express = require("express");
const zlib = require("zlib");
const app = express();

// Helper function to convert bytes to kilobytes
const bytesToKB = (bytes) => (bytes / 1024).toFixed(2);

// Route 1: Auto-inflate enabled (Express handles decompression)
app.post(
  "/webhook/auto",
  express.raw({ inflate: true, type: "*/*", limit: "10mb" }), // Adjust limit as needed
  (req, res) => {
    console.log("\n=== AUTO-INFLATE ROUTE ===");
    console.log("Headers:", req.headers);

    // req.body is already decompressed
    const decompressedSize = req.body.length;
    console.log(
      `Decompressed payload size: ${bytesToKB(
        decompressedSize
      )} KB (${decompressedSize} bytes)`
    );

    try {
      const data = JSON.parse(req.body.toString());
      console.log("Payload data:", data);

      res.status(200).json({
        status: "OK",
        method: "auto-inflate",
        decompressedSizeKB: bytesToKB(decompressedSize),
      });
    } catch (err) {
      console.error("Parse error:", err);
      res.status(400).send("Invalid JSON");
    }
  }
);

// Route 2: Manual decompression (inflate disabled)
// This route is optional and shows how to manually decompress if needed
// Code will be added later in this guide

const PORT = 3000;
app.listen(PORT, () => {
  console.log(`Webhook server listening on port ${PORT}`);
  console.log(`Test the endpoints:`);
  console.log(`  - http://localhost:${PORT}/webhook/auto (auto-inflate)`);
  console.log(`  - http://localhost:${PORT}/webhook/manual (manual decompression)`);
});
2.4 Run the Server
Start your server:
node app.js
2.5 Expose Your Server
To test your server with Streams, you need to expose it to the internet. You can either use a tool like ngrok or deploy it to a cloud service. For local testing, run the following command in a new terminal window:
ngrok http 3000 # or other port if you changed it
This will expose your server to the internet on a random port. Copy the forwarding URL (e.g., https://xxxx.ngrok.io) and paste it into the Streams destination URL by adding /webhook/auto to the end. (e.g., https://xxxx.ngrok.io/webhook/auto)
2.6 Test the Server
After setting up the destination URL, you can test your server by sending a sample payload to your Stream.
First, check the connection by clicking the Check Connection button in your Quicknode dashboard. Then, send a sample payload to your Stream by clicking the Send Payload button. This will trigger a webhook call to your server.
The server will log the headers, decompressed payload size, and the parsed JSON data. As the payload is automatically decompressed, you can check the actual compressed payload size (in bytes) by checking the content-length header in the request. Check your terminal running ngrok once the test payload is sent and you'll see something like:
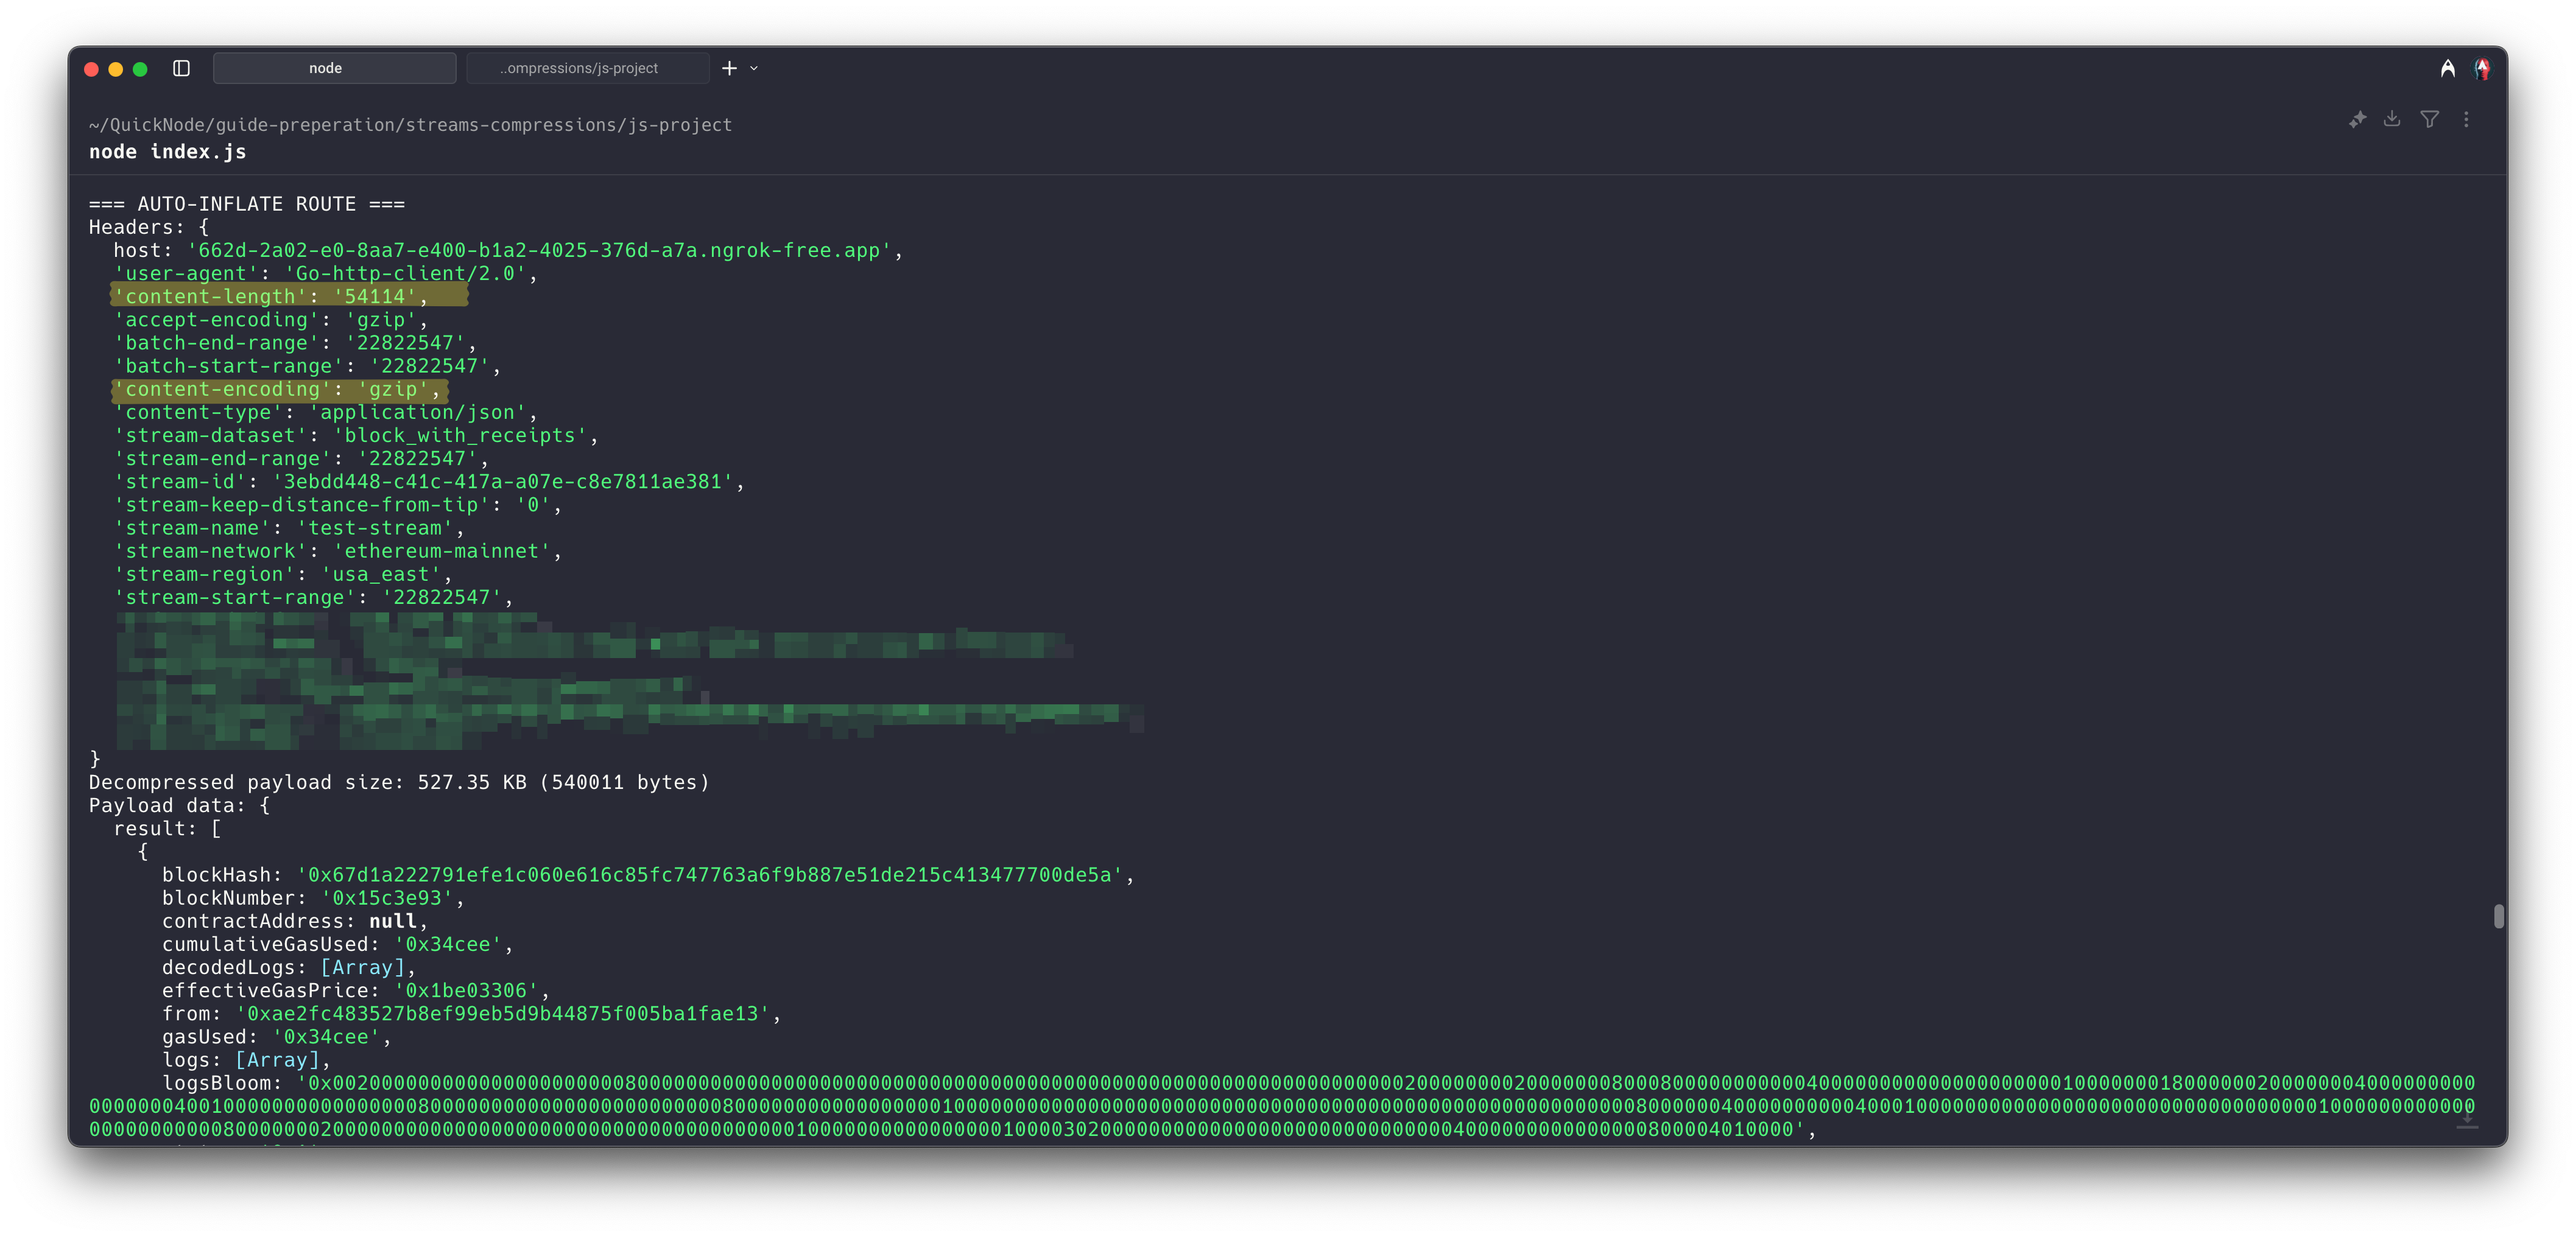
As you can see, the server automatically decompresses the payload, and you can access the data directly in req.body. That's it.
2.7 Manual Decompression (Optional)
Setting the inflate option to true in the Express middleware automatically decompresses the payload. However, if you want to manually decompress the payload for any reason, you can do so using the zlib module. Here's an example of how to do it. Just add this route to your existing app.js file.
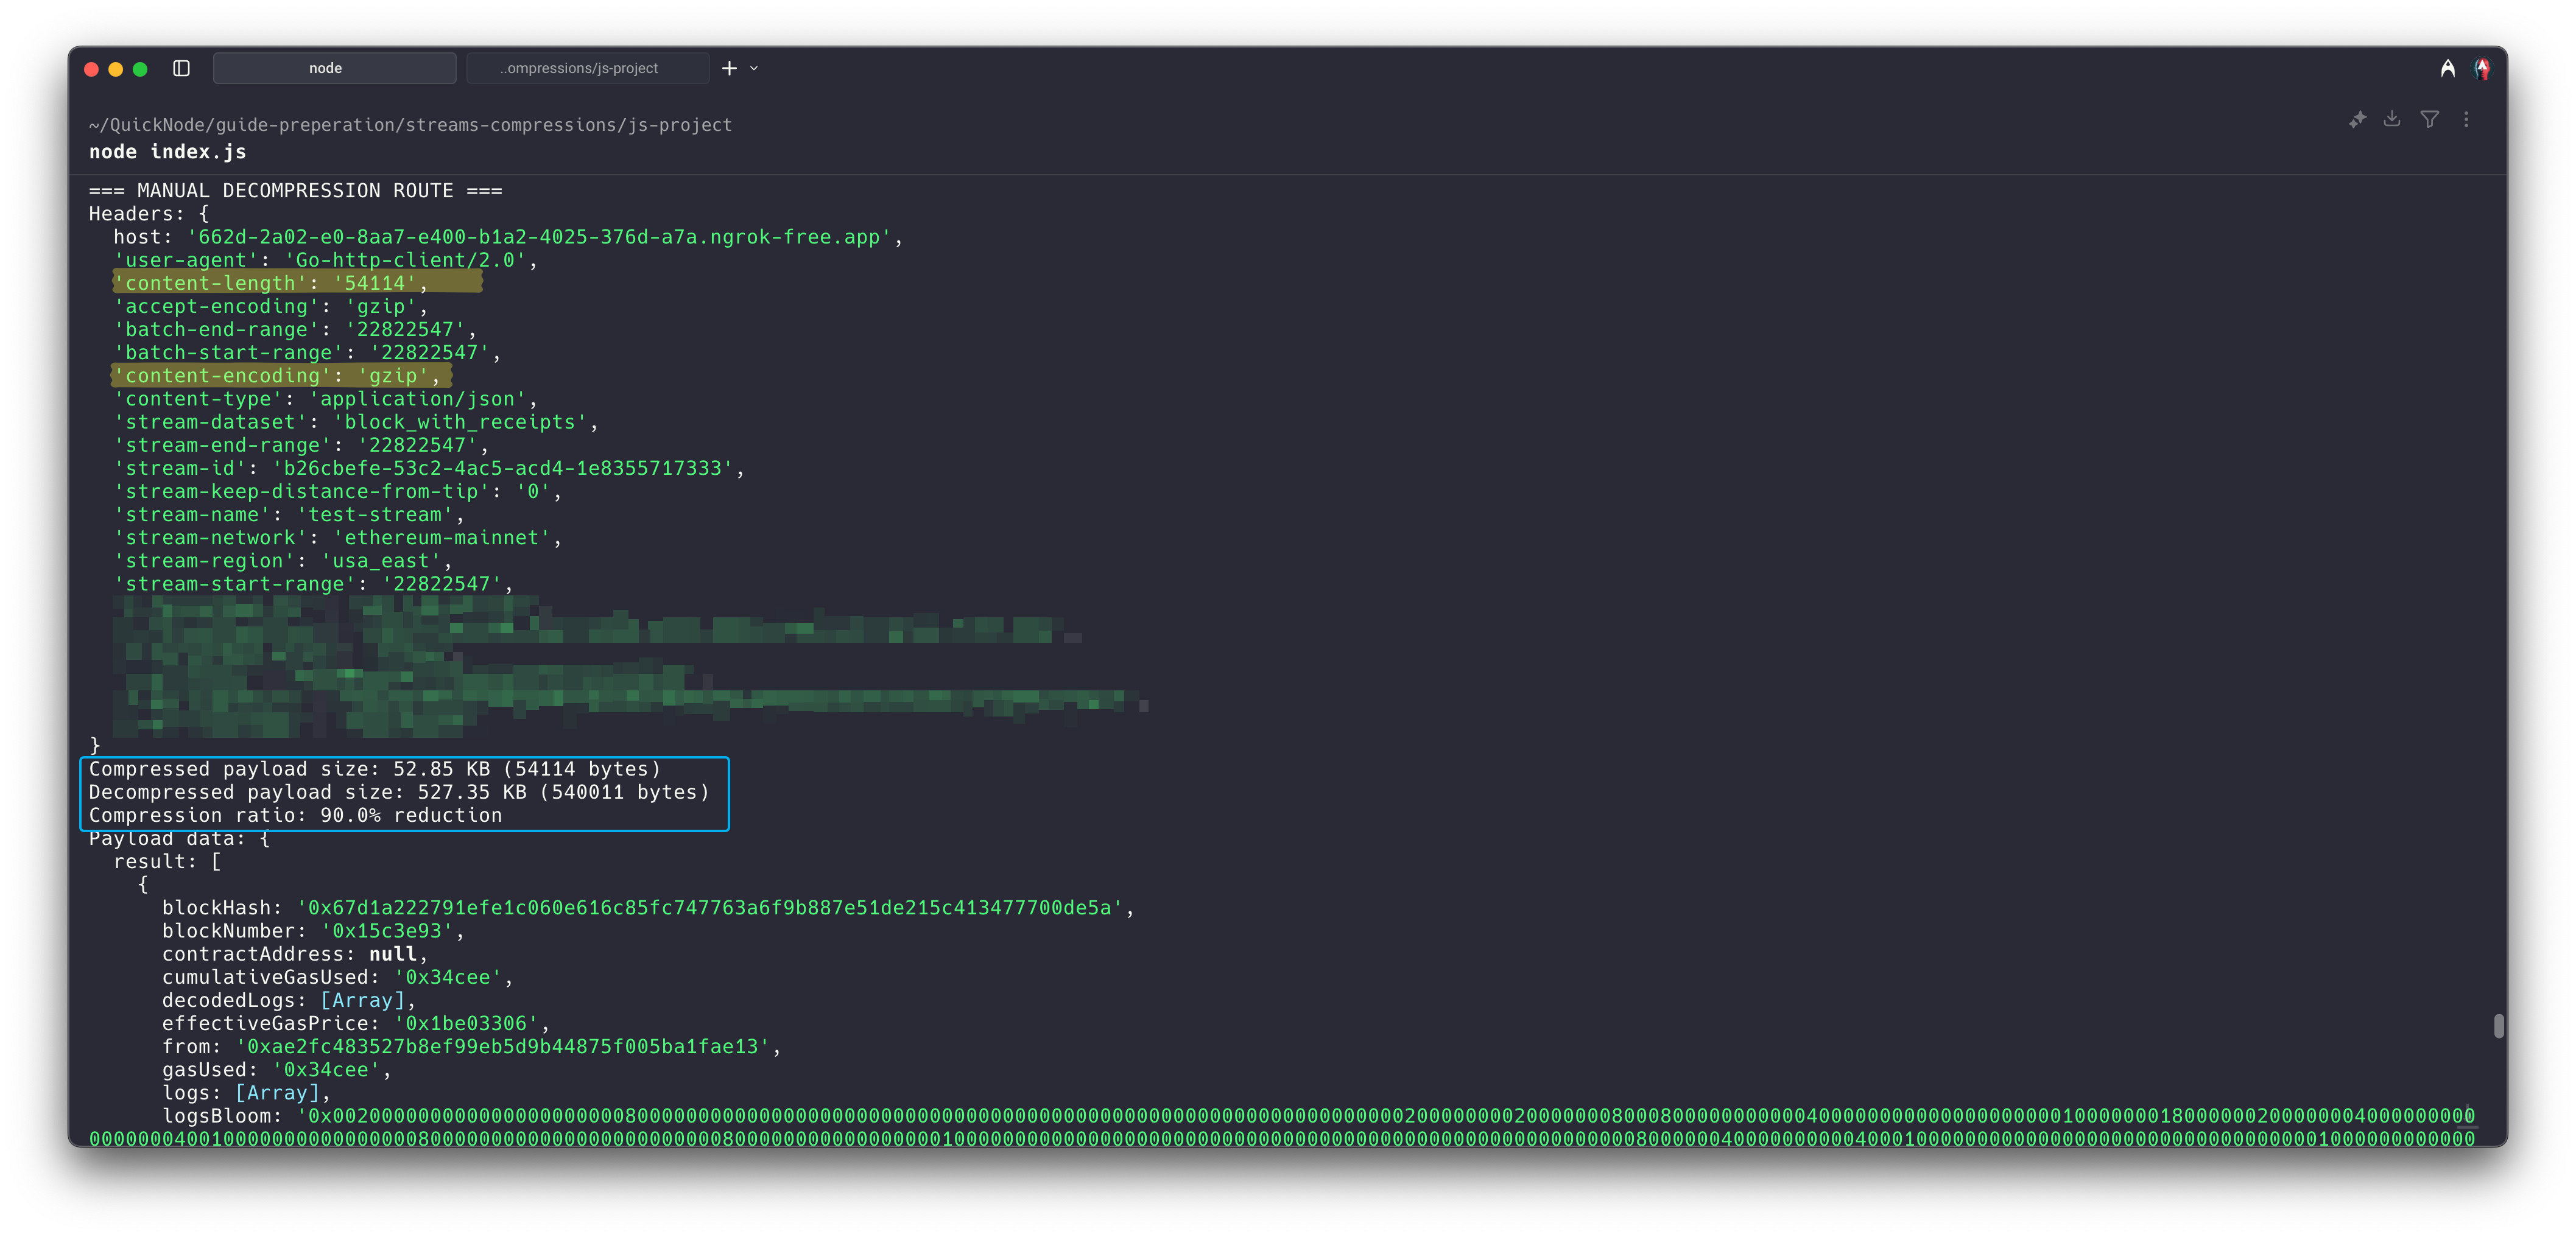
This code snippet adds the /webhook/manual route to your server. Unlike the auto-inflate route, this one processes the raw request body. It collects the incoming compressed data into a buffer, checks the content-encoding header, and if it's gzip, uses Node.js's built-in zlib.gunzip method to decompress the payload.
This method also calculates and logs the compression ratio, showing you the exact size difference between the compressed and decompressed data.
// Continue from the previous app.js code snippet

// Route 2: Manual decompression (inflate disabled)
// This route is optional and shows how to manually decompress if needed

app.post("/webhook/manual", (req, res) => {
  console.log("\n=== MANUAL DECOMPRESSION ROUTE ===");
  console.log("Headers:", req.headers);

  // Store the content-encoding header and then delete it
  // to prevent Express from throwing an error
  const contentEncoding = req.headers["content-encoding"];
  delete req.headers["content-encoding"];

  let chunks = [];

  req.on("data", (chunk) => {
    chunks.push(chunk);
  });

  req.on("end", () => {
    const compressedBuffer = Buffer.concat(chunks);
    const compressedSize = compressedBuffer.length;
    console.log(
      `Compressed payload size: ${bytesToKB(
        compressedSize
      )} KB (${compressedSize} bytes)`
    );

    // Check if content was compressed
    if (contentEncoding === "gzip") {
      zlib.gunzip(compressedBuffer, (err, decompressedBuffer) => {
        if (err) {
          console.error("Decompression error:", err);
          return res.status(500).send("Decompression error");
        }

        const decompressedSize = decompressedBuffer.length;
        console.log(
          `Decompressed payload size: ${bytesToKB(
            decompressedSize
          )} KB (${decompressedSize} bytes)`
        );

        const compressionRatio = (
          (1 - compressedSize / decompressedSize) *
          100
        ).toFixed(1);
        console.log(`Compression ratio: ${compressionRatio}% reduction`);

        try {
          const data = JSON.parse(decompressedBuffer.toString());
          console.log("Payload data:", data);

          res.status(200).json({
            status: "OK",
            method: "manual-decompression",
            compressedSizeKB: bytesToKB(compressedSize),
            decompressedSizeKB: bytesToKB(decompressedSize),
            compressionRatio: `${compressionRatio}%`,
          });
        } catch (err) {
          console.error("Parse error:", err);
          res.status(400).send("Invalid JSON");
        }
      });
    }
  });

  req.on("error", (err) => {
    console.error("Request error:", err);
    res.status(500).send("Request error");
  });
});
After that, you can test the manual decompression route by sending a compressed payload to /webhook/manual. The log output will show the compressed size, decompressed size, and the compression ratio, as shown below.
After testing the compression, you can now finalize and activate your Stream to receive compressed real-time data by clicking the Create a Stream button in your Quicknode dashboard.
Conclusion
You have successfully learned how to enable compression for Quicknode Streams and handle the compressed data within an Express.js application. The implementation is straightforward, just a few lines of code to handle decompression, while the savings are immediate and substantial.
If you have questions, please contact us directly. If you have any ideas or suggestions, such as new destinations, features, metrics, or datasets, you want us to support.
Also, stay up to date with the latest by following us on Twitter and joining our Discord and Telegram announcement channel.
Further Resources
- Streams Documentation
- Streams Guides
- Streams Pricing
We ❤️ Feedback!
Let us know if you have any feedback or requests for new topics. We'd love to hear from you.