7 min read
In the past, we demonstrated how to query mempools using Web3.js in this guide. However, Web3.js is no longer being actively maintained. For all new development, we recommend using either Ethers.js or Viem instead. Both options offer modern tooling and active community support.
If you're currently using Web3.js, this guide will help you migrate to either of these options smoothly.
Overview
When you send a transaction on Ethereum, it first waits in a "mempool" before being added to a block. To track these pending transactions, you need to query the mempool directly. This guide shows you how to query the mempool using QuickNode's Ethereum nodes.
What is Ethereum Mempool?
In blockchain terminology, a mempool is a waiting area for the transactions that haven't been added to a block and are still unconfirmed. This is how a Blockchain node deals with transactions that have not yet been included in a block.
When an Ethereum node receives a transaction, it will propagate the transaction to peer nodes until a miner approves the transaction and adds it to a new block. Before it’s added to the next block, the transaction remains in a staging/waiting area called mempool or txpool. It is also known as “pending transactions” to some people.
This waiting area or buffer zone functionality is needed because transactions aren't immediately added to the Blockchain. Nodes also run a series of validity checks on these transactions. These checks include ensuring that the funds are still available, the output is not exceeding the input, the signature is valid, etc. The transaction is rejected if it fails any of these tests. Note that the Mempool cannot be considered as a master reference shared universally by all nodes. Each node configures its own rules for the node’s mempool. Additionally, a node may be the first to receive a transaction but may not have propagated the transaction to the rest of the network.
For example, the default settings for slots and memory on Geth dictate their behavior with mempool transactions. When a new pending transaction is allowed into the mempool, but all the node spaces are full -- the transaction with the lowest gas fee will be dropped from the pool. The rules for accepting and dropping transactions vary for different nodes and depend on their settings.
Even the term itself differs depending on clients:
However, “mempool” is a widely used and accepted term.
What is the Use of Ethereum Mempool?
As stated above, transactions need to be stored before they are confirmed and picked up by a miner. Usually, the transactions with lower gas prices spend more time in a mempool. Such transactions may be overwritten with replacement transactions (commonly known as 'cancel and speed up transaction'). One of the most prominent uses of the Mempool is to get pending transactions in real time. Here’s why you may want to monitor the mempool:
- To detect large pending trades before they execute — useful for MEV strategies, arbitrage, and frontrunning protection.
- To optimize your own transactions by analyzing current gas prices and adjusting fees to avoid delays or drops.
- To monitor security risks and identify potential attacks by watching for suspicious transactions targeting their contracts.
Let’s get started!
Set Up Your QuickNode Ethereum Endpoint
For the purpose of this guide, any Ethereum client can be used, such as Geth or Erigon. To boot a new Ethereum endpoint - first, select a client and configure it. Note that syncing and maintaining an Ethereum node is a challenging task and could take days.
To make things easy, we'll grab an endpoint from QuickNode, which is a lot easier to set up. After your QuickNode endpoint is created, copy your HTTP Provider endpoint and keep it handy for later use.
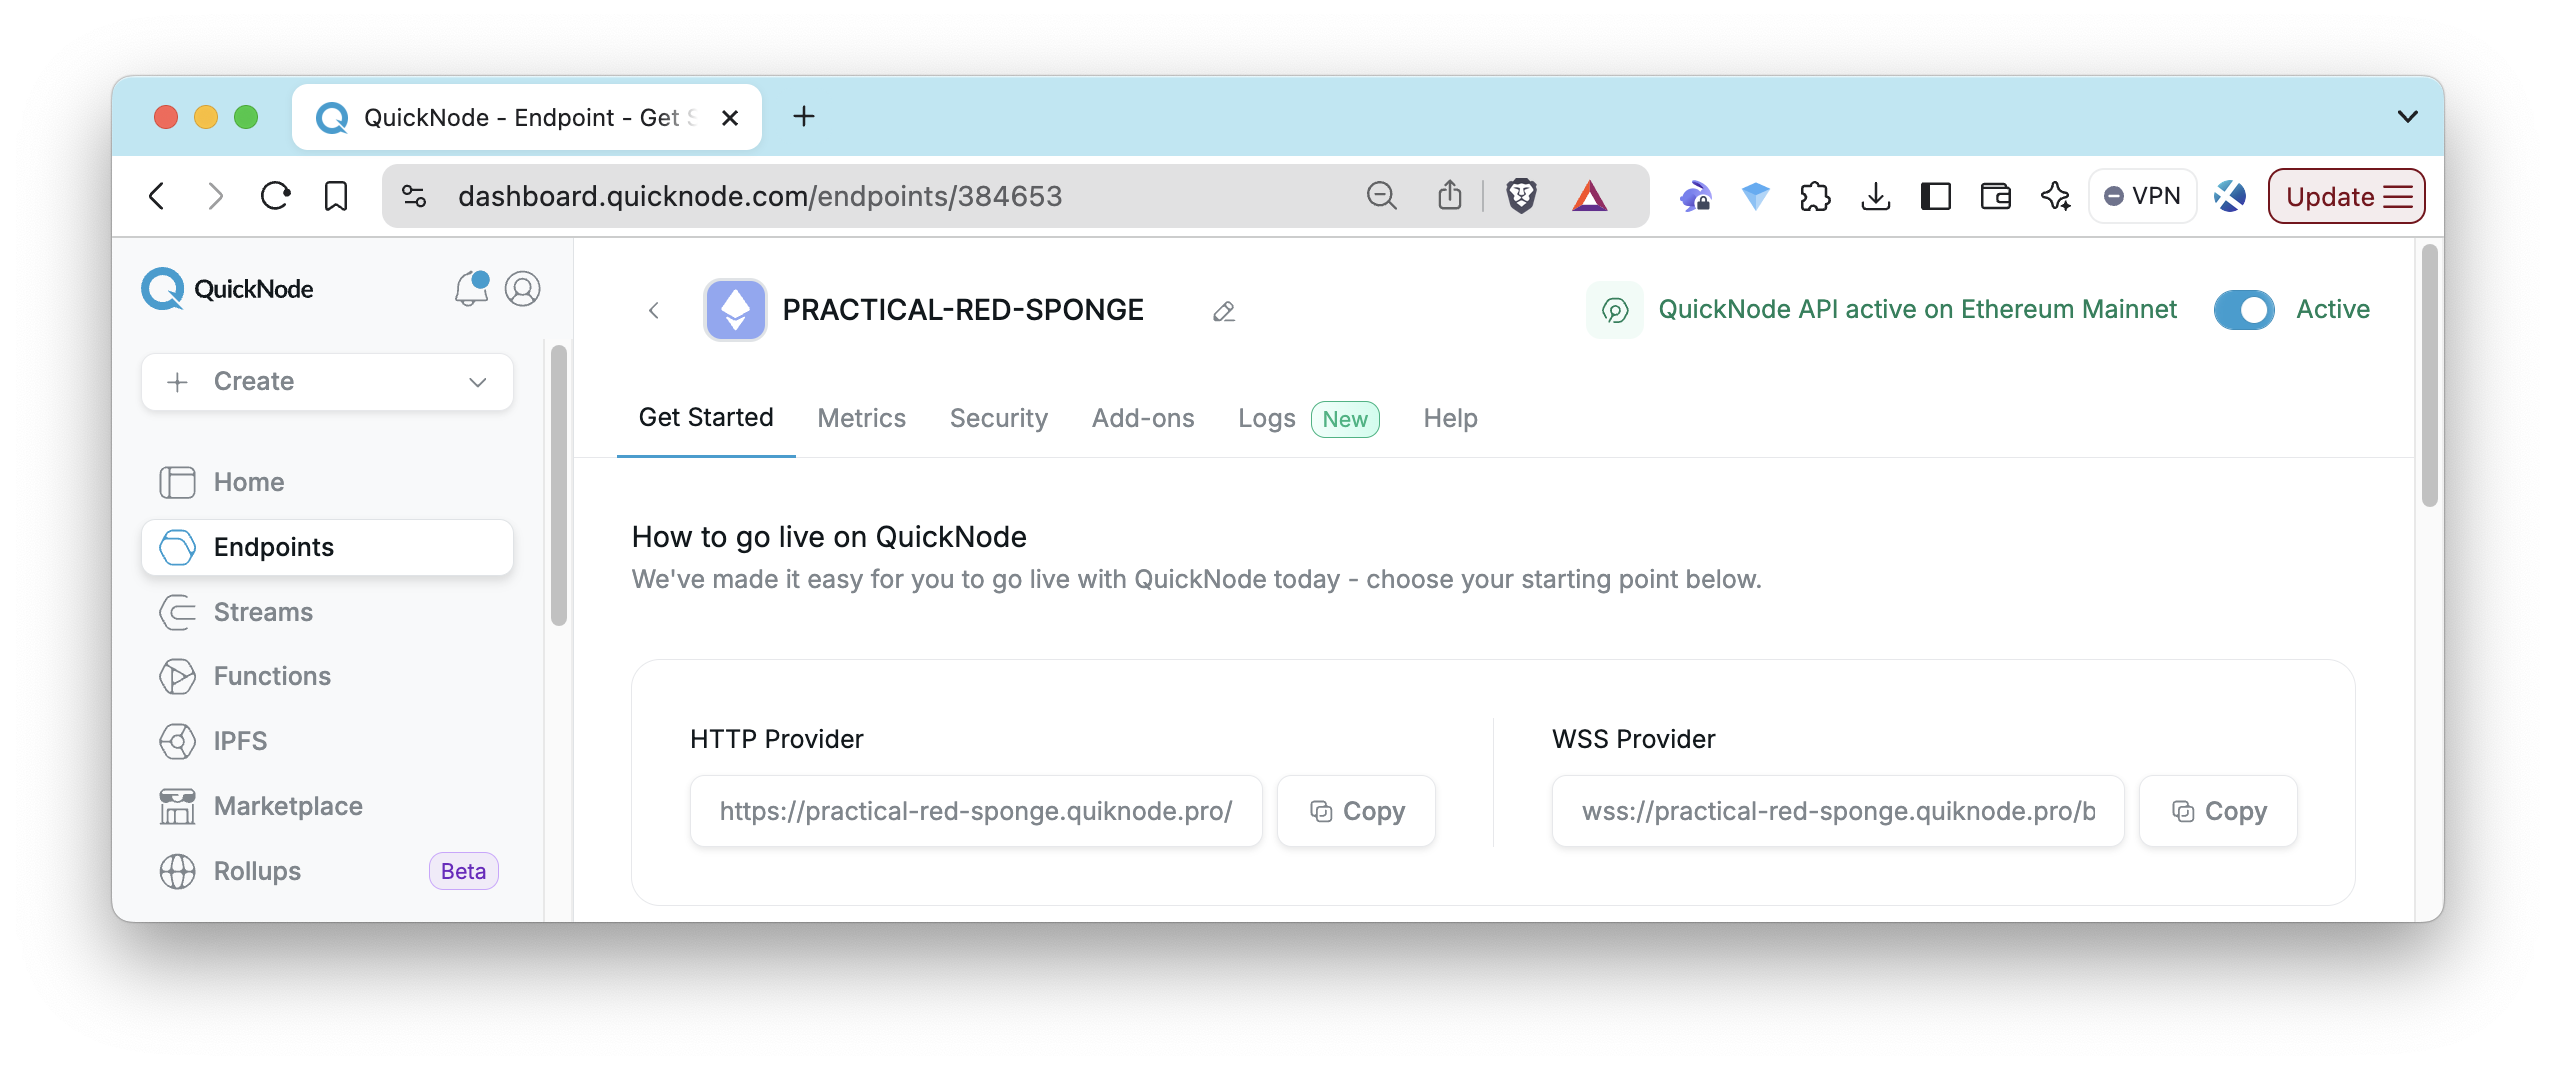
Copy and save your HTTP provider endpoint.
How to Access and Query Ethereum Mempool with QuickNode?
To query the transaction pool (txpool) of your QuickNode Ethereum endpoint, you can make a cURL request using the txpool_content method:
curl --data '{"method":"txpool_content","id":1,"jsonrpc":"2.0"}' -H "Content-Type: application/json" -X POST ADD_YOUR_ETHEREUM_NODE_URL
Replace ADD_YOUR_ETHEREUM_NODE_URL with the HTTP provider you saved earlier.
This will send a JSON-RPC request (txpool_content) to your Ethereum node’s transaction pool, returning both pending transactions (waiting to be mined) and queued transactions (waiting for future execution). The response will include two main fields: pending and queued.
By default, QuickNode’s shared Ethereum endpoints handle the client selection for you — ensuring optimized performance and uptime. However, if you need a dedicated Ethereum Cluster where you have full control, including choosing the client, you can explore our Dedicated Clusters offering.
A successful output should look like this:
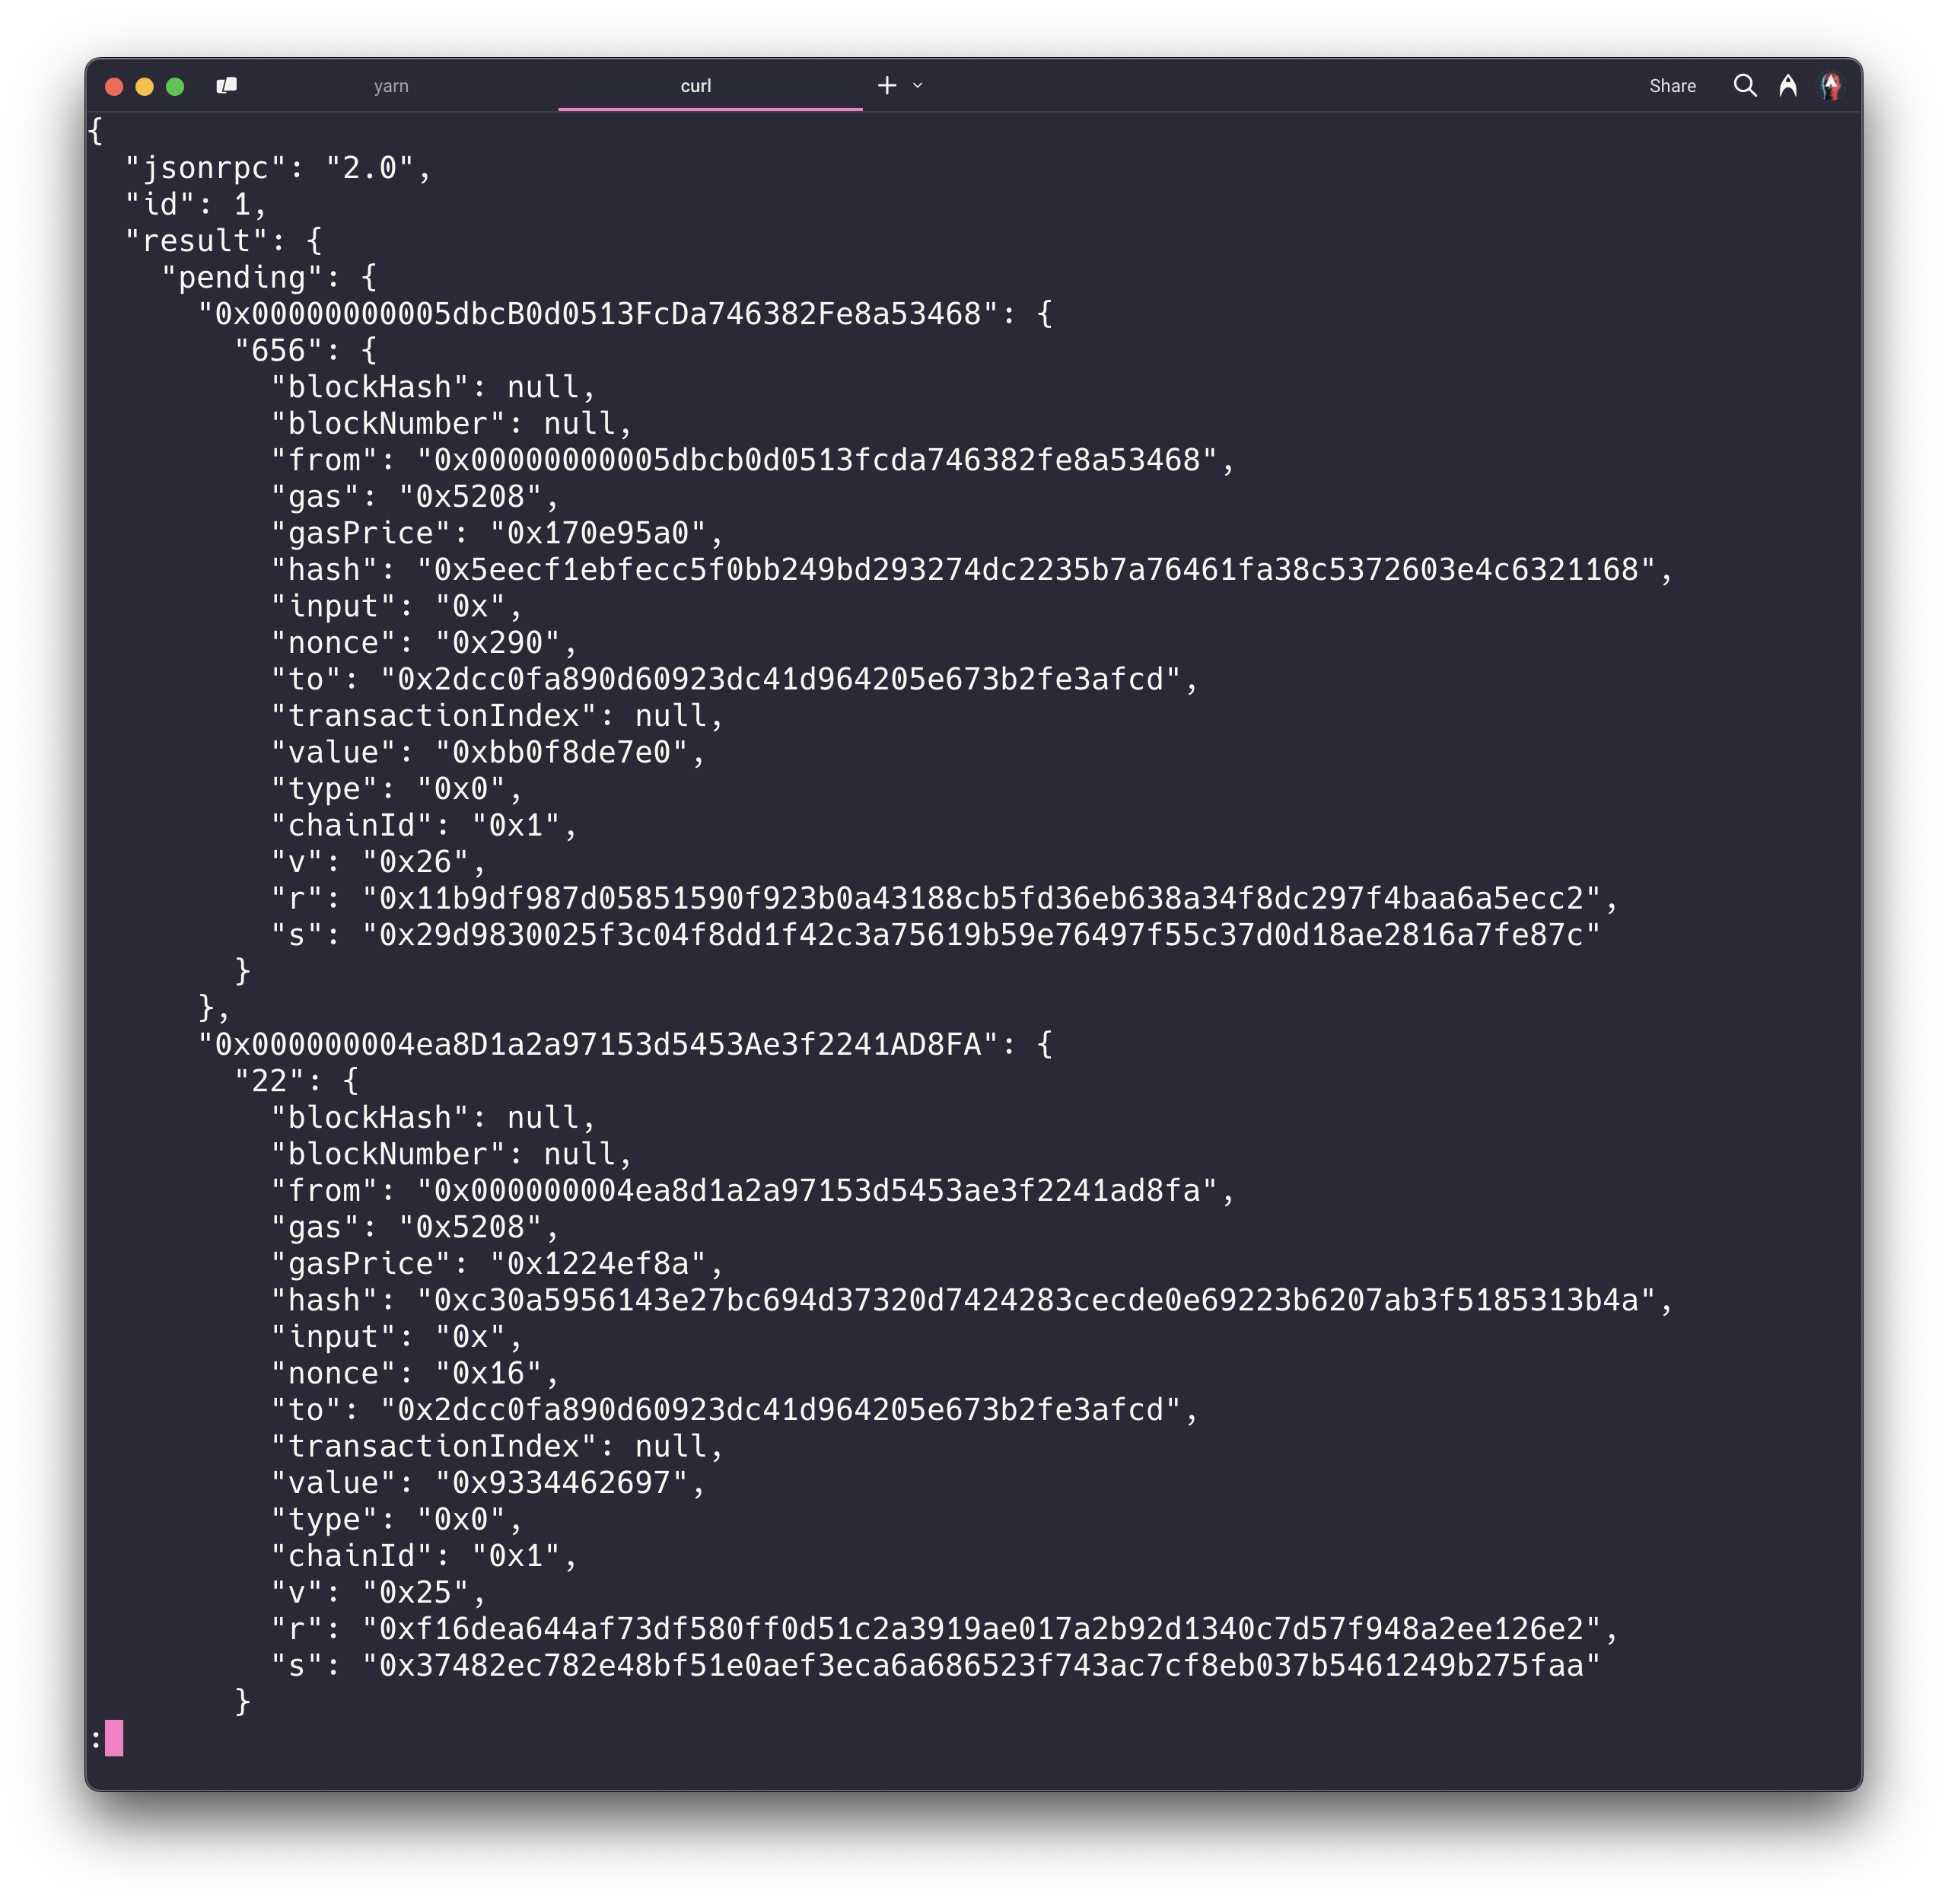
This output features the same elements as in the previous example.
The other methods to get queued transactions are txpool_inspect which returns a listed summary of pending transactions in text form for a quick view, txpool_status which returns the current number of pending and queued transactions, and txpool_contentFrom which returns the pending transactions from a specific address.
Query Mempool with Ethers.js
Let’s examine how to subscribe to pending transactions from the mempool using Ethers.js.
Prerequisites
- NodeJS installed on your system.
- A text editor.
- CLI.
If you're new to Ethers.js, check out our guide on 'How to connect to Ethereum with Ethers.js' to learn how to install and work with the Ethers.js library.
Step 1: Project Setup
Create a new directory and navigate to it:
mkdir mempool
cd mempool
npm init -y
Step 2: Install Ethers.js
Run the following command to install Ethers.js:
npm install ethers
Step 3: Create a Script File
Create a new file called index.js, and add the following code:
const { ethers } = require("ethers");

// Add your QuickNode Ethereum WSS endpoint here
const url = "ADD_YOUR_ETHEREUM_NODE_WSS_URL";

// Connect to the WebSocket provider
const provider = new ethers.WebSocketProvider(url);

// Listen for pending transactions
const init = () => {
    provider.on("pending", async (txHash) => {
        try {
            const tx = await provider.getTransaction(txHash);
            if (tx) {
                console.log(tx);
            }
        } catch (err) {
            console.error(`Error fetching transaction ${txHash}:`, err);
        }
    });

    console.log("Listening for pending transactions...");
};

init();
You can now access Logs for your RPC endpoints, helping you troubleshoot issues more effectively. If you encounter an issue with your RPC calls, simply check the logs in your QuickNode dashboard to identify and resolve problems quickly. Learn more about log history limits on our pricing page.
- First, we import
ethersfrom the Ethers.js library. - Next, we add your QuickNode WSS URL to the
urlvariable. - Then, we instantiate a
WebSocketProviderwith the URL. - Finally, we use
provider.on("pending", callback)to subscribe to pending transactions. Inside the callback, we fetch the full transaction data usingprovider.getTransaction()and log it to the console.
Step 4: Run the Script
To start the listener, run:
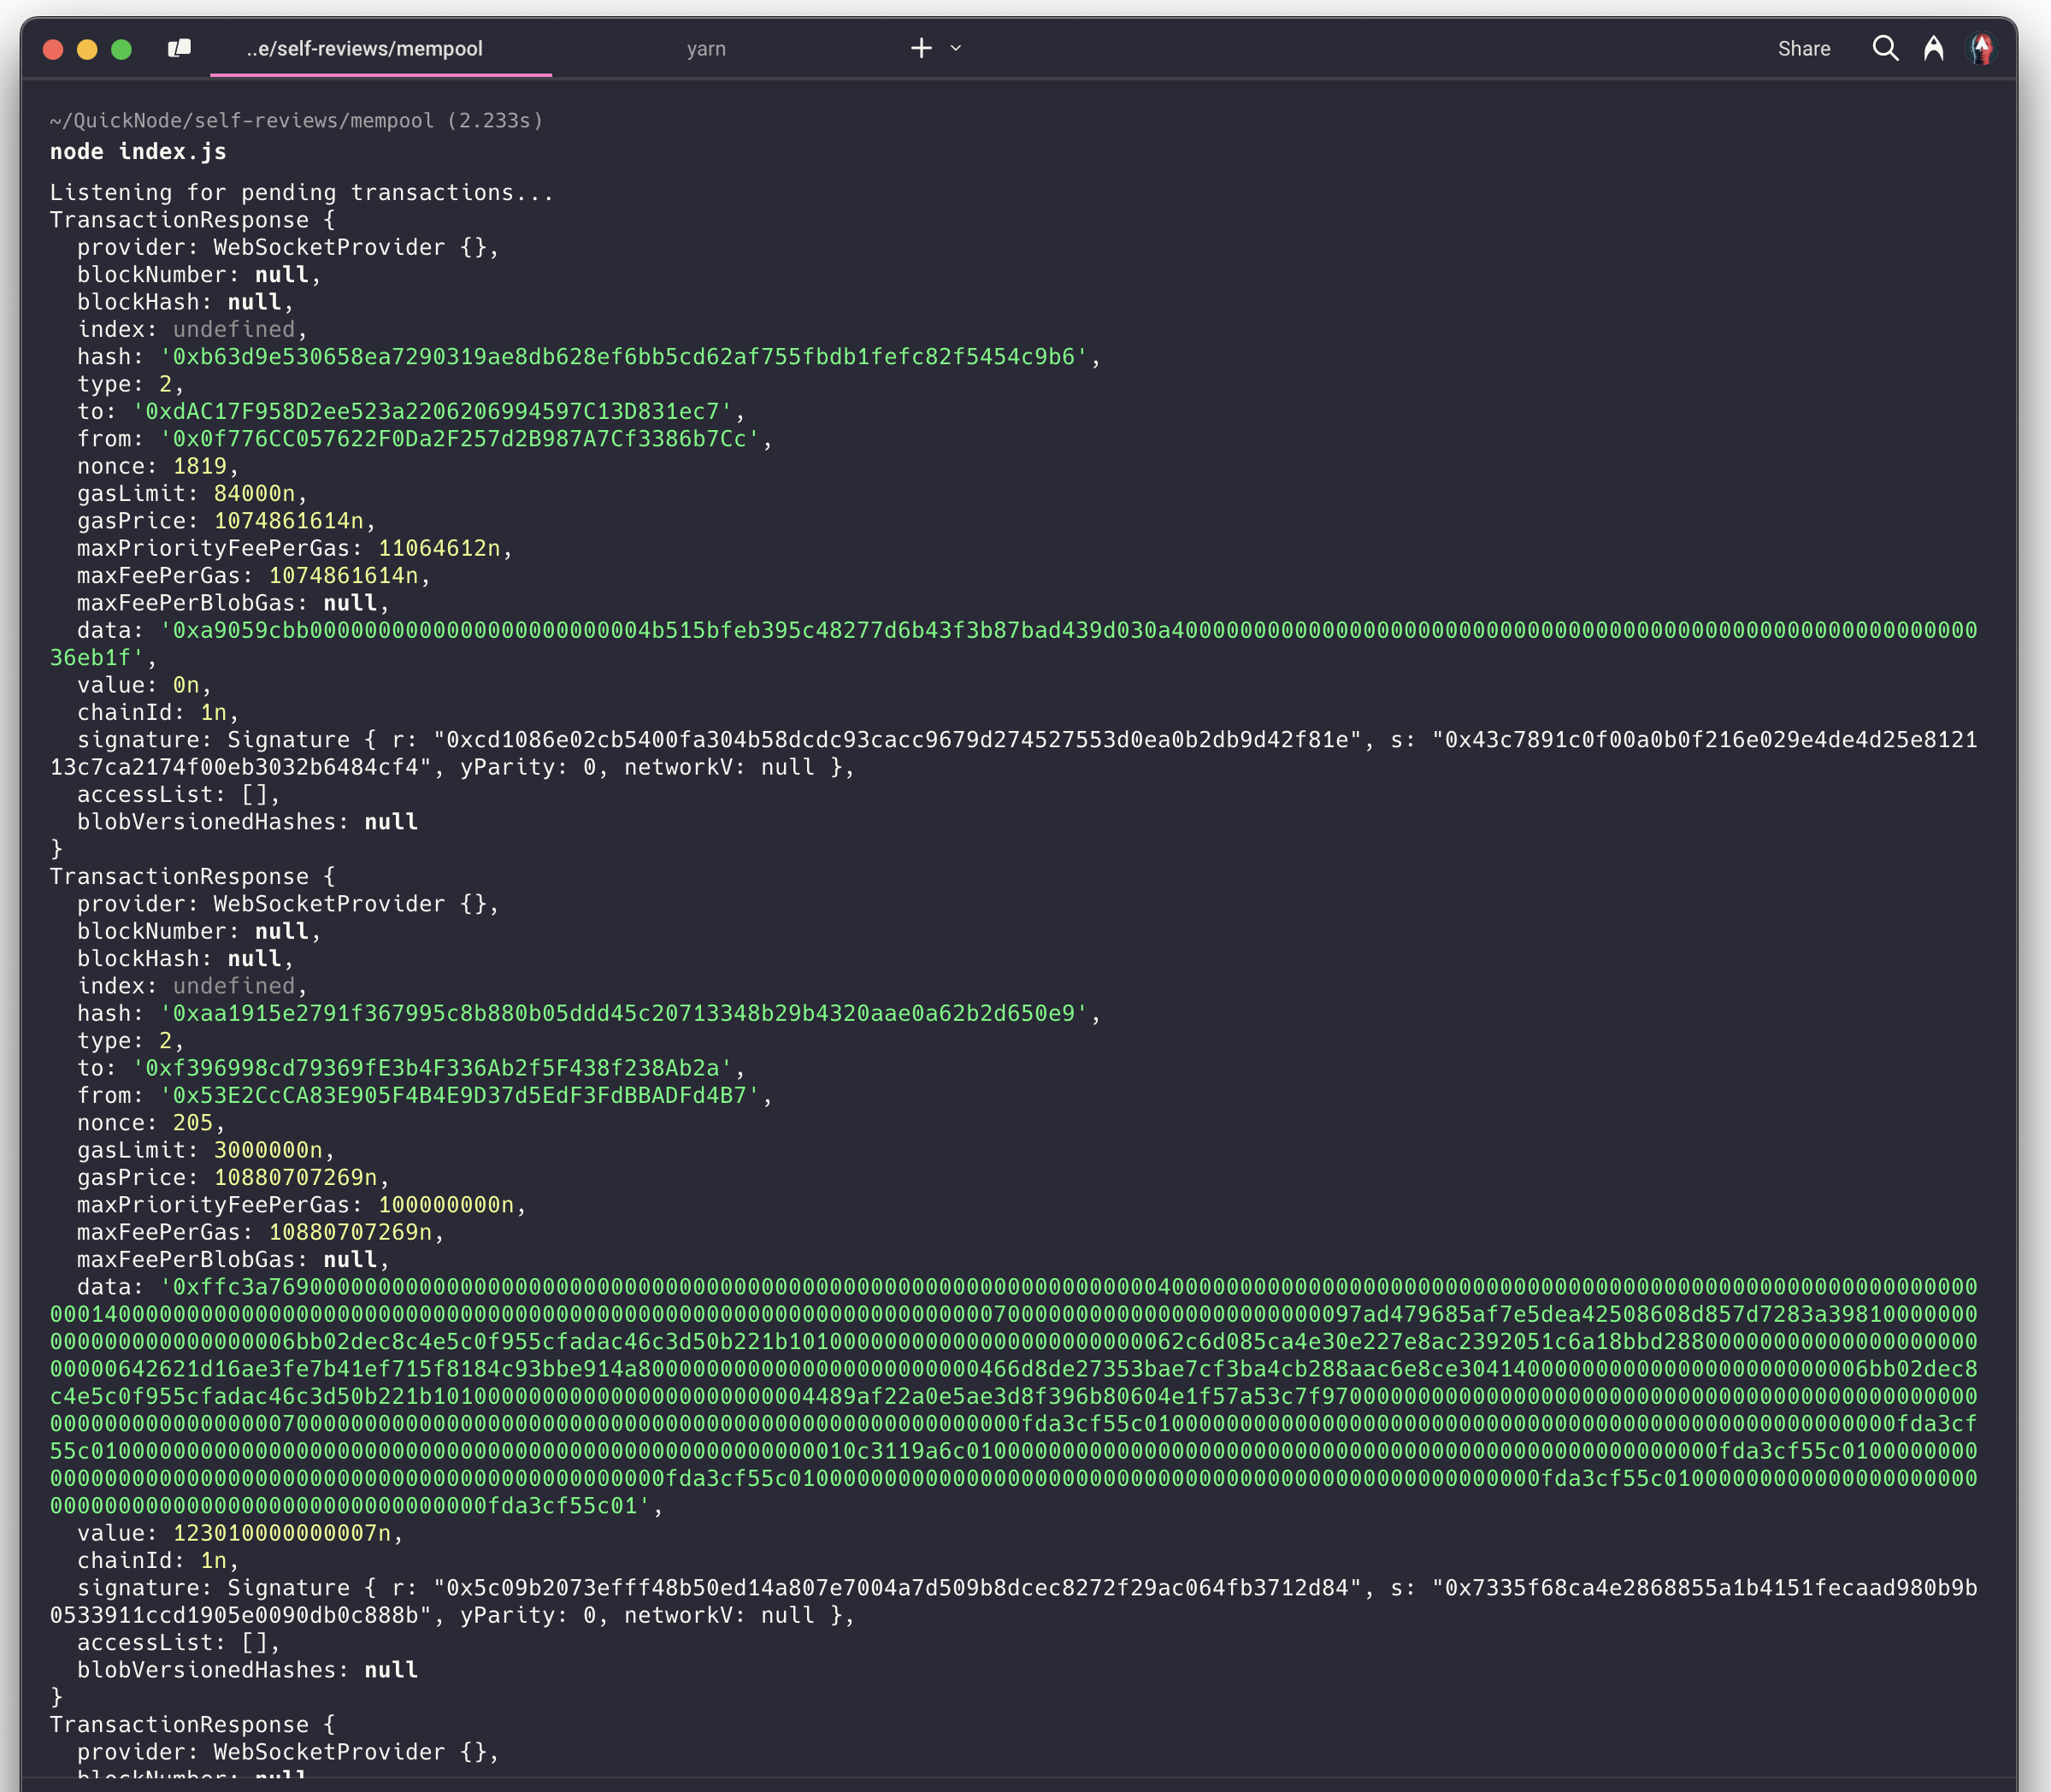
node index
You should see a stream of pending transactions printed in the console.
Example Output
Query Mempool with Viem
Let’s examine how to subscribe to pending transactions from the mempool using Viem.
Prerequisites
- NodeJS installed on your system.
- A text editor.
- CLI.
Step 1: Project Setup
If you already followed the Query Mempool with Ethers.js part of this guide, you should already have a project set up. If so, feel free to skip to the next step. If not, create a new directory and navigate to it:
mkdir mempool
cd mempool
npm init -y
Step 2: Install Viem
Run the following command to install Viem:
npm install viem
Step 3: Create a Script File
Create a new file called index-node.js, and add the following code:
import { createPublicClient, webSocket } from "viem";

// Add your QuickNode Ethereum WSS endpoint here
const url = 'ADD_YOUR_ETHEREUM_NODE_WSS_URL'

// Create a WebSocket client
const client = createPublicClient({
  transport: webSocket(url),
});

// Function to listen for pending transactions
const init = async () => {
  console.log("Listening for pending transactions...");

  const unwatch = client.watchPendingTransactions({
    onTransactions: async (hashes) => {
      for (const hash of hashes) {
        try {
          const tx = await client.getTransaction({ hash });
          console.log("Transaction details:", tx);
        } catch (error) {
          console.error(`Failed to fetch details for ${hash}:`, error);
        }
      }
    },
  });
};

init()
- First, we import
createPublicClientandwebSocketfrom Viem. - Next, we add your QuickNode WSS URL to the
urlvariable. - Then, we instantiate a WebSocket client using Viem’s
createPublicClient(). - Finally, we use
client.watchPendingTransactions()to subscribe to pending transactions. Each time a pending transaction hash is received, we fetch its full data usingclient.getTransaction()and log it to the console.
Step 4: Run the Script
To start the listener, run:
node index-node
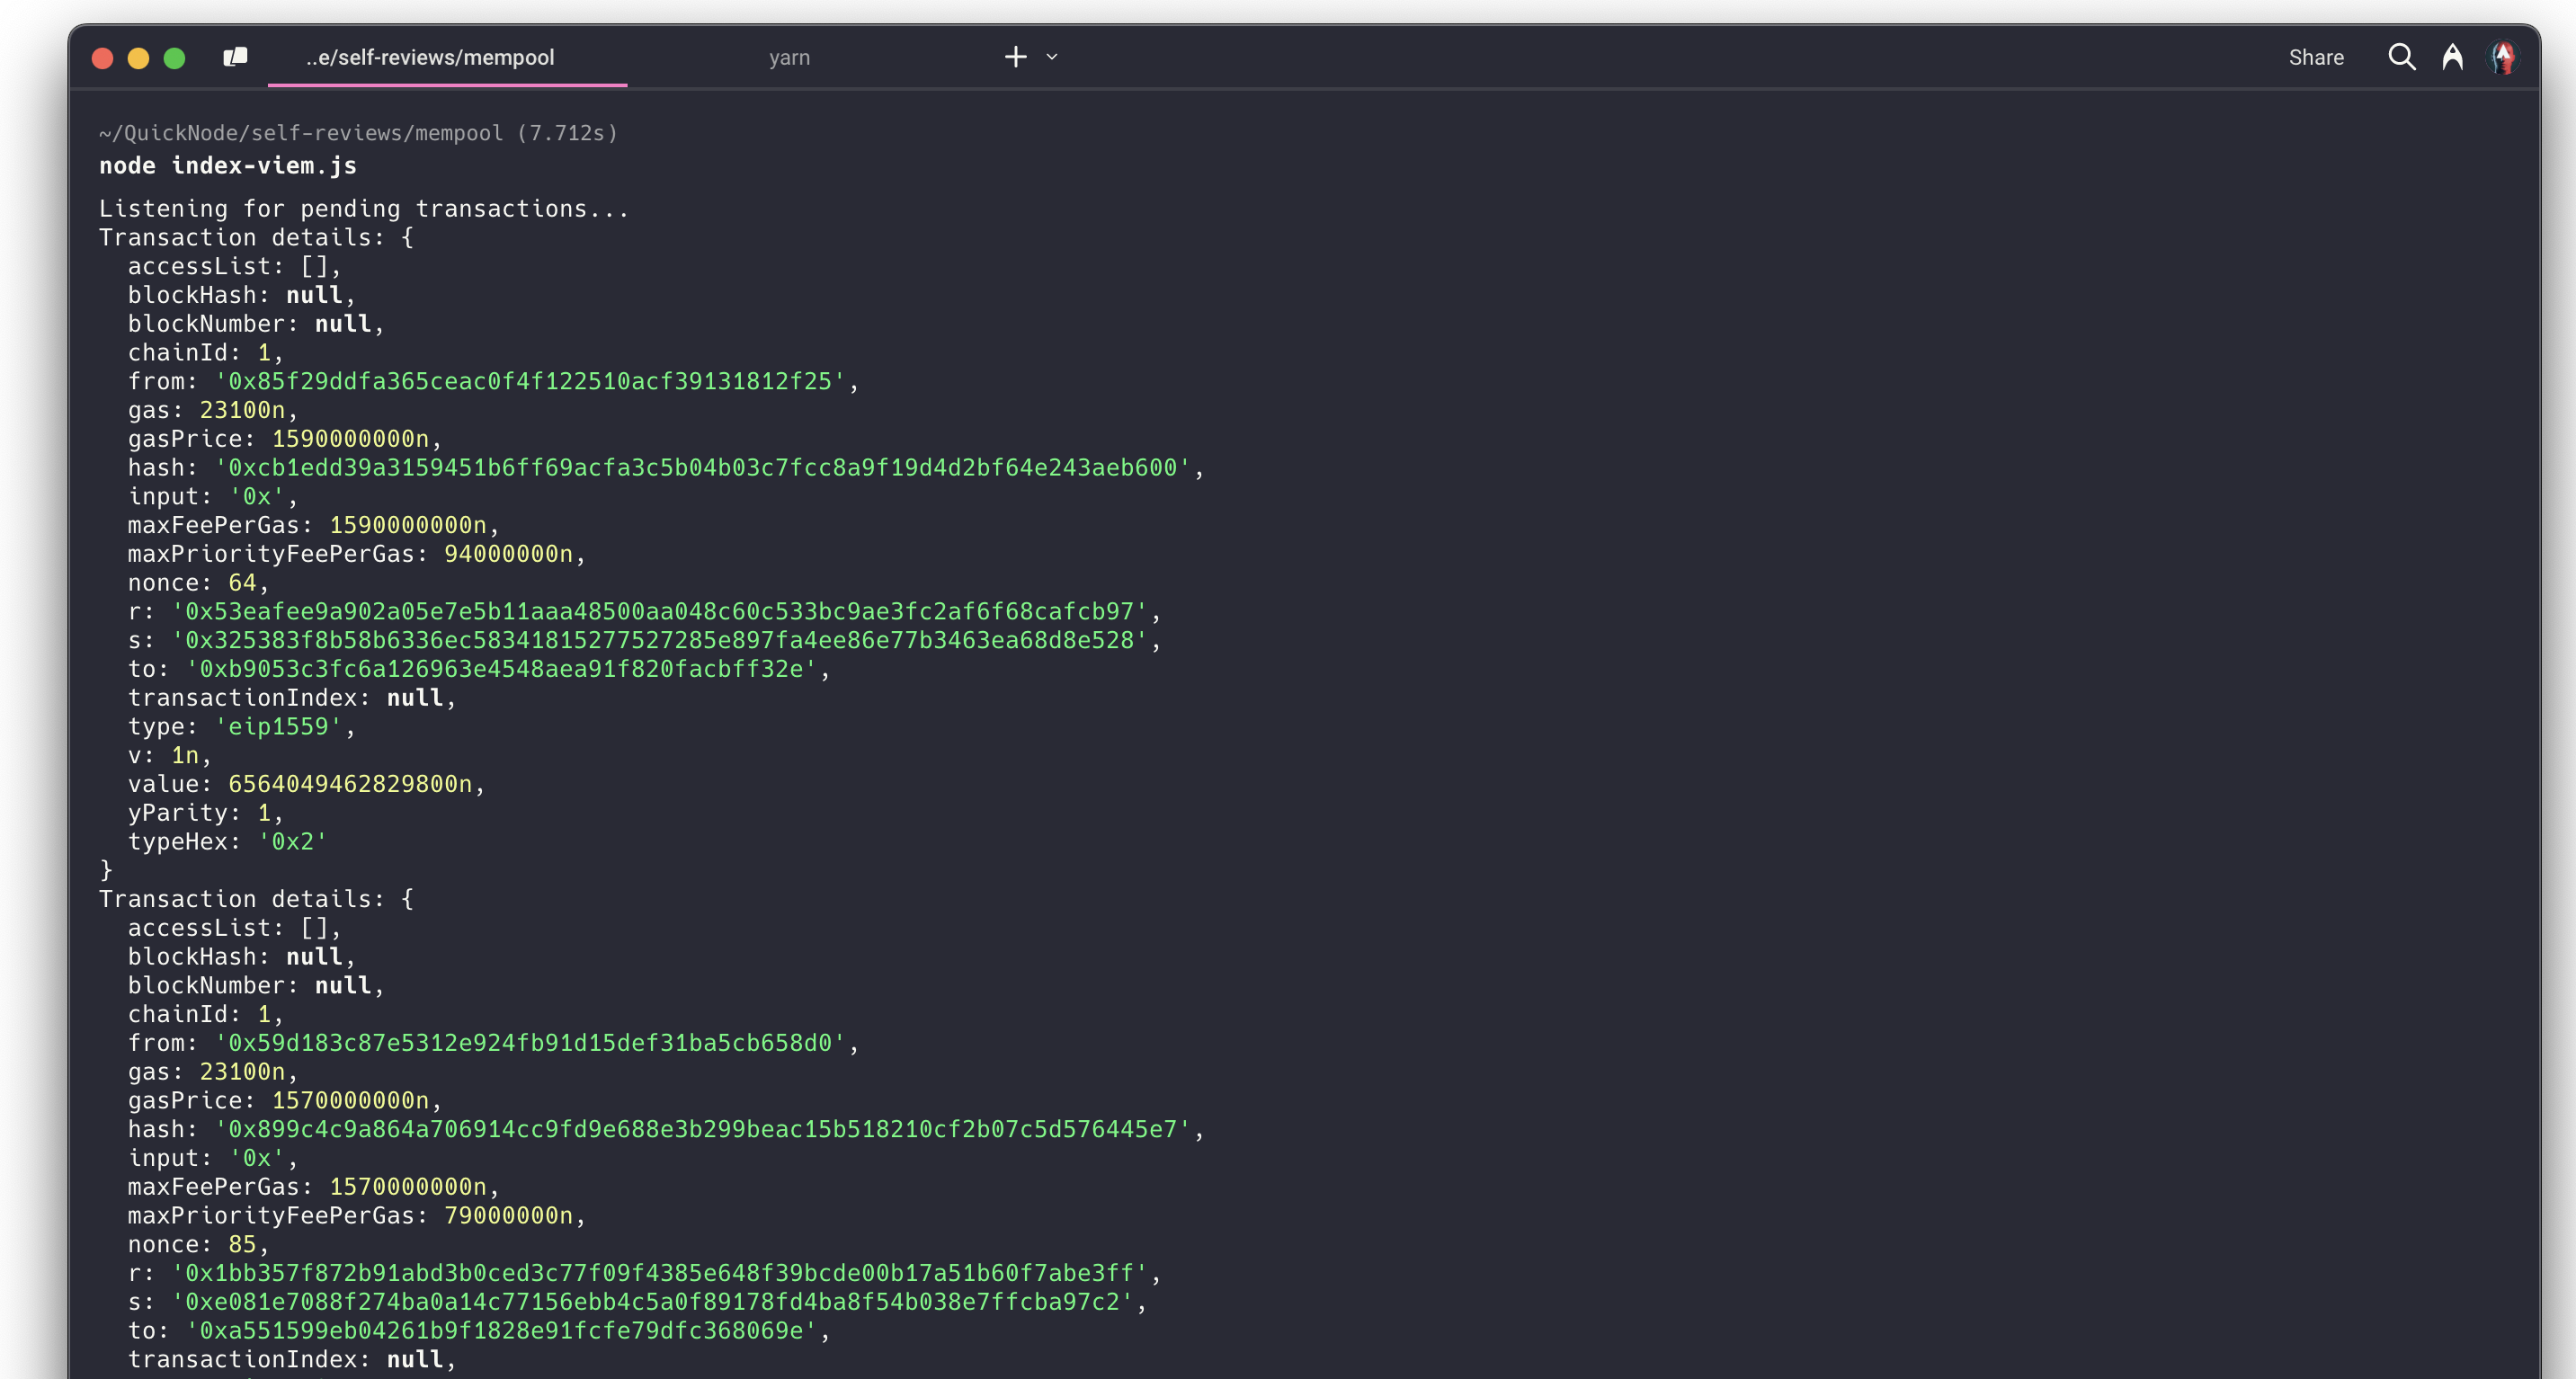
Example Output
You should see a stream of pending transactions printed in the console.
This approach is useful for real-time mempool monitoring, tracking specific transactions, building trading bots, and more. By tapping into pending transactions, you gain visibility into network activity before transactions are confirmed, which can unlock valuable insights for your applications.
Conclusion
In this guide, we showed you how to subscribe to Ethereum’s mempool using different SDKs like Ethers.js and Viem, with QuickNode as our RPC provider. Understanding pending transactions can help you optimize your own transactions or gain a competitive edge by observing others’ activity.
Subscribe to our newsletter for more articles and guide on Ethereum. If you have any feedback, please feel free to reach out to us via Twitter, and you can always chat with us if you have a question via our community server on Discord; thanks :)