9 min read
Web3.js, the popular JavaScript library for Ethereum, is no longer being actively maintained. For all new development, we recommend using either Ethers.js or Viem instead. Both options offer modern tooling and active community support.
If you have any questions or need guidance in transitioning to alternative solutions, please reach out to us.
Overview
When a new token is made on the Ethereum network, it usually follows a specification. The most popular of which is the ERC20 specification. A token must have a multitude of different methods and properties to meet the ERC20 standard. You could think of it as a standard interface for smart contracts to follow if they are to operate on the Ethereum network as a token.
Today, we will walk you through how to obtain a wallet's current balance of a particular ERC-20 token.
What You Will Need
- Node.js installed
- Web3.js
- A code editor (e.g. Visual Studio Code)
- Terminal/CLI
Dependencies Used in this Guide
| Dependency | Version |
|---|---|
| node.js | 18.16.0 |
| web3.js | 4.1.1 |
Set Up Your QuickNode Ethereum Endpoint
To interact with Ethereum, you'll need an API endpoint to connect with the network. You're welcome to use public nodes or deploy and manage your own infrastructure; however, if you'd like faster response times, you can leave the heavy lifting to us. Sign up for a free account here.
After creating your account, click the Create an Endpoint button. Then, select the chain of your choice. We use Ethereum Mainnet in this guide.
Then, copy your HTTP Provider URL; you'll use it in the following sections to access the Ethereum blockchain.
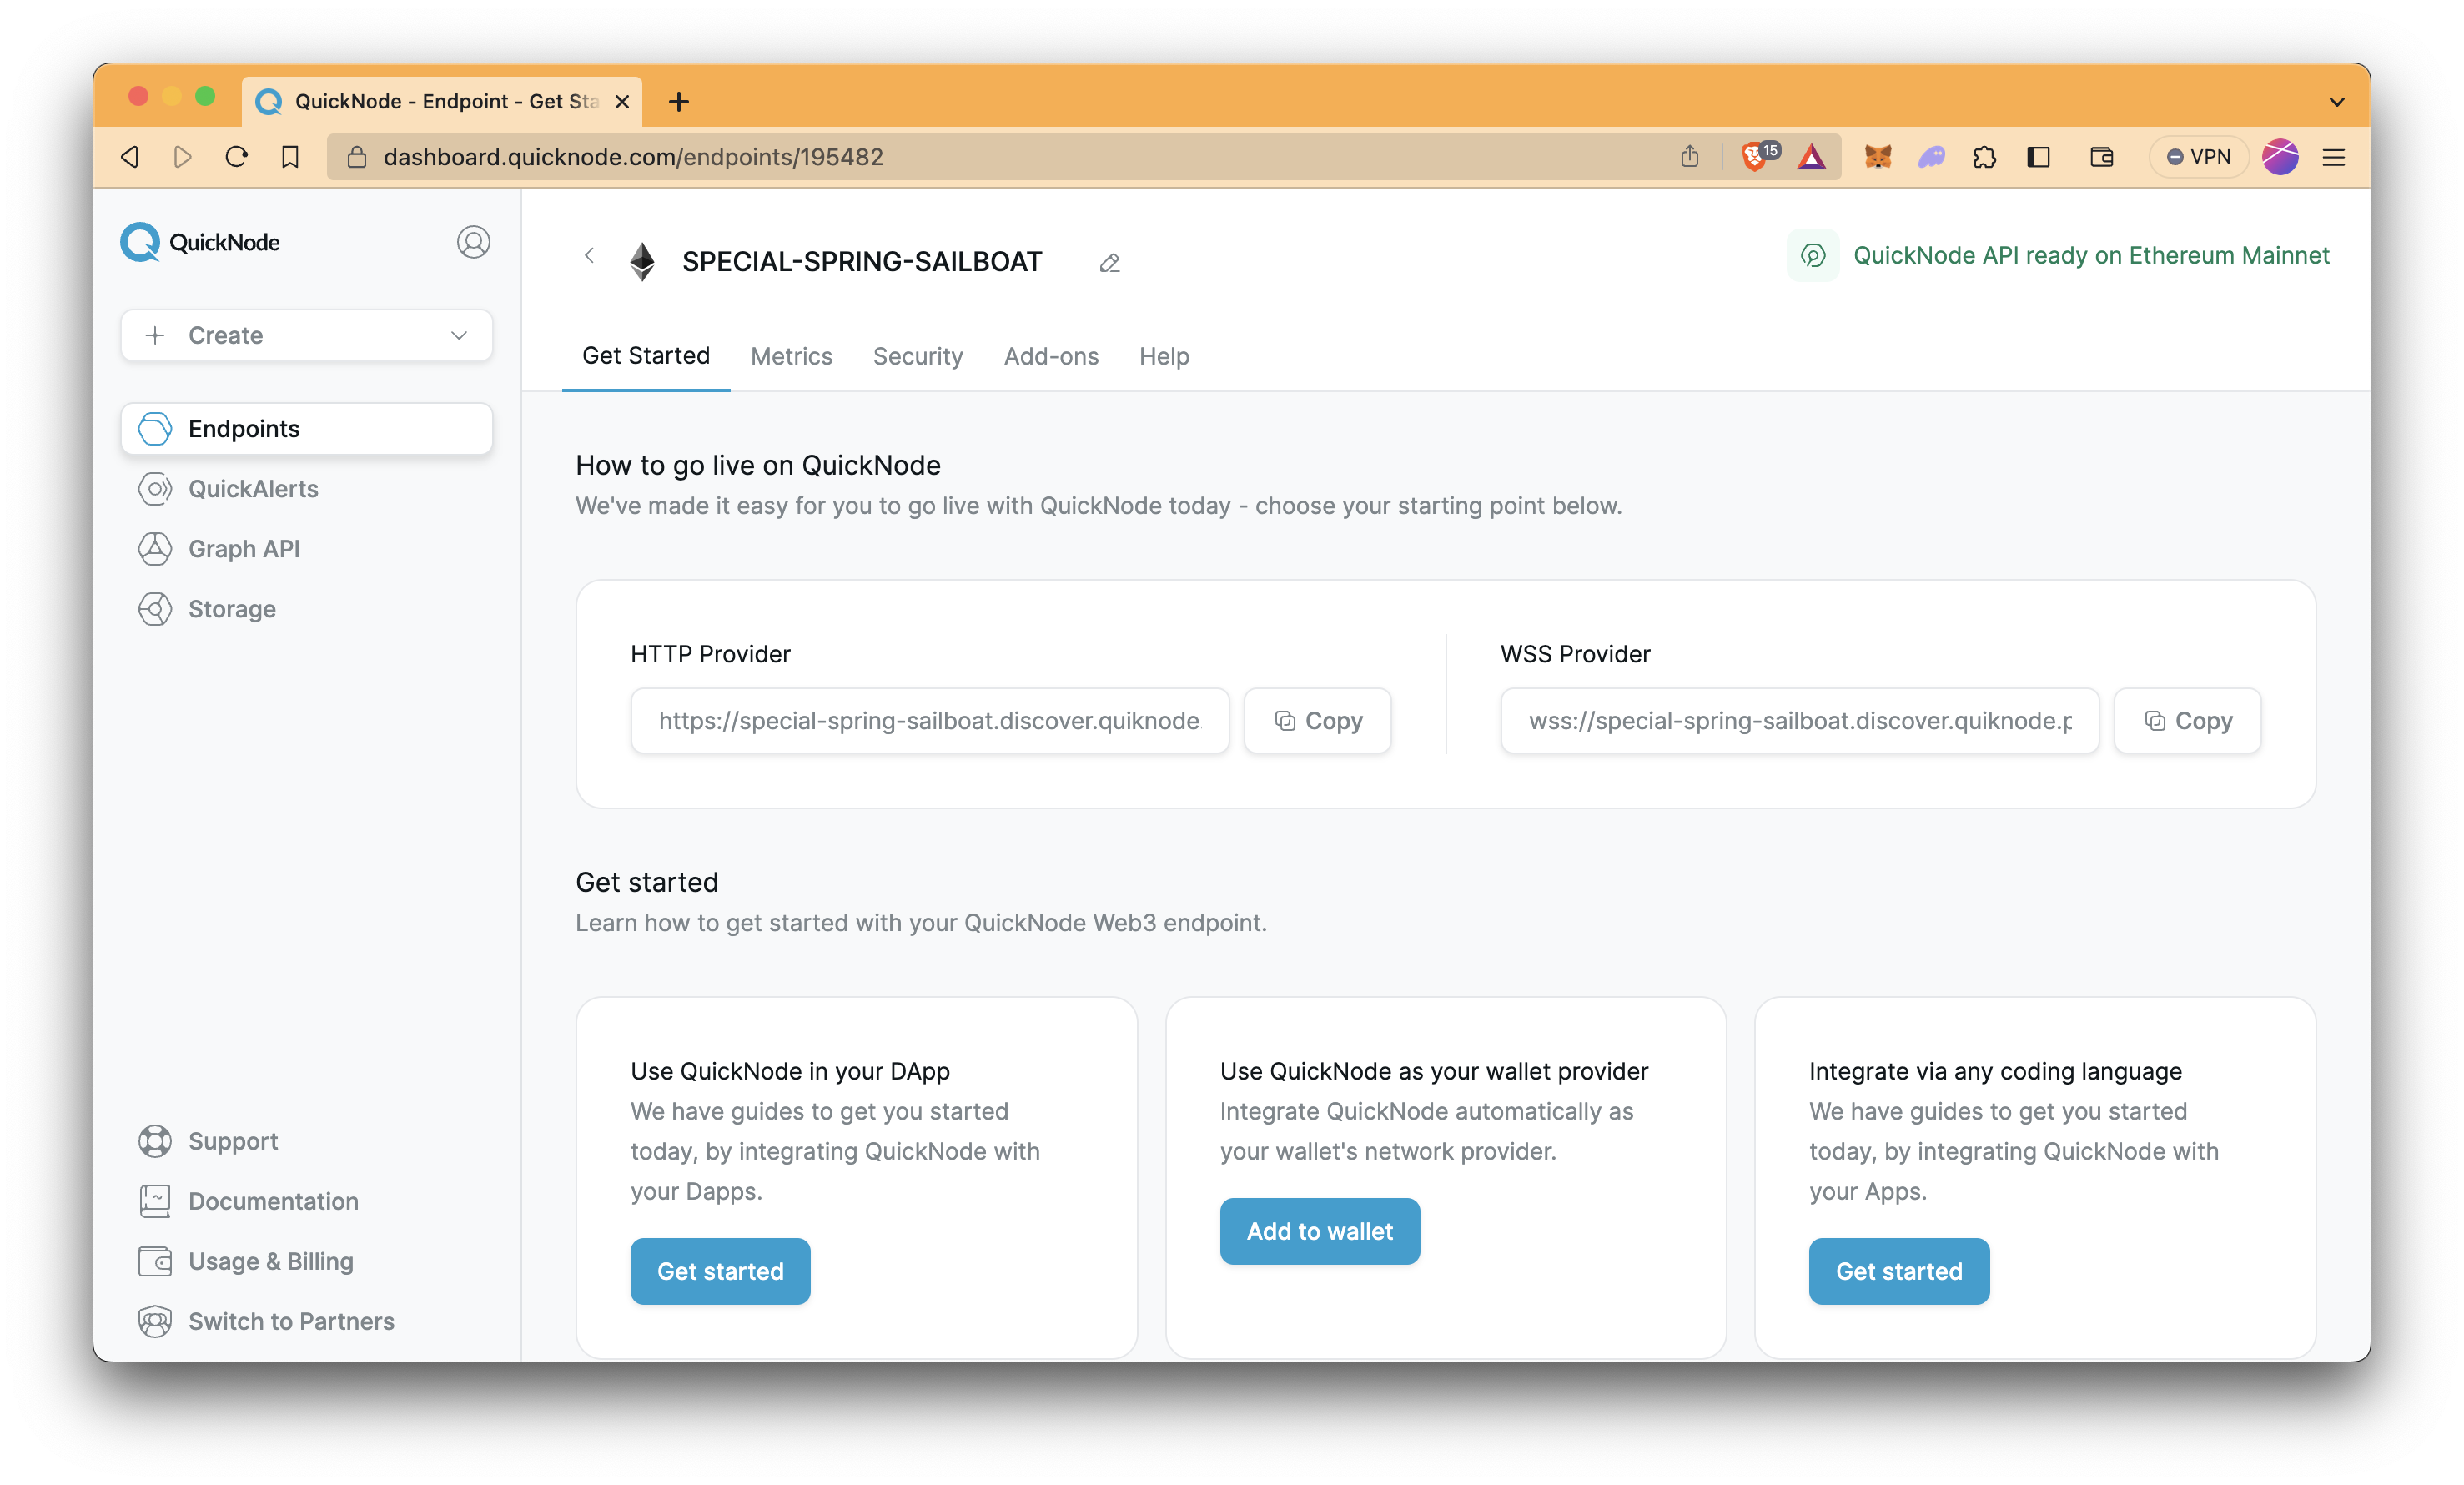
That's it! You now have an endpoint on the Ethereum Mainnet.
Setting up the Project
Now that you've done the legwork to get an Ethereum endpoint running, you can connect to the endpoint via Web3.js. This is a package on npm that will allow you to easily interface with the Ethereum blockchain.
Run the following code in your terminal (i.e., Terminal, Windows PowerShell) to set up the project. Our project folder's name will be ERC20Balance, but you can modify the name as you wish.
mkdir ERC20Balance
cd ERC20Balance
This should create a folder called ERC20Balance and then move the command line into that directory.
Next, install the Web3.js package via npm.
npm init --yes
npm install web3
The code snippets throughout this guide will follow the new 4.1.1 web3.js version, but if you are using the older, still valid version 1.10, refer to Entire Code with Web3.js version 1.10. The steps will be mostly equivalent.
This will create a package.json and package-lock.json file, along with a node_modules folder. All of this should live in your ERC20Balance folder.
Create index.js file by running the command.
echo > index.js
Then, open up your favorite code editor in the ERC20Balance folder.
Once you are done with that, you can create a file and name it index.js. This is all the setup you should need to write a script that will get you the token balance you're looking for!
Getting the ERC20 Token Balance of a Wallet
With your project all configured, it's time to learn a bit about the Ethereum blockchain. In order to get the ERC-20 token balance, you will need to do a number of things.
- Connect to an Ethereum Endpoint
- Write up the ABI (Application Binary Interface) for the smart contract that you want to use to interact with the blockchain
- Find an ERC20 token to get the balance of
- Find a wallet to get the balance of
- Put it all together
Let's start.
Connect to an Ethereum Endpoint
At the top of your index.js file, you will want to import the Web3 library you installed earlier. You can do this like so:
//index.js
const { Web3 } = require("web3");
You can now access Logs for your RPC endpoints, helping you troubleshoot issues more effectively. If you encounter an issue with your RPC calls, simply check the logs in your QuickNode dashboard to identify and resolve problems quickly. Learn more about log history limits on our pricing page.
This allows us to call Web3 methods that are useful for interacting and connecting to the Ethereum blockchain.
To connect to a node, we can use the HTTP Provider from QuickNode that we gathered earlier. All in all, your code should look as follows:
//index.js
const { Web3 } = require("web3");
const endpointUrl = "QUICKNODE_HTTP_ENDPOINT"
const httpProvider = new Web3.providers.HttpProvider(endpointUrl);
const web3Client = new Web3(httpProvider)
Replace
QUICKNODE_HTTP_ENDPOINTwith your QuickNode HTTP Provider URL.
This code will connect you to the QuickNode API that is running the Ethereum client for you. You can now use the web3Client variable to call any web3.js methods that are offered by the library.
Write up the ABI
ABI stands for Application Binary Interface. An ABI is like a guidebook that explains how smart contracts can communicate with each other. It outlines the rules for how data should be packaged and sent between these contracts. The ABI helps different smart contracts understand each other's messages.
An ABI outlines which function you would like to use from a smart contract deployed on the Ethereum Virtual Machine.
The ERC20 spec is actually a smart contract on Ethereum, and you can see the entire ABI for it here. However, you only need the balanceOf method in this guide. It seems a bit unnecessary to copy this entire thing over just for the one function.
Luckily for you, this is completely possible. Out of that huge thing, you only need this one piece to use the balanceOf method.
//index.js

// The minimum ABI to get the ERC20 Token balance

const minABI = [
  // balanceOf
  {
    constant: true,

    inputs: [{ name: '_owner', type: 'address' }],

    name: 'balanceOf',

    outputs: [{ name: 'balance', type: 'uint256'}],

    type: 'function',
  },
]
Find an ERC20 Token to Get the Balance of
You will most likely interact with many different ERC20 tokens over the course of your crypto activities. We will use the Basic Attention Token, but you could use any token that follows the ERC20 spec.
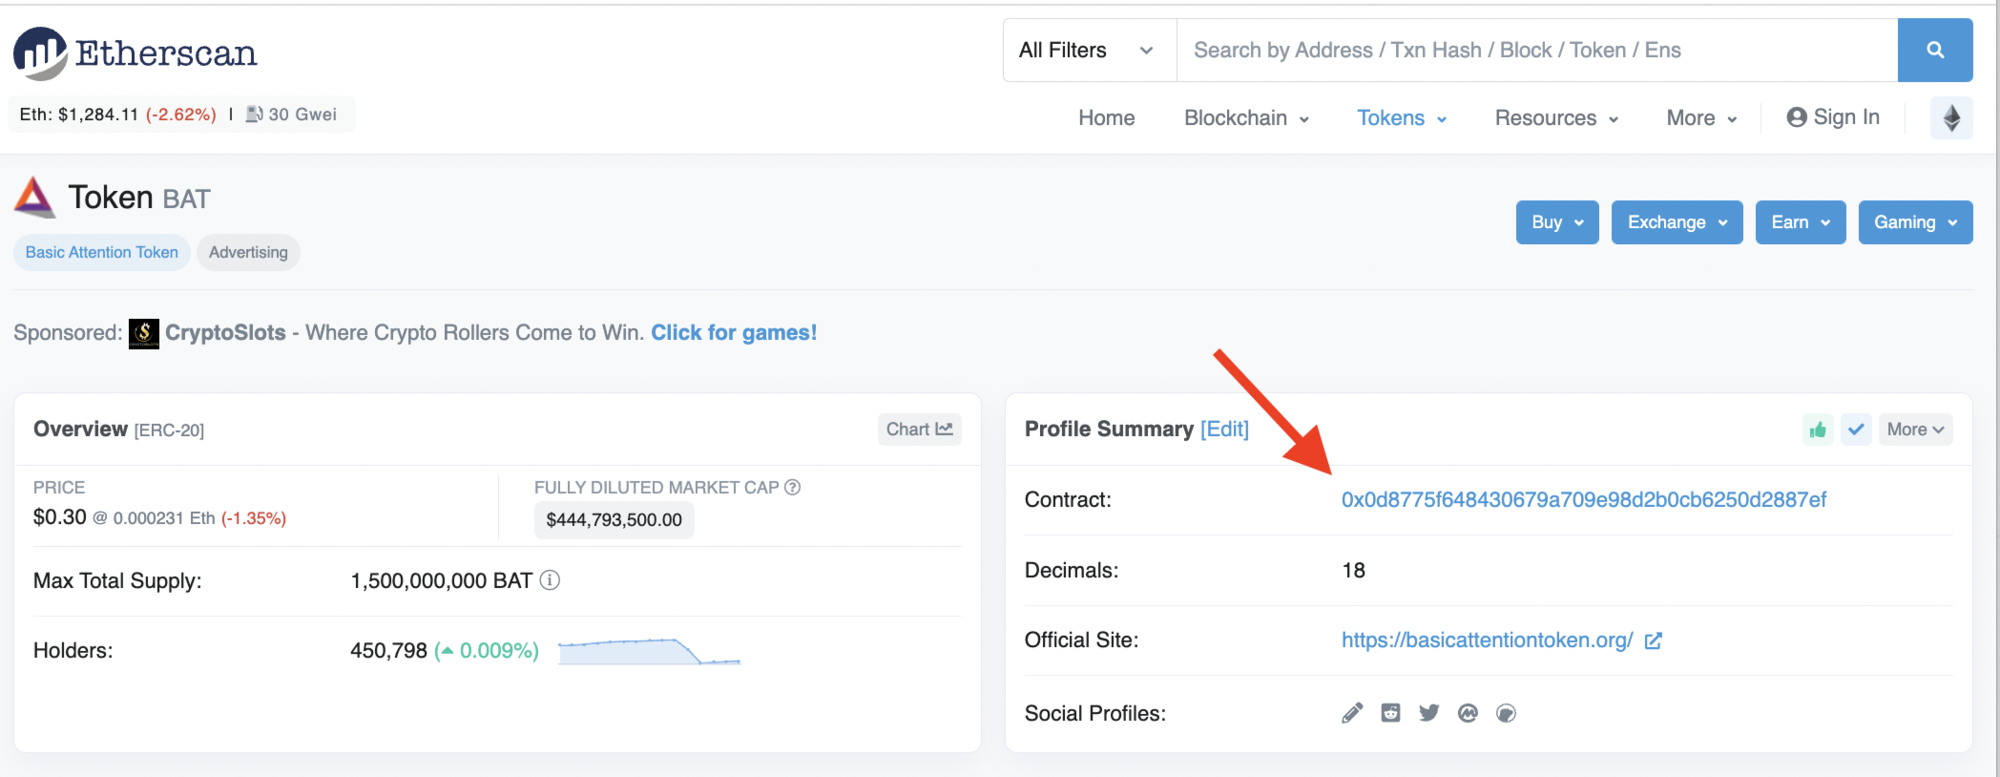
To find the contract address,
- Go to the Etherscan's token page
- Click on the token that you want
- Get the
Token Contract Address
The Contract Address of BAT is 0x0D8775F648430679A709E98d2b0Cb6250d2887EF, so we will use this contract address in the guide.
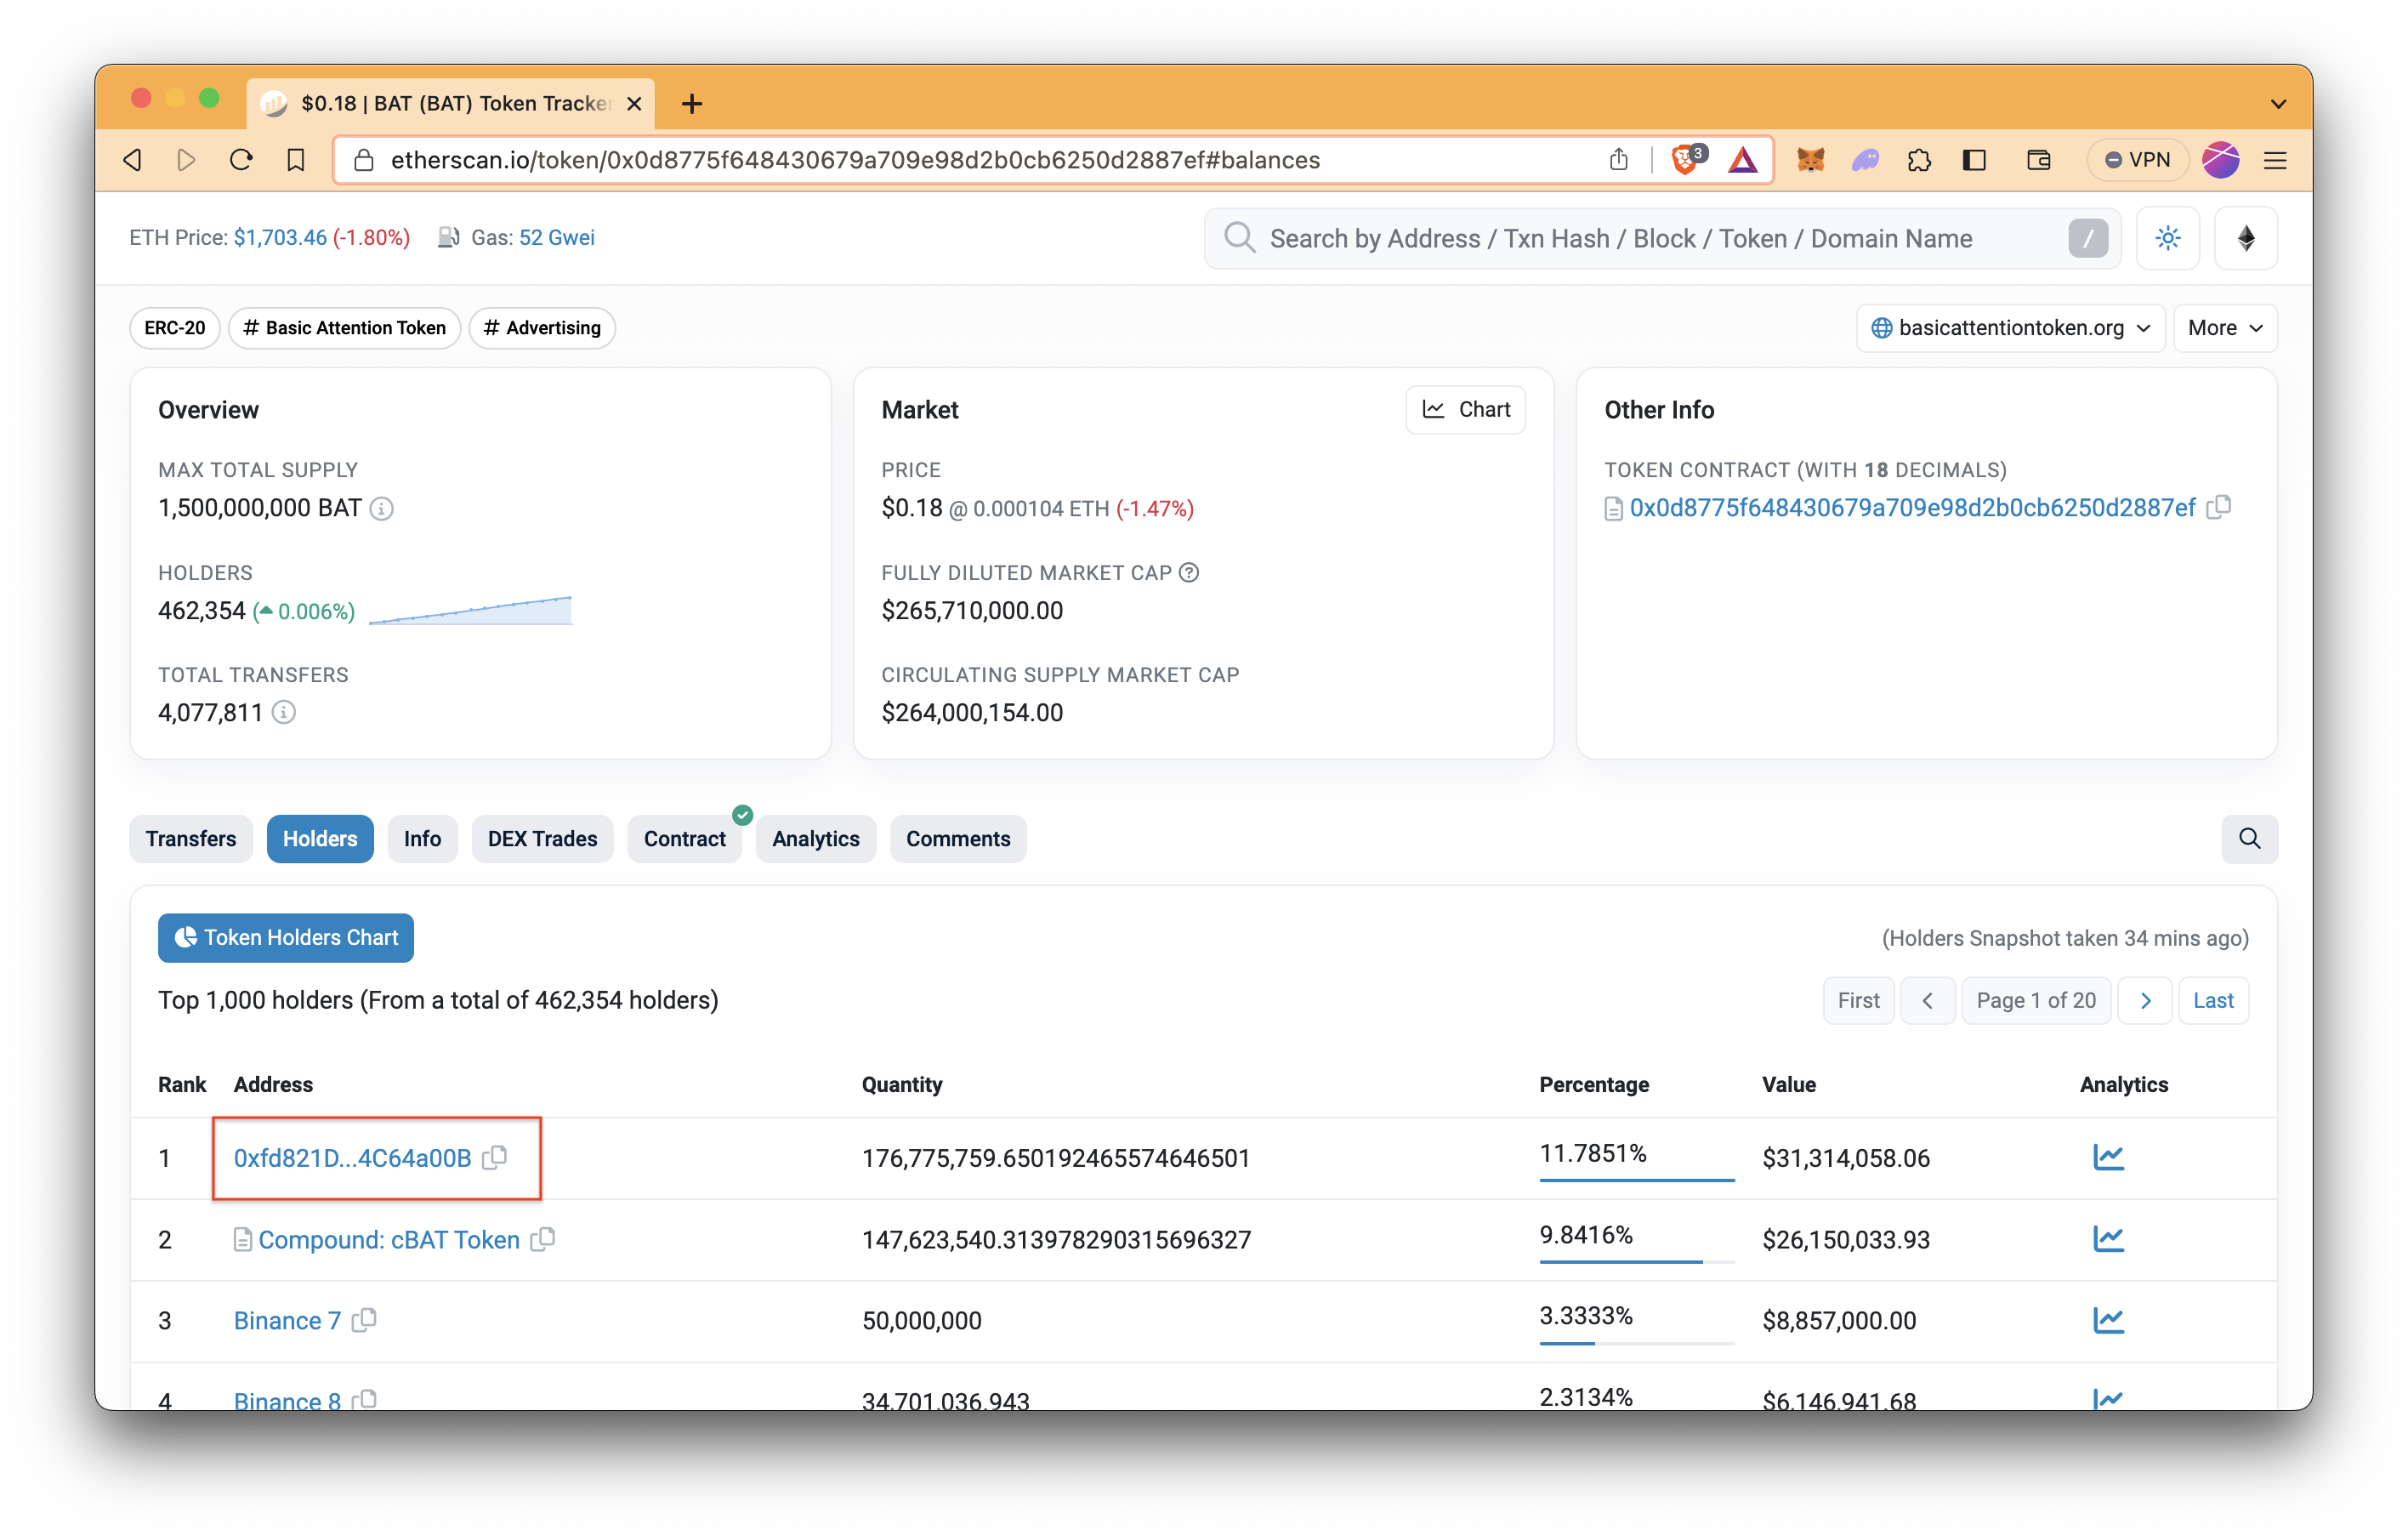
Find a Wallet Address to Get the Balance Of
To find a wallet address that holds the ERC20 token that you select,
- Click the Holders tab on the token page
- Copy the wallet address that you want to get the balance of
Entire Code
We now have a connection to an Ethereum node, an ABI, a smart contract address, and a wallet address. With a few Web3.js calls, we can get the amount of BAT that this address holds.
Your entire index.js file will look as follows;
//index.js
const { Web3 } = require("web3");
const endpointUrl = "QUICKNODE_HTTP_ENDPOINT"
const httpProvider = new Web3.providers.HttpProvider(endpointUrl);
const web3Client = new Web3(httpProvider);

const minABI = [
  // balanceOf
  {
    constant: true,
    inputs: [{ name: "_owner", type: "address" }],
    name: "balanceOf",
    outputs: [{ name: "balance", type: "uint256"}],
    type: "function",
  },
];

const tokenAddress = "0x0d8775f648430679a709e98d2b0cb6250d2887ef";
const walletAddress = "0xfd821d8cea64feacb6ec86d979e37bc64c64a00b";

const contract = new web3Client.eth.Contract(minABI, tokenAddress);

async function getBalance() {
  const result = await contract.methods.balanceOf(walletAddress).call();

  const resultInEther = web3Client.utils.fromWei(result, "ether");

  console.log(`Balance in wei: ${result}`);

  console.log(`Balance in ether: ${resultInEther}`);
}

getBalance();
-
The program starts by importing the
Web3module, which helps in connecting to Ethereum networks. It sets up an Ethereum node's HTTP endpoint using the URL provided. -
It creates a new instance of the
Web3.providers.HttpProviderusing the defined endpoint URL, establishing a connection to the Ethereum network. -
The
minABIconstant is an array of information about an ERC20 token smart contract's functions. It describes the functionbalanceOfthat can be called on the contract. This function allows checking the balance of an Ethereum wallet address. The information includes details like the function's name, inputs, outputs, and their types. -
The
tokenAddressandwalletAddressconstants hold Ethereum addresses. ThetokenAddressrepresents the address of an ERC20 token smart contract on the Ethereum network, while thewalletAddressrepresents an Ethereum wallet address to check the balance. -
A new contract instance is created using the
minABIarray and thetokenAddress. This allows the program to interact with the smart contract functions using thecontractvariable. -
The
getBalancefunction is defined with anasynckeyword, indicating it performs asynchronous operations. Inside this function, thebalanceOffunction from the smart contract is called with thewalletAddress. Theawaitkeyword is used to wait for the response from the Ethereum network. Theresultis the balance of the specified wallet address in the smart contract's token. -
The program logs both the original
result(in wei) and the convertedresultInEther(in ether) to the console. -
Lastly, the
getBalancefunction is invoked at the end of the code, triggering the entire process. This results in displaying the balance of the specified wallet address, both in wei and in ether units. -
The
getBalancefunction is called at the end of the code, triggering the entire process and displaying the balance of the specified wallet address.
Wei is the smallest unit of Ethereum's cryptocurrency, while ether is the larger and more commonly used unit, with 1 ether being equivalent to 10^18 wei.
The last thing to do is run it! The only thing you should need to do at this point is save your index.js file and then in your terminal run. Make sure that you are still in the main project directory.
node index
It should display in your console the amount of BAT in the both formats.
> node index.js
Balance in wei: 176775759650192465574646501
Balance in ether: 176775759.650192465574646501
Entire Code with Web3.js version 1.10
If you are using version 1.10 of Web3.js, refer to this code. If not, you can skip this section.
//index.js

const Web3 = require('web3')

const provider = 'QUICKNODE_HTTP_ENDPOINT'

const Web3Client = new Web3(new Web3.providers.HttpProvider(provider))

// The minimum ABI required to get the ERC20 Token balance
const minABI = [
  // balanceOf
  {
    constant: true,
    inputs: [{ name: '_owner', type: 'address' }],
    name: 'balanceOf',
    outputs: [{ name: 'balance', type: 'uint256'}],
    type: 'function',
  },
]
const tokenAddress = '0x0d8775f648430679a709e98d2b0cb6250d2887ef'
const walletAddress = '0xfd821d8cea64feacb6ec86d979e37bc64c64a00b'

const contract = new Web3Client.eth.Contract(minABI, tokenAddress)

async function getBalance() {
  const result = await contract.methods.balanceOf(walletAddress).call()

  const resultInEther = Web3Client.utils.fromWei(result)

  console.log(`Balance in wei: ${result}`);

  console.log(`Balance in ether: ${resultInEther}`);
}

getBalance()
Using the QuickNode Token API
Alternatively, you can easily retrieve the balance of an ERC20 token using the QuickNode Token API. The Token API allows users to easily retrieve aggregated token data such as balances by wallet, token transfers, and token details (such as metadata and decimal places). You can also check out our Token API documentation page.
Please note that this RPC method requires the Token and NFT API v2 bundle add-on enabled on your QuickNode endpoint.
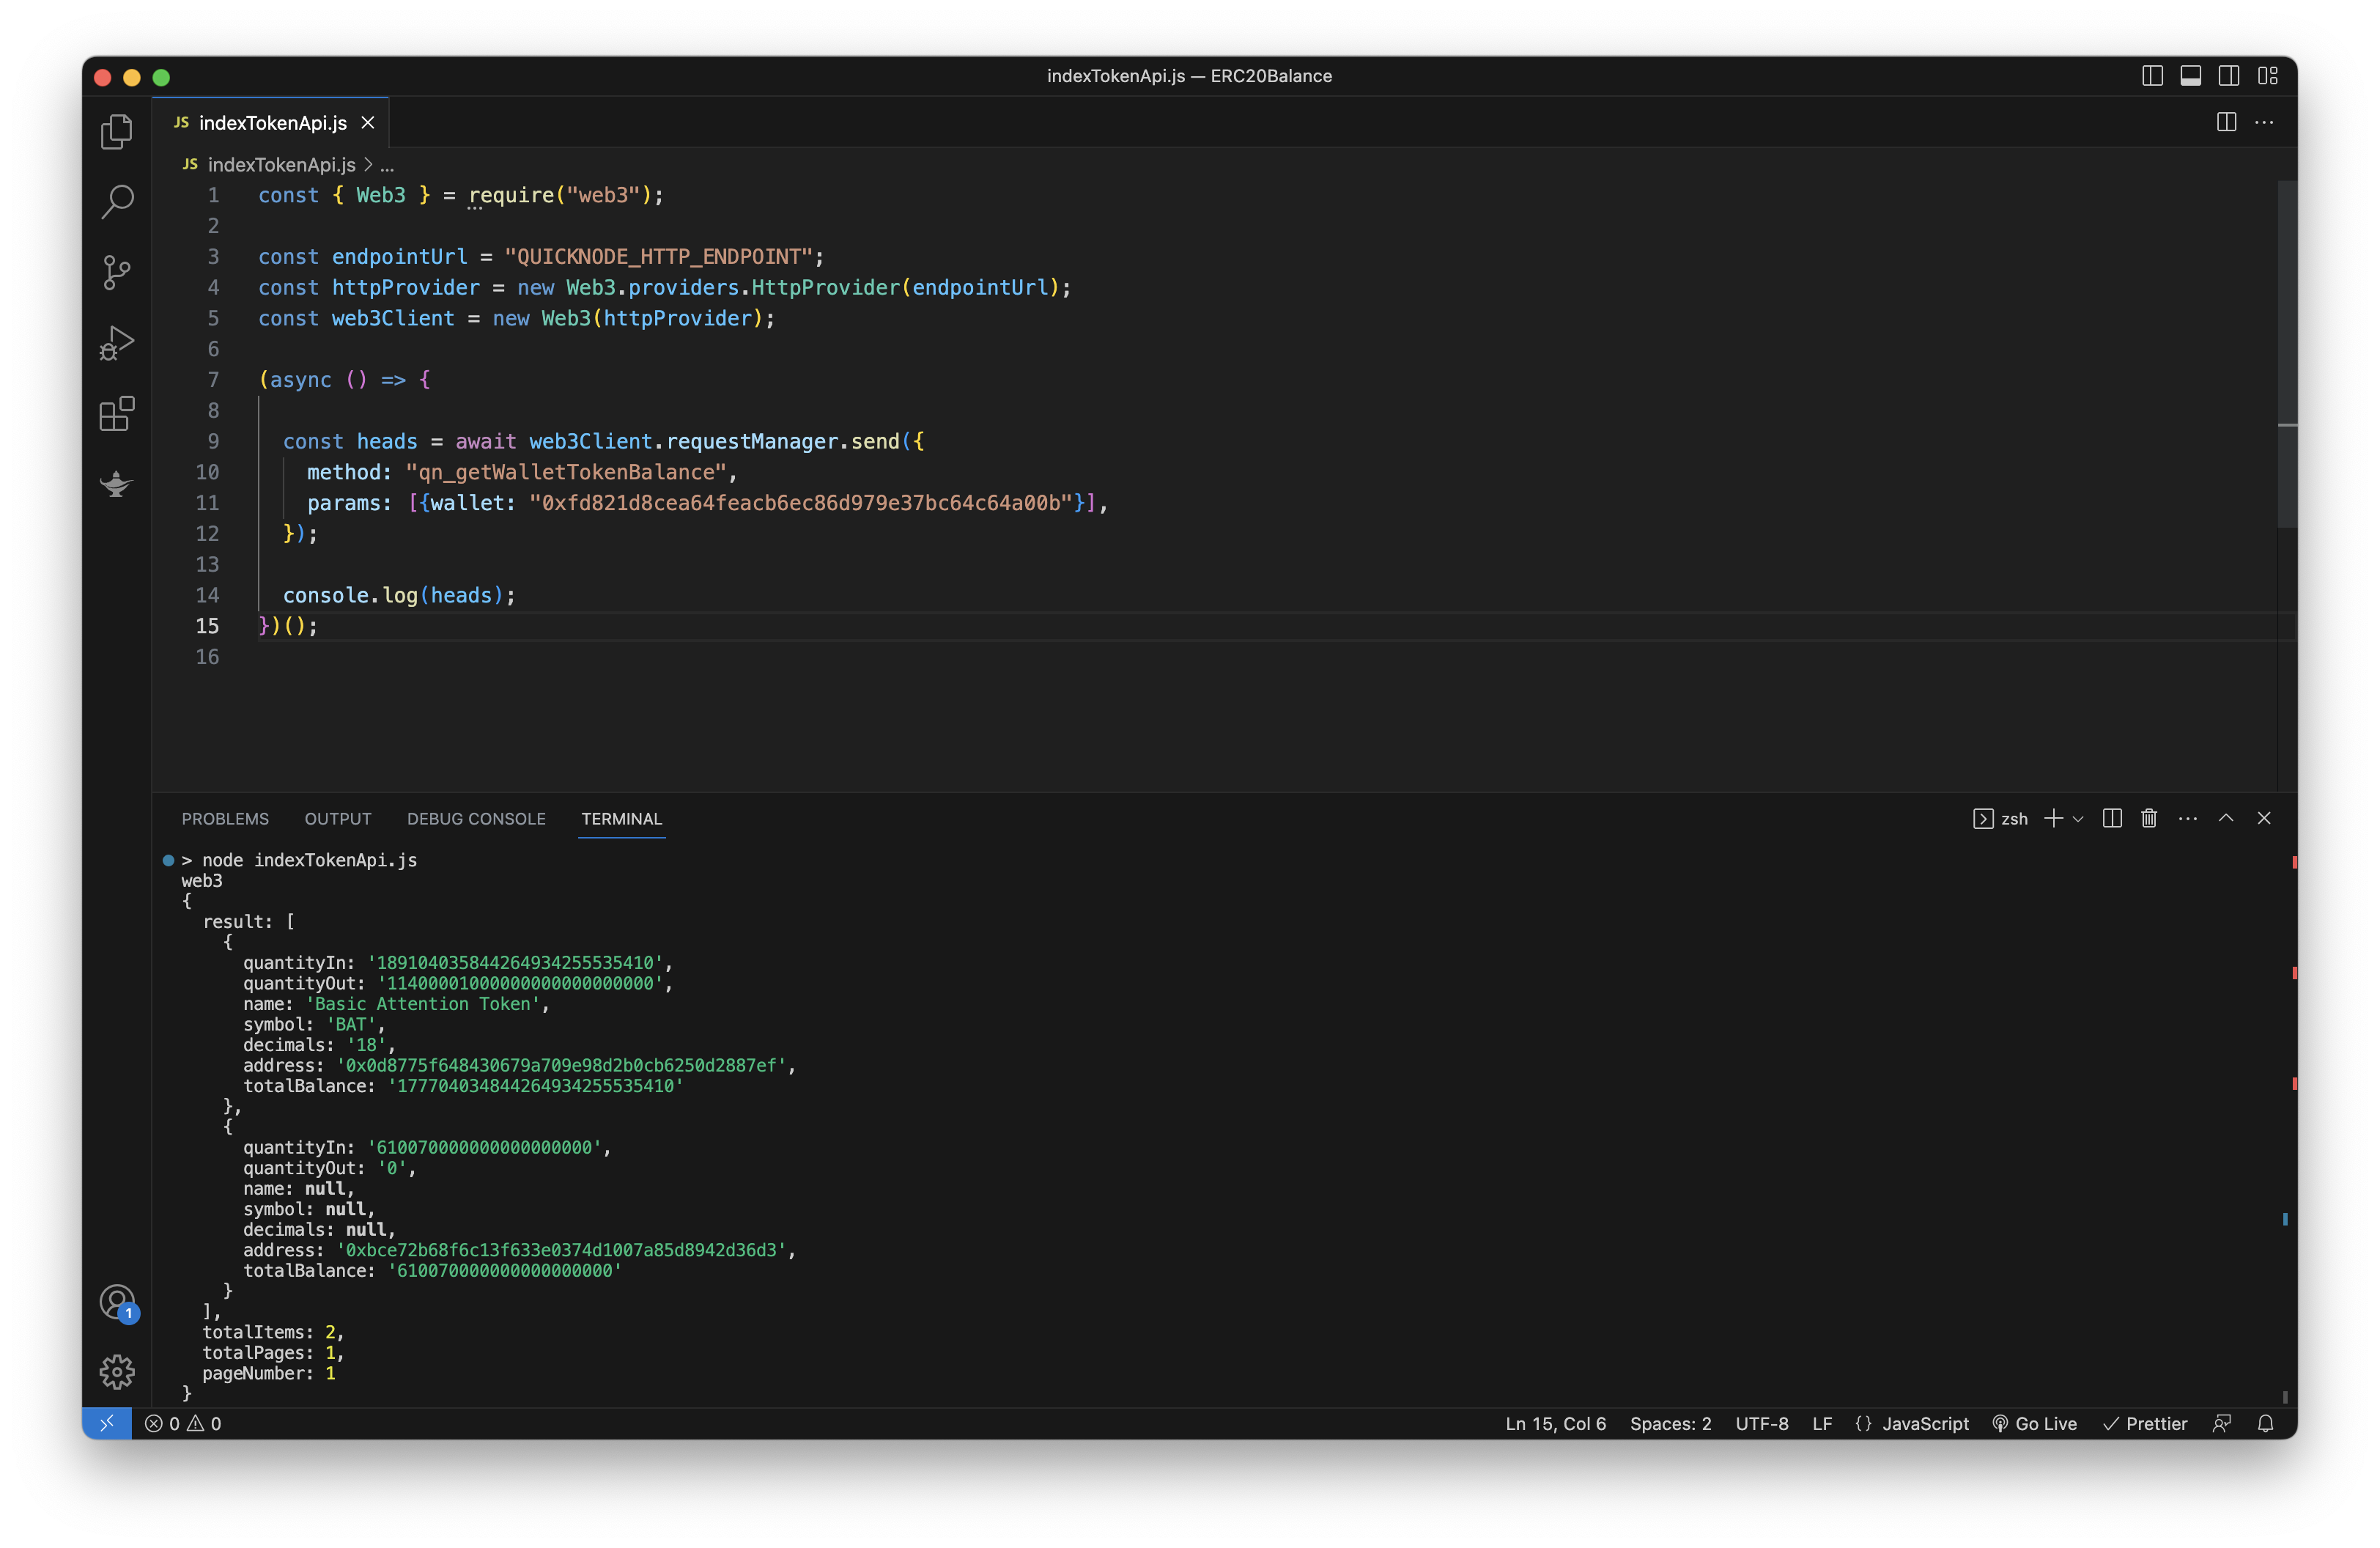
See the following web3.js example below to see how easy it is to get all the token balances with this method:
Create the indexTokenApi.js file by running the command.
echo > indexTokenApi.js
Then, modify the file.
Replace
QUICKNODE_HTTP_ENDPOINTwith your QuickNode HTTP Provider URL.
const { Web3 } = require("web3");

const endpointUrl =
  "QUICKNODE_HTTP_ENDPOINT";
const httpProvider = new Web3.providers.HttpProvider(endpointUrl);
const web3Client = new Web3(httpProvider);

(async () => {
  const heads = await web3Client.requestManager.send({
    method: "qn_getWalletTokenBalance",
    params: [{wallet: "0xfd821d8cea64feacb6ec86d979e37bc64c64a00b"}],
  });

  console.log(heads);
})();
Finally, run the code.
node indexTokenApi.js
The console output is like the one below. It brings up all the ERC20 balances and a bunch of information easily.
Conclusion
Having made it to the end, you will have gained some valuable insights. You now know how to navigate Etherscan to view token and wallet addresses, what an ABI is, and how to set up an Ethereum endpoint. Then you put all of those things together and were able to get the amount of BAT that is inside a particular wallet!
Subscribe to our newsletter for more articles and guides on Ethereum. If you encounter any problems or have any questions, we'd love to help you! Find us on Discord or Twitter.
We ❤️ Feedback!
Let us know if you have any feedback or requests for new topics. We'd love to hear from you.