
12 min read
Overview
Developing applications involves juggling several moving pieces like frontends, backends, and databases. However, developing a decentralized application (dApp) on a blockchain adds a few more layers, such as smart contracts and the infrastructure needed to communicate (i.e., read/write) with the blockchain.
Managing these pieces can become arduous if you are starting as a developer wanting to develop a decentralized blockchain application. Scaffold-ETH gives you a jump start with its application pack. In this guide, we will learn how to set up and use the latest version Scaffold-ETH 2.
Although the name of Scaffold-ETH's new repository is called as "Scaffold-ETH 2", the name Scaffold-ETH will be used throughout the guide to avoid confusion.
What You Will Need
- Node.js installed (>= v18.17)
- Yarn (v1 or v2+)
- Git
- Terminal/CLI
- A free Quicknode account
What is Scaffold-ETH
The Scaffold-ETH Github repository can be thought of as a foundational framework for understanding the workings of dApps. It comes with tools to make the Ethereum (and EVM) dApp building process faster and easier. The combination of tools used in Scaffold-ETH allows you to have a frontend for your smart contracts. The stack of tools for development are as follows:
- NextJS: A React framework that enables features like server-side rendering for building web applications.
- RainbowKit: A React library designed for easily connecting wallets to your dApp.
- Hardhat: A development environment for compiling, deploying, testing, and debugging smart contracts.
- Wagmi: A collection of React Hooks for Ethereum, simplifying blockchain interactions.
- TypeScript: A superset of JavaScript that adds static types to the language, enhancing code reliability and developer experience.
- Viem: A Typescript library to interface with the blockchain.
Setting up Scaffold-ETH Environment
First of all, before getting started with Scaffold-ETH, your machine needs to have Yarn, Node.js, and Git installed as indicated in the What You Will Need section.
To set up the environment, we will need three different terminal windows.
- Terminal 1: Local Ethereum network - must remain running
- Terminal 2: Smart contract deployment
- Terminal 3: NextJS application - must remain running
Now, open your first terminal window, go to a directory where you would like to clone the Scaffold-ETH repository, and follow these instructions.
Step 1: Clone the repository
git clone https://github.com/scaffold-eth/scaffold-eth-2.git
cd scaffold-eth-2
yarn install
These commands will clone the repo, make the scaffold-eth-2 your working directory, and install all the necessary packages.
Click here to learn more about the folder structure
Top-Level Structure
- CONTRIBUTING.md: Guidelines for contributing to the project. It usually includes instructions on how to make pull requests, report bugs, and contribute to the development.
- LICENCE: The legal licensing agreement for the project specifying how it can be used or distributed.
- README.md: An introductory file that provides information about the project, setup instructions, and other important details.
- node_modules: A directory where all the project's packages and their dependencies are installed.
- package.json: A file that holds various metadata relevant to the project, including scripts, dependencies, and project version.
- packages: This directory contains the different packages or modules of the project, each with its own specific functionality.
- yarn.lock: This file locks the versions of the packages installed, ensuring consistency across installations.
Inside the packages Directory
hardhat
- contracts: Contains the Solidity smart contracts for the project.
- deploy: Scripts for deploying contracts to the blockchain.
- hardhat.config.ts: Hardhat configuration file to customize the development environment.
- node_modules: Dependencies specific to the Hardhat environment.
- package.json: Metadata and dependencies for the Hardhat package.
- scripts: Various scripts for tasks like compiling contracts or running custom tasks.
- test: Tests for the smart contracts to ensure they work as expected.
- tsconfig.json: Configuration for TypeScript in the Hardhat project.
nextjs
- app: Main application logic and pages for the Next.js frontend.
- components: Reusable UI components for the application.
- contracts: Possibly a place to store ABI files or contract interaction logic.
- hooks: Custom React hooks, likely for interacting with blockchain data or managing state.
- next-env.d.ts: TypeScript declaration file for Next.js types.
- next.config.js: Configuration file for Next.js to customize its behavior.
- node_modules: Dependencies specific to the Next.js environment.
- package.json: Metadata and dependencies for the Next.js package.
- postcss.config.js: Configuration for PostCSS, a tool for transforming CSS with plugins.
- public: Static assets like images and fonts that can be publicly accessed.
- scaffold.config.ts: Custom configuration for scaffolding or setup specific to the project.
- services: Services for external API calls or business logic.
- styles: CSS or styling files for the application.
- tailwind.config.js: Configuration for Tailwind CSS, a utility-first CSS framework.
- tsconfig.json: Configuration for TypeScript in the Next.js project.
- types: TypeScript type definitions specific to the application.
- utils: Utility functions or helpers used across the application.
Step 2: Run a local network
Scaffold-ETH comes with a demo contract and a frontend. Let us try to run that and understand what it does under the hood.
Type the following in your terminal/cmd window:
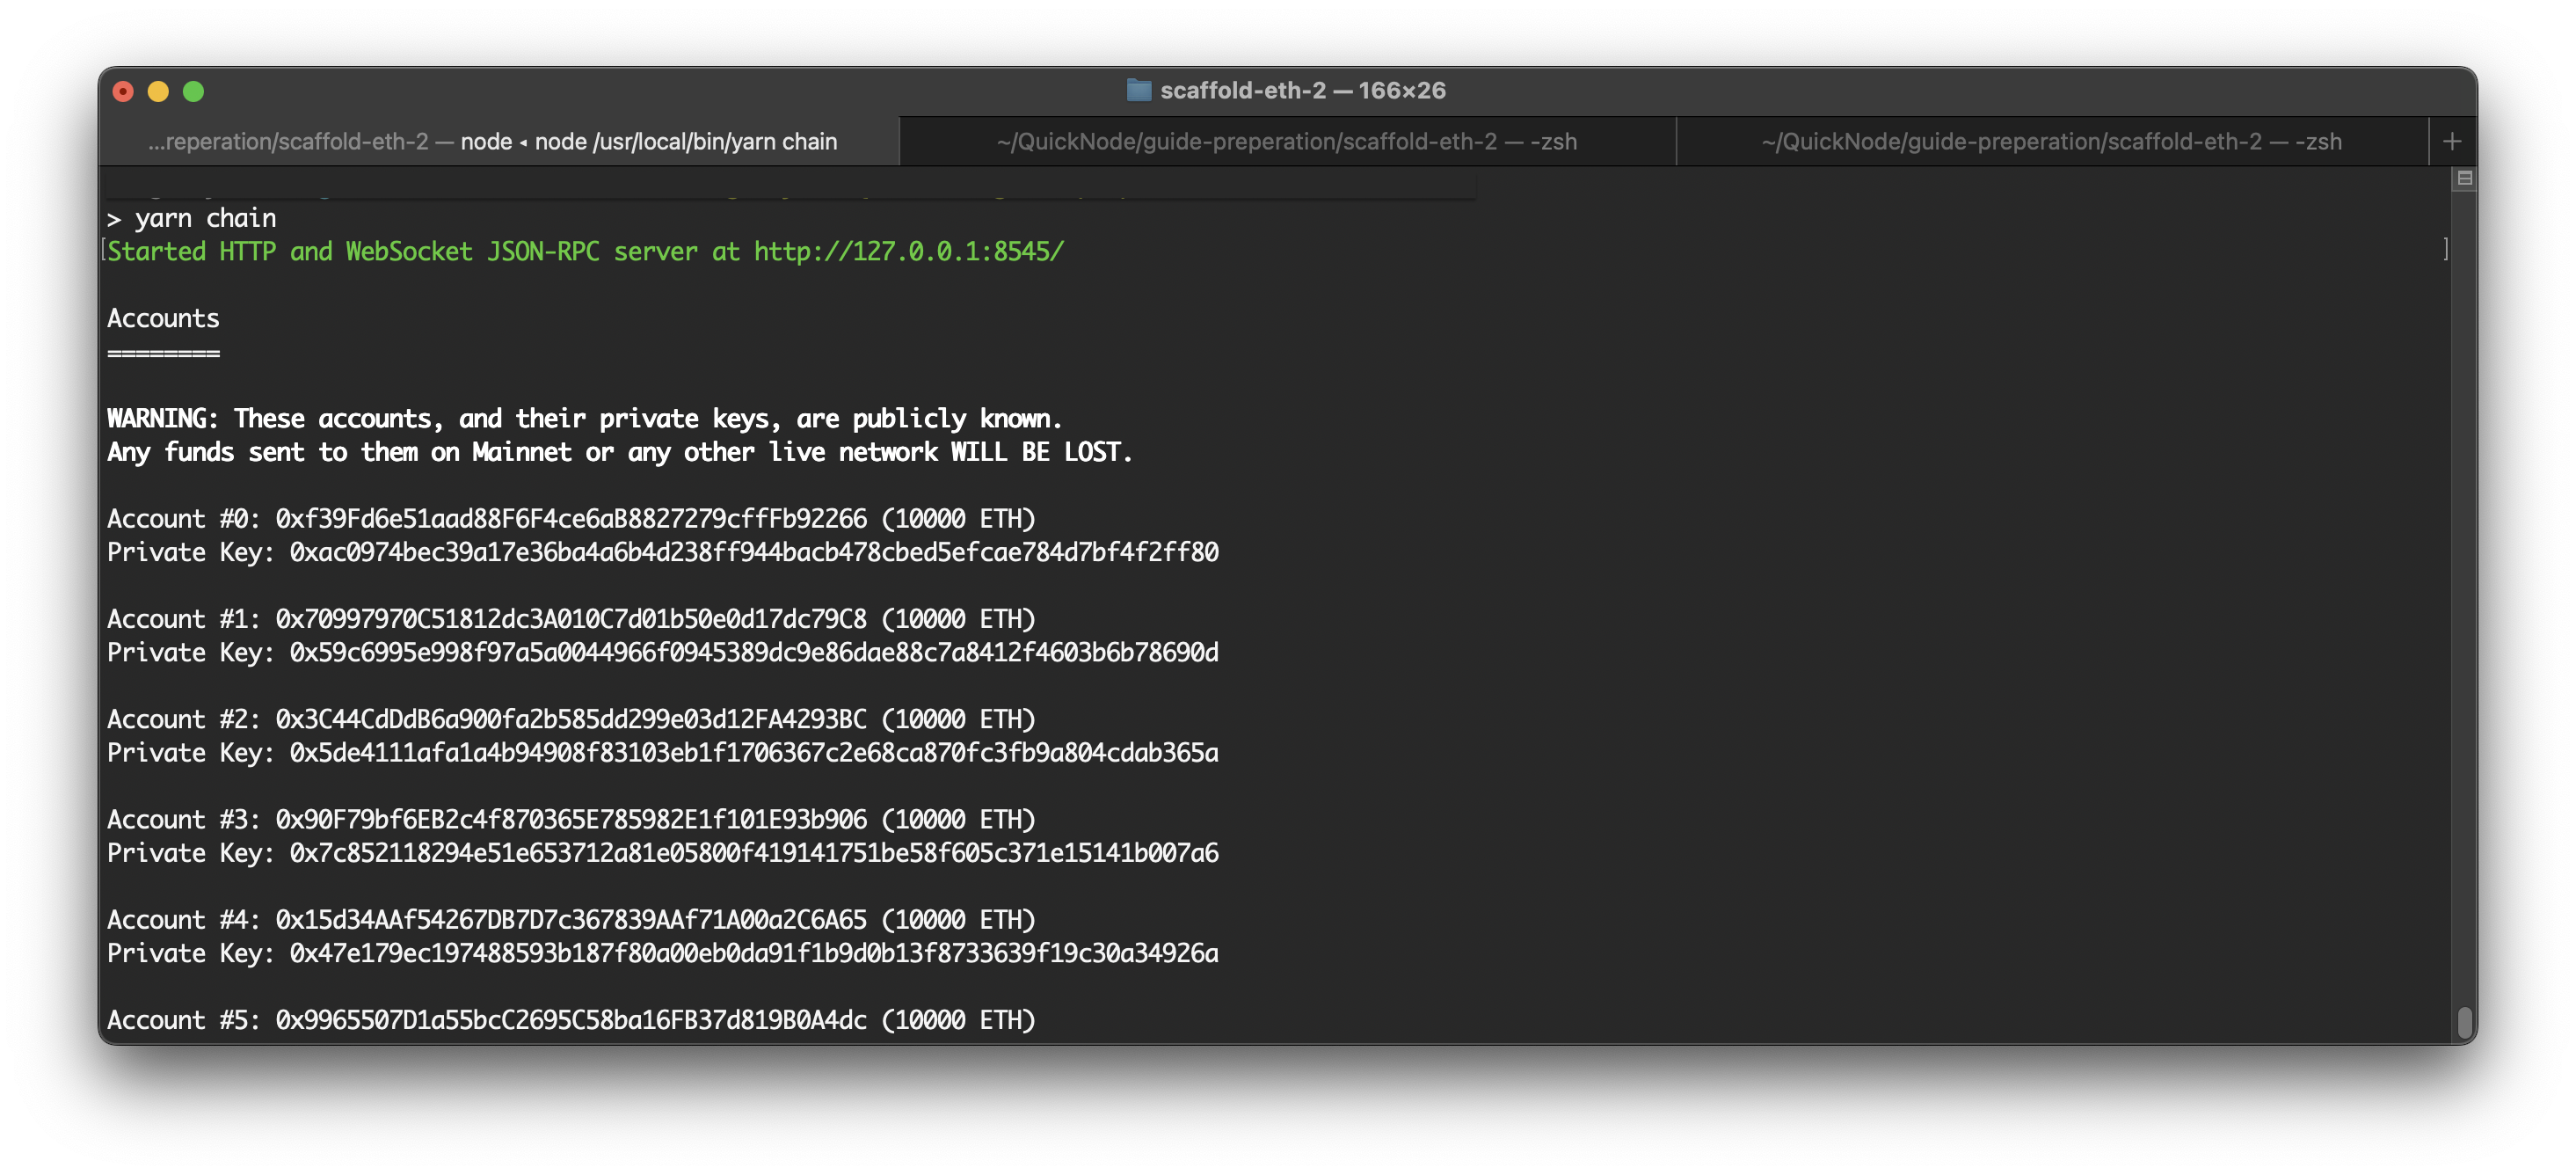
yarn chain
This command starts a Hardhat network, a local Ethereum network used for development and testing purposes. Unlike public testnets or mainnets, local networks provide a controlled environment that confines all interactions to your local machine. This setup eliminates the need to wait for transaction confirmations typical of live networks, and there's no need to acquire testnet tokens for deployment or testing. With Hardhat, developers can simulate network conditions, execute transactions, and interact with smart contracts quickly and efficiently, making it an ideal choice for rapid development cycles.
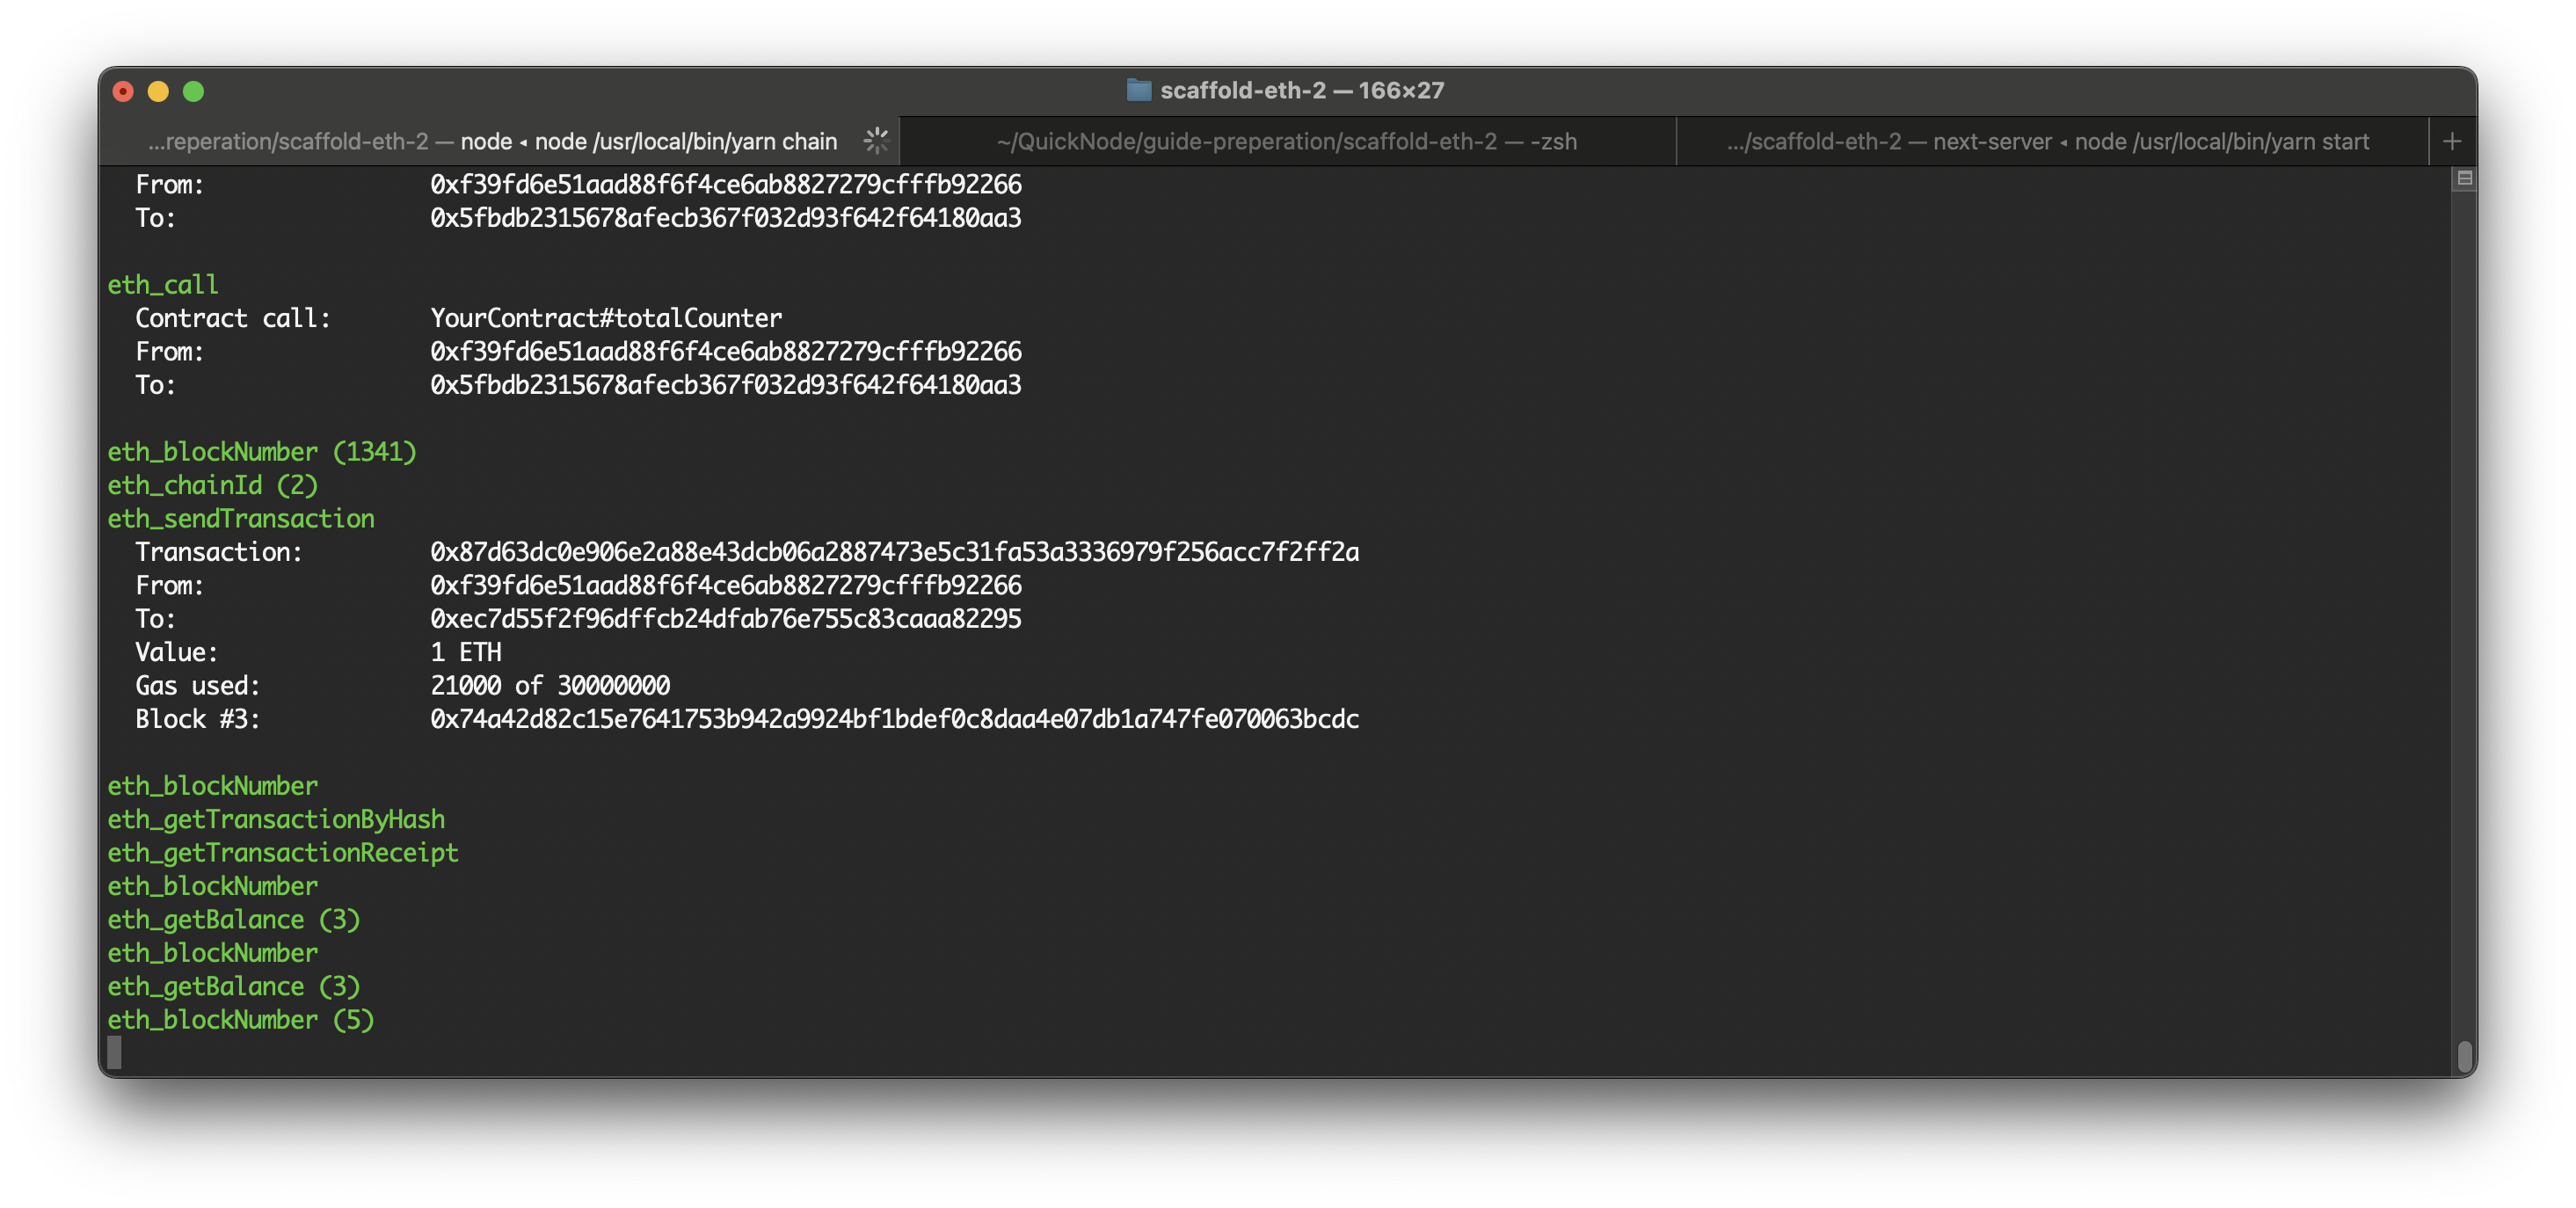
Once the process is completed, you will see a message similar to this. Keep running this terminal window.
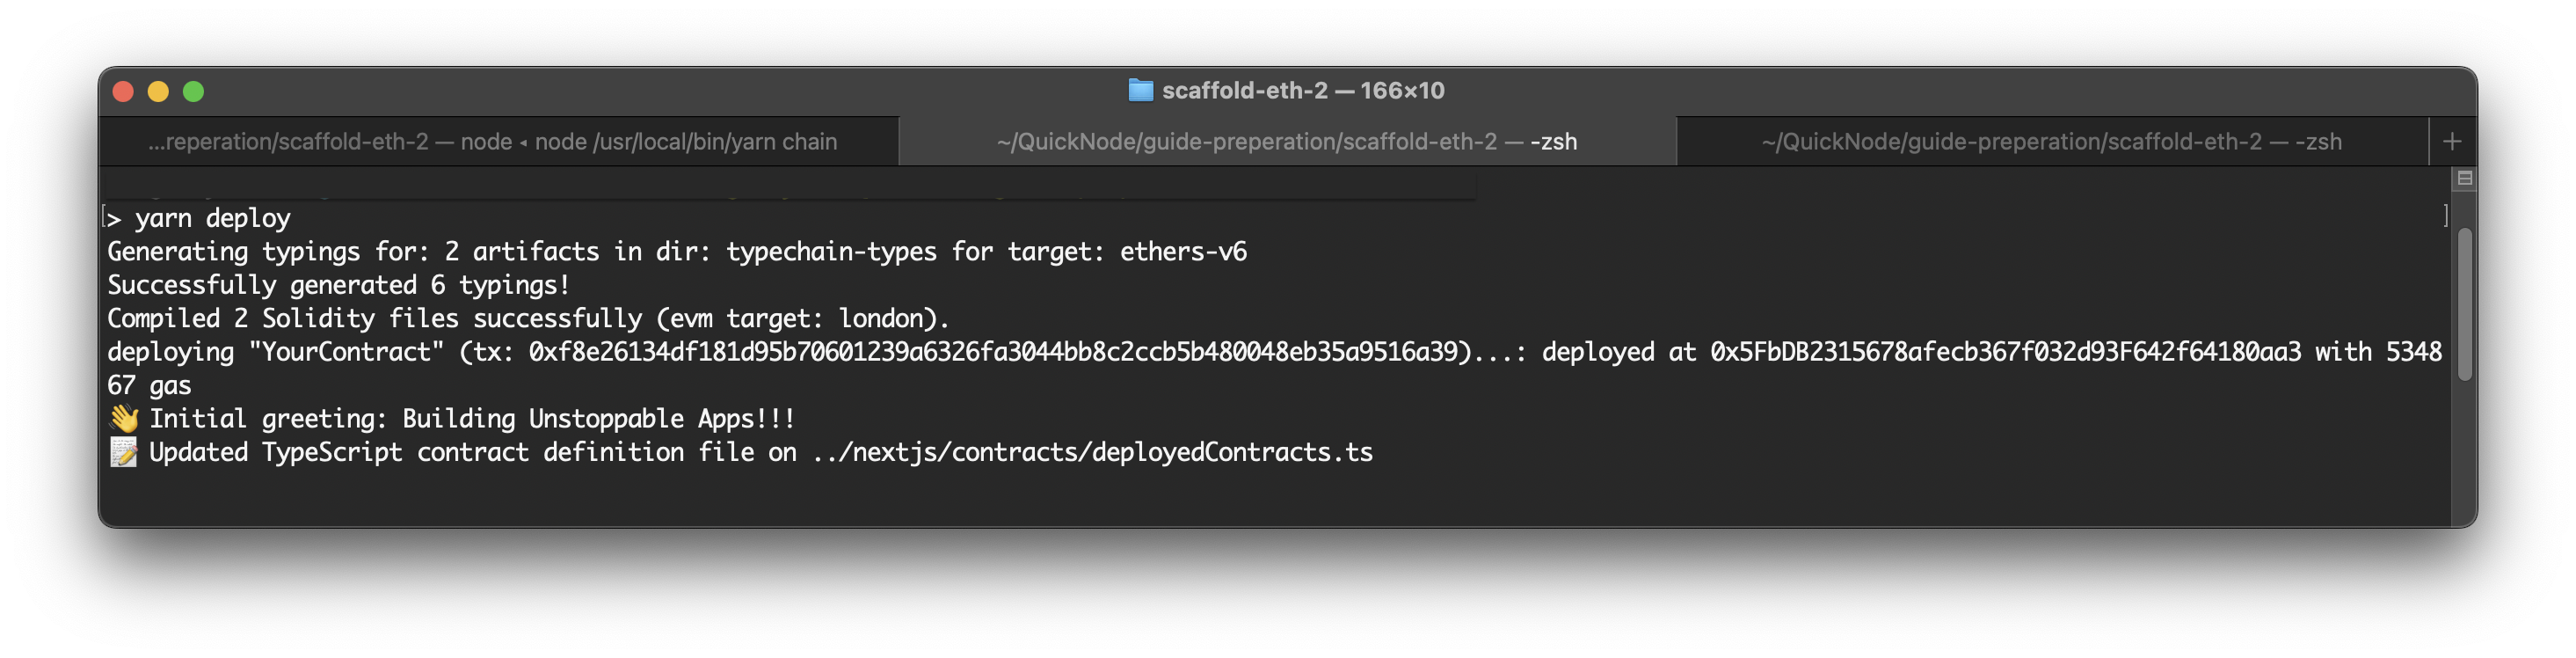
Step 3: Deploy smart contracts
Now, let us try to deploy the contract. YourContract.sol is a basic smart contract that assigns an owner upon deployment, allows anyone to update a stored message with or without sending Ether, and tracks how many times the message has been changed in total and by individual users. If you want to review or change it, you can find the demo contract in the /packages/hardhat/contracts directory.
Open your second terminal window in the scaffold-eth-2 directory, and run the following command.
yarn deploy
Here, we are telling Hardhat to deploy the smart contract to the Hardhat local network, which we started in the last step. The deployment script can be found here: /packages/hardhat/deploy/00_deploy_your_contract.ts
When the contract is deployed, you will see a message like the one below. It will provide your newly deployed contract's address and transaction hash.
Step 4: Launch the NextJS application
Now that we have deployed the contract, it's time to fire up the frontend application. To do so, open a third terminal window that points to the scaffold-eth-2 directory and run the following command.
yarn start
This will launch the Next.js app, which uses the local network and deployed contract. Once the server starts, the app runs on https://localhost:3000.
And it should look something like this.
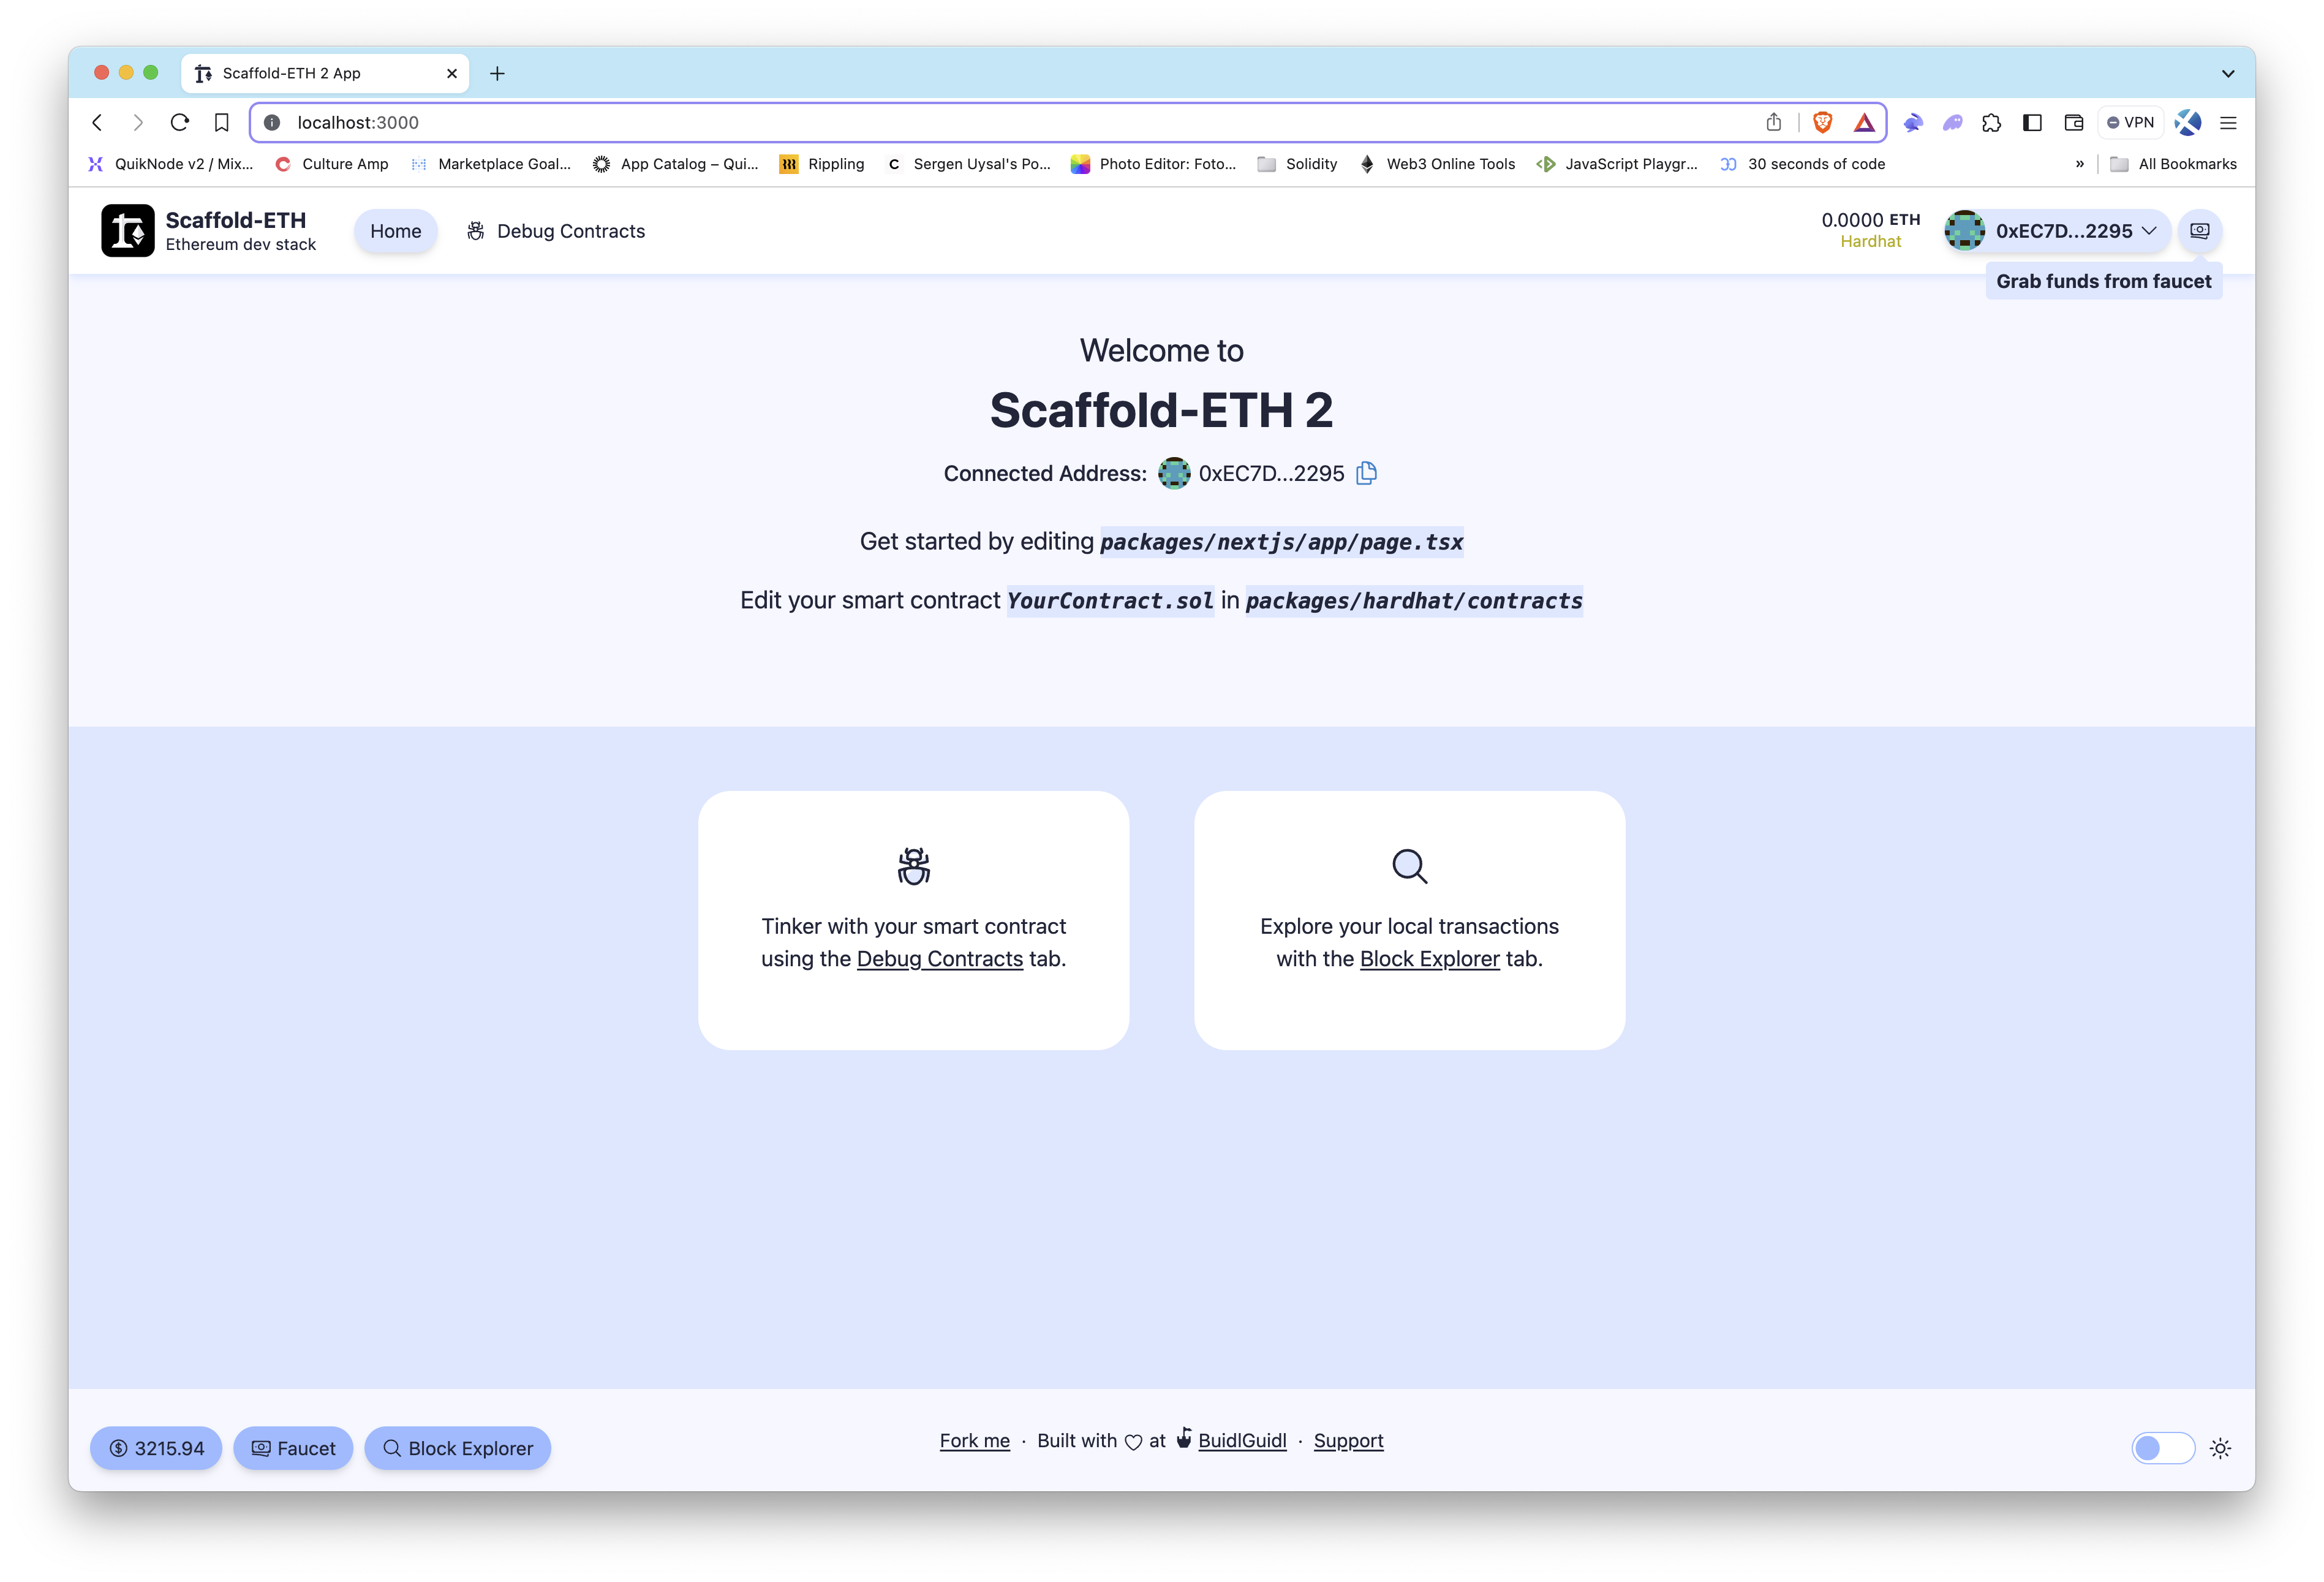
Congratulations! You just ran the Ethereum blockchain locally, then deployed your smart contract to the local network, and launched your frontend that allows you to interact with the deployed smart contract. Now, let's take this to the next level by examining the smart contract's functions and interacting with those functions through the frontend.
Reviewing the Smart Contract
We can now walk through the demo contract, YourContract.sol, which is working behind the app.
This smart contract, named YourContract.sol, is a basic contract demonstrating how to interact with the Ethereum blockchain to change data and manage Ether. Although comments in the smart contract help find out the functionality, let's dive deeper into YourContract.sol to understand its functionalities.
-
Ownership Setup: Right at the beginning, the contract's
constructorassigns an owner. This means the person or entity that deployed it is recorded as the owner as soon as the contract is created on the blockchain. This is crucial for ensuring that only this owner can withdraw Ether from the contract. -
Storing and Changing a Message: The contract has a message stored in the
greetingvariable. Anyone can update this message by calling thesetGreetingfunction. If you want your message to be considered "premium", you can send some Ether along with your message. This demonstrates how to update data stored on the blockchain and interact with financial transactions. -
Tracking Interactions: The contract counts every time someone changes the
greeting. It does this in two ways:totalCounterkeeps track of the total number of times the greeting has been changed by anyone.userGreetingCounteris a bit more specific, tracking how many times each individual user has changed the greeting.
-
Withdrawing Ether: Only the owner can withdraw Ether from the contract, thanks to the
withdrawfunction. This function uses a security check (isOwnermodifier) to ensure that the person attempting to withdraw the Ether is indeed the owner. It's a good practice to restrict sensitive actions to authorized users only. -
Receiving Ether: The contract can also receive Ether directly because of the
receive()function. This is a special function that allows the contract to hold Ether sent to it directly from a transaction. -
Events for Monitoring: Whenever someone changes the
greeting, the contract emits aGreetingChangeevent. This is useful for apps or services that want to keep track of changes in real-time. It's a way for the blockchain to communicate important changes or actions that have occurred. -
Debugging with Console Logs: Inside the
setGreetingfunction, there's a line that logs the new greeting to the Hardhat console. This is great for developers during testing but should be removed in a live environment.
//SPDX-License-Identifier: MIT
pragma solidity >=0.8.0 <0.9.0;

// Useful for debugging. Remove when deploying to a live network.
import "hardhat/console.sol";

// Use openzeppelin to inherit battle-tested implementations (ERC20, ERC721, etc)
// import "@openzeppelin/contracts/access/Ownable.sol";

/**
 * A smart contract that allows changing a state variable of the contract and tracking the changes
 * It also allows the owner to withdraw the Ether in the contract
 * @author BuidlGuidl
 */
contract YourContract {
	// State Variables
	address public immutable owner;
	string public greeting = "Building Unstoppable Apps!!!";
	bool public premium = false;
	uint256 public totalCounter = 0;
	mapping(address => uint) public userGreetingCounter;

	// Events: a way to emit log statements from smart contract that can be listened to by external parties
	event GreetingChange(
		address indexed greetingSetter,
		string newGreeting,
		bool premium,
		uint256 value
	);

	// Constructor: Called once on contract deployment
	// Check packages/hardhat/deploy/00_deploy_your_contract.ts
	constructor(address _owner) {
		owner = _owner;
	}

	// Modifier: used to define a set of rules that must be met before or after a function is executed
	// Check the withdraw() function
	modifier isOwner() {
		// msg.sender: predefined variable that represents address of the account that called the current function
		require(msg.sender == owner, "Not the Owner");
		_;
	}

	/**
	 * Function that allows anyone to change the state variable "greeting" of the contract and increase the counters
	 *
	 * @param _newGreeting (string memory) - new greeting to save on the contract
	 */
	function setGreeting(string memory _newGreeting) public payable {
		// Print data to the hardhat chain console. Remove when deploying to a live network.
		console.log(
			"Setting new greeting '%s' from %s",
			_newGreeting,
			msg.sender
		);

		// Change state variables
		greeting = _newGreeting;
		totalCounter += 1;
		userGreetingCounter[msg.sender] += 1;

		// msg.value: built-in global variable that represents the amount of ether sent with the transaction
		if (msg.value > 0) {
			premium = true;
		} else {
			premium = false;
		}

		// emit: keyword used to trigger an event
		emit GreetingChange(msg.sender, _newGreeting, msg.value > 0, 0);
	}

	/**
	 * Function that allows the owner to withdraw all the Ether in the contract
	 * The function can only be called by the owner of the contract as defined by the isOwner modifier
	 */
	function withdraw() public isOwner {
		(bool success, ) = owner.call{ value: address(this).balance }("");
		require(success, "Failed to send Ether");
	}

	/**
	 * Function that allows the contract to receive ETH
	 */
	receive() external payable {}
}
Now, it's time to see the contract in action.
Interacting with Smart Contracts via the App
Upon opening the app, you'll encounter a wallet section that provides the option to use a Burner wallet for transactions or connect to other external wallets of your choice. It's important to note that the app utilizes the Burner wallet for user interactions, distinct from the accounts generated by the local Hardhat network, which are primarily used for deploying contracts. For development and testing on localhost, the app features a faucet function to request ETH, ensuring you have the necessary funds to interact with smart contracts on the local Hardhat network.
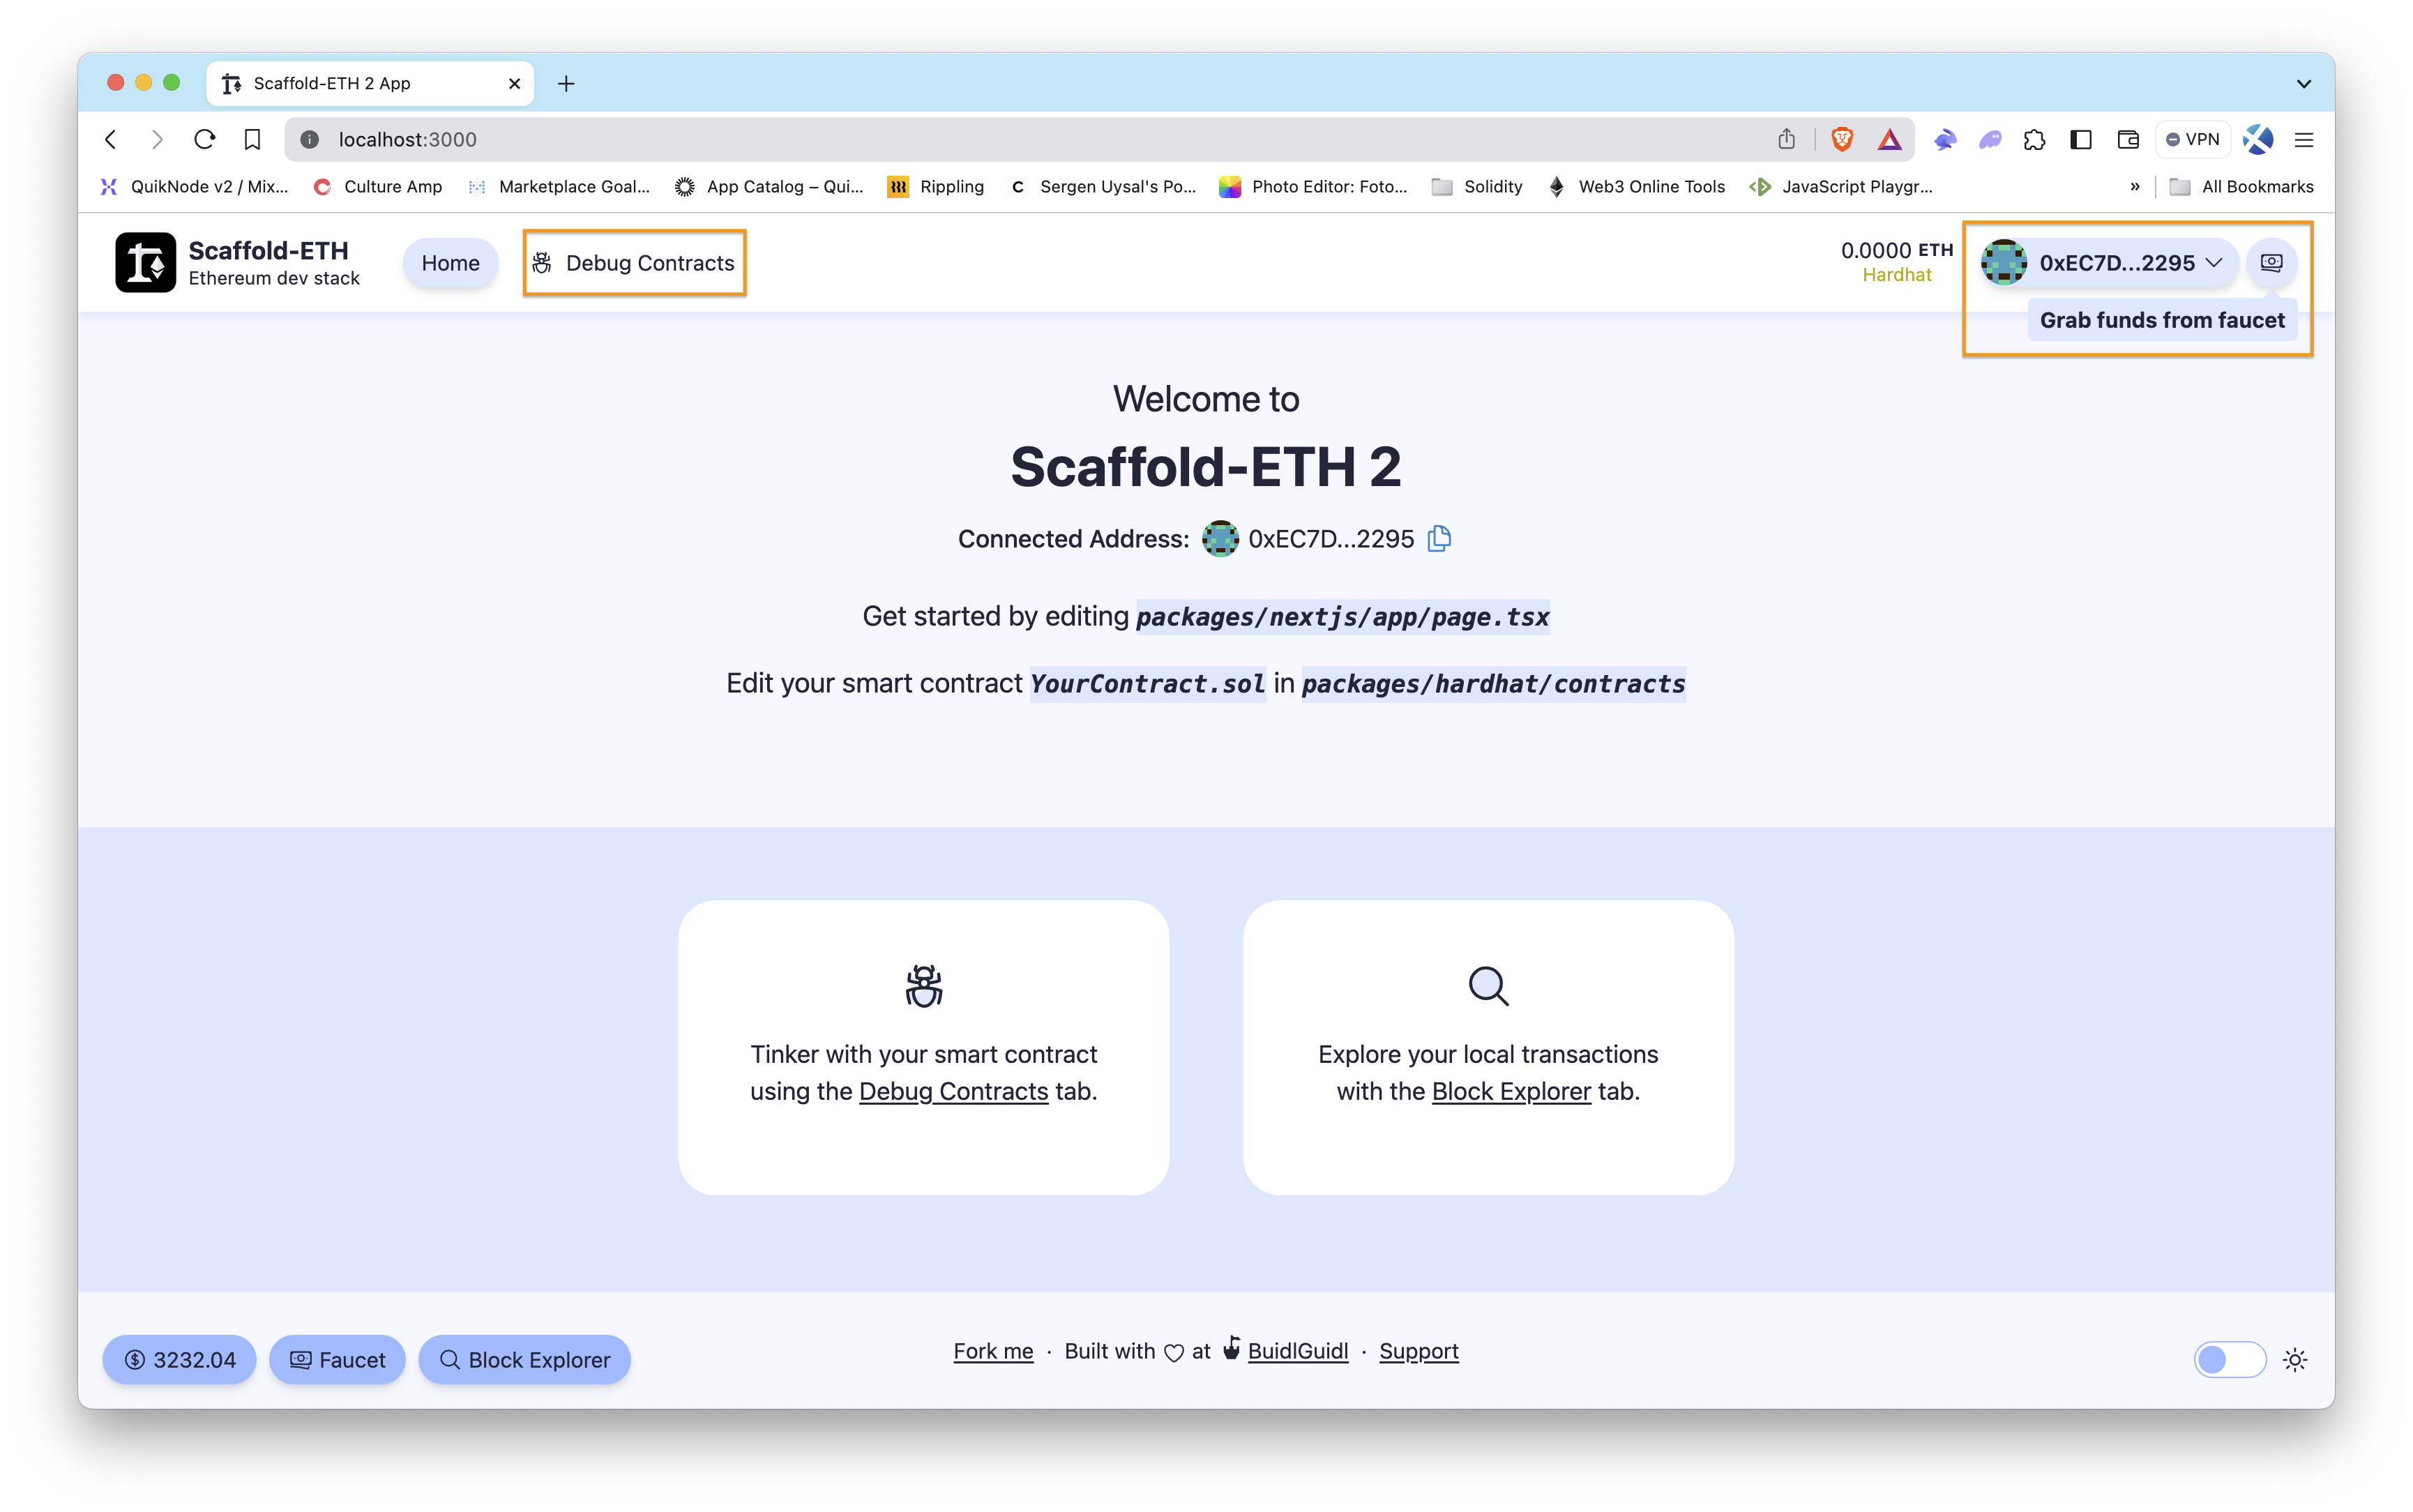
Step 1: Connect your wallet
Begin by connecting your wallet to the app. If you're using the local Hardhat environment, your address should be automatically detected and displayed.
Step 2: Fund the wallet
If you need ETH for testing, use the money icon next to the Grab funds from faucet text to top up your balance in the local Hardhat network.
Step 3: Read and write functions
Navigate to the Debug Contracts section, where you can interact with the smart contracts deployed on your local network. Here, you can execute both read and write operations:
-
Read Operations: These are functions that read the smart contract state. You can call them without performing a transaction. For example, checking the balance or greeting of a contract would be a read operation.
-
Write Operations: These functions change the state of the blockchain and require a transaction. For instance, using the
setGreetingfunction to change the greeting message in a contract is a write operation. When you input a new greeting and send it, it will be a blockchain transaction.
After any transaction, information on the debug page will be updated accordingly. For example, if you change the greeting message using setGreeting, the new greeting will be displayed once the transaction is confirmed.
Also, see the changes in the local Hardhat network in the first terminal window after interactions with smart contracts on the app.
Now, see how quickly we can set up Quicknode in the Scaffold-ETH setup to deploy smart contracts to a real network, either a mainnet or testnet.
Using Quicknode Ethereum Endpoint with Scaffold-ETH
When you're ready to deploy your smart contracts to a live Ethereum network, such as the mainnet or a testnet, integrating a Quicknode Ethereum endpoint with Scaffold-ETH is a seamless process. We'll use the Ethereum Sepolia testnet in this guide. Here's how to get started:
Step 1: Create a free Quicknode account
To build on a live network, whether mainnet or testnet, you'll need an API endpoint to connect with the network. You're welcome to use public nodes or deploy and manage your own infrastructure; however, if you'd like faster response times, you can leave the heavy lifting to us. Sign up for an account here.
Once you are logged in, click Create an endpoint and then select the Ethereum Sepolia blockchain.
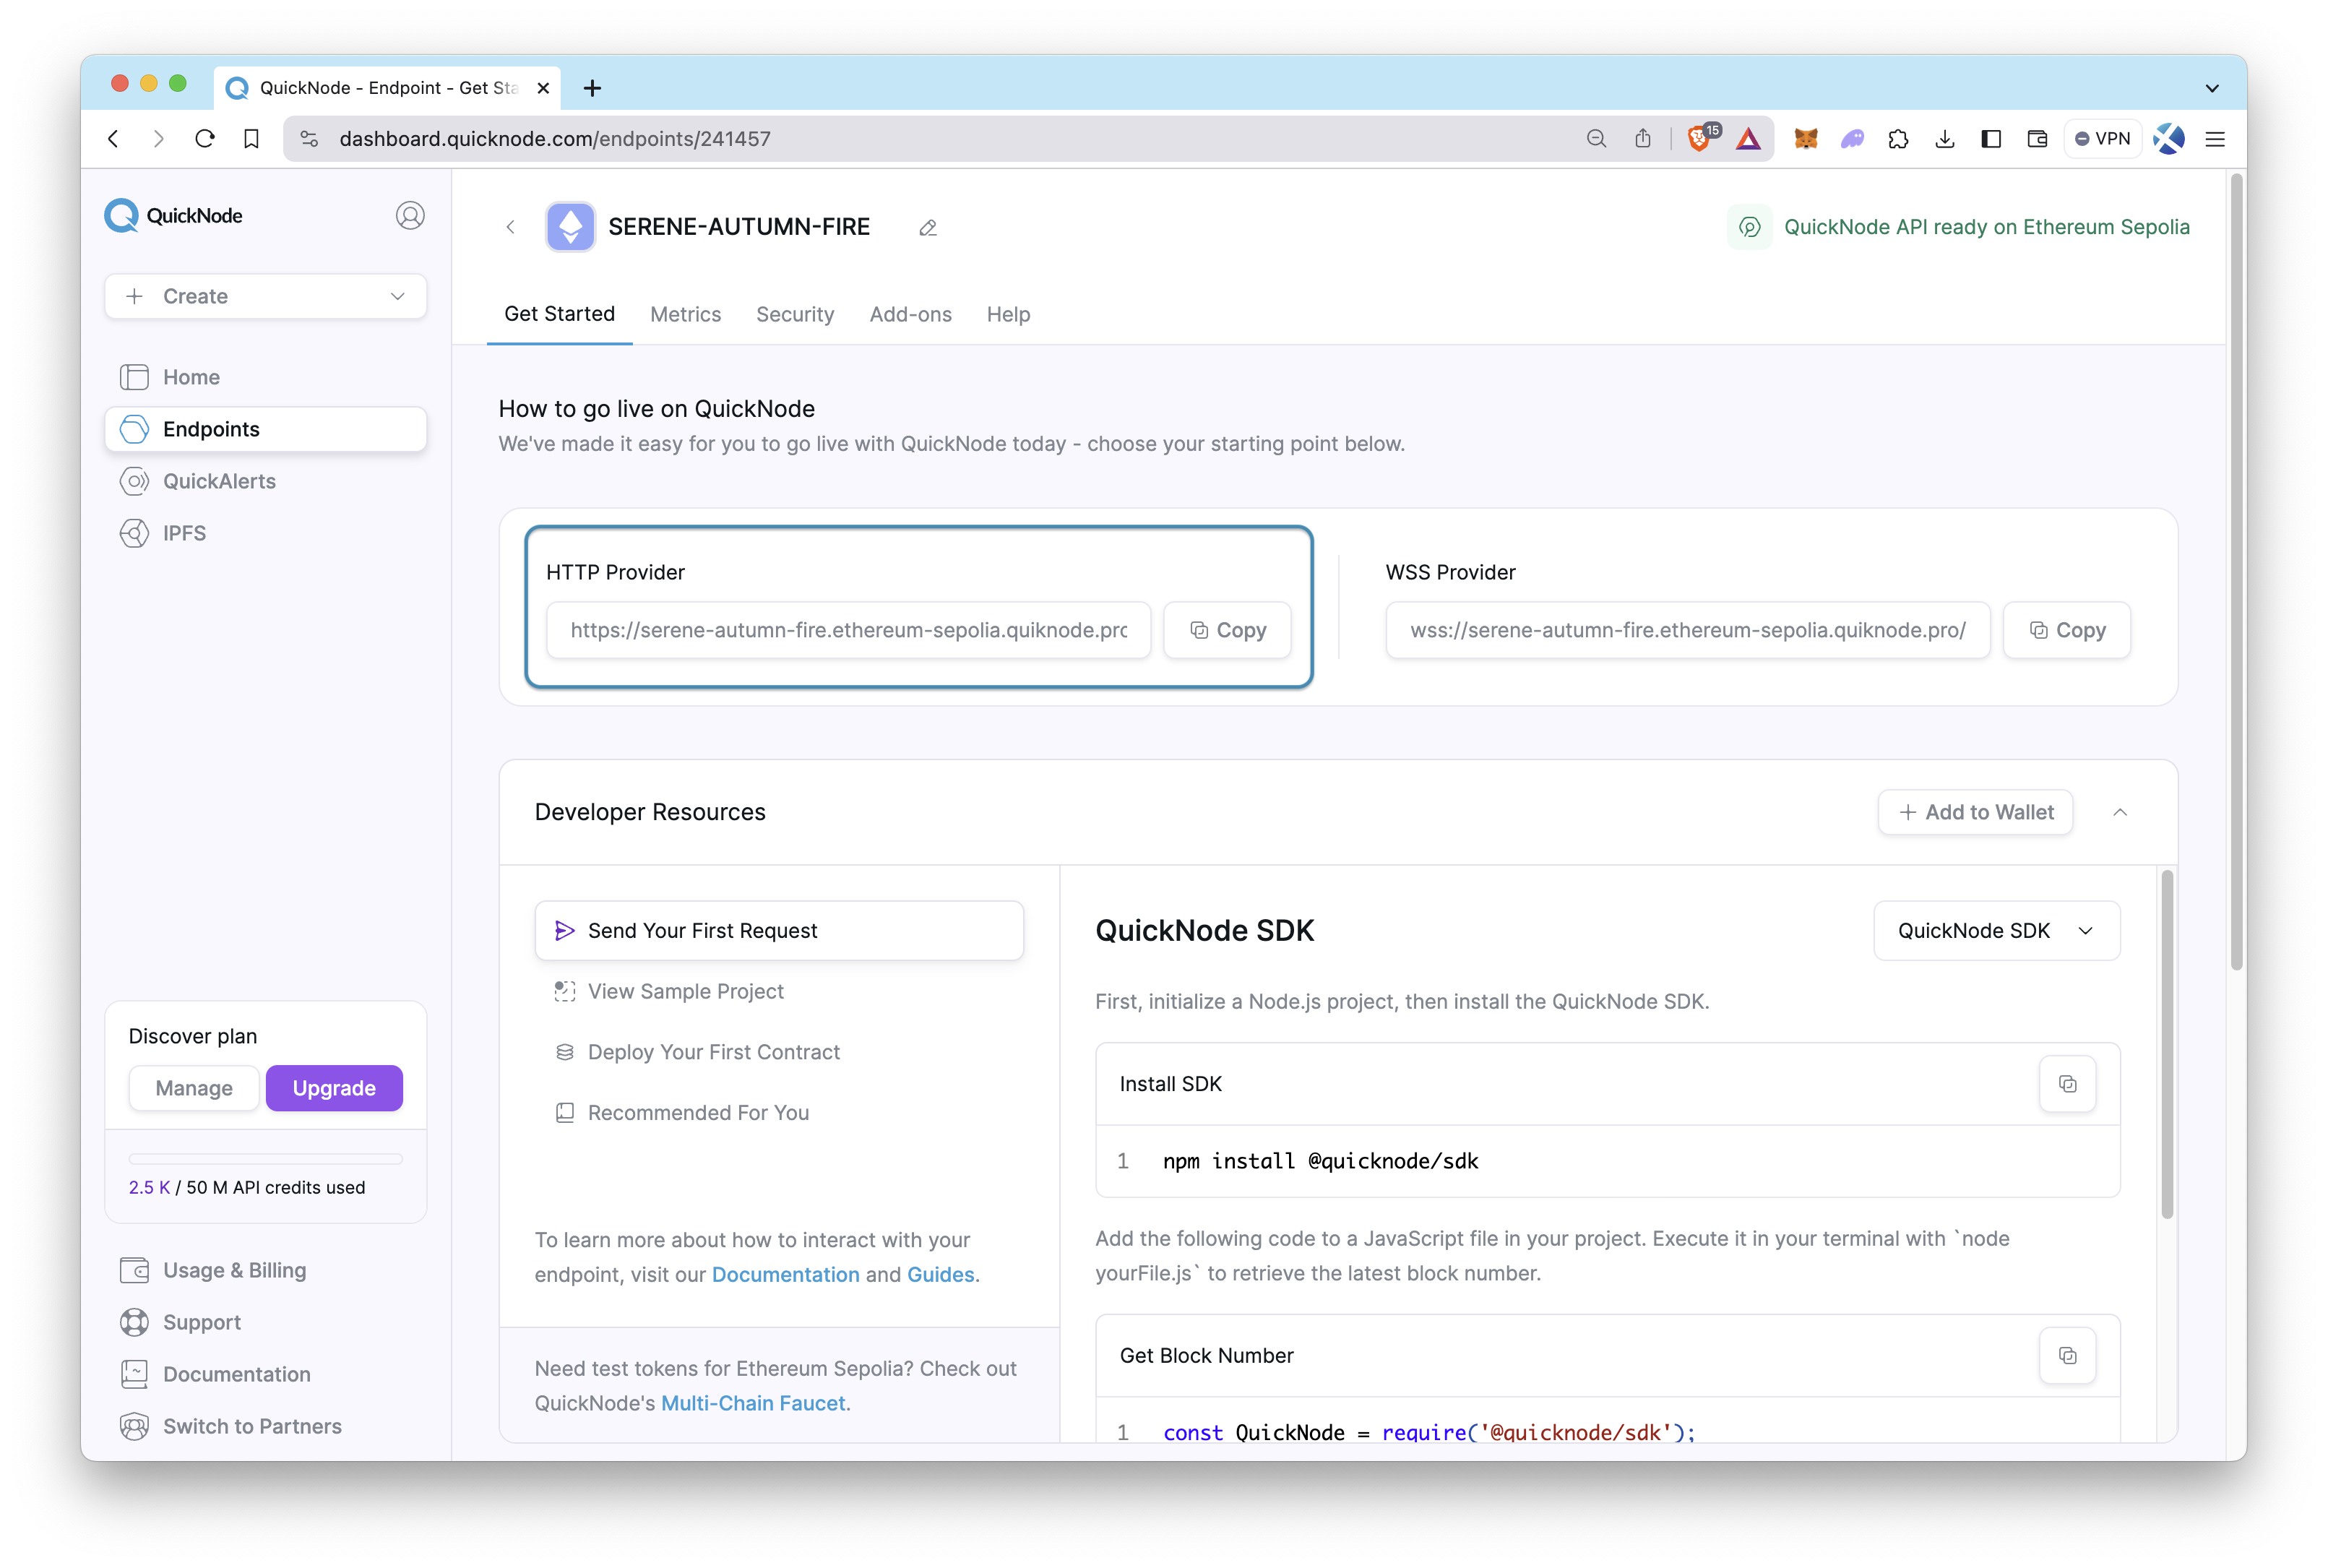
After creating your endpoint, copy the HTTP Provider link and keep it handy, as you'll need it next.
Step 2: Funding your wallet
You need to use your own wallet with some ETH to deploy your contract and send transactions to the blockchain.
Navigate to the Quicknode Multi-Chain Faucet and connect your wallet or paste in your wallet address. Then, select the Ethereum chain and Sepolia network and then request funds.

Step 3: Adding your private key
Find the .env.example file in the packages/hardhat directory and rename it .env. Then, modify the file as below.
Replace YOUR_PRIVATE_KEY and YOUR_QUICKNODE_HTTP_PROVIDER_URL placeholders with your actual private key and Quicknode HTTP provider URL.
DEPLOYER_PRIVATE_KEY="YOUR_PRIVATE_KEY"
QUICKNODE_ENDPOINT="YOUR_QUICKNODE_HTTP_PROVIDER_URL"
Step 4: Modify the configuration file
Head to the hardhat.config.ts file that is under the /packages/hardhat directory. Then, find the Sepolia network under the networks property and modify it as the one below.
sepolia: {
      url: process.env.QUICKNODE_ENDPOINT,
      accounts: [deployerPrivateKey],
    }
Step 5: Deploy your contracts
With your Quicknode endpoint configured, you're now ready to deploy your contracts. Use the command below to send your contracts to the specified network.
yarn deploy --network sepolia
You can also refer to this guide on How to Create and Deploy a Smart Contract with Hardhat, to learn more about Hardhat and how to set up Quicknode with Hardhat.
Conclusion
Great job on reaching the end, and a big thanks for sticking through! You've learned about Scaffold-ETH, how to get it set up, and how to start building with it. A shout-out to Austin Griffith for creating Scaffold-ETH, a great tool that helps us jump into dApp development with ease. For more details and tips on using Scaffold-ETH, check out their official documentation. Keep building and exploring!
If you have any questions or need further assistance, feel free to join our Discord server or provide feedback using the form below. Stay up to date with the latest by following us on Twitter (@Quicknode) and Telegram announcement channel.
We ❤️ Feedback!
Let us know if you have any feedback or requests for new topics. We'd love to hear from you.