
14 min read
Web3.js, the popular JavaScript library for Ethereum, is no longer being actively maintained. We already covered how to interact with smart contracts using Ethers.js in this guide, so we recommend using that instead.
For all new development, we recommend using either Ethers.js or Viem instead. Both options offer modern tooling and active community support.
If you have any questions or need guidance in transitioning to alternative solutions, please reach out to us.
Overview
Whether you're a developer looking to integrate blockchain functionalities into your applications or simply curious about interacting directly with smart contracts, this guide will provide you with the knowledge and tools you need to start interacting with Ethereum smart contracts effectively.
What You Will Do
By following this guide, you will:
- Understand the basics of Ethereum smart contracts
- Learn about the Application Binary Interface (ABI) and its importance
- Differentiate between read functions and write functions within smart contracts
- Get familiar with Ethereum units like wei
- Start interacting with smart contracts using Etherscan, Ethers.js, and Web3.js
What You Will Need
Before diving into the world of smart contracts, ensure you have the following:
- Node.js installed
- Libraries to interact with the Ethereum blockchain (e.g., Ethers.js, Web3.js)
- A Quicknode account (sign up for free here)
- A Web3 wallet (e.g., MetaMask, Coinbase Wallet) with test ETH (you can get some at the Multi-Chain Quicknode Faucet)
| Dependency | Version |
|---|---|
| ethers | ^6.10.0 |
| web3 | ^4.4.0 |
Understanding Smart Contracts
ABI (Application Binary Interface)
The ABI is crucial for Ethereum smart contracts as it serves as the interface. It basically tells your application how to format calls to the smart contract and how to read the data returned. Think of it as an interface between your code and the blockchain, detailing the functions and variables of the smart contract in a way that your application can understand.
The example ABI below details the balanceOf and deposit functions from a smart contract.
;[
	{
		constant: true,
		inputs: [{ name: '', type: 'address' }],
		name: 'balanceOf',
		outputs: [{ name: '', type: 'uint256' }],
		payable: false,
		stateMutability: 'view',
		type: 'function',
	},
	{
		constant: false,
		inputs: [],
		name: 'deposit',
		outputs: [],
		payable: true,
		stateMutability: 'payable',
		type: 'function',
	},
]
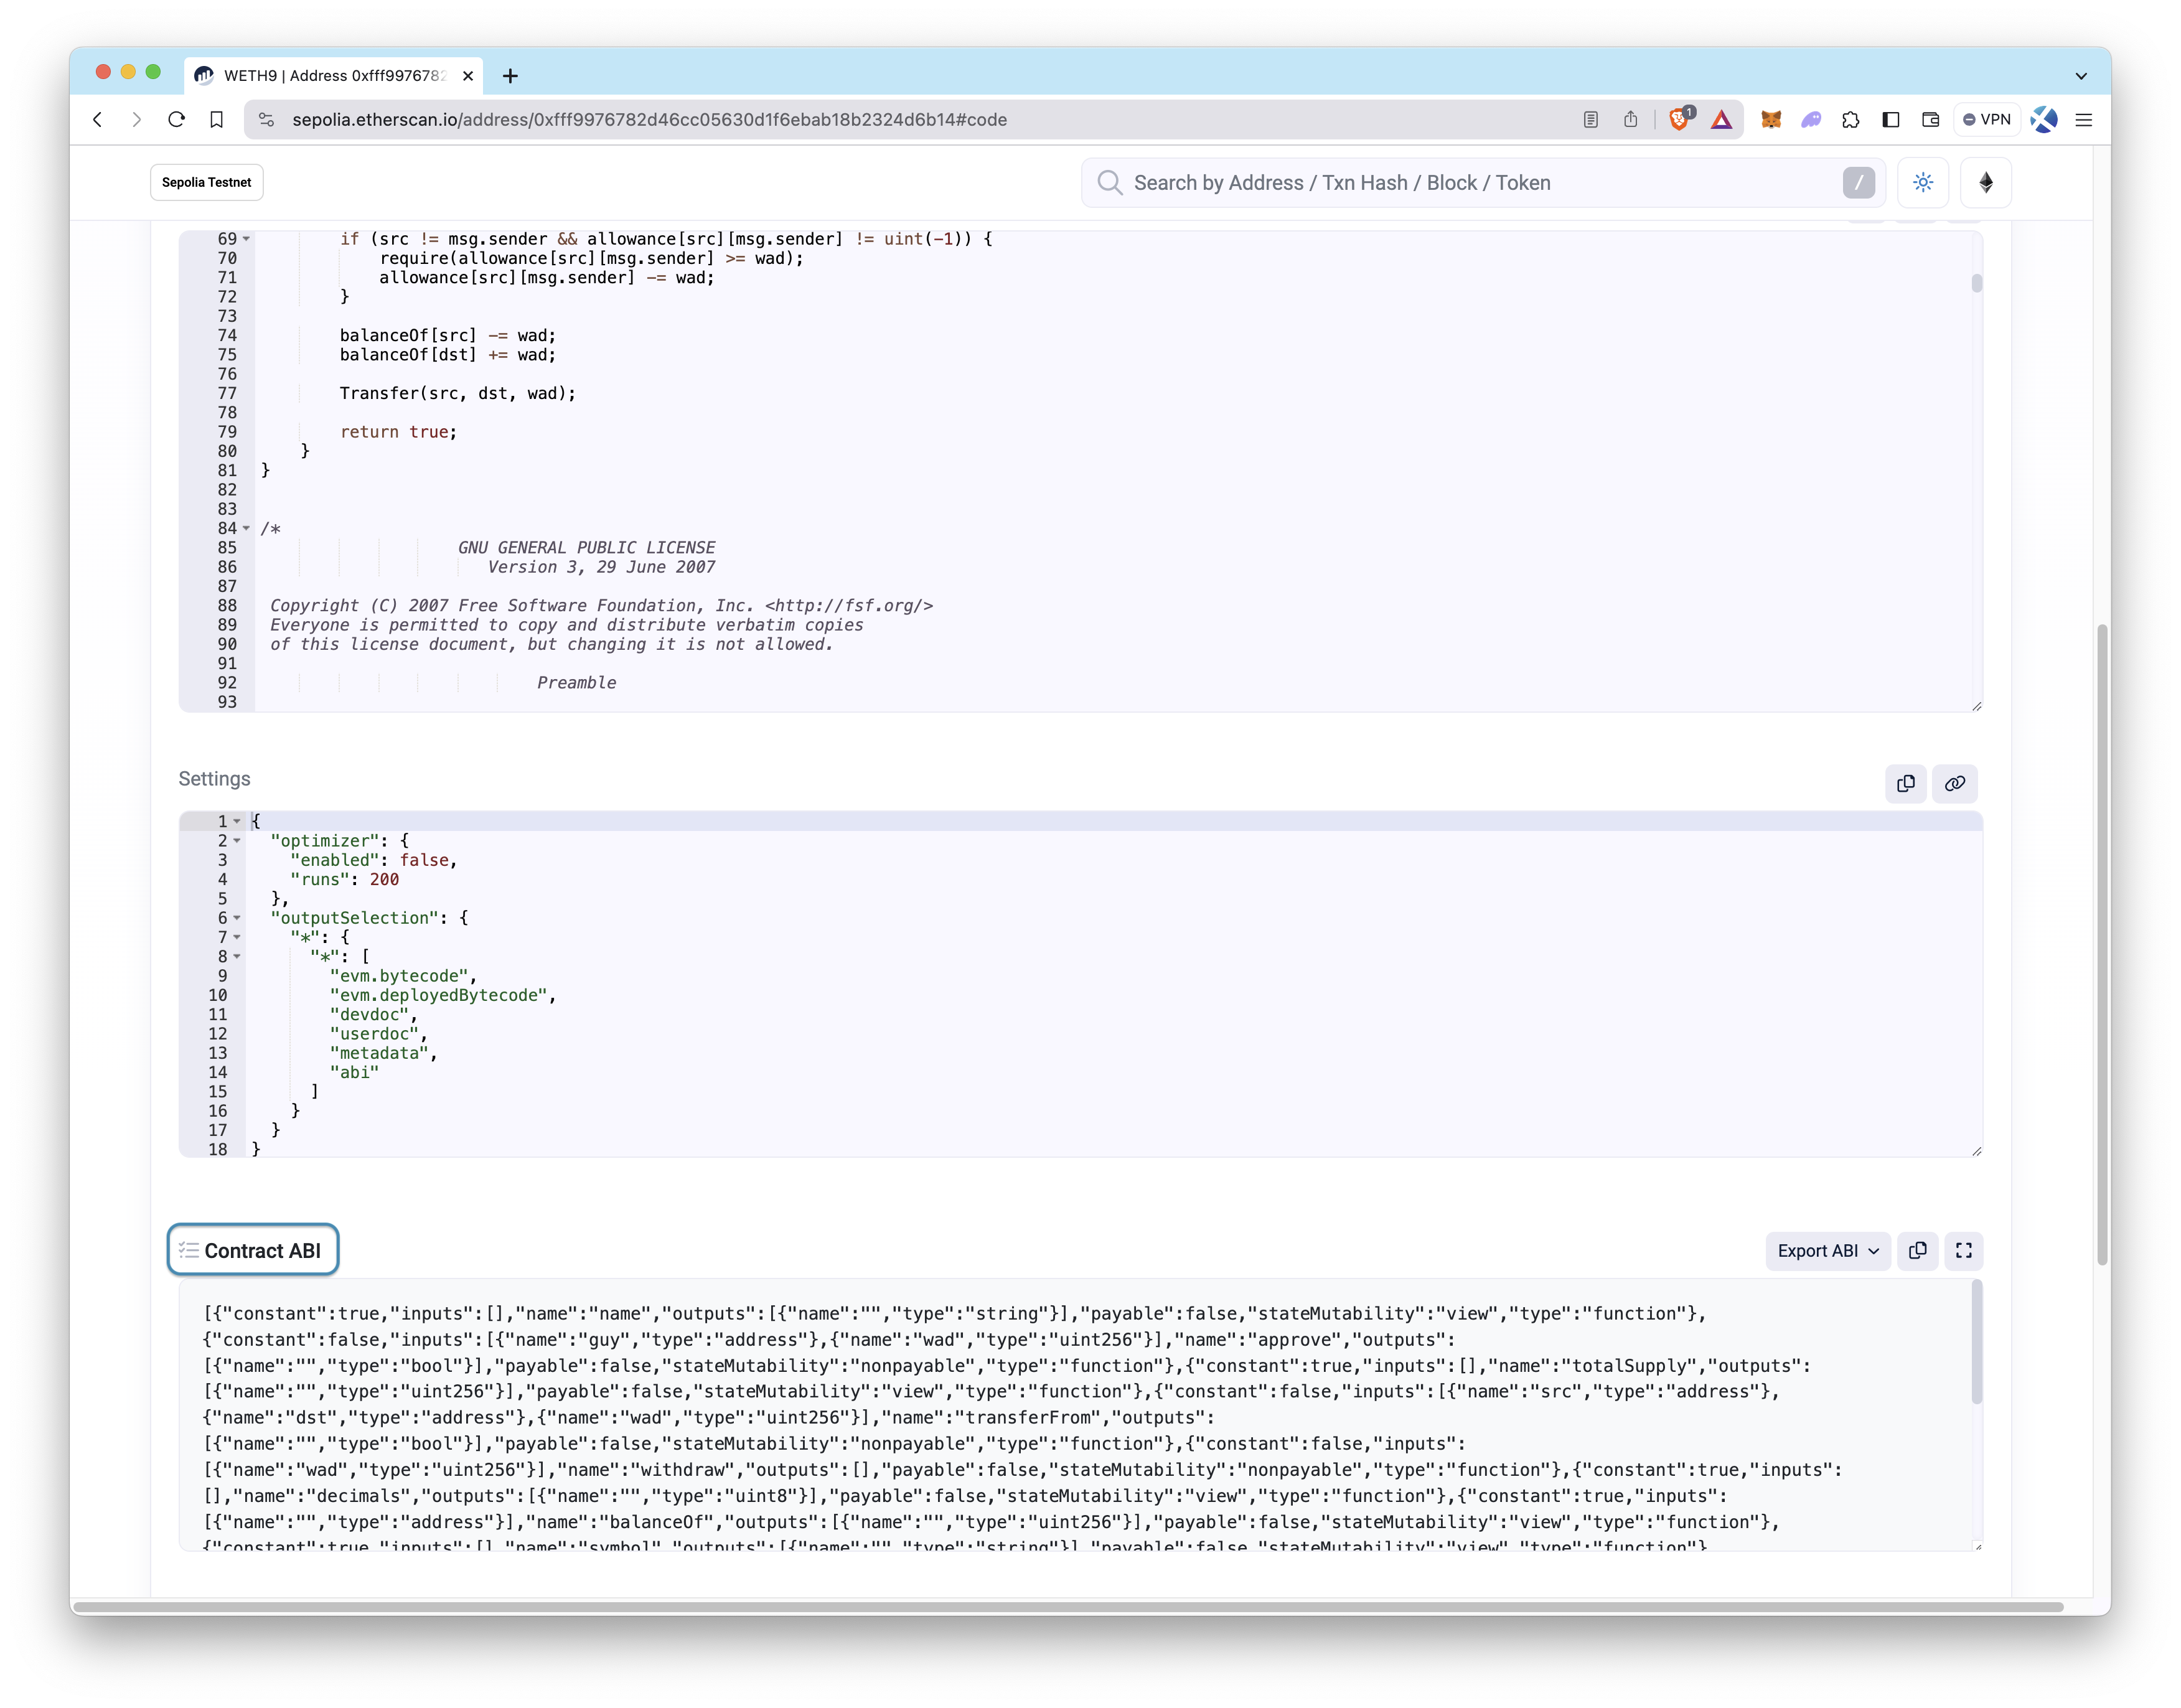
If a contract is verified on Etherscan, you can obtain the ABI of the contract under the Code section.
Read/Write Functions
Smart contracts are composed of code and can contain functions (similar to functions in other programming languages) that have read and write capabilities. Some examples of read capabilities within a function include reading state from your own smart contract (e.g., retrieving a mapping value or structure) or reading state from other smart contracts. Unlike write functions, these read operations do not require a transaction to be submitted to the network.
On the other hand, write functions (which alter the blockchain state; e.g., transferring tokens to another address) can only be accomplished by submitting a transaction (originating from an EOA or smart contract) to the network with the appropriate transaction format and payload data. Since the write operation is contained within a transaction, you must pay for gas fees.
Units
When interacting with smart contracts, you'll encounter different denominations of Ether (ETH). Ether's smallest denomination is in wei, which is equivalent to 10^-18 ETH. It's important to understand these units for transactions, as gas prices are generally denominated in gwei, and transaction values are often specified in wei or its multiples.
| Unit | Wei | Wei Value | Gwei Value | Ether Value |
|---|---|---|---|---|
| Wei | 1 | 1 Wei | 1e-9 Gwei | 1e-18 Ether |
| Gwei | 1,000,000,000 | 1e+9 Wei | 1 Gwei | 1e-9 Ether |
| Ether | 1,000,000,000,000,000,000 | 1e+18 Wei | 1e+9 Gwei | 1 Ether |
Project Prerequisites
Quicknode Multi-Chain Faucet
You will need some ETH both to confirm transactions and to make some of them WETH.
Navigate to the Quicknode Multi-Chain Faucet and connect your wallet or paste in your wallet address. You'll need to select the Ethereum chain and Sepolia network and then request funds. Note that there is a mainnet balance requirement of 0.001 ETH on Ethereum Mainnet to use the EVM faucets. You can also tweet or log in with your Quicknode account to get a bonus!
Quicknode Ethereum Endpoint
To interact with Ethereum, you'll need an API endpoint to connect with the network. You're welcome to use public nodes or deploy and manage your own infrastructure; however, if you'd like faster response times, you can leave the heavy lifting to us. Sign up for an account here.
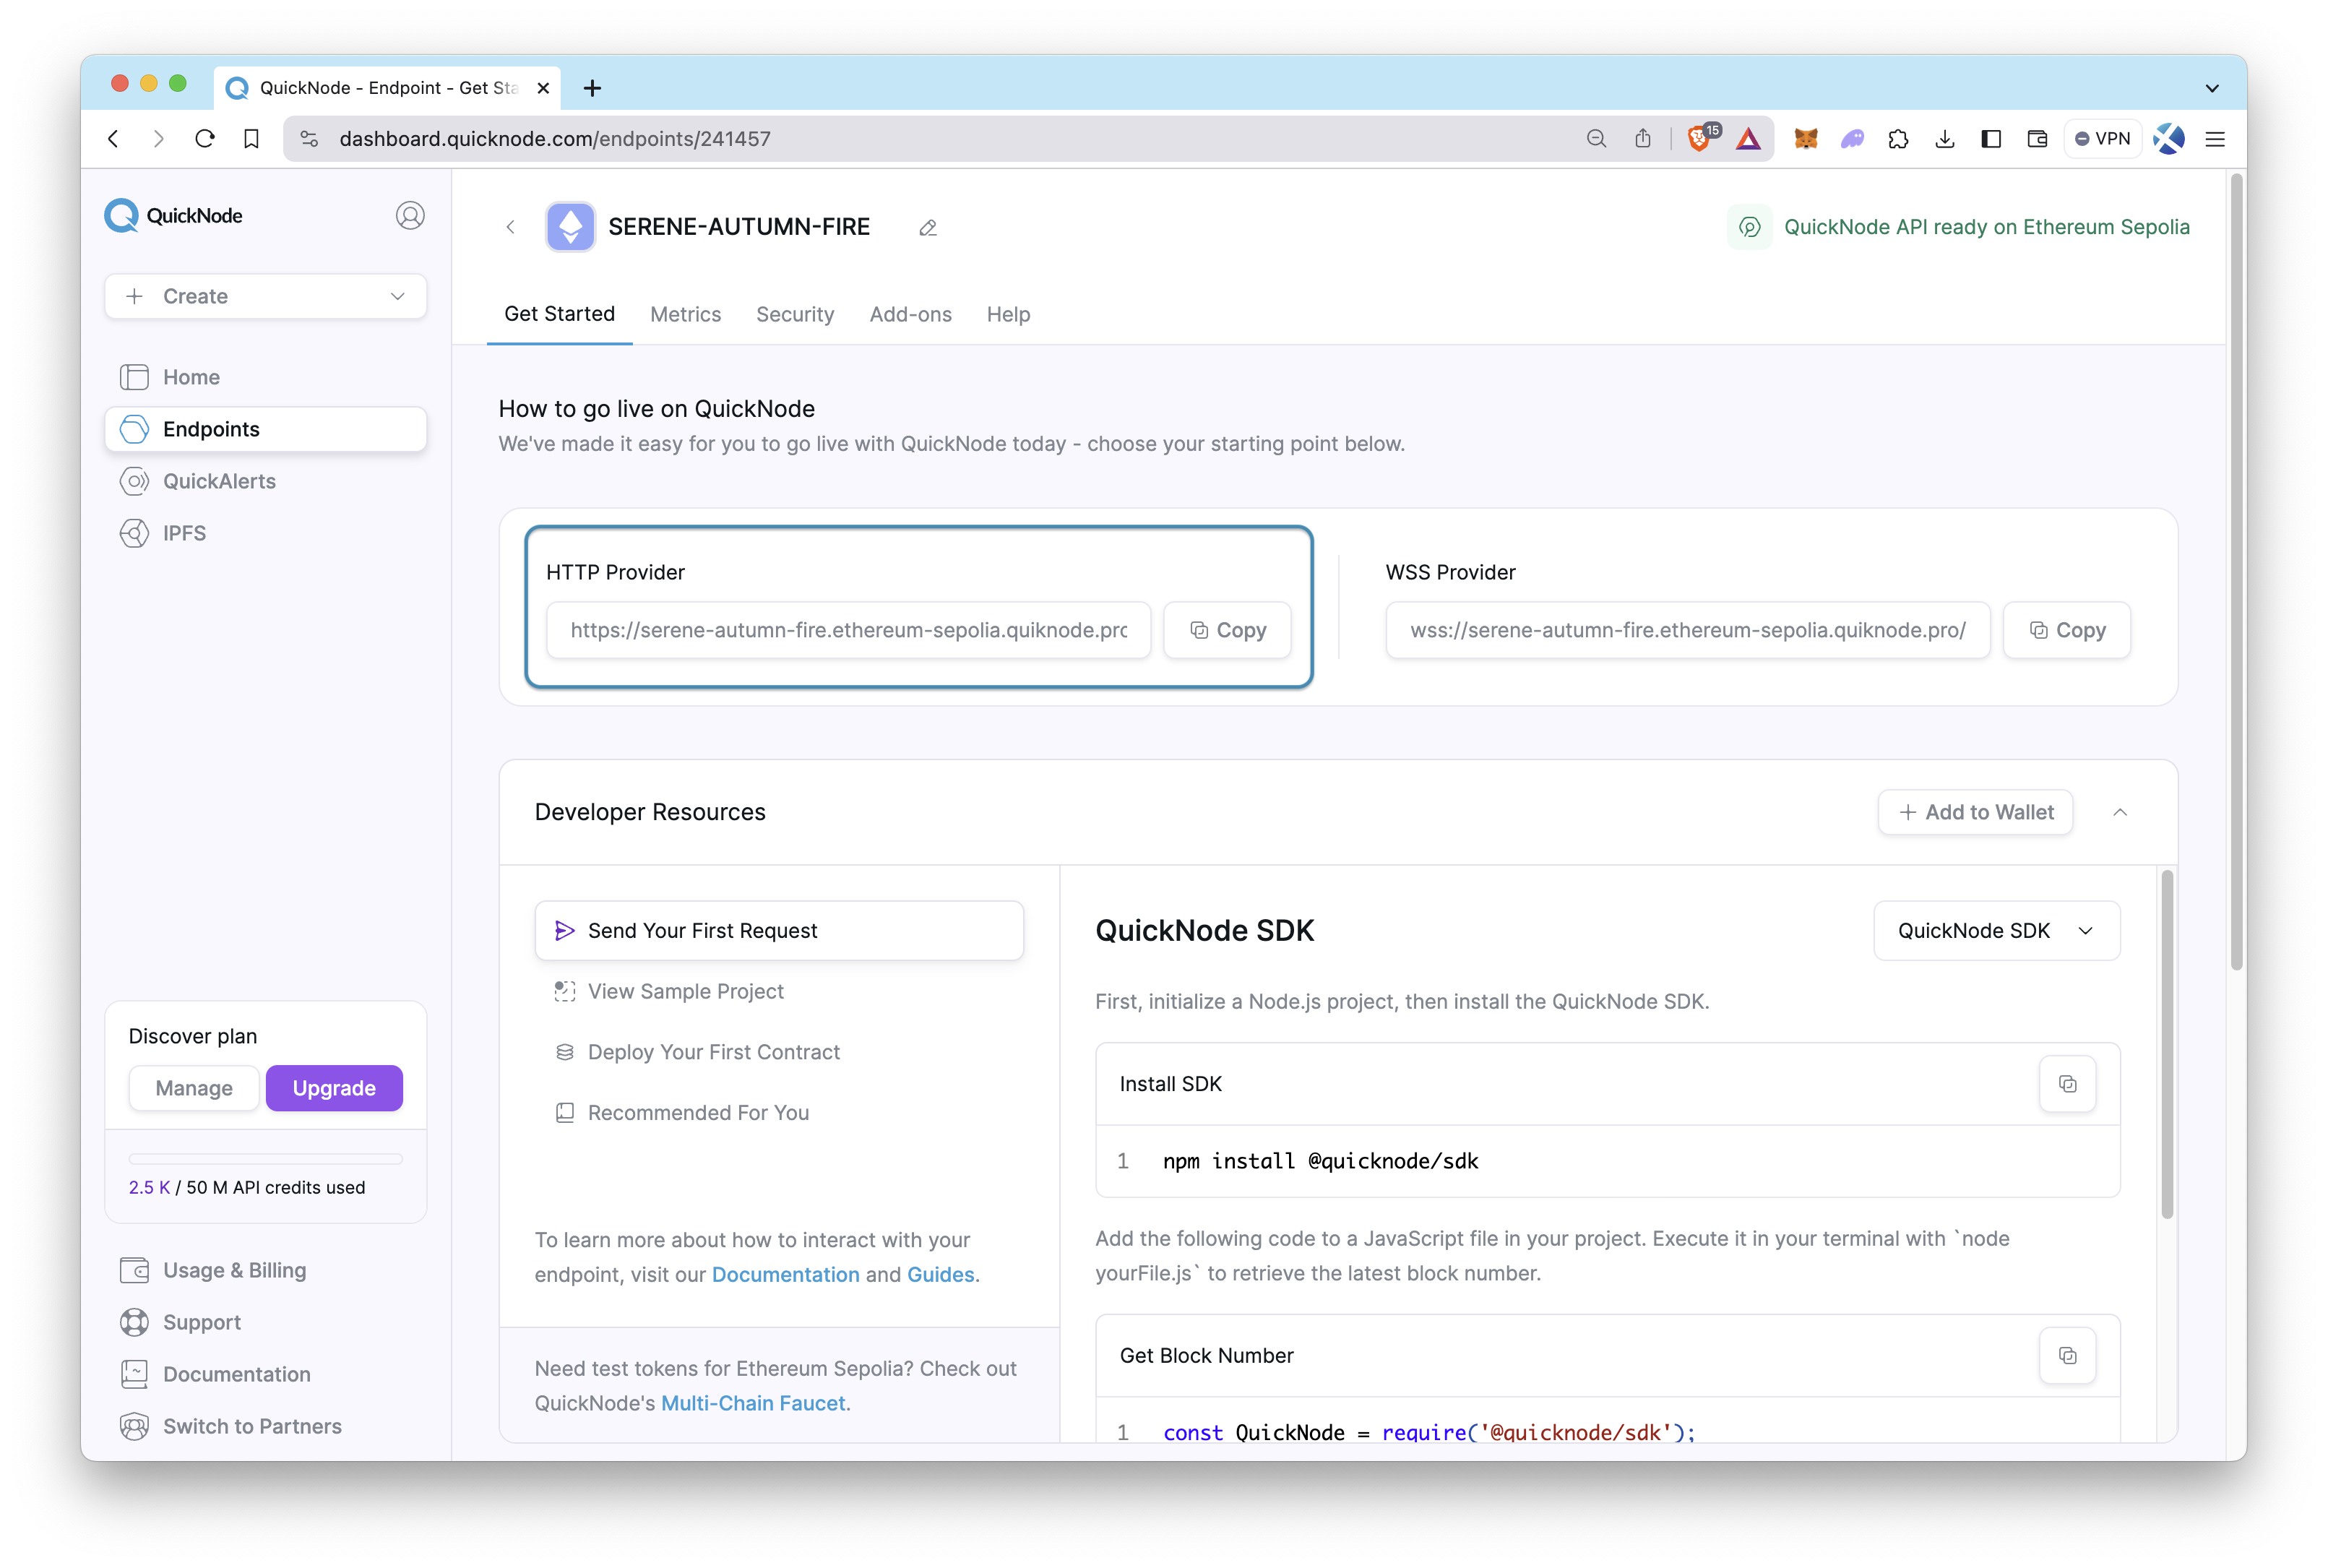
Once logged into Quicknode, click the Create an endpoint button, then select the Ethereum chain and Sepolia network. Note that all processes in this guide are also applicable to other EVM-based chains (e.g., Polygon, Arbitrum).
After creating your endpoint, copy the HTTP Provider link and keep it handy, as you'll need it in the following sections.
Interacting with Smart Contracts
To interact with smart contracts, you can use various tools and libraries. Let's start with the simplest method — Etherscan, followed by more advanced interactions using Ethers.js and Web3.js.
In all methods, we will use the following functions of the WETH contract.
balanceOffunction, to get WETH balance information, as an example of a reading functiondepositfunction, to convert some ETH to WETH, as an example of a writing function
For convenience, we will use the Ethereum Sepolia testnet, but Ethereum Mainnet can also be used throughout the entire process.
- WETH contract address on Ethereum Sepolia:
0xfFf9976782d46CC05630D1f6eBAb18b2324d6B14 - WETH contract address on Ethereum Mainnet:
0xC02aaA39b223FE8D0A0e5C4F27eAD9083C756Cc2
WETH stands for Wrapped ETH. WETH is compatible with the ERC-20 standard and pegged to ETH. For instance, 1 ETH can be convertible to 1 WETH by calling the deposit function of the WETH contract. It is also possible to do the opposite with the withdraw function.
Interacting with Smart Contracts using Etherscan
Etherscan is the easiest and most convenient way to interact with verified smart contracts directly. There is no need to set up a project and write some code.
If the smart contract is not verified on Etherscan, it is not possible to interact with it using Etherscan.
Step 1: Go to the Etherscan Sepolia Block Explorer.
Step 2: Go to the contract page by searching the contract address.
In this guide, we will use WETH's address: 0xfFf9976782d46CC05630D1f6eBAb18b2324d6B14
How to Read Data from Smart Contracts on Etherscan
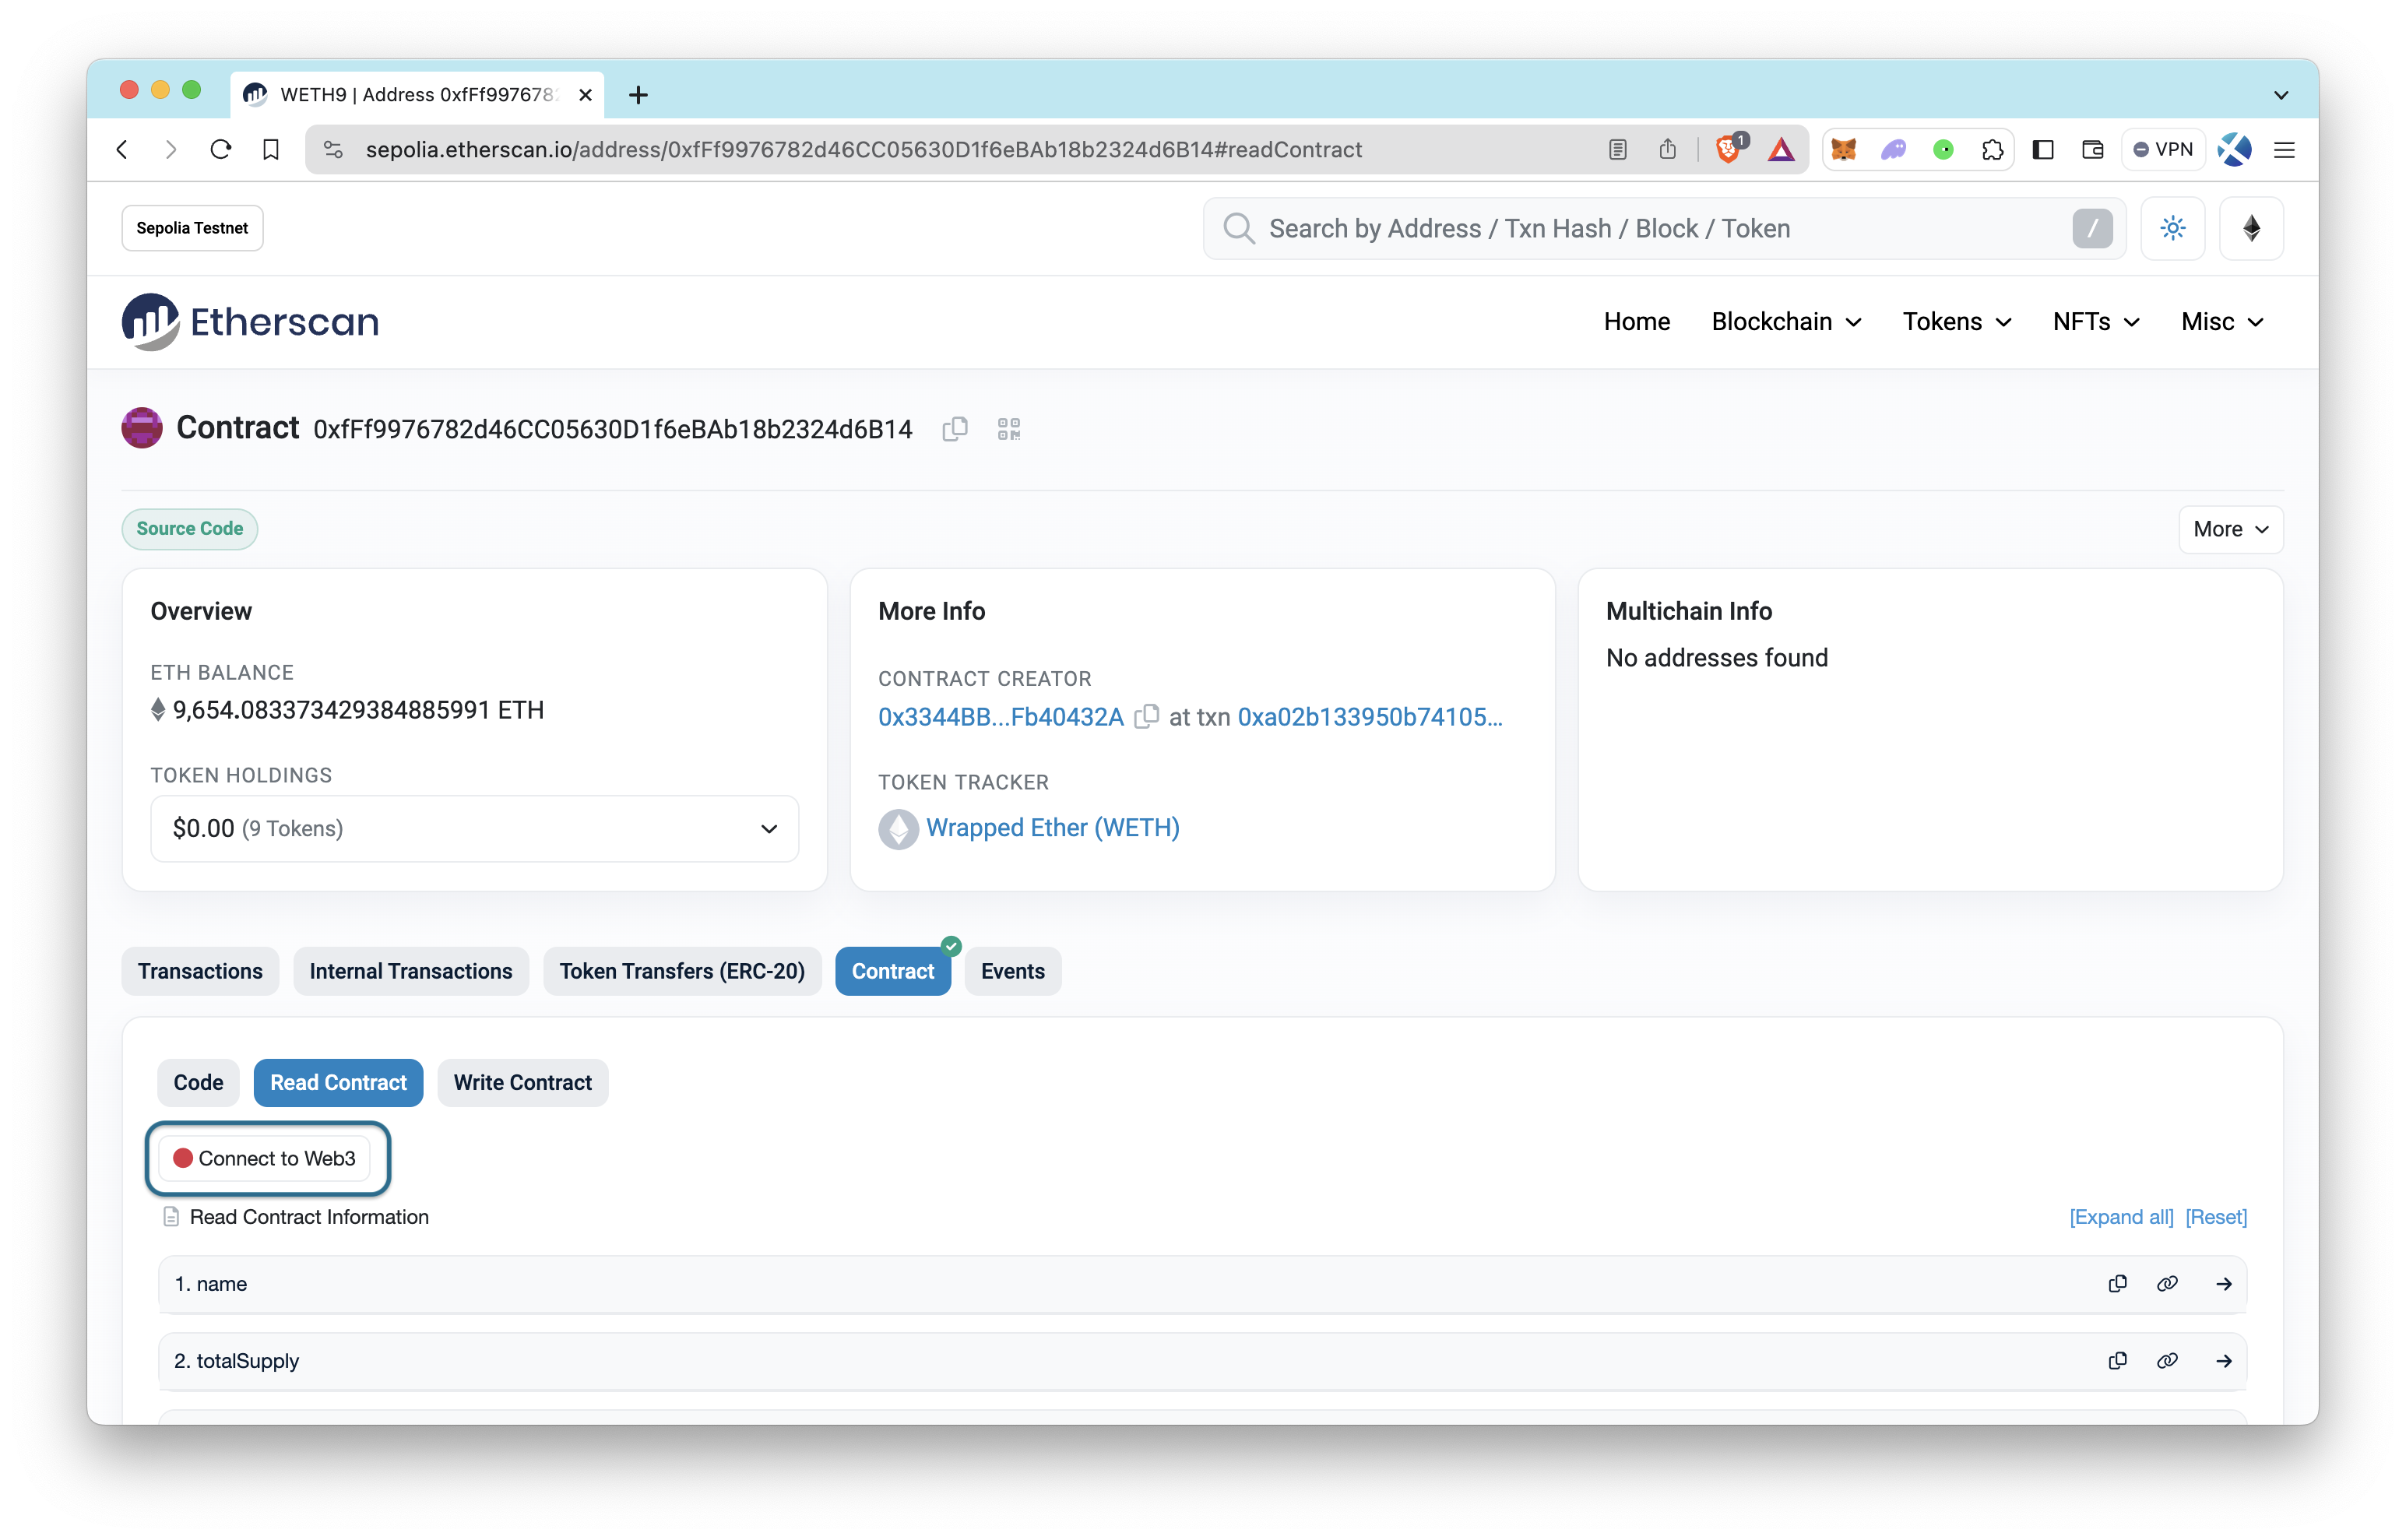
Step 3: On the contract's page, navigate to the Contract tab and click on Read Contract.
Step 4: Click Connect to Web3 button to connect your browser-based Web3 wallet (i.e., MetaMask).
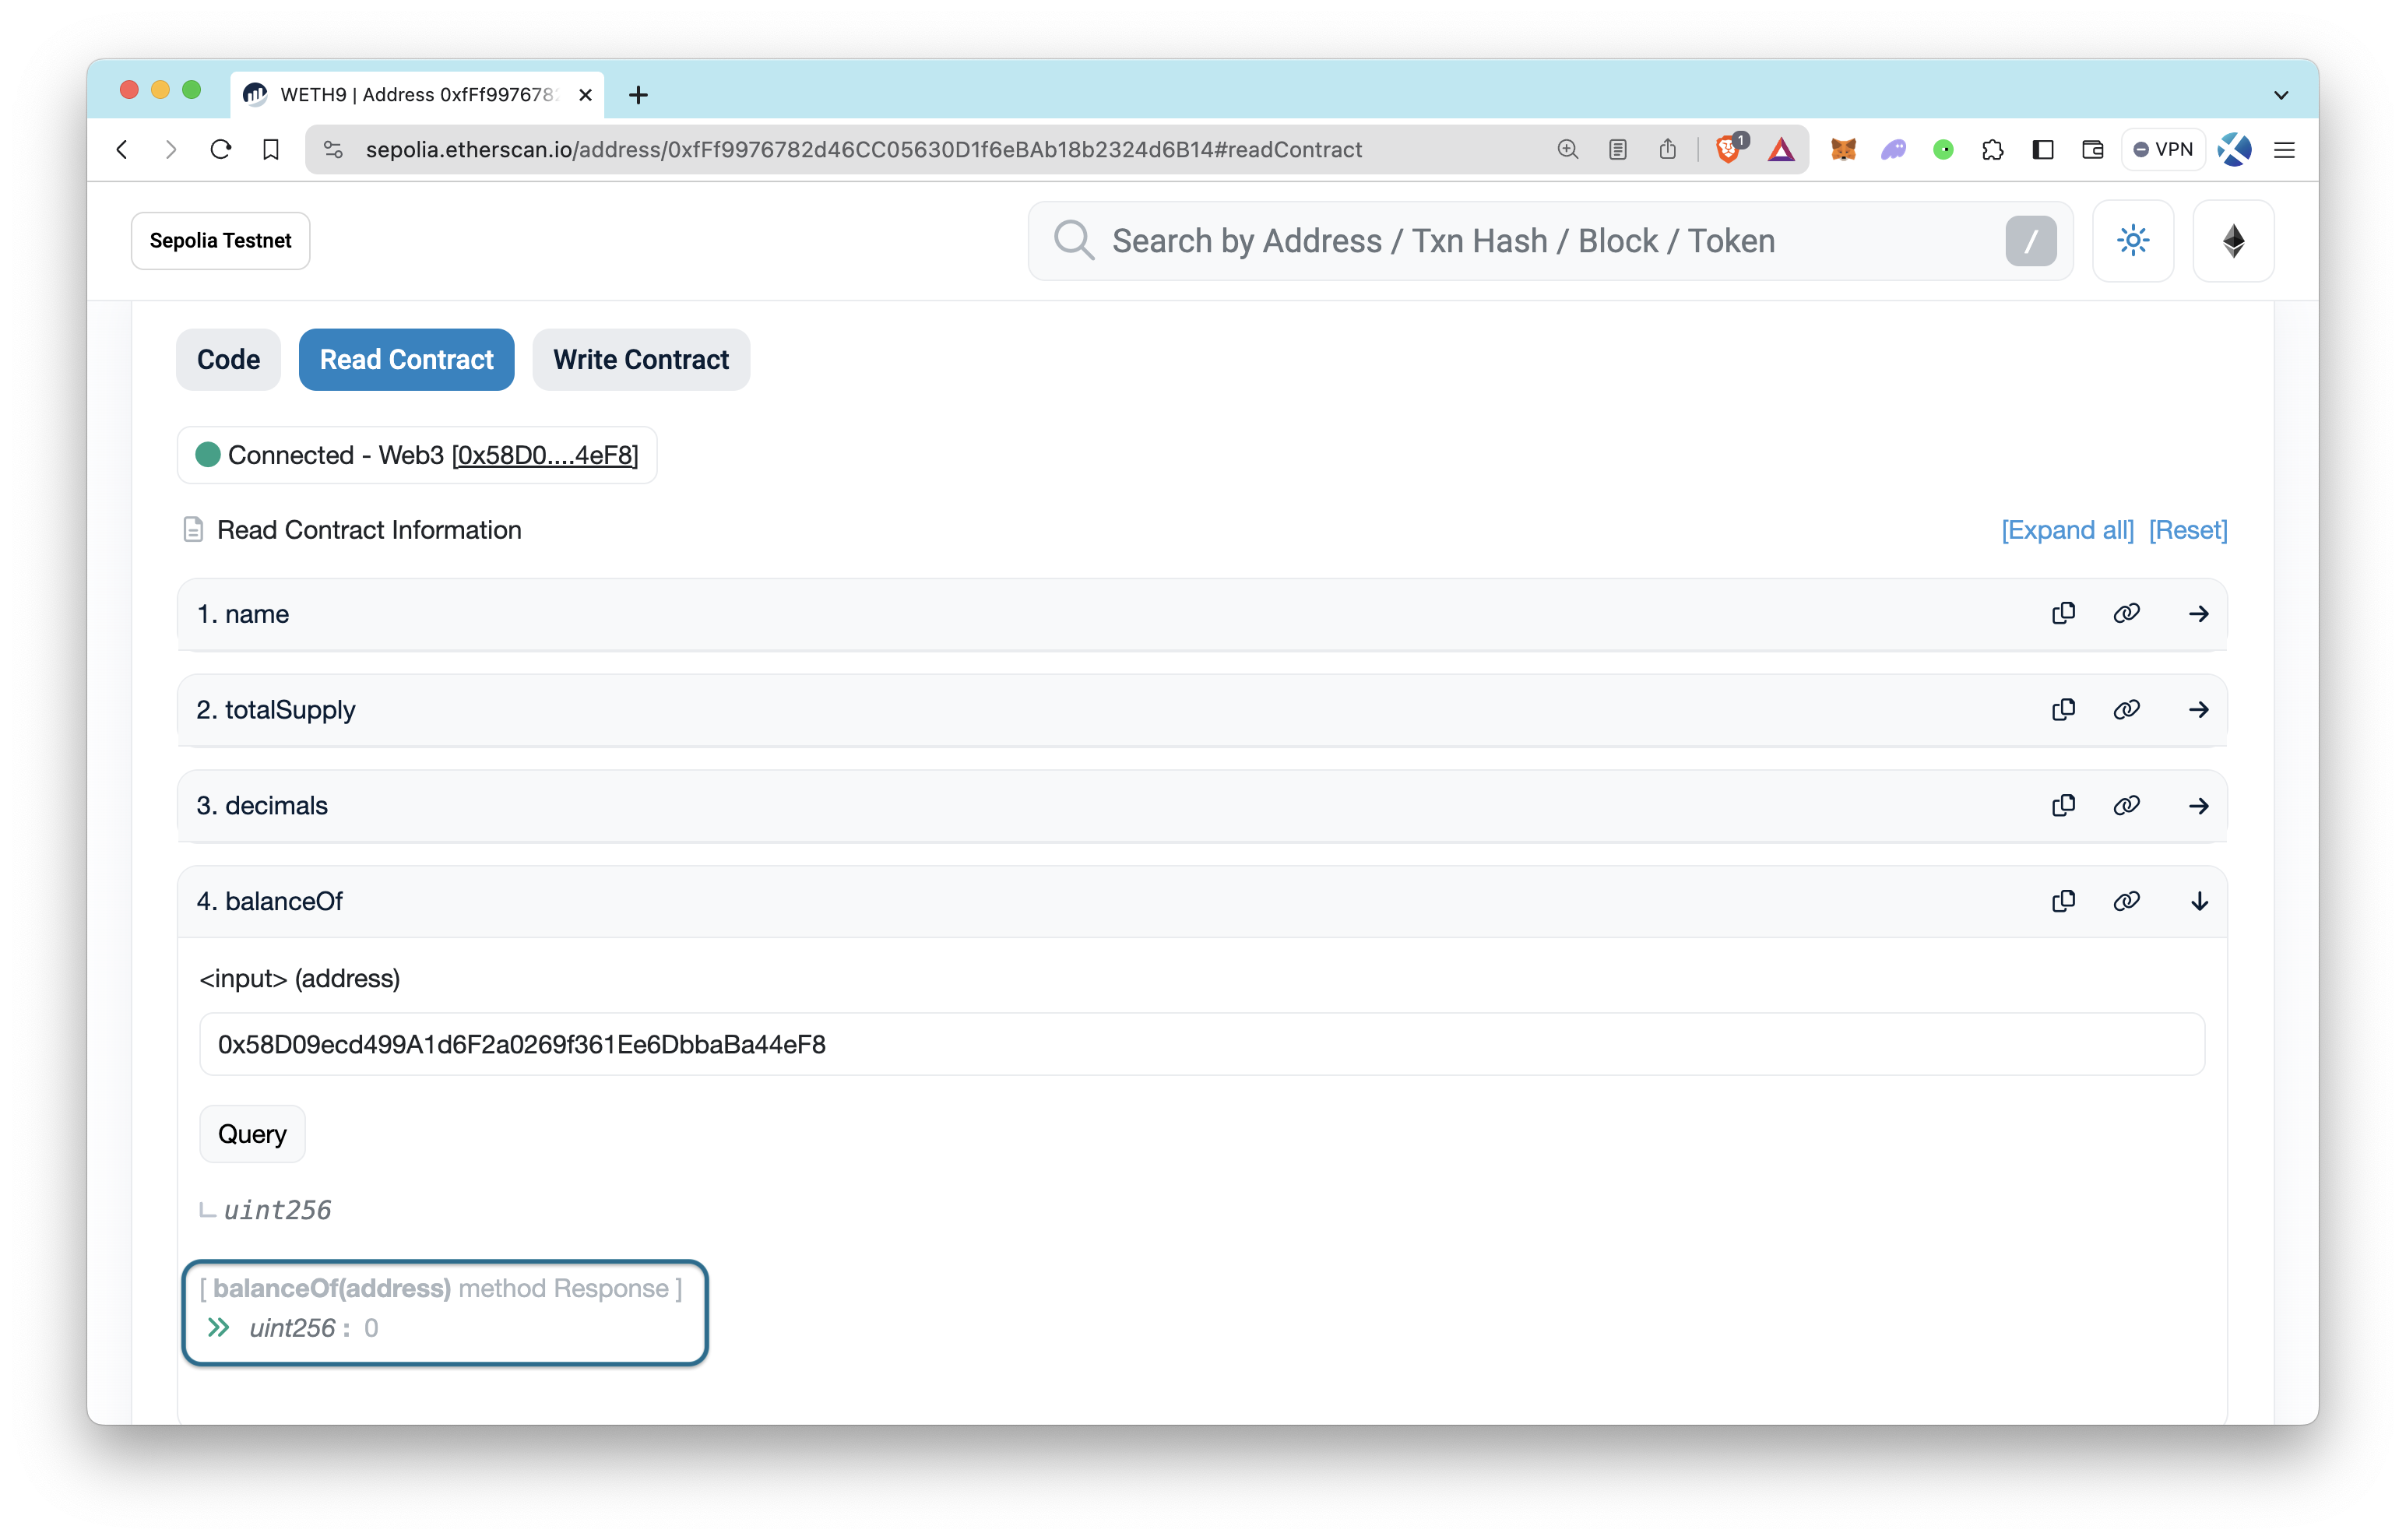
Step 5: Click the read function you want to query. Make sure to input any necessary input parameters if the function requires them. If it requires parameters, do not forget to click the Query button after you input parameters.
In this guide, we will call the
balanceOffunction to get the token balance of the address that we want.
How to Write Data to Smart Contracts on Etherscan
Step 6: Under the Contract tab, click on Write Contract.
Step 7: Connect your Web3 wallet if you have not already.
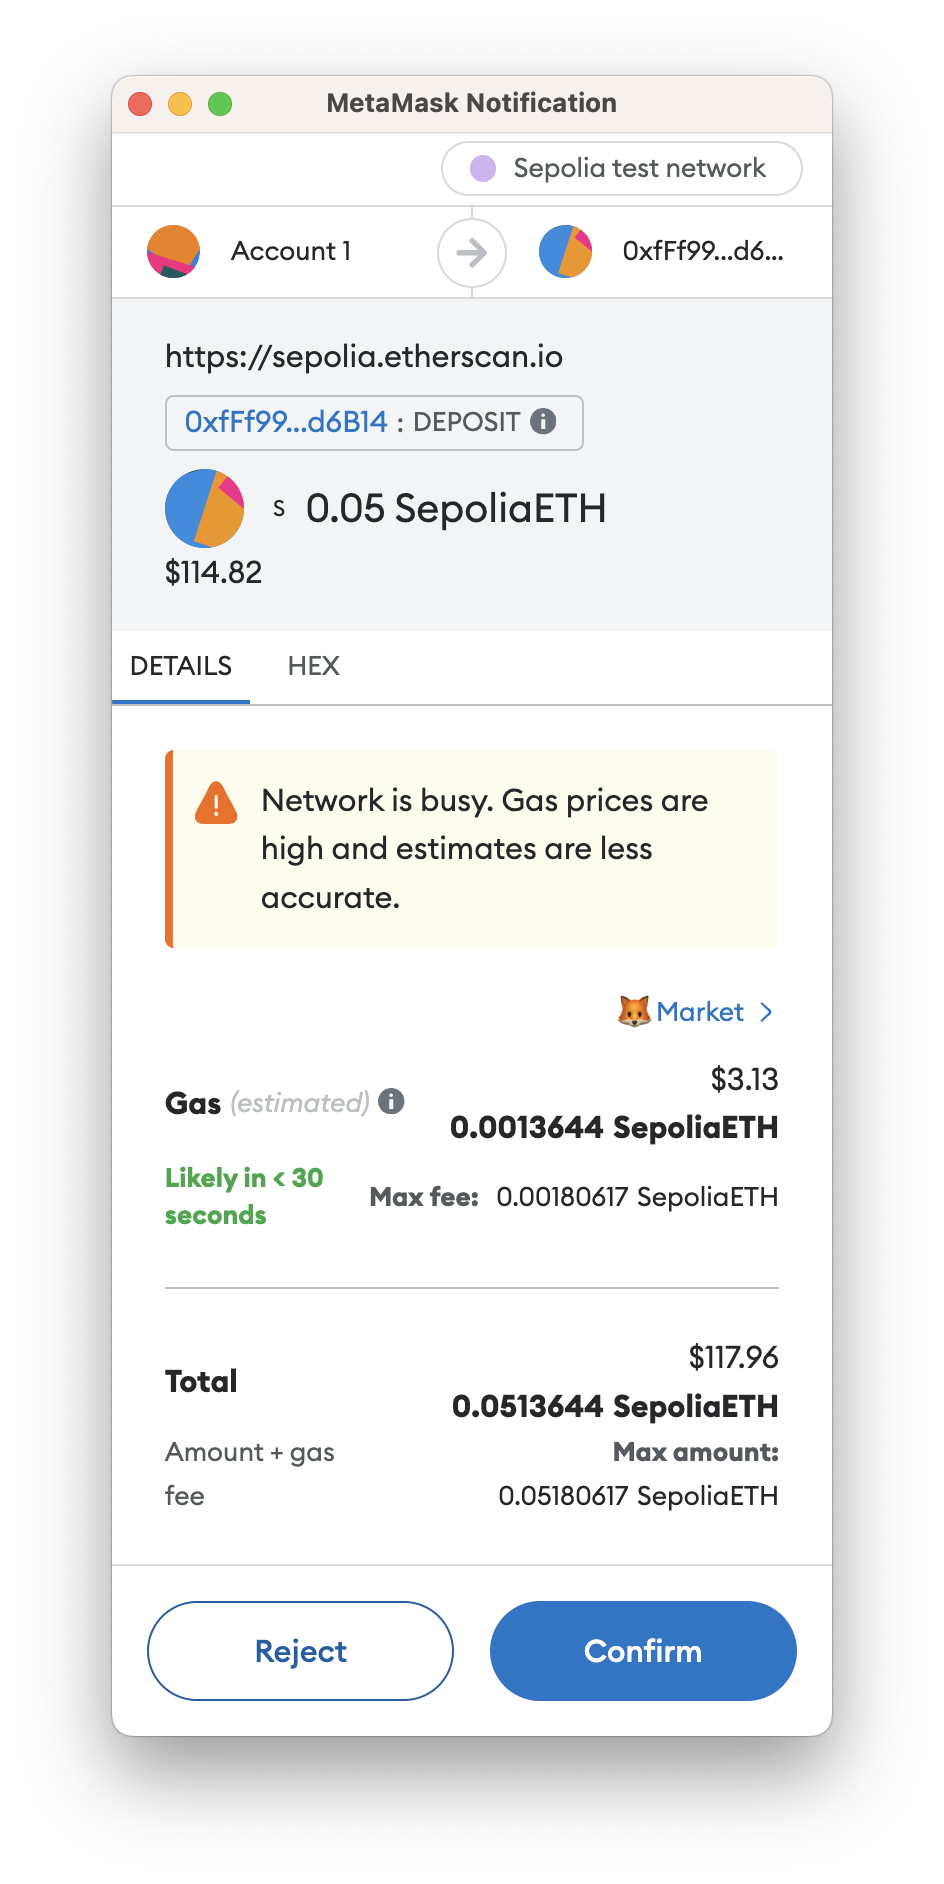
Step 8: Click the write function you want to call. Make sure to input any necessary input parameters if the function requires them. In this guide, we will call the deposit function to convert 0.05 ETH to 0.05 WETH (a.k.a. wrapping 0.05 ETH).
While
wei, the lowest unit of ETH, is generally used in smart contracts, the Etherscan interface requires us to write inetherunit, notweias specified in the parameter field.
After typing 0.05 as input, click the Write button and confirm the transaction on your wallet.
Step 9 (optional): Repeat the reading data process to check if the result of the balanceOf function is increased by 0.05 ETH.
If your initial WETH balance is 0, the result should be
50000000000000000wei, which equals 0.05 ETH.As mentioned in the Units section, 1 ETH equals 1,000,000,000,000,000,000 wei (or 10^18 wei). So, if you divide
50000000000000000wei (or 5*10^16 wei) by1,000,000,000,000,000,000wei (or 10^18), the result will be 0.05 ETH.
Interacting with Smart Contracts with Ethers.js
Ethers.js is one of the most popular Ethereum libraries to interact with Ethereum and other EVM-compatible blockchains. Let's learn how to interact with smart contracts directly with the Ethers.js library.
Setting Up the Project
Step 1: Ensure Node.js is installed on your computer. If not, install it.
Step 2: Create a new folder and initialize a new Node.js project in the newly created folder.
mkdir interact-ethersjs && cd interact-ethersjs
npm init --y
Step 3: Add Ethers.js and dotenv to your project.
npm install ethers dotenv
Step 4: Create a new JavaScript file (e.g., index-ethers.js) and a .env file.
echo > index-ethers.js
echo > .env
Step 5: Add your sensitive information (Quicknode Endpoint HTTP URL and your wallet's private key) to the .env file.
Open the .env file and replace YOUR_QUICKNODE_ENDPOINT_HTTP_URL and YOUR_WALLET_PRIVATE_KEY with your Quicknode endpoint URL and your wallet's private key (to sign transactions), respectively.
HTTP_PROVIDER_URL="YOUR_QUICKNODE_ENDPOINT_HTTP_URL"
PRIVATE_KEY="YOUR_WALLET_PRIVATE_KEY"
Step 6: Initialize the connection and set up the code.
Open the index-ethers.js file and add the following code:
This code snippet initializes a connection to an Ethereum smart contract using Ethers.js, setting up the stage for further interactions such as querying balances or initiating transactions through the smart contract's functions.
A provider is an abstraction of a connection to the Ethereum blockchain, allowing read-only access to data and states on the blockchain. It does not have the capability to sign transactions or messages because it does not hold a private key. However, it can broadcast any signed transaction to the blockchain.
A signer is an entity that holds a private key and can sign transactions or messages, thus capable of executing state-changing operations on the blockchain. It's often used to sign and send transactions.
The contract instance is connected to the blockchain via a provider for read-only interactions. When you create a contractWithSigner, you essentially reconnect the same contract instance with a signer (which includes a private key and provider), enabling it to perform write operations (like sending transactions) on the contract.
// Importing the ethers.js library for Ethereum blockchain interaction
require('dotenv').config()
const ethers = require('ethers')

// Configuration for Quicknode endpoint and user's private key
const QUICKNODE_ENDPOINT = process.env.HTTP_PROVIDER_URL
const PRIVATE_KEY = process.env.PRIVATE_KEY

// Setting up the provider and signer to connect to the Ethereum network via Quicknode
const provider = new ethers.JsonRpcProvider(QUICKNODE_ENDPOINT)
const signer = new ethers.Wallet(PRIVATE_KEY, provider)

const userAddress = signer.address

// Contract details: WETH contract on the Sepolia test network
const contractAddress = '0xfFf9976782d46CC05630D1f6eBAb18b2324d6B14'
const contractABI = [
	// ABI definitions for interacting with the contract
	{
		constant: true,
		inputs: [{ name: '', type: 'address' }],
		name: 'balanceOf',
		outputs: [{ name: '', type: 'uint256' }],
		payable: false,
		stateMutability: 'view',
		type: 'function',
	},
	{
		constant: false,
		inputs: [],
		name: 'deposit',
		outputs: [],
		payable: true,
		stateMutability: 'payable',
		type: 'function',
	},
]

// Instantiating the contract object for interacting with the WETH contract
const contract = new ethers.Contract(contractAddress, contractABI, provider)
const contractWithSigner = contract.connect(signer)

// Reading from the contract
// READ FUNCTION WILL BE HERE

// Writing to the contract
// WRITING FUNCTION WILL BE HERE
How to Read Data from Smart Contracts with Ethers.js
As we set up the connection and contract instance to interact with, let's add the readContract function.
This function, readContract, reads the WETH balance of a specified user address from the smart contract and logs it to the console in both wei and ether units for clear understanding. Add the highlighted function to the index-ethers.js file.
Since reading data from smart contracts does not require any transaction to sign, the private key has not been used yet.
Simply add the provided code snippet to the bottom of your file.
// Reading from the contract
async function readContract() {
	console.log('Reading the balance...')
	// Query the contract for the balance of the specified user address
	const balance = await contract.balanceOf(userAddress)
	// Convert the balance from wei to ether for readability
	const balanceInEther = ethers.formatEther(balance)
	// Log the balance in wei
	console.log(`User's WETH balance in Wei: ${balance}`)
	// Log the balance in ether, providing a more familiar unit of measure
	console.log(`User's WETH balance in Ether: ${balanceInEther}`)
}
How to Write Data to Smart Contracts with Ethers.js
Now, it's time to call one of the write functions (e.g., deposit()) to wrap some ETH.
Add the highlighted function to the index-ethers.js file.
Note that we call both functions after defining them. Lastly, we call the readContract function again in order to see the WETH balance increment after wrapping some ETH.
Transactions can include various parameters, including gasLimit, gasPrice, value, and nonce. Check all parameters in the Ethers.js documentation.
In this guide, we only use the value parameter, which specifies the amount of Ether (in wei) sent along with the transaction for payable functions. The Ethers.js SDK manages the other required values for us, simplifying the transaction process.
Simply add the provided code snippet to the bottom of your file.
// Writing to the contract
async function writeContract() {
	console.log('Calling deposit function...')
	const transactionResponse = await contractWithSigner.deposit({
		value: ethers.parseEther('0.05'),
	})
	await transactionResponse.wait()
	console.log(`Transaction hash: ${transactionResponse.hash}`)
}

// Call the functions
;(async () => {
	// First, read the contract to get the initial state
	await readContract()
	// Next, write to the contract and wait for the transaction to complete
	await writeContract()
	// Finally, read the contract again to see the changes made by the write operation
	await readContract()
})().catch(console.error)
Running the Code
Run the command below to run the index-ethers.js file.
node index-ethers.js
If everything goes as expected, your console output should be similar to the one below. As seen, after calling the deposit function, the WETH balance of the address is increased by 0.05 ether.
Reading the balance...
User's WETH balance in Wei: 100000000000000000
User's WETH balance in Ether: 0.1
Calling deposit function...
Transaction hash: 0x10be646a1be093c6baf744ec436d48f6b11b649322ba358e0a9a4fbc3810fe62
Reading the balance...
User's WETH balance in Wei: 150000000000000000
User's WETH balance in Ether: 0.15
Interacting with Smart Contracts with Web3.js
Web3.js is a comprehensive Ethereum library that enables interaction with Ethereum and other EVM-compatible blockchains. Let's explore how to directly interact with smart contracts using the Web3.js library.
Setting Up the Project
Step 1: Ensure Node.js is installed on your computer. If not, install it.
Step 2: Create a new folder and initialize a new Node.js project in the newly created folder.
mkdir interact-web3js && cd interact-web3js
npm init -y
Step 3: Install Web3.js and dotenv in your project.
npm install web3 dotenv
Step 4: Create a new JavaScript file (e.g., index-web3.js) and a .env file.
echo > index-web3.js
echo > .env
Step 5: Populate the .env file with your sensitive data, including the Quicknode Endpoint HTTP URL and your wallet's private key, to enable transaction signing.
Edit the .env file to replace YOUR_QUICKNODE_ENDPOINT_HTTP_URL and YOUR_WALLET_PRIVATE_KEY with your actual Quicknode endpoint URL and your private key.
HTTP_PROVIDER_URL="YOUR_QUICKNODE_ENDPOINT_HTTP_URL"
PRIVATE_KEY="YOUR_WALLET_PRIVATE_KEY"
Step 6: Prepare the connection and setup code within your project.
Open the index-web3.js file and add the following code to initiate a connection to an Ethereum smart contract through Web3.js, readying the environment for queries or transactions.
// Importing Web3.js for blockchain interactions
require('dotenv').config()
const { Web3 } = require('web3')

// Configuring the Quicknode endpoint and private key for the user
const QUICKNODE_ENDPOINT = process.env.HTTP_PROVIDER_URL
const PRIVATE_KEY = process.env.PRIVATE_KEY
const privateKeyWithPrefix = PRIVATE_KEY.startsWith('0x')
	? PRIVATE_KEY
	: `0x${PRIVATE_KEY}`

// Establishing a provider connection to the Ethereum network via Quicknode
const web3Client = new Web3(QUICKNODE_ENDPOINT)

// Contract details for interacting with the WETH contract on the Sepolia test network
const contractAddress = '0xfFf9976782d46CC05630D1f6eBAb18b2324d6B14'
const contractABI = [
	// The ABI array for contract interaction
	{
		constant: true,
		inputs: [{ name: '', type: 'address' }],
		name: 'balanceOf',
		outputs: [{ name: '', type: 'uint256' }],
		payable: false,
		stateMutability: 'view',
		type: 'function',
	},
	{
		constant: false,
		inputs: [],
		name: 'deposit',
		outputs: [],
		payable: true,
		stateMutability: 'payable',
		type: 'function',
	},
]

// Addind the account object
const account = web3Client.eth.accounts.wallet.add(privateKeyWithPrefix)
const userAddress = account[0].address

// Instantiating the contract object for Ethereum contract interaction
const contract = new web3Client.eth.Contract(contractABI, contractAddress)
How to Read Data from Smart Contracts with Web3.js
Following the setup of our connection and contract instance, we'll now add the readContract function.
This readContract function retrieves and logs the specified user address's WETH balance from the smart contract in both wei and ether units for easy comprehension. Add the highlighted function to your index-web3.js file.
Reading from smart contracts doesn't need a signed transaction, so the private key remains unused at this point.
Simply add the provided code snippet to the bottom of your file.
// Reading from the contract
async function readContract() {
	console.log('Reading the balance...')
	// Query the contract for the balance of the specified user address
	const balance = await contract.methods.balanceOf(userAddress).call()
	// Convert the balance from wei to ether for readability
	const balanceInEther = web3Client.utils.fromWei(balance, 'ether')
	// Log the balance in wei
	console.log(`User's WETH balance in Wei: ${balance}`)
	// Log the balance in ether, providing a more familiar unit of measure
	console.log(`User's WETH balance in Ether: ${balanceInEther}`)
}
How to Write Data to Smart Contracts with Web3.js
Now, let's implement the deposit function to execute a write operation on the smart contract, specifically to wrap ETH.
Add this highlighted function to your index-web3.js file.
Note that executing write operations involves utilizing the private key to sign the transaction.
Transactions can include various parameters, including gasLimit, gasPrice, value, and nonce. Check all parameters in the Web3.js documentation.
In this guide, we only use from, which defines the address that sent the transaction, and value parameter, which specifies the amount of Ether (in wei) sent along with the transaction for payable functions. The Web3.js SDK manages the other required values for us, simplifying the transaction process.
Simply add the provided code snippet to the bottom of your file.
// Writing to the contract
async function writeContract() {
	console.log('Calling deposit function...')
	const transactionResponse = await contract.methods.deposit().send({
		from: account[0].address,
		value: web3Client.utils.toWei('0.05', 'ether'),
	})
	console.log(`Transaction hash: ${transactionResponse.transactionHash}`)
}

// Call the functions
;(async () => {
	await readContract() // Read the initial state
	await writeContract() // Execute a write operation
	await readContract() // Read the final state to observe changes
})().catch(console.error)
Running the Code
Run the command below to run the index-web3.js file.
node index-web3.js
The expected output should indicate the initial WETH balance, the transaction hash of the deposit, and the updated WETH balance, demonstrating a successful interaction with the smart contract through Web3.js. This interaction showcases the balance increment by 0.05 ETH after the deposit operation.
Reading the balance...
User's WETH balance in Wei: 0
User's WETH balance in Ether: 0.
Calling deposit function...
Transaction hash: 0x4283732f33ea2540ae6ceb5f27e0831dcd00c6ffcc6b1c12fd1432e7396ddc2b
Reading the balance...
User's WETH balance in Wei: 50000000000000000
User's WETH balance in Ether: 0.05
Conclusion
In this guide, we've navigated through interacting with Ethereum smart contracts via Etherscan, Ethers.js, and Web3.js, providing a solid foundation for anyone looking to dive into Ethereum development. Each method offers unique advantages, from Etherscan's simplicity to the flexibility and control provided by Ethers.js and Web3.js. This foundational knowledge sets the stage for advanced Ethereum development, encouraging further exploration and innovation within the blockchain ecosystem.
If you'd like to check out other guides, you can check Ethers.js related guides and Web3.js related guides.
Subscribe to our newsletter for more articles and guides on Web3 and blockchain. If you have any questions or need further assistance, feel free to join our Discord server or provide feedback using the form below. Stay up to date with the latest by following us on Twitter (@Quicknode) and our Telegram announcement channel.
We ❤️ Feedback!
Let us know if you have any feedback or requests for new topics. We'd love to hear from you.