
13 min read
Overview
Imagine a digital world where every piece of information, every claim, and every credential could be verified, whether on the blockchain or off. That's the power of Ethereum Attestation Service (EAS).
In this guide, we'll explore the functionalities of EAS, including how to create what's known as a claim — referred to in EAS as an "attestation" — and the steps to sign and verify it digitally. In EAS, an attestation is a statement made by one entity about itself or another, covering a broad range of verifiable data such as identity, ownership, credentials, and rights.
Let's get started!
Prefer a video walkthrough? Follow along with Sahil and learn about Ethereum Attestation Service and how to use it.
What You Will Do
- Learn about Ethereum Attestation Service (EAS)
- Learn how to create an Attestation
- Verify the Attestation you created
What You Will Need
- Basic understanding of Ethereum and smart contracts
- Experience with JavaScript and Node.js installed
- A Quicknode Sepolia endpoint (you can create one for free here)
- A Web3 wallet (e.g., MetaMask, Coinbase Wallet) with ETH (you can get some test funds here)
| Dependency | Version |
|---|---|
| node.js | 18.13.0 |
| @ethereum-attestation-service/eas-sdk | 1.3.7 |
What is Ethereum Attestation Service (EAS)
Establishing a verifiable digital identity is a complex challenge. Multiple applications have already attempted to address this issue, but a common problem they face is the lack of interoperability. EAS tackles this by providing a universal framework for creating and managing digital attestations.
Ethereum Attestation Service (EAS) is an open-source public good infrastructure for making attestations onchain or offchain. In the context of EAS, an attestation is a digitally signed claim by any entity about anything. It's a digital signature of some structured data, which could be as simple as some entity (e.g., another individual or KYC firm) attesting to who you say you are or anywhere trust and verification is needed.
Next, let's dig a bit more into how this protocol is designed and functions.
Core Components of EAS
EAS operates through two primary smart contracts and an optional resolver contract:
Schema Creation Contract: This smart contract allows the creation of unique schemas for any topic and data type. A schema defines the structure and type of data that can be attested to and more technically speaking, to register a schema (that is unique and not already created on that chain), you would interact with the register function. Optionally, if you want to point to a resolver contract (we'll cover soon), you'd need to set it while registering the schema, which in this case would have a different unique identifier (UID) than a schema initiated without a resolver contract.
Attestation Creation Contract: Using the defined schema, this smart contract facilitates the creation of attestations (via the attest function). It's where the actual data gets attested according to the specified schema. This function takes in the recipient address of the attestor, expiration time, a boolean flag if you can revoke the attestation, and optionally can reference another attestation by its unique identifier (UID).
(Optional) Resolver Contract: This is an optionally referenced smart contract that can be used to execute additional logic, such as facilitating payments or triggering other smart contract functions, like minting an NFT, or triggering a DAO to do a governance-related action. Check out the resolver repository in the EAS's Github for templates on building resolvers.
Off-chain and Private Functionalities
For off-chain attestations, the actual attestation is not stored onchain and to ensure privacy its only encoded in the URI fragment of the URL used when creating the attestation. The unique identifier (UID) is part of the attestation and is a hash of that attestation itself. Since the attestation is offchain, there is no source of truth (since its not on the blockchain ledger). However, you can still store the UID of the attestation onchain (effectively timestamping it), allowing others to see what and when was attested to.
To make your attestations more private, you can create Private Data attestations. These are onchain attestations encoded by a 32-byte hash created from a Merkle tree. It does this by allowing you to define a schema, create the attestation, and only post the Merkle root hash onchain. The Merkle root hash consists of hashes of the data fields used when creating the schema and can be verified against the ground truth data. Useful for interactions when you don't want to expose private data like your government ID, bank account information, or other private data.
EAS also leverages EIP-712 for signing, ensuring that attestations are secure and verifiable. This can be used by wallets such as MetaMask, Coinbase Wallet, Safe, and other smart contracts.
EASSCAN (EAS Explorer)
EAS has built an explorer (like Etherscan) for the Attestation Ecosystem called EASSCAN. This explorer is currently live on various test networks and mainnet blockchains, including Sepolia, Optimism, Base, and Polygon. It enables users to explore, make, and verify schemas and attestations.
Project Prerequisite: Create a Quicknode Endpoint
To interact with the EAS protocol, you'll need to be able to communicate with the Ethereum blockchain. You're welcome to use public nodes or deploy and manage your own infrastructure; however, if you'd like 8x faster response times, you can leave the heavy lifting to us. Sign up for an account here.
For demonstration and testing EAS's functionality in this guide, we'll conduct our transactions on a testnet such as Ethereum Sepolia.
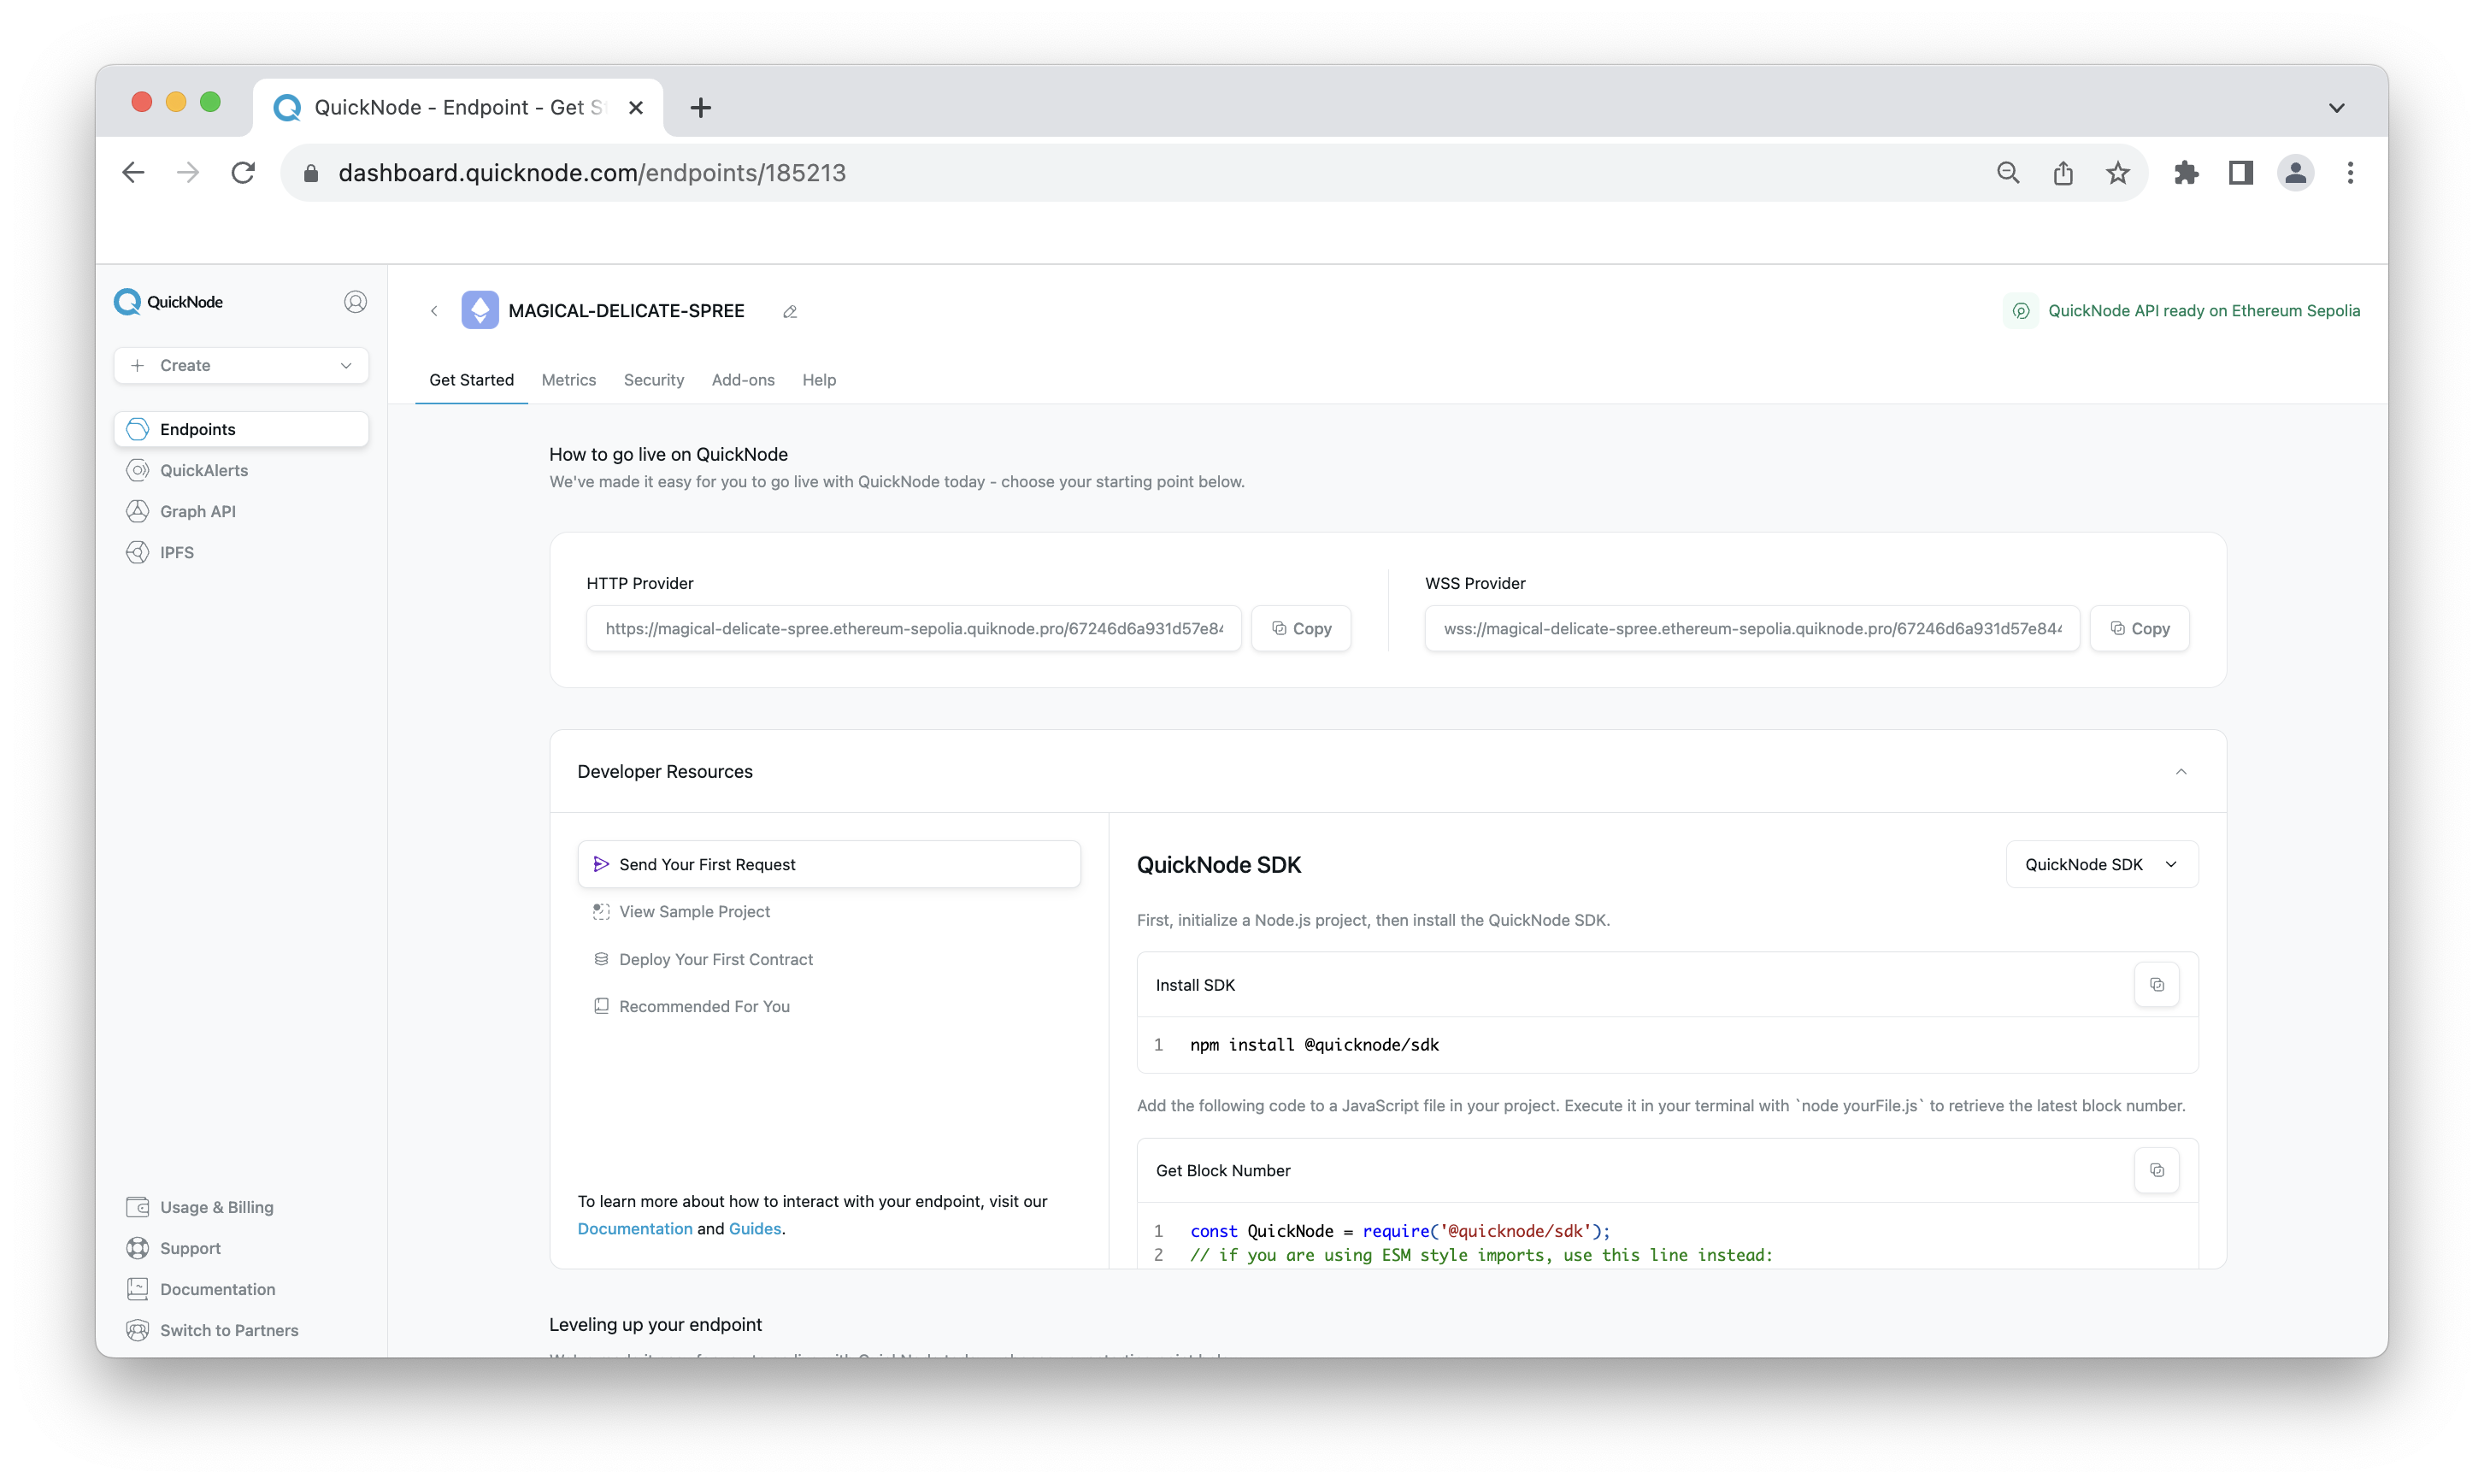
Once logged into Quicknode, click the Create an endpoint button, then select the Ethereum chain and Sepolia network.
After creating your endpoint, copy the HTTP Provider link and keep it handy, as you'll need it in the following sections.
Project Prerequisite: Fund Your Wallet
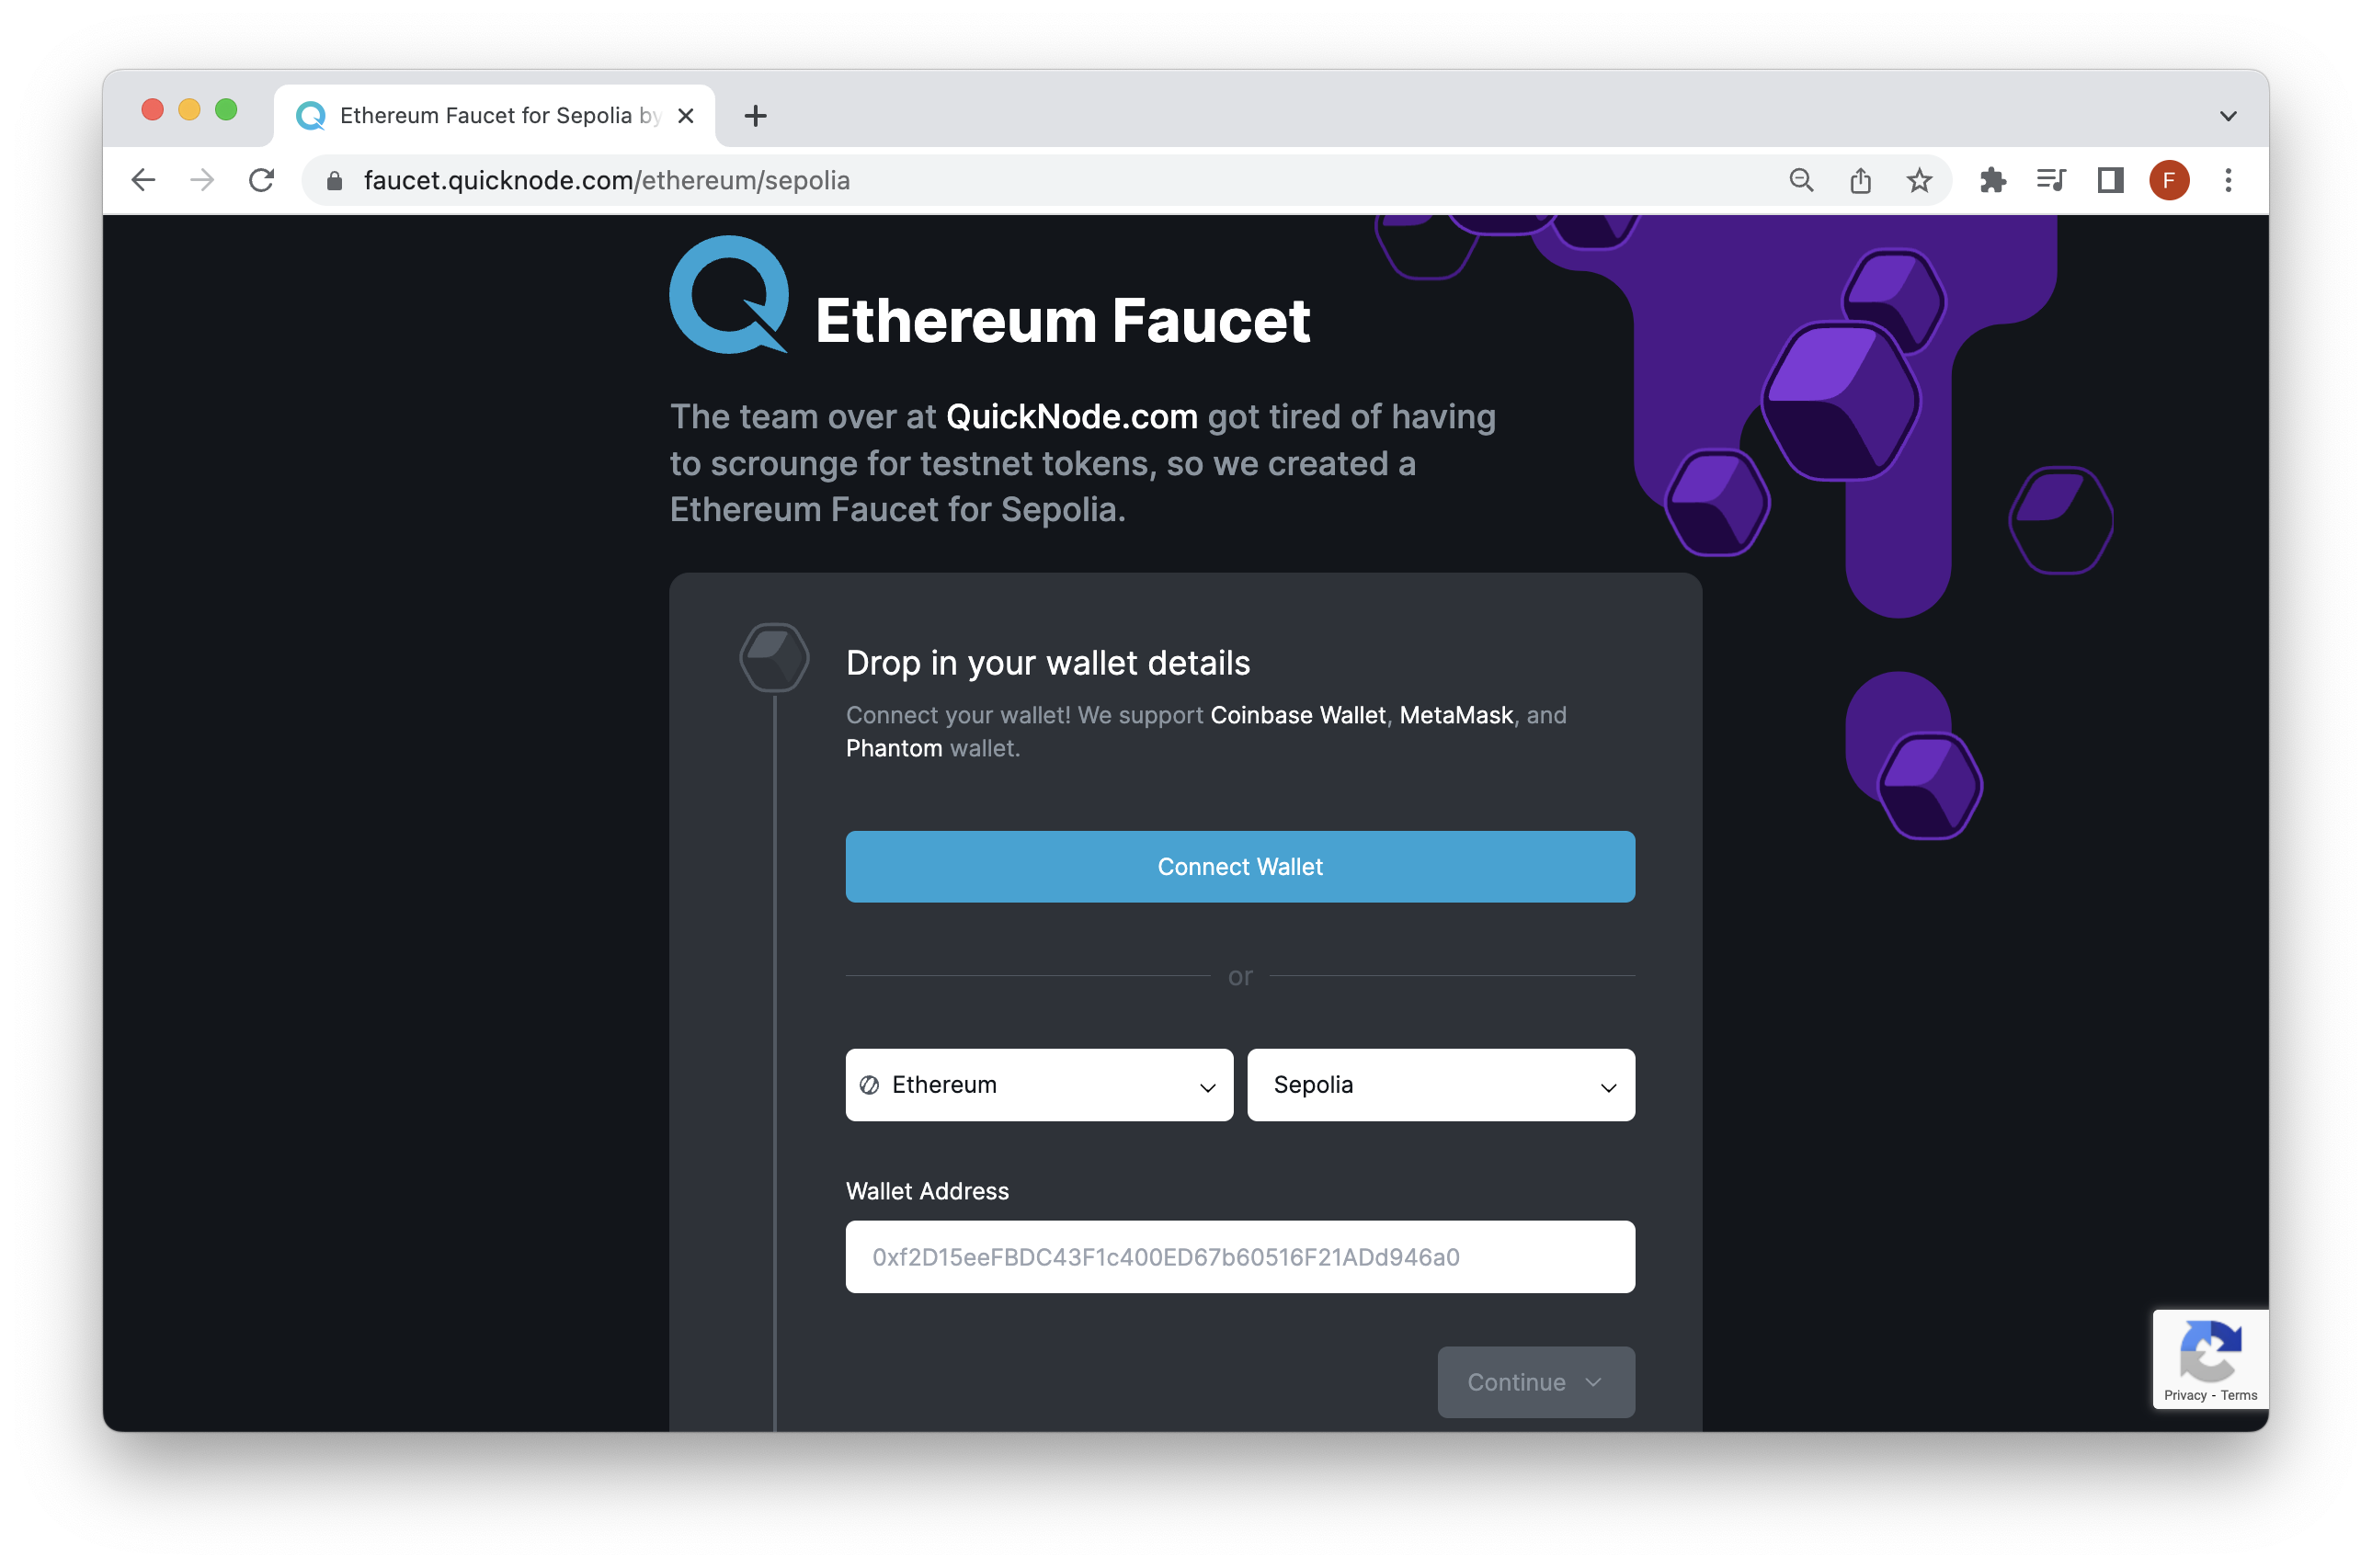
To conduct transactions on Ethereum Sepolia, we'll need some test Ether to pay for gas fees. If you need some, the Multi-Chain Quicknode Faucet makes it easy to obtain test ETH!
Navigate to the Multi-Chain Quicknode Faucet and connect your wallet (e.g., MetaMask, Coinbase Wallet) or paste in your wallet address to retrieve test ETH. Note that there is a mainnet balance requirement of 0.001 ETH on Ethereum Mainnet to use the EVM faucets. You can also tweet or log in with your Quicknode account to get a bonus!
Installing and Configuring EAS
There are multiple ways to configure EAS with your project. You can create and manage attestations via the UI (which can be found here), or use the EAS SDK. In this guide, we'll use the SDK option.
First, let's initialize a CommonJS project:
mkdir eas-project && cd eas-project && npm init es6
Next, you can install the SDK via npm:
npm install @ethereum-attestation-service/eas-sdk dotenv
Note you can also install via Yarn but the initial project setup will differ
Finally, we'll create an index.js and .env file that we'll need to use soon:
echo > index.js && echo > .env
Now, open the .env file and input the following variable names along with their respective values in strings (i.e., "http://quicknode-endpoint").
QUICKNODE_ENDPOINT=
WALLET_PRIVATE_KEY=
Remember to save the file. In the next section, let's set up a script to fetch an existing attestation (as a warmup). Then, we'll work on creating a unique schema and attesting to it.
Fetching and Creating Attestations with EAS
Fetching an Existing Attestation
Before diving into creating new attestations, let's start by fetching an existing attestation. This will help us understand the structure and nature of attestations within EAS. Add the following code to your index.js file:
import { EAS } from "@ethereum-attestation-service/eas-sdk";
import { ethers } from "ethers"; // install alongside EAS
import 'dotenv/config'

async function fetchAttestation() {
    // Use constants for configurations
    const EAS_CONTRACT_ADDRESS = "0xC2679fBD37d54388Ce493F1DB75320D236e1815e"; // Sepolia v0.26 address

    // Initialize EAS and provider
    const eas = new EAS(EAS_CONTRACT_ADDRESS);
    const provider = new ethers.JsonRpcProvider(process.env.QUICKNODE_ENDPOINT);
    eas.connect(provider);

    // Define UID as a constant if it's not dynamic
    const UID = "0x62aa93fbae908100345fe96150c6f57ea70946bd8dec4df99bcdb7186f233e39";

    try {
        const attestation = await eas.getAttestation(UID); // This function returns an attestation object
        console.log(attestation);
    } catch (error) {
        console.error("Error fetching attestation:", error);
    }
}

fetchAttestation();
Optionally, you can change the value in the UID variable to fetch details about a different attestation. You can explore and find other UIDs on EASSCAN.
Then, execute the script by running the command in your terminal window:
node index.js
You'll see an output similar to the one below. It consists of information about that specific onchain attestation.
Result(10) [
  '0x62aa93fbae908100345fe96150c6f57ea70946bd8dec4df99bcdb7186f233e39', // UID
  '0xf164b8a3b56bcc6f0e61f395507fd20e772efe9a5f09bd789ec9585ac1acdd74', // Schema identifier
  1701894216n, // The Unix timestamp when the attestation was created
  0n, // The Unix timestamp when the attestation expires (0 for no expiration)
  0n, // The Unix timestamp when the attestation was revoked, if applicable
  '0x0000000000000000000000000000000000000000000000000000000000000000', // The reference UID of the attestation if any
  '0xBe09cDb573E1553672eEC44540754b6F4d5B5112', // The Ethereum address of the recipient of the attestation
  '0xBe09cDb573E1553672eEC44540754b6F4d5B5112', // The Ethereum address of the attester who created the attestation
  true, // A boolean indicating whether the attestation is revocable or not
  '0x00000000000000000000000000000000000000000000000000000000000000a00000000000000000000000000000000000000000000000000000000000000120000000000000000000000000be09cdb573e1553672eec44540754b6f4d5b51120000000000000000000000000000000000000000000000000000000000000160000000000000000000000000000000000000000000000000000000000000000700000000000000000000000000000000000000000000000000000000000000423078356665396535613964613539336630633234636266663030383461396530303262643638636264303233373665643461643039383434643265643238663061310000000000000000000000000000000000000000000000000000000000000000000000000000000000000000000000000000000000000000000000000007726576616e74680000000000000000000000000000000000000000000000000000000000000000000000000000000000000000000000000000000000000000076f7074696f6e31 // Data
]
Creating a Schema
Now, let's create our own schema. As we discussed, a schema can be about anything, from a simple claim like a name to more complex data structures.
All schemas are publicly available for use by anyone, and any schema that is registered can be used by anyone.
One important thing to note is that you cannot create a new schema if there is an existing one on the chain with the same data structure. If the schema was invoked with a resolver contract, it would have a different UID compared to one that wasn't initiated with one.
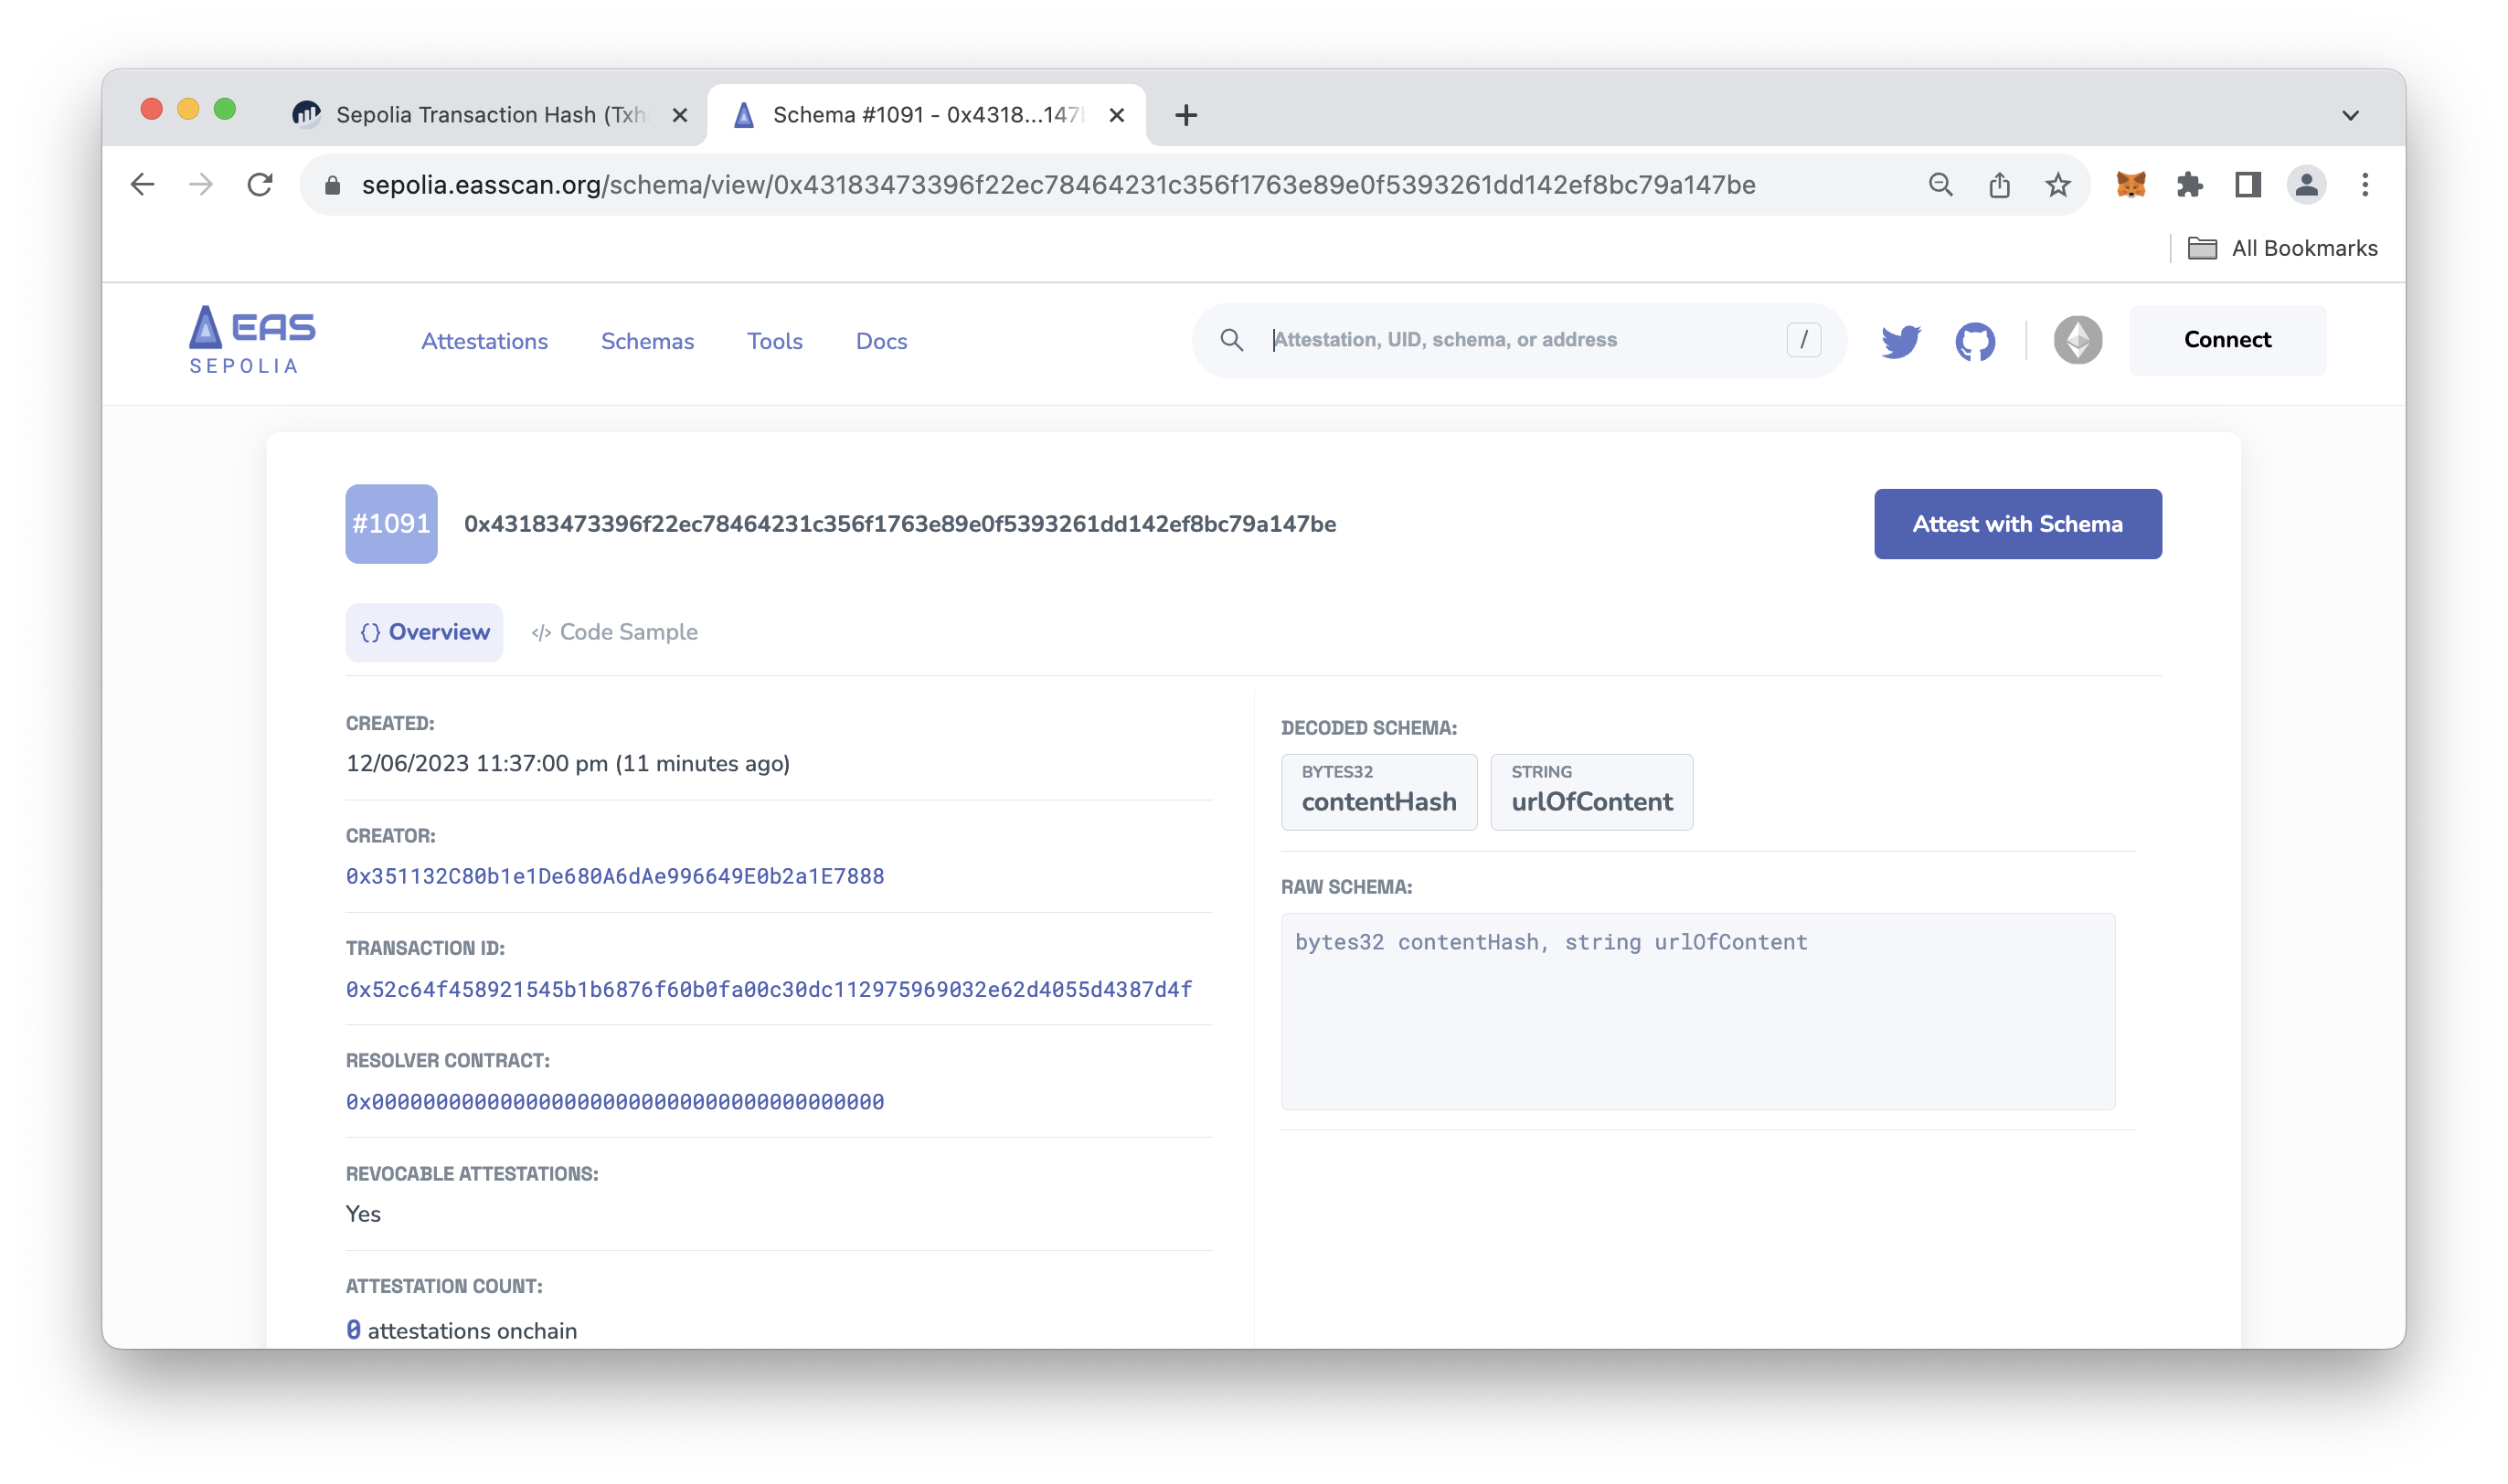
For this guide, we'll show you how to create the schema using the SDK. Our schema will be for content authenticity, and we'll define it as below.
bytes32 contentHash,
string urlOfContent
NOTE: For the purpose of making the schema different (so that you can actually deploy and register it), adjust the fields above to something more unique (e.g., add a number, and/or different text and casing).
The schema above contains a contentHash field which represents the hash of the content being attested to, and a urlOfContent field, which specifies the URL where the content lives. This schema is a simple schema that can be used to attest and verify the authenticity of digital content (i.e., technical documentation, videos, and more).
Now, let's update the index.js file with the following code:
import { SchemaRegistry} from "@ethereum-attestation-service/eas-sdk";
import { ethers } from 'ethers';
import 'dotenv/config'

// Configuration constants
const schemaRegistryContractAddress = "0x0a7E2Ff54e76B8E6659aedc9103FB21c038050D0"; // Sepolia 0.26
const schemaRegistry = new SchemaRegistry(schemaRegistryContractAddress);

async function registerSchema() {
    try {
        // Initialize provider and signer
        const provider = new ethers.JsonRpcProvider(process.env.QUICKNODE_ENDPOINT);
        const signer = new ethers.Wallet(process.env.WALLET_PRIVATE_KEY, provider);
        schemaRegistry.connect(signer);

        // Initialize SchemaEncoder with the schema string
        const schema = "YOUR_SCHEMA"; // e.g., bytes32 contentHash, string urlOfContent
        const revocable = true; // A flag allowing an attestation to be revoked

        const transaction = await schemaRegistry.register({
            schema,
            revocable,
            // You could add a resolver field here for additional functionality
          });

        // Optional: Wait for transaction to be validated
        await transaction.wait();
        console.log("New Schema Created", transaction);
    } catch (error) {
        console.error("An error occurred:", error);
    }
}

registerSchema();
You need to replace the YOUR_SCHEMA placeholder in the code above with your schema structure. This schema will need to be unique and an example is provided in the code comments.
Once the schema is defined and you save the file, execute the script again by calling node.js in your terminal. Upon successful output, search the hash on Etherscan.
On the Logs tab on Etherscan, notice the Registered event emitted, which contains a hex value of the bytes32 hash of the UID and the address of the registerer in topic one of the logs. You can search for this UID in the EASSCAN, see that it exists, and later create attestations with the newly created schema.

Attest to the Schema
Now, attest to the schema you created by inputting values according to your defined schema. If you didn't create your own schema and are using the schema we provided as an example, you can use an online tool (search Google) to convert a string to a bytes32 value.
In your index.js update the code to include the following:
import { EAS, SchemaEncoder } from "@ethereum-attestation-service/eas-sdk";
import { ethers } from 'ethers';
import 'dotenv/config'

// Configuration constants
const EAS_CONTRACT_ADDRESS = "0xC2679fBD37d54388Ce493F1DB75320D236e1815e"; // Sepolia v0.26 address

async function attest() {
    try {
        // Initialize provider and signer
        const provider = new ethers.JsonRpcProvider(process.env.QUICKNODE_ENDPOINT);
        const signer = new ethers.Wallet(process.env.WALLET_PRIVATE_KEY, provider);
        const eas = new EAS(EAS_CONTRACT_ADDRESS);
        eas.connect(signer);

        // Initialize SchemaEncoder with the schema string
        const schemaEncoder = new SchemaEncoder("YOUR_DEFINED_SCHEMA"); // e.g., bytes32 contentHash, string urlOfContent
        const encodedData = schemaEncoder.encodeData([
            { name: "", value: "", type: "" },
            { name: "", value: "", type: "" },
            /*
            In our example schema we provided, it would look something like this:
            { name: "contentHash", value: "0x2d2d2d0a617574686f723a20466572686174204b6f6368616e0a...", type: "bytes32" },
            { name: "urlOfContent", value: "quicknode.com/guides/ethereum-development/smart-contracts/what-is-ethereum-attestation-service-and-how-to-use-it", type: "string" },
            */
        ]);

        const schemaUID = "SCHEMA_ID"; // The UID of the schema. The content schema is: 0x43183473396f22ec78464231c356f1763e89e0f5393261dd142ef8bc79a147be

        // Send transaction
        const tx = await eas.attest({
            schema: schemaUID,
            data: {
                recipient: "YOUR_RECIPIENT_ADDRESS", // The Ethereum address of the recipient of the attestation
                expirationTime: 0,
                revocable: true, // Note that if your schema is not revocable, this MUST be false
                data: encodedData,
            },
        });

        const newAttestationUID = await tx.wait();
        console.log("New attestation UID:", newAttestationUID);
    } catch (error) {
        console.error("An error occurred:", error);
    }
}

attest();
You'll need to define schemaEncoder variable with your unique defined structure or the one we provide in the code comment.
Also, update the encodedData variable with the input data you are attesting with (we provide an example if you are using the content schema we provide). The schemaUID variable also needs to be updated according to your schema's ID or the schema already registered for the example we provided (see code comment).
Additionally, replace the YOUR_RECIPIENT_ADDRESS placeholder with an Ethereum address you want to make the attestation to. This can be your personal address for testing purposes, but in an ideal scenario, it may be the address of a verifying entity.
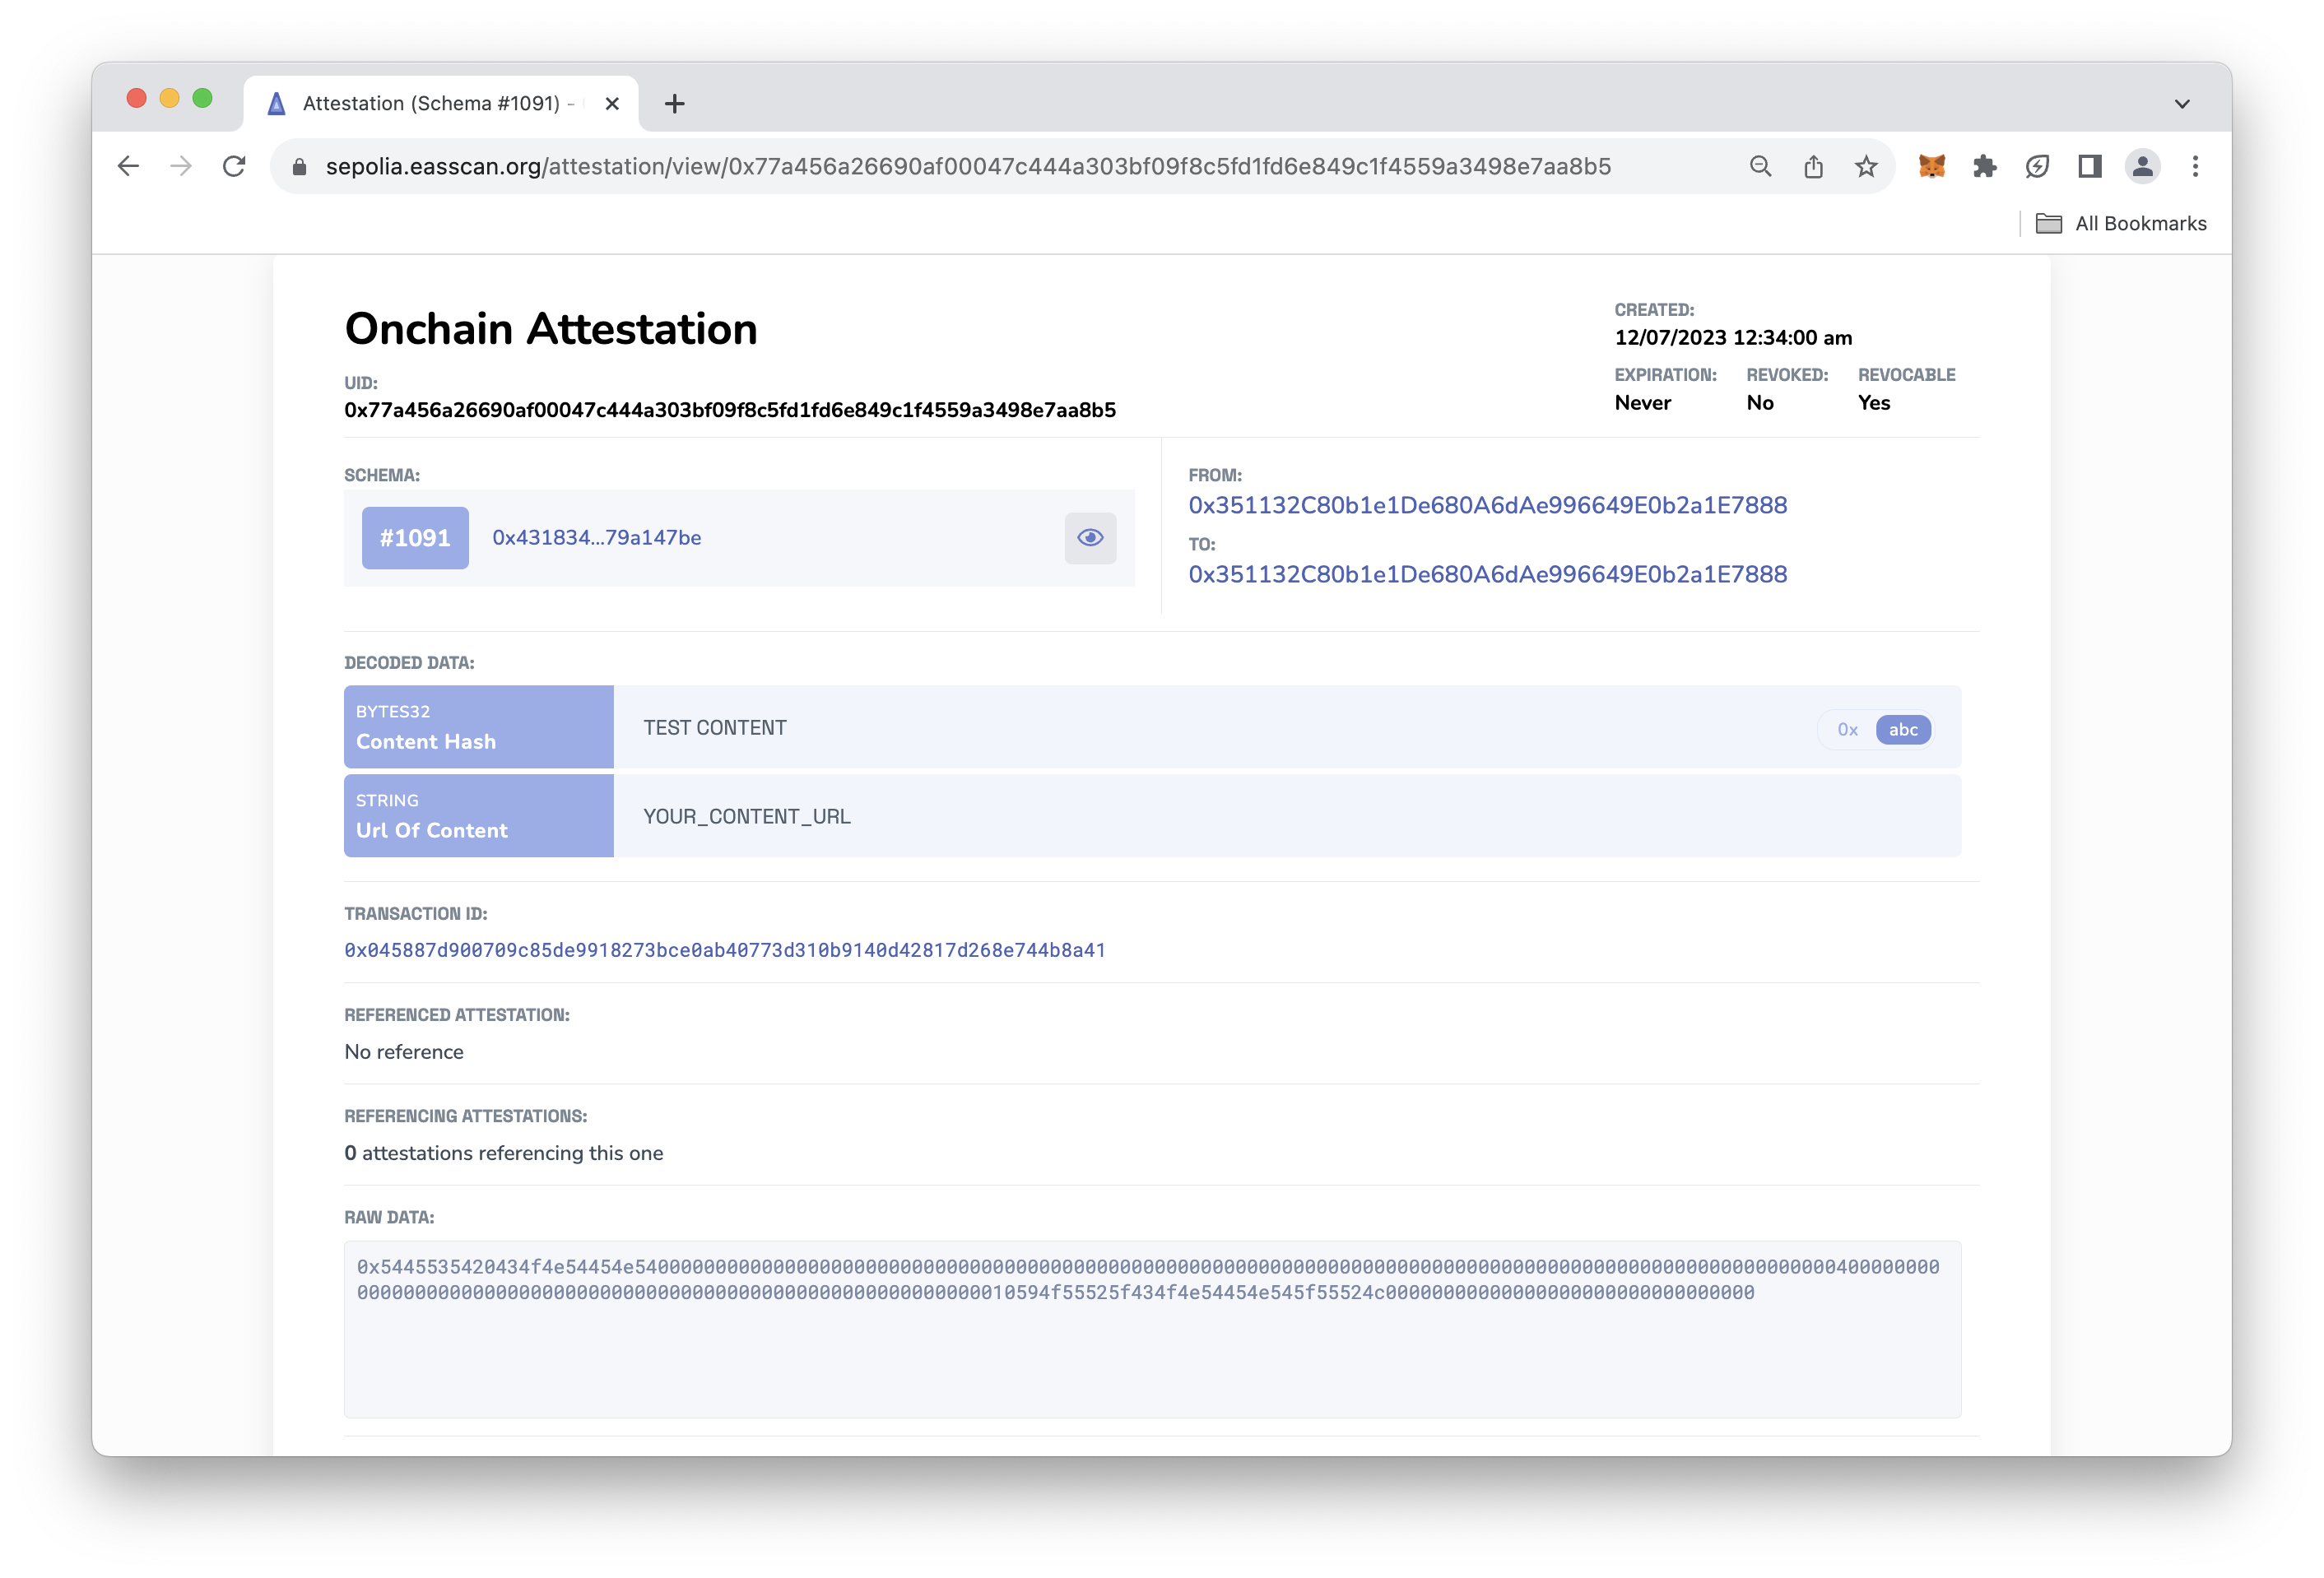
Once you execute the file again and the transaction is confirmed, you can search the transaction hash outputted from the terminal on the EAS Explorer. You'll see your attested information similar to the below:
That's it! You can now fetch the attestation again by following the code example covered in the Fetching an Existing Attestation section of this guide.
Test Your Knowledge
Try attempting the short quiz to test your knowledge!
More Use Cases and Resources
To learn more about EAS, check out the following resources:
Final Thoughts
In this guide, we learned about EAS and later showed you how to create a schema programmatically, attest to the content, and verify the attestation afterward.
Subscribe to our newsletter for more articles and guides on Web3 and blockchain. If you have any questions or need further assistance, feel free to join our Discord server or provide feedback using the form below. Stay informed and connected by following us on Twitter (@Quicknode) and Telegram announcement channel.
We ❤️ Feedback!
Let us know if you have any feedback or requests for new topics. We'd love to hear from you.