16 min read
Overview
Are you someone who has dabbled in building protocols or tools that depend on the tokens of multiple DeFi protocols? If you have, you may have encountered the challenge of dealing with different code logic for each protocol. But what if I told you there's a solution? Enter EIP-4626, a standard that addresses this very issue. In fact, many prominent protocols, including Yearn V3 (as seen in their vaults), have already embraced this standard.
This guide will teach you about The Vault Standard (ERC-4626), which simplifies the process of interacting with different DeFi protocols and creating yield-generating vaults. You will learn about the ERC-4626 standard, how yield-bearing vaults operate, and how to create a yield-bearing vault using the ERC-4626 Tokenized Vault Standard.
What You Will Do
- Understand the functioning of yield-bearing vaults.
- Explore the ERC-4626 Tokenized Vault Standard.
- Develop a yield-bearing vault using the ERC-4626 Tokenized Vault Standard.
What You Will Need
- A basic understanding of Decentralized Finance.
- An Ethereum wallet and some Sepolia test ETH. If you don’t have Test ETH, you can get some from the QuickNode faucet.
- Knowledge of creating an ERC20 (TOKEN) smart contract.
- Basic knowledge of Remix.
What Are Yield-Bearing Vaults?
Yield-bearing vaults are a key component of decentralized finance (DeFi) platforms. They are smart contracts designed to optimize the returns on cryptocurrency assets by pooling and strategically allocating them across various DeFi protocols. Users deposit their tokens, typically ERC-20 tokens, into the vault, and in return, they receive vault-specific tokens (vTokens) that represent their share of the pooled assets and earned interest. For instance, when participating in USDC stablecoin yield farming on Compound, a DeFi lending/borrowing platform, you will earn cUSDC. Similarly, when depositing ETH on Curve, you will obtain stETH.
Yield-bearing vaults employ automated strategies to continuously seek the best yield opportunities within the DeFi ecosystem. These strategies can include lending, borrowing, liquidity provision, staking, and arbitrage opportunities. By doing so, vaults generate passive income for their users while minimizing the complexity of individual yield farming activities.
Vaults are often considered more secure than wallets due to their smart contract-based design, which usually undergoes rigorous audits and testing to ensure the safety of users’ funds. This has led many DeFi platforms to prefer using vaults for depositing and managing funds. Well-known DeFi protocols that leverage yield-bearing vaults include Aave, Compound, Sushiswap, Balancer, and others.
What is the Problem with Tokenizing Vaults?
Yield-bearing tokens pose a significant challenge for developers, particularly when it comes to integrating tokens across multiple protocols. For instance, if you want to build a treasury, endowment, or any DeFi dApp that requires integrating tokens from multiple protocols, you’ll need to research each protocol, understand its yield-accrual model, and incorporate it into your codebase.
If you want to integrate cUSDC on Compound, stETH on Curve, or any other yield-bearing tokens, you’ll need to have a deep understanding of their smart contracts and develop custom solutions to successfully integrate them into your DeFi app.
This process of integrating different tokens can be stressful and time-consuming, and it also increases the risk of smart contract errors. Developers will need to spend more time checking for potential loopholes in the adapters, and in some cases, they may need to outsource the auditing to third-party smart contract auditors, which can be costly. This is particularly important now as attackers are breaching the integrity of many protocols and DeFi apps almost every week.
What is ERC-4626?
The ERC-4626, also known as the Tokenized Vault Standard, is a protocol designed to create tokenized vaults that represent shares of yield-bearing tokens. It provides a standard API for tokenized yield-bearing vaults that represent shares of a single underlying ERC-20 token. It extends the functionality of the ERC-20 token standard, enabling users to earn profits from their stakes.
Built on top of ERC-20, ERC-4626 introduces the following features:
- Deposits and redeems
- Conversion rates
- Vault balances
- Interfaces
- Events
In the next section, we'll show you how to create an Endpoint on QuickNode, which you will then use when deploying and interacting with your contract on Remix.IDE.
Creating a Sepolia Endpoint on QuickNode
To deploy a smart contract to Ethereum's test blockchain, Sepolia, you'll need an API endpoint to communicate with the network. You're welcome to use public nodes or deploy and manage your own infrastructure; however, if you'd like 8x faster response times, you can leave the heavy lifting to us. Sign up for a free account here.
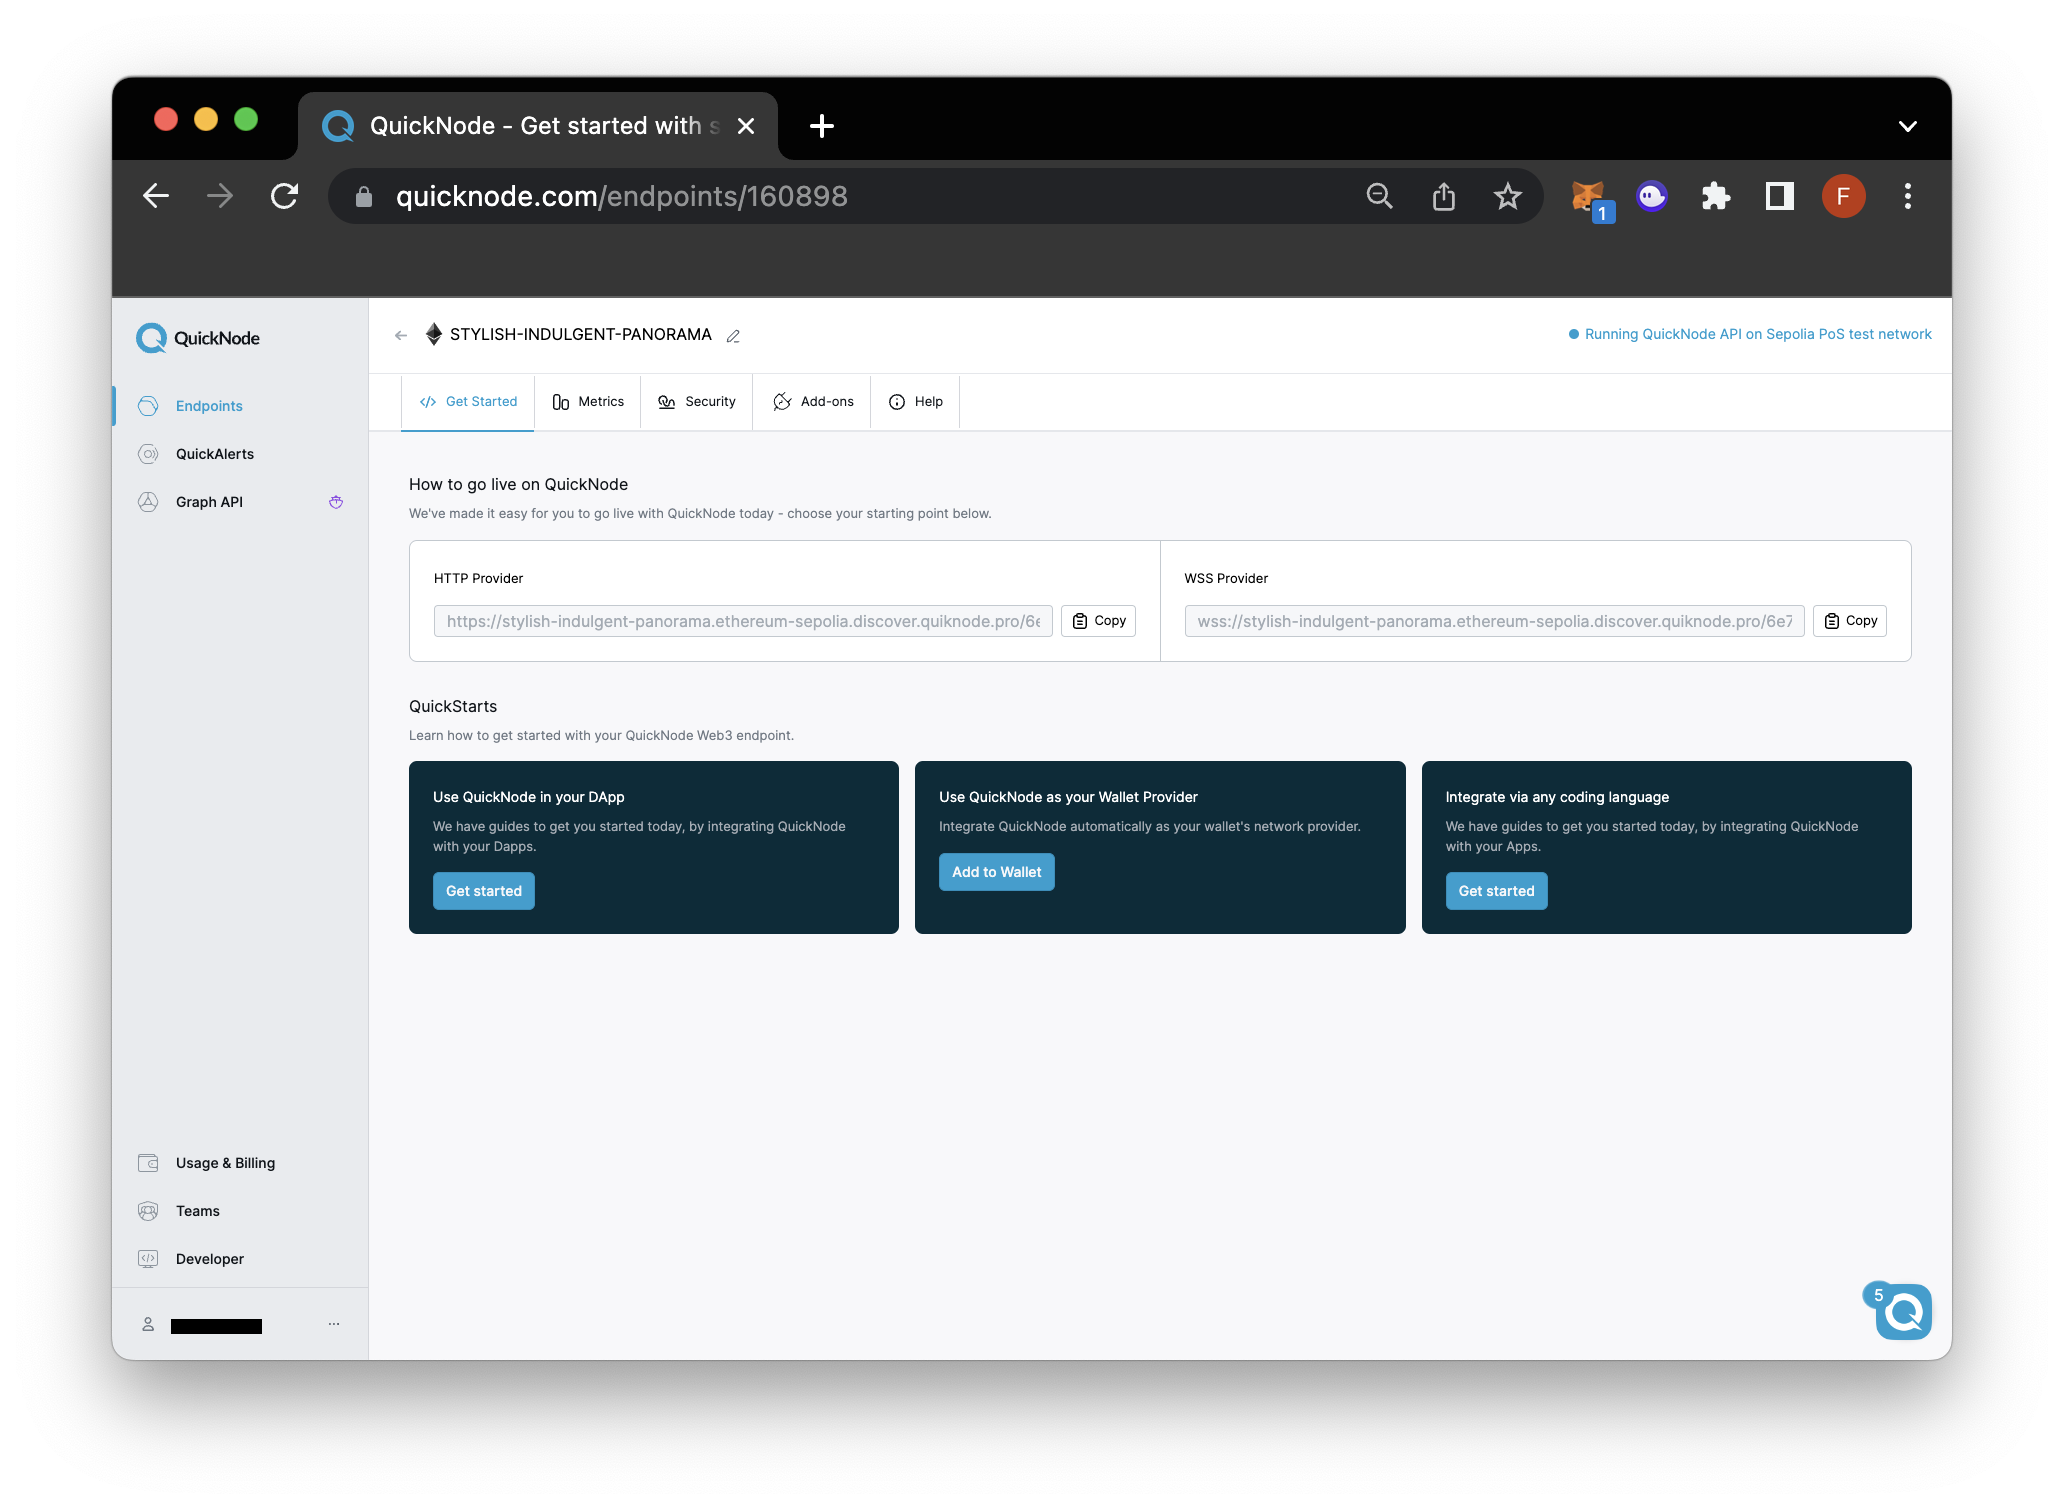
Once logged in, click the Create an endpoint button, then select the Ethereum chain and Sepolia network.
After creating your endpoint, copy the HTTP Provider link and keep it handy, as you'll need it next.
Configuring Your Web3 Wallet with QuickNode
If you're using MetaMask to deploy this contract, you'll first need to configure your RPC settings. However, note you can also use a WalletConnect compatible wallet for this guide. Some compatible wallets are Coinbase Wallet, Rainbow Wallet and TrustWallet.
Open up MetaMask and click the network dropdown at the top. After, click the Add Network button.

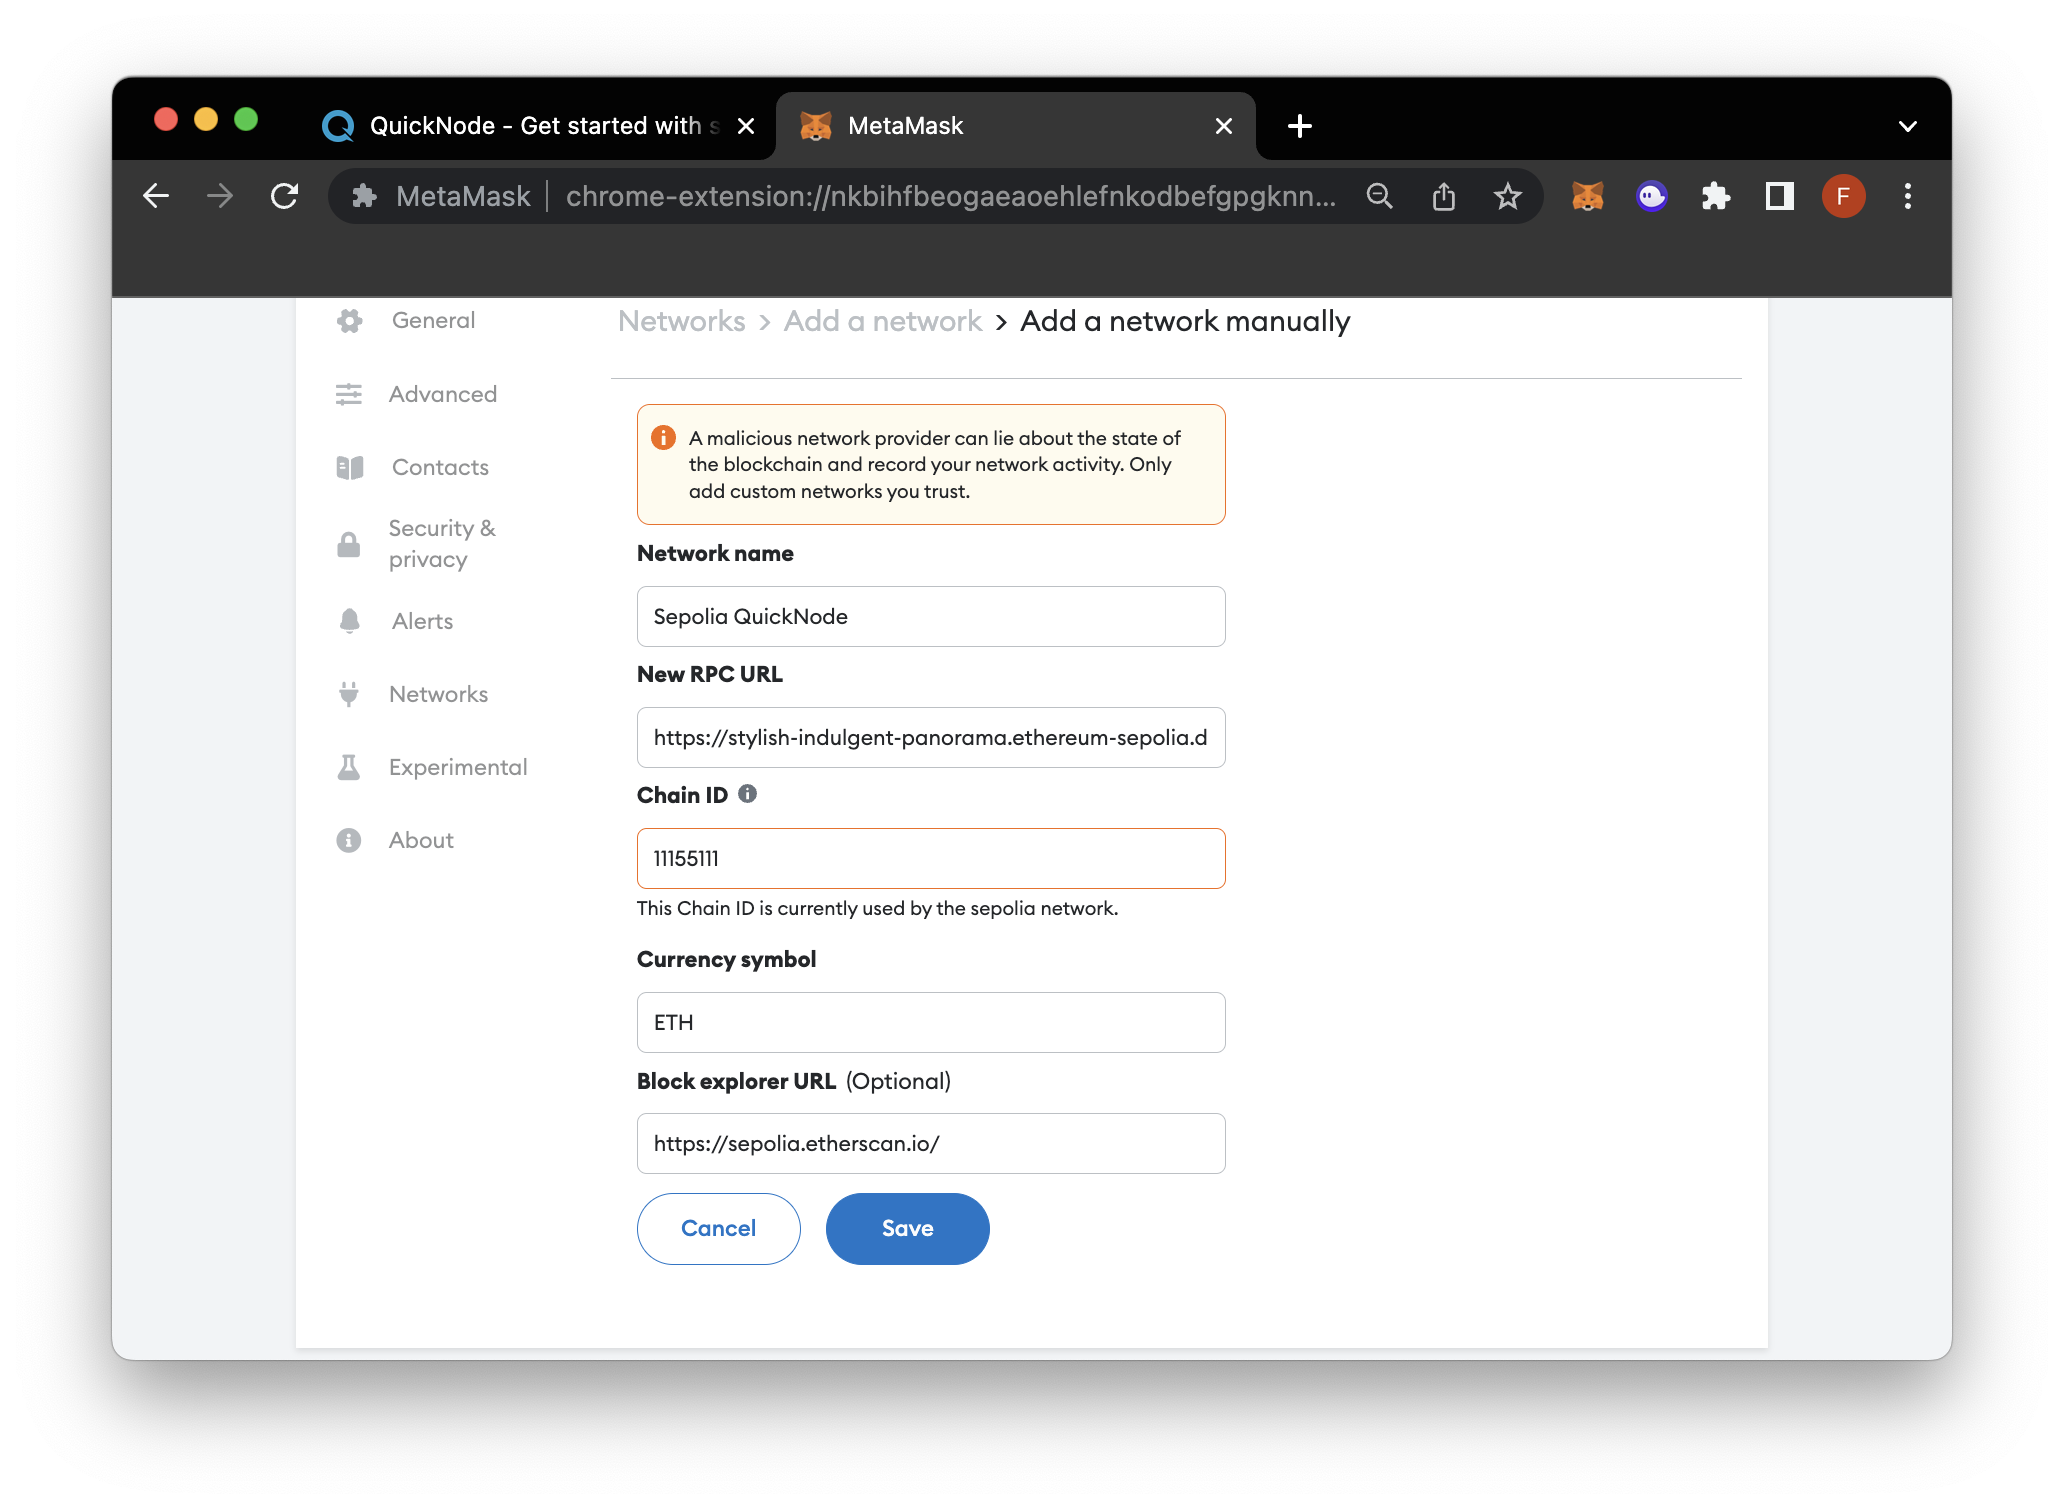
At the bottom of the page, click Add a network manually and fill out the following details:
- Network name: Sepolia QuickNode
- New RPC URL: Enter the QuickNode HTTP URL you retrieved earlier
- Chain ID: 11155111
- Currency symbol: ETH
- Block Explorer URL: https://sepolia.etherscan.io/
It should end up looking similar to this:
Build an ERC-4626 Vault Contract
Now that we have a fundamental understanding of the ERC-4626 standard and yield-generating vaults, let’s apply our knowledge and build a smart contract that applies both. Open Remix.IDE and create a new file called TokenVault.sol where our vault smart contract will live. The complete code will be at the bottom of this section, however first let's recap the code in bites.
The first step in building our vault is to determine our license identifier, the Solidity compilation version, and then import the ERC-4626 library.
//SPDX-License-Identifier: MIT
pragma solidity 0.8.7;

import "https://github.com/transmissions11/solmate/blob/main/src/tokens/ERC4626.sol";
You can now access Logs for your RPC endpoints, helping you troubleshoot issues more effectively. If you encounter an issue with your RPC calls, simply check the logs in your QuickNode dashboard to identify and resolve problems quickly. Learn more about log history limits on our pricing page.
After importing the ERC-4626 library, the next step is to assign a name to your contract and inherit the library using the ‘is’ keyword.
//SPDX-License-Identifier: MIT
pragma solidity 0.8.7;

import "https://github.com/transmissions11/solmate/blob/main/src/tokens/ERC4626.sol";

contract TokenVault is ERC4626 {

}
The next step is to create a mapping that tracks users’ shares in the vault after they make deposits. This mapping will maintain a record of each user’s share balance.
// a mapping that checks if a user has deposited the token
mapping(address => uint256) public shareHolder;
Next, create a constructor that assigns values to the ERC-4626 constructor: _asset for the ERC20 token address, _name for the name of the vault token, and _symbol for the symbol of the vault token. For example, if you are depositing USDC, you could use ‘vaultUSDC’ for the _name and ‘vUSDC’ for the _symbol.
constructor(ERC20 _asset, string memory _name, string memory _symbol) ERC4626 (_asset, _name, _symbol){}
You might be wondering why we are assigning only these specific parameters. The reason is that these parameters are required by the constructor of the ERC-4626 vault standard. Here is the ERC-4626 library constructor that accepts these parameters.
// ERC-4626 LIBRARY
constructor(
        ERC20 _asset,
        string memory _name,
        string memory _symbol
    ) ERC20(_name, _symbol, _asset.decimals()) {
        asset = _asset;
}
Now, we’ll create a function _deposit that allows users to deposit asset tokens into the vault. The functionality of the vault should enable users to deposit tokens and receive proof of deposit in the form of ‘shares’. These shares represent the users’ ownership of the deposited tokens and allow them to withdraw their tokens from the vault whenever they choose to do so.
/**
 * @notice function to deposit assets and receive vault token in exchange
 * @param _assets amount of the asset token
 */
function _deposit(uint _assets) public {
    // checks that the deposited amount is greater than zero.
    require(_assets > 0, "Deposit less than Zero");
    // calling the deposit function ERC-4626 library to perform all the functionality
    deposit(_assets, msg.sender);
    // Increase the share of the user
    shareHolder[msg.sender] += _assets;
}
First, we check the value of _assets to ensure that it is greater than zero. Then, we utilize the deposit function from the ERC-4626 library. This function handles all the logic related to receiving the asset token, minting the vault token for the user, and emitting the Deposit event. For example, if a user deposits 100 USD, they would receive 100 vUSD (vault USD) as proof of their deposit. Finally, we increase the user’s share value using the shareHolder mapping. Here is the deposit function from the ERC-4626 library that performs all these functionalities.
// ERC-4626 LIBRARY
function deposit(uint256 assets, address receiver) public virtual returns (uint256 shares) {
        // Check for rounding errors, as we round down in previewDeposit.
        require((shares = previewDeposit(assets)) != 0, "ZERO_SHARES");

        // Need to transfer before minting or ERC777s could reenter.
        asset.safeTransferFrom(msg.sender, address(this), assets);

        _mint(receiver, shares);

        emit Deposit(msg.sender, receiver, assets, shares);

        afterDeposit(assets, shares);
}
After creating the _deposit function, let’s now create a getter function to view the total amount of assets deposited in this vault. We will override the existing totalAssets function in the ERC-4626 library and add custom logic to retrieve the balance of the vault in terms of asset tokens.
// returns total number of assets
function totalAssets() public view override returns (uint256) {
    return asset.balanceOf(address(this));
}
Now, let’s implement the _withdraw function so that users can redeem their original amount of asset tokens, along with the yield generated by those asset tokens, in exchange for shares or vault tokens.
/**
 * @notice Function to allow msg.sender to withdraw their deposit plus accrued interest
 * @param _shares amount of shares the user wants to convert
 * @param _receiver address of the user who will receive the assets
 */
function _withdraw(uint _shares, address _receiver) public {
    // checks that the deposited amount is greater than zero.
    require(_shares > 0, "withdraw must be greater than Zero");
    // Checks that the _receiver address is not zero.
    require(_receiver != address(0), "Zero Address");
    // checks that the caller is a shareholder
    require(shareHolder[msg.sender] > 0, "Not a shareHolder");
    // checks that the caller has more shares than they are trying to withdraw.
    require(shareHolder[msg.sender] >= _shares, "Not enough shares");
    // Calculate 10% yield on the withdraw amount
    uint256 percent = (10 * _shares) / 100;
    // Calculate the total asset amount as the sum of the share amount plus 10% of the share amount.
    uint256 assets = _shares + percent;
    // calling the redeem function from the ERC-4626 library to perform all the necessary functionality
    redeem(assets, _receiver, msg.sender);
    // Decrease the share of the user
    shareHolder[msg.sender] -= _shares;
}
In the above code block, we first take two arguments: _shares, which is the amount of shares the user wants to redeem, and _receiver, which is the address of the user who will receive the asset tokens. We have several checks in place: _shares must be greater than zero, the _receiver address must not be zero, the caller must be a shareholder, and they must have an equal or greater number of shares than what they are redeeming.
Once these conditions are met, we calculate the yield generated and add it to the original _shares to determine the total amount of asset tokens that the _receiver will receive. Next, we use the redeem function of ERC-4626 to burn the share tokens and transfer the asset tokens to the _receiver’s account. Finally, we update the shareHolder value for the caller.
Here’s the redeem function from the ERC-4626 library that performs all of these redeem functionalities:
function redeem(
        uint256 shares,
        address receiver,
        address owner
    ) public virtual returns (uint256 assets) {
        if (msg.sender != owner) {
            uint256 allowed = allowance[owner][msg.sender]; // Saves gas for limited approvals.

            if (allowed != type(uint256).max) allowance[owner][msg.sender] = allowed - shares;
        }

        // Check for rounding error since we round down in previewRedeem.
        require((assets = previewRedeem(shares)) != 0, "ZERO_ASSETS");

        beforeWithdraw(assets, shares);

        _burn(owner, shares);

        emit Withdraw(msg.sender, receiver, owner, assets, shares);

        asset.safeTransfer(receiver, assets);
}
We will also create the totalAssetsOfUser function to check the balance of a user’s asset tokens by taking their address as an argument.
// returns total balance of user
function totalAssetsOfUser(address _user) public view returns (uint256) {
    return asset.balanceOf(_user);
}
Here’s the complete VaultToken smart contract:
//SPDX-License-Identifier: MIT
pragma solidity 0.8.7;

import "https://github.com/transmissions11/solmate/blob/main/src/tokens/ERC4626.sol";

contract TokenVault is ERC4626 {
    // a mapping that checks if a user has deposited the token
    mapping(address => uint256) public shareHolder;

    constructor(
        ERC20 _asset,
        string memory _name,
        string memory _symbol
    ) ERC4626(_asset, _name, _symbol) {}

    /**
     * @notice function to deposit assets and receive vault tokens in exchange
     * @param _assets amount of the asset token
     */
    function _deposit(uint _assets) public {
        // checks that the deposited amount is greater than zero.
        require(_assets > 0, "Deposit less than Zero");
        // calling the deposit function from the ERC-4626 library to perform all the necessary functionality
        deposit(_assets, msg.sender);
        // Increase the share of the user
        shareHolder[msg.sender] += _assets;
    }

    /**
     * @notice Function to allow msg.sender to withdraw their deposit plus accrued interest
     * @param _shares amount of shares the user wants to convert
     * @param _receiver address of the user who will receive the assets
     */
    function _withdraw(uint _shares, address _receiver) public {
        // checks that the deposited amount is greater than zero.
        require(_shares > 0, "withdraw must be greater than Zero");
        // Checks that the _receiver address is not zero.
        require(_receiver != address(0), "Zero Address");
        // checks that the caller is a shareholder
        require(shareHolder[msg.sender] > 0, "Not a share holder");
        // checks that the caller has more shares than they are trying to withdraw.
        require(shareHolder[msg.sender] >= _shares, "Not enough shares");
        // Calculate 10% yield on the withdrawal amount
        uint256 percent = (10 * _shares) / 100;
        // Calculate the total asset amount as the sum of the share amount plus 10% of the share amount.
        uint256 assets = _shares + percent;
        // calling the redeem function from the ERC-4626 library to perform all the necessary functionality
        redeem(assets, _receiver, msg.sender);
        // Decrease the share of the user
        shareHolder[msg.sender] -= _shares;
    }

    // returns total number of assets
    function totalAssets() public view override returns (uint256) {
        return asset.balanceOf(address(this));
    }

    // returns total balance of user
    function totalAssetsOfUser(address _user) public view returns (uint256) {
        return asset.balanceOf(_user);
    }
}
That’s it! You have created the vault smart contract that generates yield using the ERC-4626 Tokenized Vault Standard.
Deploy the Vault Smart Contract
Now, let’s deploy our vault smart contract. However, before doing so, we need to create an ERC-20 smart contract that will serve as the asset token.
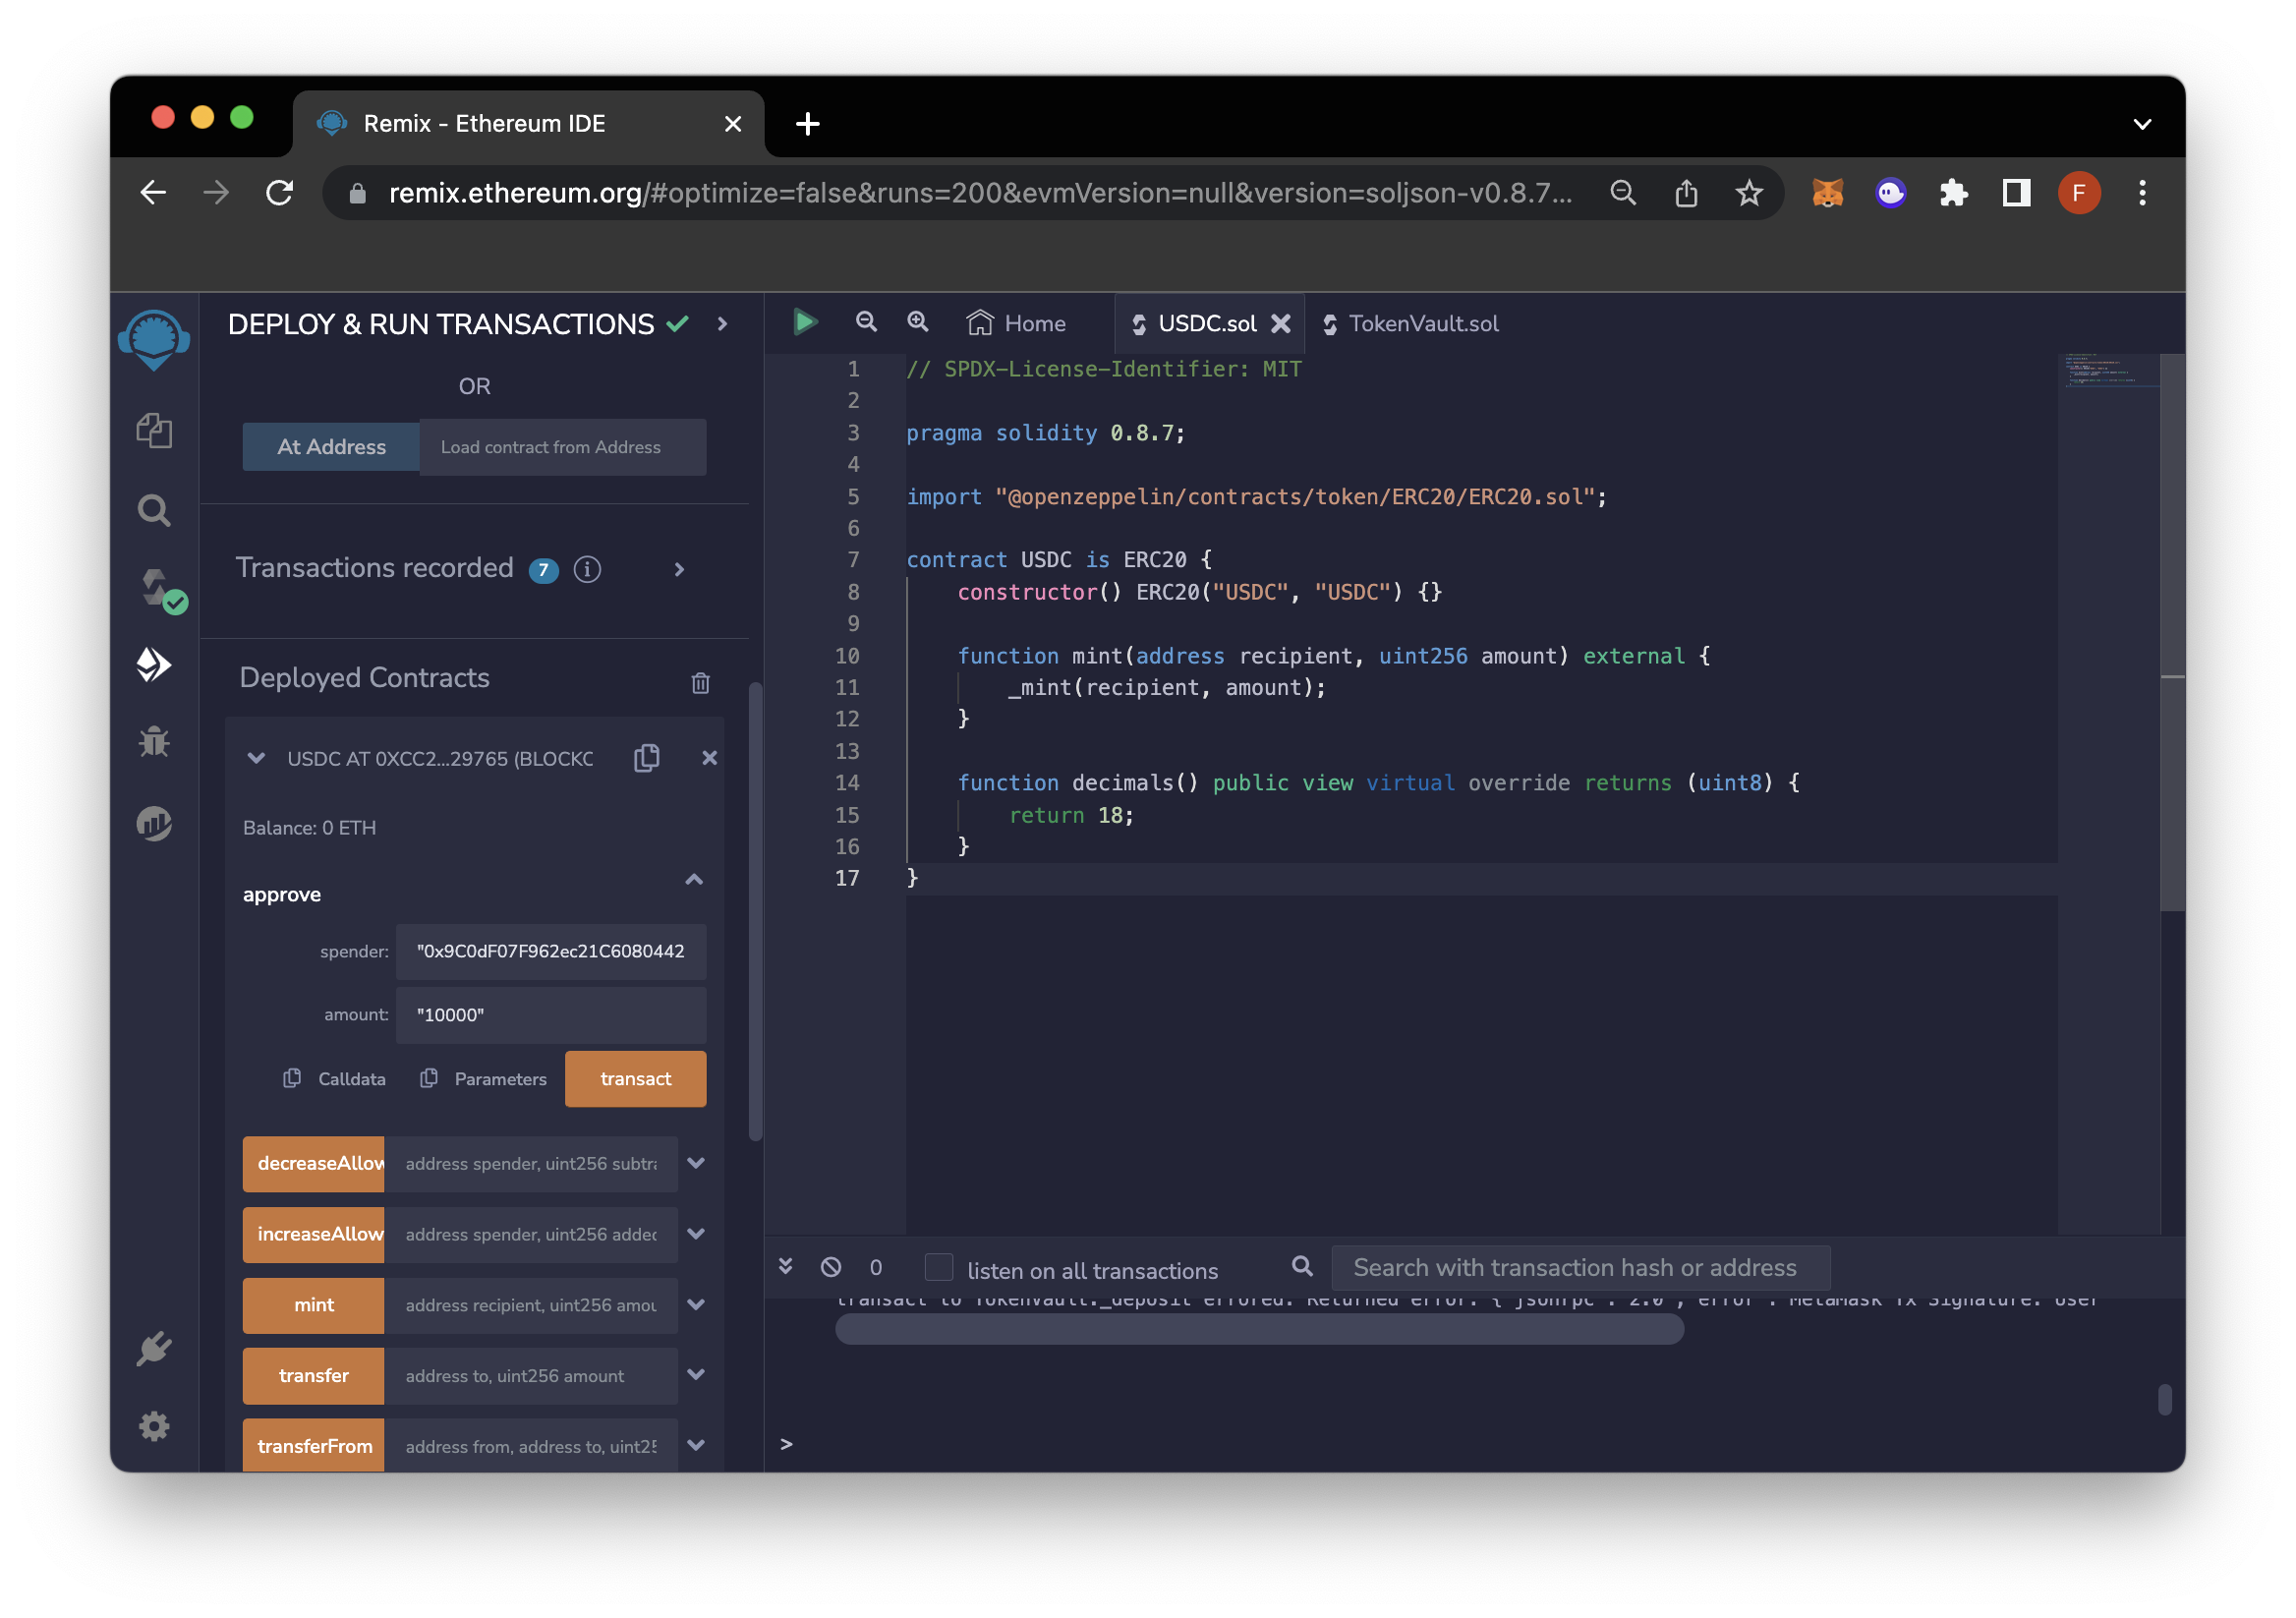
Here’s a smart contract for the asset token:
// SPDX-License-Identifier: MIT

pragma solidity 0.8.20;

import "@openzeppelin/contracts/token/ERC20/ERC20.sol";

contract USDC is ERC20 {
    constructor() ERC20("USDC", "USDC") {}

    function mint(address recipient, uint256 amount) external {
        _mint(recipient, amount);
    }

    function decimals() public view virtual override returns (uint8) {
        return 18;
    }
}
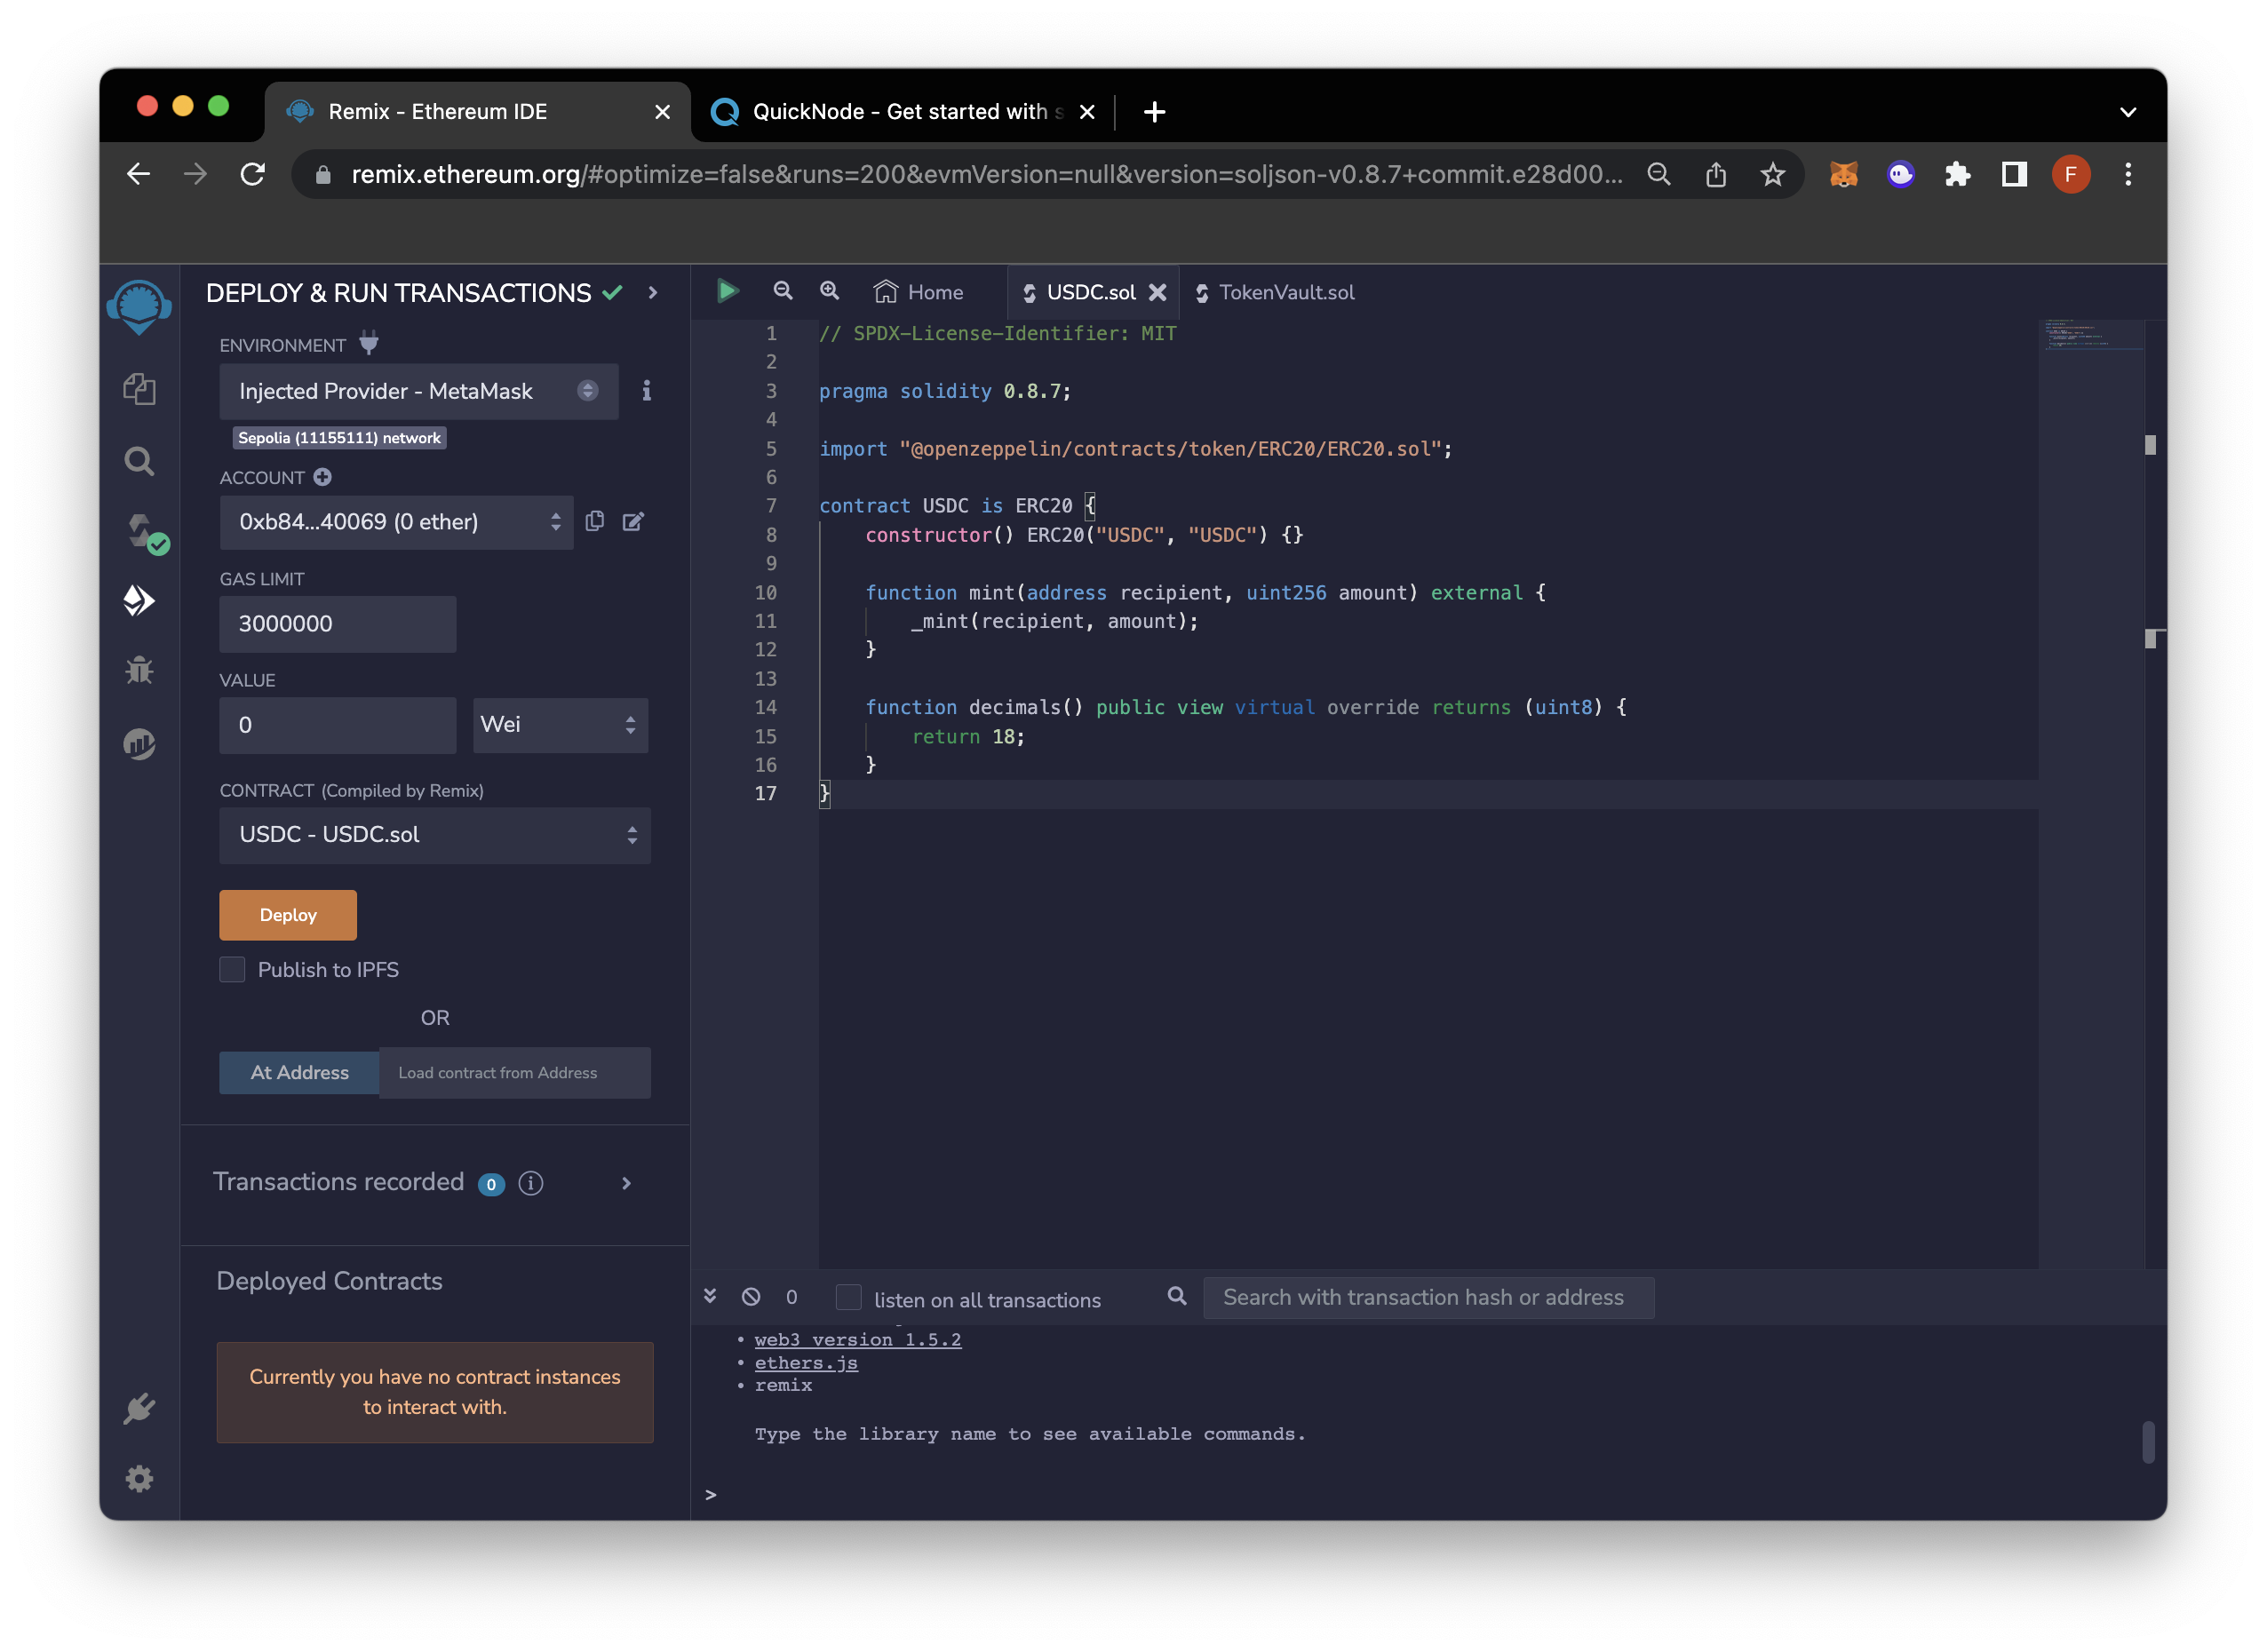
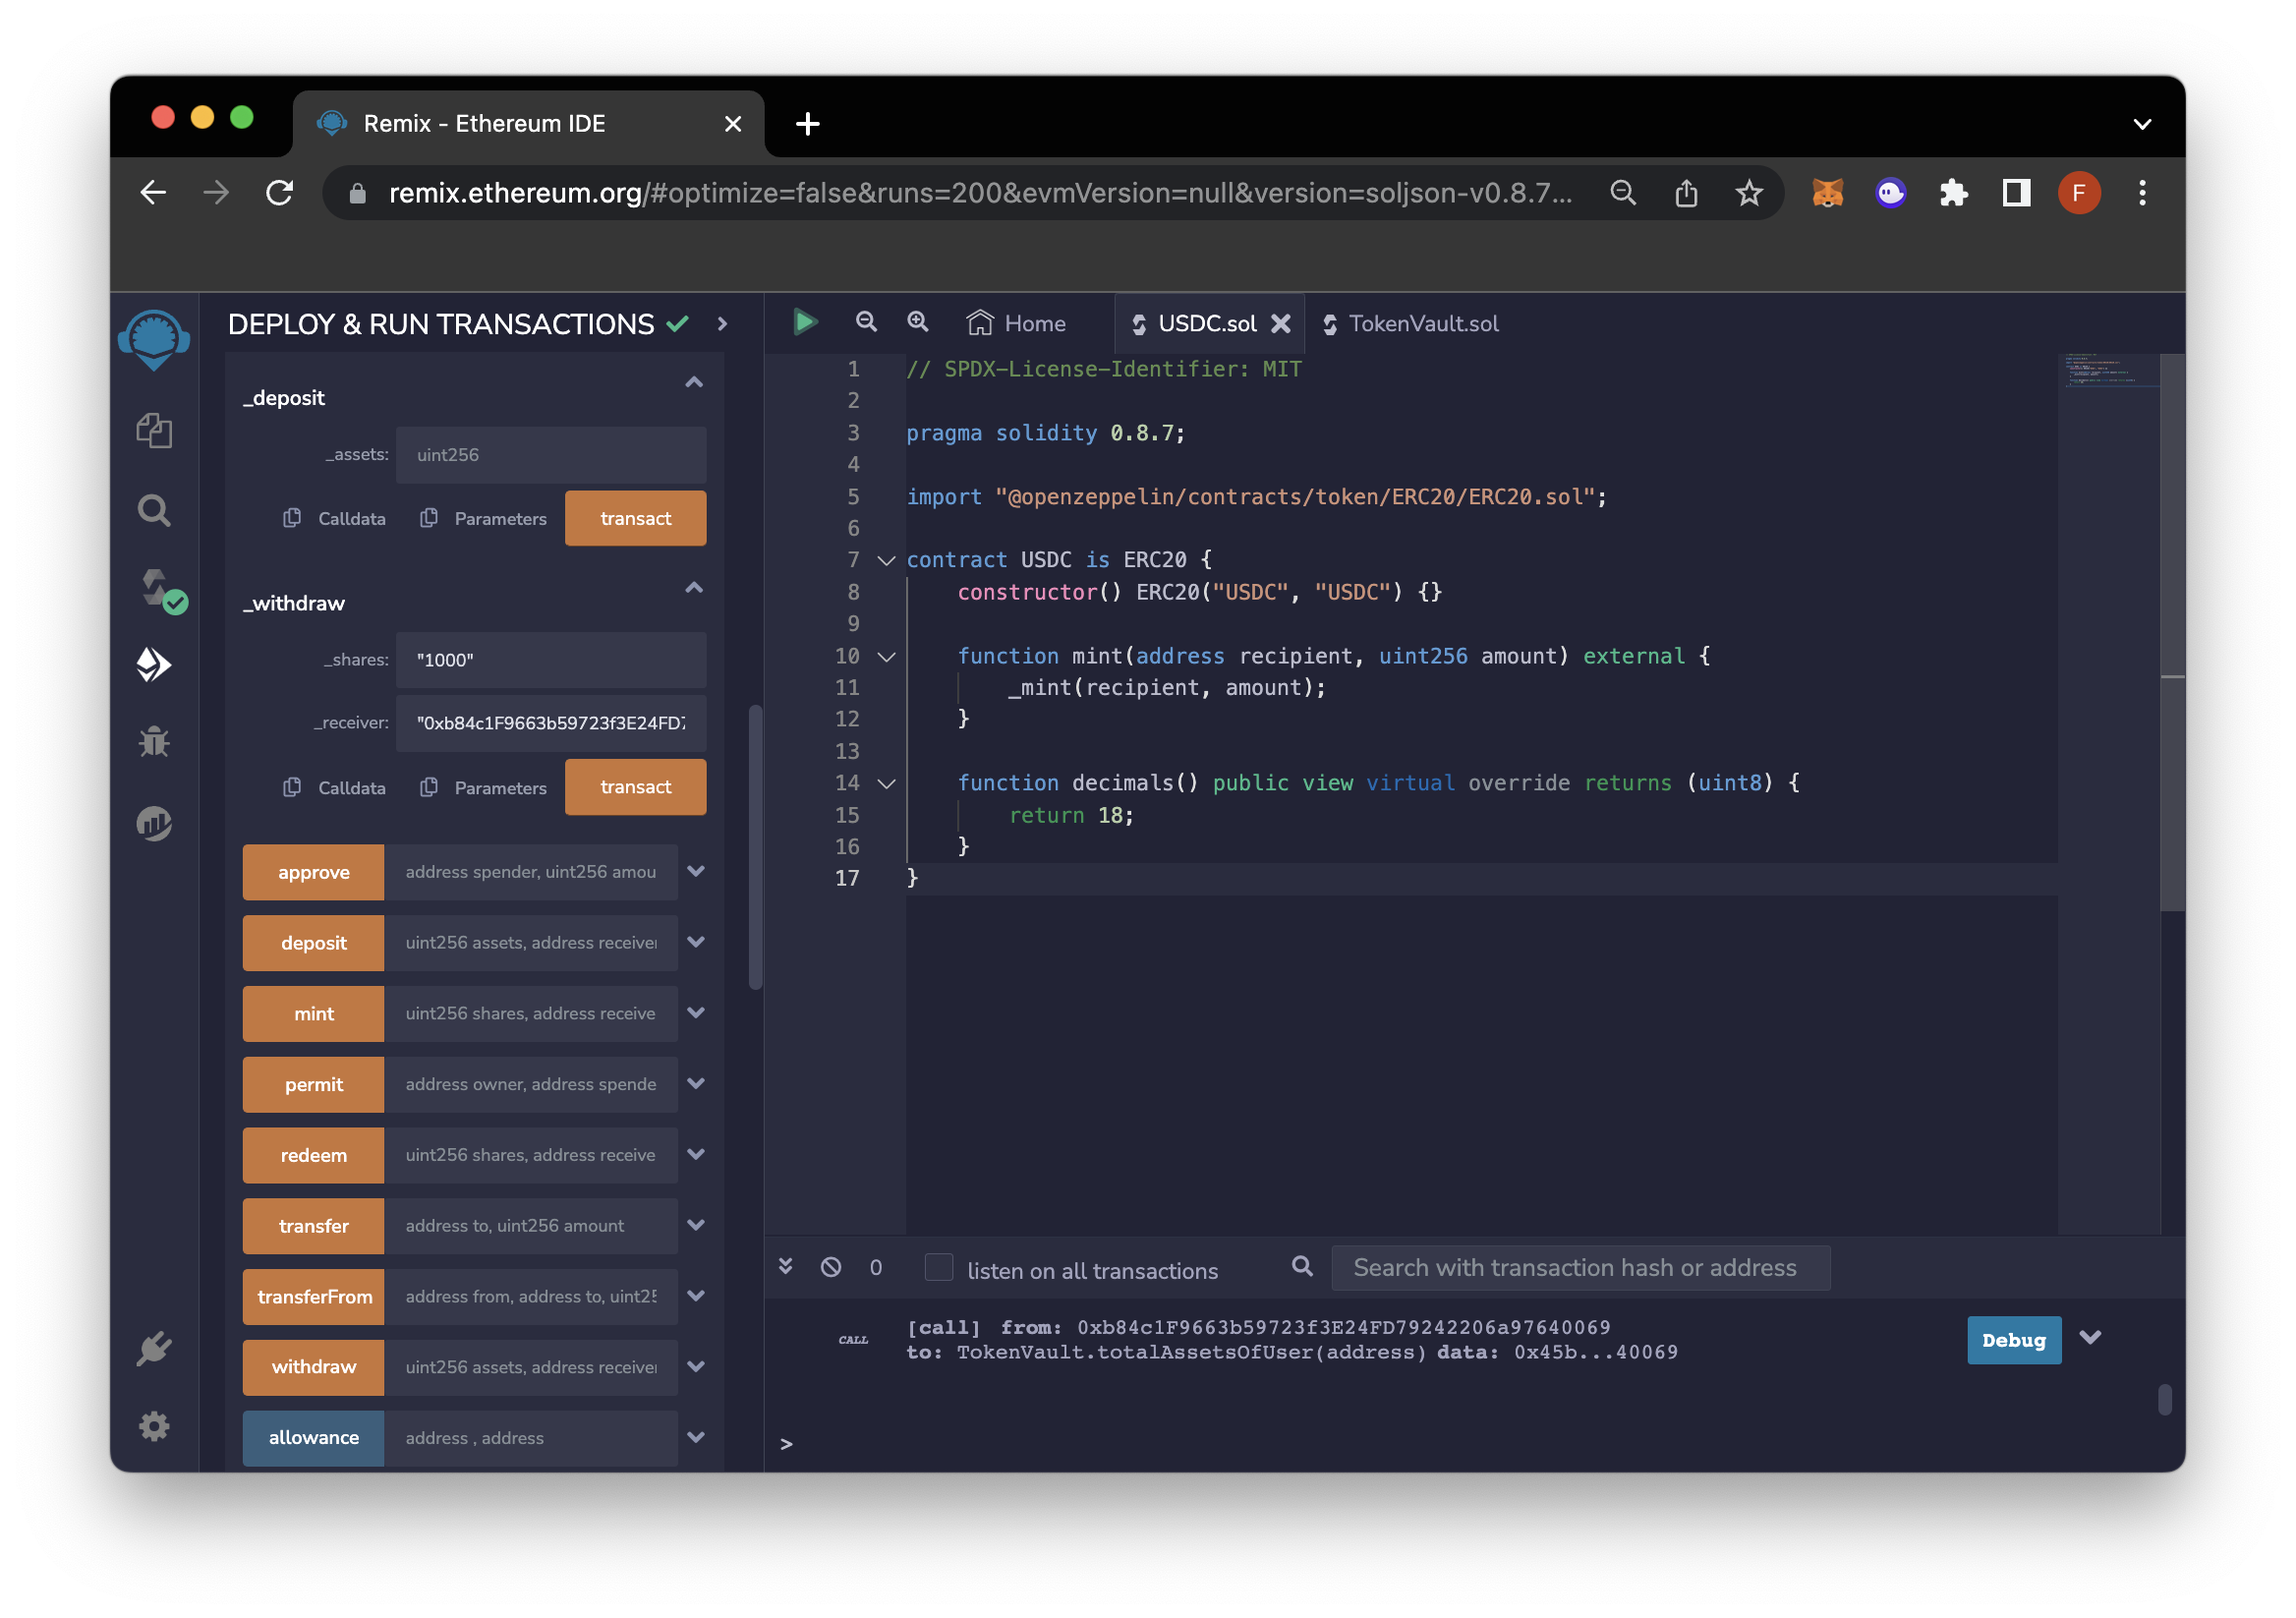
Begin by creating a file called USDC.sol, and paste the asset token smart contract code shown above. Then, select the Injected Provider - Metamask option in the environment. Finally, select the Asset (USDC) smart contract and click the Deploy button. Then, copy the token’s contract address.
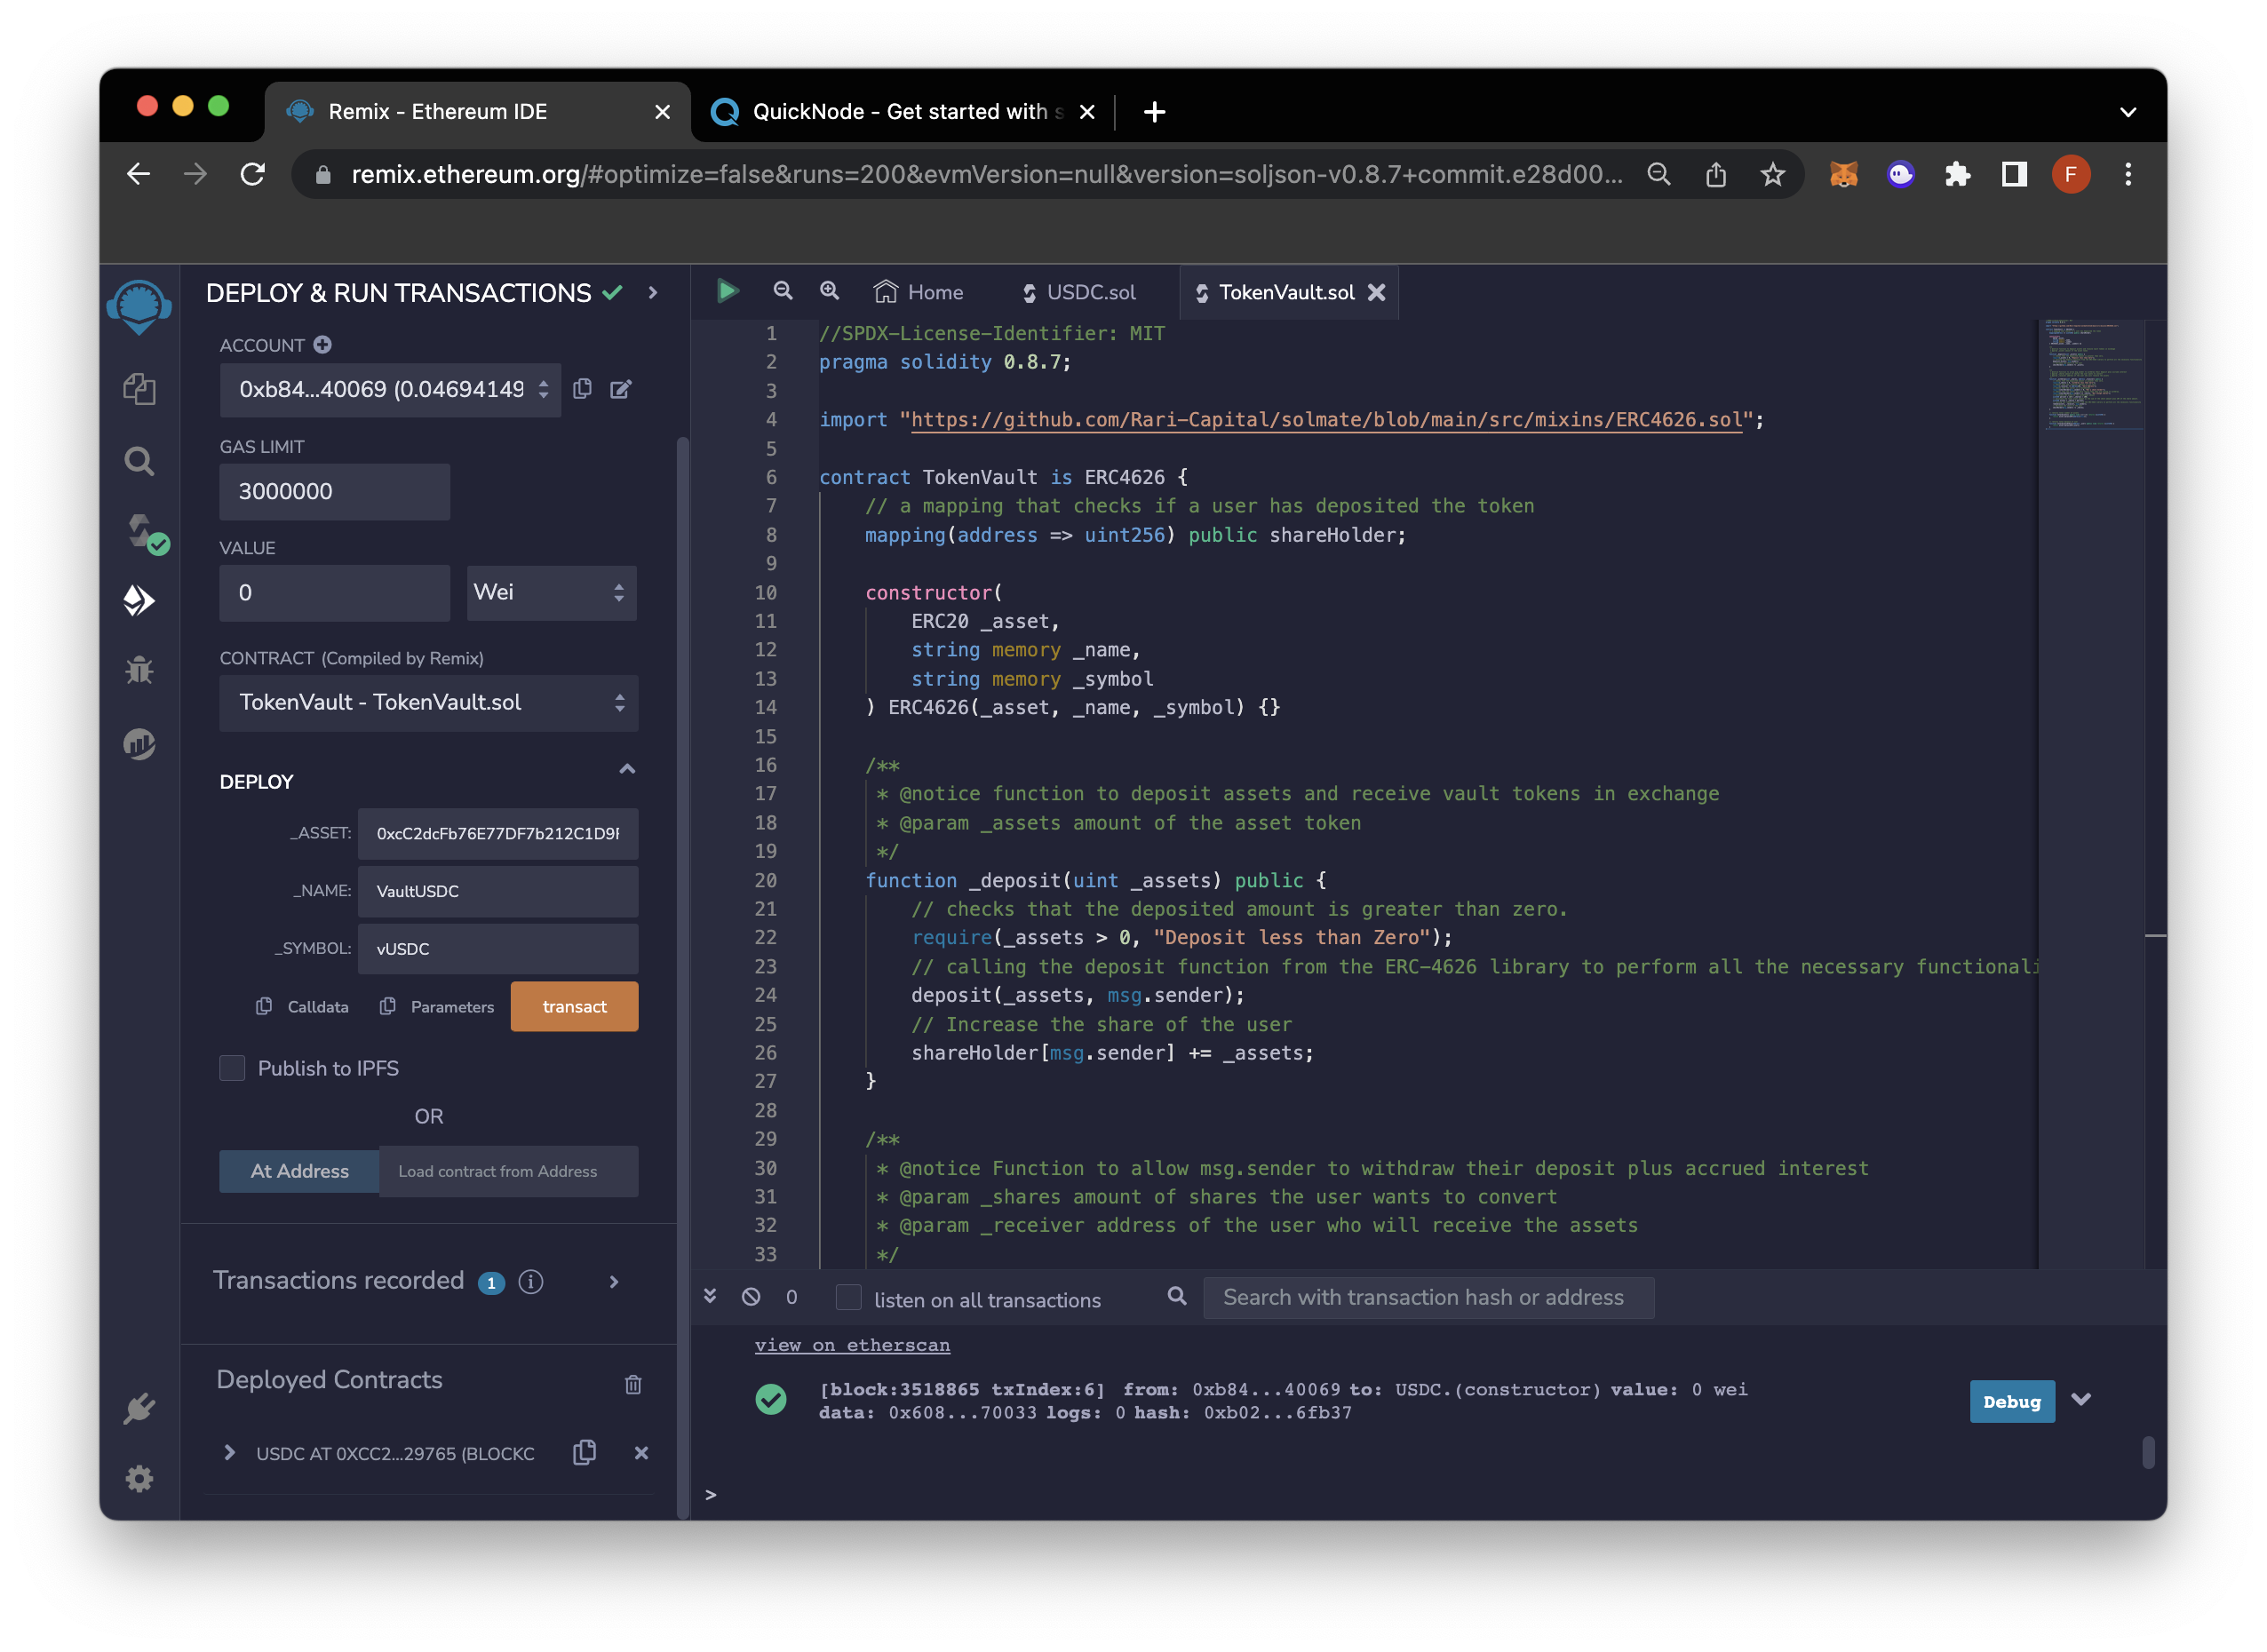
Select the TokenVault smart contract and enter the following parameters:
- Address of the asset token
- Name of the vault token
- Symbol of the vault token
Click on the transact button. MetaMask or another Ethereum wallet will pop up. Click the confirm button in the wallet.
Now, return to the asset smart contract, or the USDC.sol smart contract, and mint 10,000 wei units of tokens. Enter your wallet address and the desired amount.
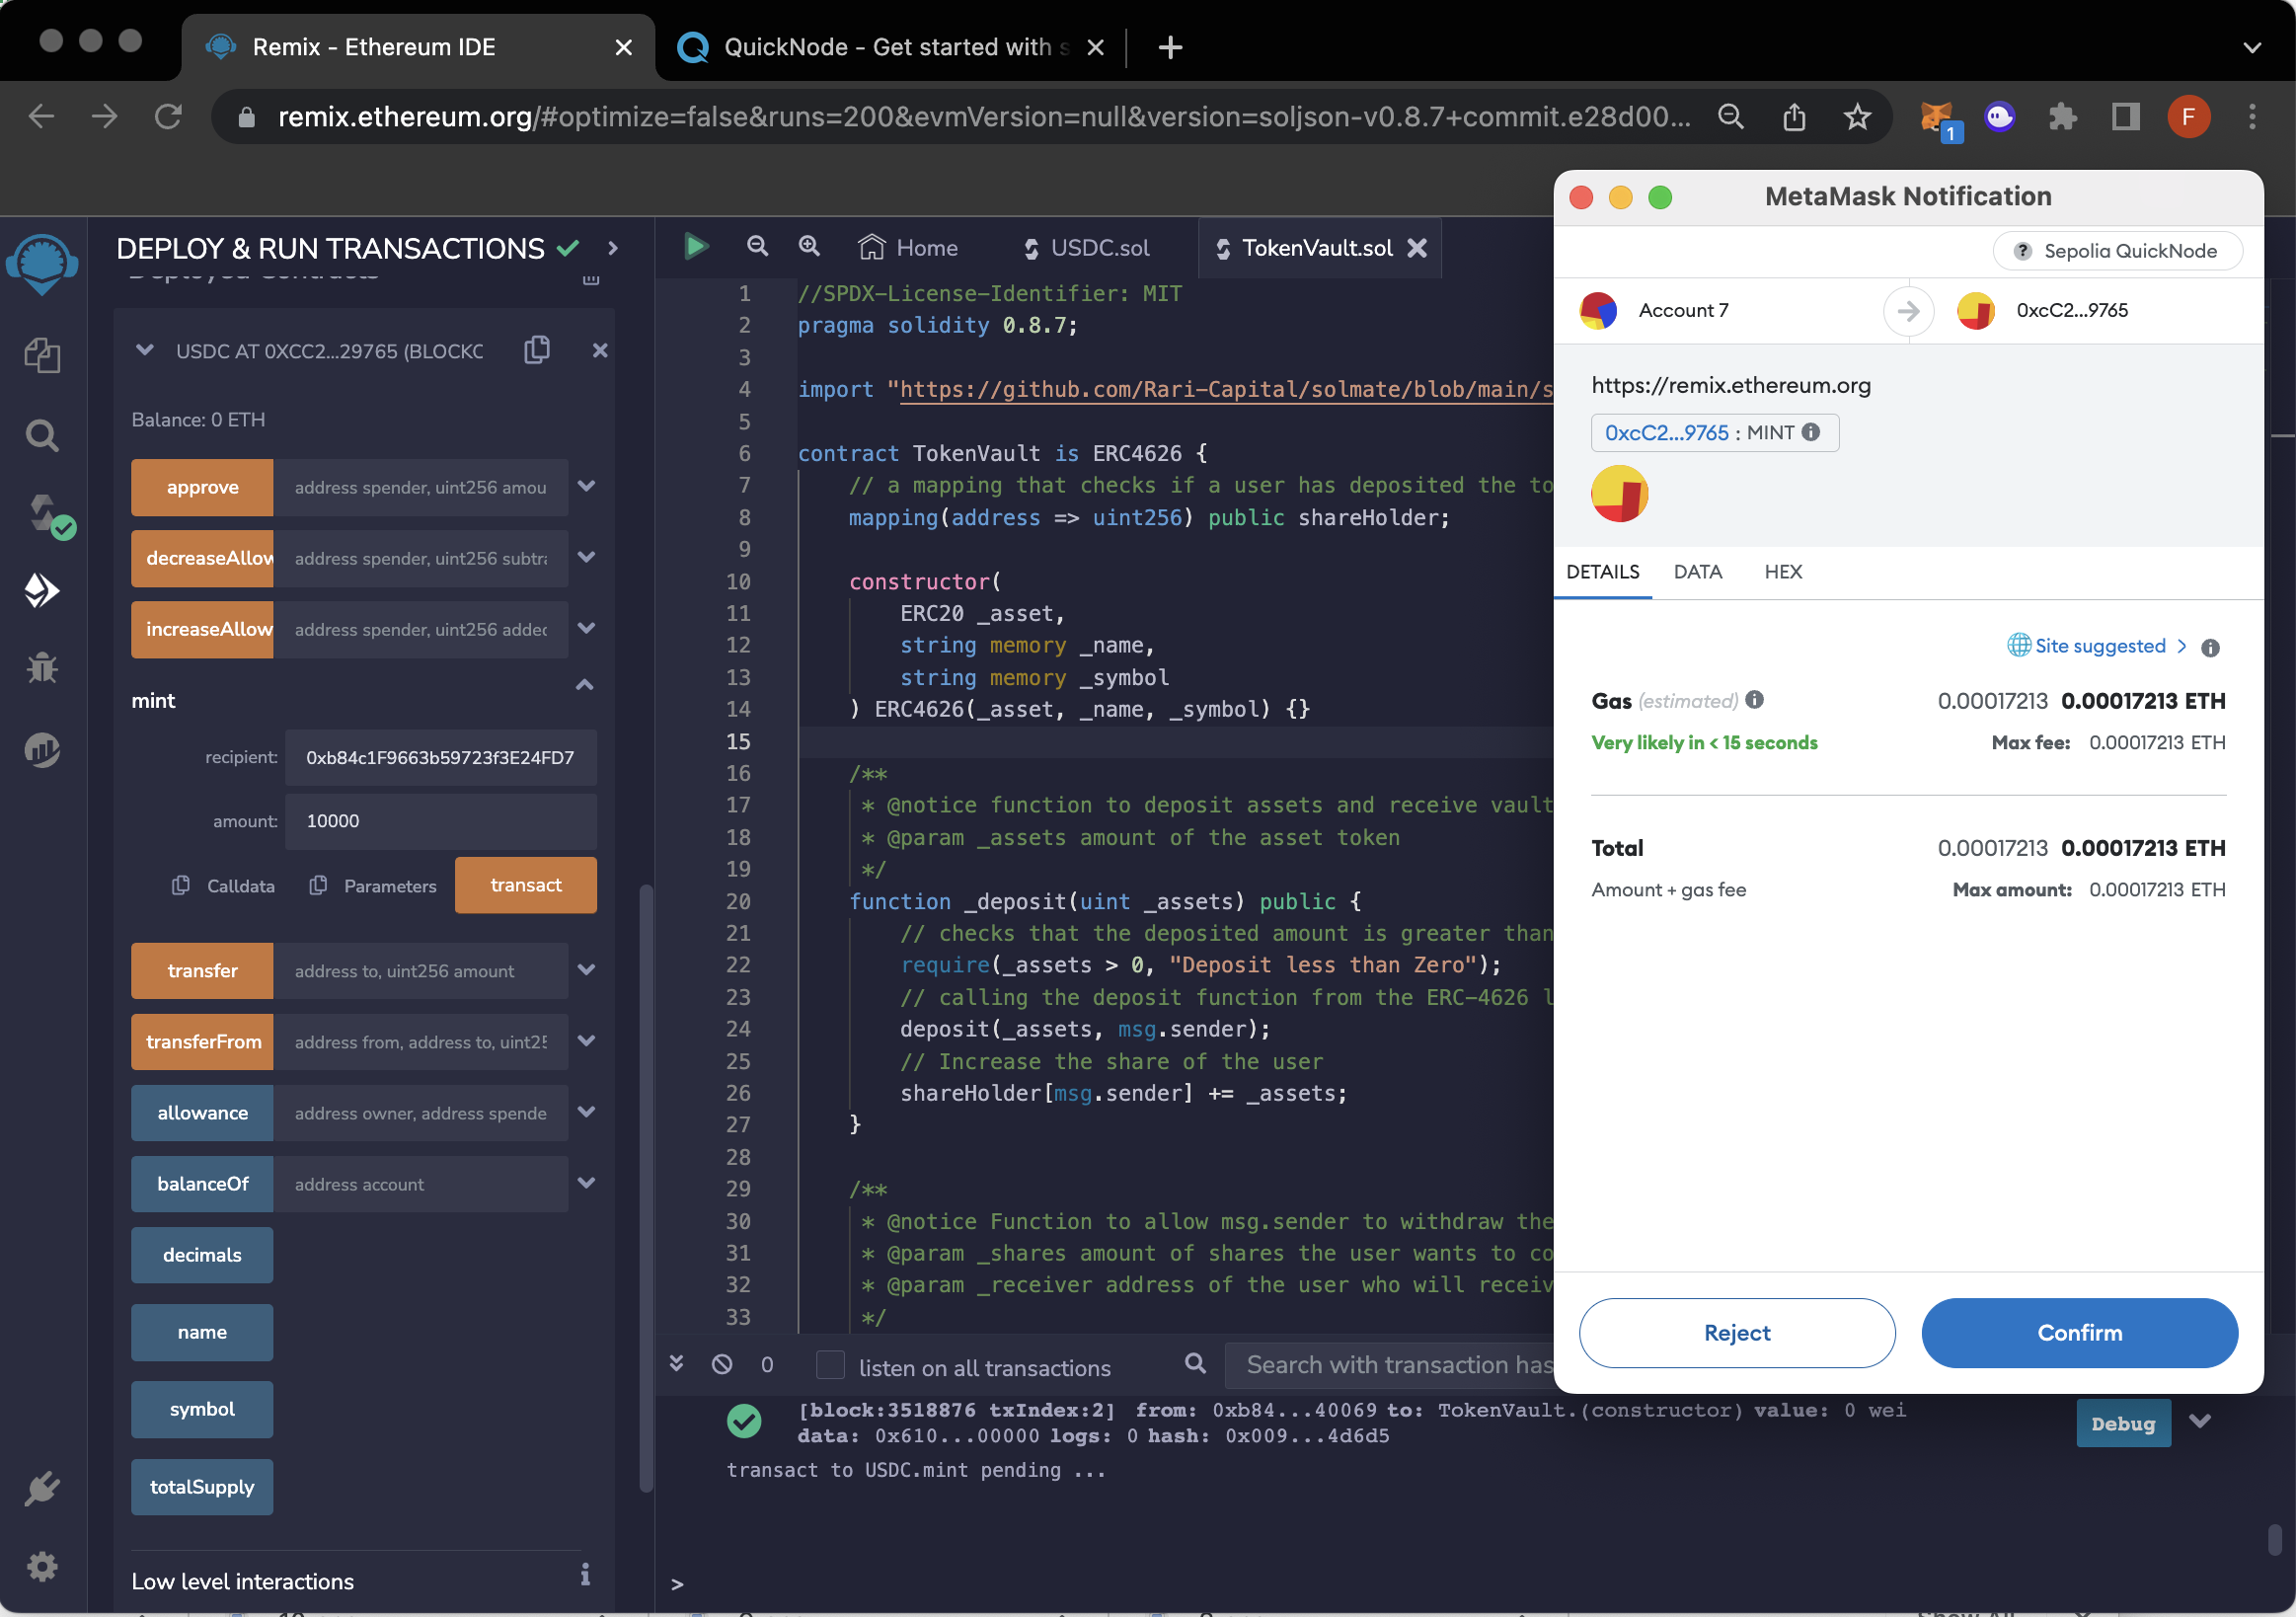
Subsequently, Authorize the vault contract address to spend USDC by interacting with the approve function. Enter the vault contract address and the amount to be approved. Click on Transact button and then click on the Approve button in MetaMask.
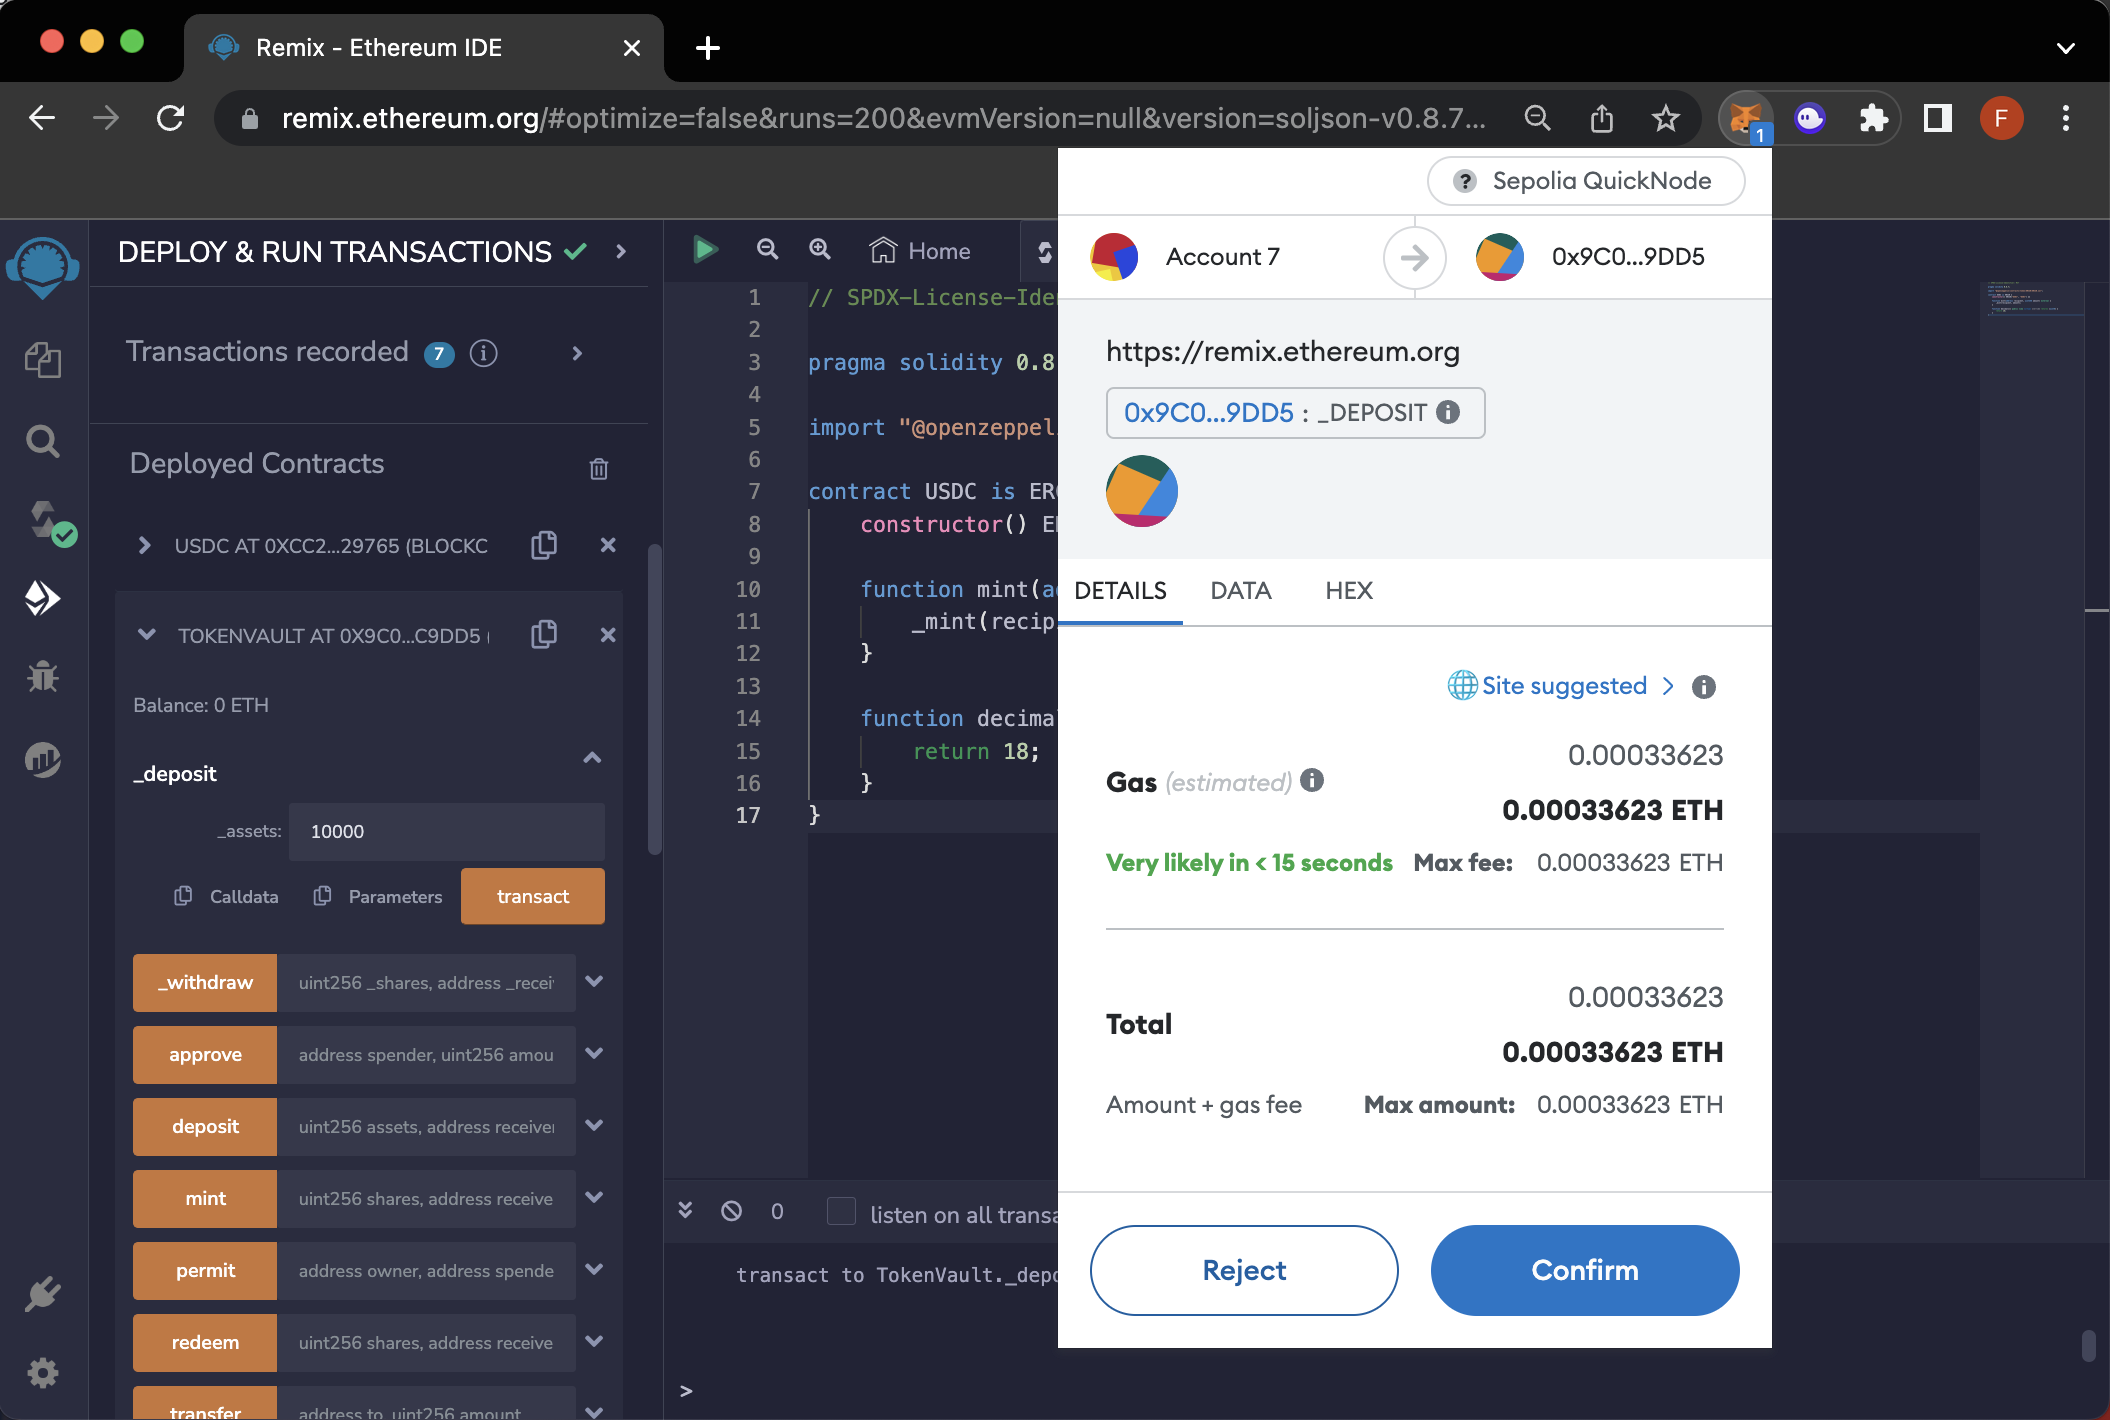
Return to the TokenVault.sol and interact with the _deposit function to receive share/vault tokens in exchange for Assets. Enter the amount of assets you want to deposit. Click on the transact button. Following that, click on the Confirm button in MetaMask.
Now, examine the totalAssets and totalAssetsOfUser functions. As previously mentioned, totalAssets shows the balance of USDC for the TokenVault contract, while totalAssetsOfUser displays the balance of USDC for the user.
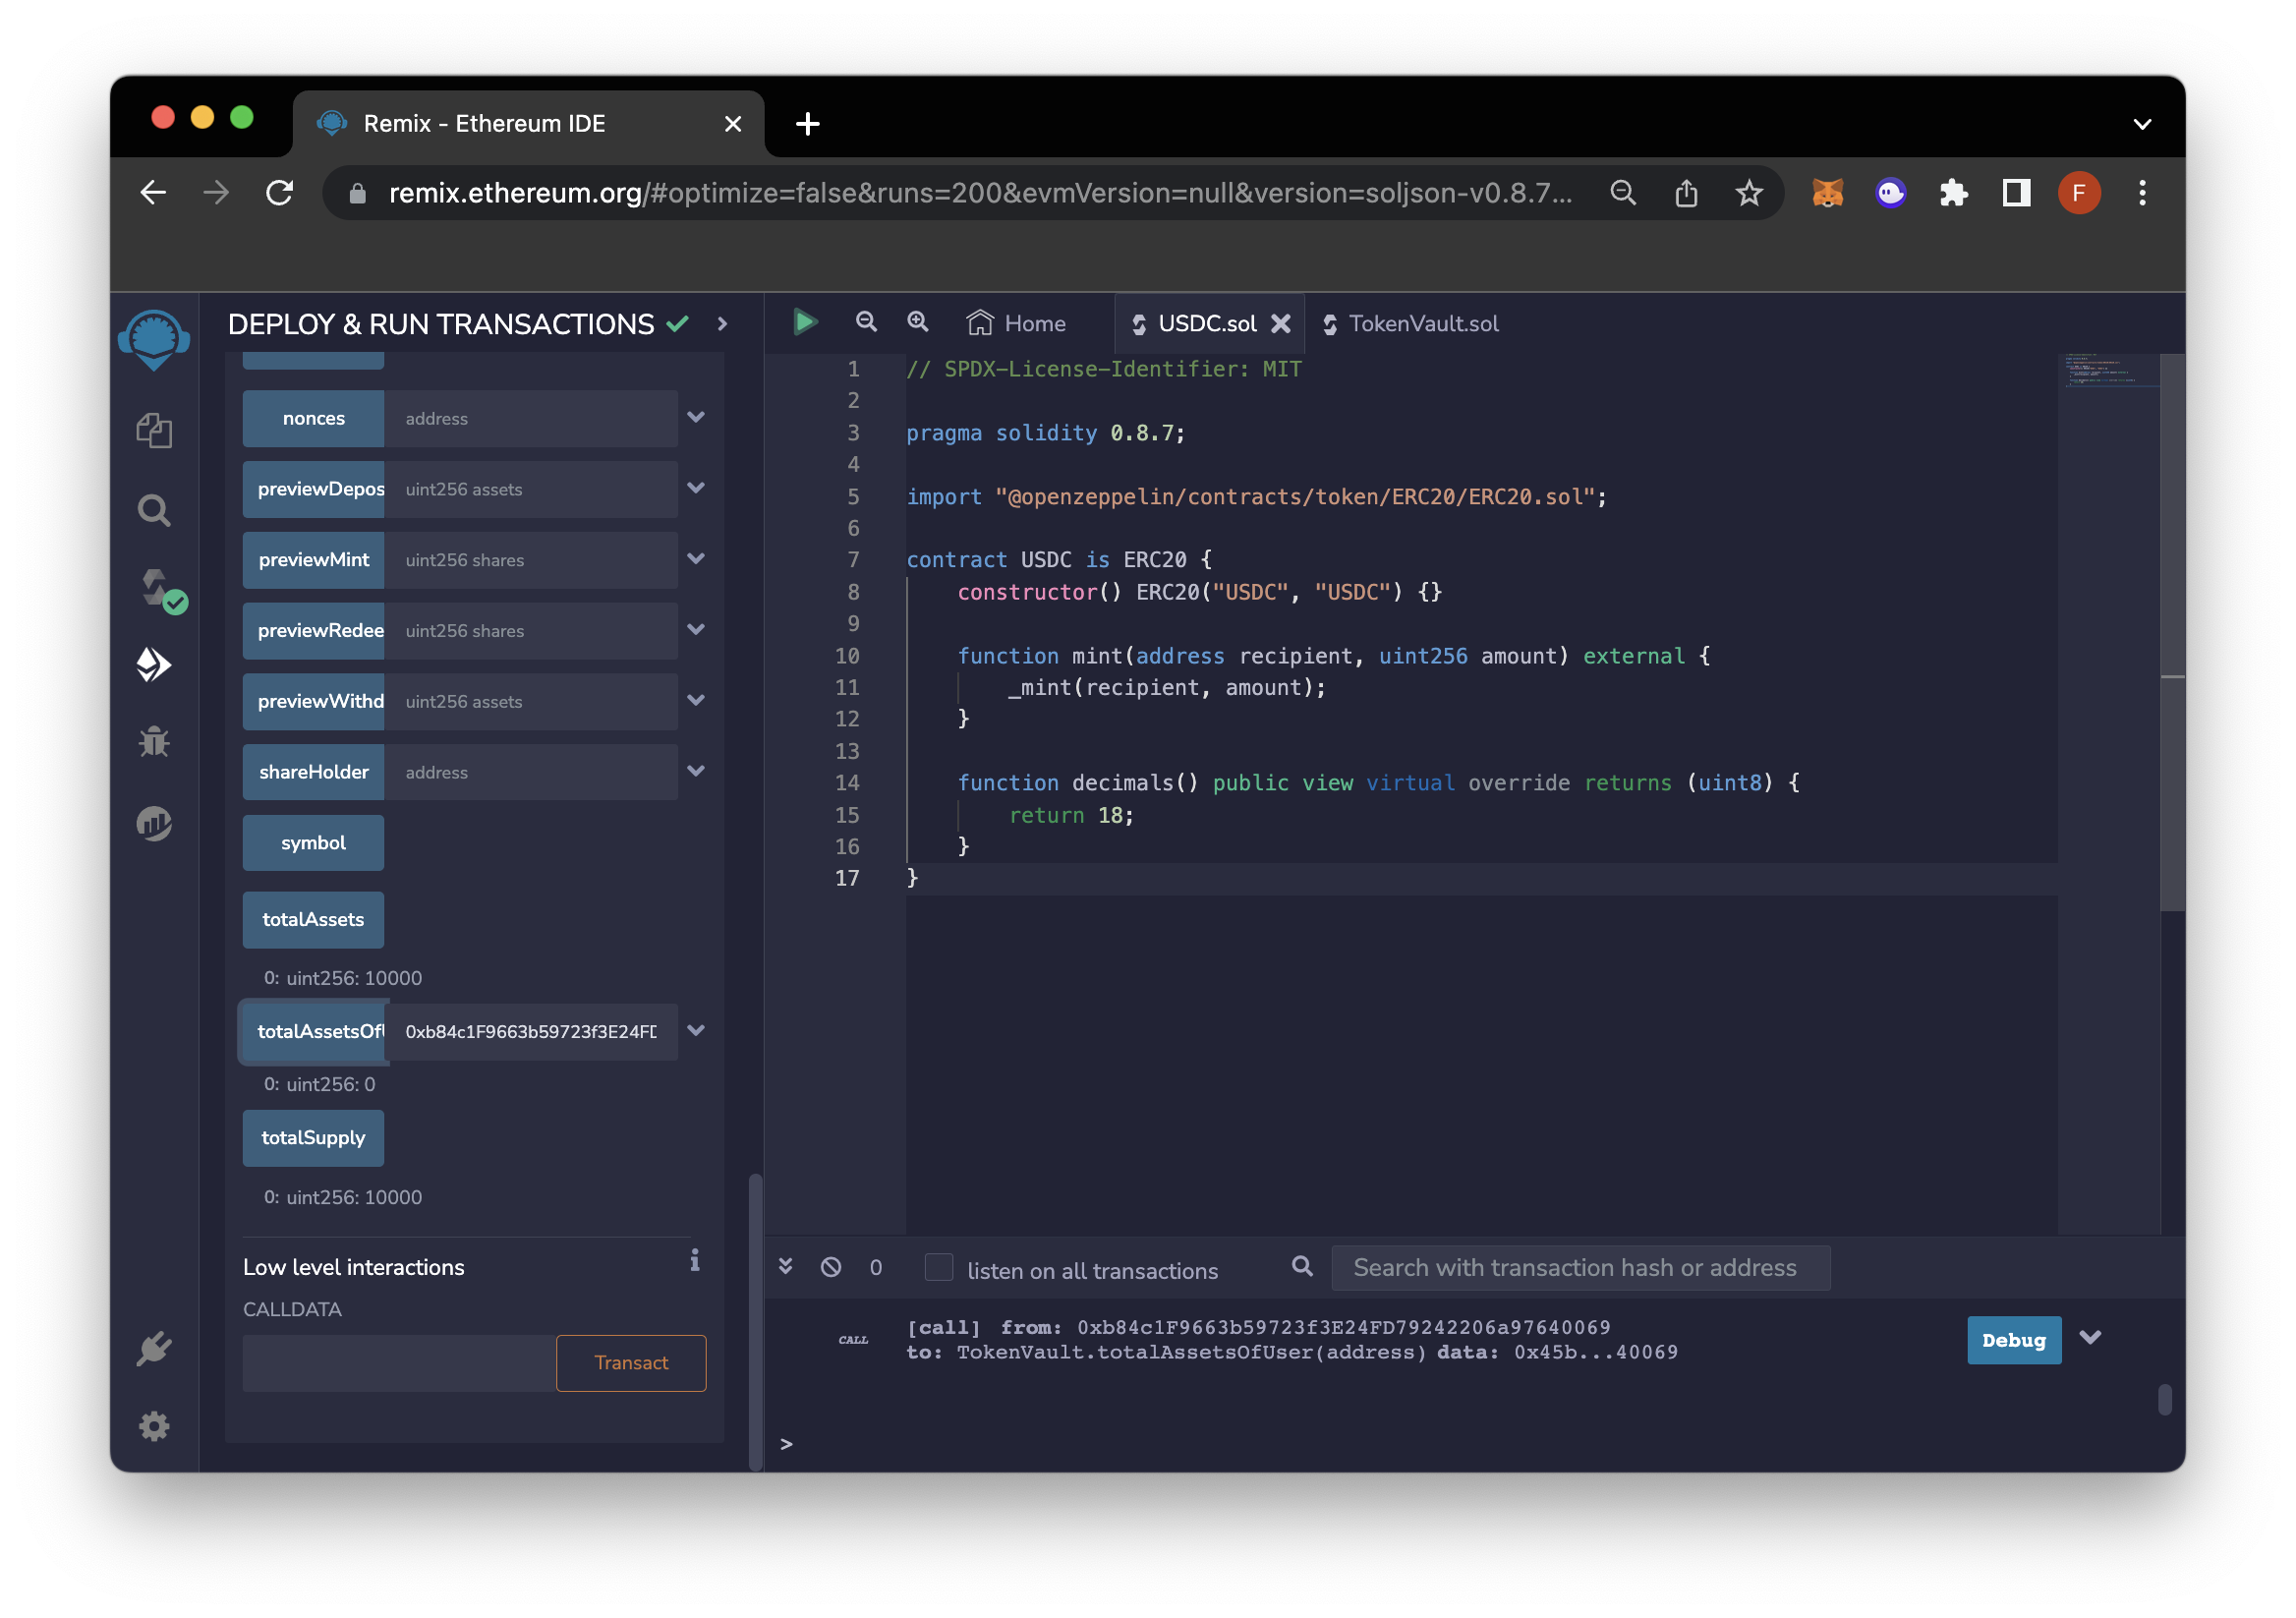
TotalAssets is 10,000, as we just deposited 10,000 wei of USDC, and TotalAssetsOfUser is 0 because we minted only 10,000 wei, which is now deposited in the TokenVault contract
Let’s withdraw our asset tokens along with the yield in exchange for shares/vUSDC by interacting with the _withdraw function. Enter the amount you want to withdraw and the recipient’s address, who will receive the asset tokens/USDC. Click the Transact button to proceed, and then click on the Confirm button in MetaMask.
Now, there is a catch. If you attempt to withdraw all the vUSDC you deposited, you will encounter an error. This is because the contract does not have a sufficient asset balance. If you do the calculation, 10,000 vUSDC would equate to 11,000 USDC (10,000 from the original deposit plus 1,000 from yield), but the contract only has 10,000 wei of USDC.
Let’s check and examine the totalAssets and totalAssetsOfUser functions again.

We can see that the totalAssetsOfUser is now 1,100, which means the user has received back an initial capital of 1,000 along with an interest of 100. Additionally, the total assets in the Vault contract are now 8,900, confirming that the Vault contract has returned the 1,000 as initial capital and 100 as interest.
Conclusion
If you’ve made it this far, congratulations! You are well on your way to becoming a Solidity expert. In this guide, we explored the ERC-4626 Tokenized Vault Standard, learned how yield-bearing vaults operate, and discovered how to build our own yield-bearing vault using the ERC-4626 Tokenized Vault Standard.
We would love to hear more about what you are building. Drop us a line in Discord, or give us a follow on Twitter to stay up to date on all the latest information!
We ❤️ Feedback!
If you have any feedback on this guide, let us know. We'd love to hear from you.