11 min read
Updated on July 30, 2023
The Vyper team has found some vulnerabilities in the Vyper versions 0.2.15, 0.2.16, and 0.3.0 if ya’ll have active contracts in those version please refer to the below tweet and contact the Vyper team. PLEASE ACT WISELY AND DO NOT SHARE ANY PRIVATE KEYS OR SEED PHRASE EVEN IF ITS ASKED BY A TEAM MEMBER OF A REPUTED GROUP🙏.
Overview
Hey readers! If you are familiar with Ethereum, and smart contracts generally speaking, you may be familiar with Solidity. In this guide we will show you Solidity's lesser-known cousin Vyper. We will walk through what Vyper is, why you may want to use it, and how to deploy a smart contract written in Vyper to an Ethereum testnet.
Prerequisites:
- Text editor/IDE
- Python 3 installed
- Working knowledge of Python
- Some Goerli ETH
- MetaMask
What is Vyper?
Vyper is a language to write smart contracts in, that you can deploy to EVM-based blockchains. It is a subset of Python 3. The definition of a language subset, is that all syntax of the subset, is valid syntax of the parent language. That is to say, all Vyper code is valid Python, but not the other way around. Python 3 still has features that Vyper does not support.
Vyper only has a fraction of adoption that Solidity has seen thus far, and the supermajority of the big players in the ecosystem prefer Solidity. However there is one dApp that breaks this pattern. Uniswap is currently the largest DEX (decentralized exchange) on Ethereum, and they wrote their v1 in Vyper. Other notable projects that use Vyper are Yearn v2, and Curve. While there may not be as much wide-spread adoption of Vyper, you can rest assured that if Uniswap can trust $2 billion in trades to the language, so can you!
If you were to break down how to think about Vyper, it would be to think of it as Python 3 without classes meets solidity without modifiers.
What Will We Build?
In this project we will be building a smart contract that functions as a permissioned graffiti wall. This will mean that people that have been white-listed can write to the wall, but no one else.
To that end we will need to do a bit of leg work ahead of time to get the project set up and configured.
Configuring The Project
First things first, if we are writing a smart contract in Vyper, it would be a good idea to install the complier. Along with the complier, we will also be installing the web3 python library, and eth-account.
pip install vyper web3 eth-account
With the packages installed, we will need to grab a Goerli node.
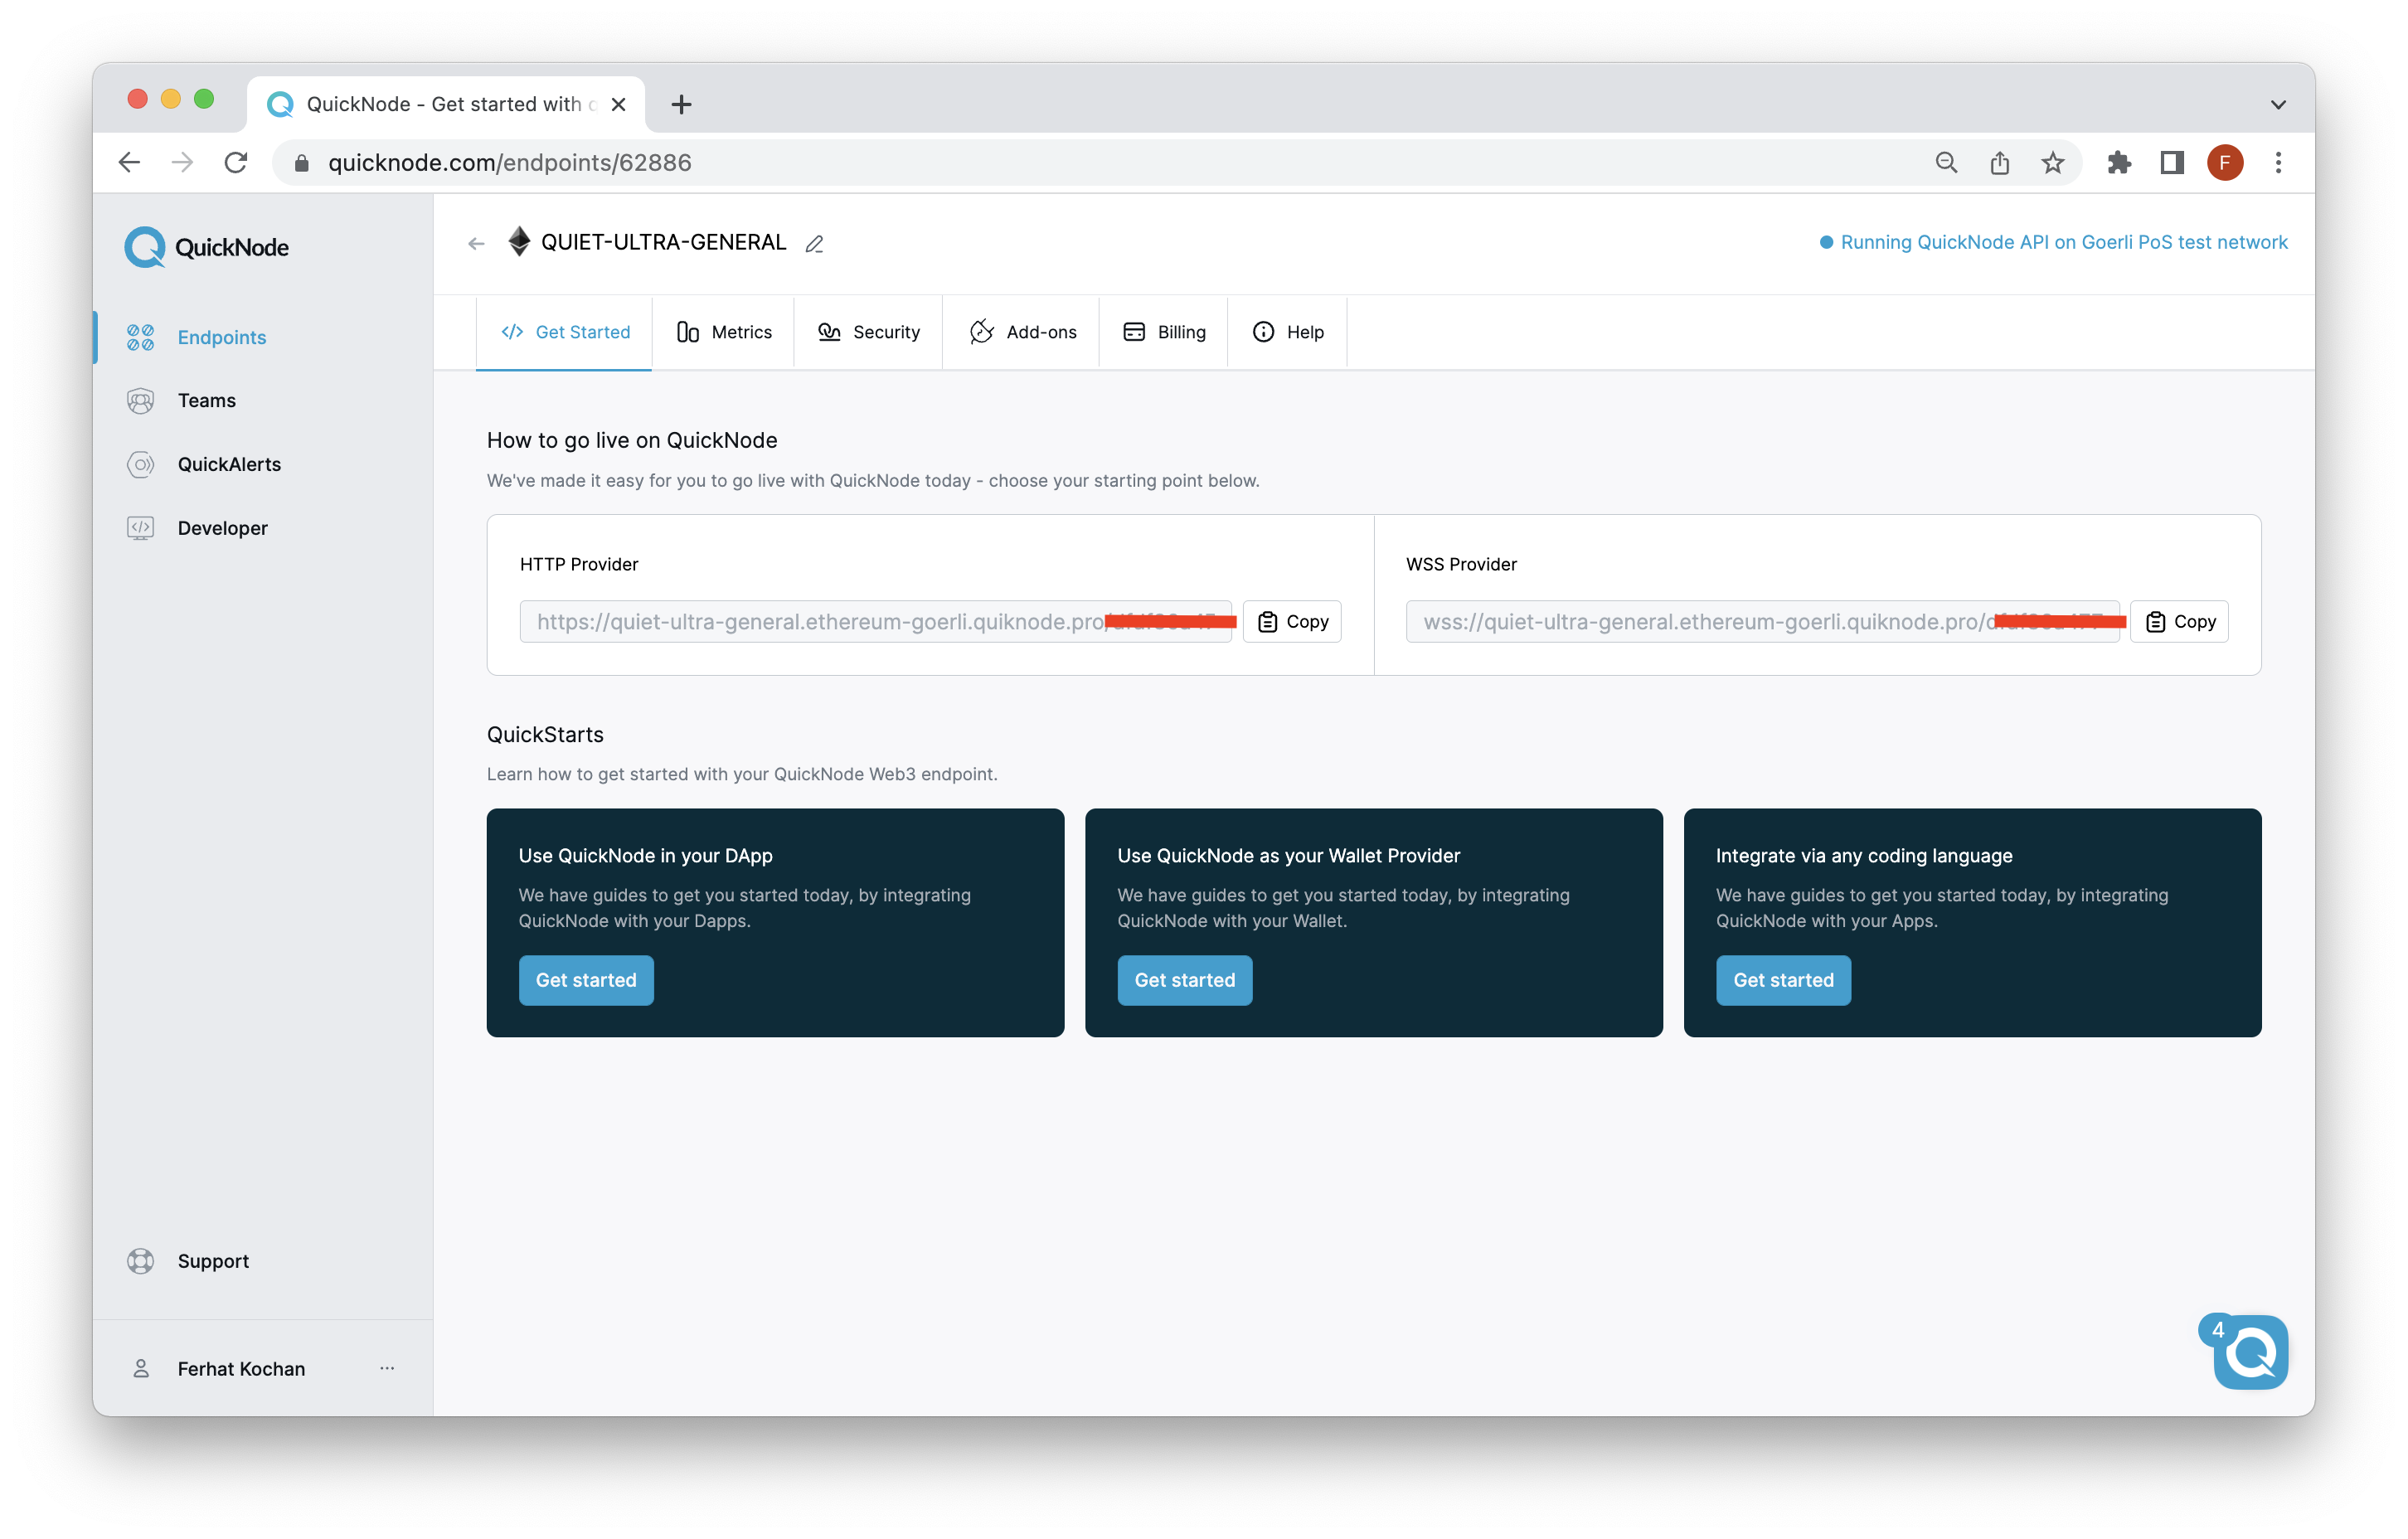
For that, we could use pretty much any Ethereum client such as Geth or OpenEthereum (fka Parity). Since that is a bit too involved for deploying a single contract, we create a free Quicknode account here and easily generate an Ethereum endpoint. After you've created your endpoint, copy your HTTP Provider URL.
Now that we have all of the tools we will need to start our project, we can initialize our working directory and start coding! Run the command below to get started.
mkdir vyper_intro
cd vyper_intro
touch deployer.py
touch graffiti_wall.vy
What the command above will do is create a folder named vyper_intro, have you move into the directory, and create two files; deployer.py and graffiti_wall.vy.
Coding the Smart Contract
We can begin by writing our Vyper code. Open up the vyper_intro folder in your favorite text editor.
We want our project to have a white-list of addresses that are approved to write on our "graffiti wall". We will need to have a method that allows the owner of the contract to add addresses to the white list. In addition to that, we will also need a method that allows white-listed users to write to the graffiti wall.
To break this down we will start by adding the 3 variables we know from our previous paragraph we will need.
approved_addresses: public(address[5])
graffiti_wall: public(String[100])
owner: public(address)
Here we declare variables, approved_addresses, graffiti_wall, and owner. These are all public functions. You can see that Vyper is statically typed, and we have an array that holds 5 addresses,
💡 Public functions are part of the contract interface and can be either called internally or via messages. For public state variables, an automatic getter function is generated.
- ❗ make sure to authenticate calls to this method as anyone can access it
With this, we can begin writing our functions.
@external
def __init__():
    self.owner = msg.sender
    assert chain.id == 3

@external
def add_approved_address(new_address: address):
    assert msg.sender == self.owner
    i: uint256 = 0
    for approved_address in self.approved_addresses:
        if approved_address != 0x0000000000000000000000000000000000000000:
            i += 1
    self.approved_addresses[i] = new_address

@external
def set_graffiti(graffiti: String[100]):
    is_approved: bool = False
    for approved_address in self.approved_addresses:
      if approved_address == msg.sender:
        is_approved = True

    if is_approved:
      self.graffiti_wall = graffiti
      log GraffitiSet(graffiti)
Here we can see 3 funtions that we have written, all with the @external decorator, which is a visibility decorator. Visibility decorators are required on every method, and in this case, @external means that these functions can be invoked by other smart contracts or transactions.
Walking through our functions one at a time, we can see the first one, __init__, assigns the owner of the contract to be the address that deploys it, but only if the chain that we are deploying to is Goerli (Goerli's chain id is 3). __init__ is a constructor, which means it is automatically invoked whenever the contract is made and then never again.
The second function, add_approved_address takes an address as an argument, and then adds it to the approved_addresses variable that we declared in the first code block. There is a bit of this code worth mentioning, which is the if approved_address != 0x0000000000000000000000000000000000000000:. We need to add this because if you query the (empty) initialized array, it will return that 0x00 address.
The third function, set_graffiti takes in a string as an argument and checks if the person interacting with the function is on our list of approved addresses. If they are on the list, we will replace the current message with whatever the person wrote. After replacing the message, we are going to fire an event called GraffitiSet.
We will need to write this GraffitiSet event.
💡 Indexed arguments can be searched for by listeners. Each indexed argument is identifier by the indexed keyword. Here, each indexed argument is a String. You can have any number of indexed arguments, but indexed arguments are not passed directly to listeners, although some of this information (such as the sender) may be available in the listener’s results object.
This event can be passed a string, which you can see us doing in the previous set_graffiti function. To fire the event for others on the blockchain to pickup, we have to use the log keyword. In the set_graffiti function you can see we use log GraffitiSet(graffiti), which will allow users to set up a listener on this smart contract, and will broadcast the event, along with the string we passed to the log.
All in all, your contract should look like this:
approved_addresses: public(address[5])
graffiti_wall: public(String[100])
owner: public(address)

event GraffitiSet:
    graffiti: indexed(String[100])

@external
def __init__():
    self.owner = msg.sender
    assert chain.id == 3

@external
def add_approved_address(new_address: address):
    assert msg.sender == self.owner
    i: uint256 = 0
    for approved_address in self.approved_addresses:
        if approved_address != 0x0000000000000000000000000000000000000000:
            i += 1
    self.approved_addresses[i] = new_address

@external
def set_graffiti(graffiti: String[100]):
    is_approved: bool = False
    for approved_address in self.approved_addresses:
      if approved_address == msg.sender:
        is_approved = True

    if is_approved:
      self.graffiti_wall = graffiti
      log GraffitiSet(graffiti)
With all of our smart contract written, we can move on to deploying this onto the Goerli Testnet.
Deploying The Smart Contract
Here we will write the code needed to deploy the smart contract. As mentioned in the prerequisites, you will need to have some Goerli ETH at your disposal.
Open up your deployer.py file and write the following code.
from eth_account import Account
from web3 import Web3
import secrets
priv = secrets.token_hex(32)
private_key = "0x" + priv
print ("SAVE BUT DO NOT SHARE THIS:", private_key)
acct = Account.from_key(private_key)
print("Address:", acct.address)
Here we are importing all of the libraries we will need to deploy the contract, as well as generating a private key ussing the secrets.token_hex() method. Save this file, and then run the script with the following command:
python3 deployer.py

Alt Text: SAVE BUT DO NOT SHARE THIS: 0xae4d38cbdd44521036658724403d3f2b33dbb26b2e9c93a93be083515979a2e3 Address: 0xd466687E156D088E8e97e13bb838113A4676EC06
Here you can see we have generated a private key, along with its address. Modify your python code to have this private key hardcoded. I will be using the one that I'm sharing in the terminal, but you should use the key that your script generated.
from eth_account import Account
from web3 import Web3
import secrets
priv = secrets.token_hex(32)
private_key = "0x" + priv
private_key = "YOUR_PRIVATE_KEY_HERE"
print ("SAVE BUT DO NOT SHARE THIS:", private_key)
acct = Account.from_key(private_key)
print("Address:", acct.address)
Here you can see that we are reassigning private_key from the randomly generated value to the value you generated from running the script.
The next thing we will need to do is compile our smart contract into bytecode so we can deploy the contract to the testnet.
To do so, run the following command:
vyper graffiti_wall.vy
It should spit out a long string that looks a little like this:
0x33600a55600346186102a85761029056600436101561000d57610275565b60046000601c376000513461027b57632502eb8081186100a6576004358060a01c61027b5760e052600a54331861027b5760006101005261014060006005818352015b6101405154610120526000610120511461007f5761010080516001818183011061027b57808201905090508152505b815160010180835281141561005057505060e051600161010051600581101561027b570255005b63f92d4699811861019557600435600401606481351161027b57808035602001808260e0375050506000610180526101c060006005818352015b6101c051546101a052336101a051186100fa576001610180525b81516001018083528114156100e057505061018051156101935760e0806005602082510160c060006005818352015b8260c051602002111561013b5761015a565b60c05160200285015160c0518501558151600101808352811415610129575b50505050505060e08051602082012090507f1feb66a2165328c0029dd757c8c304e5a76ebb0f047f8eefaf16e9bbfa6e336660006101a0a25b005b635506011181186101b9576001600435600581101561027b57025460e052602060e0f35b63bbbaf2c3811861025c5760e08060208082528083018060058082602082540160c060006005818352015b8260c05160200211156101f657610215565b60c05185015460c05160200285015281516001018083528114156101e4575b5050505050508051806020830101818260206001820306601f8201039050033682375050805160200160206001820306601f820103905090509050810190509050905060e0f35b638da5cb5b811861027357600a5460e052602060e0f35b505b60006000fd5b600080fd5b61001061029003610010600039610010610290036000f35b600080fd
We are going to assign this to a variable called bytecode in our python script. Along with the new variable, we are going to connect to the blockchain using our HTTP Provider from Quicknode, and then deploy the contract to the testnet. All in all, your script should look like this:
from eth_account import Account
from web3 import Web3
import secrets
priv = secrets.token_hex(32)
private_key = "0x" + priv
private_key = "YOUR_PRIVATE_KEY_HERE"
print ("SAVE BUT DO NOT SHARE THIS:", private_key)
acct = Account.from_key(private_key)
print("Address:", acct.address)

bytecode = "0x33600a55600346186102a85761029056600436101561000d57610275565b60046000601c376000513461027b57632502eb8081186100a6576004358060a01c61027b5760e052600a54331861027b5760006101005261014060006005818352015b6101405154610120526000610120511461007f5761010080516001818183011061027b57808201905090508152505b815160010180835281141561005057505060e051600161010051600581101561027b570255005b63f92d4699811861019557600435600401606481351161027b57808035602001808260e0375050506000610180526101c060006005818352015b6101c051546101a052336101a051186100fa576001610180525b81516001018083528114156100e057505061018051156101935760e0806005602082510160c060006005818352015b8260c051602002111561013b5761015a565b60c05160200285015160c0518501558151600101808352811415610129575b50505050505060e08051602082012090507f1feb66a2165328c0029dd757c8c304e5a76ebb0f047f8eefaf16e9bbfa6e336660006101a0a25b005b635506011181186101b9576001600435600581101561027b57025460e052602060e0f35b63bbbaf2c3811861025c5760e08060208082528083018060058082602082540160c060006005818352015b8260c05160200211156101f657610215565b60c05185015460c05160200285015281516001018083528114156101e4575b5050505050508051806020830101818260206001820306601f8201039050033682375050805160200160206001820306601f820103905090509050810190509050905060e0f35b638da5cb5b811861027357600a5460e052602060e0f35b505b60006000fd5b600080fd5b61001061029003610010600039610010610290036000f35b600080fd"
w3 = Web3(Web3.HTTPProvider('https://cool-frosty-moon.Goerli.quiknode.pro/your-token-here'))

signed_txn = w3.eth.account.sign_transaction(dict(
    nonce=w3.eth.get_transaction_count(acct.address),
    gasPrice=20000000000,
    gas=900000,
    to=None,
    value=0,
    data=bytecode,
    chainId=3, #Goerli
  ),
  private_key,
)

print(signed_txn)

tx = w3.eth.send_raw_transaction(signed_txn.rawTransaction)

print(tx.hex())
Here you can see our newly added bytecode, in addition to the code needed to send a transaction using web3.py. You can see we initialize the w3 variable, which allows us to connect to the blockchain so we can send transactions. We then use the sign_transaction method to generate a transaction, and then we use the send_raw_transaction method to send the transaction up to the blockchain.
The contents of the transaction are around setting up the gas price you are willing to pay, what network you are sending it to, and what data should be included. This code is sending the smart contract (the bytecode) to None, which is how we deploy smart contracts to Ethereum networks. You can also dictate which network to deploy to via this transaction data. In this transaction, we are using a chain id of 3 which is the id of the Goerli network. This also is not utilizing some of the knobs that EIP-1559 have given users. If you would like to, you can learn more about how to send EIP-1559 transactions here.
Save your file, and then run the command we used before.
python3 deployer.py
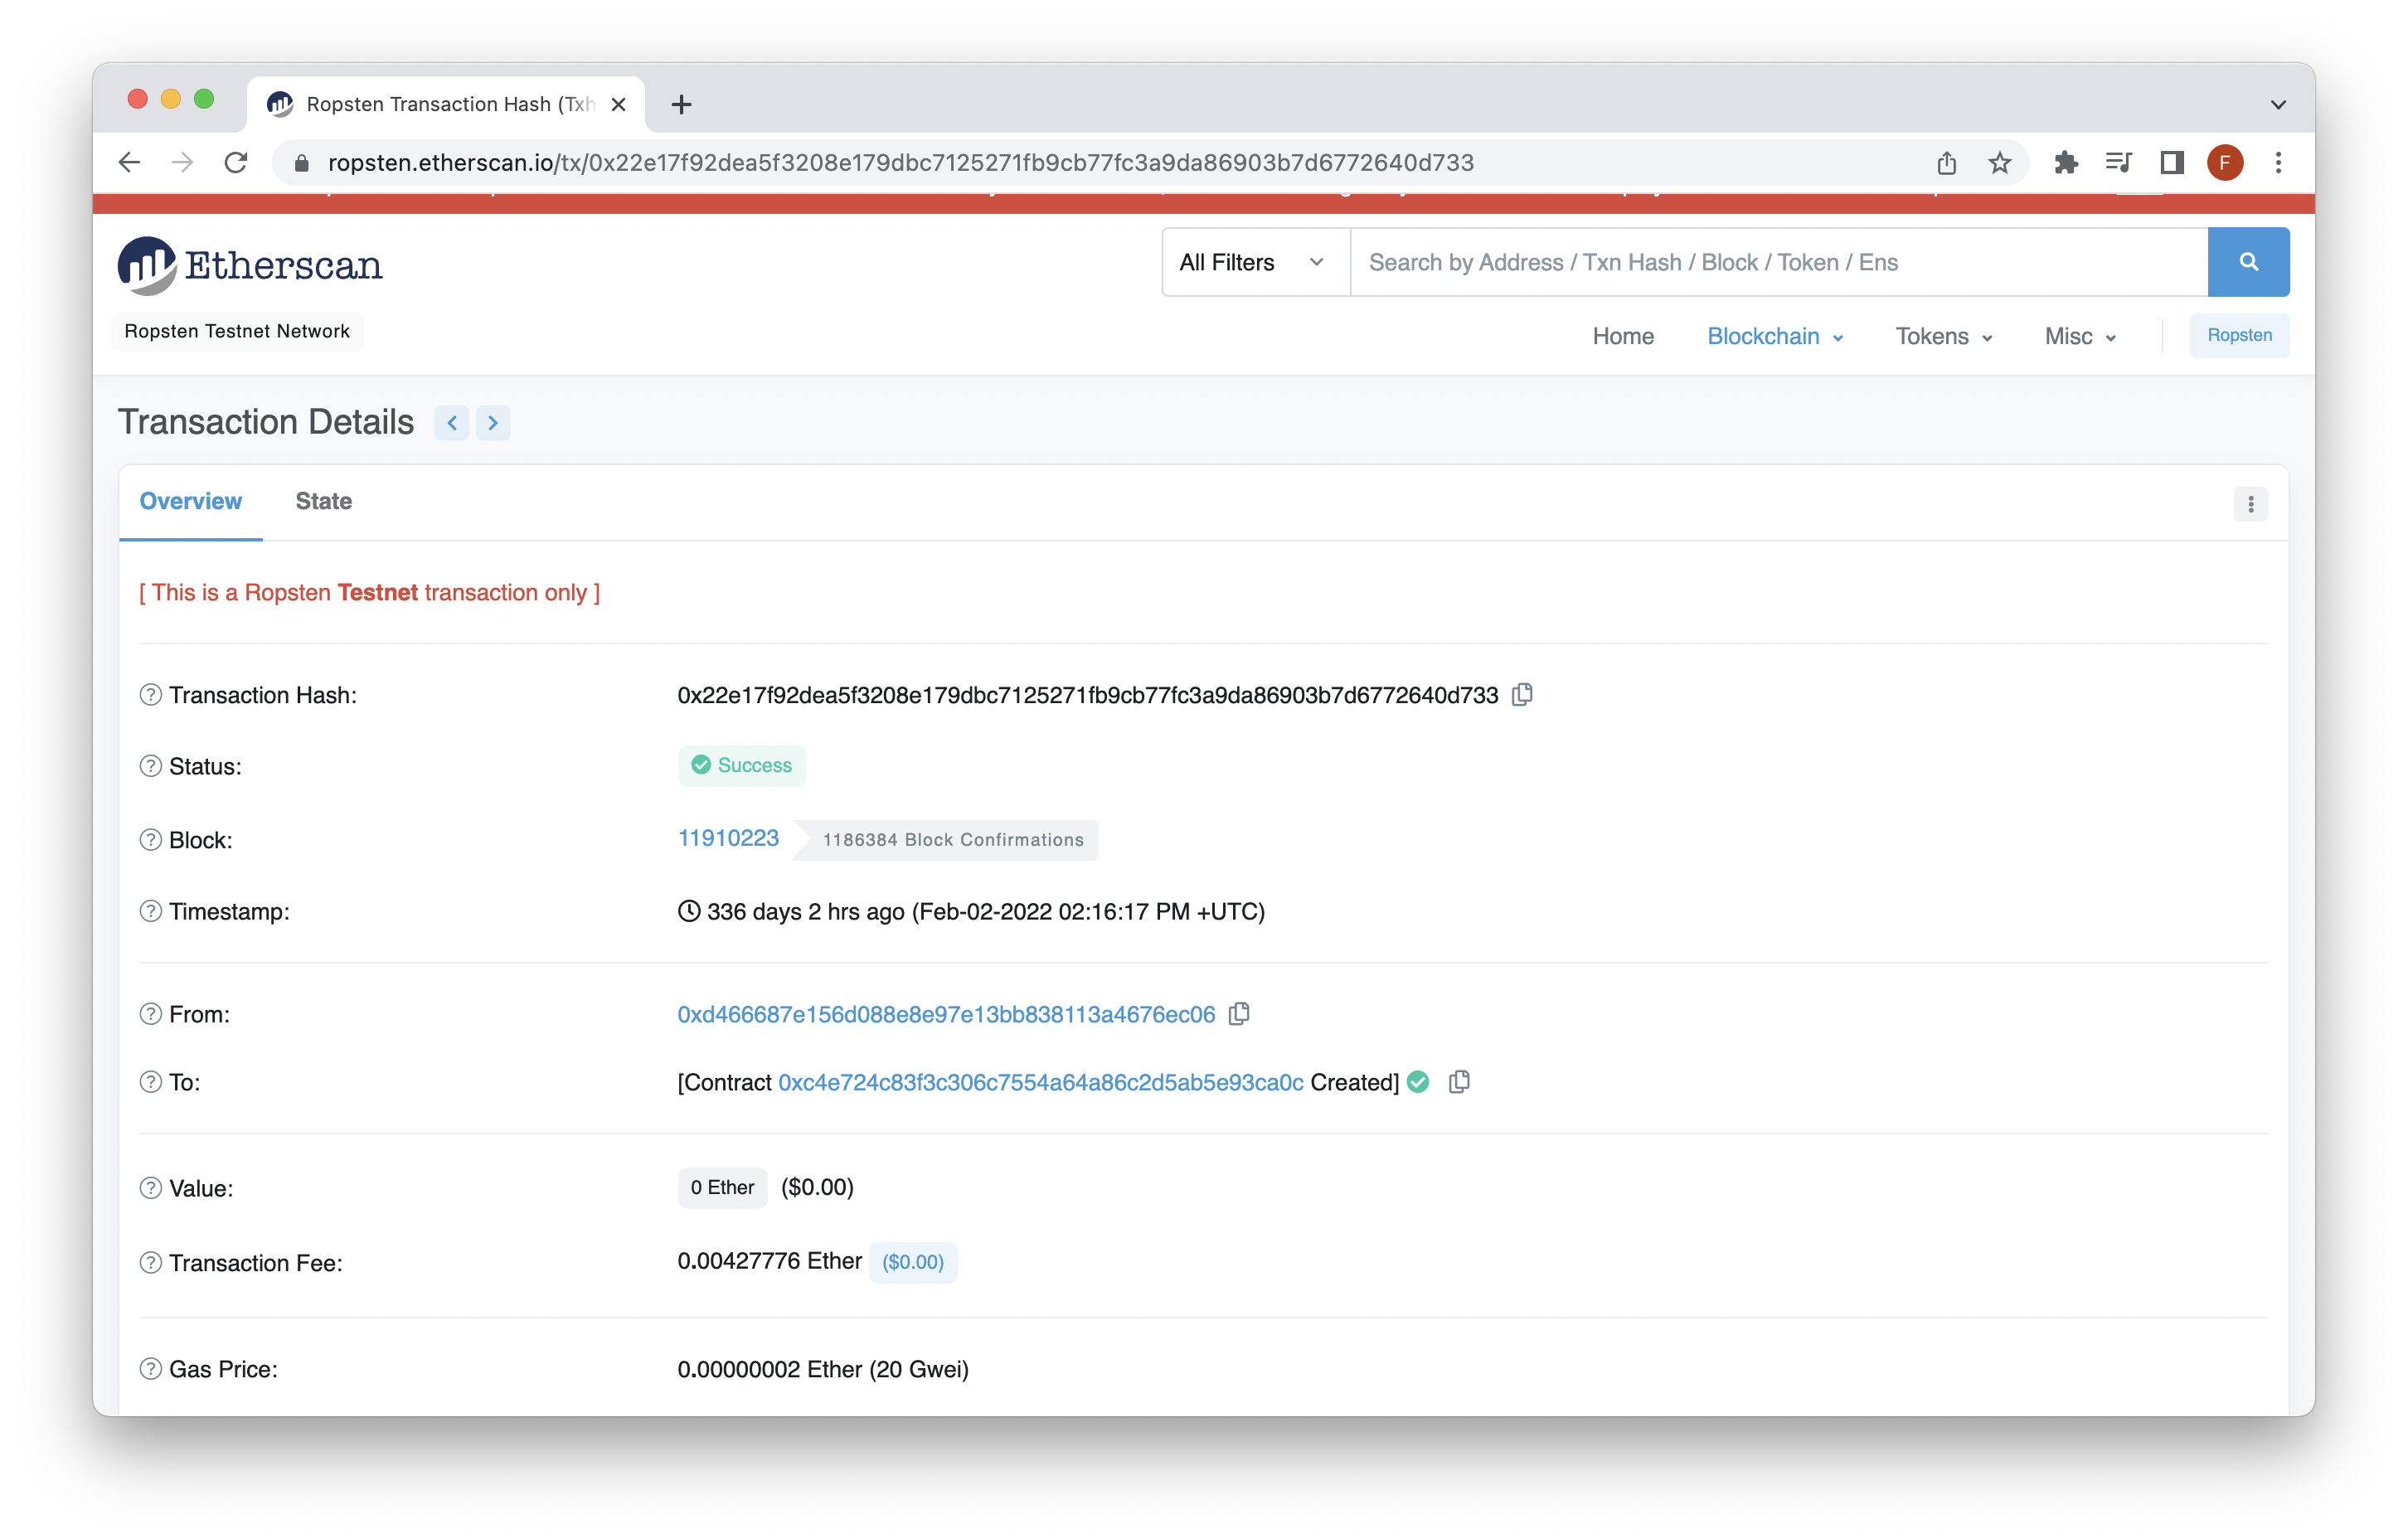
This is mostly information about the transaction. What we are really interested in is the hash of the transaction so we can look it up on etherscan. You can find the hash at the very bottom of your output. In my case it was: 0x22e17f92dea5f3208e179dbc7125271fb9cb77fc3a9da86903b7d6772640d733. Open up Goerli Etherscan and paste your transaction hash in. My transaction looks like the picture below.
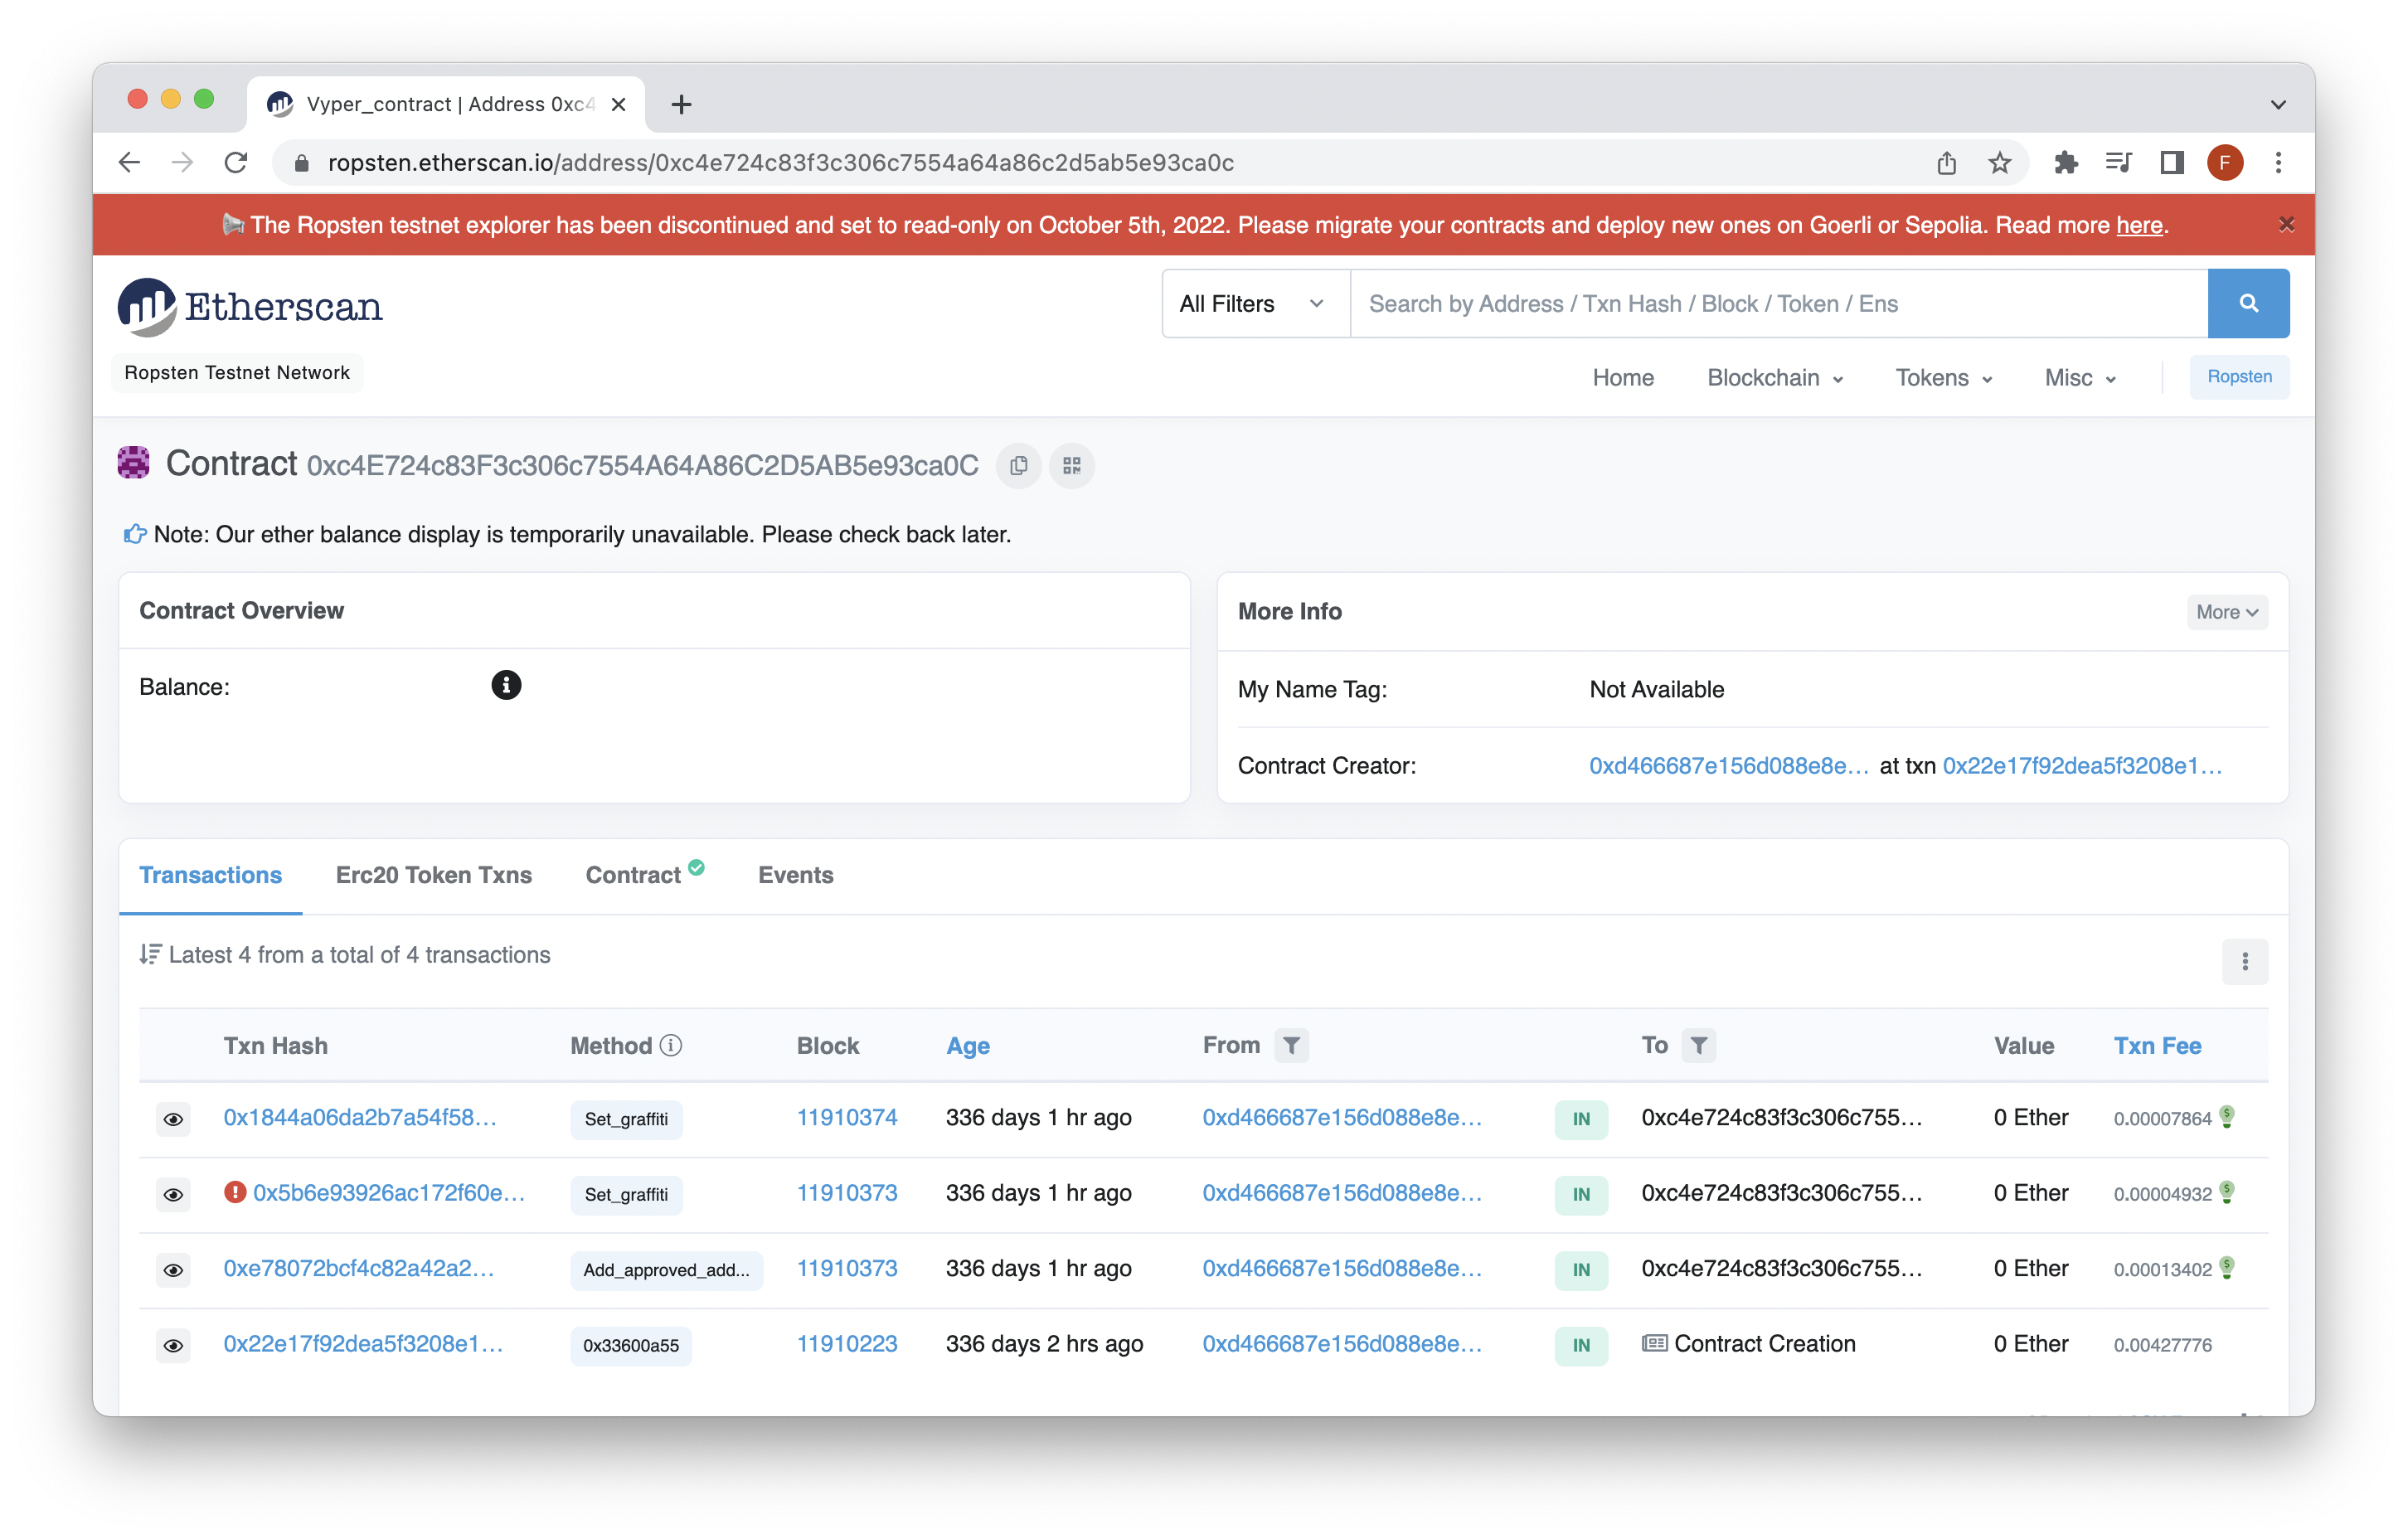
From there, you can see the contract you deployed in the to field of the transaction. From there, go to the contract tab.
You will want to open up MetaMask, and import a new account using the private key you generated earlier.
After setting up your MetaMask account (make sure you are on the Goerli Test Network), hit the "Connect to Web3" button under the "Write Contract" tab. After connecting your wallet, paste your wallet address into the add_approved_address method and click "Write." You should now have a MetaMask pop up asking for confirmation. Once that transaction goes through, you can then go to the second method.
Here you can paste any string. I'm going to send "gm graffiti frens." Once both of those transactions have been approved go to the "Read Contract" tab. Check the approved_addresses at the 0 index. You should see the address that you pasted in the previous step. Here you can confirm the statement I made earlier around the 0x00 address. If you query numbers 1-4 you will see the address returned is 0x00. If you query a number higher than 4, you will get an error, as we only allocated space in the smart contract for 5 addresses total.
You also can check the graffiti_wall for the message. You can check what mine looks like here. If you would like to test the security of the contract, you can switch to a different account, and try the same methods. You will not be able to add anyone to the approved addresses array as you are not the owner and will not be able to write to the wall since you are not on the white list.
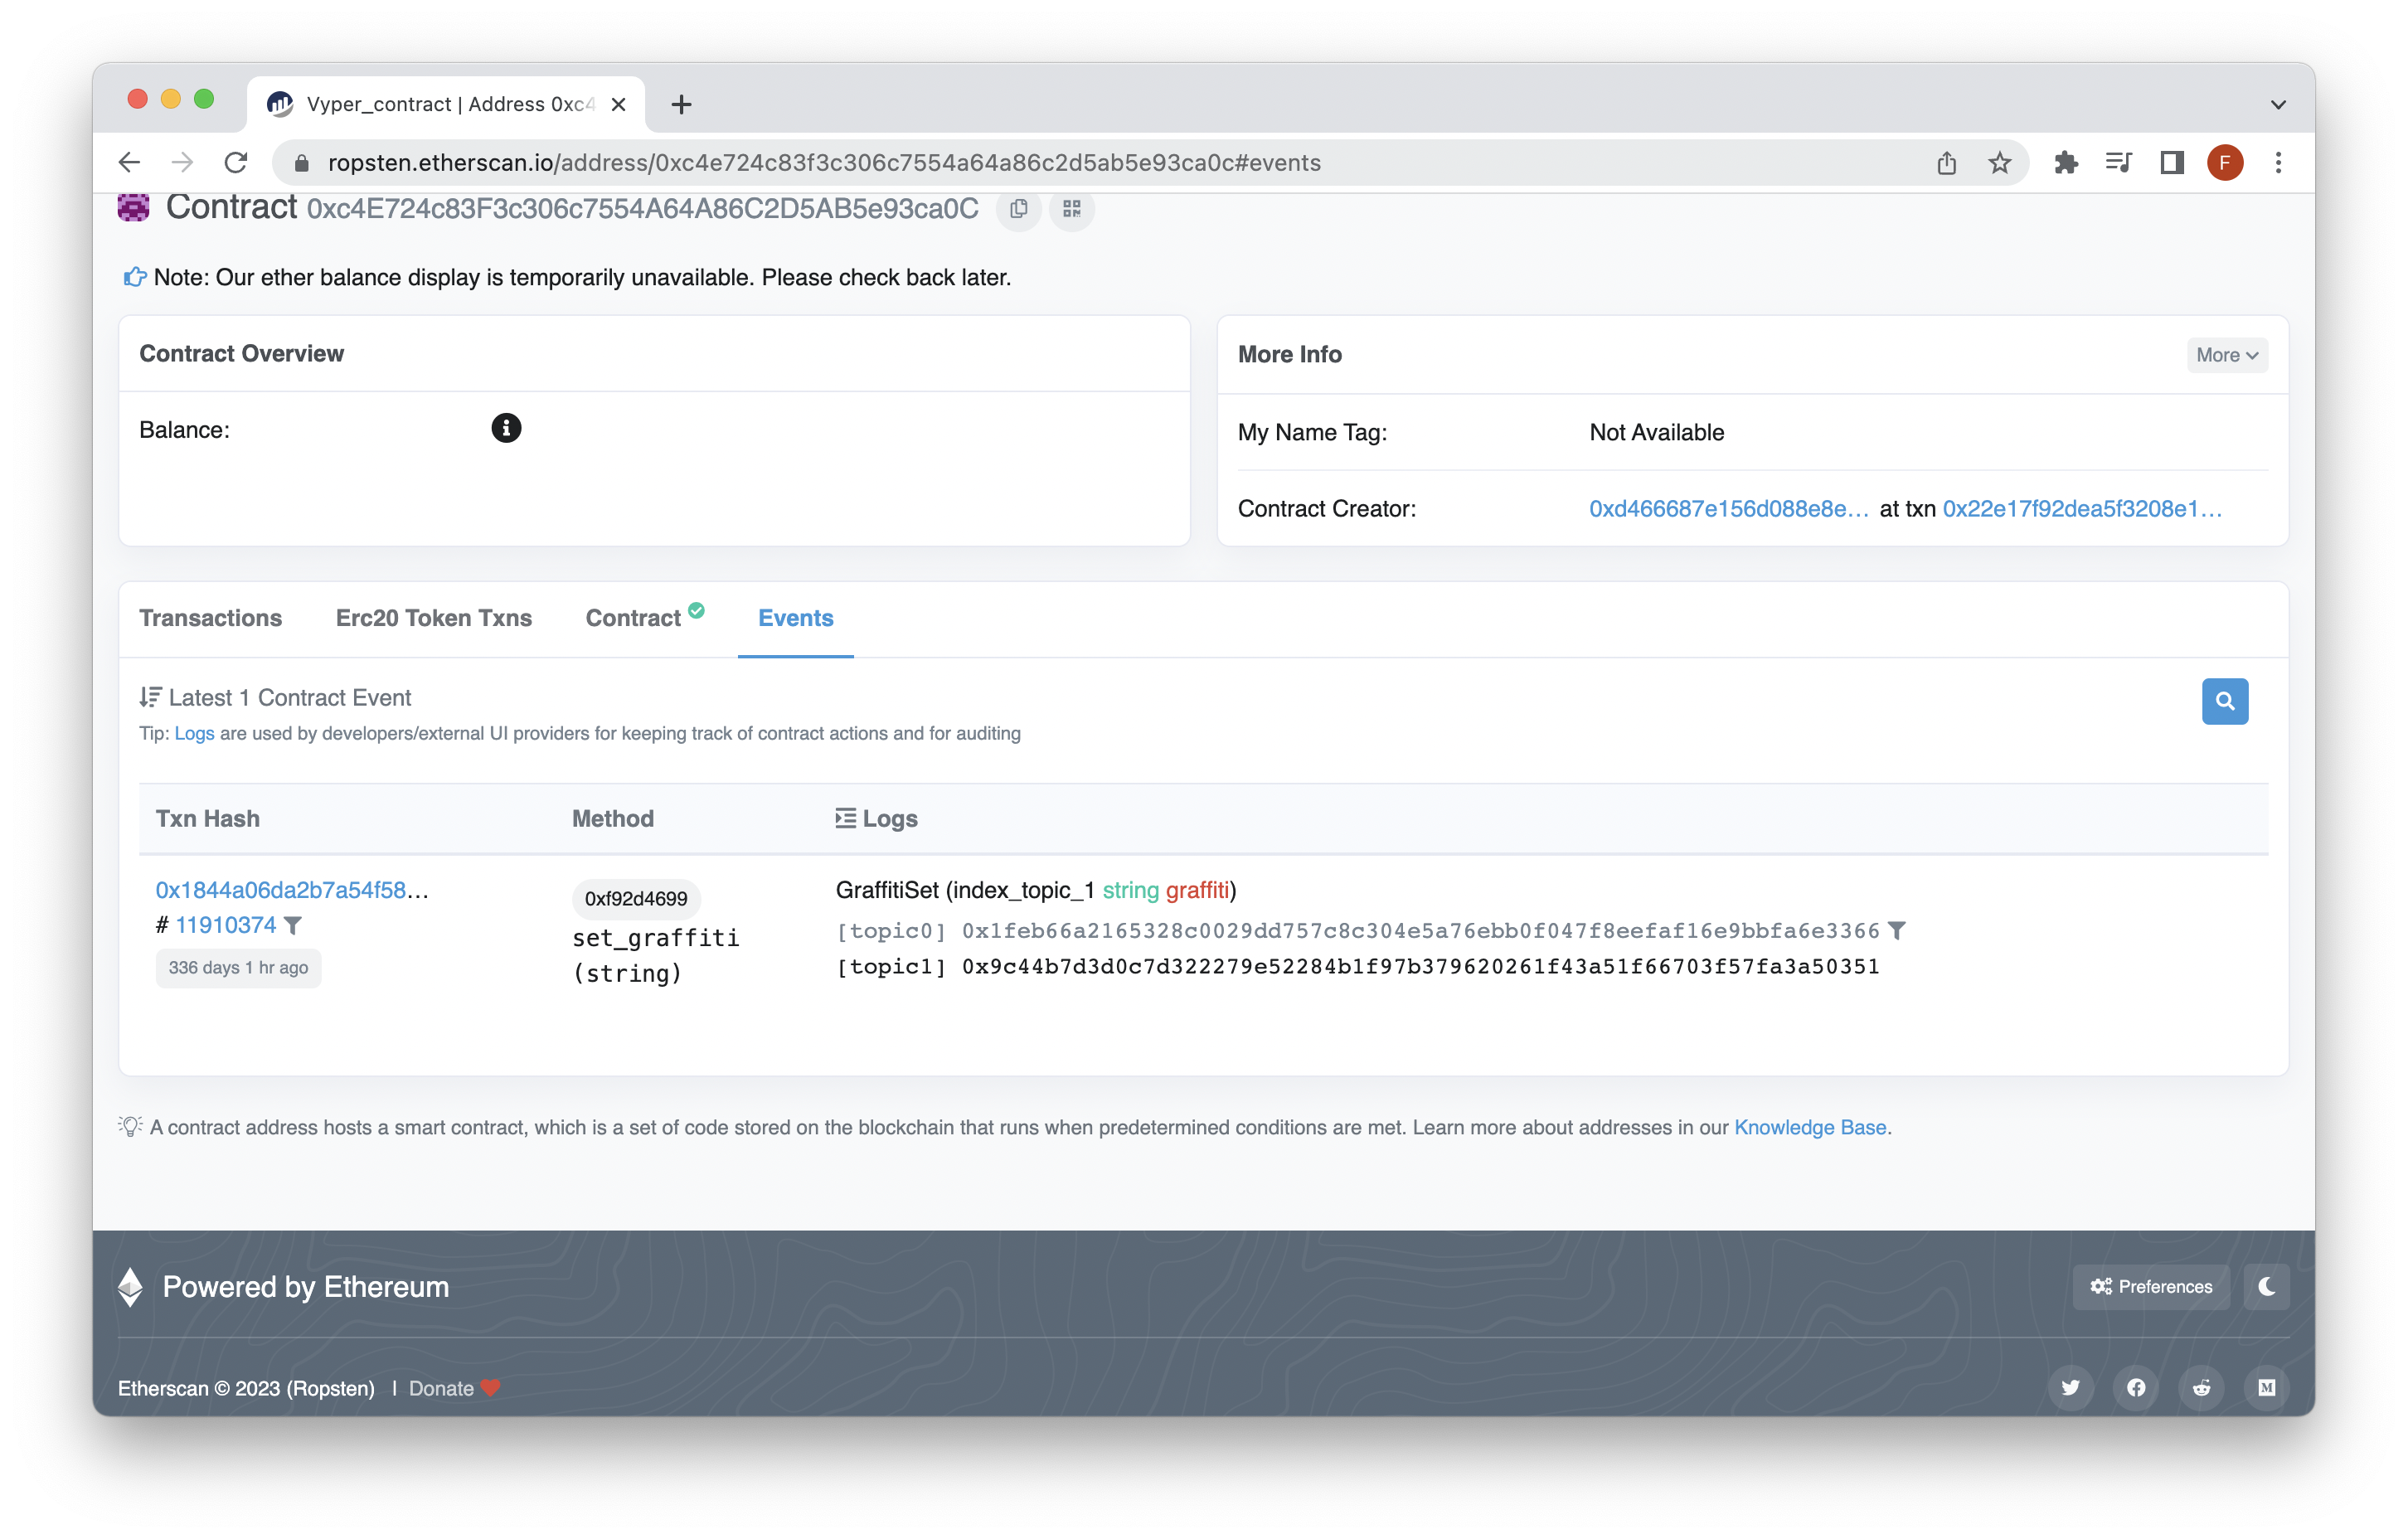
The last thing to check is that our events are being properly emitted. Go over to the "Events" tab in Etherscan and you should have 1 GraffitiSet event logged there.
Conclusion
Congrats on making it to the end! In this tutorial you wrote a smart contract using Vyper. In doing so, you learned about making externally callable functions, how to properly add a layer of security to your smart contract, and even how to deploy it to a test network! If you would like to learn more about pythonic tooling for smart contracts you can check out how to deploy using brownie.
Subscribe to our newsletter for more articles and guides on Ethereum. If you have any feedback, feel free to reach out to us via Twitter. You can always chat with us on our Discord community server, featuring some of the coolest developers you’ll ever meet :)