16 min read
Overview
Today, we will be building a sample app in Svelte and connecting it to a smart contract that we deploy on the Sepolia Network. Svelte is a free open source frontend project with ongoing development that allows users to build web applications easily.
What You Will Do
Our frontend will be able to do the following:
- Allow the user to send a greeting message along with a wave to the contract owner
- Display all the greeting messages on the frontend along with the sender's address
- A contract for storing a user's greeting message and their wave
Our tech stack will look like the following:
- Client-side framework: Svelte
- Ethereum development environment: Hardhat
- Ethereum Web Client library: Ethers.js
Refer to this link here to see the final code.
What You Will Need
- Node.js environment installed on your local machine
- IDE or Code Editor (e.g., VSCode)
- Familiarity with the CLI (e.g., Terminal, Windows Powershell)
- MetaMask extension installed in your browser
- ETH on Sepolia Testnet (you can use the Quicknode Multi-Chain Faucet)
| Dependency | Version |
|---|---|
| node.js | 18.18.1 |
| svelte | ^3.0.0 |
| hardhat | ^2.18.1 |
| ethers | ^5.7.2 |
| @rollup/plugin-json | ^6.0.1 |
| dayjs | ^1.10.7 |
| sirv-cli | ^1.0.0 |
| rollup | ^2.3.4 |
Getting Started
Clone this svelte starter template which contains all the required components and CSS properties by running the following command.
With HTTPS:
git clone https://github.com/quiknode-labs/qn-guide-examples.git
Or, with SSH:
git clone git@github.com:quiknode-labs/qn-guide-examples.git
Following that, navigate into the project directory (e.g., qn-guide-examples/ethereum/wave-portal-svelte/code/wave-portal-starter-boilerplate) and install node_modules by running the below command:
cd qn-guide-examples/ethereum/wave-portal-svelte/code/wave-portal-starter-boilerplate/
yarn
Inside the wave-portal-starter-boilerplate directory, install the @nomicfoundation/hardhat-toolbox (which has all we need for smart contract development) by running the following command:
yarn add --dev hardhat @nomicfoundation/hardhat-toolbox @nomicfoundation/hardhat-network-helpers @nomicfoundation/hardhat-chai-matchers @nomicfoundation/hardhat-ethers @nomicfoundation/hardhat-verify chai ethers hardhat-gas-reporter solidity-coverage @typechain/hardhat typechain @typechain/ethers-v6
Now, let's initialize our smart contract development environment with Hardhat.
Initializing and Configuring a Hardhat Environment
To create a new smart contract development environment with Hardhat, run the command below. Before running the command, make sure you are in the wave-portal-starter-boilerplate folder in your terminal window.
npx hardhat init
Select the following settings when prompted:
- What do you want to do? Select Create an empty hardhat.config.js project
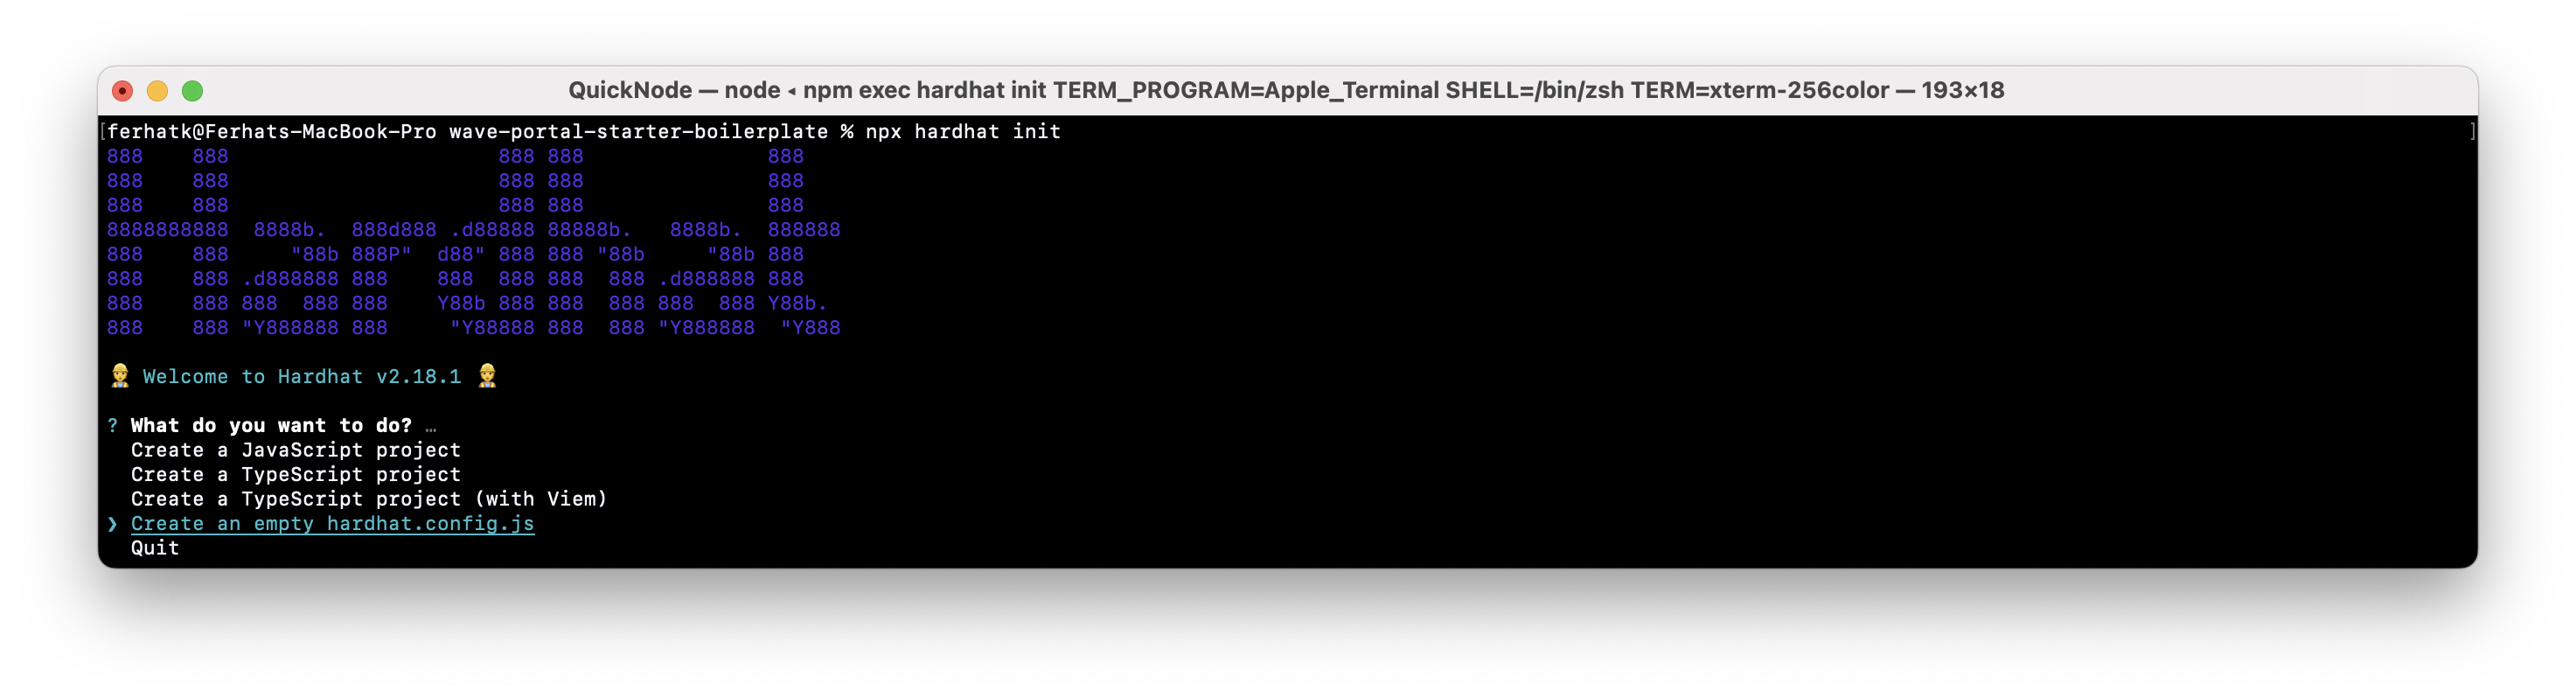
Now you should see a hardhat.config.js file within your project folder.
Next, open up your hardhat.config.js file. This file consists of all the configurations regarding the Hardhat ethereum environment. Update the contents of the file to look like this:
require("@nomicfoundation/hardhat-toolbox");

module.exports = {
  solidity: "0.8.4",
  paths: {
    artifacts: "./src/artifacts",
  },
  networks: {
    hardhat: {
      chainId: 1337,
    },
  },
};
With our Hardhat configuration setup, let's continue.
We'll now need to create the required files. First, we'll create a contracts and create a file called WavePortal.sol inside it:
mkdir contracts
echo > contracts/WavePortal.sol
This file will contain our smart contract code. In this new file, paste the smart contract code from below. This contract will allow us to store the wave, reaction type, greeting message and grants prizes to a random user.
Your **WavePortal.sol **file should look like this:
// SPDX-License-Identifier: UNLICENSED
pragma solidity ^0.8.0;

contract WavePortal {
  enum Reaction {
    Wave,
    Cake,
    Hype
  }

  struct Wave {
    Reaction reaction;
    string message;
    address waver;
    uint256 timestamp;
  }

  uint256 totalWaves;
  Wave[] public waveList;

  event NewWave(
    Reaction reaction,
    string message,
    address indexed from,
    uint256 timestamp
  );

  constructor() {}

  function wave(Reaction _reaction, string memory _message) public {
    totalWaves += 1;
    waveList.push(Wave(_reaction, _message, msg.sender, block.timestamp));
    emit NewWave(_reaction, _message, msg.sender, block.timestamp);
  }

  function getAllWaves() public view returns (Wave[] memory) {
    return waveList;
  }

  function getTotalWaves() public view returns (uint256) {
    return waveList.length;
  }
}
Explanation of the code above.
- Line 1: Specifying SPDX license type, which is an addition after Solidity ^0.6.8. Whenever the source code of a smart contract is made available to the public, these licenses can help resolve/avoid copyright issues. If you do not wish to specify any license type, you can use a special value UNLICENSED or simply skip the whole comment (it won't result in an error, just a warning).
- Line 2: Declaring the solidity version.
- Line 4: Starting our Contract named
WavePortal. - Line 5: Declaring Reaction as enum with
Wave,CakeandHypeas predefined values. - Line 11: Declaring Wave as struct containing variables reaction of type Reaction, message of type string, waver of type address and timestamp of type uint.
- Line 18: Declaring variable
totalWavesof type uint to store the total number of waves. - Line 19: Declaring an array
wavelistof type of Wave to store all the waves. - Line 21: Declaring an event
NewWave, containing information about the reaction, message, sender address and timestamp of the wave. This event gets emitted once our wave gets stored in the contract successfully. - Line 28: Initializing the constructor, but do not need to set anything, so we leave it empty.
- Line 30: Declaring function wave with two arguments, _reaction of type
Reactionwhich will store our reaction information and _message of type string which will store the message of the user. Declaring _message as memory means, it will get destroyed from the memory once the function gets executed. - Line 36: Declaring function getAllWaves, that returns all the an array containing all the waves.
- Line 40: Declaring function getTotalWaves, that returns the number of waves.
Interacting with the Ethereum Blockchain
We can interact with our smart contract from our Svelte app using the combination of our contract's ABI, the ethers.js library, and our contract address. ABI stands for Application Binary Interface. We can think of ABI as an interface that provides our frontend with all the available callable functions and variables from our smart contract.
We can get ABIs by compiling our smart contract using a development framework like Hardhat. You can often find the ABI for a smart contract on Etherscan.
So, let us compile our smart contract by running the command below.
npx hardhat compile
Make sure you are within the root directory of your project (e.g., wave-portal-starter-boilerplate)
On successful compilation, you should see a new folder named artifacts under the code/wave-portal-starter-boilerplate/src folder. You can see the ABI of our contract under artifacts/contracts/WavePortal.json folder. We can use this ABI by simply importing this .json file.
Deploying to localhost
For easy and fast interaction, we will be deploying our contract to a local test node. For that, we need to create another terminal window within the same directory (CMD + T for Mac users; CTRL + SHIFT + T for Windows). Then, to start a local chain node by running the following command:
npx hardhat node
Running this command will list all the accounts and their private keys in your terminal:
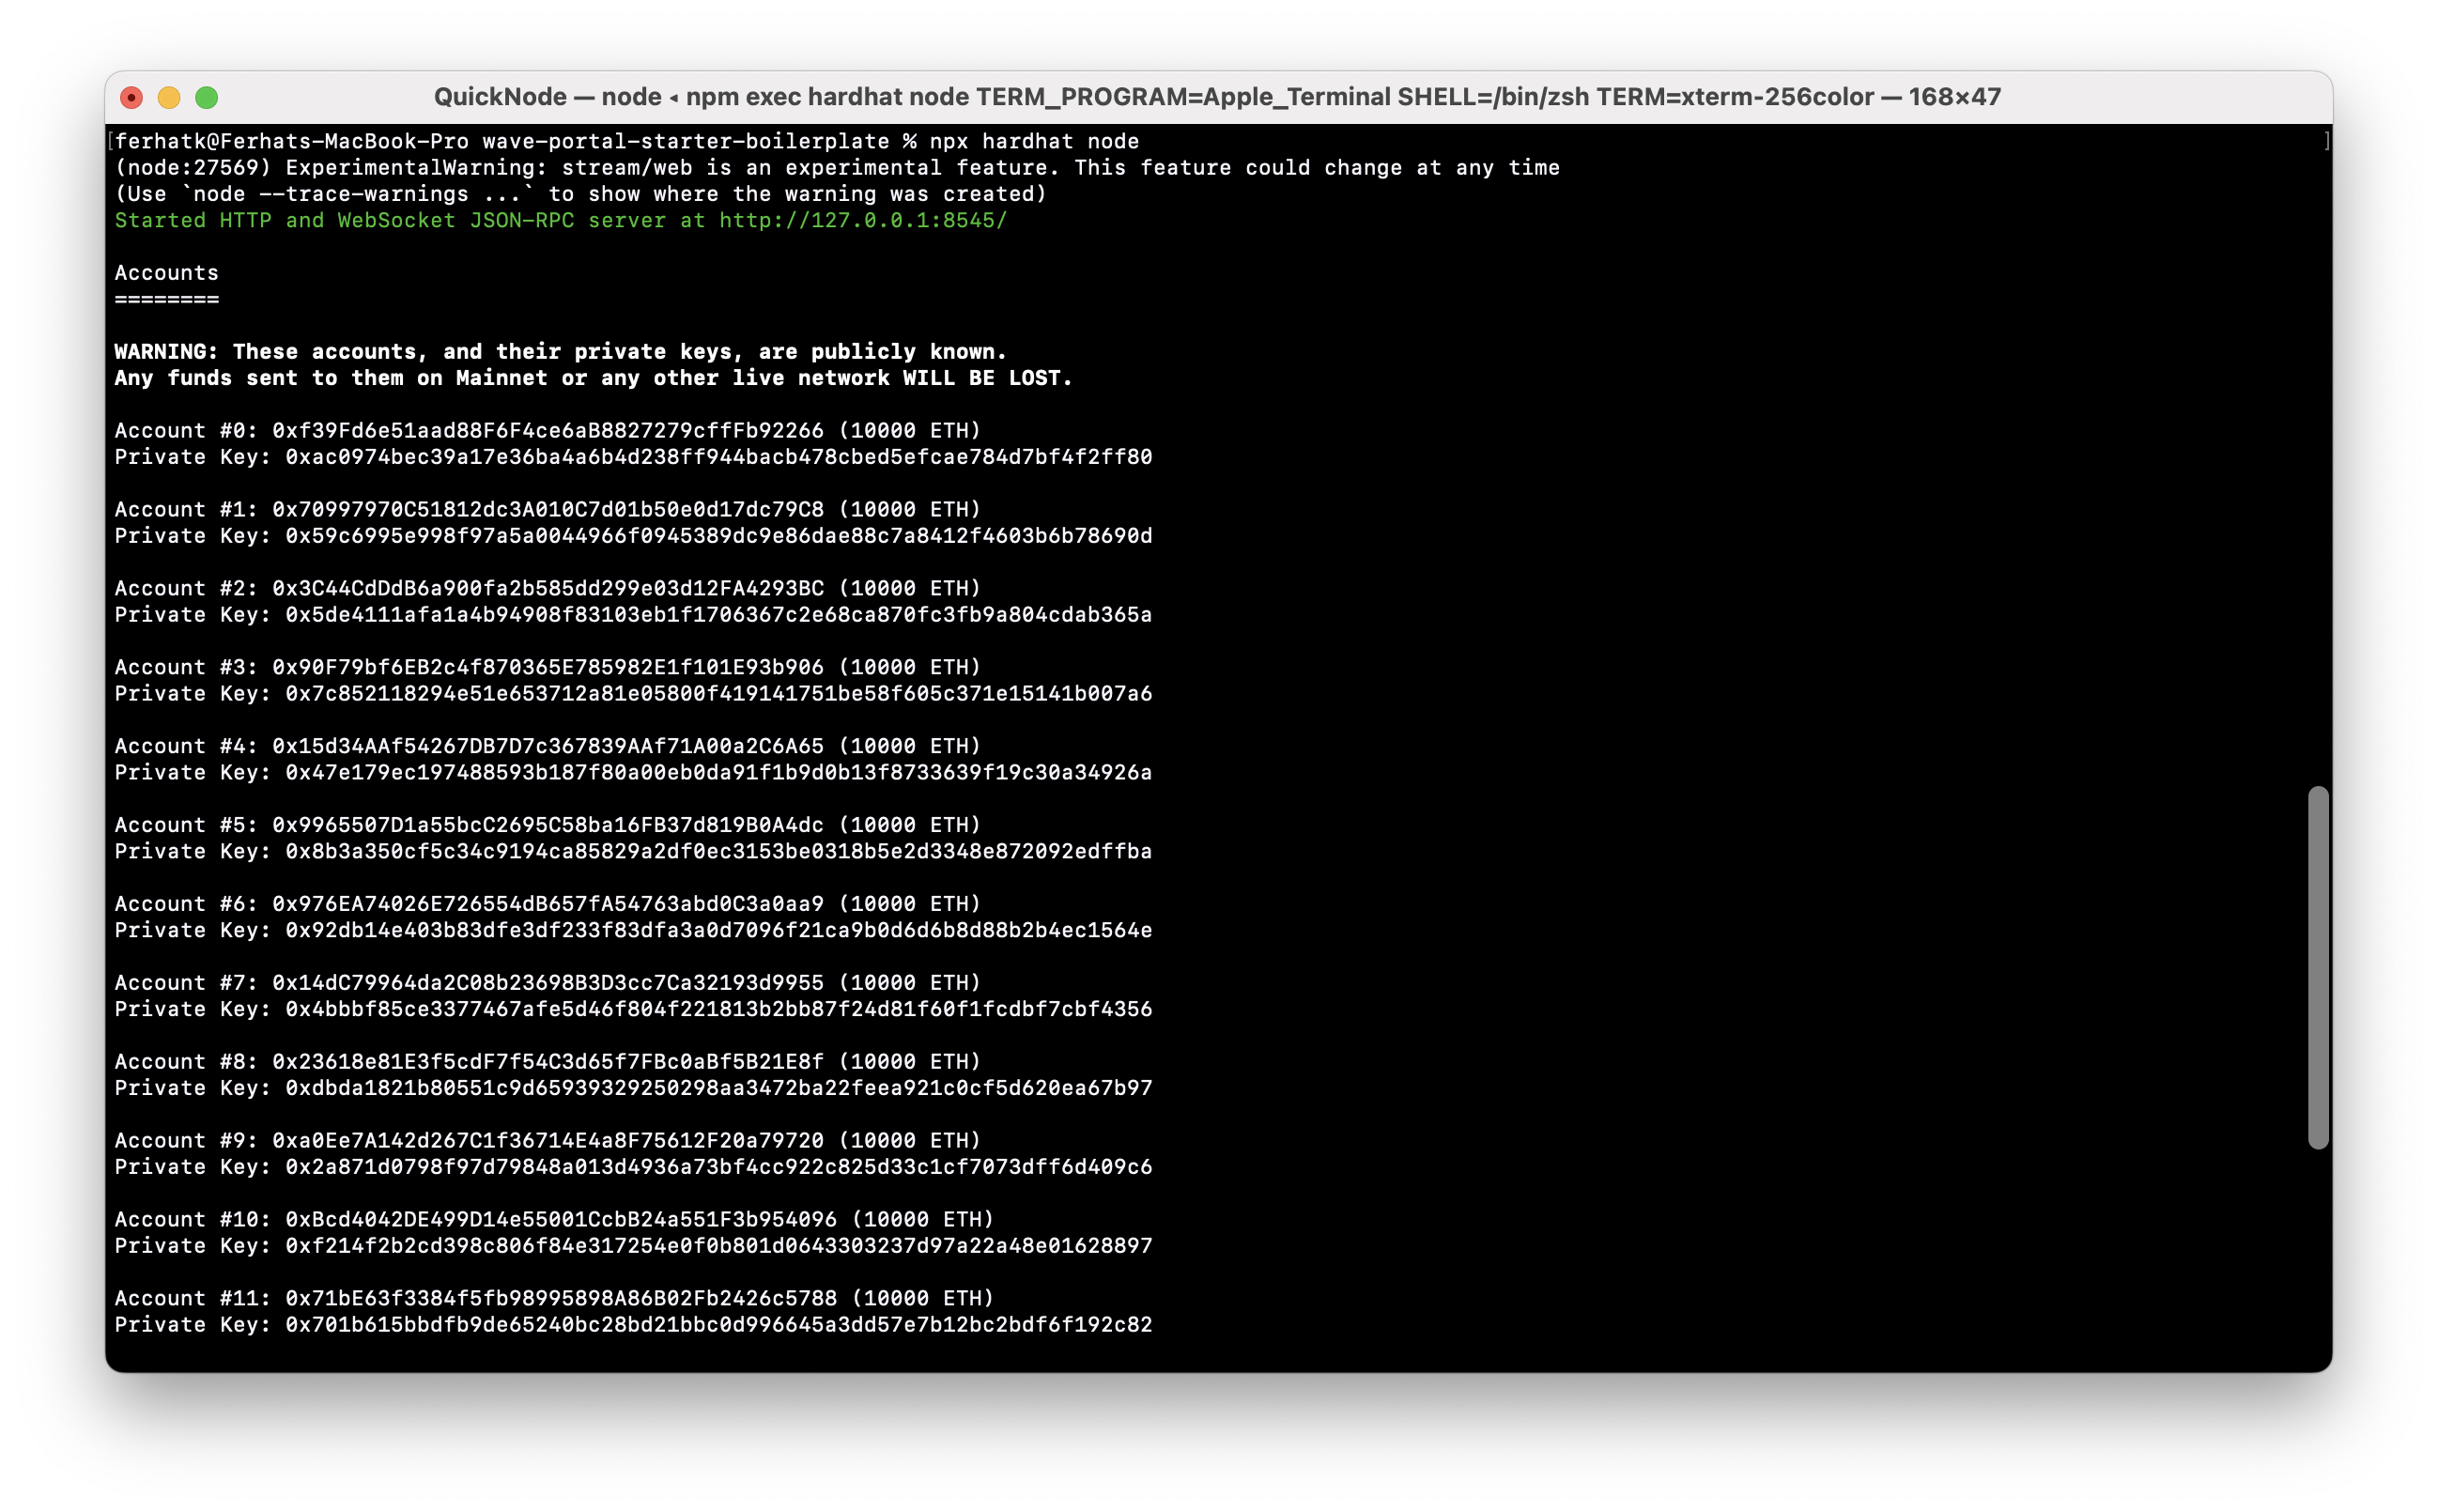
These are the 20 test accounts created for us by Hardhat that we can use to deploy and test our smart contract locally. Each account has a sufficient amount of test Ether.
Let us deploy our smart contract to localhost using one of these accounts. But before that, in our scripts folder, we'll create a file called deploy.js:
mkdir scripts
echo > scripts/deploy.js
This file will get executed when we'll try to deploy our contract. Inside this deploy.js file, include the following code:
const hre = require("hardhat")

async function main() {
    const WavePortal = await hre.ethers.getContractFactory("WavePortal");
    const wavePortal = await WavePortal.deploy();
    await wavePortal.waitForDeployment();
    console.log("WavePortal deployed to:", wavePortal.target);
  }

main()
    .then(() => process.exit(0))
    .catch((error) => {
      console.error(error);
      process.exit(1);
});
Let's recap the code.
- Line 1: Declaring an asynchronous function main, that executes when we will deploy our smart contract.
- Line 4: Calling hre.ethers.getContactFactory that returns an instance of the contract.
- Line 5: Calling
.deploy(), that deploys an instance of the contract - Line 6: Calling
.waitForDeployment(), that awaits for the contract to get deployed. - Line 7: Logging the address of the deployed contract in the console.
- Line 10: Calling the
main()function and add error handling.
Now, let us run the deploy script and provide the flag --network localhost to the CLI which indicates that we want to deploy to our local network.
npx hardhat run scripts/deploy.js --network localhost
This script will deploy our smart contract to our local network and now we should be able to interact with it.
On successful deployment, you should see the following output in your terminal

NOTE: This contract is deployed on the local node, using the first account that was created when we started the local network.
Store this address for your reference, as we will need it while interacting with our smart contract from our Svelte Client.
Now, to send a transaction to our smart contract deployed on the test node, we need to configure MetaMask wallet to use one of the accounts created by our Hardhat environment.
Let us import one of these accounts into our MetaMask wallet and use its test ETH. To do so, follow these steps:
- In the upper left corner, select the network you're currently connected to.
- Select Add network.
- Select Add a network manually.
- Enter a network name: Localhost 8545
- Enter your Hardhat Network RPC URL, http://127.0.0.1:8545/ (or http://localhost:8545).
- Enter the currency symbol: ETH
- Enter your Hardhat Network chain ID, 1337 (or 0x539 in hexadecimal format).
Once the custom network is added, change your network to the newly added network. Next, we'll import one of they private keys from our Hardhat environment into MetaMask.
In the top of your MetaMask extension, click the Account dropdown, then click Import Account. Enter the private key from your terminal window that is running the Hardhat local blockchain, then click Import. Make sure this is the account selected before moving onto the next step.
As we have our contract deployed and our MetaMask wallet configured, let us start interacting from our Svelte frontend.
Connecting to Ethereum with Svelte
For this tutorial, we are not going to focus on developing the UI. Instead, we will be focussing entirely on the core functionality and integration. In the frontend, we will mainly focus on 2 things:
- Fetch all the greeting messages from our smart contract and display them in the frontend.
- Create functions to send messages along with the greeting.
Let us start integration with our front end. To test our frontend, start the server using the following command. But, before starting the server, make sure that the current directory is code/wave-portal-starter-boilerplate/:
yarn dev
Now you should see our front end as below on the localhost:5000. If localhost:5000 doesn't work then try http://127.0.0.1:5000/.
Note: If you are a M1 user, you may need to disable Airplay settings on your Mac in order for this to work
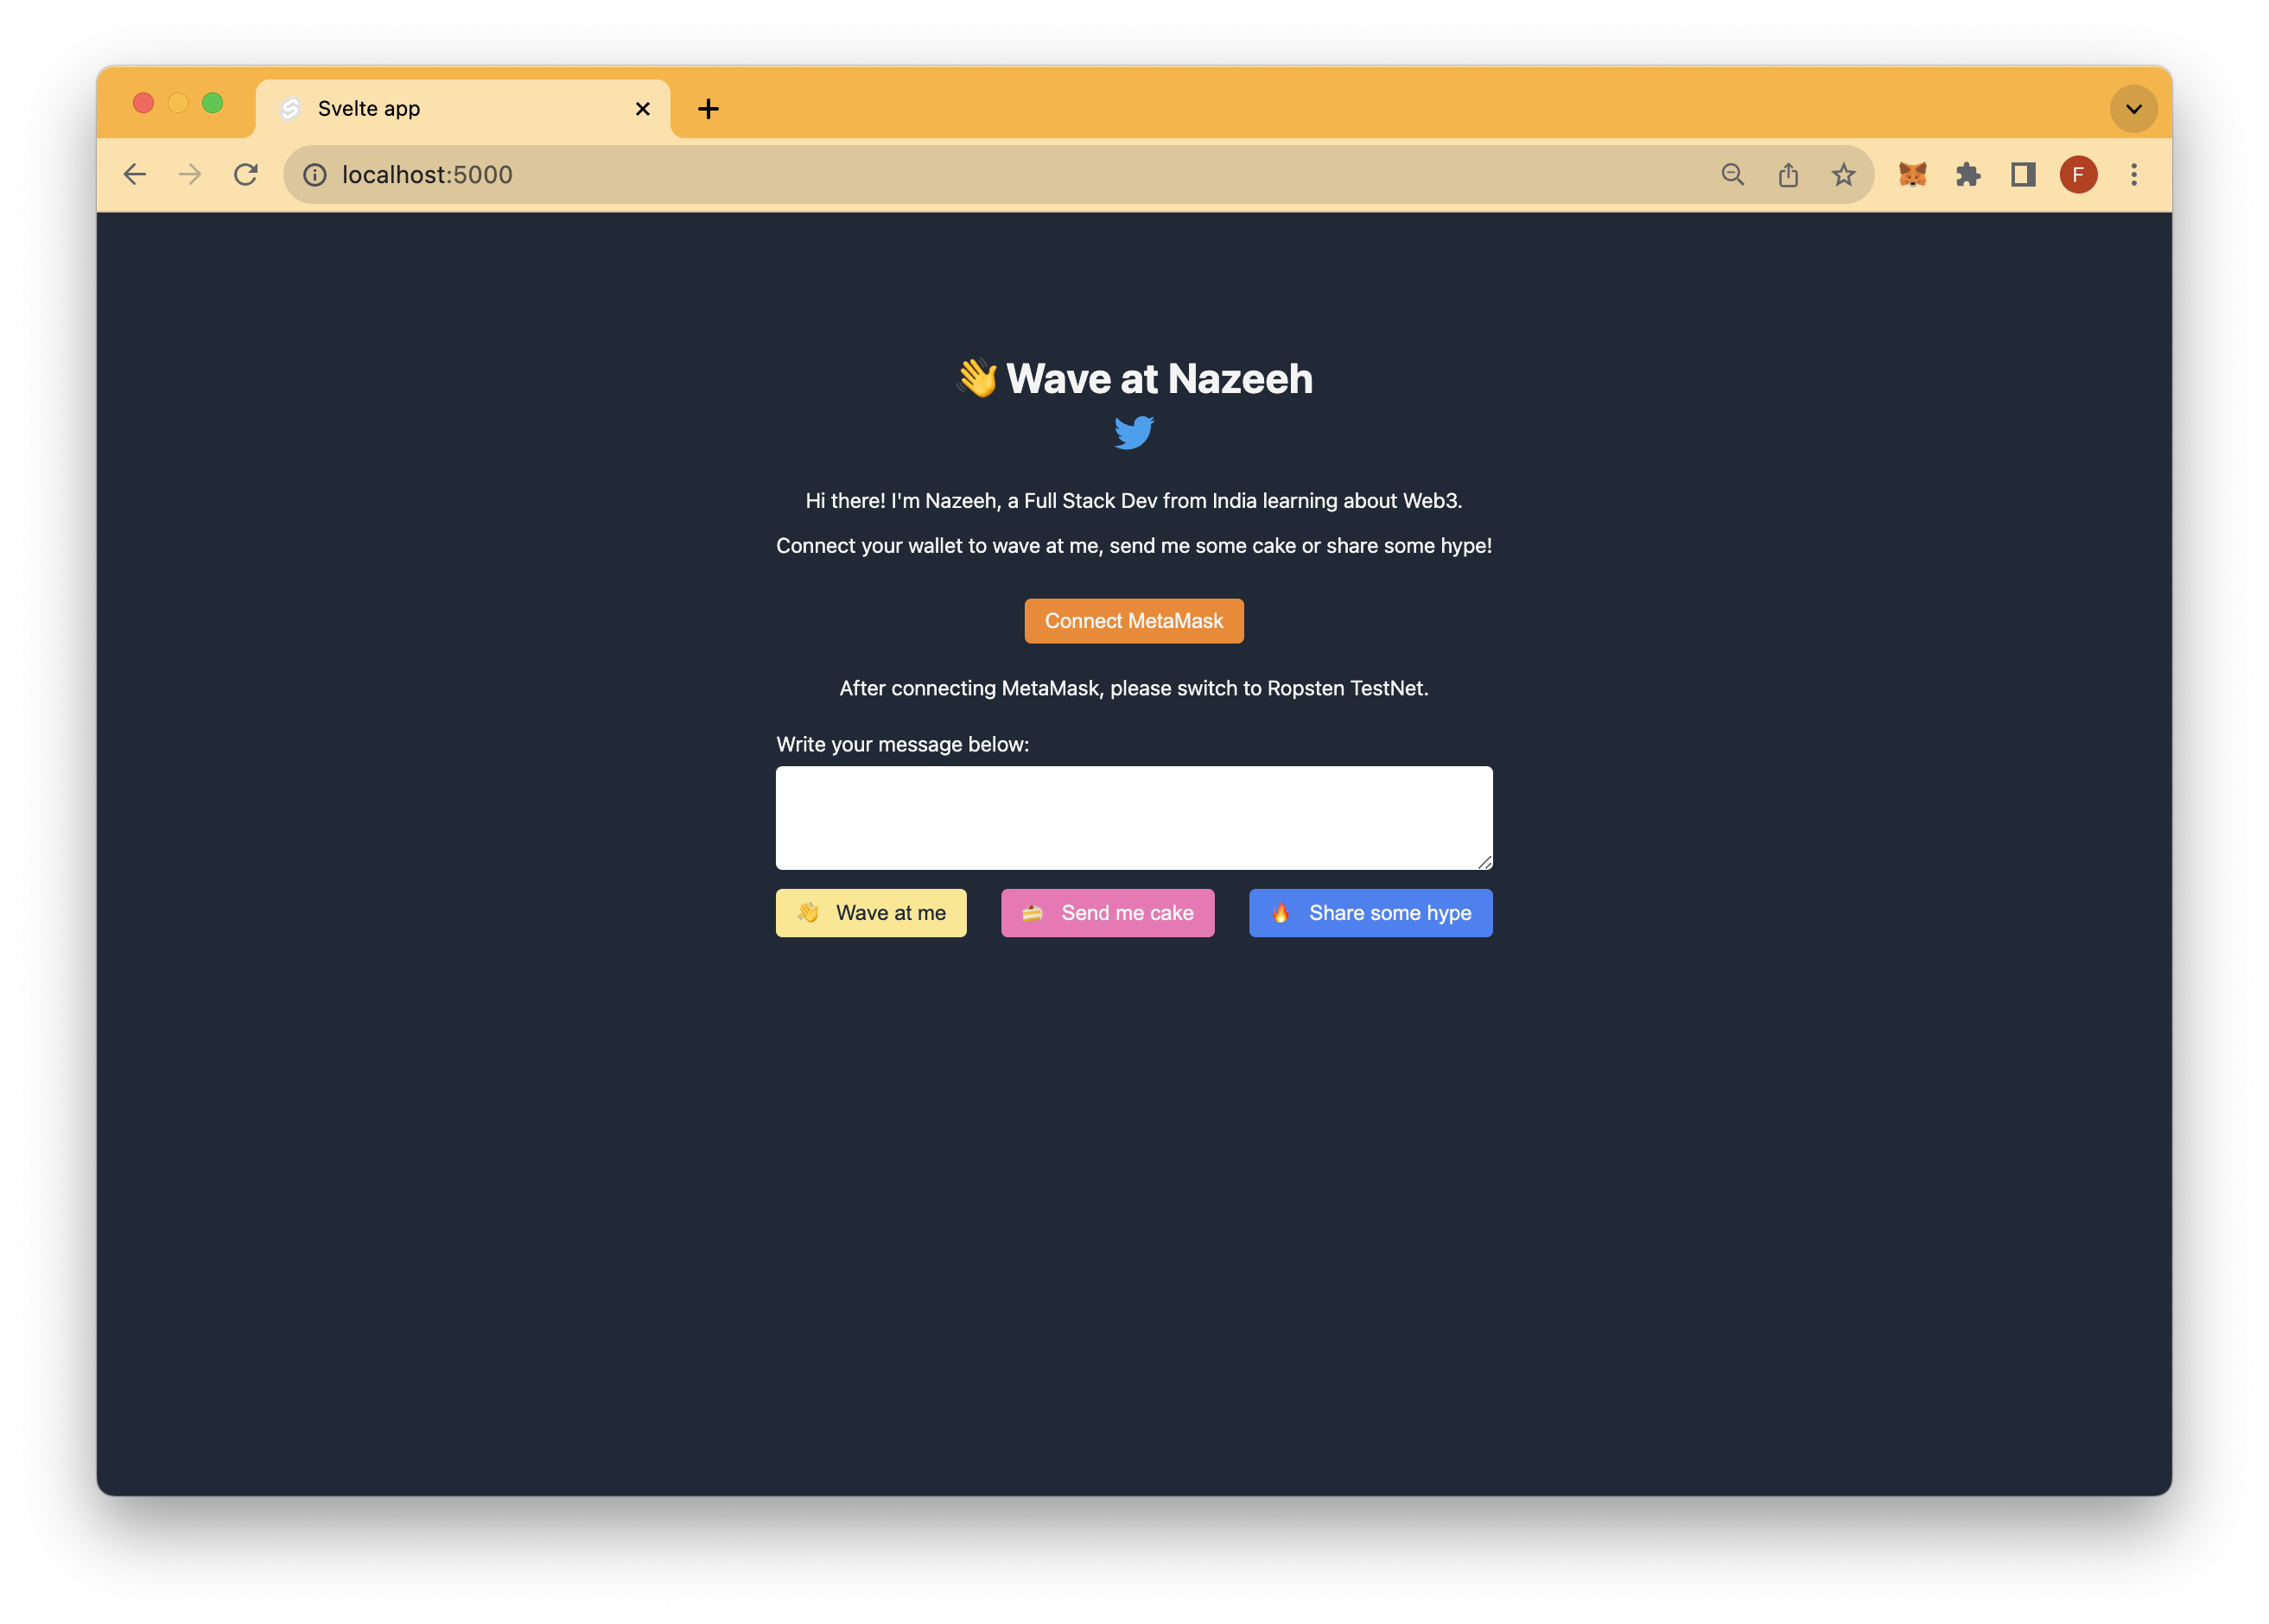
You will notice that, by clicking on any of the greetings, nothing is happening. Also, we are not able to see any previous greetings. So, let us add logic to send greetings to our smart contract and fetch all the previous greetings.
Navigate to the App.svelte file under the code/wave-portal-starter-boilerplate/src folder. App.svelte gets rendered on the home page upon server start and thus contains all the functionality to fetch the waves.
Update your contract address on line 10, which logged into the CLI while deploying it.
const CONTRACT_ADDRESS = 'YOUR_CONTACT_ADDRESS';
Now, paste the below code in the getAllWaves() function on line 12 in App.svelte. This function fetches all the greetings from the blockchain network to our Client.
async function getAllWaves() {
    if (!window.ethereum) {
      return;
    }

    const provider = new ethers.providers.Web3Provider(window.ethereum);
    const wavePortalContract = new ethers.Contract(
      CONTRACT_ADDRESS,
      WavePortal.abi,
      provider
    );
    const recievedWaves = await wavePortalContract.getAllWaves();

    if (!recievedWaves) {
      waveList = [];
      return;
    }

    const normalizeWave = (wave) => ({
      reaction: wave.reaction,
      message: wave.message,
      waver: wave.waver,
      timestamp: new Date(wave.timestamp * 1000),
    });

    waveList = recievedWaves
      .map(normalizeWave)
      .sort((a, b) => b.timestamp - a.timestamp);
    console.log('waveList: ', waveList);
    return;
  }
Explanation of the code above.
- Line 1: Declaring an asynchronous function getAllWaves() that will fetch all the waves from our smart contract.
- Line 2: Checking if we are getting an ethereum object in our window, if not we will return null.
- Line 6: Getting the provider to access the blockchain data.
- Line 7: Creating a local instance of our contract by passing Contract address, Contract abi and provider as an argument.
- Line 12: Fetching all the waves from our smart contract by calling getAllWaves() method.
- Line 14-17: If we do not get any waves, then we will return an empty array.
- Line 19: Declaring function normalizeWave(), that will destruct the wave.
- Line 26: Destructing the recievedWaves(), sorting on the basis of timestamp and assigning these sorted waves to the waveList variable.
We have to import the ABI of our WavePortal contract which enables us to interact with our smart contract. Thus add the following import statements on line 3 in App.svelte.
import { ethers } from 'ethers';
import WavePortal from './artifacts/contracts/WavePortal.sol/WavePortal.json'
You should see an error as shown below.
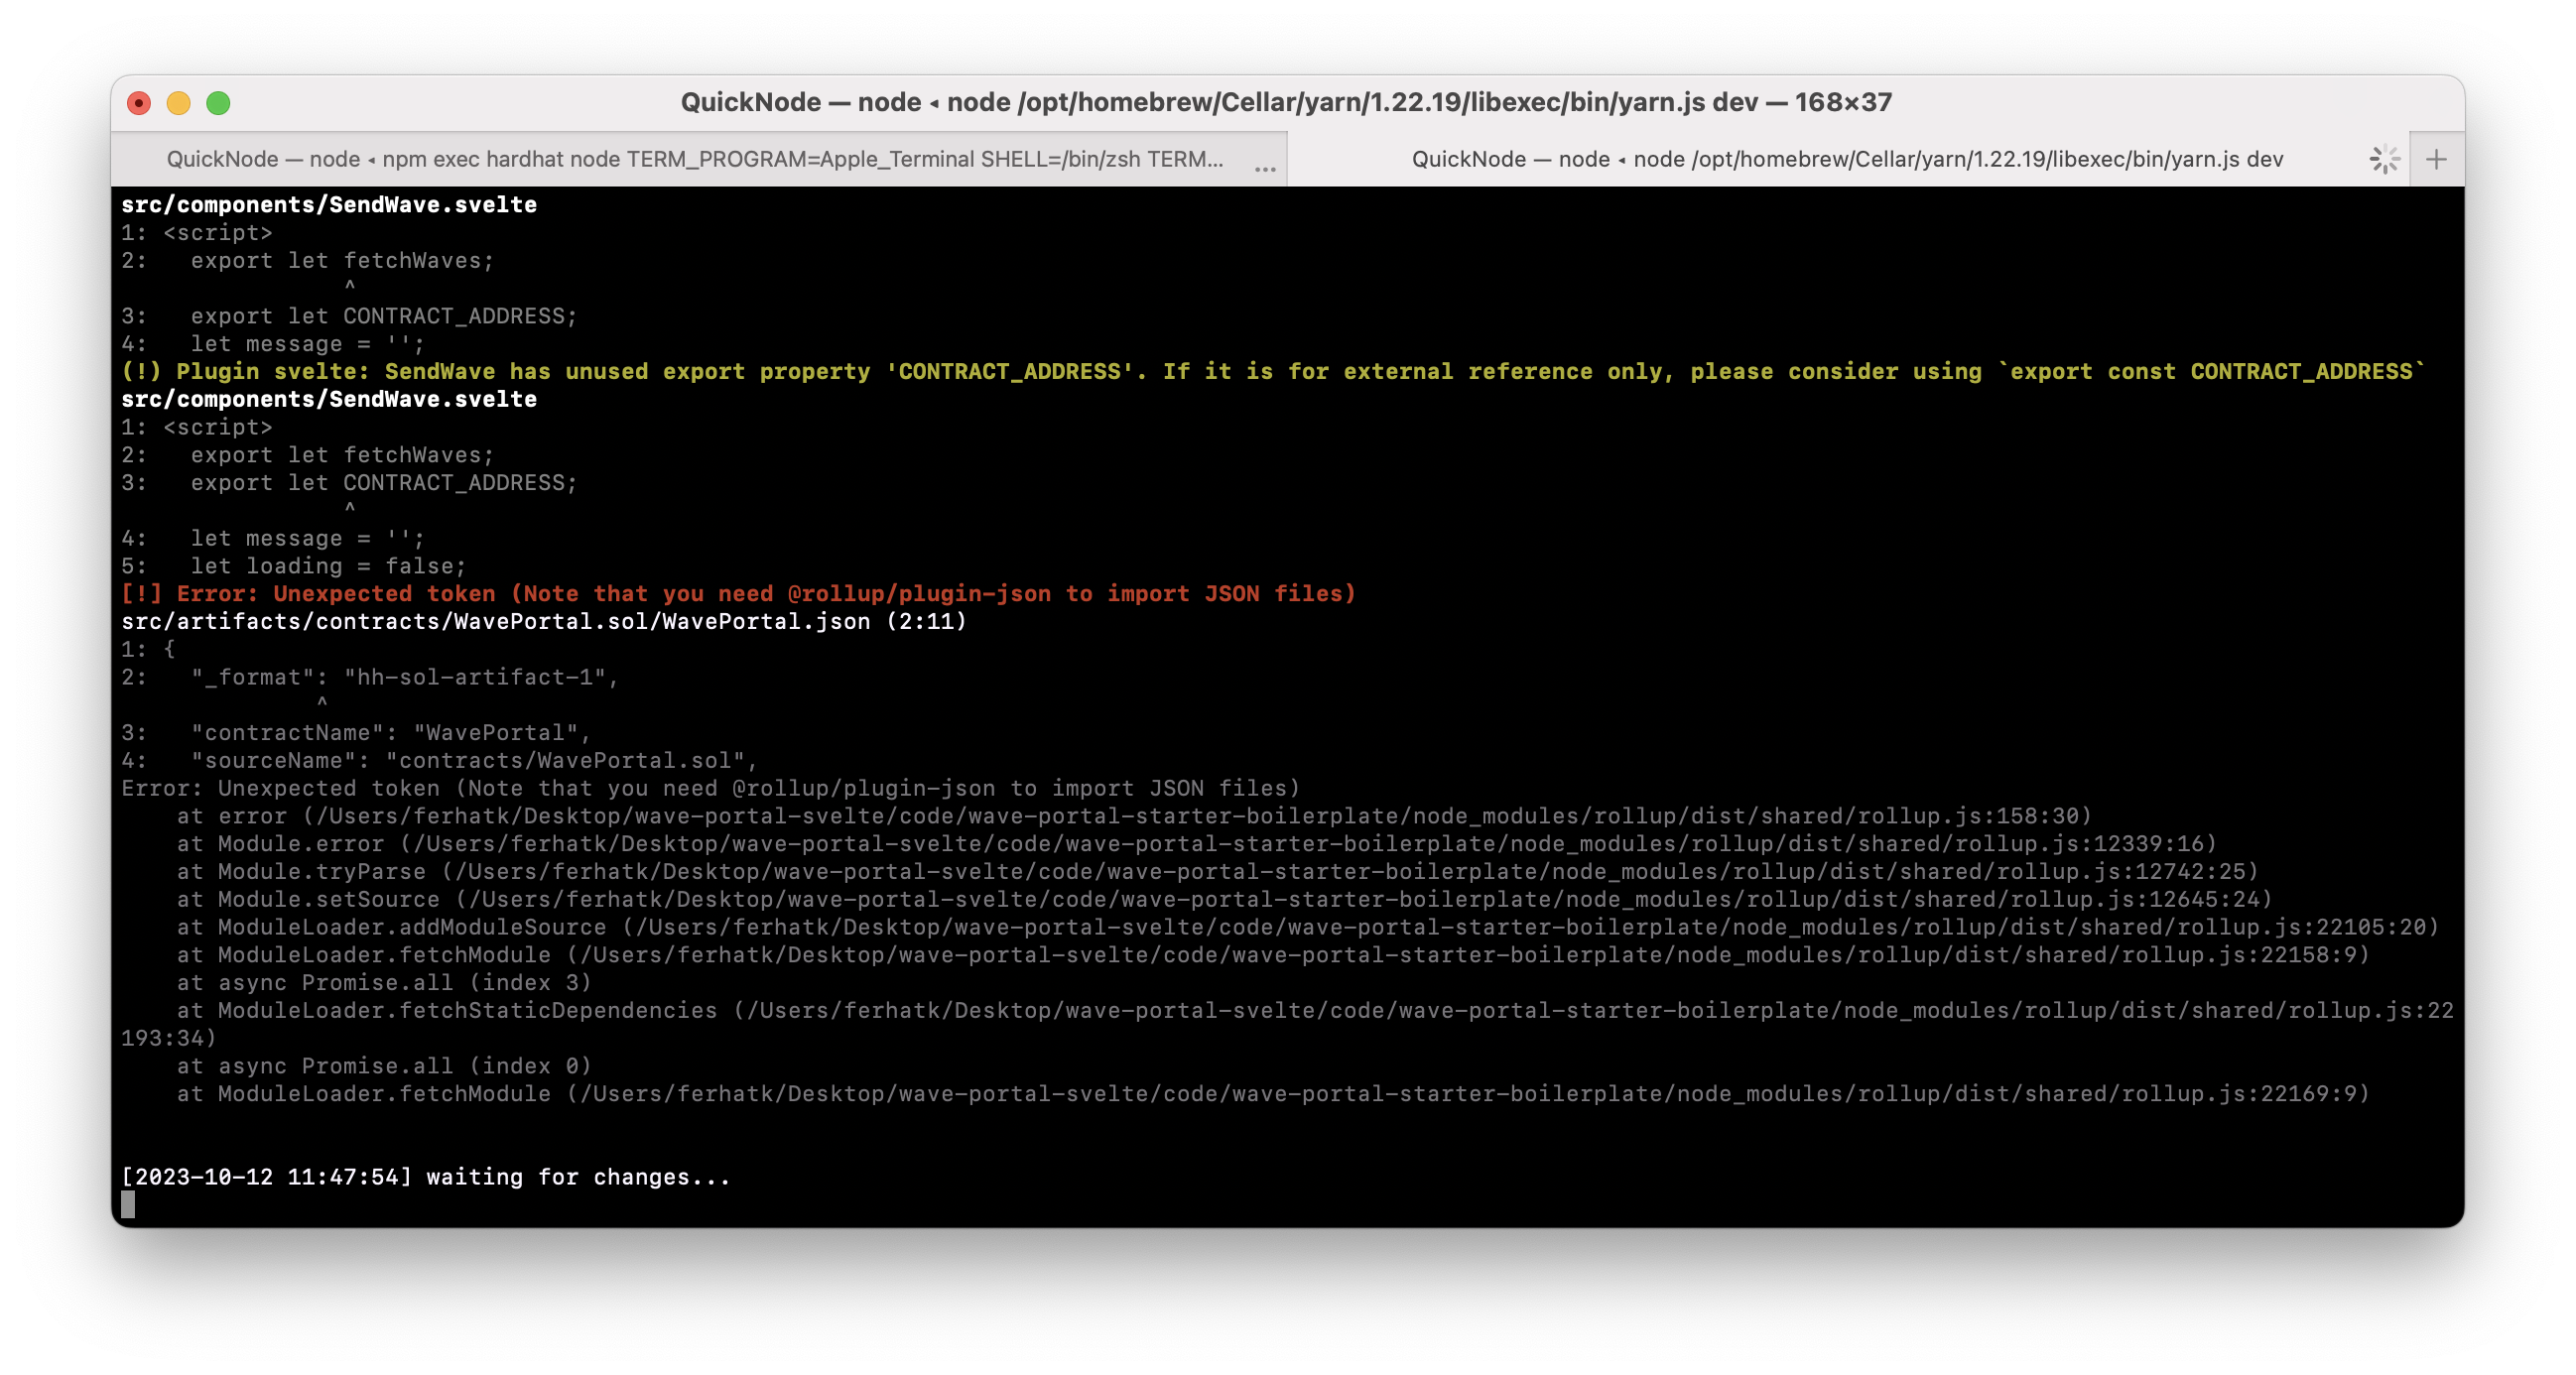
This is because we are trying to import a json file in our App.svelte, and to import a json file, we need to add an extra plugin rollup-plugin by running the following command.
yarn add @rollup/plugin-json
Navigate to the rollup.config.js file in code/wave-portal-starter-boilerplate/ directory. This file contains all your configurations for the rollup. Now, in your rollup.config.js file navigate to the plugins array as show below and add json(), on line 60.
plugins: [
     commonjs(),
     json(),
     ...
]
In rollup.config.js file, in code/wave-portal-starter-boilerplate/ directory in order to use json(), we also need to import json() from our newly added plugin, thus add the following import statement in line 7 of rollup.config.js file.
import json from "@rollup/plugin-json";
Now, restart the development server, you should see the frontend server started successfully. Currently, you won't see any greetings on our front end because we don't have one. So, let's add a function to send the greeting.
For that, navigate to code/wave-portal-starter-boilerplate/src/components/SendWave.svelte file. This file will contain logic for sending the wave. Complete the sendWaveReaction() function in line 7 by pasting the code from below. This function will send wave reaction.
async function sendWaveReaction(reaction, message) {
    loading = true;
    try {
      const provider = new ethers.providers.Web3Provider(window.ethereum);
      const signer = provider.getSigner();
      const wavePortalContract = new ethers.Contract(
        CONTRACT_ADDRESS,
        WavePortal.abi,
        signer
      );
      const transaction = await wavePortalContract.wave(reaction, message, {
        gasLimit: 400000,
      });
      await transaction.wait();
      message = '';
      fetchWaves();
      loading = false;
    } catch (error) {
      alert('Error while sending wave', error);
      loading = false;
    }
  }
Recap of the code above.
Line 1: Declaring an asynchronous function sendWaveReaction(), that will send our reaction to our smart contract on the blockchain network.
Line 2: Setting loading variable to true.
Line 4: Declaring a provider variable that contains the read-only abstraction to access the blockchain data.
Line 5: Storing the signer object from our provider in singer variable, that will allow us to sign the transaction.
Line 6: Creating the local instance of our smart contract.
Line 11: Calling the wave() function from our smart contract, with reaction and message as arguments.
Line 14: Waiting for the transaction to get completed.
Line 15: Resetting the value of message variable after sending the wave.
Line 16: Fetching all the waves again.
Line 17: Setting the loading indicator to false.
Line 19: Showing an alert if something goes wrong.
We also need to add the following import statements in SendWave.svelte file in line 2.
import { ethers } from 'ethers';
import WavePortal from '../artifacts/contracts/WavePortal.sol/WavePortal.json';
To interact with our smart contract from our front end, we need to connect our MetaMask wallet to our website. For that, in code/wave-portal-starter-boilerplate/src/components/Wallet.svelte file, complete the connectWallet() function in line 6 by pasting the below code. Wallet.svelte will contain all the logic required for connecting MetaMask wallet to our frontend.
async function connectWallet() {
    walletConnected = false;
    const { ethereum } = window;
    await ethereum
      .request({ method: 'eth_requestAccounts' })
      .then((accountList) => {
        const [firstAccount] = accountList;
        account = firstAccount;
        walletConnected = true;
      })
      .catch((error) => {
        walletConnected = false;
        connectWalletError = error;
        console.log('error connecting wallet');
      });
}
Explanation of the above code:
- Line 1: Declaring an asynchronous function connectWallet().
- Line 2: Setting walletConnected variable to false.
- Line 3: Getting an ethereum object from our window.
- Line 4: Calling ethereum.request
({ method: 'eth\_requestAccounts' })that will give us the accounts of the connected wallet. - Line 7: Getting first account from an array of all the accounts
- Line 8: Assigning account variable the value of first account.
- Line 9: Setting walletConnected variable to true.
- Line 12: Setting walletConnected variable to false, if encountered an error while connecting wallet.
Now, restart the server if needed and you should see a MetaMask popup on clicking the Connect MetaMask button. After connecting, we'll be able to successfully send greetings, waves as well as fetch all the greetings.
Now, we have our smart contract running successfully on a local node, so let's deploy it on a live public testnet. Feel free to close your local node running on Hardhat as it's not needed anymore.
Creating an Ethereum Sepolia Endpoint
We'll be deploying to the Sepolia test network in this tutorial. For that, we'll update our MetaMask wallet to connect to the Sepolia network and send yourself some test ETH (you can use the Quicknode Multi-Chain Faucet). Don't worry, we'll show you each step.
Navigate to the Endpoints page on Quicknode (don't worry you can create an account for free), and click Create an Endpoint. Then, select the Ethereum Chain and Sepolia test network and click Create Endpoint.
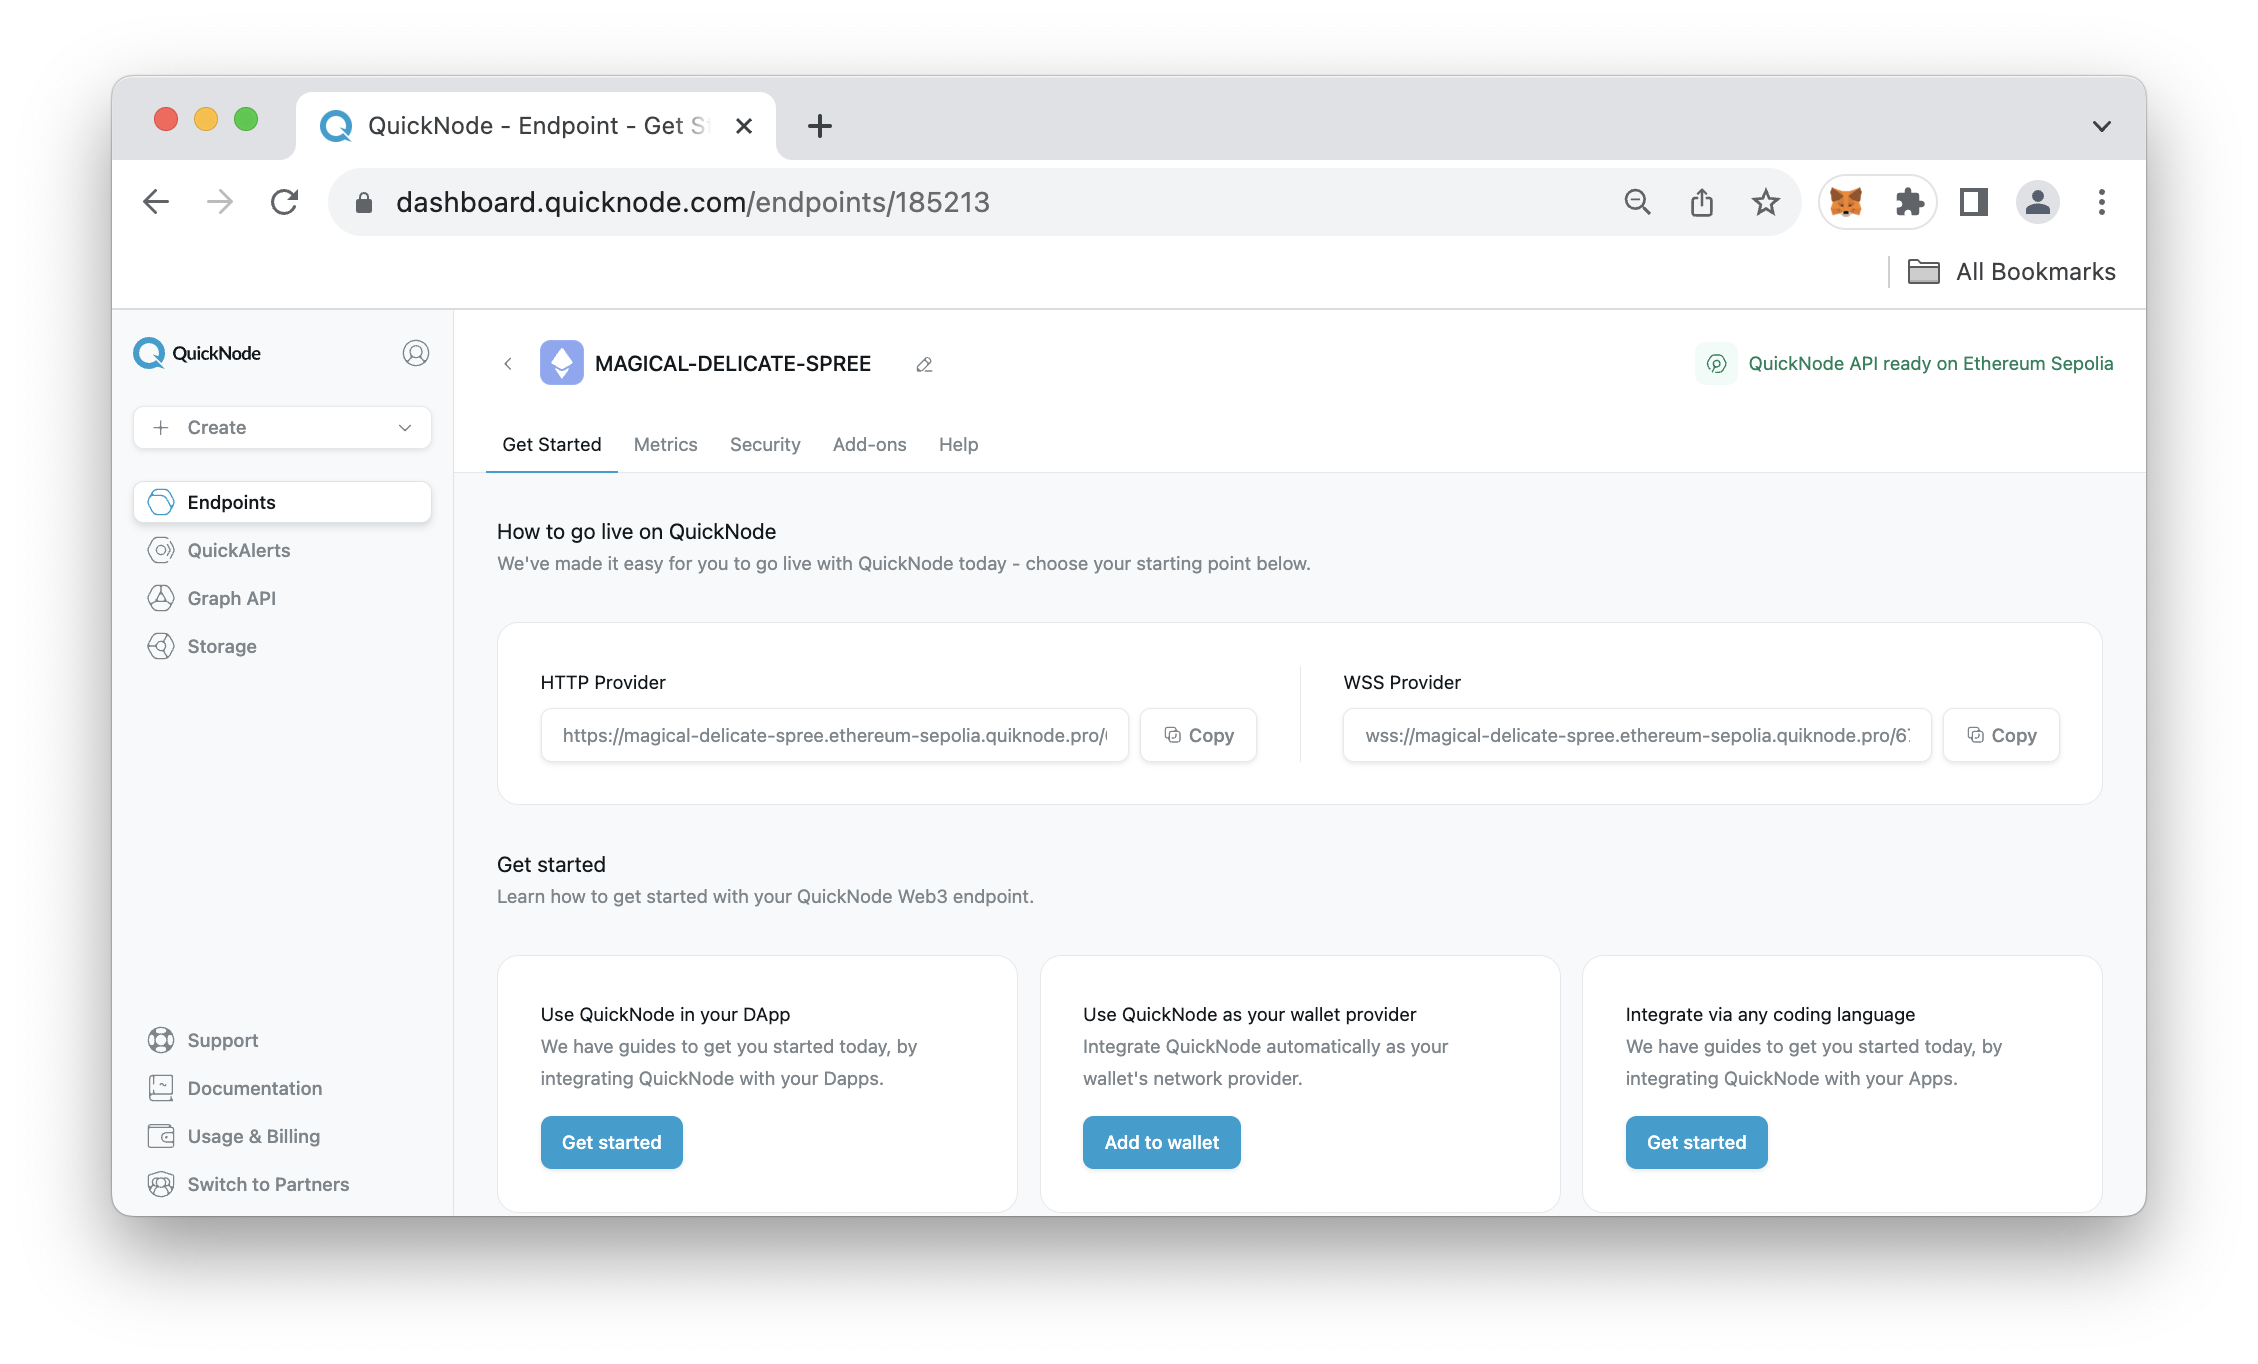
Once you've created the endpoint, you'll have a HTTP and WSS URL. For the purpose of this guide, keep the HTTP Provider URL handy as you'll need it later on.
Retrieve ETH with Quicknode Multi-Chain Faucet
Since we'll be deploying the smart contract on a testnet. We'll need testnet ETH for transaction costs.
You can use the Quicknode Multi-Chain Faucet to get test ETH on a number of blockchains. Just select the blockchain and network, then paste your wallet address or connect your wallet.

Note: You'll need at least 0.001 ETH on Ethereum mainnet in order to use the Faucet
Deploying the Smart Contract
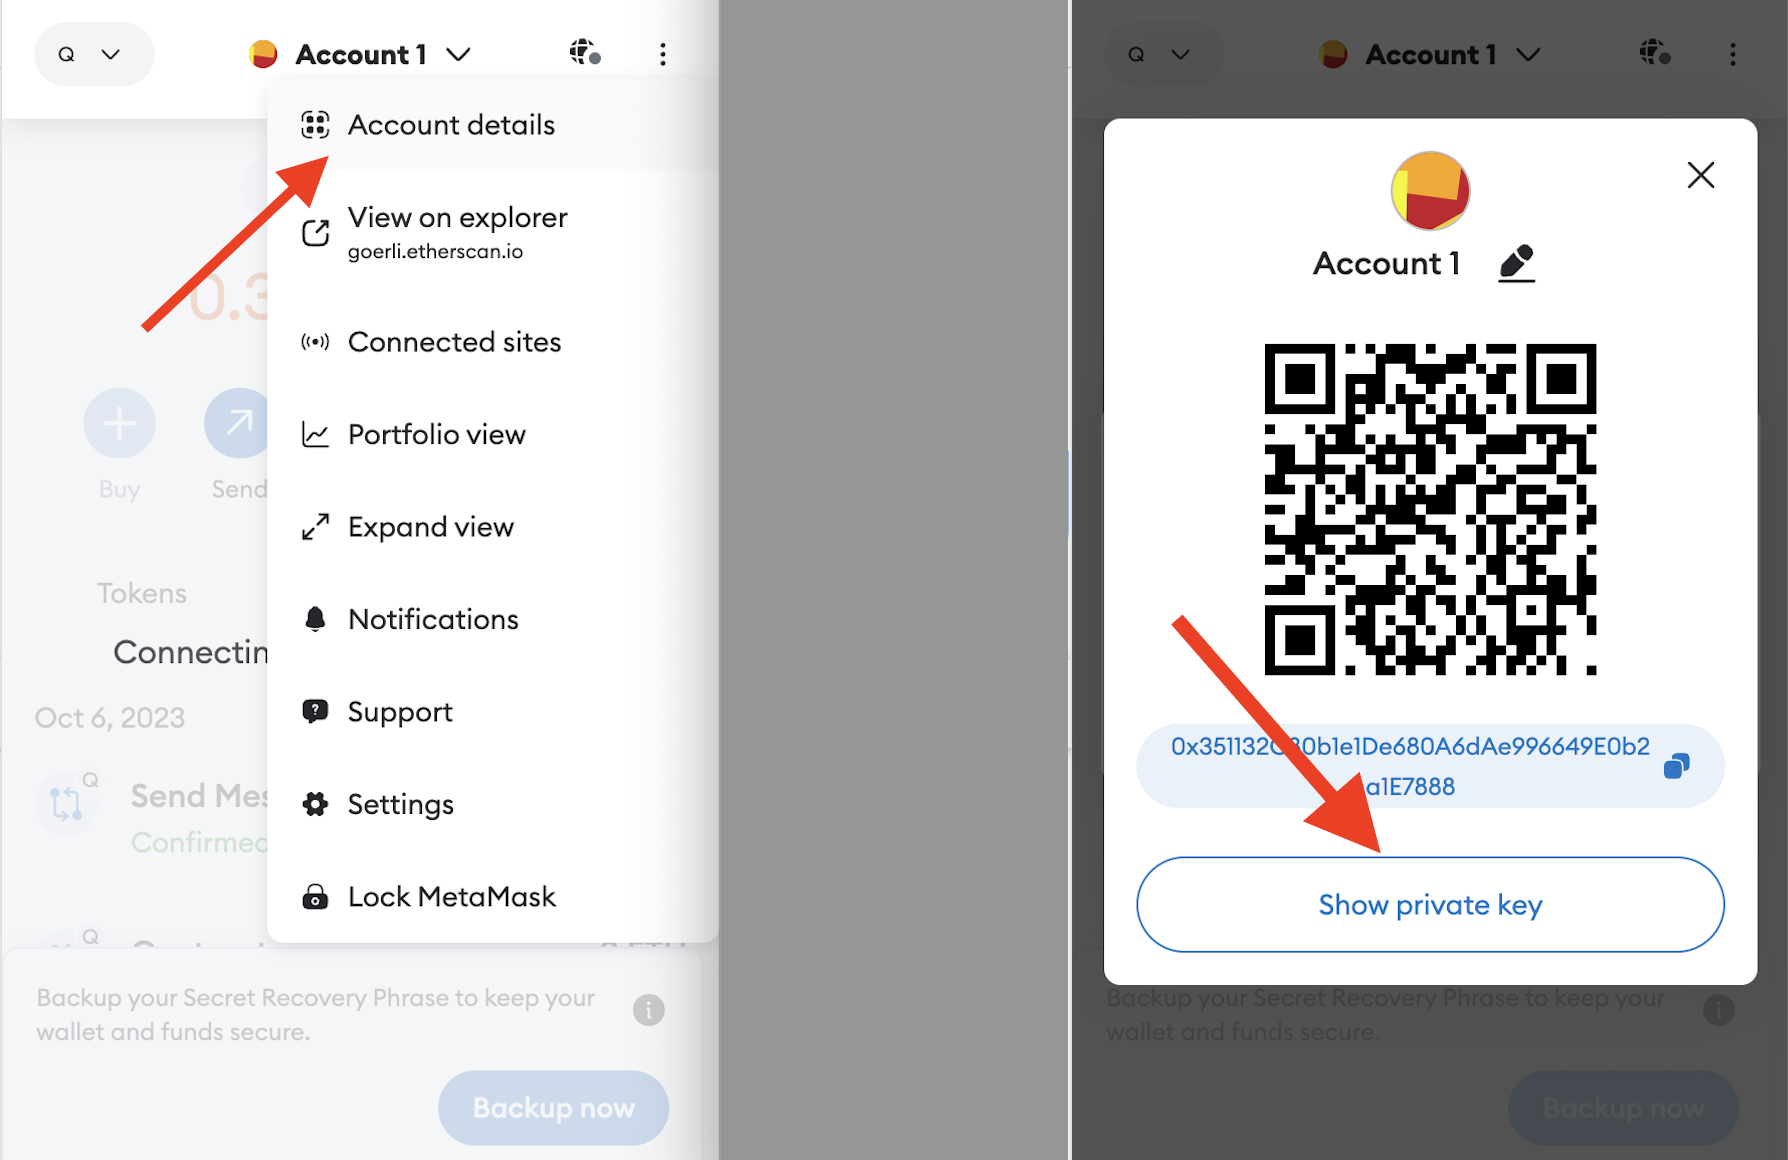
To deploy to the test network we need to update our hardhat.config.js with additional network and wallet information. One thing is to set our private key of the wallet we'll be deploying from. You can export your private key from MetaMask by clicking the elippsis (three dots in the top-right) then, click Account Details --> Show Private Key. Keep this handy as you'll need to place it in the file below.
So open the hardhat.config.js file and input the code below:
require("@nomicfoundation/hardhat-toolbox");

module.exports = {
  solidity: "0.8.4",
  paths: {
    artifacts: './src/artifacts',
  },
  networks: {
    hardhat: {},
    sepolia: {
      url: "<YOUR_QUICKNODE_URL_HERE>",
      accounts: [`0x${your-private-key}`]
    }
  },
};
You'll need to replace the YOUR_QUICKNODE_URL_HERE with the HTTP Provider URL you obtained in the Creating an Ethereum Sepolia Endpoint. Additionally, replace the your-private-key placeholder with the private key you obtained from MetaMask.
Now, to deploy our smart contract to the Sepolia network, run the following command within your root directory (e.g., code/wave-portal-starter-boilerplate/).
npx hardhat run scripts/deploy.js --network sepolia
On successful deployment, you should see the following output in your terminal.
WavePortal deployed to: 0x4f5F98f3696e1dDc107fd786d252D6Ff8D351B6b
You'll need to update your contract address in src/App.svelte with the contract address you just created on the Sepolia blockchain.
Additionally, since our front-end app uses a different version of Ethers compared to Hardhat toolbox, let's downgrade it to the proper version:
yarn remove ethers
yarn add --dev ethers@5.7.2
Refresh your front-end app and connect your wallet, you should be now be able to interact with it on the Sepolia blockchain.
Conclusion
Congratulations! You have integrated your first dApp using Svelte. Try the challenges mentioned above and feel free to connect me (@0xCrispy on Twitter) if you encounter any errors.
Note that a lot of things can still be improved in this project. So, we challenge you to try the following:
- Showing a loading indicator while the transaction is in progress
- Detecting the current network of the MetaMask. If the user is on a network other than Sepolia, then prompt the user to change the network.
If you have any questions, feel free to use our dedicated channel on Discord or provide feedback using the form below. Stay up to date with the latest by following us on Twitter and our Telegram announcement channel.
We ❤️ Feedback!
Let us know if you have any feedback or requests for new topics. We'd love to hear from you.