9 min read
This guide includes references to the Goerli testnet, which is no longer actively maintained. While specific steps related to this chain may not be applicable, the overall process may be valid for other chains. We recommend exploring current alternatives for your implementation. If you’d like to see an updated version of this guide, please let us know!
Overview
Want to become a Web3 Developer? In this short guide, you will gain an understanding of smart contracts and deploy your first Hello World smart contract to an Ethereum testnet blockchain (Goerli). Let's dive in!
What We Will Do
- Learn about the basics of Solidity
- Create a Hello World Smart Contract
- Spin up an Ethereum Goerli Endpoint on QuickNode
- Deploy the Hello World Smart Contract
- Interact with the Hello World Smart Contract
What You Will Need
- A basic understanding of Ethereum. See our What is Ethereum guide for more information
- A code editor (e.g., VSCode)
- Remix.IDE
- A web3 wallet (e.g., MetaMask, WalletConnect compatible)
- ETH on Goerli Testnet (e.g., you can get some at the QuickNode Faucet)
What are Smart Contracts?
A smart contract is an immutable digital contract designed to enforce the logic within it automatically. Smart contracts live on the blockchain and are written in Solidity (the native language for the EVM). This code is stored and replicated on the blockchain network, where it is executed upon being called or automatically when certain conditions are met.
Solidity 101
Before we build our Hello Word smart contract, let us get a quick primer on Solidity.
In Solidity, smart contracts resemble classes in object-oriented programming languages. State variables, functions, function modifiers, events, errors, structural types, and enum types can all be declared in a contract. Contracts may also be inherited from other contracts. Now, let us recap some of these concepts.
Global Variables: You can use several built-in Solidity keywords to reference global information, such as block and transaction information. Let's list a few of the most popular:
- msg.sender (address): sender of the message (current call)
- msg.sig (bytes4): first four bytes of the calldata (i.e. function identifier)
- msg.value (uint): number of wei sent with the message
- tx.origin (address): sender of the transaction (full call chain)
- block.number (uint): current block number
- block.timestamp (uint): current block timestamp as seconds since unix epoch
Feel free to check out this comprehensive list of built-in keywords for more information. You can also look at the full Ethereum RPC methods available on the QuickNode Docs.
You should also be aware of the EVM (i.e., Ethereum Virtual Machine), which is the virtual machine for the Ethereum blockchain. To get a quick overview, check out this What is the Ethereum Virtual Machine (EVM) guide.
Variables & Types: Variables have a type, which determines the kind of data they can store, and a name, which is used to reference the variable in the code. There are types such as:
- uint: unsigned integer, can store a non-negative whole number (i.e., 0, 1, 2, 3, etc.). They can also be prefixed with a number to limit the bit size (e.g., uint256). Solidity allows uint's from 8 to 256 (in steps of 8; uint8, uint16, uint24, etc.) and defaults to uint256 if not specified.
- int: signed integer, can be used to store a whole number with a sign (i.e. -1, 0, 1, 2, etc.)
- bool: boolean, can be used to store a true/false value
- enum: an enumerable value (i.e., enum Status
{ started, ended }) - address: an Ethereum address used to store the address of another contract or account on the blockchain
- bytes32: a fixed-length byte array used to store a sequence of 32 bytes (256 bits)
- string: a string of characters used to store text
- struct: a type that can be made up of multiple types
Functions: Functions are used to define a block of code that can be executed multiple times in a smart contract. Functions can take input parameters, perform various operations on these parameters and return a result. Functions are declared using the function keyword, followed by the function name, input parameters, visibility, and the code block that defines the operations of the function. Functions visibility can be public, private, internal, external, pure and view. Functions declared with the view keyword can read the state but not modify it, while pure functions do not view or access state variables.
Functions also have scopes that can allow different visibility. Here are some:
- public: Allows access from inside the contract and can be called from outside the scope of the contract
- private: Restricts access to only within the contract
- internal: Allows access within the contract or can be inherited within other contracts
- external: Allows access within the contract and call from outside the scope of the contract
- payable: Not a visibility but marks if a variable/function with address types is a payable address (one that can be sent ether)
These visibilities can also apply to variables except external
Modifiers: Modifiers are code that can be executed before and/or after a function call. Modifiers can be used to restrict function access, validate function inputs, and protect against attack vectors. A modifier can be setup such as:
contract Test {
    address payable owner;

    constructor() { owner = payable(msg.sender); }

    modifier onlyOwner {
        require(
            msg.sender == owner,
            "Only owner can call this function."
        );
        _;
    }
}
You can now access Logs for your RPC endpoints, helping you troubleshoot issues more effectively. If you encounter an issue with your RPC calls, simply check the logs in your QuickNode dashboard to identify and resolve problems quickly. Learn more about log history limits on our pricing page.
Events & Logs: Events in Solidity are similar to logs. They are stored on-chain and placed inside functions you declare. When a function gets executed, the event is emitted and can be queried historically. An event may look something like this:
contract Test {

    event LogUser(address _user, bool _status);

}
Note you can also add the indexed keyword to an event field to declare it as a special data structure called topics (which we'll cover in another guide).
Constructor: A constructor is an optional function that gets executed upon deployment. It can be thought of as an initializer, and its state is added to the contract's bytecode rather than held in contract storage.
contract Test {
    address public owner;

    constructor(address _owner) {
        owner = _owner;
    }
}
Fallback Function: Although not present in the HelloWorld contract we will be deploying in this guide, a fallback function is declared with fallback() function that gets executed when a function call is made on a contract that is not recognized or if no data was sent and there is no receive Ether function. A test contract with a fallback function can look something like:
contract Test {
    address x;

    fallback() external { x = msg.sender; }
}
Creating an Ethereum Endpoint on QuickNode
To deploy a smart contract to Ethereum's test blockchain, Goerli, you'll need an API endpoint to communicate with the network. You're welcome to use public nodes or deploy and manage your own infrastructure; however, if you'd like 8x faster response times, you can leave the heavy lifting to us. Sign up for a free account here.
Once logged in, click the Create an endpoint button, then select the Ethereum chain and Goerli network.
After creating your endpoint, copy the HTTP Provider link and keep it handy, as you'll need it next.

Configuring Your Web3 Wallet with QuickNode
If you're using MetaMask to deploy this contract, you'll first need to configure your RPC settings. However, note you can also use a WalletConnect compatible wallet for this guide. Some compatible wallets are Coinbase Wallet, Rainbow Wallet and TrustWallet.
Open up MetaMask and click the network dropdown at the top. After, click the Add Network button.
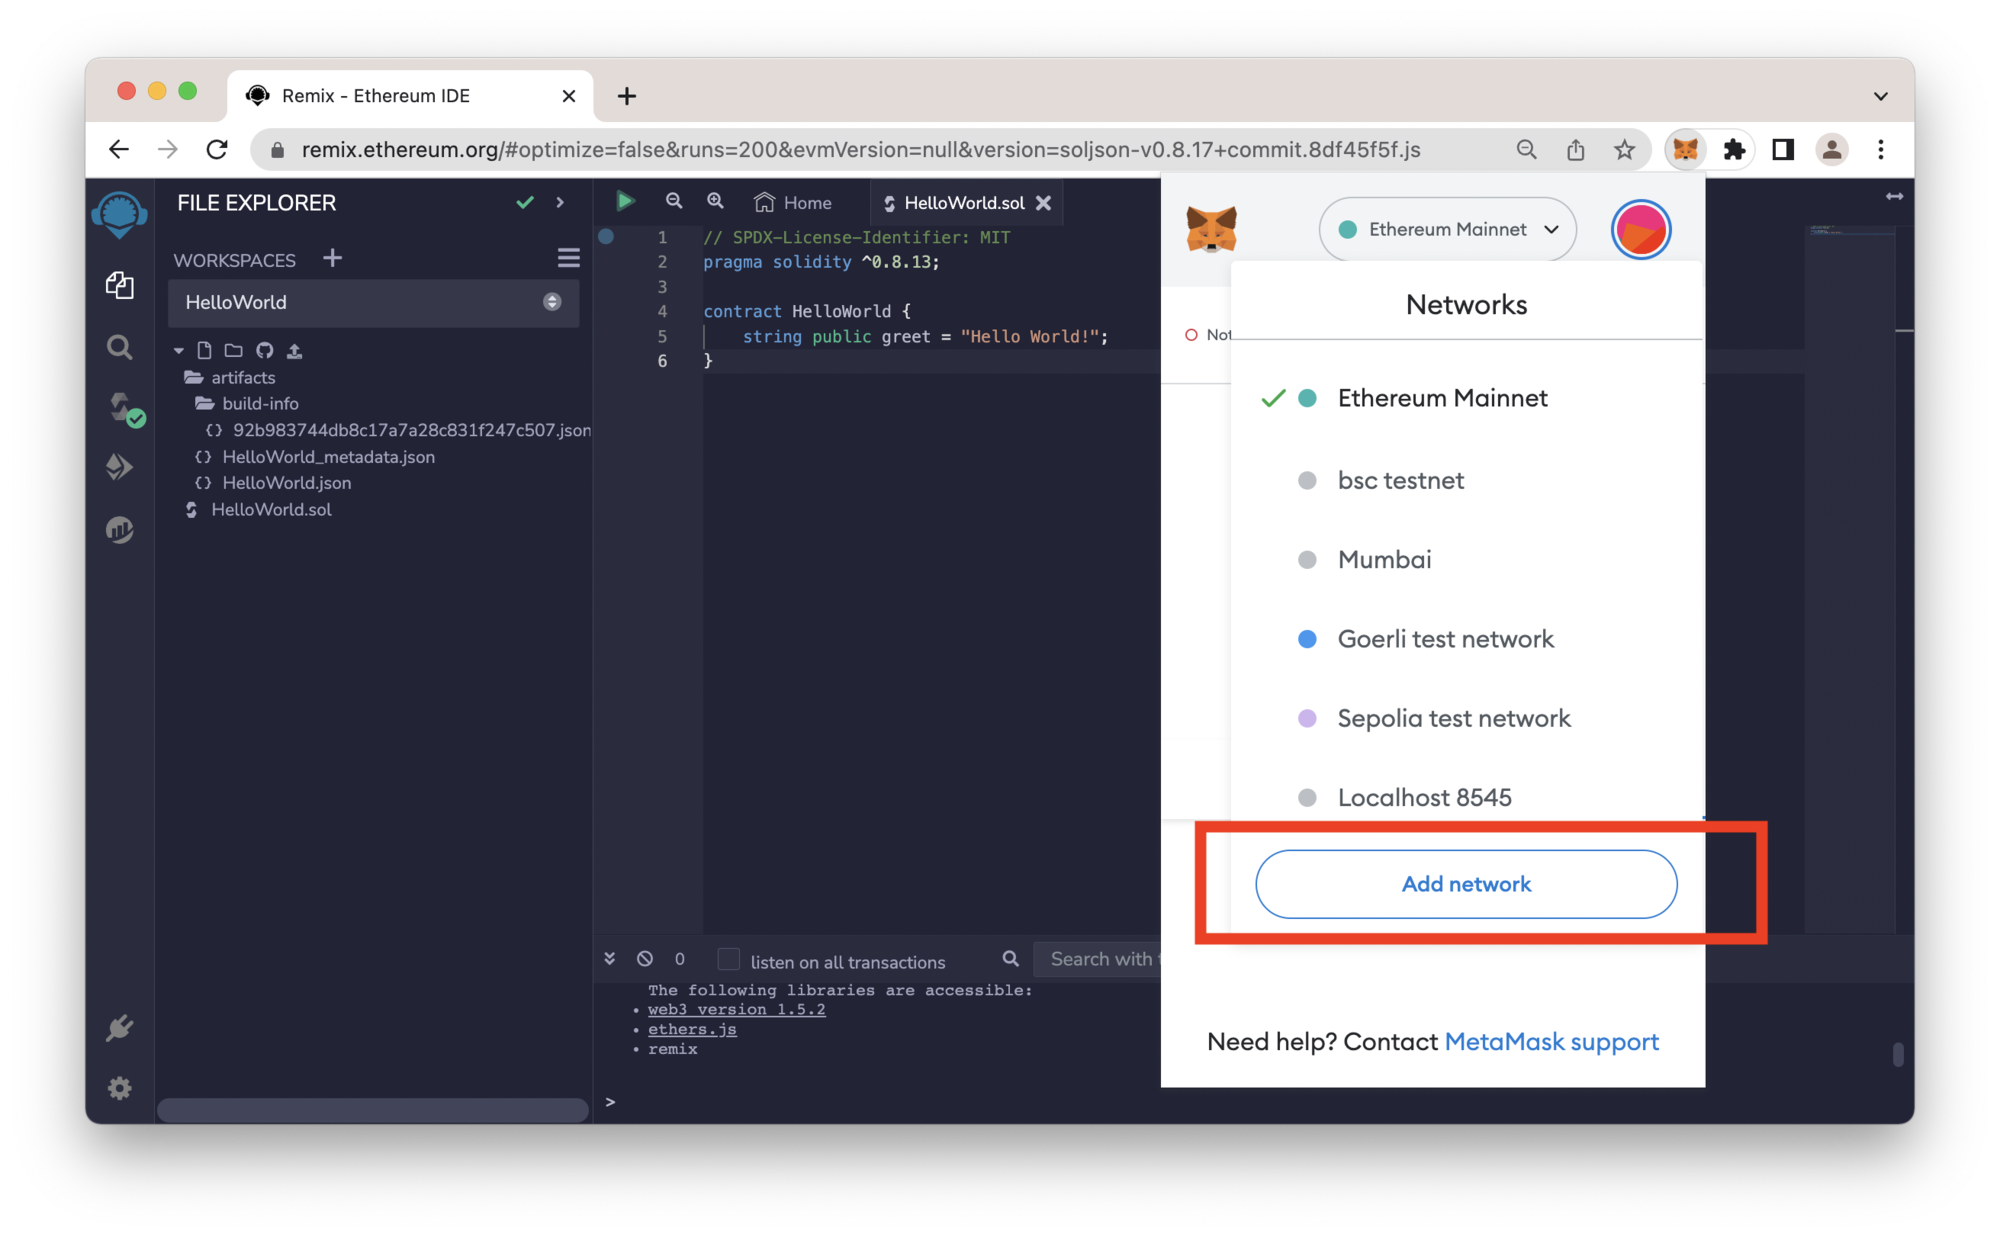
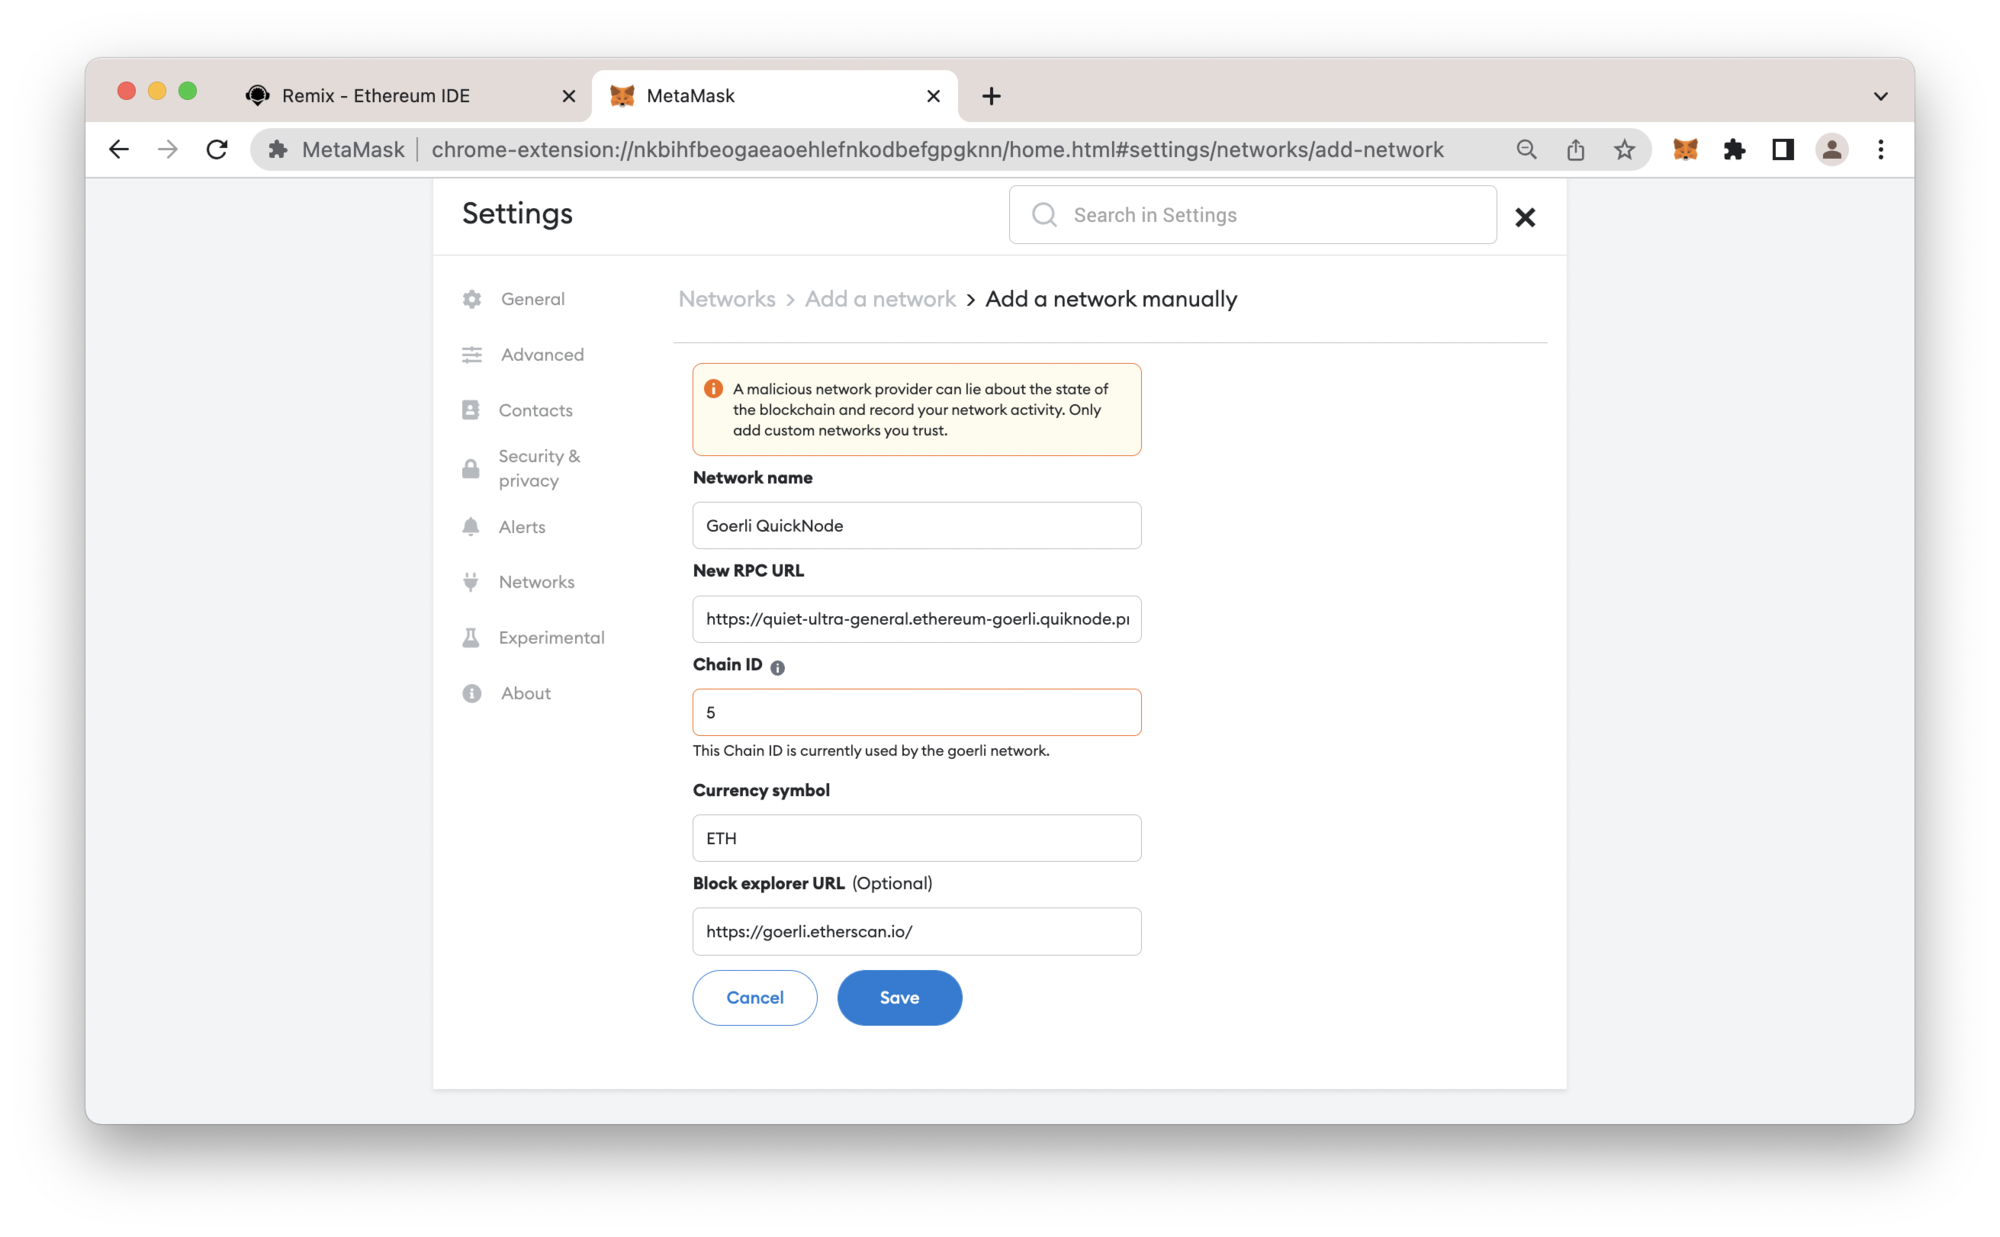
At the bottom of the page, click Add a network manually and fill out the following details:
- Network name: Goerli QuickNode
- New RPC URL: Enter the QuickNode HTTP URL you retrieved earlier
- Chain ID: 5
- Currency symbol: ETH
- Block Explorer URL: https://goerli.etherscan.io/
It should end up looking similar to this:
Retrieving Test Tokens via the QuickNode Faucet
Now that we have our QuickNode Endpoint configured with our web3 wallet, the next step is retrieving some testnet tokens to pay for transactions on a blockchain.
Navigate to the QuickNode Faucet, connect your wallet, and request tokens.
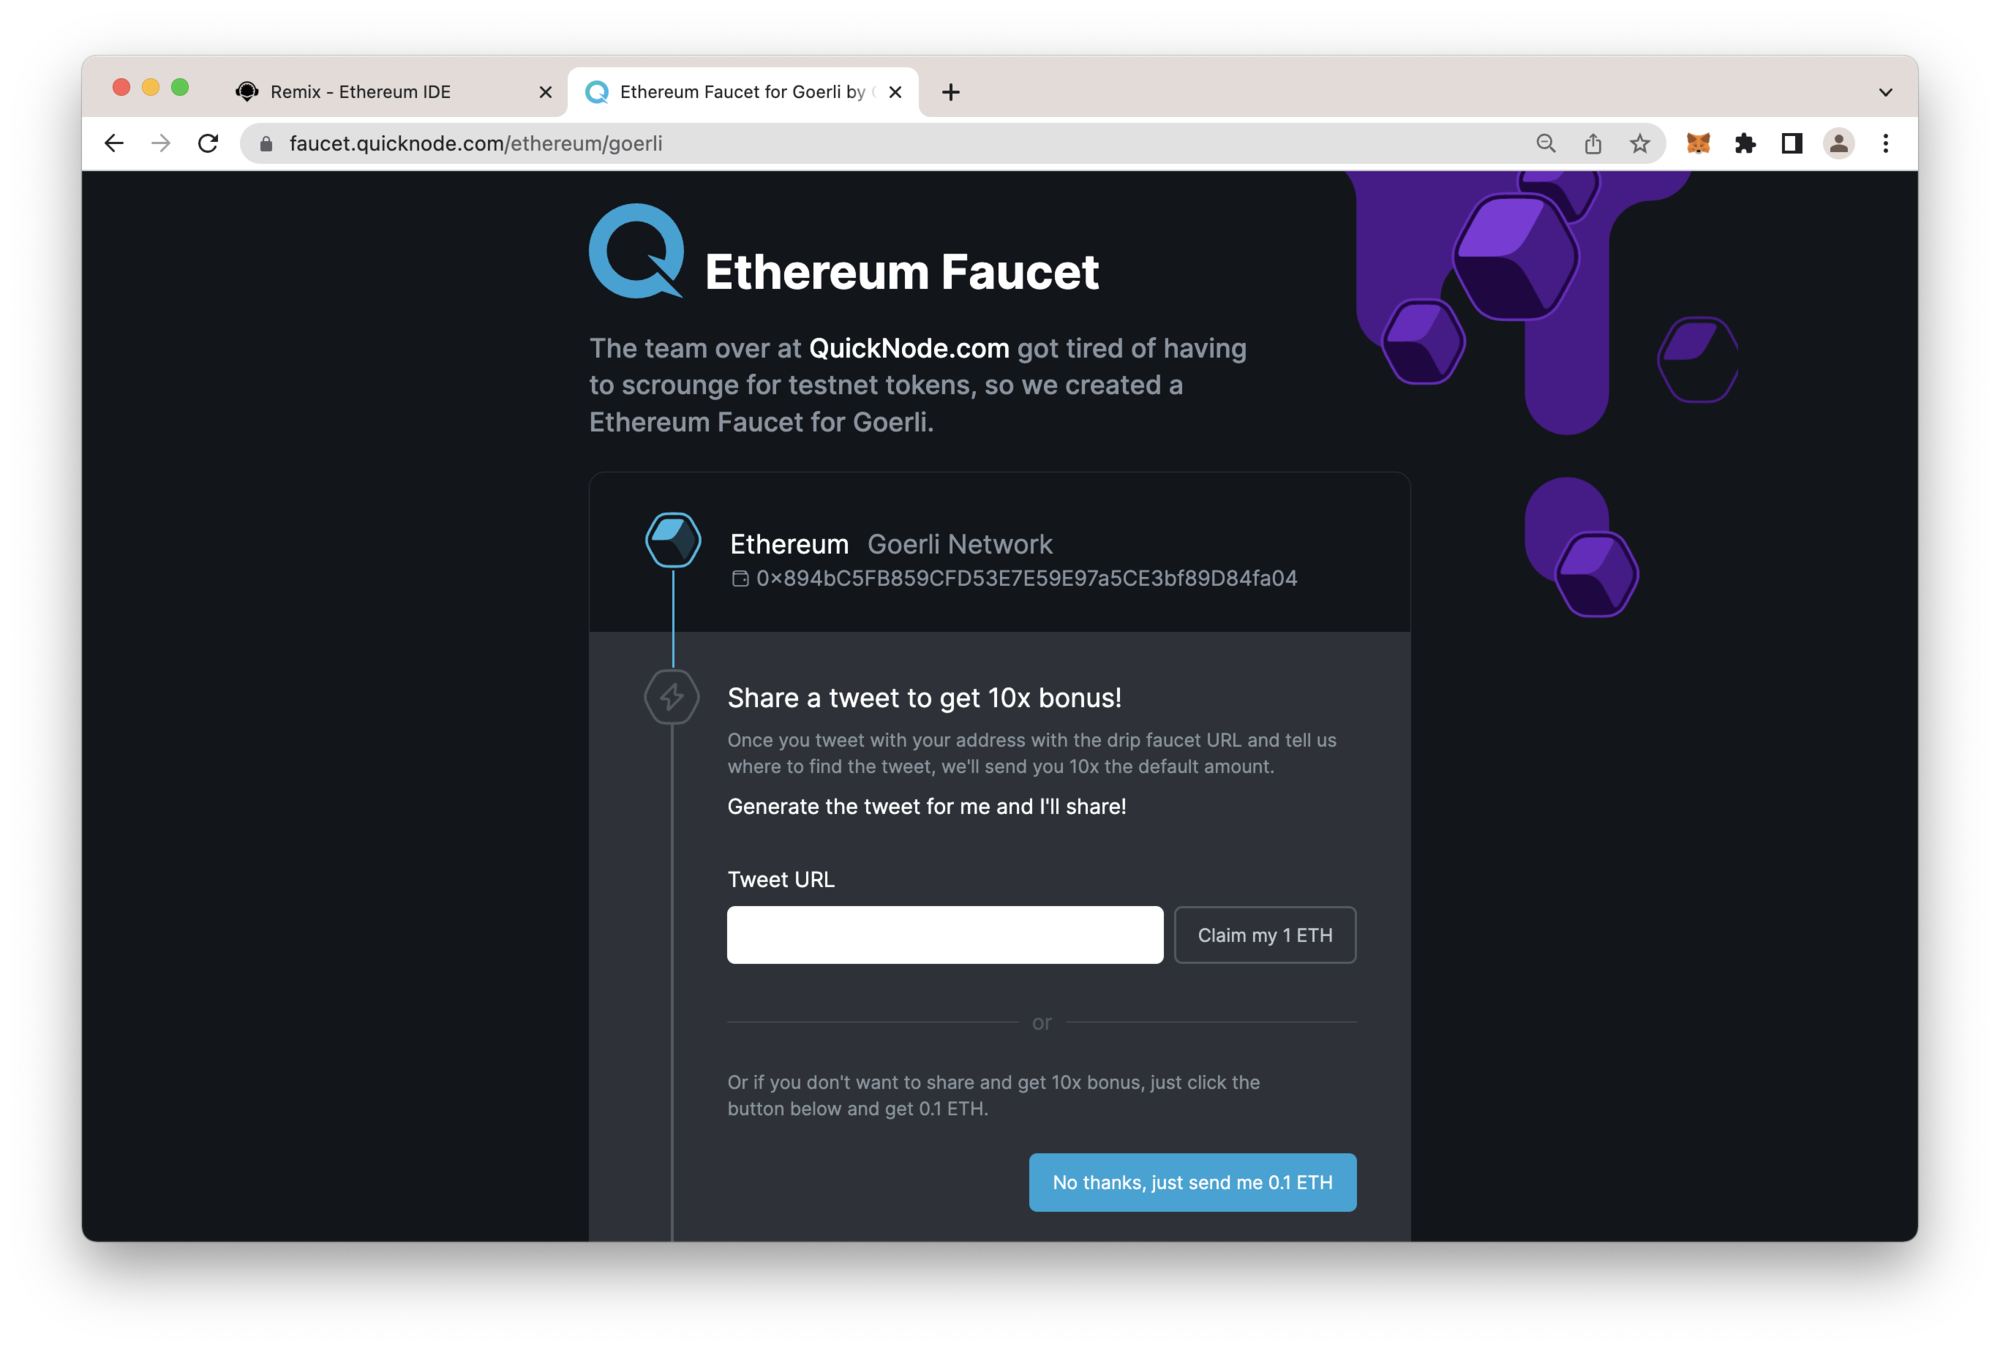
Pro-tip. You can sign in with Twitter and get more testnet tokens!
You can also verify the test ETH tokens are received by navigating to the explorer URL provided.
Building the Hello World Smart Contract
Time to build! Navigate to Remix.IDE and open a new workspace (click the + sign, then select a Blank template and pick a name).
Create a file called HelloWorld.sol and input the following code:
// SPDX-License-Identifier: MIT
pragma solidity ^0.8.17;

contract HelloWorld {
    string public greet = "Hello World!";
}
Let's recap the code.
Line 1: Specify the license identifier. In general, you can use MIT licensing to express permission to reuse code for any purpose. This is what we will use for this smart contract.
Line 2: Specify the pragma version. You can use the ^ character to note acceptable versions above the specified version. Also, note that this doesn't change the compiler version but acts as a check and throws an error if it is not met.
Line 4: Declare a HelloWorld contract using the contract keyword and open bracket (e.g., {)
Line 5: Declare a public state variable called greet which will contain a string value of "Hello World!".
Compiling the Hello World Smart Contract
This section will cover how to compile the HelloWorld smart contract. Compiling your contract takes the solidity code and turns it into bytecode which can be deployed onto the blockchain. Note that you can also optimize your smart contract, which saves on storage of code size and runtime execution. However, we won't implement this in the contract we build later.
Navigate to the Solidity Compiler tab on Remix.IDE and click the Compile button (or use the CMD + S command on your keyword).
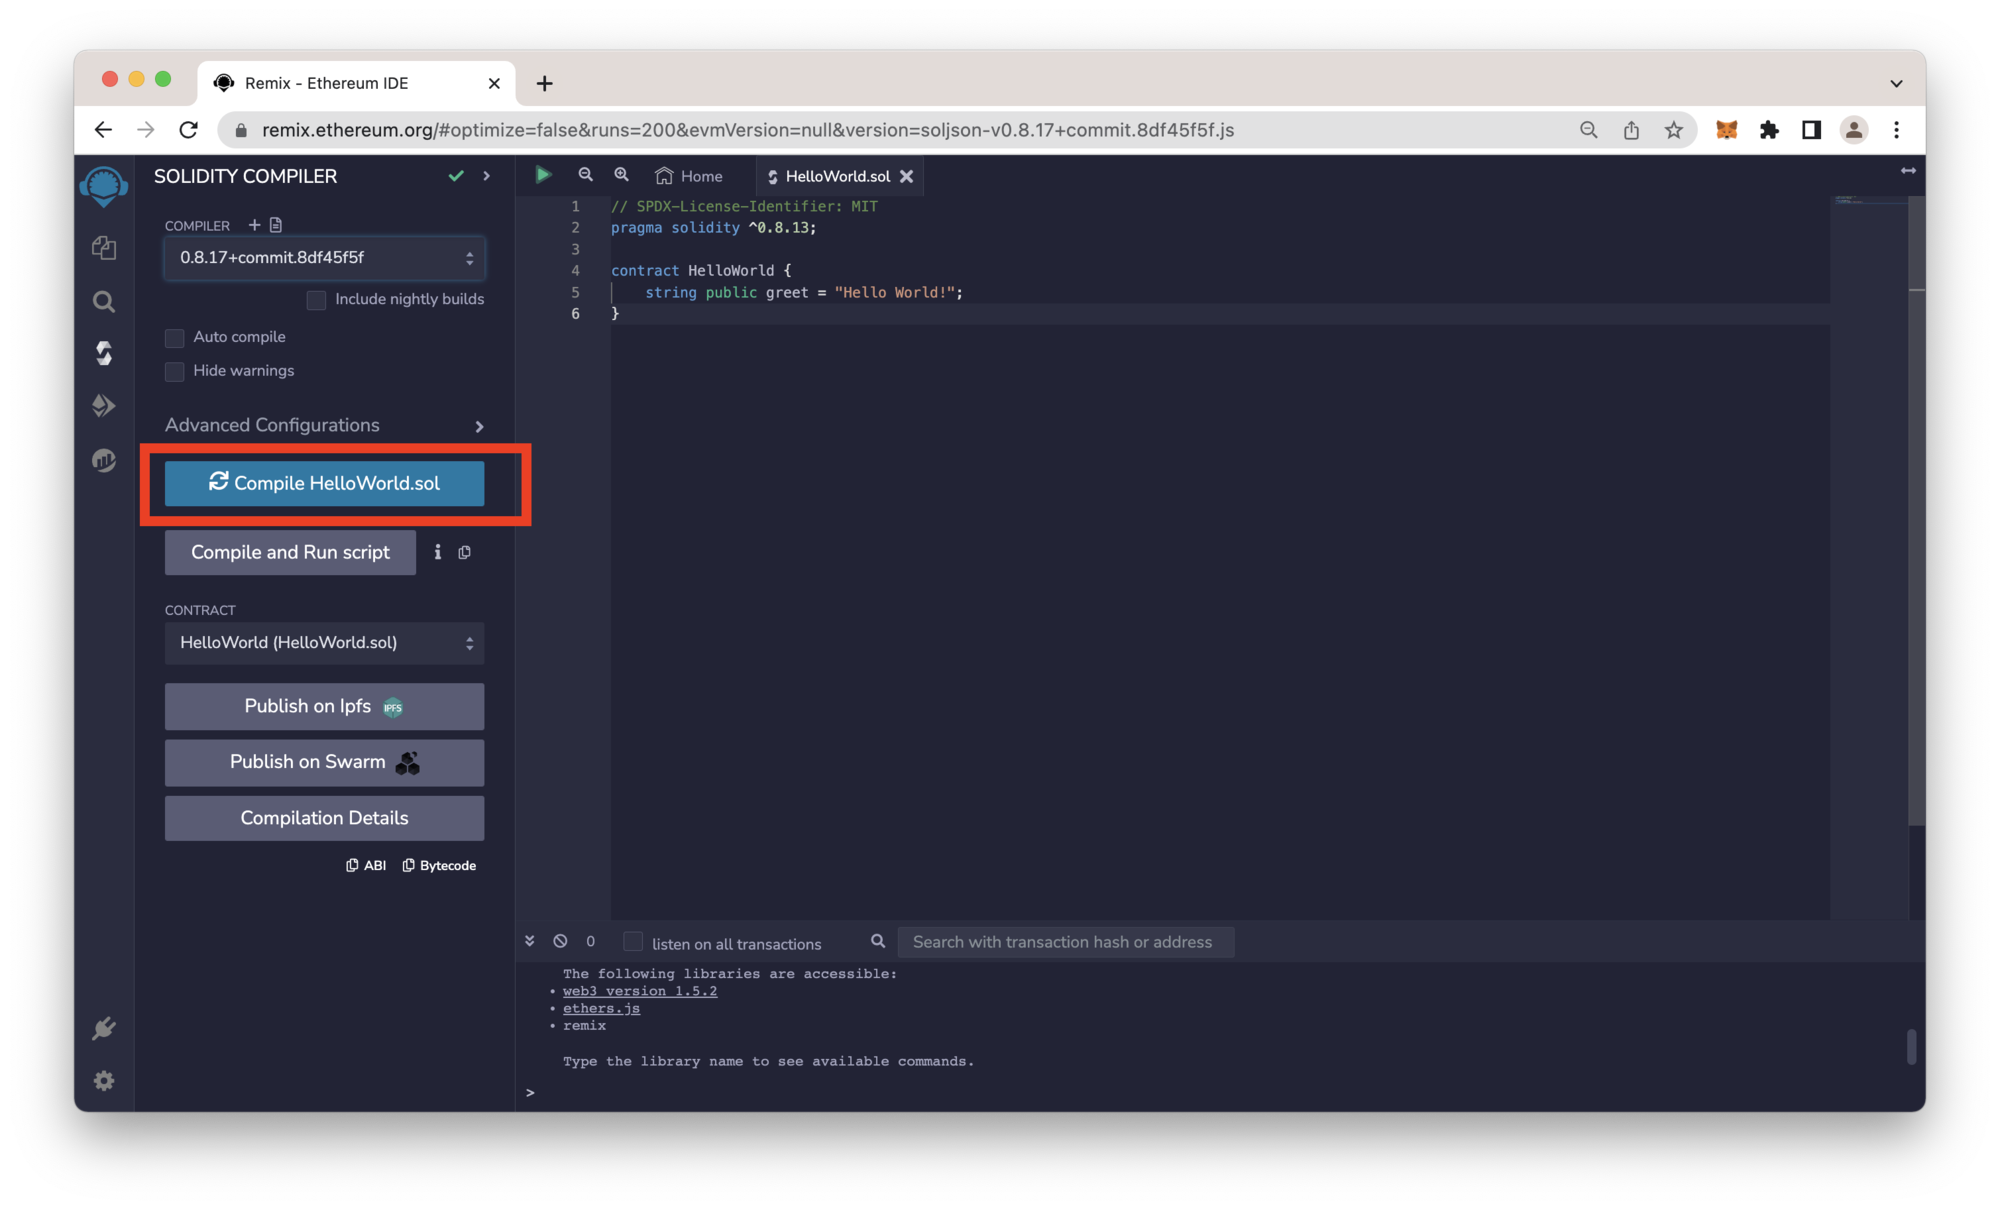
Pro-tip: Use the auto-compile field to speed up your development.
Before moving on to the next step, check that your HelloWorld contract is compiled (i.e., a green checkmark on the left toolbar). However, if the compilation throws an error, check to ensure your code matches the one above.
Deploying the Hello World Smart Contract
Now that our code is created and compiled, it's time to deploy the smart contract to Ethereum's Goerli test network.
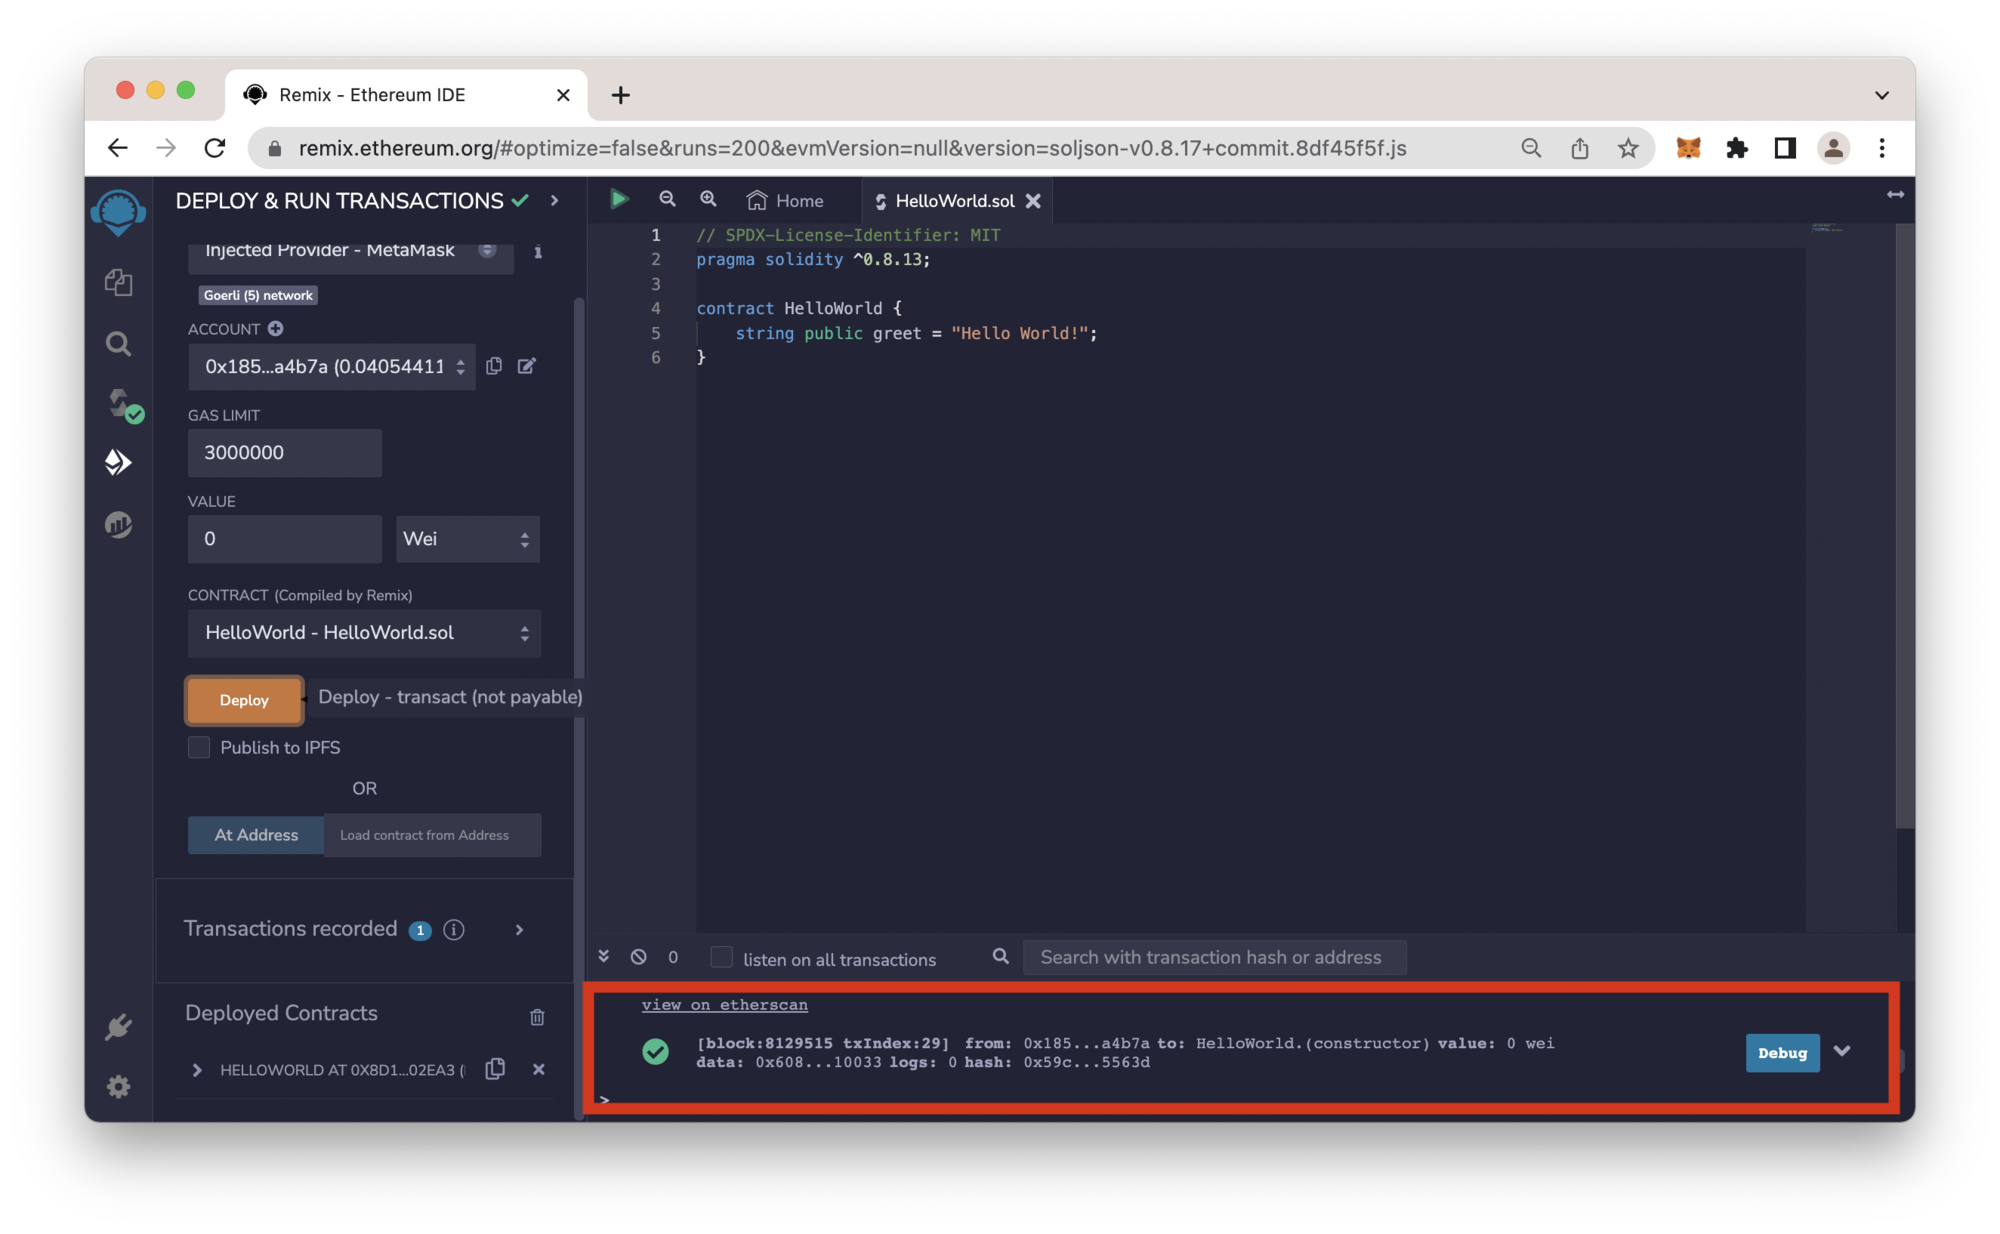
Navigate to the Deploy & Run Transactions tab, select Injected Provider or Wallet Connect and connect your wallet. Make sure the HelloWorld.sol contract is set in the Contract field, then click Deploy and sign the transaction in your wallet.
Once deployed (which can take a minute or so), you should see a confirmed transaction similar to the one below:
Interacting with the Hello World Smart Contract
With our Hello World contract deployed, we can now interact with it. On Remix.IDE, navigate to the Deployed Contracts section and expand your HelloWorld contract to click the greet button.
You should see a similar response:

Resources
If you want to take the next step into smart contract development, check out these other guides, which will help you build on top of the knowledge you just gained.
- An Overview of How Smart Contracts Work on Ethereum
- How to Call Another Smart Contract From Your Solidity Code
- How to Create an ERC-20 Token
- How to Create an ERC-721 Token
You can also explore these different QuickNode education sections:
Final Thoughts
We'd love to see what you're creating! Please share your ideas with us on Discord or Twitter. If you have any feedback or questions on this guide, we'd love to hear from you!