10 min read
Overview
ERC20 tokens are the building blocks of the Ethereum ecosystem, powering DeFi protocols, DAOs, loyalty systems, and more. But they weren’t always standardized. In Ethereum’s early days, tokens were created without a standard, making it hard for wallets and applications to integrate with every new token. To solve this, the community introduced the ERC20 standard, which brought consistency and interoperability to token development.
In this guide, we’ll walk through how to write a compliant ERC20 smart contract, compile and deploy it using Remix, with step-by-step instructions and highlight best practices—no unnecessary detail.
Prefer a video walkthrough? Follow along with Radek and learn how to create and deploy an ERC20 Token in 15 minutes.
What You Will Do
- Learn about ERC-20 tokens and their use cases
- Create and deploy an ERC-20 token using Remix.IDE
What You Will Need
- A web3 wallet (e.g., MetaMask, Coinbase Wallet, Phantom, or a WalletConnect-compatible wallet)
- Test ETH (You can get some at the Multi-Chain QuickNode Faucet)
- A modern web browser (e.g., Chrome or Brave)
- A free QuickNode account, for post launch building
In this guide, we use Remix IDE to keep things simple, utilizing browser-based development for quicker development and testing. If you're ready to level up, check out our more advanced deployment tutorials using modern frameworks such as Foundry and Hardhat:
What is an ERC-20 Token?
ERC stands for Ethereum Request for Comment, and 20 is the proposal identifier number. ERC-20 was designed to improve the Ethereum network.
ERC-20 is one of the most significant ERCs. It has emerged as the technical standard for writing smart contracts on the Ethereum blockchain network, used for token implementation. ERC-20 contains a set of rules that all Ethereum based tokens must follow.
ERC-20 defines tokens as blockchain-based assets that can be sent/received and have value. ERC-20 tokens are similar to Bitcoin and Litecoin in many aspects. However, the most significant difference is that instead of running on their own blockchain network, ERC-20 coins run on Ethereum’s blockchain network and use gas as the transaction fee.
Before the emergence of ERC-20, everyone who created tokens had to reinvent the wheel, which means all tokens were different from each other. For example, if a developer wanted to work with another token, they had to understand the entire smart contract code of that token due to the lack of any specific structure or guidelines for building new tokens.
This was particularly painful for wallets and exchange platforms - adding different types of tokens required developers to go through the code of each and every token and understand it in order to handle those tokens on their platforms. Needless to say, it was rather difficult to add new tokens to any app.
Today, wallets and exchanges use the ERC-20 standard to integrate various standardized tokens onto their platforms and also facilitate easy exchange between ERC-20 tokens and other tokens. The ERC-20 token standard has made interaction between tokens almost seamless and painless.
Key Points about ERC-20 Tokens
Standardized Functions: ERC-20 tokens follow a specific set of standards, which means they have a common list of rules and functions. This includes how the tokens can be transferred, how transactions are approved, how users can access data about a token, and the total supply of tokens.
Smart Contracts and DeFi: The use of smart contracts in ERC-20 tokens enables the automation and enforcement of complex financial operations. This is crucial for DeFi platforms, where these tokens can represent various financial instruments, like loans or stakes in a liquidity pool.
Interoperability: Since ERC-20 tokens follow the same standard, they are easily interchangeable and can work seamlessly with other ERC-20-compliant tokens and applications on the Ethereum network. This standardization simplifies the process of creating new tokens and makes them instantly compatible with existing wallets, exchanges, and other services.
Use Cases: ERC-20 tokens can represent a wide range of assets or utilities. For example, ERC-20 tokens can serve various roles, such as collateral for loans, interest-bearing assets in yield farming, and governance tokens granting voting rights in decentralized autonomous organizations (DAOs).
Transferability and Exchange: These tokens can be transferred from one account to another as payment, similar to cryptocurrencies like Bitcoin, and can be traded on various cryptocurrency exchanges.
ERC-20 is a standard or guideline for creating new tokens. The standard defines six mandatory functions that a smart contract should implement and three optional ones.
The mandatory functions are listed below with explanations.
- totalSupply: A method that defines the total supply of your tokens; when this limit is reached, the smart contract will refuse to create new tokens.
- balanceOf: A method that returns the number of tokens a wallet address has.
- transfer: A method that takes a certain amount of tokens from the total supply and gives it to a user.
- transferFrom: Another type of transfer method that is used to transfer tokens between users.
- approve: This method verifies whether a smart contract is allowed to allocate a certain amount of tokens to a user, considering the total supply.
- allowance: This method is exactly the same as the approved method except that it checks if one user has enough balance to send a certain amount of tokens to another.
Besides the mandatory functions listed below, functions are optional, but they improve the token's usability.
- name: A method that returns the name of the token.
- symbol: A method that returns the symbol of the token.
- decimals: A method that returns the number of decimals the token uses. It is used to define the smallest unit of the token. For example, if an ERC-20 token has a
decimalsvalue of 6, this means that the token can be divided up to six decimal places.
If you're familiar with object-oriented programming, you can compare ERC-20 to an Interface. If you want your token to be an ERC-20 token, you have to implement the ERC-20 interface, and that forces you to implement these 6 methods.
How to Create an ERC-20 Token
Now that we know what ERC-20 tokens are and how they work, let’s see how we can build and deploy our own token.
We’ll use the Ethereum Sepolia testnet in this guide because it's fast, free, and widely supported. But the same steps apply to any EVM-compatible chain—whether you’re deploying to a testnet or a mainnet like Arbitrum, Base, or Avalanche.
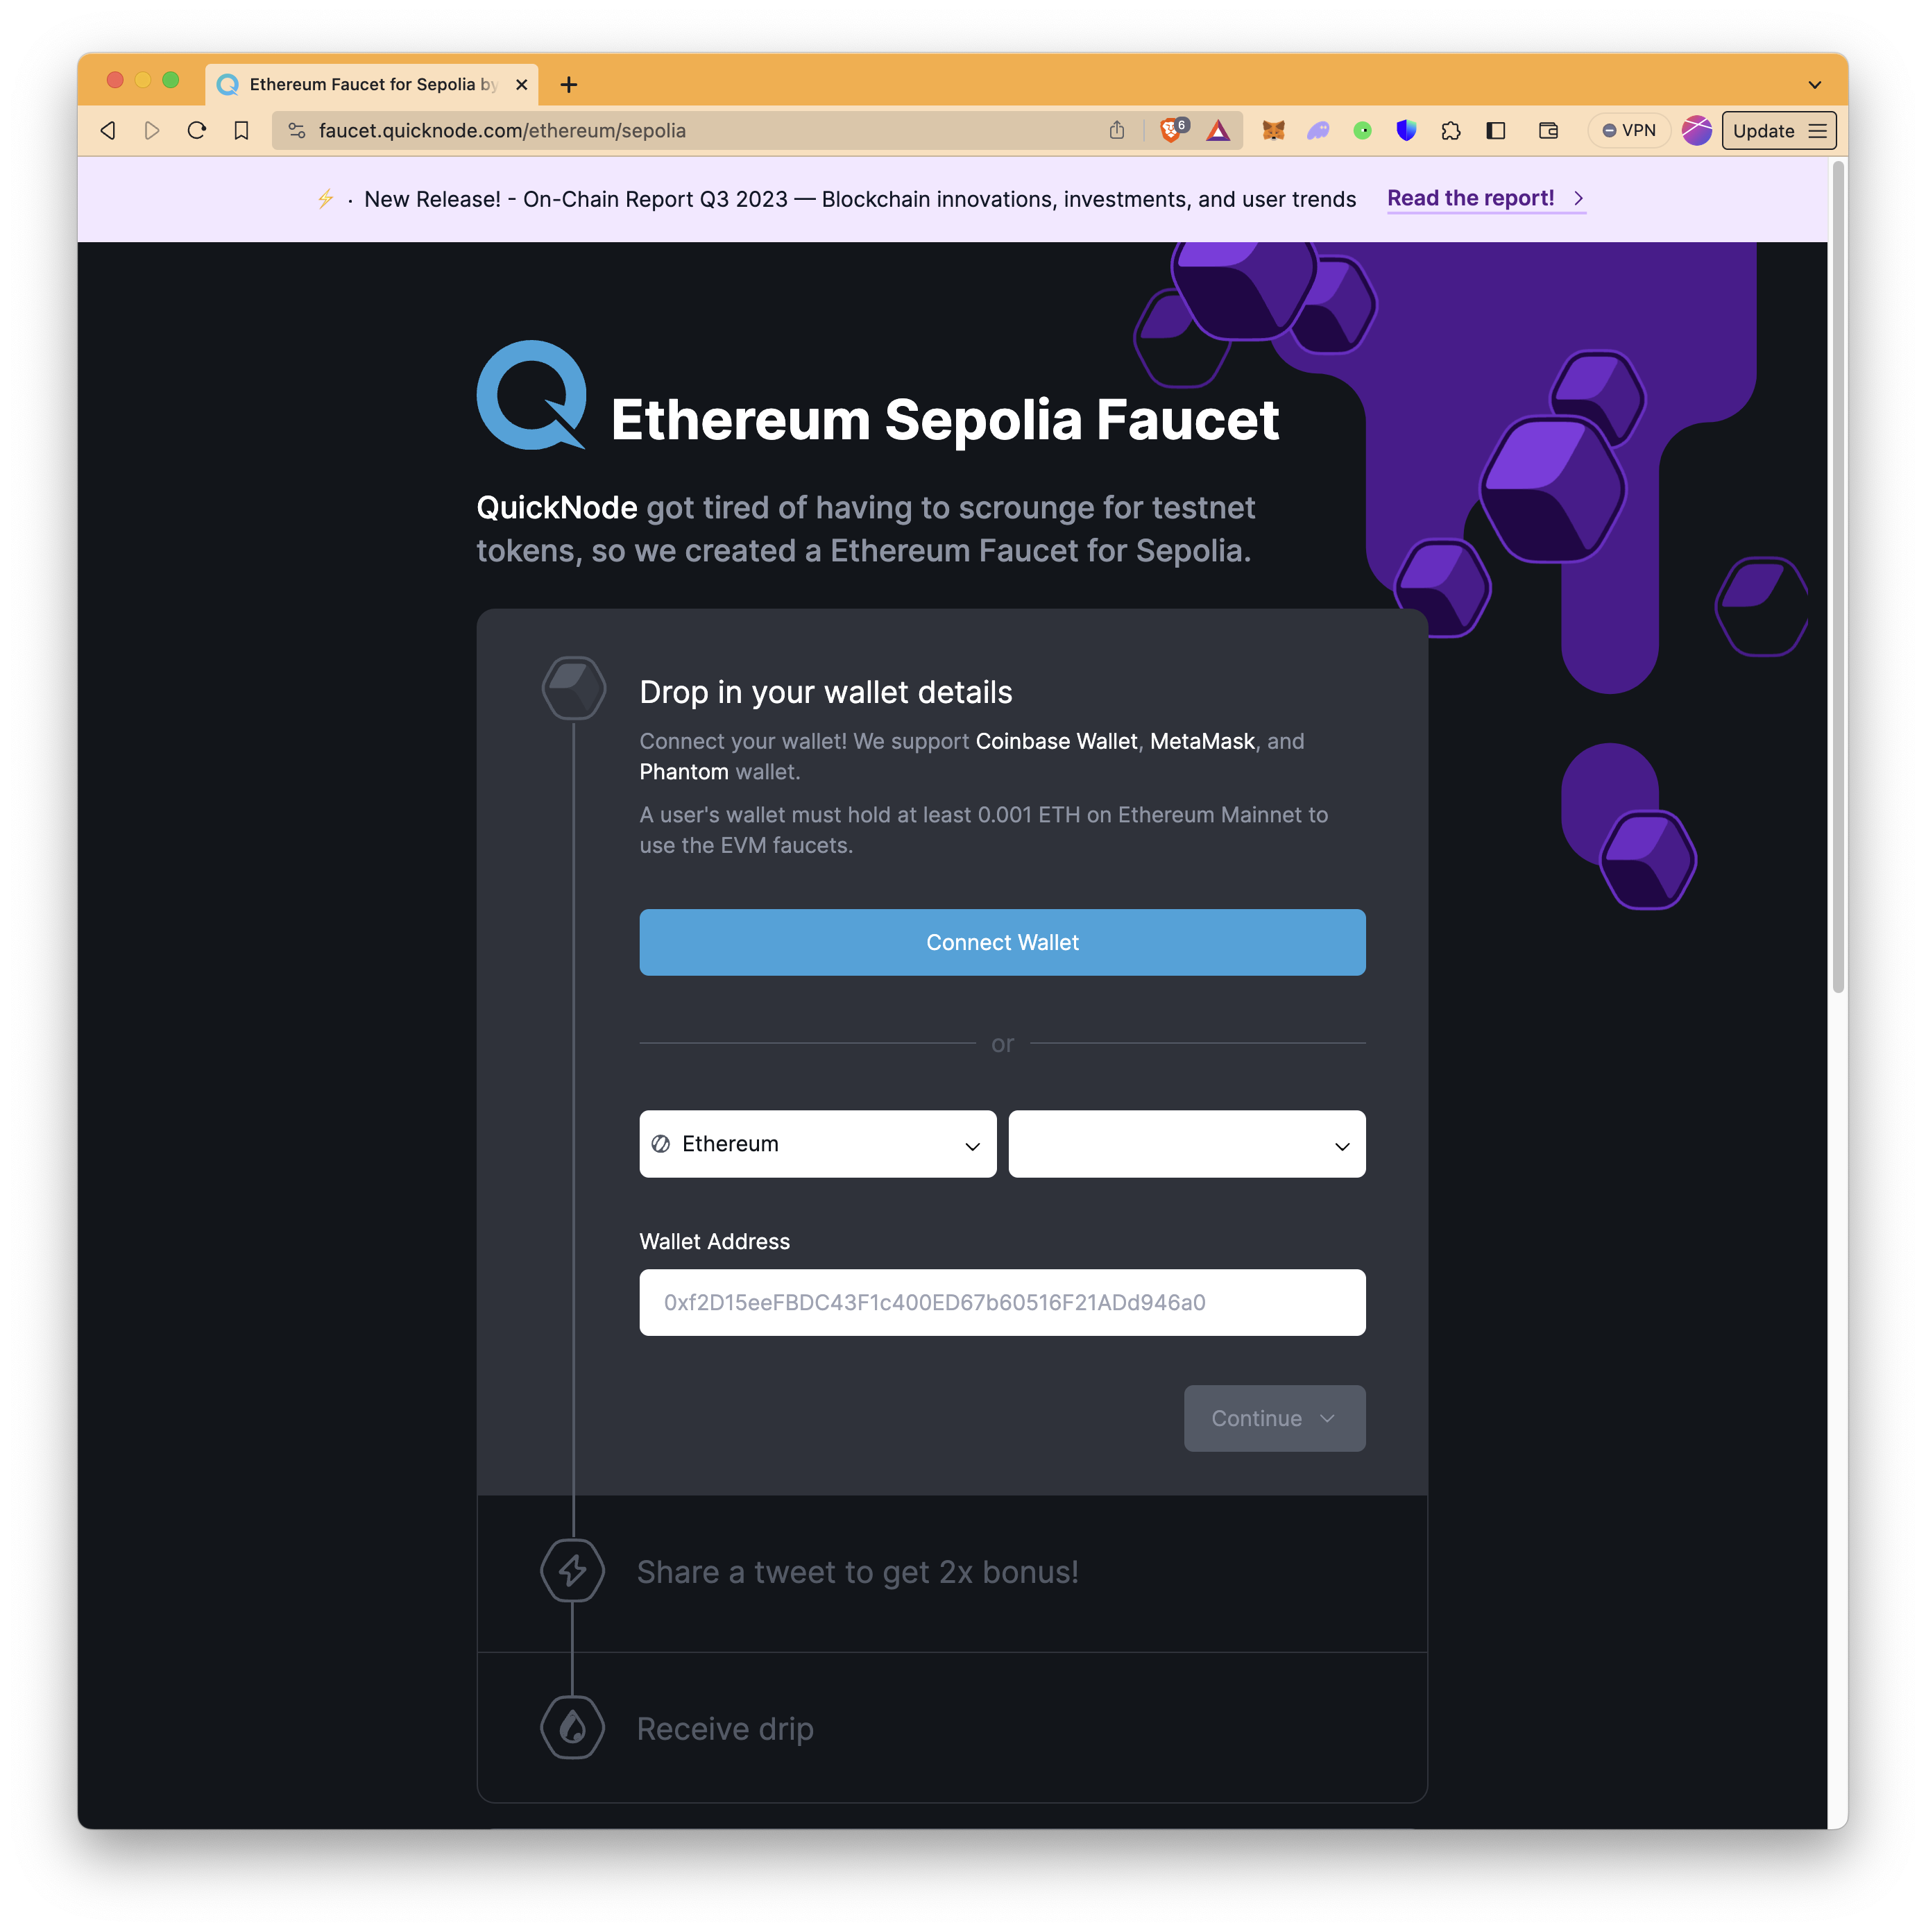
Step 1: Get Test ETH
To begin deploying your contract on the Ethereum Sepolia testnet, you'll need to acquire some test ETH. To do this:
- If you don't have a wallet yet, install the MetaMask browser extension or use another web3 compatible wallet like Rabby or Phantom
- Go to the QuickNode Ethereum Sepolia Faucet
- Connect your wallet or enter your wallet address, and proceed. You'll have an option to share a tweet for an additional bonus. If you choose not to, you can just select the option "No thanks, just send me 0.05 ETH" to receive your test ETH.
Note: You will need an Ethereum mainnet balance of at least 0.001 ETH in order to be eligible to use the faucet.
Step 2: Write the Smart Contract for Your Token
There are a multitude of ERC20-compliant tokens already operational on the Ethereum blockchain, developed by different groups. These implementations vary, with some focusing on reducing gas costs and others prioritizing enhanced security.
For a robust and secure implementation, many developers opt to use OpenZeppelin's ERC20 token standard. OpenZeppelin provides a well-tested, community-audited library of reusable smart contracts, which includes a reliable and secure framework for ERC20 tokens, making it a preferred choice for ensuring compliance and security in token development.
For ease and security, we’ll use the OpenZeppelin ERC-20 contract to create our token. With OpenZeppelin, we don’t need to write the whole ERC-20 interface. Instead, we can import the library contract and use its functions.
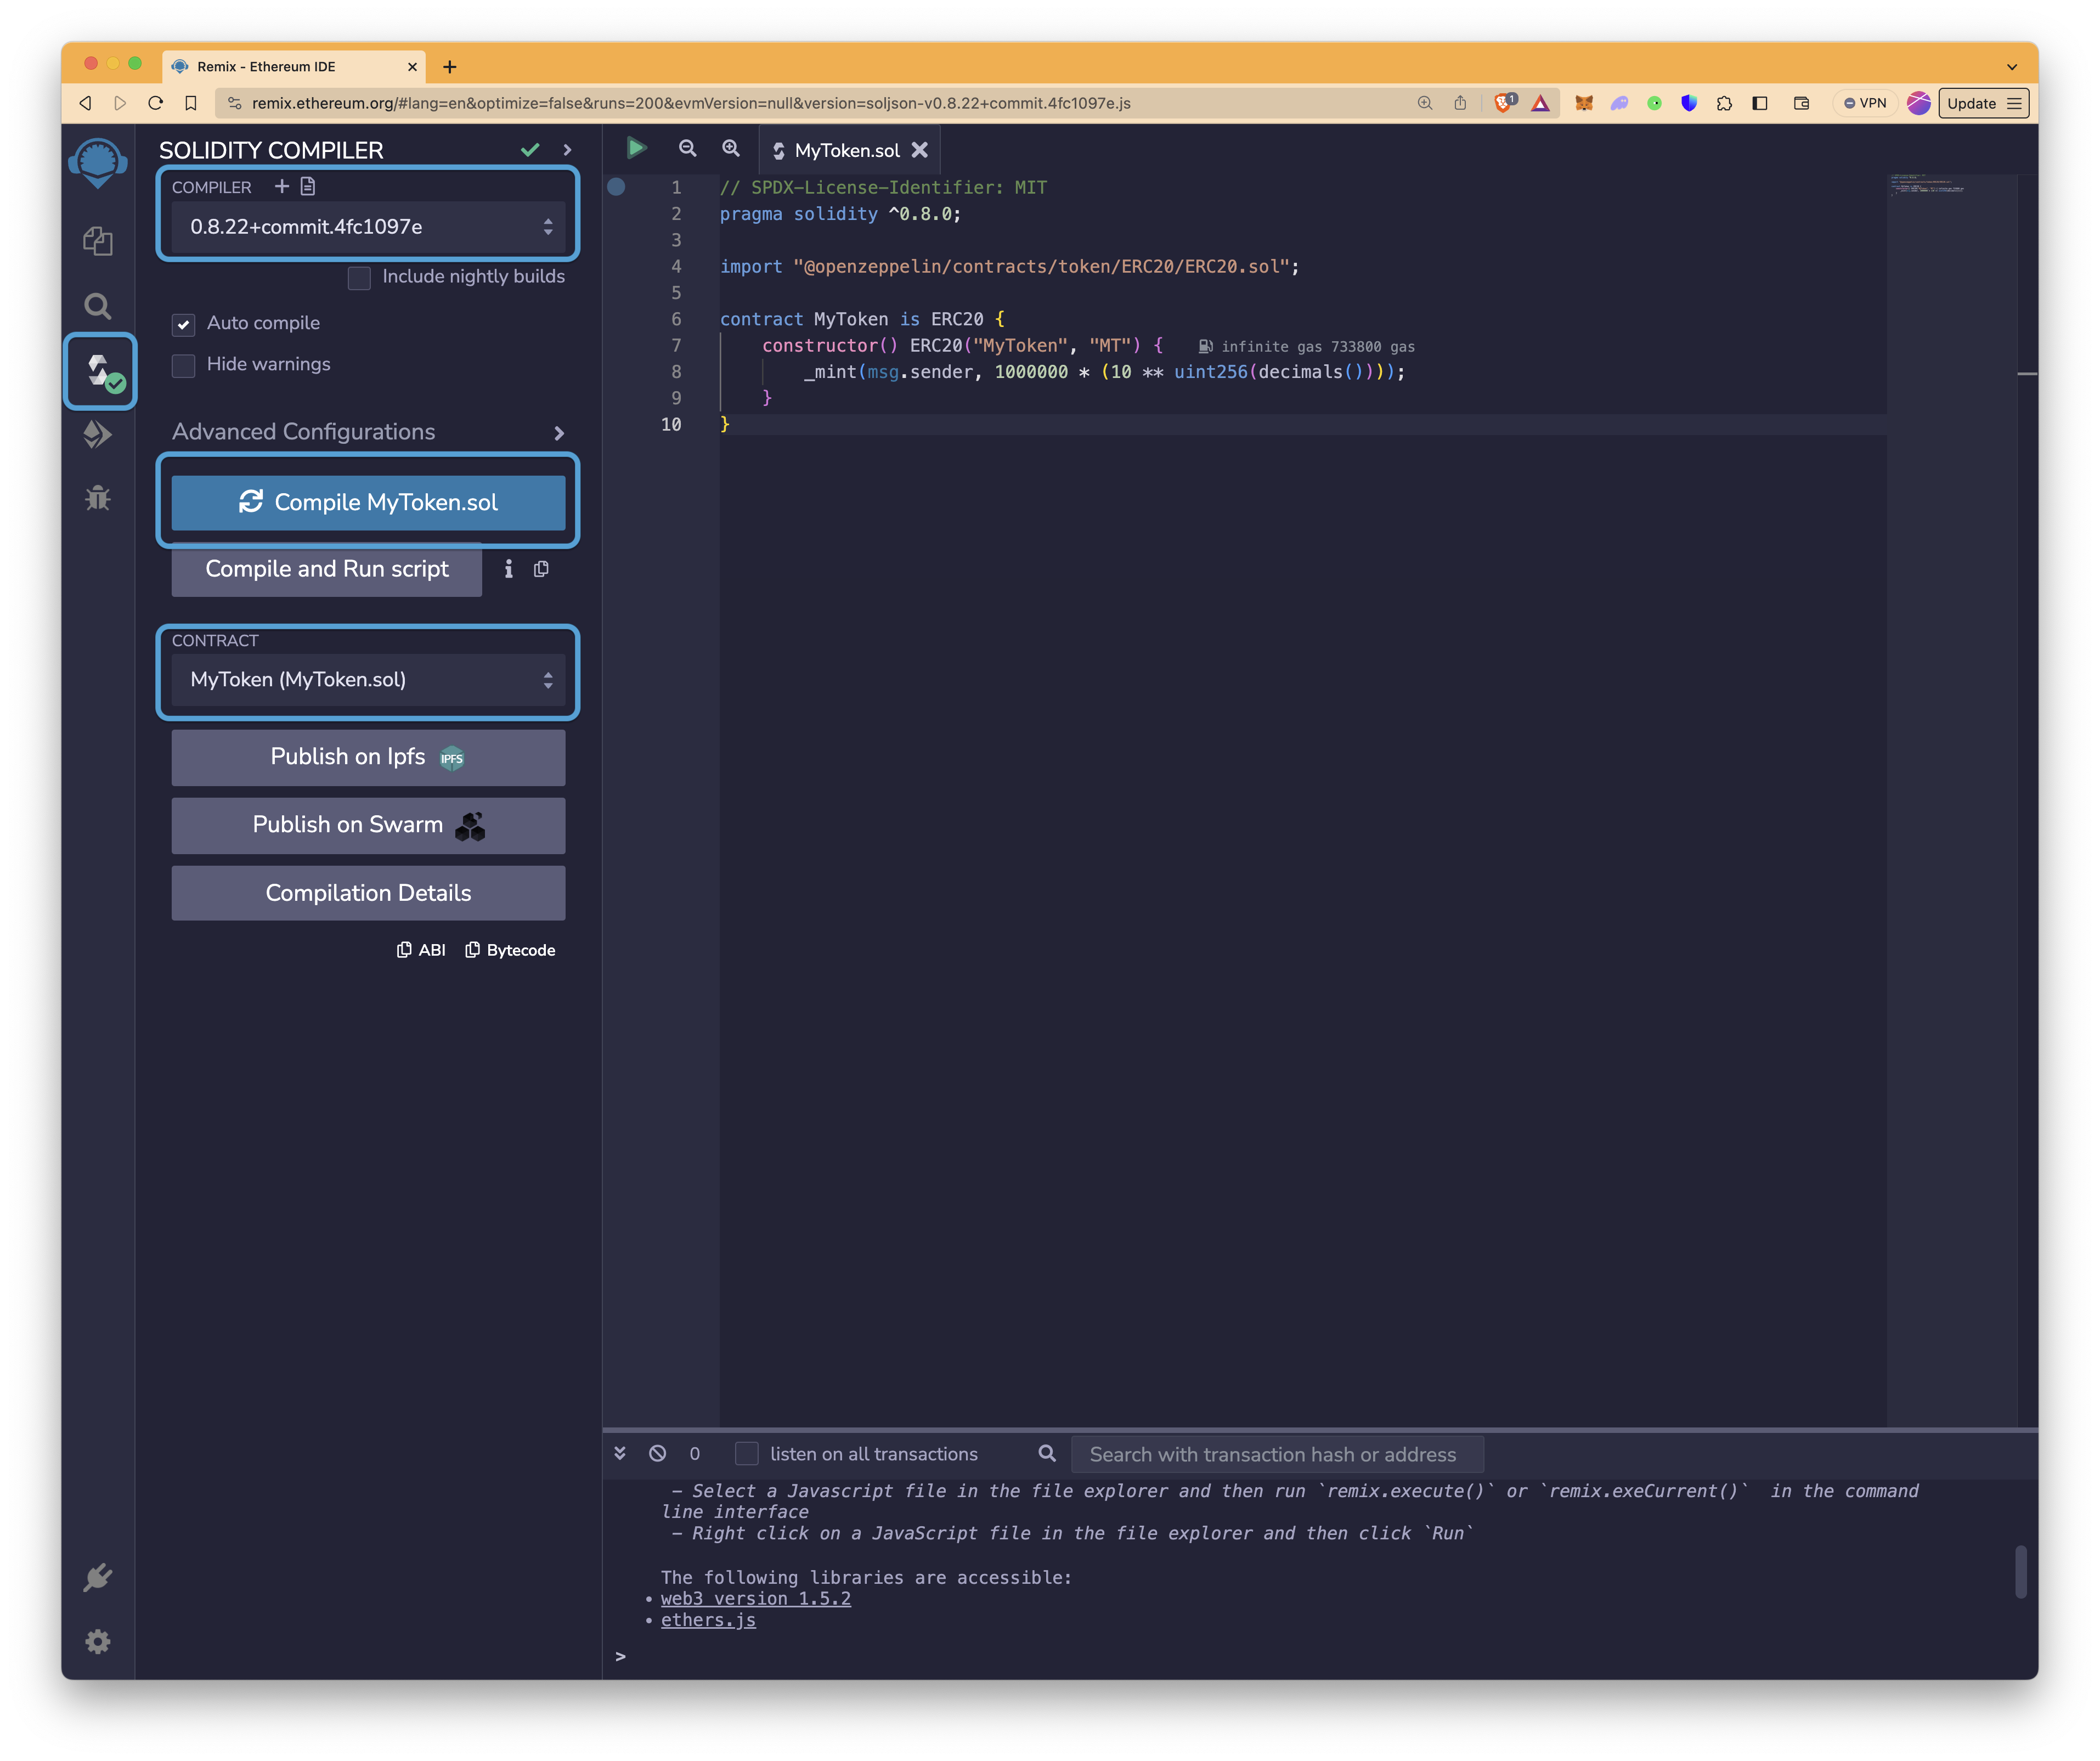
Head over to the Ethereum Remix IDE and make a new Solidity file, for example - MyToken.sol.
Paste the following code into your new Solidity script:
// SPDX-License-Identifier: MIT
pragma solidity ^0.8.20;

import "@openzeppelin/contracts/token/ERC20/ERC20.sol";

contract MyToken is ERC20 {
    constructor() ERC20("MyToken", "MT") {
        _mint(msg.sender, 1000000 * (10 ** uint256(decimals())));
    }
}
Explanation of the code above:
- The SPDX-License-Identifier comment specifies the license under which the contract is released.
- The
pragmadirective states the compiler version to use. - The
ERC20contract from OpenZeppelin is imported and used as a base. MyTokenis the name of your contract, and it extends the ERC20 contract.- The
constructorfunction initializes your token with a name ("MyToken") and a symbol ("MTK"). - The
_mintfunction in the constructor mints an initial supply of tokens. In this example, 1 million tokens are minted and assigned to the address that deploys the contract. The number of tokens is adjusted by thedecimalsvalue, which defaults to 18 in the OpenZeppelin implementation.
Since we import the
ERC20smart contract from OpenZeppelin and theMyTokencontract inherits theERC20contract, it is not necessary to define all functions. All functions that are defined in theERC20contract are imported into theMyTokencontract. If you would like to see the full ERC-20 code which is more in-depth, check it out the file here
Now, take a minute to customize the smart contract with your own details if you'd like. You can update the token name and symbol by updating the following part - ERC20("MyToken", "MT").
Explore our guide to deploying an upgradeable ERC20 contract using OpenZeppelin and Hardhat.
Step 3: Deploy Your Token
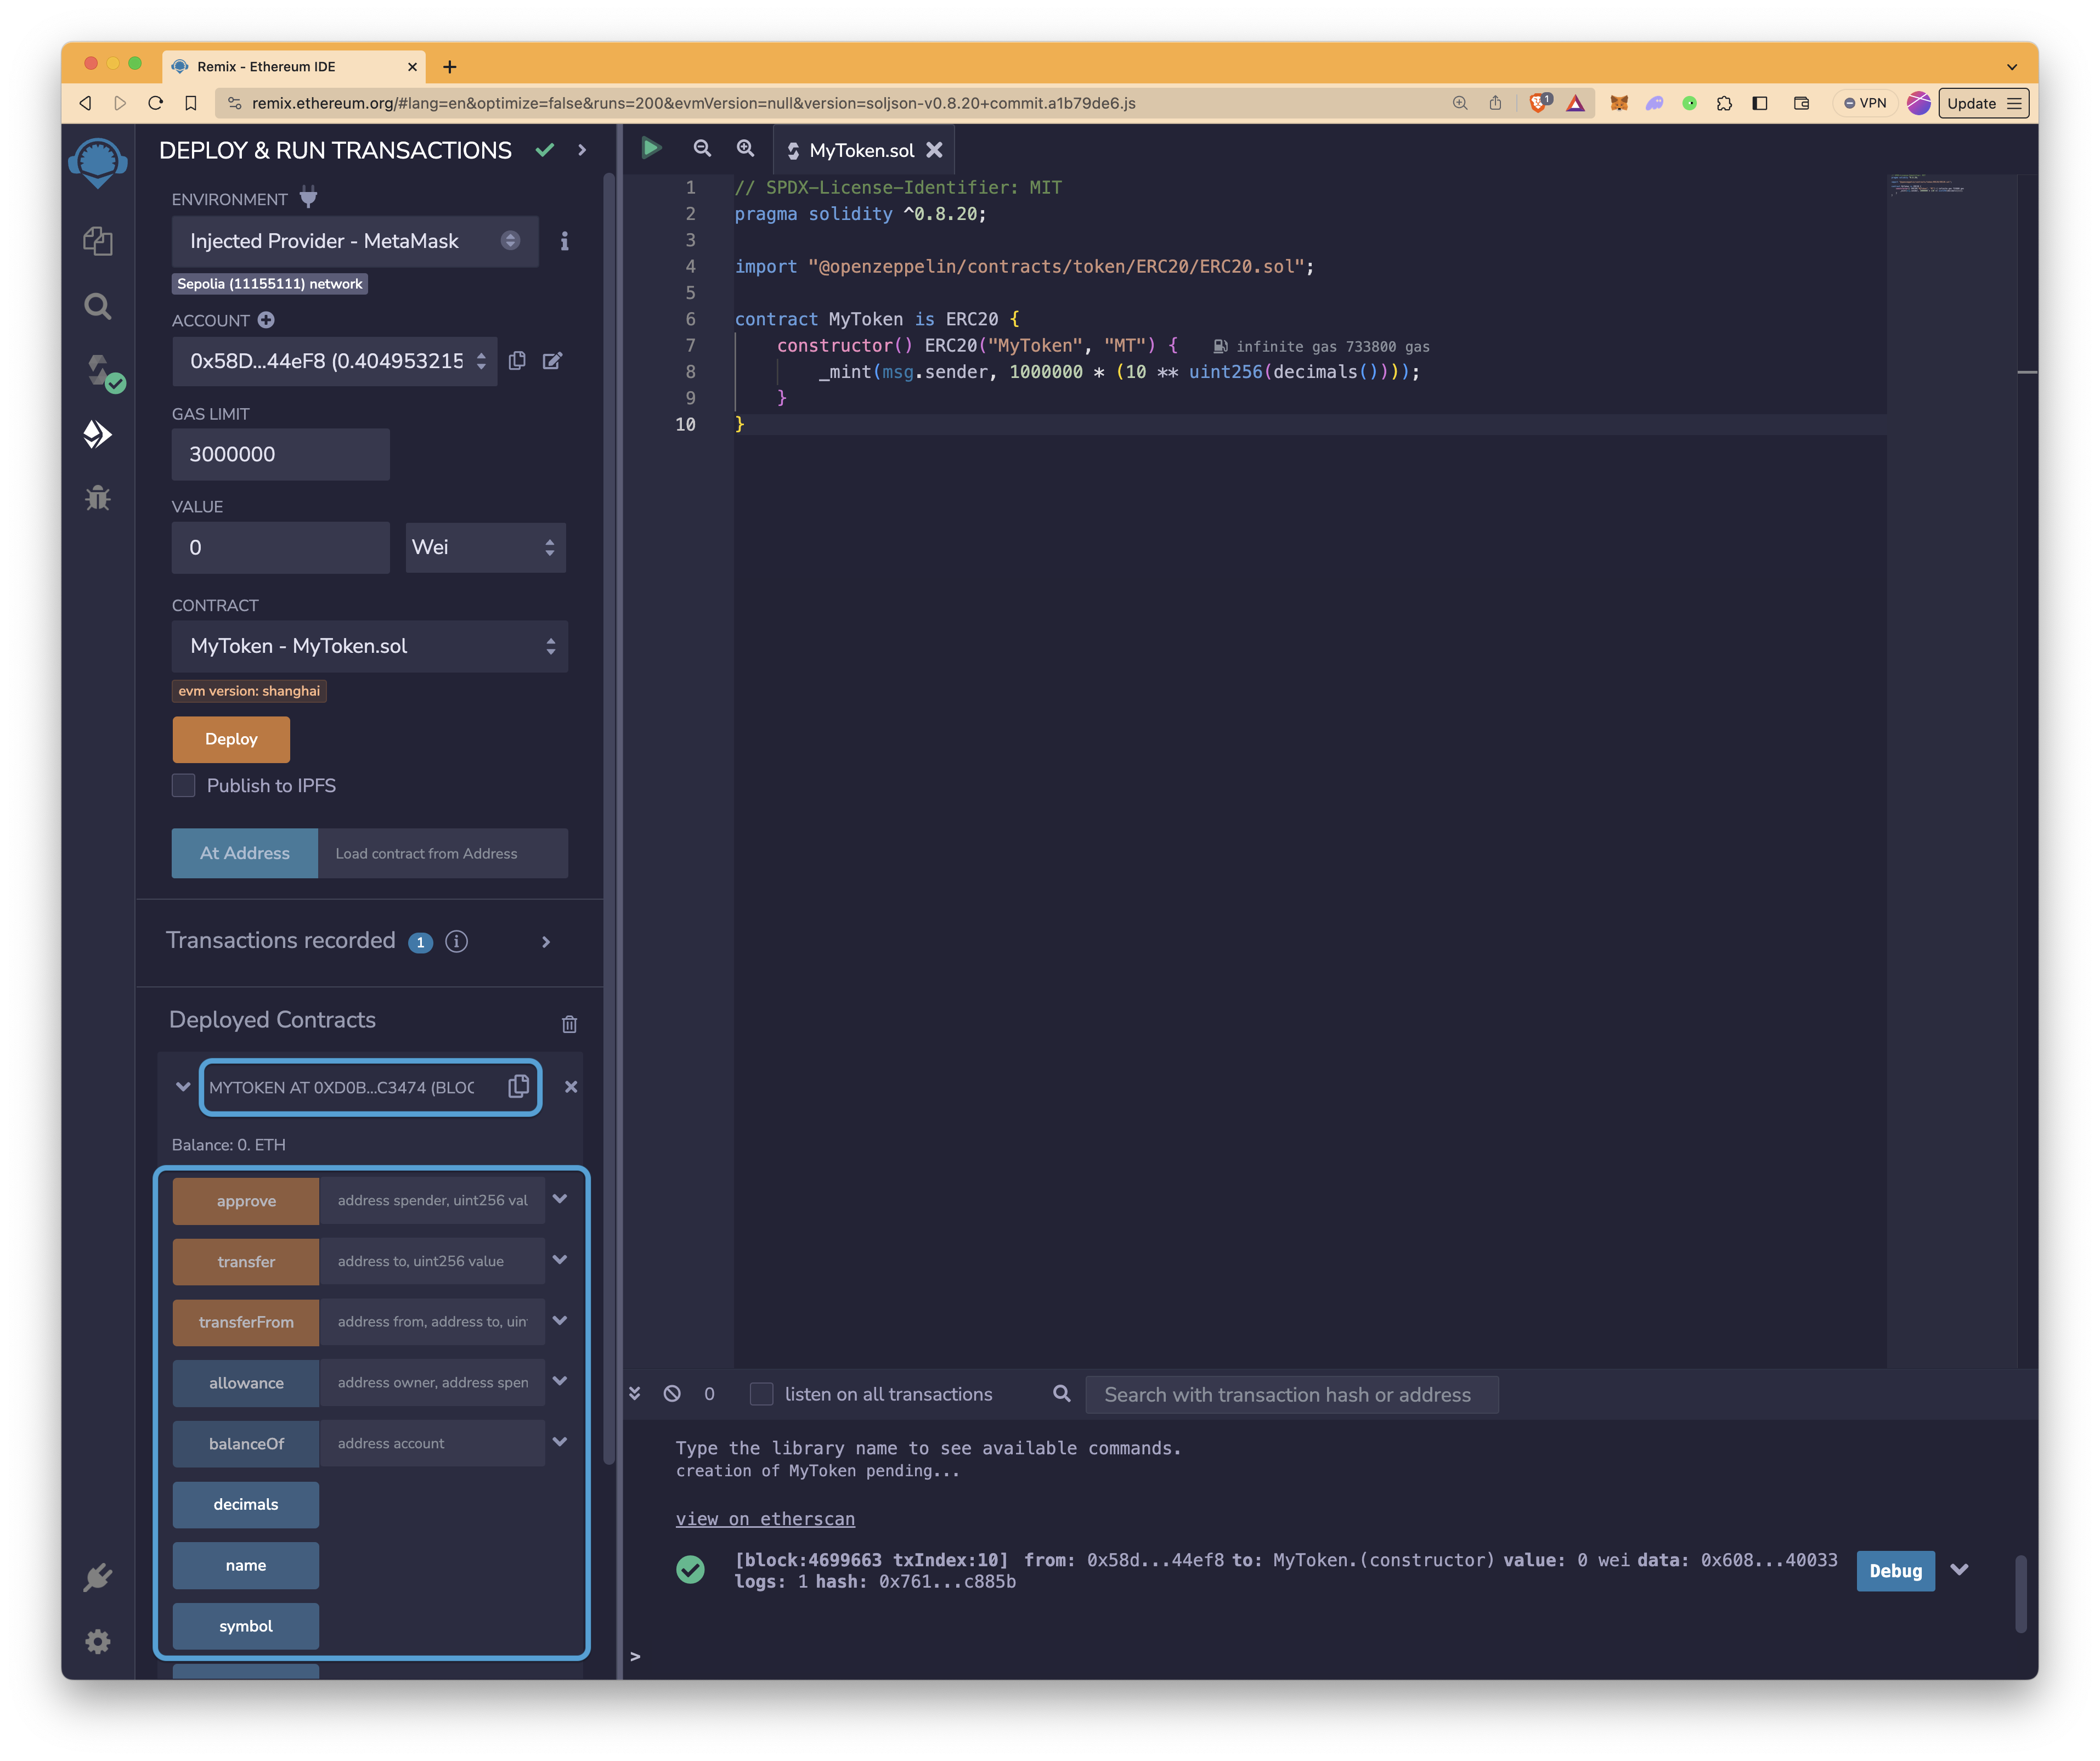
Once you've completed customizing the smart contract, proceed to compile it.
First: Click on the Solidity compiler button. Check the compiler version and the selected contract. The compiler version should be at least 0.8.20 because of the line pragma solidity ^0.8.20; in the smart contract. Then, click the Compile MyToken.sol button. If everything goes well, you will see a green check mark on the Compile button.
Next: Go to the Deploy & Run Transactions tab. For deployment, use the Injected Provider option under the Environment. Before the deployment, ensure that your MetaMask is set to the Sepolia testnet, and MyToken contract is the selected contract to be deployed. Finally, click on the Deploy button to deploy your contract.
If you are unsure how to change the network, open the MetaMask extension, click the Network Selector in the top-left corner, and then select Sepolia. If you don't see it, make sure that the Show test networks option is enabled. If you would like to learn how to add your QuickNode RPC URL to MetaMask, check out this QuickNode Guide.
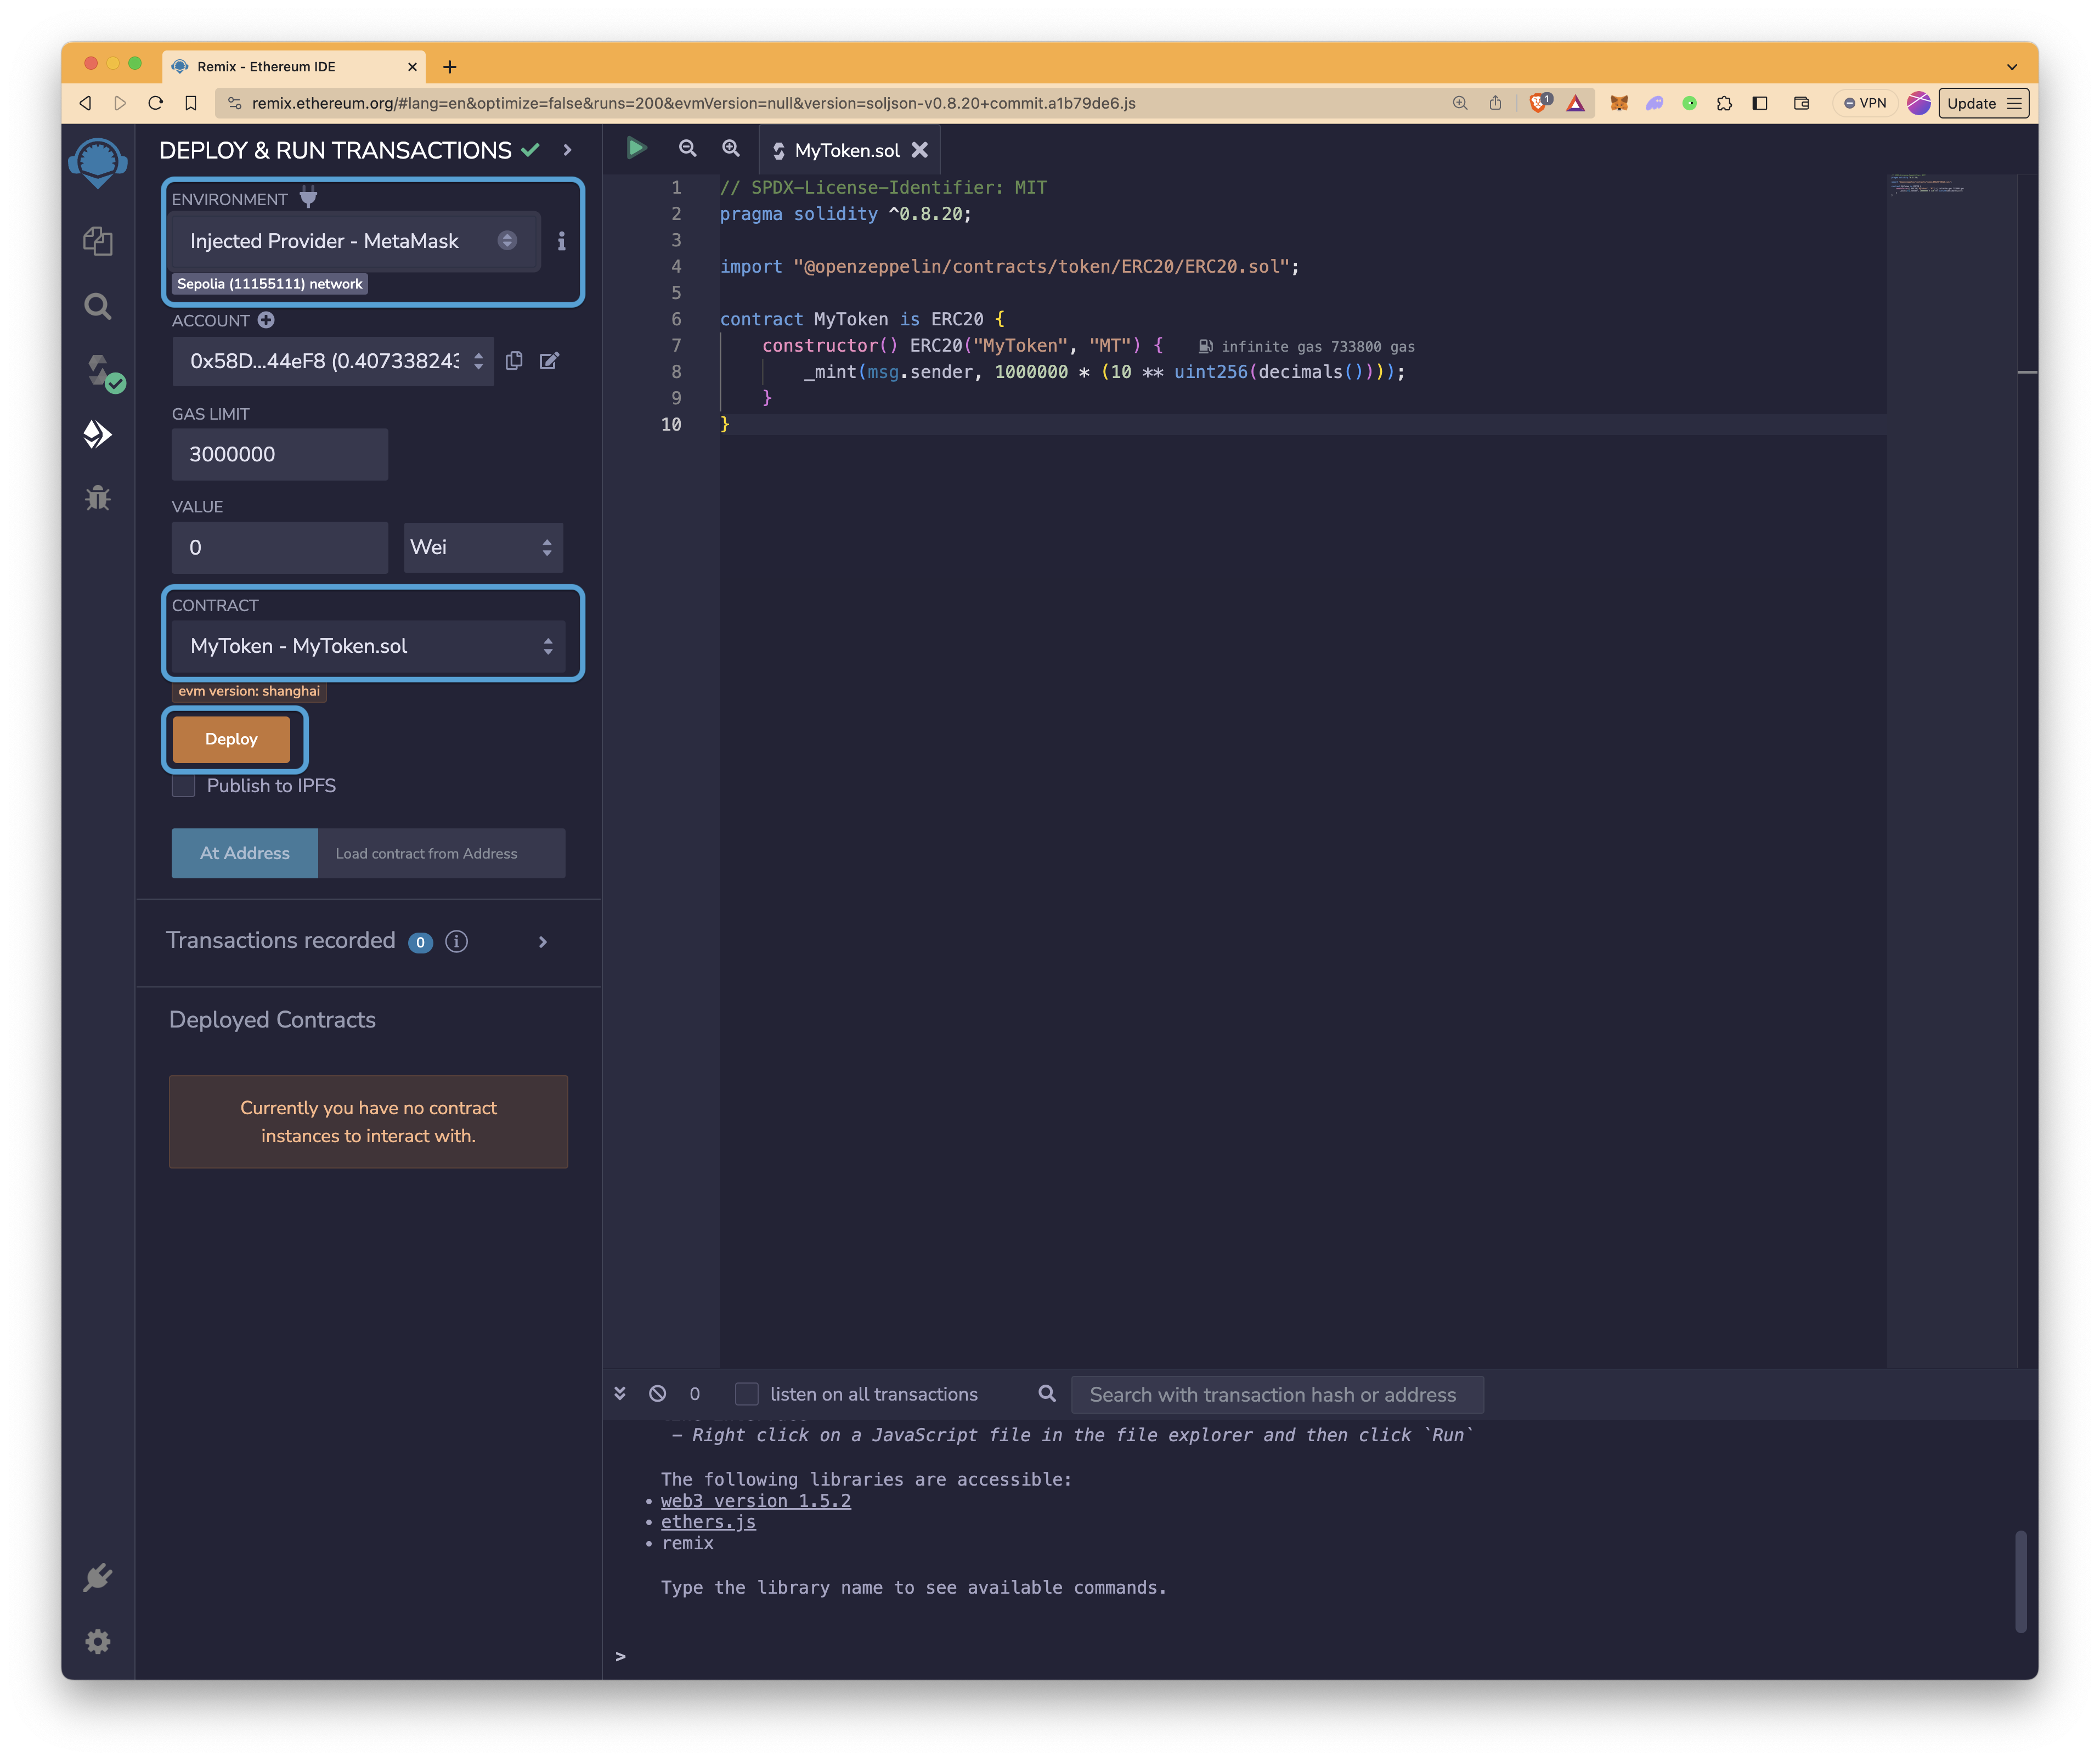
If you receive an error message before deployment - “This contract may be abstract”, make sure to select the appropriate contract under the Contract tab.
Finally: Confirm the transaction in MetaMask:
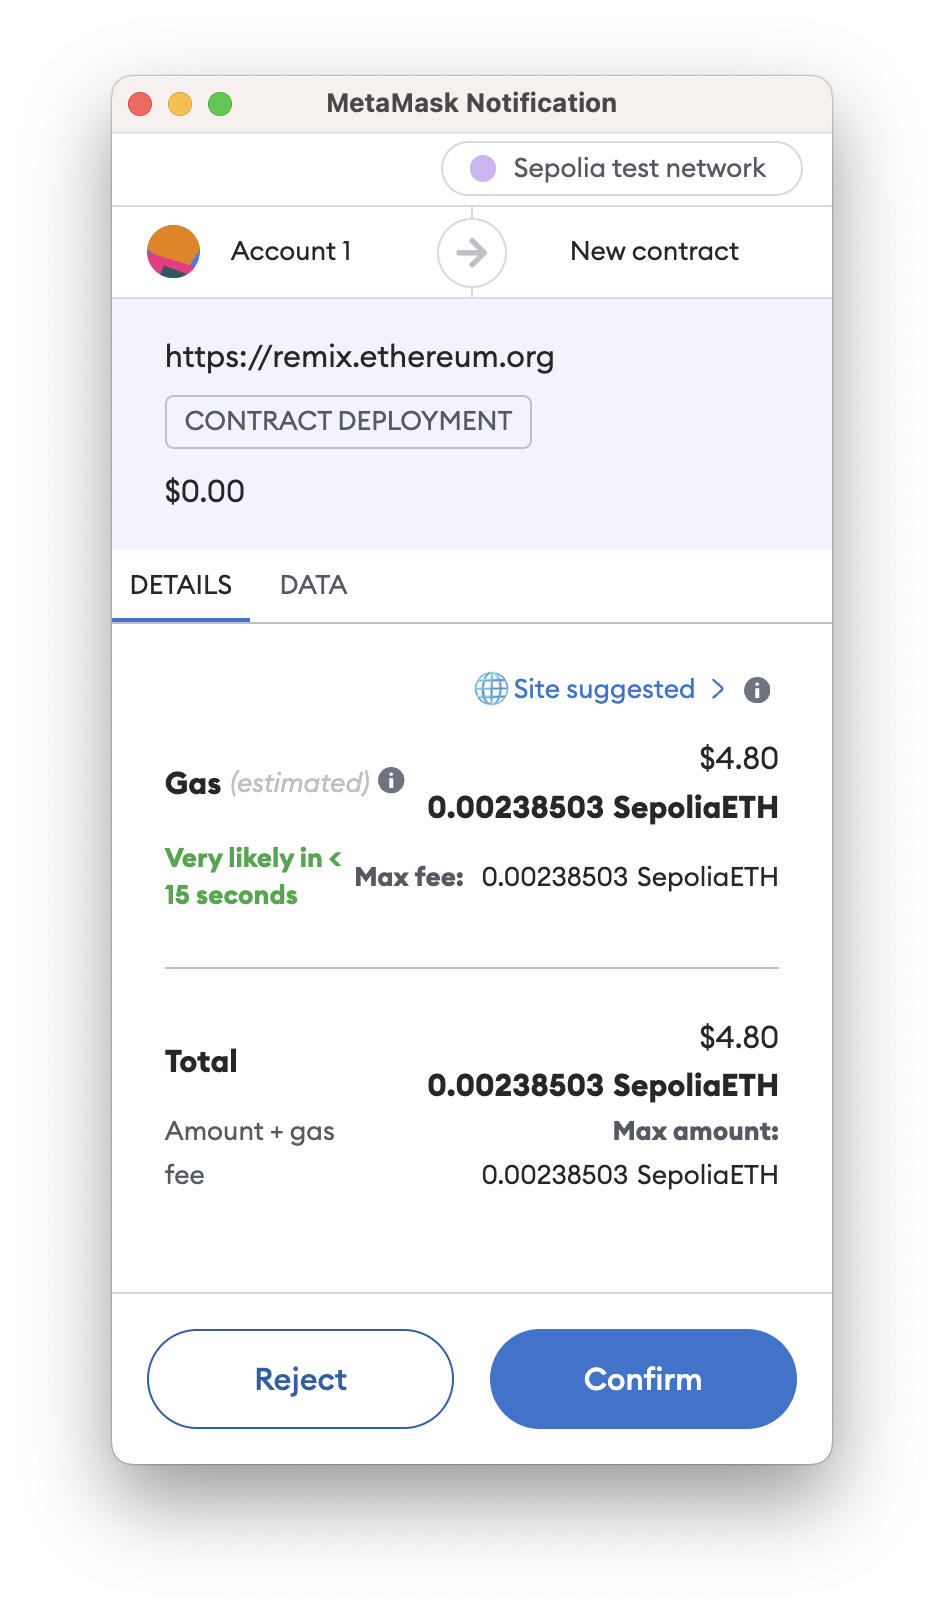
That’s it! Your token contract is now deployed on Ethereum’s Sepolia testnet!
Now, let's interact with it. Click the arrow (>) near the contract's name under the “Deployed Contracts” section to see the functions of the contract. Then, click the name button, and you should see the name that you customize in your contract. Feel free to try other functions as well.
On Remix.IDE, functions are color-coded in the interface based on their nature and effect:
-
Blue Button Functions: These represent constant or pure functions. Clicking these buttons won't initiate a new transaction or alter the contract's state. They only return a value from the contract and do not incur any gas fees.
-
Orange Button Functions: These are non-payable functions that change the state of the contract but do not accept Ether. Activating these functions generates a transaction, which means they will cost gas.
-
Red Button Functions: Functions with red buttons are payable and can create transactions that accept Ether. The value for these transactions is entered in the "Value" field, located beneath the "Gas Limit" field. These also incur gas fees upon execution.
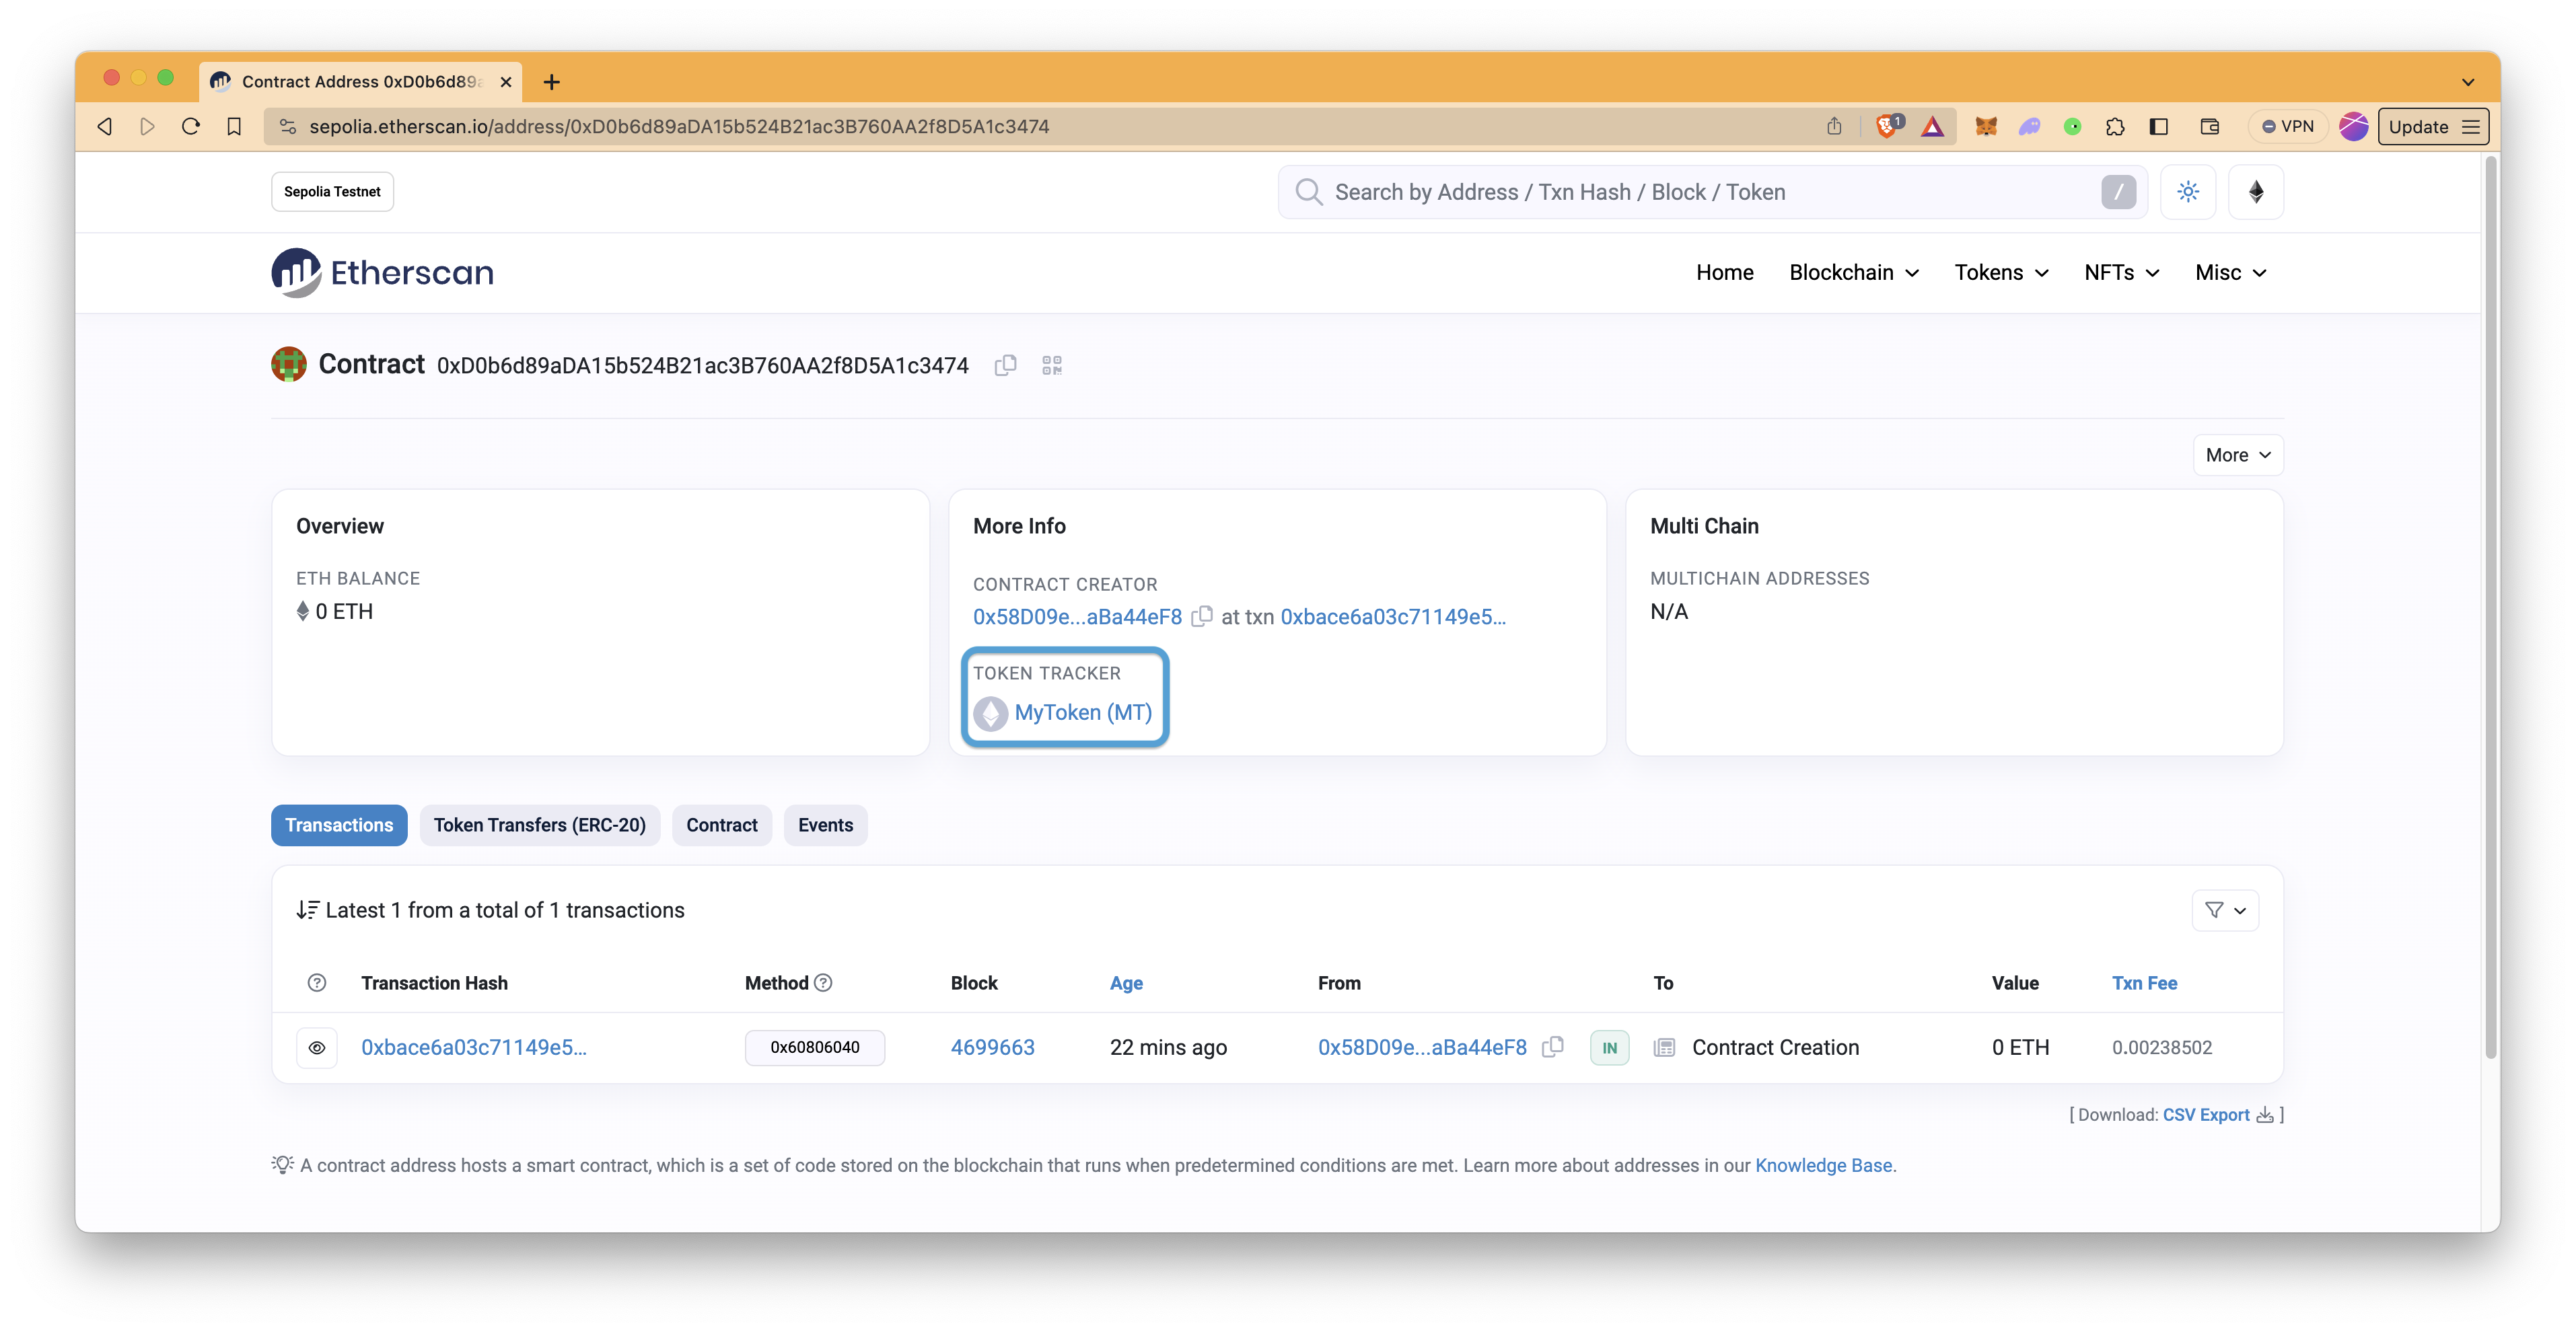
To see your contract on a blockchain explorer, a beginner-friendly useful tool used to analyze various blockchain data, go to the Etherscan Sepolia Explorer and search your contract's address.
You will see your token name and token symbol under the Token Tracker section.
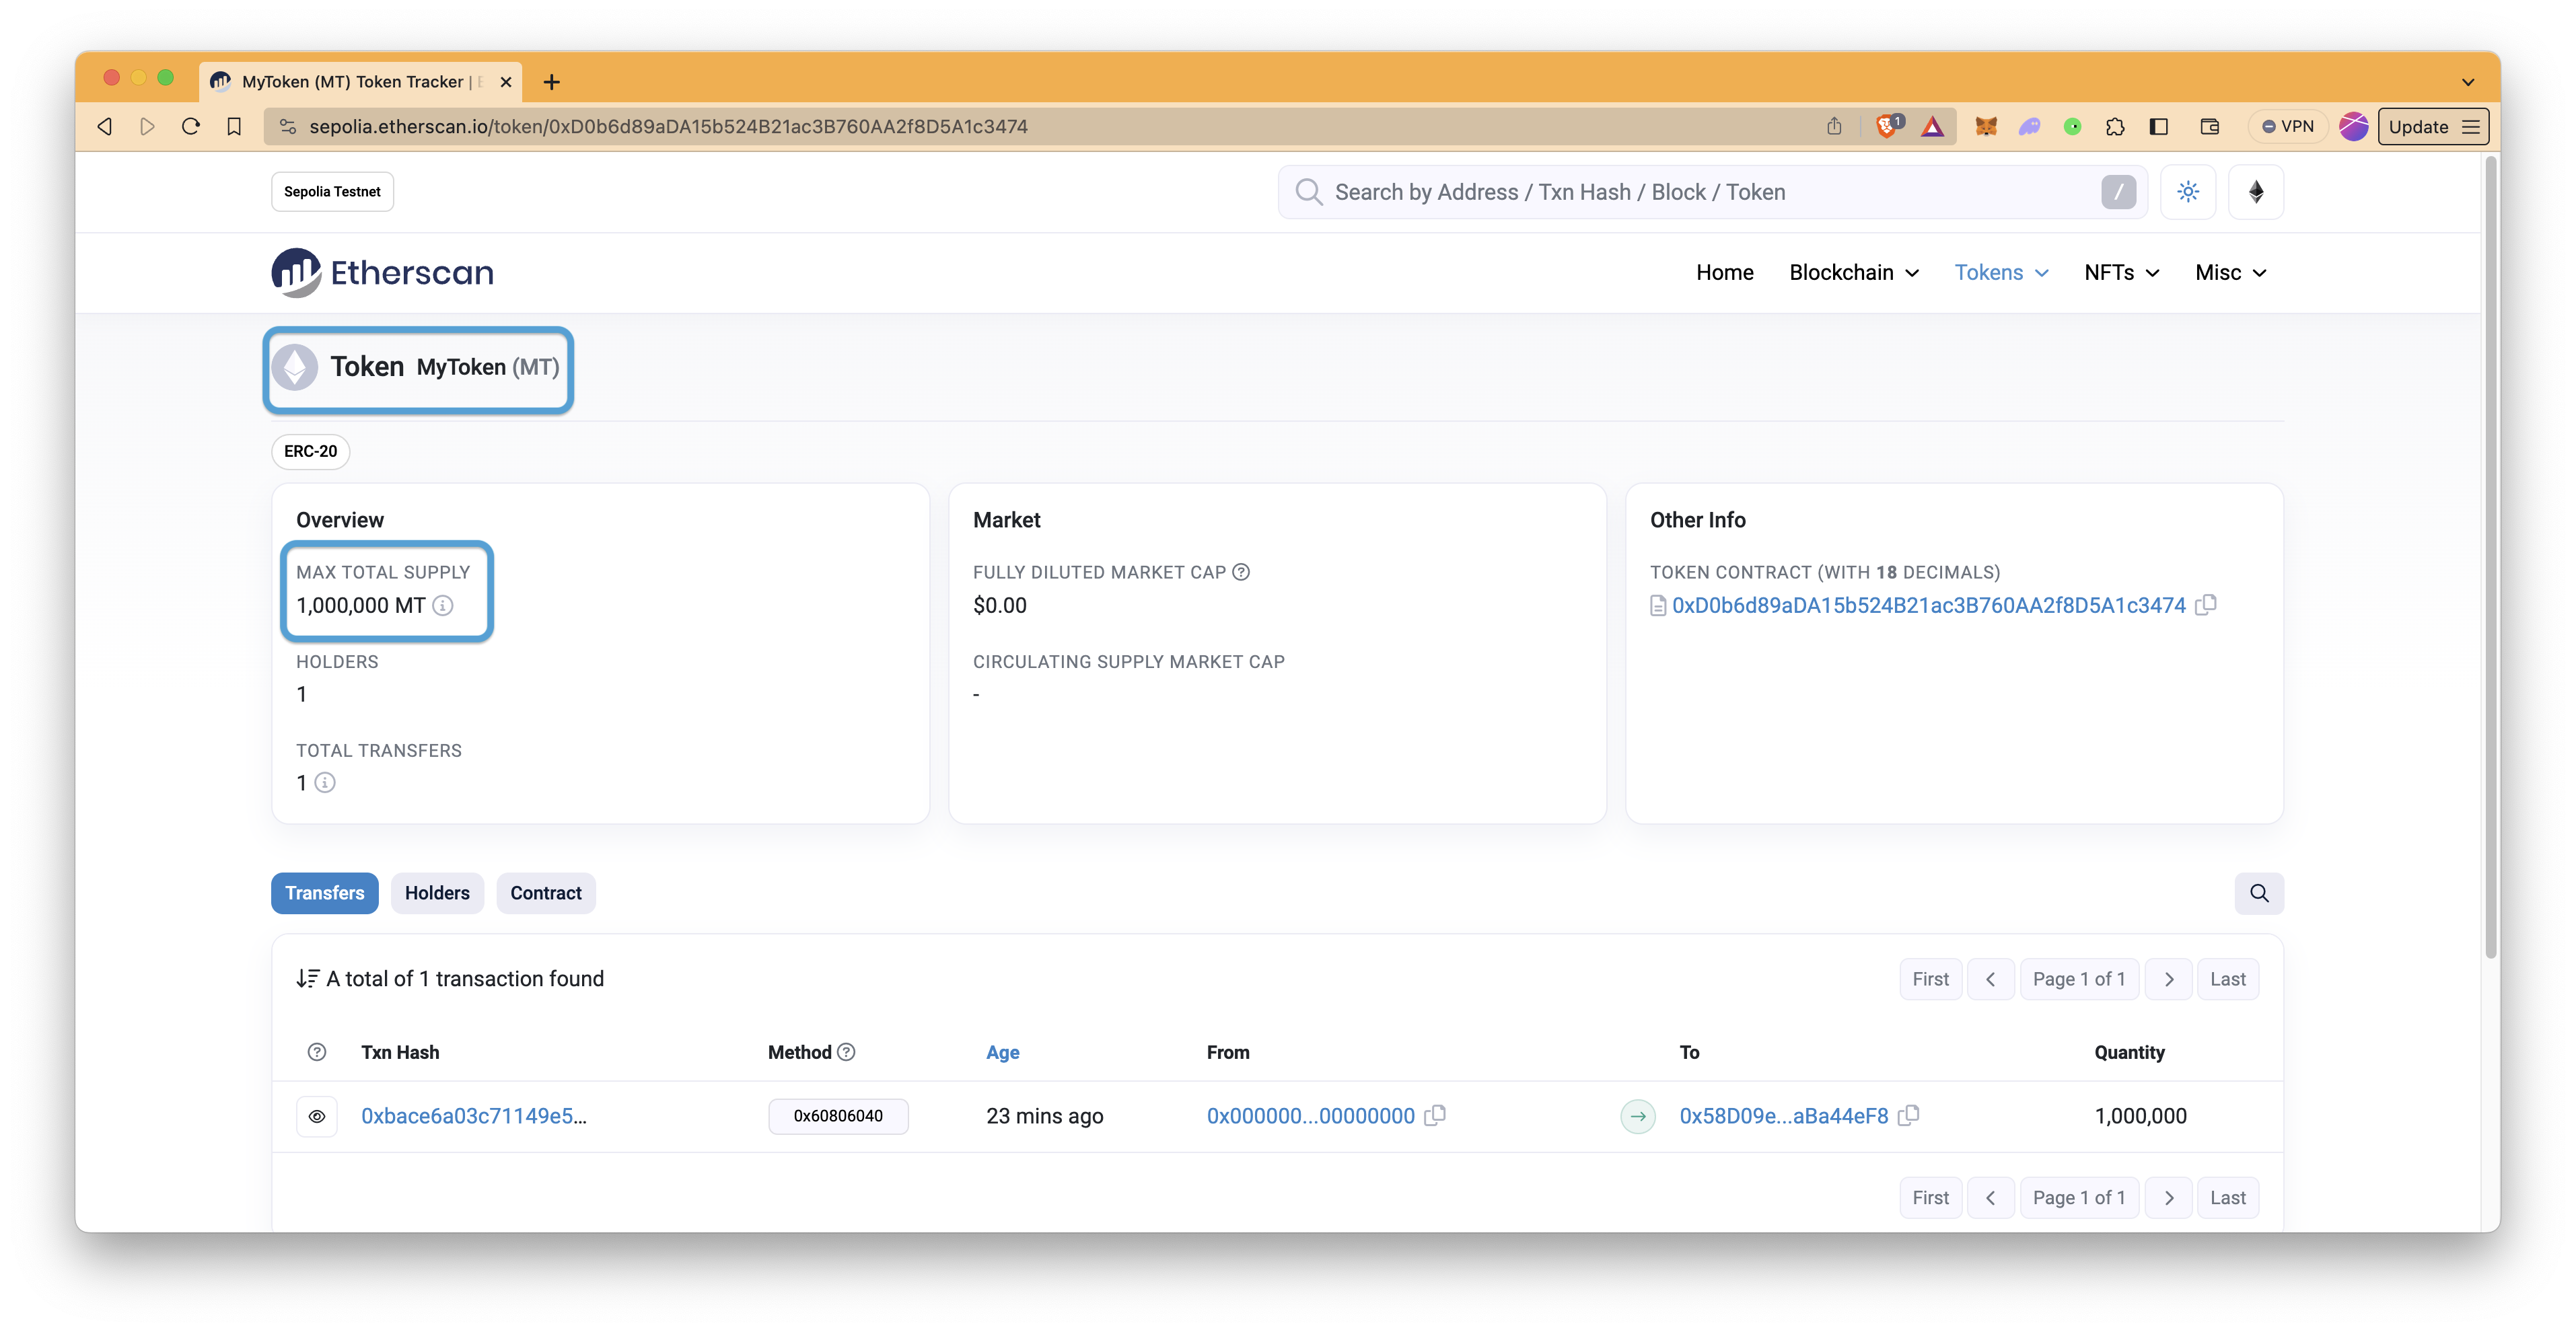
Now, click on your token name. The page that opens displays the name, symbol, max total supply, and decimals information of your token.
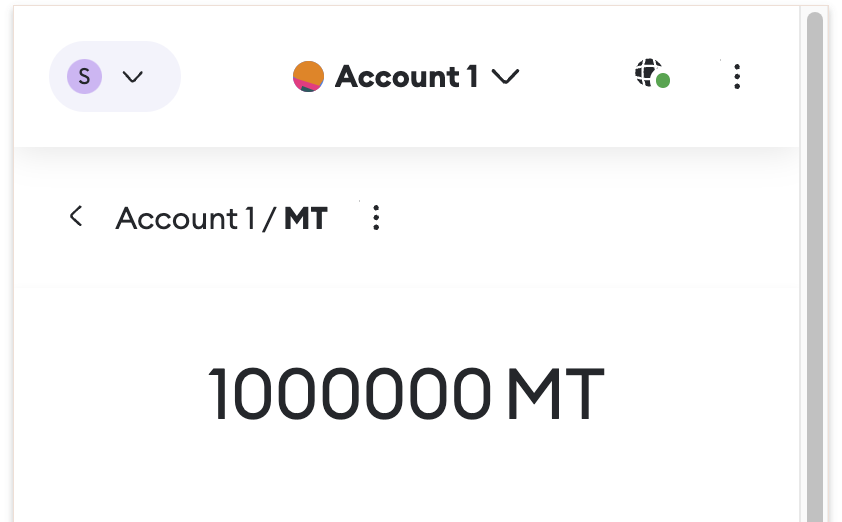
If you want to see your token in your MetaMask, copy the deployed contract’s address using the copy button near the contract’s name. Then, open MetaMask, click on the Import tokens button and paste the contract’s address in the Token contract address field. MetaMask will fetch the Token Symbol and decimals automatically. Click the Next and Import, and your token will be added to the wallet; it will be available under the assets section in Metamask.
Follow our step-by-step guide to verify your smart contract on Etherscan.
Conclusion
Congratulations on successfully creating your very own token on the Ethereum Sepolia testnet!
Now that you’ve launched your first token, take the next step in your onchain journey, with a free QuickNode account. Sign up today and get instant access to the fastest RPC Nodes, a comprehensive library of web3 APIs, and the most performant blockchain ETL tools—all backed by enterprise-grade infrastructure.
To learn more about other token standards and smart contract deployment, check out these QuickNode guides:
- How to Create and Deploy an ERC-721 (NFT)
- How to Create and Deploy an ERC-1155 NFT
- How to Create and Deploy an Upgradeable ERC20 Token
- How to Create a "Hello World" Smart Contract with Solidity
- How to Create and Deploy a Smart Contract with Hardhat
You can also explore these different QuickNode guide sections:
Subscribe to our newsletter for more articles and guides on Web3 and blockchain. If you have any questions or need further assistance, feel free to join our Discord server or provide feedback using the form below. Stay up to date with the latest by following us on Twitter (@QuickNode) and our Telegram announcement channel.
We ❤️ Feedback!
Let us know if you have any feedback or requests for new topics. We'd love to hear from you.