
7 min read
Prefer a video walkthrough? Follow along with Radek and learn how smart contracts work on Ethereum in under 11 minutes.
Overview
Smart contracts are the first-class citizens in the Ethereum blockchain; they are a critical part of Ethereum development. In this guide, we’ll see an overview of how smart contracts work on the Ethereum blockchain. This will include how to set up an Ethereum IDE and then the process of writing and deploying a smart contract.
What is a smart contract?
Smart contracts are just like the contracts in the real world. The only difference is that they are digital. In fact, a smart contract is a computer program stored on a blockchain. Smart contracts are self-executing pieces of code that execute when the preset conditions by the involved parties are met; for example, a smart contract that issues a token when someone deposits fiat.
Smart contracts allow secure and trusted transactions to transpire between anonymous parties without consulting a central authority. Smart contracts on ethereum are written mainly in Solidity and Vyper. Solidity is a high-level object-oriented language influenced by C++, JavaScript, and Python, and is designed to integrate with the Ethereum Virtual Machine (EVM). Vyper is an experimental contract-based language inspired by Python.
Virtual machines create an abstraction layer between executing code and the executing machine. At any given block, there can only be a single state of blockchain present. The Ethereum blockchain maintains its state with the help of EVM (Ethereum Virtual Machine). The EVM does this by defining the rules for computing a new valid state from block to block.
To represent this in a mathematical model, we can take Y as a state transition function. The function can be written as Y(S, T) = S' where:
S is the old valid state,
T is the set of new valid transitions to be added to the next block, and
S' is the new valid state.
This function takes the old valid state, and a set of new valid transactions to produce a new valid state as an output. You can read more on EVM and how Ethereum state works in this comprehensive blog on EVM.
Above were the technicalities of EVM; now, let’s understand how it works practically. EVM creates a sandboxed environment that executes smart contracts’ bytecode. This means the machine code is completely isolated from the network, filesystem, or process on the host machine. For every instruction implemented on the EVM, a system keeps track of the execution cost. This cost associated with the instruction execution is measured in a gas unit. The user willing to execute this instruction has to reserve some ether to pay as a gas fee. Learn more about gas and gas fees here.
The EVM is also Turing complete. It achieves this by enabling a system that charges per software instruction executed rather than charging per financial transaction executed like in Bitcoin. Ethereum network being Turing complete means that it can be considered a peer-to-peer worldwide distributed computer.
How does a smart contract work?
Whenever someone wants to sell a house, they consult a broker. The broker takes some percentage of the total amount to process the transaction and intermediate with the buyer and seller. Let’s say we eliminate the broker and create a smart contract instead.
This is programmed so that whenever an amount greater than a particular number is offered for the property, it will sell the house to the buyer, transfer the rights, and transfer the money to the seller. This eliminates the middleman from the process. Since the transaction takes place directly between two parties, the whole process is cheaper and more secure.
Smart contracts are stored on the blockchain, which means they inherit certain properties. Out of the properties, two are of note—immutability and global distributability. Being immutable means once the smart contract is deployed, no one can tamper with it. And global distributability means everyone on the blockchain network validates the contract’s output. If someone tries to alter the contract, others on the network will mark it invalid, which makes tampering almost impossible.
How are smart contracts deployed?
Smart contracts are first compiled and converted into bytecode when the contract is deployed. This bytecode is then stored on the blockchain, and an address is assigned to it. The contract address is determined based on the person's address creating the contract (sender) and the number of transactions the creator has sent (nonce). The sender address and nonce are RLP encoded and hashed with the keccak-256 algorithm.
Smart contracts, which are overwhelmingly written in Solidity, are often deployed and tested using Ethereum Remix IDE. Remix IDE is an open-source browser-based IDE for Ethereum smart contracts.
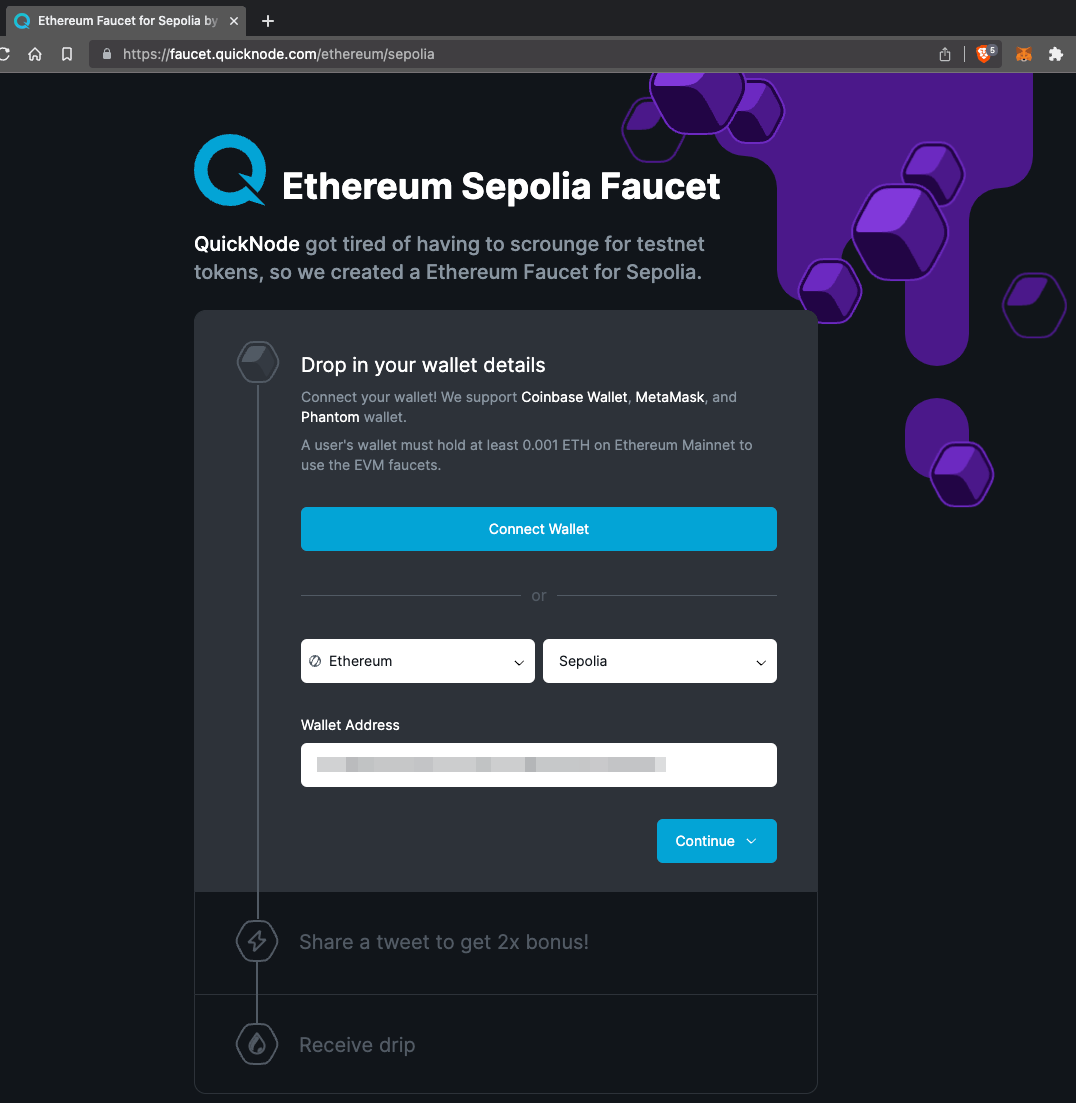
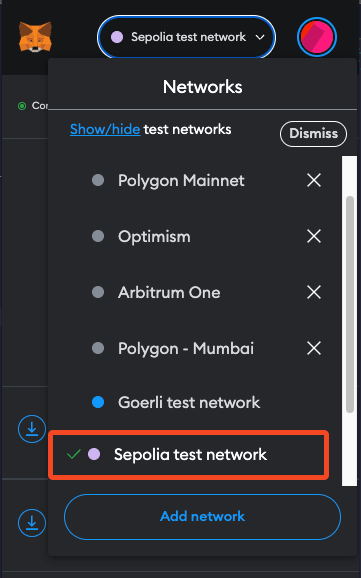
Let’s try to deploy a contract using Remix IDE. We’ll deploy our contract on the Sepolia Testnet. For that, we’ll need some test ETH. You will need the MetaMask browser extension to create an ETH wallet, and some test ETH to get started.
You can get test ETH by going to the Quicknode Faucet. Connect your wallet and select the Sepolia Test Network on your MetaMask wallet. Your wallet address should be automatically filled in the "Wallet Address" field. Nex, click “Continue” and in the next step you can double your test ETH if you share it on Twitter. You should have your test ETH in your wallet in a couple of minutes (longer if the network is busy).
Head over to the Ethereum Remix IDE and make a new Solidity file - for example, TestContract.sol.
Paste the following code into your new Solidity script:
// SPDX-License-Identifier: MIT
pragma solidity 0.8.20;

contract TestContract {

    uint256 private count = 0;

    function increment() public {
        count += 1;
    }

    function getCount() public view returns (uint256) {
        return count;
    }

}
Explanation of the code above:
Line 1: Specifying SPDX license type, which is an addition after Solidity ^0.6.8.
Whenever the source code of a smart contract is made available to the public, these licenses can help resolve/avoid copyright issues. If you do not wish to specify any license type, you can use a special license UNLICENSE or simply skip the whole comment (it won’t result in an error, just a warning).
Line 2: Declaring the Solidity version.
Line 4: Starting our contract named TestContract.
Line 6: Declaring a private variable count of unsigned type integer and assigning it zero value.
Line 8-10: Declaring a function increment() of type public which means it can be accessed outside the function and by other contracts, incrementing the value of count by 1.
Line 12-14: Declaring a function getCount() of type public and view as it’s immutability value, which means that it can only read blockchain status, and not write anything. Using the returns keyword to specify that the function returns a value, in the form of an unsigned integer here. Returning the value of count to the function.
Compile the smart contract by first clicking on the Solidity icon in the left menu, and then clicking on “Compile TestContract.sol”. You can also use the shortcut Ctrl+S / Cmd+S to compile the contract.
Make sure that the version of Solidity compiler in the left sidebar is set to the same version as you have in your contract. If the versions don't match, you will get an error.
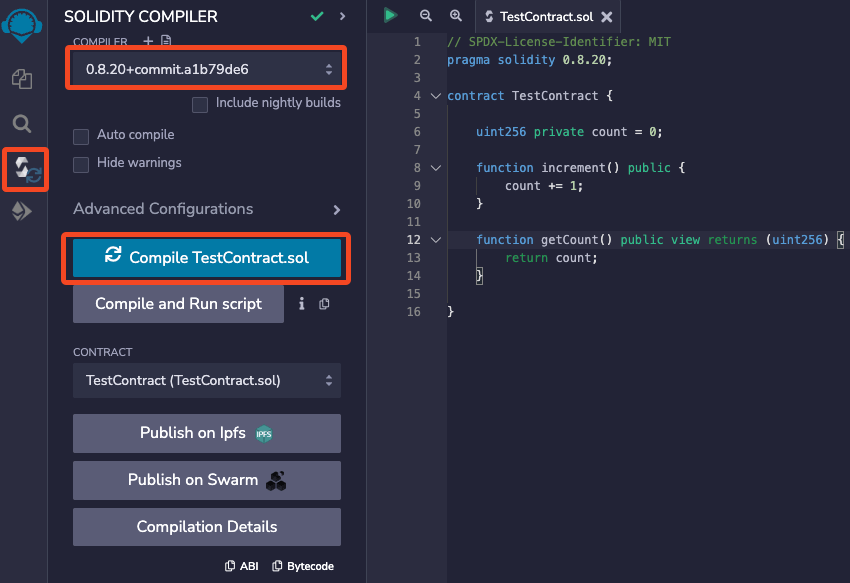
A green tick will be added to the compiler tab on the left menu on a successful compilation of the contract. Make sure to select Sepolia testnet in MetaMask before deploying the contract.
Now to deploy the contract, click on the Ethereum icon in the left menu and select Injected Provider - MetaMask from the dropdown under “Environment,” and then click on “Deploy”. Approve the transaction from MetaMask.
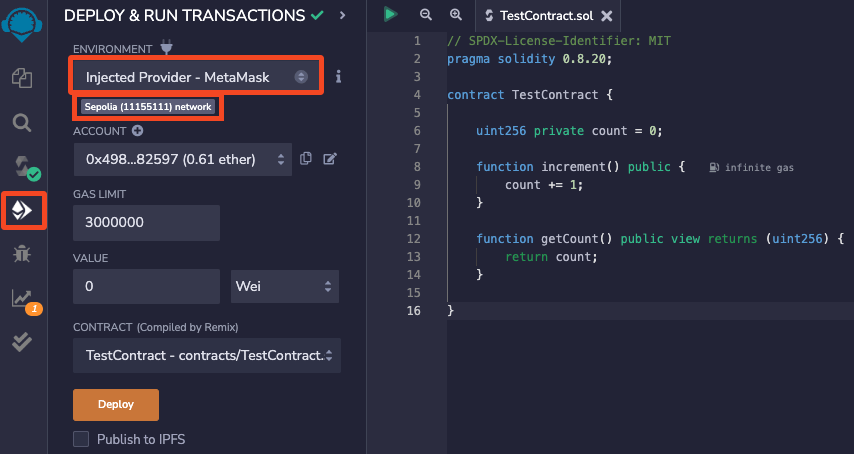
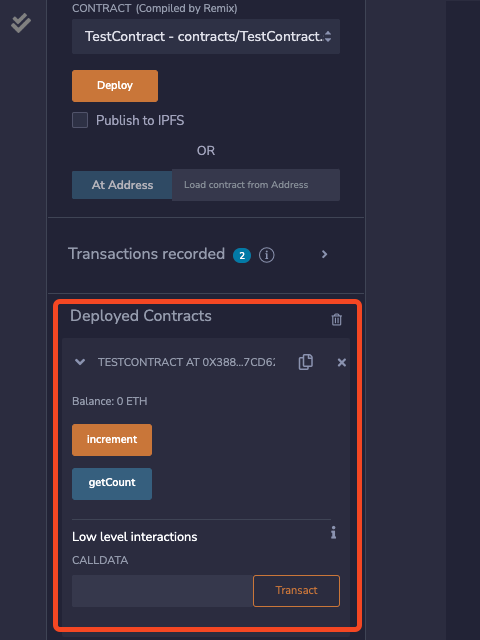
Now that your contract is deployed, you can find it in the "Deployed Contracts" section.
Smart contracts can also be deployed using Hardhat, Foundry, or other Ethereum libraries.
How to use smart contracts?
We can interact with the smart contracts from Remix IDE itself. For that, expand the contract in the "Deployed Contracts" section and click on getCount. You will see the initial value of count as zero.

Now, click on increment to increase the value of the count by one. As this is a write operation (we'll be writing to a blockchain, not just reading from it), we’ll need to pay the gas fee for this. Confirm the transaction in MetaMask.
Once the transaction is completed, click on getCount again, and you will see the value of the count increased by 1. We are modifying the value of the count on the chain and then querying the updated value.

You can also interact with the contracts using various Ethereum libraries; here’s an example in Ruby. For that purpose you'll need the ABI(Application Binary Interface) and the smart contract address. The ABI defines the functions and types used in the contract. Learn more in our comprehensive guide on ABI.
Conclusion
Kudos for making it all the way! You now know how the EVM (Ethereum Virtual Machine) works. You know how to set up the Ethereum Remix IDE for smart contract testing and development. You wrote a smart contract, learned how to get test ETH, and deployed your contract on a Testnet. You also saw how to interact with a smart contract through Remix IDE and how to write to blockchain.
Learn more about Solidity and Vyper from Quicknode guides.
Subscribe to our newsletter for more articles and guides on Ethereum. If you have any feedback, feel free to reach out to us via Twitter. You can always chat with us on our Discord community server, featuring some of the coolest developers you'll ever meet :)